These poses stimulate digestion and elimination; improve flexibility in the shoulders, spine, hips and legs; and encourage deeper and smoother breathing.
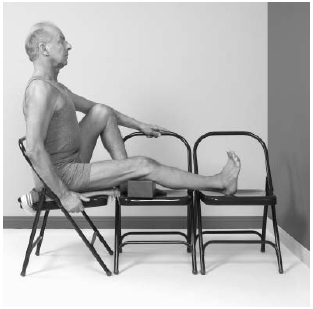
Twisting Seated Pose
1. Put three chairs side-by-side, turn the end chair to face the other two, and sit on it so the back is supported. Lift the chest and press the sit bones onto the seat of the chair.
2. Take your legs one at a time up onto the other chairs by lifting them with your hands behind each knee. This allows the groin to stay loose and soft.

3. Turn and squarely face the feet. Raise up the left knee with your hands; brace the leg against the back of the chair.
4. Position your torso parallel to the chair backs, then extend the right leg. Now reach around with your right hand and hold onto the back of the chair against which the left leg is resting.
5. Now inhale smoothly and lift the chest. An instructor can encourage and support your lifting the spine by placing their right knee against the right mid thoracic spine.
6. Now inhale and turn the abdomen toward the left leg. As you do so, turn the chest and the shoulders, slipping your right elbow, if possible, around the left knee.
7. Reach with the left hand around the back of the chair to hold the seat as close to the spine as is comfortable.
8. Let the back of the chair you are sitting on to support the rib cage from the hips to the armpit. Lower the shoulders evenly.
9. Turn your head to face the right foot, and lower the inside of the right knee to the seat of the chair. Bring the left knee closer to the body.
10. Inhale slowly. Remain in this posture for 15 to 30 seconds. While you do this, continue to draw the bottom right ribs down and to the left.
11. Simultaneously press the left heel into the seat of the chair in order to lift the sternum. The instructor may guide the right shoulder blade down and toward the hip. The idea is to turn the torso, not the shoulder itself. Therefore the instructor might also encourage the left ribs to come back and around to the right. Make space by lifting the entire torso while it is in rotation.
12. Release the pose by first releasing the abdomen, then the right arm, and then the left arm.
13. Return your body to the right. Then bring your right leg to the floor with your hands. Do the same with your left leg and turn to face forward while sitting in the chair.
14. Rest a moment, then spread your feet by turning the toes slightly in and heels slightly outward. Lower your hands to rest gently on your thighs, and continue with slow and even breaths. Then repeat the pose on the other side by changing the position of the chairs.
This pose stimulates all the organs in the torso to improve function. Sitting posture is improved. It enhances flexibility in the flanks, hips, and legs and reduces leg cramps. Tension in shoulders and neck is lessened, resulting in fewer headaches.
Chair Twist with Bolster
1. Begin by securing the safety belt. Bring the feet under the knees. If the leg is long, place a folded blanket under the buttocks. If the leg is short, place a folded blanket under the feet. Put a bolster or folded blankets on the thighs. This is important if the student is full-figured, so as to not cramp or pinch the organs in the torso or pelvis, or if there is a limited range of motion.
2. Sit up, turn toward the bolster, and grasp the back leg of the chair with the right hand in order to maintain balance.
3. Raise the left arm up even with the ear, pressing the sit bones down into the chair seat.
4. Lift the rib cage and turn the navel toward the bolster to bring the left elbow to the top of the bolster on the right side.
5. Keep the head in line with the spine, and try not to tighten the throat.
6. Extend the fingers of the left hand as if pressing against a wall and breathe smoothly and evenly for 3 to 5 breaths.
7. Return the arm up in line with the left ear on the inhalation. Bring the arm down on the exhalation and sit quietly.
Please note that the left ear is more in line with the left leg, rather than leaning to the right or looking down or back. This assures that the muscles of the mid and lower back are not put to any undue strain. After returning to center, sit for 10 to 20 seconds and then repeat to the other side.
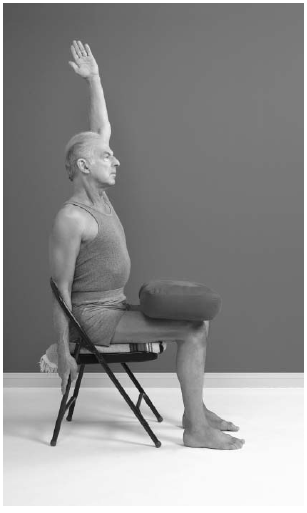
This pose is excellent for the digestion. It relieves lower back discomfort from sitting for extended periods of time. It aids elimination and reduces flatulence and the frequency of constipation. It increases flexibility in the hip joints and increases circulation in the torso, pelvis, and limbs.
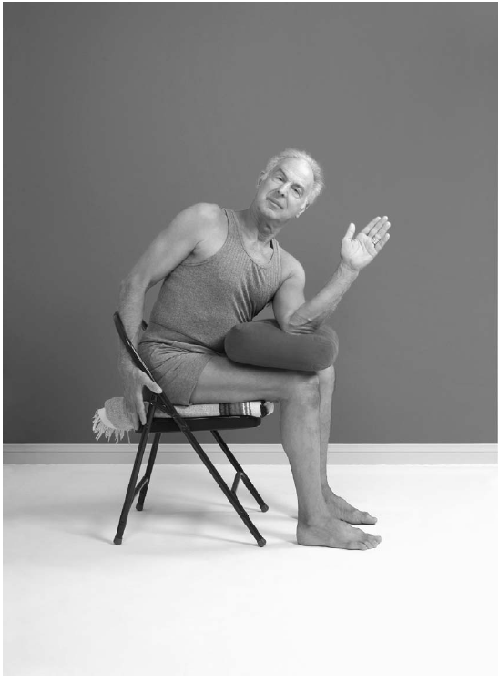
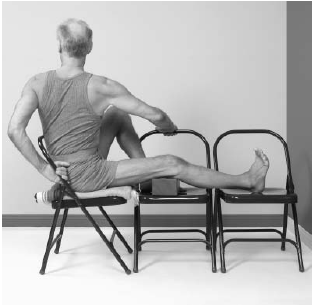
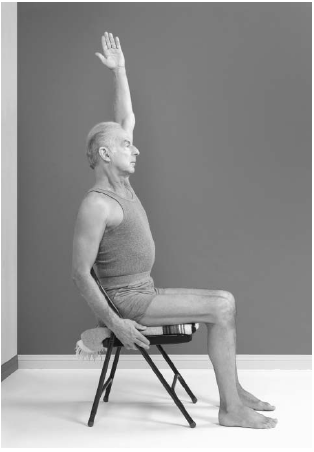
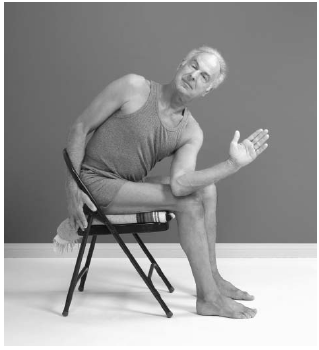
Seated Chair Twist Without Bolster
1. To begin, sit erect in the chair, feet directly under the knees. If tall, place a folded blanket under the buttocks. If short, place a folded blanket under the feet. With an inhalation, lift the left hand parallel to the left ear.
2. Grasp the seat near your right hip with your right hand. With an exhalation, turn the navel toward the right leg.
3. With an inhalation, stretch the left arm up past the ear, and with a sharp exhalation, bring the left elbow to the outside of the right knee as shown in the photograph.
4. Bring the head back so the left ear is in line with the left knee, and open the palm of the left hand and fingers, as if they are pressing against a wall.
5. Each exhalation should bring the back of the left upper arm closer to the floor. Look straight ahead. Hold the position for 5 to 7 breaths.
6. Continue to revolve the right side of the navel toward the right rib cage. If possible, the left hand can be moved inside the strut of the chair back to further stabilize the position.
7. To release the pose, return to the position of the picture shown for step 1 as you inhale.
8. Then with the next inhalation, place your hands back on the top of your thighs. Sit quietly, then repeat on the other side.
This pose is excellent for the digestion. It relieves lower back discomfort from sitting for extended periods of time. It aids elimination and reduces flatulence and the occurrence of constipation. It increases flexibility in the hip joints and increases circulation in the torso, pelvis, and limbs.
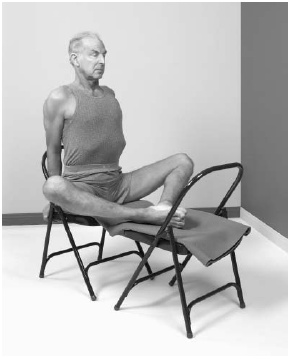
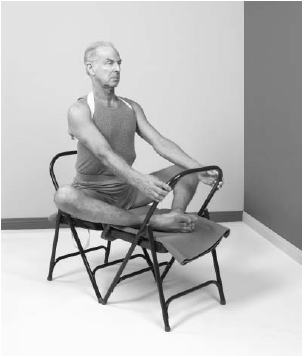
Cobbler’s Pose
1. Place a folding chair with the seat facing you. Secure the safety belt.
If the range of movement is limited, turn the chair around so the back of the chair can act as a support. Place a folded sticky mat on the seat.
2. Raise the legs by holding behind the knee to release the hamstrings and tendons. Place the feet together: toes and heels
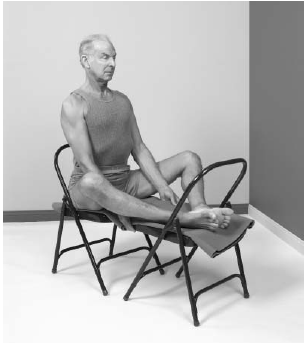
touching if possible. If there is undue pressure in the groins, then support the outer knee with the backs of chairs placed under the legs or a strap passed around the outside of the knees.
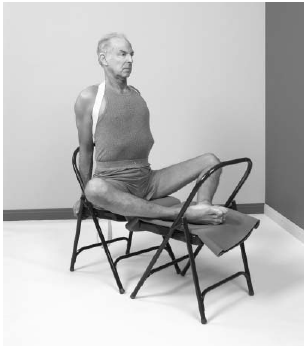
3. Sit up away from the back of the chair. If this presents a problem, then place a rolled sticky mat, or a folded blanket, or a foam block between the chair back and the mid back behind the heart area.
4. Inhale and lift the rib cage and side chest. Exhale behind the navel. Hold the position for 10 breaths or whatever is comfortable.
5. If maintaining an erect torso is difficult, place your hands behind you, holding onto the arms of the chair and pressing down.
6. The second phase of the pose starts by holding the back of the second chair either on the side or at the top. Then draw the second chair closer to the first, thereby further opening the legs.
Hands grasping upper arm of chair.
A shoulder strap can also be used to facilitate the proper alignment of the torso.

Clasping lower on the arm of the chair.
7. To exit the pose, use your hands on the outer side of the knees, and raise the knees up and together slowly and carefully.
8. Then place the hands behind the knees, and draw the back flesh of the knee toward the hips, as the legs stretch forward and rest on the seat of the chair.
9. Turn to sit squarely in the chair, lowering one foot at a time gently to the floor. Sit quietly with both feet on the floor.
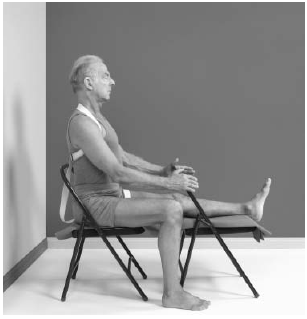
CHAIR PREPARATION FOR JANU SIRSASANA
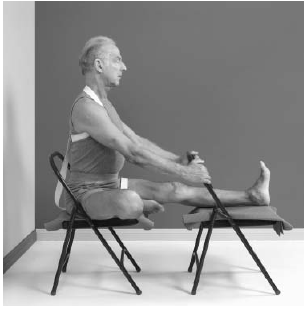
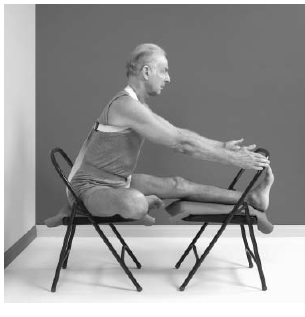
Head-to-the-Knee Pose
1. Sit up away from the back of the chair, using a prop if necessary to support the torso. Place another folding chair in front, with the seat facing away from your chair. Please note that a strap has been placed around the shoulders and over the back of the neck, like a harness. The buckle is in the middle of the back; the tail can be used to tighten the strap to hold the shoulders back. This will improve the posture and strengthen the torso. This device can be used in many asanas throughout the book to enhance posture and develop an awareness of alignment.
2. Lift the left leg and put the foot through the back of the second chair. If the leg is long, support the foot with a third chair.
3. Let the right foot rest fully on the floor, parallel to the thigh, perpendicular to the calf.
4. Sit up, breath into the side chest, and extend the left heel away from the left hip.
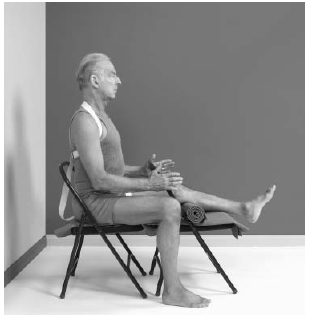
With roll.
5. Hold the position for 5 to 10 breaths. Bend the knee by placing the left hand on the inside of the knee and lifting it up quickly.
6. Return both feet to the floor. Sit quietly for 3 to 5 breaths and repeat on the other side.
If there is increased pressure behind the knee, use a rolled towel or sticky mat to reduce any tension on the hamstrings.
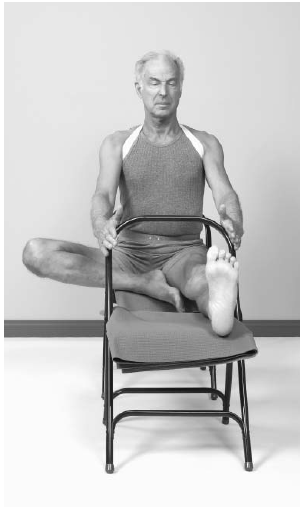
1. Face two folding chairs toward each other. Place a folded blanket on the seat of one chair. Bring a third folding chair to the right side. Bend the right leg and place the right foot against the left thigh. Support the right leg with additional folded blankets on the third chair.

2. Raise the rib cage away from the back of the chair, lift the bottom edge of the sternum, and press the buttocks back and down into your seat
3. Gently turn the navel toward the inner left leg without distorting the neck or head.
4. Hold the position for at least 5 even breaths and then release.
5. Use your right hand to bring the right knee up, and using the hands behind the right knee, stretch the leg forward next to the left leg. Bring the third chair with the folded blankets to the other side and repeat the asana.
This asana is a combination of Baddha Konasana (Cobbler’s Pose) and the seated twists. It greatly enhances digestion, elimination, flexibility of legs and arms, and relaxation of the shoulders, neck, and spine. It tones the legs and arms and lengthens the hamstrings.
If blankets are not necessary you will only need two chairs, as shown above.
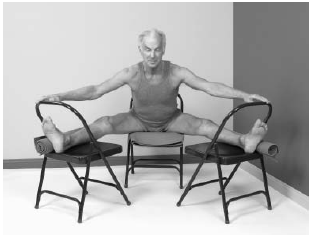
Seated Wide-Angle Pose
Pose I
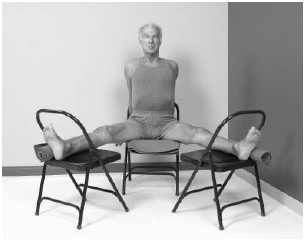
1. Begin by securing the safety belt. Bring two folding chairs in front and to either side of your chair, with the seats facing you.
2. Place your legs on the chair, with the back supports of the chair bracing the legs.
3. Place a rolled sticky mat between the chair and your legs to keep the legs and feet in alignment. Please note that it is a moderate opening of the legs only. Notice that the feet point up as much as possible, and the inner knees are turned toward the seats of the chairs.
4. Bring the torso away from the back of the chair, using props if necessary. Sit on the tips of the sit bones, bracing your hands behind you.
5. Bring the breath into the sides of the chest, press down on the hands, and lift the sides of the chest as much as possible.
6. Remain in the posture for 5 to 10 breaths. Return to center by bringing the chairs together slowly and carefully. Remain seated with the legs stretched forward, supported on the chairs. Sit quietly and breathe.
This pose opens the groins, increases circulation in the lower pelvis, and increases flexibility in the hips. There is a reduction of tension in the mid and lower spine and a general overall toning of the legs and arms. A sense of peaceful quiet becomes readily apparent.
Pose II
Bring the hands to rest on top of the shins. Hold for five to ten breaths.
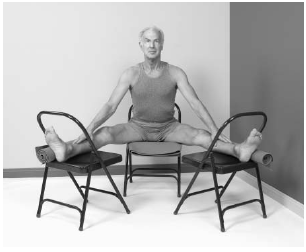
Pose III
1. For extended forward movement, place your hands on top of the chairs and press the hips and sit bones back firmly.
2. Keep the bottom of the sternum lifted away from the pubis.
3. Hold for 5 to 10 breaths.
4. To release the pose, place the hands on the shins. Hold for 5 breaths. Then place your hands behind your hips and hold for 5 breaths.
Pose IV
For the advanced pose, spread the chairs farther apart. Bring the head and torso parallel to the hips. Keep the hands on top of the chairs.

To complete the pose, rest the palms on top of the toes, and stretch the arms any amount. If there is concern regarding balance, a fourth chair can be placed under the head, with the forehead resting on a folded blanket.
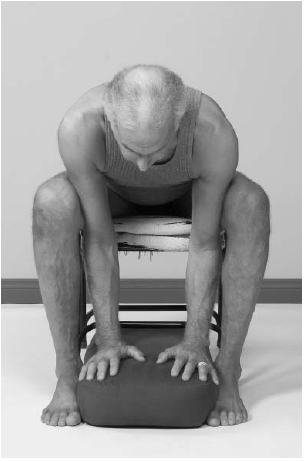
Forward Bend Pose
1. Begin by securing the seat belt with enough slack to be able to bend forward. If necessary, use a shoulder harness. Place a bolster between the feet, toes forward, ankles braced by the sides of the bolster.
2. Sit up, and with a few breaths align the head with the center of the pelvis.
3. On an exhalation, place the hands palms down on top of the knees and lean forward 30 degrees.
4. Then slip the hands down the inside of the legs to the mid calf, and lean forward 60 degrees.
5. Keep the head in line with the spine. With an exhalation, place the palms down onto the bolster, between the legs if possible.
6. Then gently press the knees against the outer upper arm and the arms against the inner knees. This action will release tension in the lower spine and hips.
7. If there is any difficulty maintaining the head in line with the spine, a second chair can be placed under the head, with folded blankets or bolsters on the seat to support the head.
8. Only the forehead rests on the support so that the nose is free from pressure. Rest the eyes against the cheekbones. Hold for at least 30 seconds to 1 minute at the start. Build up to 2 minutes.
9. Return to a sitting position by keeping your head down and placing your hands on your knees.
10. Hold for several breaths, then use the hands to push up slowly on the count of 10 to a sitting position. Sit quietly for 10 to 20 breaths.
This pose tones the kidneys, liver, and spleen and reduces discomfort in the stomach. The heartbeat is slowed and the spinal nerves rejuvenated. Depression in many instances is reduced, and students that are easily excited often become calm and cool. Vision often improves, and there is a general sense of well–being.
Supported Boat Pose
Note: This asana is not to be done before at least three months of practice. Then it is usually performed toward the end of a practice or class session.
1. Secure a safety belt after facing two folding chairs toward each other.
2. Position a folded sticky mat on the seat of the second chair. A blanket can be folded over the back of the first chair for comfort.
3. Lift both feet onto the edge of the folding chair, and arrange the bolster at the angle illustrated.
4. Extend the legs up toward the back of the folding chair, grasping a strap in each hand that is placed midway on the back of the second chair around the bolster.
5. The bolster can be placed fiat on the seat to accommodate those who are tight in the hamstrings or have a balance problem.
6. Raise the chest and side ribs. Keep the head in line with the spine and breathe easily. Try not to hold the breath. If there is undue stiffness in the neck and shoulders, the chair can be moved next to a wall to support the head. Hold the posture for at least 5 to 10 breaths.
7. Release the strap. Bend the knees; rest the feet on the edge of the second chair seat. Push the chair away and lower the legs to the ground, using the hands to keep the groins soft, and return to a sitting position.
This pose is very beneficial for the liver, spleen, and gall bladder. The back muscles, which become flaccid due to the shape of the chair and prolonged sitting, are strengthened. This pose works against osteoporosis.
Relaxation Pose
1. Place a folding chair in front of your chair, with the seat facing forward. Put a folded sticky mat on the seat.
2. Place a bolster so that one end rests against the back of the second chair and the other end rests on your mid thighs (similar to the position of the bolster on the facing page). Additional blankets can be used to accommodate a stiff spine and hips.
3. Lean forward to rest the head face down on the bolster, with a towel or blanket supporting the forehead.
4. Keep the nose free from any pressure. If possible cross the arms over the head resting on the bolster.
5. If it is difficult to rest your head on the bolster, then use folded blankets or another bolster to provide greater comfort.
6. The arms can also rest on the seat of the chair if it is difficult to raise them over the head.
7. Allow the eyes to rest into the cheekbones, and position the tongue away from the upper and the lower palate. Make the breath to be smooth and even. Try to stay focused on the breath. It is natural to let your thoughts wander into the past, into the future, or to take in the events of the day. Part of savasana is to learn to be in the moment. It is also the time that the effects of the day’s yoga practice have a chance to be absorbed into the conscious mind.
8. When it becomes difficult to remain in the rhythm of the breath, then it’s time to slowly rise up from the support of the bolster. Lift your head from your chest. Open your eyes on an inhalation.