This series is appropriate for the student who is able to sit on the floor unassisted.
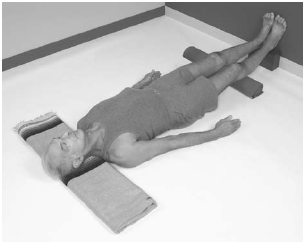
Reclining Big-Toe Pose
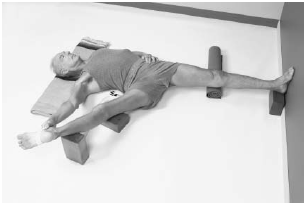
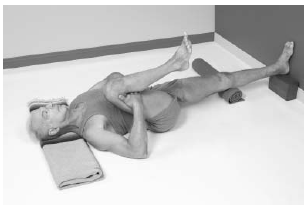
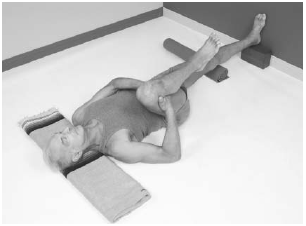
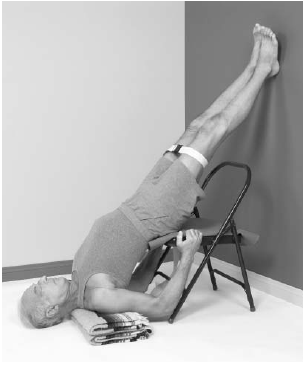
Stage I
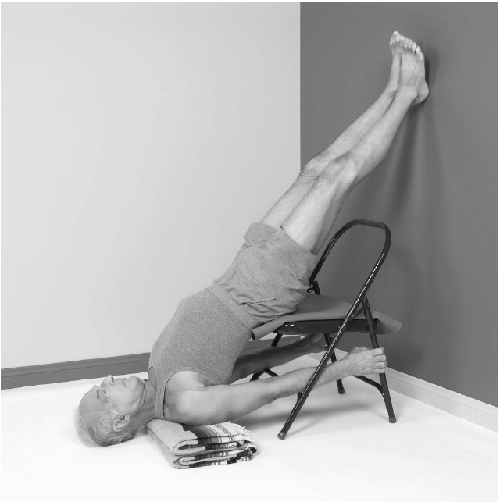
1. To begin, lie down on the floor and place a folded blanket under your head, a rolled sticky mat under the left knee, and a block under the left heel, with the left foot pressed firmly and evenly into the wall. Bring the shoulder blades toward the spine and lift the chest.
2. Exhale and bend the right knee toward the chest in line with the right shoulder. Bring both hands behind the knee, elbows toward the floor.
3. On an inhalation, bring the knee slightly away from the chest.
4. On an exhalation, press the knee toward the shoulder. Keep the hips and shoulders level, and continue to extend the left leg as much as possible toward the wall.
5. Turn the inner left knee firmly toward the floor or the sticky mat.
6. With an inhalation, stretch the right leg to the wall, resting the heel on the block. Move the sticky mat to support the back of the right knee. With an exhalation, repeat the flexion process to the left. Repeat the process 3 or 4 times each on the right and the left.
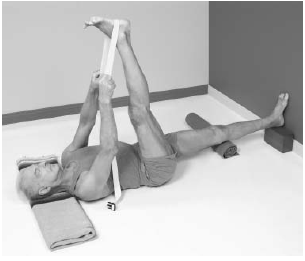
Stage II
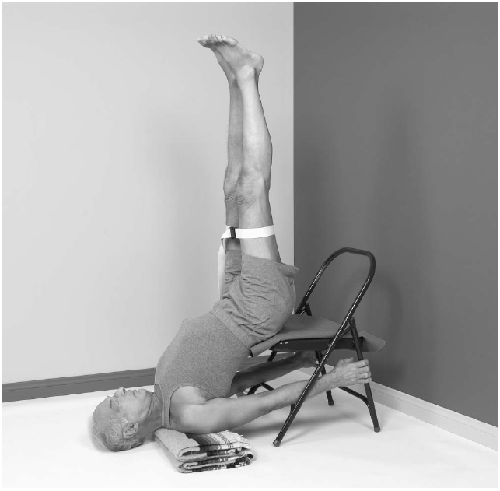
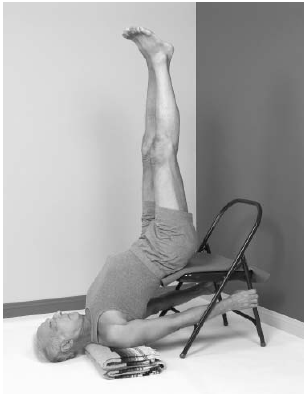
1. Return the sticky mat and block to the left leg. Bend your right knee toward the right shoulder. Place a strap around the right foot at the bottom of the arch and top of the heel. Hold one end of the strap in each hand. Keep the knee soft
2. As you inhale, extend the right leg either 90 degrees to the hip or slightly toward the head.
3. Straighten the arms, still holding one end of the strap in each hand.
4. Draw the shoulders away from the ears, lift the chest and side ribs, and keep a firm but not an aggressive grip on the strap.
5. Lift the leg up and away from the floor. Hold the position for 5 to 10 breaths, consistently moving the right hip and sit bones down toward the wall. Be sure that the right and the left waist are equidistant from the top of the pelvis.
6. To release the pose, lower the right leg toward the wall, letting the strap slip slowly through your hands until the right heel is resting on the block.
Stage III
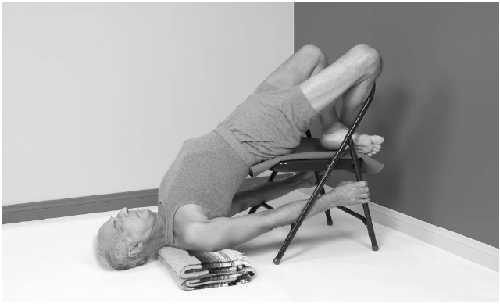
1. Return to the beginning posture
2. Either place a strap around the foot as instructed before, or grasp the right big toe with the first and second fingers of the right hand on the inside of the toe and the thumb on the outside.
3. Extend the leg at 90 degrees to the right hip, keeping the knees soft.
4. Press the left hip firmly to the floor with the left hand. Then slowly, while straightening
the right leg, drop the leg to the right, extending it 90 degrees to the right hip. If necessary, support the right leg with a block at the knee and at the ankle. Please note that the left hip does not rise from the floor. The right leg and arm are as straight as possible and the right chest is lifted toward the ceiling.
5. Continue to press into the left foot and leg, and with each exhalation draw the navel toward the left. Hold the pose for 5 to 10 breaths.
6. Then draw the leg back up to 90 degrees and return to the original position.
This pose tones the arms and legs, elongates the sciatic nerve, and in some cases improves paralysis of the legs. Increased circulation in legs and hips improves neural response. Stiffness in the hip joints is reduced. Supta Padangusthasana prevents hernias from developing.
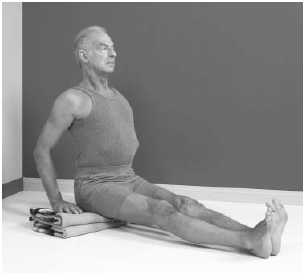
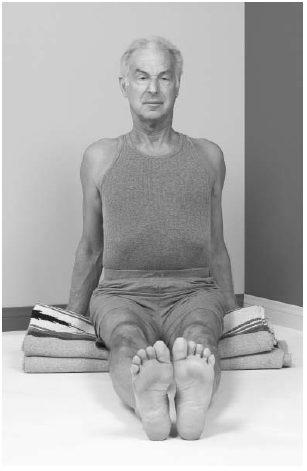
Stafi Pose
1. Sit on a folded blanket. Use as many folded blankets as necessary to elevate the spine. Extent the legs forward, with the inner knee rotating downward to the floor.
2. Rotate the top of the thighs inward (from the outside to the inside).
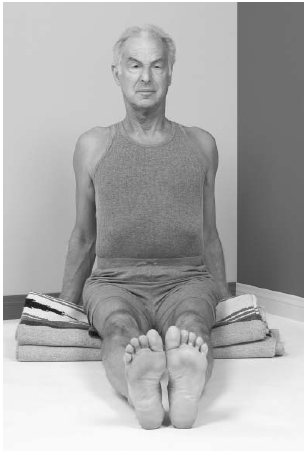
3. Place the hands on the blanket, fingers forward. Soften the elbows, bringing them back parallel to the rib cage.
4. Extend the heels away from the hips, pressing the balls of the feet forward. Lift the chest and bring the bottom of the sternum up and away from the pubis.
5. Lift the back waist. Remain in this posture for 5 to 10 breaths. If there is tension in the hamstrings or backs of the knees, place a folded blanket or rolled sticky mat under the knees.
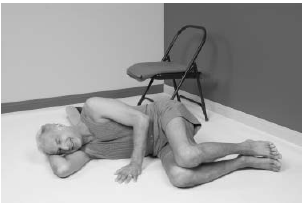
6. To release from the pose, bend your knees and lie back on the floor, with the hips supported on one folded blanket. If necessary, the rolled sticky mat can remain under the knees. Lie quietly and breathe smoothly and evenly.
Dandasana stretches adductors and strengthens quadriceps, reducing scissor-gait.
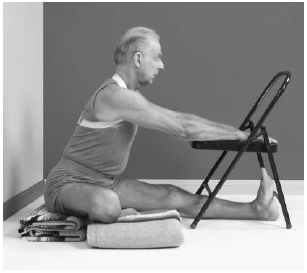
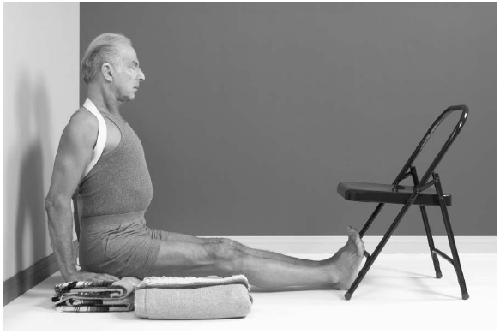
Seated Forward Bend Pose
1. Sit as you did in Dandasana. Sit on blankets to accommodate stiff hamstrings You may need to place a rolled sticky mat or folded blanket under the knees if the knees are not touching the floor. This depends upon the ability of the student and how many blankets are used underneath the buttocks.
2. Place a chair over your legs, between the feet and the knees. Put your palms face down on the seat of the chair (not pictured).Please note that a shoulder brace is used. Inhale.
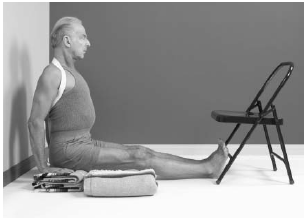
3. With an exhalation, press the hips back and push the chair forward as much as possible but to where it is still comfortable.
4. Each inhalation lifts the torso. With each exhalation press the chair further forward.
5. Hold the position for 5 to 10 breaths and slowly, with each inhalation, return to an upright sitting position. This pose can be repeated 2 or 3 times.
This pose gently moves the abdominal organs and stretches the hamstring. It also tones the kidneys and rejuvenates the whole spine. It improves digestion. By supporting the hands on the seat of the chair, this asana creates a sense of peaceful quiet.
Bound-Angle Pose
1. Begin by sitting in Dandasana. Be sure that the centers of the heels are resting on the floor. Press the balls of the feet forward and take a few breaths.
2. Then drop the legs open, resting the little toe on the floor.
Place the right hand on the inside of the right knee. Draw it back quickly, with the knee moving out and the foot in line with the pubis. Do the same with the left leg, bringing the soles of the feet together in front of the pubis. The pressure at the heels and the soles of the feet should be equal.
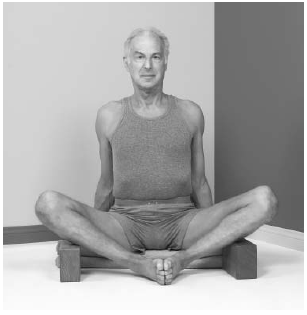
4. Place the hands behind the hips with fingers pointed forward and the elbow joints soft. Raise the side chest; move the shoulders away from the ears. If there is undue pressure or strain in the groins or legs, support the outer knees with blocks or blankets.
5. Maintain the position for 1 or 2 minutes.
6. Charge the chest with an inhalation and direct your exhalation into the legs. There is a tendency to try and push the knees to the floor, which can cause discomfort at the groins and inner thighs. Instead it is suggested that the inner thigh and knee press outward, away from the hips, and that supports be used under the knees to eliminate any chance of damage. Therefore encourage the groins to be soft. It is also very important that the torso lift, using the arms to press against the blanket or floor. Note that the chest is open, without sticking the ribs out, thus tightening the diaphragm. The torso is balanced over the pelvis. The breath is steady, rising from behind the navel into the side chest.
This pose can be an effective tool to control urinary disorders. The pelvis, abdomen, and lower back receive additional circulation. The kidneys, prostate, and bladder are kept healthy, and the occurrence of sciatica and hernia is reduced.
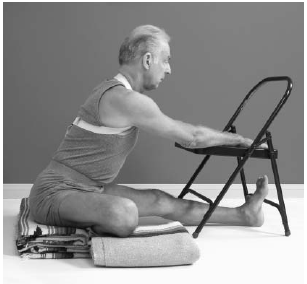
Downward Bound-Angle Pose
This variation enables the student to increase hip flexibility and strengthen the lower back muscles. Begin with the same setup as in the previous asana.
1. Place a chair in front, with the seat facing toward you. Place a folded blanket or bolster on the seat of the chair.
2. Use your hands on the seat of the chair to bring the shoulders away from the ears.
3. Lift the chest and rib cage by pressing down firmly with the hands on the chair seat.
4. With an exhalation, push the chair forward. As the torso extends forward, the hips must press back deeply into the blanket or bolster.
5. Be sure that you do not push the chair beyond your capacity. Then if it is comfortable, rest your forehead on the support.
Note that the hands are placed half way between the seat and the top of the chair.
Note that the nose is free, and the skin of the forehead is pressing gently toward the eyebrows.
6. If it is too difficult to push the chair in this position, the asana can be performed by crossing the legs, with the right leg in front, knees supported (simple cross-leg posture). You will experience the same results.
This pose can be an effectives tool to control urinary disorders. The pelvis, abdomen, and lower back receive additional circulation. The kidneys, prostate, and bladder are kept healthy, and sciatica and hernia are reduced. There is the added benefit here of permitting the brain to relax. Tension in the neck and shoulders is reduced. The pose reduces agitation and nervousness, thereby lowering stress.
Head-to-the-Knee Pose
1. Begin with Dandasana seated on a blanket or bolster, depending on the degree of flexibility and comfort.
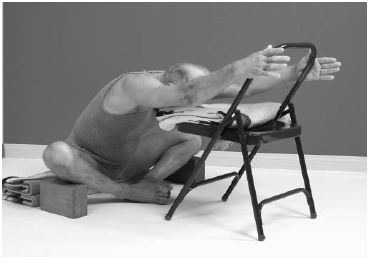

2. Use the arms and hands placed by the hips to lift the chest and rib cage. Note that the shoulder harness is used to facilitate the proper posture.
3. Place a folded blanket at the right. Place a chair over the legs near the ankles, with the bar near the shinbone.
4. Then with an exhalation use the right hand behind the right knee to quickly lift the leg out to the side and bring the right heel close to the right groin or the middle of the left thigh.
5. Press the right heel firmly against the inner left thigh.
6. Release the right knee, to rest the thigh on the folded blanket.
7. Bring the chair closer to the hips, so the leg of the chair can support the inner knee, and the seat of the chair is extending to the left.
8. With an exhalation, turn the navel firmly toward the inner left thigh, moving away from the dome of the right knee.
9. Press the hips back firmly into the blanket or bolster.
10. Reach across the seat of the chair more with the right hand, to increase the turning of the mid spine. Move the chair forward with each exhalation; pause with each inhalation. Try to keep the head in line with the spinal column, with the eyes resting into the cheekbones.
11. As the range of motion increases with practice, the hands can be brought up to grasp the arms of the chair. As this happens the chair can be pushed farther forward over the extended left leg. It is also possible to rest the head on a folded blanket or bolster on the seat of the chair in order to move deeper into the asana.
12. Breathe evenly, bringing the breath from the back around the ribs to the sternum. Hold the asana as long as it is comfortable.
13. Then use the hands to press down on the chair seat and raise the torso, keeping the head in line with the spine. Use the right hand on the outside of the right knee to bring it up.
14. Then place both hands behind the knee to draw the hamstring muscles and tendons back toward the hips, as if putting on a long stocking. Place the legs together and sit in Dandasana for several breaths. Then repeat on the other side.
This pose aids digestion by fiushing the liver and spleen. The kidneys are toned. By remaining in the pose, distress from an enlarged prostate gland can be reduced. The legs and arms are strengthened, and the hamstring muscles are stretched, improving flexibility and cutting down spasticity.
Shoulder Stand
A word of caution: Inverting the body is important for those of us who have MS. But please take into consideration what is appropriate and safe. In many cases simply putting your feet and legs up on the seat of a chair, with a lift under the pelvis, is a sufficient inversion.
Lying on a sofa, with several pillows under the legs so that the feet are above the heart, is also considered a safe inversion. In many cases, lying on a bed with pillows under the legs to raise the legs slightly above the heart, or putting the legs up on the wall with pillow support, is also very effectives.
It is recommended two months be spent putting the feet slightly above the heart level before attempting Supported Sarvangasana or any other inversion. That would include Viparita Karani, as illustrated in the beginning chapters and shown here with the legs at 30 degrees, working up to 60 degrees, and then with the buttocks close to the wall to achieve a 90-degree angle.
If you have any blood pressure condition or eye pressure condition, obtain a doctor’s permission before attempting this asana. I would also recommend that a Certified Iyengar instructor with an Intermediate Junior 2 or above certificate be consulted and present when this asana is attempted.
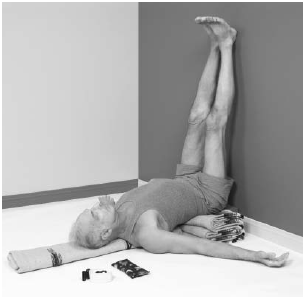
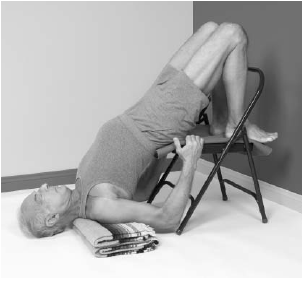
Viparita Karani
1. Begin with a bolster, a chair, and a sticky mat. If tall, put one or two sticky mats on the seat of the chair.
2. Be sure that the folded edges of the sticky mats are in line with the edges of the seat of the chair.
3. Do not allow the sticky mats to extend beyond the edge of the chair seat. Two blankets folded into thirds may be placed under the shoulders. The length and width of the neck has to be considered in determining how much lift is needed.
4. If the torso is short, then a bolster can be placed under the shoulders and only one sticky mat on the seat of the chair. Lie down on the floor, with the chair near the wall.
5. Place the props under the shoulders, with the blanket positioned so that the shoulders are at least 1 or 2 inches from the edge.
6. Extending the right arm forward, lie down with the hips close to the chair, legs bent. Roll slowly over on your back.
7. Then lift your feet onto the edge of the chair seat.
8. Take hold of the front legs of the chair and raise the hips and pull the chair quickly toward you in order to place the edge of the seat of the chair at the sacrum.
9. When the chair is secure and in the proper position, put your feet on the top of the back of the chair.
10. The hands and arms can be drawn through the legs of the chair, either to grasp the front legs or the back legs, depending upon your ability.
11. Then with an inhalation, lift the legs up and rest them against the wall with firm pressure on the large toe and heel.
12. If possible, turn the inner knees to the wall and rotate the upper thighs inward through the front groins to the back of the thigh.
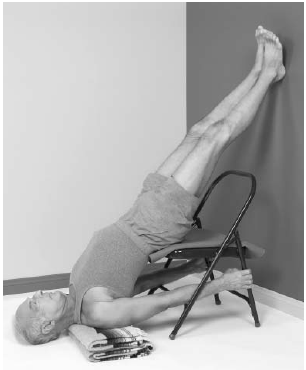
13. Bring the outer edge of the shoulders toward the floor. Draw the shoulder blades away from the ears and upward to support the ribs and lungs beneath them.
14. The center of the throat remains soft, and the head is balanced between the two points of the occipital bone as it moves gently away from the shoulders.
15. The eyes are resting in the cheekbones with the lids closed.
16. If it is difficult to hold the legs in this position, a strap can be placed around the mid thigh with a medium grip.
17. If it is necessary to open the chest, grip the seat of the chair with the hands, and press the elbows down firmly toward the floor.
18. The legs can be lifted away from the wall into a 90-degree angle with the hip joint, if a more intense inversion is desired.
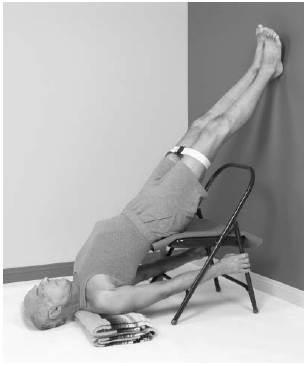
19. A strap can be added to help stabilize the posture.
20. After a period of practice, the pelvis can be opened further by bending the knees and resting the feet on the seat of the chair, supporting the shins on the back supports or seat of the chair.
21. To release from the pose, move the seat of the chair away from the sacrum toward the feet. Bring your feet to the center of the chair seat, keeping the hips slightly elevated.
22. Move the blankets or bolster toward the front legs of the chair, and rest the hips on the seat for support, allowing the legs to remain on the seat of the chair.
23. Remain in this pose for twice the time that was spent in the asana. Eyes are closed with the eyeballs resting toward the cheekbones. Do not force the eyes down. Let them float down with the breath.
24. The tongue is relaxed between the upper and lower palate. Breathe evenly. Then roll to the right.
25. Rest the head on the right arm, keep the knees soft, and relax the left arm in front of you.
26. Slowly push the chair toward the wall until your sacrum softly reaches the floor.
27. An alternative recovery would be to bring the right arm under your head, stretch the right leg toward the wall, and if possible ground the right foot onto the wall.
28. Bring the back of the head into line with the right heel, and lie in a straight line from head to toe.
29. It is important that the recovery from the asana be unhurried. The blood circulation should be allowed to return to normal, reestablishing the normal relationships between the heart, lungs, liver, and brain.
This asana is one of the most important elements of the practice for those of us with Multiple Sclerosis. It brings harmony and balance and the sense of happiness to the mind, body, and the nervous system. In Sirsasana you are always looking outward, experiencing the strength and balance of the pose. In Saravangasana you are supported and gazing at the full body in all its beauty and power. With this reaffirmation, you are encouraged to allow the benefits of Saravangasana to become part of your daily life. The thyroid, pituitary, and pineal glands receive blood and additional nutrients. As a result, there is increased functioning due to a balanced body and brain. While there are many other benefits cited in Light of Yoga, the emphasis here is on the pose is to completely enhance the breathing of the asana on the nervous and endcrine systems.
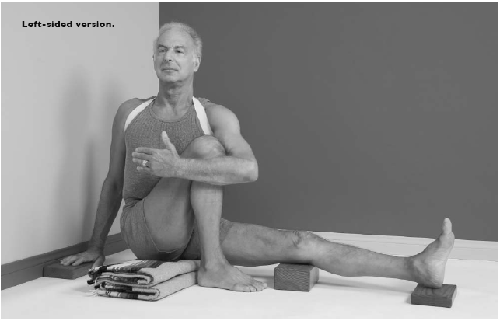
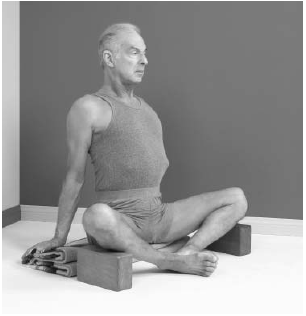
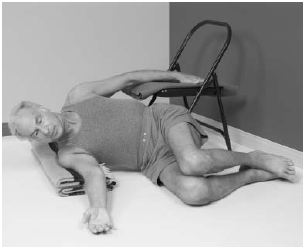
Grandfather of the Sun Pose
1. Start by sitting in Dandasana, with 1 or 2 folded blankets, depending on height, under the buttocks.
2. Lift the chest and side ribs, and press the heels away from the hips. Place blocks under the left knee and under the left heel and a folded blanket or block behind the right buttock against the wall.
3. With an exhalation, flex the right knee. Use the right hand on the inside of the right knee to draw the leg back, resting the heel against the blankets and under the knee. Inhale and raise the left hand in the air parallel to the left ear.
4. On an exhalation, begin to turn the navel to the right, moving the left elbow toward the right knee.
5. Hook the inside of the elbow around the right knee. Extend the palms and fingers parallel to the chest.
6. Keep the nose in line with the heart and the back of the head in line with the left hip.
7. Place your right hand on the block to bring both shoulders away from the ears.
8. The right ribs move back, coordinating with the left ribs moving forward.This movement strengthens and tones the mid back and abdominal muscles. If possible stand into the right foot and press the right hip forward to avoid any strain on the sacrum.

9. Breathe evenly, directing the breath into the right lung.
10. Please note that the height and placement of the blocks under the left leg may vary according to the length of the legs.
11. It is also recommended not to turn the head or neck in this asana because there is always the possibility that plaques could be present in the cervical spine. Any unwarranted pressure in this area could be detrimental to the student.
This picture illustrates the asana to the left, with the right leg supported. It is important that the back waist be lifted. The area between the lower ribs and the top of the pelvis should be even on both sides. The right arm extends from the center of the right shoulder blade to the elbow. The shoulder blades are parallel to the chest.
This asana is recommended after Sarvangasana and before any forward bending postures. It reduces backache and discomfort in the hips. Lumbar mobility is increased. This stimulation of the liver, kidneys, heart, lungs, and digestive and elimination systems is dynamic and essential.