
Energy is to the individual what capital is to a company: without it, nothing can be done. Recent research has found that if there is any one thing that can be proven about yoga and MS, it is that fatigue is significantly reduced. (19).
Yoga training is uniquely suited to this endeavor, be it after stroke, cerebral palsy, traumatic injury, in ALS, MS, or other central nervous system damage.
One of the principal handicaps in MS and practically all neurological illness is loss of energy. A person may appreciate the desirability or need to do certain things, with an understanding that is undiminished, but with energy levels that make it much more difficult to embark on and accomplish the tasks. But achieving goals is the essence of success, here in learning Yoga just as well as in every other aspect of life. Combating fatigue is critical, then, to going forward in this book.
Controlled, blinded studies at the University of Oregon confirm that Yoga practitioners with MS have higher energy levels and greater vitality than they did before beginning Yoga, and than other volunteers that did other forms of exercise.(19) Yoga literally lifts one up by the bootstraps, enabling one to go on simply by doing it. It gives more energy than it takes.
First Things First (But Not Necessarily in That Order)
The following five poses are directed toward reducing fatigue. This function logically precedes any further accomplishments or practice. Nevertheless, some of these positions may not be attainable at the get-go, and it may reasonably be returned to after working on range of motion, strengthening, spasticity, or any of the later sections.
The first example is perhaps the best: a pose of universal scope, providing relief and simultaneously boosting energy in a manner that seems to improve on sleep itself. It is invaluable to beginners and past-masters alike, and is an excellent remedy for headaches of cervical origin. Vitari Karani has already been described in the first part of the book, and is repeated here with some differences.
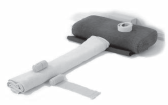
Use a bolster and a blanket folded into thirds so that it is narrower and only supports the spine, and a wall or bed or whatever vertical surface you have.
You may use an eye bag and a sandbag to weigh the shoulders down to the floor. In place of a sand bag one can use a five pound bag of flour or sugar. The weight is the same.
Inverting the body with students who have MS seems to allow them to completely and totally refresh and restore their bodies and their nervous systems.
1. Lie down.
2. Lower your elbows to the floor and move your body as close to the wall as possible.
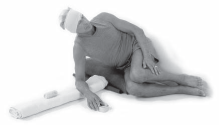
3. Just roll over to the left, keeping your head on the blanket.
4. Now shift your hips into a supine position and then gently bring your legs up on to the wall. The shoulders and chest are supported on the blanket.
5. Arch your back in order to open the chest. Use the sandbags to avoid pitching
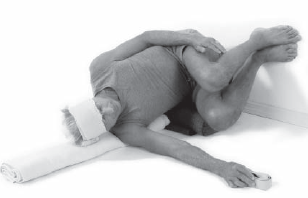
your shoulders forward. Press the shoulders down with the weight. This stretches muscles located in the front part of the chest and allows it to relax.
6. Put an eye bag under your eyes, by simply placing it above the eyebrows, pulling the skin gently down toward the nose and then distributing the sand across the eyebrow lines so that the pressure feels comfortable and the weight is not strictly on the eyeball, but is on the tissue surrounding the eye.
7. Place your hands onto the floor again about 30 degrees away from the hips with the thumb dropping more toward the floor in order to facilitate opening the chest and calming the tension in your shoulders.
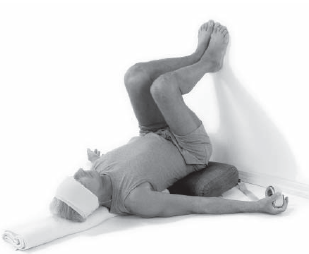
8. Now let us look at the legs. If there is a problem maintaining the legs in this posture and the legs seem to turn out, then you might want to put a strap around the mid thigh region. You or an instructor or assistant can pull the strap gently in order to raise the legs up away from the pelvis and settle the back of the heels on to the wall. This is essentially the same process we will use in the back bends which come later in this same sequence.
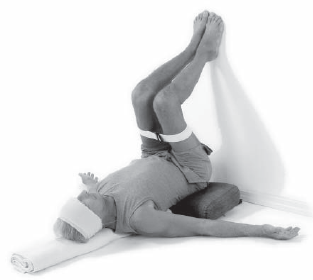
In this posture the effects of gravity on blood flow are gently reversed. Blood flows “northward” back through the pelvis with some possible additional cleansing due to the fact that the liver’s vessels may open more under the increased pressure, All the blood vessels coming up from the intestine, through the hepatic portal system, and venous blood
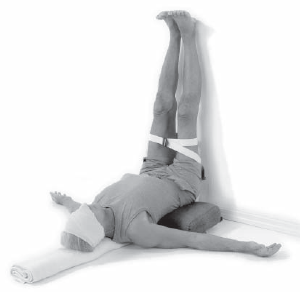
flow from the legs are drained more effectively through inversion. Breathing in this position, changing the pressures in the thoracic cavity with every inhalation and exhalation, will massage the heart and brain gently through “waves” in the blood flow through these organs.
Inhalation is through the base of the nostrils; the exhalation is through the tip of the nose. The practitioner feels rather complete and total release. If you follow the practitioner through this series of pictures, you may be able to notice that he becomes even quieter in successive pictures. You can see that his face is very relaxed and very gentle. Five minutes of this a day and if possible twice a day will offer you considerable calm. It is hard to describe how beneficial this is to people with MS.
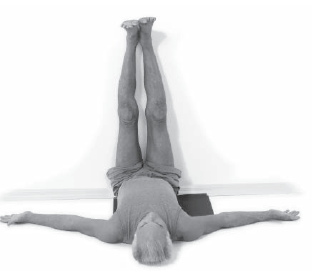
This posture should never be done after eating; it can be done before going to bed provided that the stomach is empty. Still, to do it early in the morning after the bowel and bladder are empty is perhaps the best. Three to five minutes in this pose is more than enough when you first start out. Remember, you are introducing a very effective tool to your system and it must be taken in very small doses even though you would like to take it more often and for longer. It is better at this stage, the introductory level, to stay only 3 to 5 minutes in this pose, the breath remaining smooth and calm.
After that period of time, once you come out of the pose and remove the eye bag and remove the strap, it is best to roll over onto your right thigh to swing your hips completely off the blanket or pad. Cushion your head in your right arm. Allow your left arm to drop gently onto the floor.
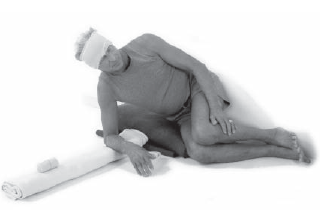
Now remember that your right lung is larger than your left lung, because the heart and stomach are on the left side, taking up a great deal of room. The liver, which is heavy, is now being supported by the floor so the return flow of blood is even and gentle. After you have stayed for at least the same amount of time in the fetal position that you were inverted, then you may sit up, placing your back against the wall. On the bolster or blanket cross your right leg in front your left, put your hands gently on your thigh and allow the total effect of the pose to come to you.
The Camel
1. Kneel on a flat surface, thighs, calves and ankles together, toes pointed behind you and parallel.
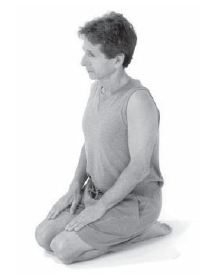
2. Place your hands on your thighs, fingers pointed down.
3. Gradually arch the neck backward to its maximum.
4. Advance the thighs forward to vertical and keep them there.
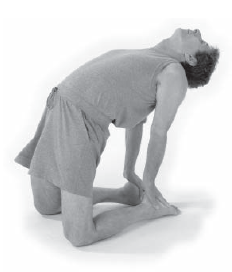
5. Extend the lumbar and thoracic spine, and bring first the right hand, then the left hand backward, resting the heel of the hands on the heels, fingers in line with the toes.
6. Raise the upper lumbar spine and lowest ribs upward as far as you can; tighten the buttocks to improve the arch of the entire spine. Breathe quietly for 30-60 seconds.
7. Exit the pose by sitting back down on your heels and simultaneously bringing your hands in your lap.
Entry-Level Ustrasana
1. Place a card chair about 2-3 feet from a wall, and facing away from it. Place another card chair directly in front of the first one, facing toward it.
2. Straddle the chair furthest from the wall as shown.
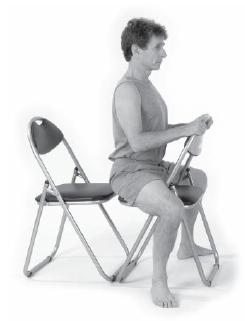
3. Holding onto the arms of the chair, hook your legs one by one under the other chair.
4. Slide backward on the chair until your buttocks are almost at the junction of the seat and back of the chair closest to the wall. Your feet should be flat against the wall.
5. Now raise your hands to grasp the arms or back of the chair that is furthest from the wall. Slowly throw your head back and lift the upper chest still further. Breathe naturally for 20-30 seconds.
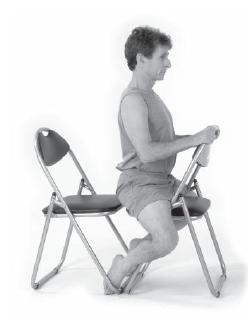
6. Lower your legs together or, if necessary, one at a time. You may use pillows under the ribs and upper lumbar spine as needed also.
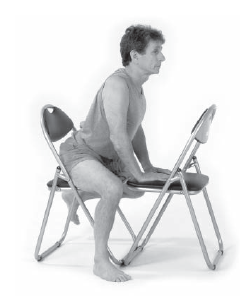
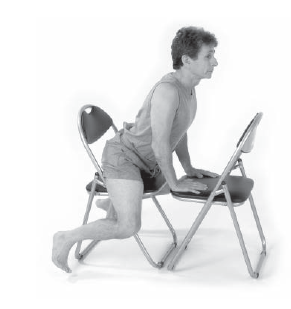
1. Slip your legs between the back and seat of a card chair. Be careful not to tip the chair, a common occurrence. If things are unstable or appear to be, place the chair next to a wall and/or use a helper.[1]
2. Slide the buttocks forward enough so that when you lie back, only the top halves of the shoulder blades extend off the edge of the seat of the chair.[2]
3. Place the feet flat on the floor, toes facing forward, legs parallel and in line with the hips. Hold the chair back when descending.[3]
4. Gradually let your head and neck and upper shoulder region descend further and further, puffing out the chest and bending the upper thoracic spine around the front edge of the chair.[4]
5. After comfortably remaining in the position at least 10 seconds, and possibly for 20-30 seconds, raise your arms over your head, palms upward, allowing the weight of your arms to further open the chest[4].
6. Remain breathing normally for 20-30 seconds.
7. Grasp the seat or side or back of the chair to return to upright on exiting the pose. Be careful of tipping the chair on entering and leaving.
More Advanced Intermediate Ustrasana
Proceed as in the intermediate pose above, but at direction 3, do not slide the buttocks as far between the seat and back of the chair.
1. Allow the entire shoulder blade to hang free beyond the front of the chair seat.[5]
2. Raise your arms over your head and behind you, placing palms on the floor.[6]
3. Now bring your feet as far beneath the chair as possible.
4. Breathe normally and evenly for 20-30 seconds.
5. To intensify the pose, grasp the chair supports and gently arch still further.[7]
6. Then return your feet to flat on the floor, calves and thighs parallel.
7. Reach your hands above and in front of you, grasping the back or seat of the chair to help you ascend back to the straddle position.[8]
The Serpent
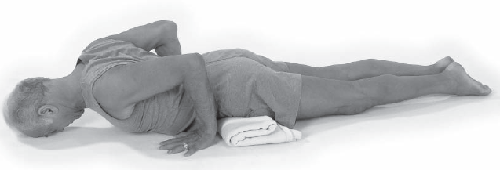
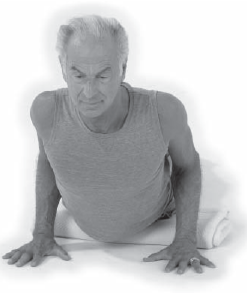
1. Lie on a surface face down.
2. Place your palms on the surface next to your lower ribs, fingers parallel to your torso.
3. Using your hands for balance and support, raise first your brow, then your eyes, then your nose, then upper lip, then mouth, chin, throat and slowly, the upper ribs from the surface until your head is as far back as possible. The shoulder blades come back, together and down, the pubic bones stay on the surface.
4. Now contract the buttocks and rectal muscles, breathing calmly for 20-30 seconds.
Entry-Level Bhujangasana
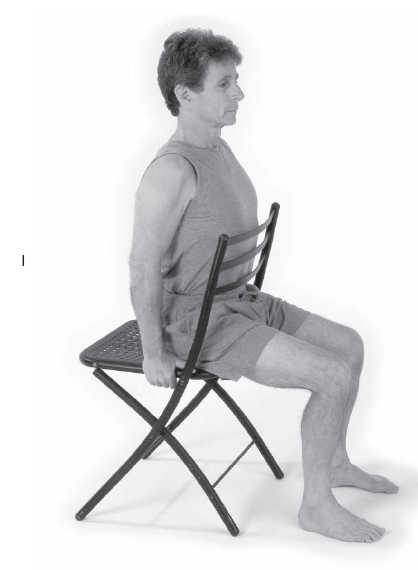
1. Sit comfortably in a chair with arms, feet flat on the floor, thighs together.
2. Place the heels of your hands on the arms of the chair, as far as possible from the chair back.
3. Press down evenly with both hands, slowly throwing your head back, and your top few ribs forward. Keep your entire lower back in contact with the chair.
4. Hold the shoulders down, the shoulder blades together. Try to press the upper sternum forward and upward. Breathe evenly for 20-30 seconds.
Intermediate-Level Bhujangasana
1. Go on all fours over a small pillow and a bolster.
2. Gradually lower yourself into the prone position over the pillows.
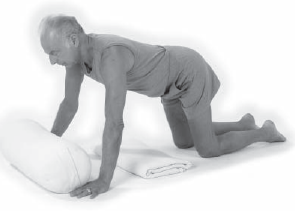
3. Place your palms on the surface next to your lower ribs.
4. Using your hands for balance and support, raise first your brow, then your eyes, then your nose, then upper lip, then mouth, chin, throat and slowly, the upper ribs from the surface until your head is as far back as possible.
5. Keep the shoulder blades back, together and down. The pubic bones stay on the surface. Point your toes.
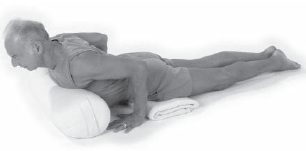
6. Now contract the buttocks and rectal muscles, and remain in the position, breathing calmly for 20-30 seconds.
The High Bridge
1. Lie in savasana.
2. Place your palms above your shoulders, fingers parallel and pointing toward them. Keep your forearms and upper arms parallel, and about as far apart as the shoulders.
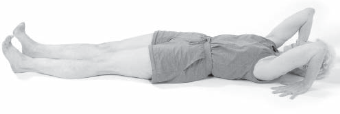
3. Bend your knees until your feet are flat on the floor, and parallel. The feet, shins, thighs, arms and hands on each side should be in the same plane.
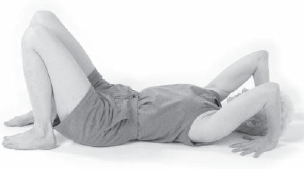
4. Press downward with your hands, lifting your head and shoulders until the apex of your head is on the surface with your hands and feet.
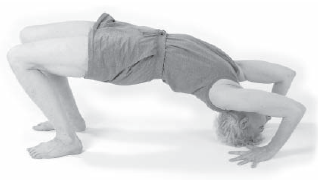
5. As you breathe in, press further with the open hands, balancing weight evenly between them. Raise your head and trunk until your elbows are straight.
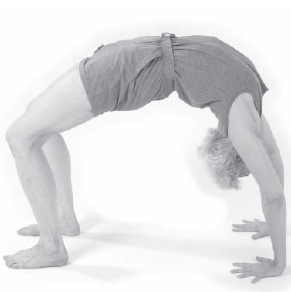
6. Straighten the knees somewhat, carefully raising the abdomen and groin regions as high as possible.
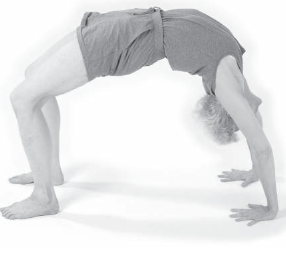
7. Use pressure from your feet and legs to move the shoulders as far forward as is comfortable, opening the armpits wide.
8. Breathe quietly for 30-60 seconds.
9. To leave the posture, first slowly flex the elbows until your head rests on the surface. Then slide your head away from your heels until your shoulder blades rest on the surface.
Entry-Level Undhva Dhanurasana
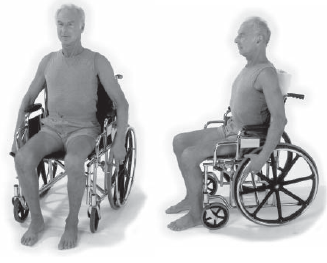
1. Sit with feet flat on the floor, knees together, buttocks wedged between the seat and back of a chair or wheelchair.
2. Raise arms in as parallel a fashion as possible, bend elbows 90 degrees, wrists in neutral position, palms facing each other.[1]
3. Reach upward and backward, grasping the top of the chair back or a strap that is tied in a sling behind the head.[2]
4. “Walk” backwards with your hands, or push backward with your head to maximize the distance backward that the hands, wrists and arms travel.[3]
5. Breathe quietly in this position for 30-60 seconds, then release the hands’ grip slowly. Return to normal seating position.
Intermediate Urdhva Dhanurasana
1. Stand in Tadasana one foot away from a wall, a few inches from the corner of a room.
2. Balance weight evenly over both feet. With an inhalation, bring the hands and arms over behind your shoulders, fingers and palms touching the wall, right and left forearms and upper arms parallel, and about as far apart as your shoulders.
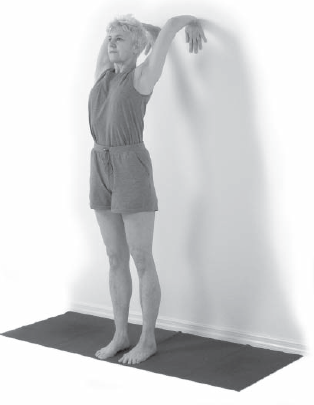
3. “Walk” down the wall, arching first the neck, then the thoracic spine, then the lumbar spine.
4. Your ankles will dorsiflex slightly, but the weight should still be balanced evenly on each foot. A side wall will help with balance.
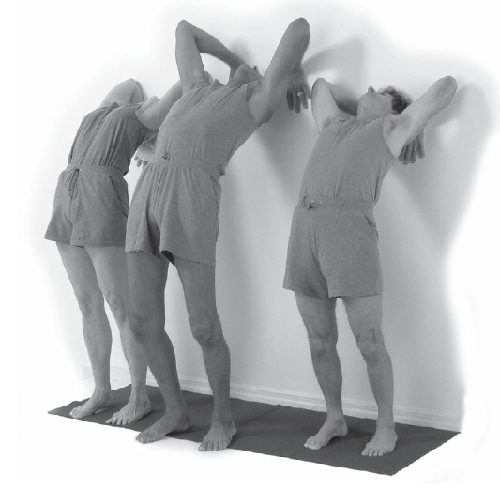
As time goes on, you will descend further and further down the wall, and may safely start by standing further and further from the wall. When you have walked down to waist level with your fingers, you are probably ready to attempt Urdhva Dhanurasana. However, if early attempts are unsuccessful, return to the intermediate pose, testing Urdhva again every week or so.
The Lotus
1. Sit on a moderately sized cushion with legs stretched out before you.
2. Bending the right knee, cradle the foot in both hands and draw it as high as possible onto the left groin.
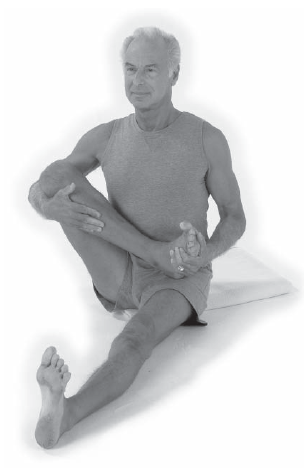
3. Bring the right knee down toward the floor.
4. Now bend the left knee and lift the left foot over the right knee and inward toward the right groin, placing it as close to the abdomen and navel as possible.
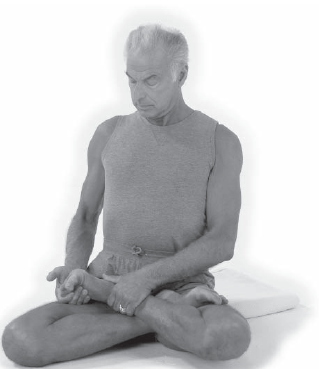
5. Pull in the abdomen, open the chest, straighten the spine from coccyx to the cervical vertebrae.
6. Rest the chin on the chest and the backs of the hands on the knees.
7. Breathe calmly, eyes closed, beginning as tolerated, and gradually extending to 30 minutes.
A certain amount of discomfort is almost inevitable at first, but do not strain too much to attain this pose, nor to stay in it too long. It may require several years to safely and usefully remain in it for 30 minutes. With practice it will become extremely comfortable.
Repeat the pose beginning with the left leg, but consistently practice breathing exercises with legs in one position or the other.
Entry- and Intermediate-Level Padmasana An excellent means of eventually attaining Padmasana, the lotus, is a smooth continuum of movements. Any division between early and intermediate efforts is, as you will see, entirely arbitrary. Therefore we present it as a single series.
1. Place a blanket next to a wall, and lying sideways in the manner described earlier, raise legs as close to vertical as possible. Spread your arms out, palms up, parallel to the wall.
2. Bend your right knee; slide the heel toward the root of the thigh.
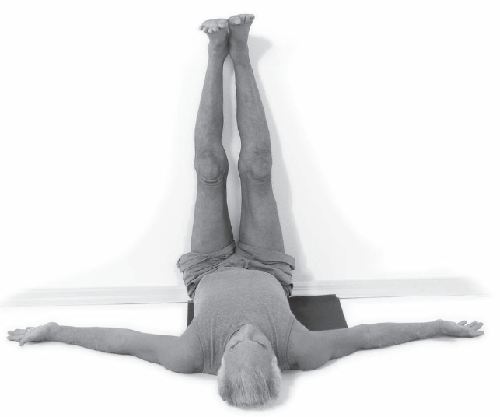
3. Take ahold of your right foot with the left hand and draw it in front of the left thigh as far as is comfortable.
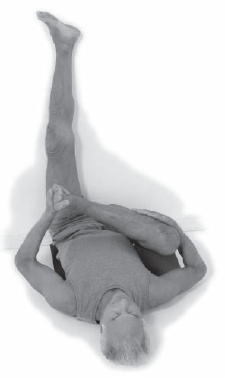
4. Set the right thigh back toward the wall.
5. Gradually bend the left knee. Retain the right thigh’s contact with the wall.
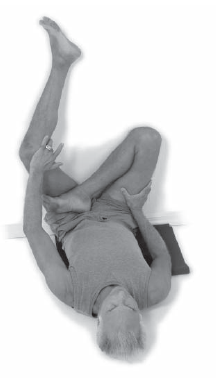
6. After 30 seconds to one minute, reverse the legs and repeat the procedure.
This step is the long one. It may take anywhere from one day to several years to succeed at the next one. Be patient and be careful. Easy does it. There is a proverb: “Be not afraid of going slowly, but of standing still.”
7. Try from time to time to place the left ankle over the right thigh. When this occurs, hold it just a short time (5-10 seconds) and then try reversing the legs.
8. Gradually increase the timing to 1-2 minutes. Fit the thighs and shins together symmetrically. Comfort may come slowly, but it comes.
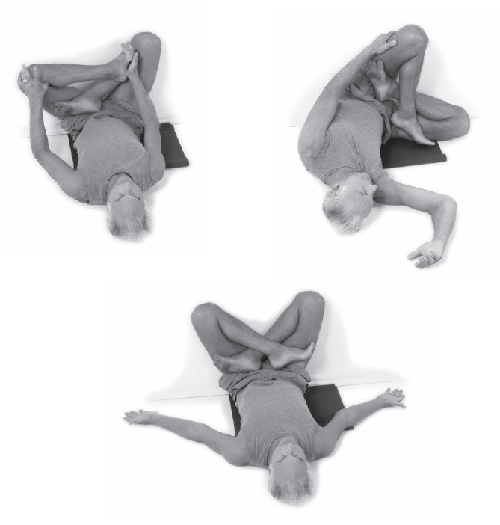
9. When this is reasonably stable, return your arms to the floor.
10. Guide your legs to the floor with your arms.
11. Spread your palms widely as you leave the inverted position.
12. Repeat the process, beginning with the left knee bent.
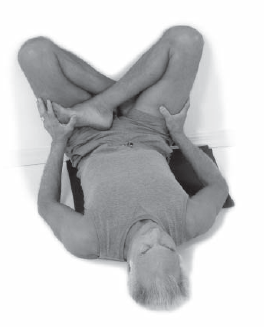
Gradually the pose may provide a stable and quiet sanctuary for you—as it has for individuals over thousands of years.
