
Whatever else Yoga does, it stretches. Stretching is a natural antidote for two of the most devastating consequences of MS: reduced range of motion and spasticity. First, consider reduced range of motion. There is no better, safer, faster nor more natural way to overcome the restrictions on full movement than lengthening them. This applies to muscles and their tendons, ligaments, joint capsules, and the adventitious scars and adhesions that may develop for a variety of reasons.
Simple as it may sound, range of motion is one of the gravest losses in a host of neurological conditions, for as range of motion decreases, the scope of possible activity diminishes proportionately. A cat with a stiff tail would have impaired balance. A mighty man with restricted range could not bench-press a barbell regardless of his strength. Yet relapsing and remitting MS, with its rising and falling levels of motor and sensory impairment is frequently accompanied by temporarily increased spasticity. But the spasticity, a neurological phenomenon, often subsequently retreats, leaving an unnecessarily long-lived mechanical reduction in range of motion that could be perpetuated by disuse.
As a retreating army of occupation leaves devastation in its wake, the resultant loss of range of motion is often the most serious consequence of an exacerbating episode of MS. Yoga is a safe and sure remedy.
In progressive MS degrees of range of motion may be lost unnecessarily due to failure to challenge the actual limits that impaired function imposes. These add up. Be it the spine, the hips, arms or ankles, unnecessary concessions to the disease work to contract the individual’s life-possibilities and opportunities, as well as their joints.
STRATEGIES TO IMPROVE RANGE OF MOTION
Many important groups of muscles cross more than one joint, and where these muscles are the limiting factors in joint mobility, both joints must be approached simultaneously. The gastrocnemius muscle, for example, crosses the back of both the ankle and the knee. If stretching it at the ankle is attempted without regard for the straightness of the knee, it will be impossible to put it under any tension at all. However, once the muscle is stretched at the ankle, further straightening the knee is often a good method of increasing the range of motion at the ankle joint.
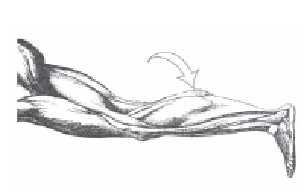
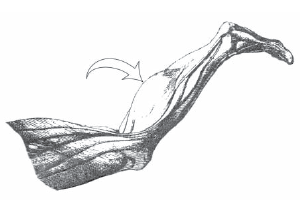
In other circumstances, such as relapsing and remitting MS, it can happen that a given joint is inactive for a period of months due to weakness or spasticity that then remits or vanishes, leaving a competent and properly toned muscle across a joint that is “frozen” by tightened ligaments or constricting joint capsule. Then the critical strategy is to take the muscle out of play, arranging position so that the muscle is slack, enabling one to work directly on the restricting elements. In that case, to disengage the gastrocnemius, one would intentionally stretch the ankle with the knee bent.
Reduced range of motion and spasticity often work together: tightened muscles serve to decrease range of motion at the joints they cross and decreased range of motion brings on tightened muscles which cannot be stretched, that readily react to everyday stimuli with painful spasticity. In this respect all the asanas given later for spasticity will also serve to extend range of motion. Nevertheless, there are a number of other postures which accomplish this task more directly.
1. Spend 20-30 seconds in Tadasana, seeking the calm of the mountain pose.
2. Inhaling, spring the legs to 3 1/2 feet apart.
3. Turn the right foot out 90 degrees, and the left foot inward 30 degrees, stretching the arms horizontally as far apart as they will go. Palms down, hands concave upward.
4. Puff out the chest, draw in the abdomen and exhale and descend toward the right calf, retaining the alignment of the arms, and keeping the torso in the plane defined by the intersection of the two legs.
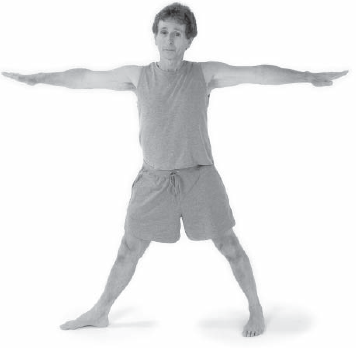
5. After the right hand reaches the floor, press backward on it to rotate the torso so that a line through the two arms would pass through the center of the earth. Steady the left foot in place as you rotate the left knee outward and curl the left buttock back, so that the lower and upper torso are also brought back, in line with the same plane.
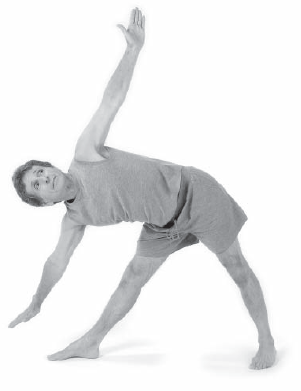
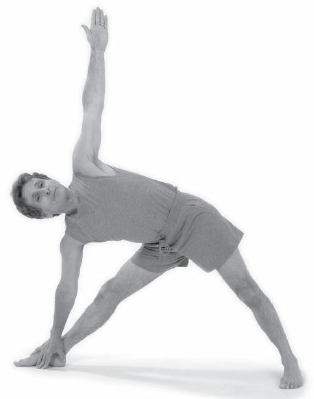
6. The action of the arms and legs will separate the torso away from the root of the right thigh, and raise the left thigh higher, widening the right groin and lengthening the left groin. Breathe calmly and evenly, filling the right and left lungs equally, for 1 minute. Then reverse this for the left side.
Entry-Level Trikonasana
1. Perform the same pose lying supine. Begin with 20-30 seconds in Savasana, quiet and calm.
2. Separate your legs by moving your left leg 2-3 1/2 feet to the left, the right leg still in the savasana position, both feet vertical.
3. Slide the arms out 90 degrees from the torso, keeping shoulder blades down, back and together, and palms horizontal. Elevating the right shoulder slightly will allow the same angling that the vertical standing poseentails.
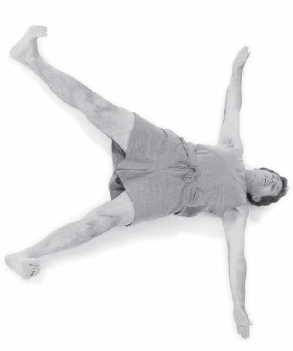
4. Turn your head to the right, attempting to gaze at the left hand with the right eye. Hold the position with regular breathing for 20-30 seconds.
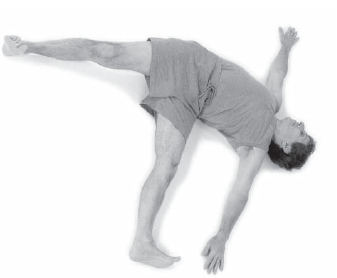
5. Then return the legs to savasana and repeat the pose with the right leg and left shoulder.
Early Intermediate Trikonasana
1. Stand facing a doorway or narrow hall with feet 3-3 1/2 feet apart.
2. Turn the right foot out 90 degrees and the left foot 30 degrees inward, using the right or left arm to keep steady balance.[A]
3. Calmly take a few breaths. Keep your weight evenly distributed by turning the left knee outward and tightening the left buttock, while inclining to the right side and slowly sliding the right arm down the side of the doorway or hall.[B]
4. Exhale while descending. Remain in the position for up to 1 minute while breathing calmly.
Later Intermediate Trikonasana
1. Stand with your buttocks touching a wall, feet 3 1/2 feet apart.
2. Turn the right foot out 90 degrees, parallel to the wall. Turn the left foot inward 30 degrees. Stretch the arms out horizontally.[1]
3. Briefly turn the palms upward, so that the flexor sides of the elbows, the cubital fossae, turn upward. Then rotate the palms downward. The cubital fossae remain facing up.
4. Take in a good breath, extending the fingertips of each hand as far from the torso as possible. Puff out the chest, draw in the abdomen and descend toward the right calf, keeping the right buttock and the right shoulder in contact with the wall. Retain the alignment of the arms, and keep the torso in the plane defined by the intersection of the two legs.[2]
5. After the right hand reaches as far as it can get without disturbing the alignment of the arms, shoulders and trunk,[3] press it
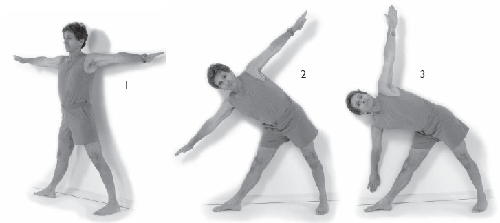
back against the ankle or calf to rotate the torso so that a line through the two arms would pass through the center of the earth, and the torso is still in the plane defined by the two legs. Bending the right elbow will add to the force that can be exerted, but is not the definitive pose. Inhale.
6. Keep the left foot in place, rotate the left knee outward and curl the left buttock back, so that the lower torso is also brought back, in line with the same plane.
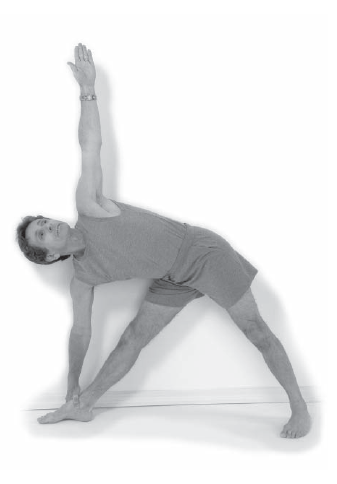
7. Attempt to bring the left buttock and the left shoulder blade to the wall behind you, parallel to their right-sided counterparts. Exhale.
The action of the arms and legs will bring the torso higher, away from the thickest part of the right thigh, widening the right groin and lengthening the left groin. Breathe calmly and evenly, filling the right and left lungs equally, for 1 minute. Then do the reverse on the left side.
This is a powerful and therefore a dangerous way to improve hip, knee and ankle range of motion. Safety first: use a good number of pillows to sit on when beginning this pose. Best to have an experienced person present. After a few trials, the practitioner will be better able to judge what is needed. Stay in the pose for only 10 seconds for the first few weeks, then, over the next 6 months, gradually increase the time to a full minute, increasing by 5 seconds every two weeks. Without an instructor, one should not try performing the first pose described and pictured below for at least six months after taking up virasana.
1. Kneel on a flat surface with knees together but feet barely further apart than the hips.
2. Slowly bend the knees, controlling the descent of your haunches with the fingertips even before knee flexion brings them down to touch the surface or pillows or blocks that have been placed between the arching feet.
3. Gradually settle the buttocks down as far as possible. The inner calves are in contact with the outer thighs.
4. Place the palms of the hands on the thighs, joining the thumb and index fingers.
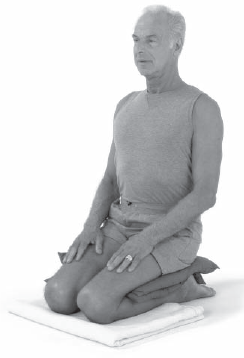
5. Lift the spine from the nape of the neck, pull back the abdomen, and reduce muscular tension in the thighs, abdomen and pelvis. Breathe quietly for 1-2 minutes.
6. Interlock the fingers, palms facing the chest. Bring the hands behind the head. Smoothly flex the shoulders while extending the elbows and wrists, palms facing upwards, biceps behind ears. Keep shoulder blades back, together and down toward the pelvis.
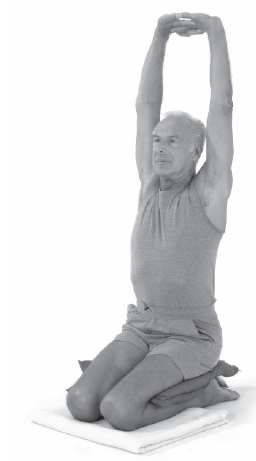
7. Retain the straight back, stretching from the palms to the coccyx. Looking straight ahead, breathe calmly for 1 minute.
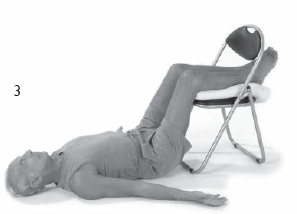
Entry-Level Virasana
1. Lie supine on a flat surface with a chair standing over the legs.[1]
2. Let the backs of the hands rest on the surface, sliding the arms down and letting the shoulders descend to the surface as well. Inhale.[2]
3. Stretch the back of the head far from the shoulders with exhalation.
4. One at a time place the backs of the calves on the chair, moving the practitioner and/or the chair to find the angle at which there is a persistent but safe pull on the knees or the hip joints. Breathe calmly for 1-2 minutes.[3]
Adjusting the chair further away from the body (toward the feet) produces more hip extension but less knee flexion. As the chair stands closer to the hips, the hips and knees are flexed more. Pillows under the sacrum give more knee flexion without increasing hip flexion, and are useful for treating concurrent hip flexion and knee extension contractures.
Intermediate Virasana
An ambulatory person will not have prohibitive hip flexion contractures, but may have knee extension contractures. Therefore this potent and potentially harmful pose still requires great vigilance to improve hip, knee and ankle range of motion.
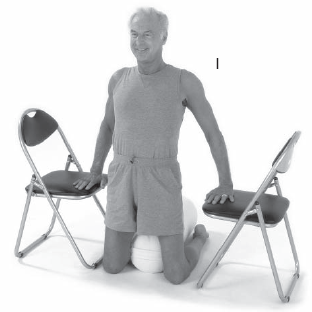
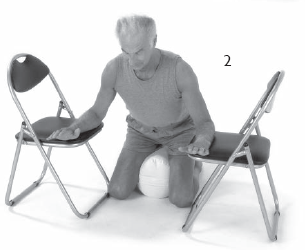
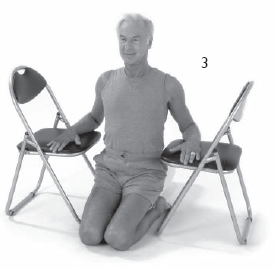
Safety first. Use four or five pillows or a bolster to sit on when beginning this pose. Scrutiny of an experienced person is better yet. After a few trials, the practitioner will be better able to judge what is safe. Let mild pain and a sense of apprehension be your guide to limitation. Stay in the pose for only 10 seconds for the first few weeks. Then, over the next 6 months, gradually increase the time to a full minute. Without an instructor, one should certainly use more pillows than absolutely needed at first, and place chairs at either elbow to assure adequate balance.
1. Place the pillows or a bolster between two chairs facing each other.
2. With palms and then forearms on the seats of the chairs, kneel in front of the pillows with knees together but feet further apart than the pillows.[1]
3. Slowly bend the knees, controlling your descent with hands and forearms.[2]
4. Gradually rest the buttocks on the pillows that are between your arching feet. The inner calves are below the outer thighs.[3]
5. Turn the palms up, and with the backs of the hands on the chair seats, join the thumb and index fingers if possible.
6. Lift the spine as though from the nape of the neck, pull back the abdomen, and reduce muscular tension in the thighs, abdomen, pelvis, shoulders and arms.
7. Breathe quietly for 1-2 minutes.
If stability is in question, begin the next part with one arm, using the other to improve balance. If possible, lift both arms off the chairs, interlocking the fingers and bringing the arms overhead, flexing the shoulders and extending the elbows and wrists and fingers maximally. Lower and retract the shoulders, opening the chest and pulling in the abdomen. Relax and breathe in this pose for 1 minute.
Supine Hero’s Pose
1. Use the steps on pages 152-153 to enter virasana.
2. Then lower the arms, and carefully lean back, placing the forearms on the surface.
3. Extend the neck, bring the head back, arch the thoracic spine.
4. Slowly slide the arms down toward the waist, palms upward, and straighten the neck, resting the shoulders and the back of the head on the surface.
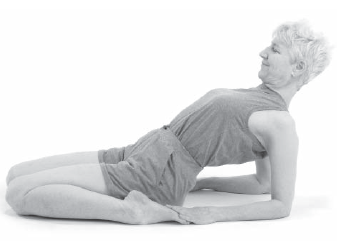
5. Last, slowly rotate the arms as they are stretched out parallel, palms upward, over the head (see below).
6. Breathe calmly for 1 minute, putting as much of the back as possible in contact with the surface.

Entry-Level Supta Virasana I
1. Begin with entry-level supta virasana. 2. Raise the arms to vertical and revolve them slowly as they are stretched maximally overhead and placed palm upward on the surface.
3. Breathe calmly for 1 minute.
A bed or couch at the home or a plinth in the clinic are useful for a further stage of beginning virasana.
1. Lie supine on the couch or plinth, using pillows under the thighs if hip flexion contractures prohibit full extension. Take several unhurried breaths.[1]
2. Let the shoulders descend into the couch or plinth. Keep the shoulder blades symmetrically placed.
3. Now inch down so that the heels, then the ankles, then the distal calves are off the end of the couch or plinth, causing the knees to bend slightly.[2]
4. Keep inching until there is a gentle but persistent tug of tension at the knee and/or hip joint. Then slide the backs of the hands as far away from the hips as possible, let the shoulders fall once again.
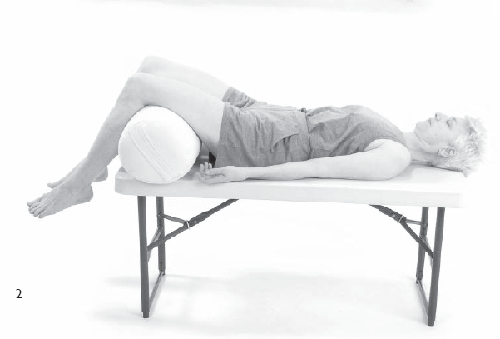
5. Straighten the spine and the back of the neck, increasing the distance between the shoulders and the ears.
6. Breathe slowly and symmetrically in this position for 1-2 minutes.[3]
Entry-Level Supta Virasana II
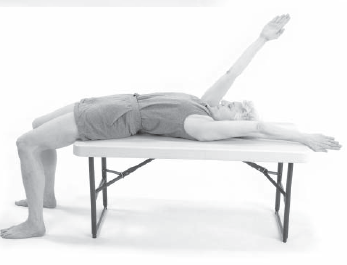
A more demanding variant of these two intermediate poses raises the arms over the head, stretching them in parallel along the couch or plinth, palms stretched open wide.
Intermediate Supta Virasana
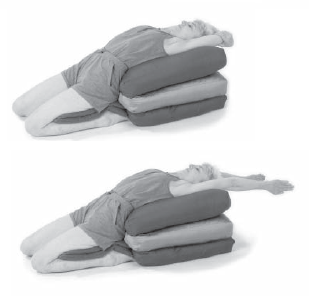
An intermediate supta virasana requires as many or more pillows under the back as under the buttocks.
Three possible variations are pictured here.
Country Gate Pose
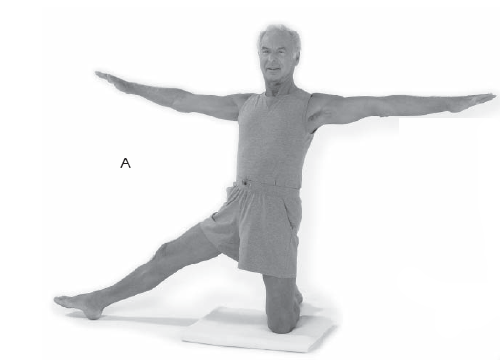
1. Kneel with legs together.
2. Straighten the right leg out to the side, putting the sole of the foot on the floor, toes facing to the right.
3. Inhale and extend the arms horizontally, palms down. Breathe calmly for one minute.[A]
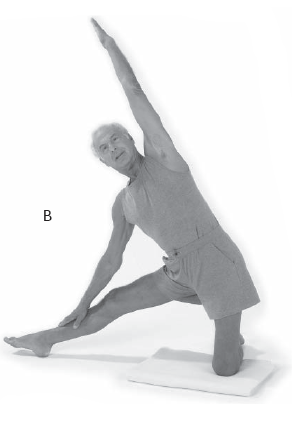
4. Incline the head, trunk and right arm toward the right leg, resting the back of the hand and wrist at the ankle and shin, and the right ear at the right deltoid-triceps.[B]
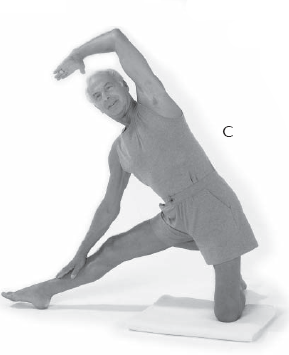
5. Stretch the left arm and flank overhead, and then to the right, resting the left palm on the right. Breathe calmly and as symmetrically as possible for one minute.[C]
6. Bring arms, trunk and legs back to the starting position and repeat the entire process on the left.
Entry-Level Parighasana
1. Sit far back and grasp the arms of the wheelchair or armchair.
2. Balance weight evenly over the two ischial tuberosities.[1]
3. Breathe calmly for 1 minute.
4. Use arm pressure to maintain an equal distribution of weight as the head and ribs incline to the right.[2]
5. Release the left hand, straightening the arm, then raise it up to vertical, and continue as much to the right side as possible, so that the left bicep is close to the left ear.
6. Still balancing the weight evenly, stretch the left flank from the iliac crest, ribs and scapula to the triceps, forearm extensors and the back of the hand.[3]
7. Now breathe evenly and calmly for 1 minute.
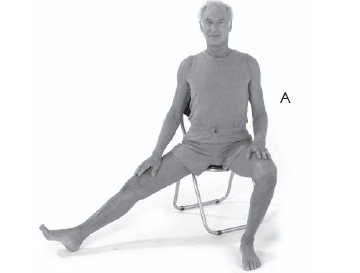
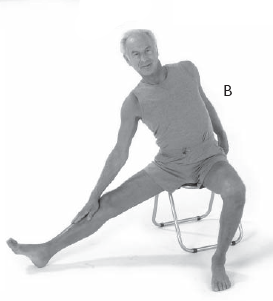
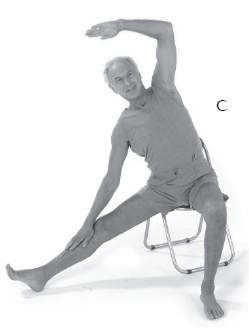
1. Sit on the edge of a wheelchair or chair.
2. Swing the right leg out maximally to the right, and straighten the knee to tolerance. Blocks may help to make it straighter.[A]
3. Release the right armrest (if there is one) and slide the right palm down the right thigh, while inclining the head and trunk to the right. Use both hands to support, guide and control the lateral descent of the trunk and head.[B]
4. When motion to the right has gone to its safe maximum, take a few calm breaths. Then, if balance permits, raise the left arm straight upward, using the right arm and hand for stability. Take a few more calm breaths.
5. When possible, bring the left arm over to the right side, stretching from the pelvic rim and iliac crest along the ribs. Bring the left shoulder as far to the right as possible, and elongate the left lateral arm, the extensors of the forearm and the back of both hands as far as possible to the right. The left wrist and hand stretch straight on from the forearm, neither flexing nor extending.[C]
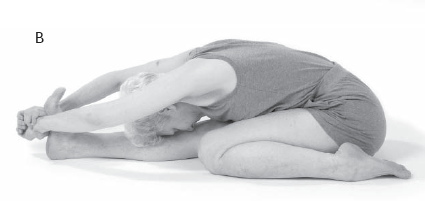
TRIANG MUKHAIKAPADA PASCHIMOTTANASANA
Three Limbs to the West Pose
1. Sitting on a flat surface, extend the right leg and bend the left underneath, so that the left shin is on the surface, the calf is in contact with the back of the thigh, and the left toes point backward. Rest as evenly as possible on the left buttock and on the right, taking several calm breaths. A pillow under the straight leg’s buttock may help.[A]
2. Incline the torso forward and slightly to the left, retaining the majority of weight on the left side. Keep the left knee in contact with the inner right thigh.
3. Clasp the left wrist with the right hand, making contact first between the abdomen and the thighs, following with the lower chest against the knees. Let the head and cheekbones rest against the inner right thigh.[B]
4. Disengage the muscles at the lateral edges of the back (latissimus dorsi) and the paraspinal muscles, and the muscles that surround the hip joint. Breathe serenely for 1-2 minutes.
5. Then repeat this exchanging left and right.
Entry-Level Triang Mukhaikapada Paschimottanasana
1. At first almost everyone has diffculty sitting firmly on the bent-leg side of this pose. Move close to the edge of a chair, possibly with some small cushion under the right buttock, and extend the right leg maximally.[1]
2. Plant the right heel firmly on the floor. If balance is an issue, sit further back in the chair, using pillows and/or blocks to support the straightened right leg.
3. One way to proceed hooks the left ankle under the footrest or supporting strut of the wheelchair or chair.[2]
4. Gently and firmly grip the armrests (if there are any) and use them for balance.
5. Extend the spine upward from the coccyx to the nape of the neck. At this point take a few calm breaths, gradually placing more weight on the left buttock.
6. Relax the muscles that normally extend both hips and the left knee, the bilateral hamstrings and the left quadriceps, and flex the left knee still further.
7. Use the chair again, this time to draw the torso forward, while keeping the majority of your weight on the left side.[3]
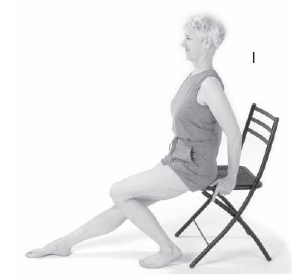
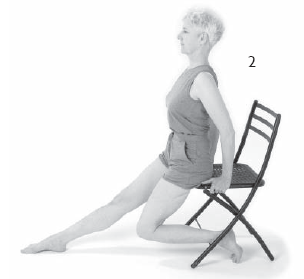
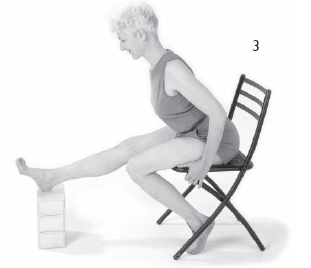
counteracts spasticity. It also serves to sharpen balance in all three planes, and strengthen the upper extremities as well as increasing range of motion at all three major joints of the bent leg, and hip flexion and knee extension of the straight leg, e.g., in the presence of flexion contracture. It is a way to approach joint capsule or ligamentous tightening, taking muscular opposition out of the picture while increasing passive range of motion.
Intermediate Triang Mukhaikapada Paschimottanasana
Where range of motion is the greatest issue, this is best done in bed. When balance is also at issue, a firmer surface is preferable, along with supportive props. One has carefully to adjust the amount of pressure that will not injure the joint or throw the practitioner off balance, while making sure it is sufficient to extend the range of the joint. Pain is not always the most accurate barometer: actually testing the leathery resistance at the ends of the joint’s range is the best way to tell.
Also, imbalance can cause sudden weight shifts that are best anticipated and managed in advance. This pose is especially helpful in Parkinsonism also.
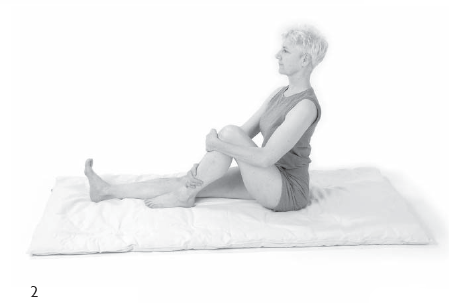
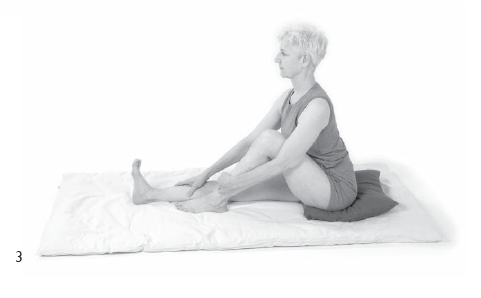
1. Performed on a bed, begin by folding the left leg off to the left side, shin against the sheets. Use pillows to elevate the buttocks as needed. Even though the left buttock needs elevation, raise the right buttock further still, in order to apportion weight on the bent-leg side.[1]
2. If flexibility does not allow sitting on the shin, the thigh and knee may be flexed directly in front of you, parallel to the extended right leg.
3. Although probably not oriented exactly vertically, straighten the spine.[2]
4. Then grasp the left shin and rest there, calmly breathing, relaxing the extensors of the left and right hip and left knee.
5. After reaching a comfortably stable and balanced posture, bend the elbows, keeping the upper arms in contact with the torso, bringing the entire torso forward and down as a unit toward the left thigh.
6. If necessary, extend the right arm out to the side, or grasp the side of the mattress with the left hand to exert pressure on the left side while maintaining safe balance.[3]
7. Deliberately calm your entire form, head to toe. Breathe symmetrically for a full minute. Then repeat the sequence on the other side.