
Yoga poses are generally stable. The practitioner gets him- or herself into a position, and then stays there for a length of time. This serves three purposes very directly, and two more besides. First, as we have already emphasized, it stretches the soft tissues that limit the range of motion of every joint, and secondly, it quiets painfully spastic muscles that restrict the activities and trouble the lives of neurologically compromised patients. Simple as that.
Third, although it involves no weights or equipment apart from ones own body, strength increases in the Yoga practitioner: Standing poses, arm balances and twists require protracted muscular efforts.
Holding any of these groups of poses for more than a few seconds requires isometric effort that has been proven to increase strength in a very efficient way. A muscle’s active range of motion is defined by the limits of its effective functioning. Therefore, in a real, practical, and immediate sense, raising strength increases range of motion.
Examining strength may be the best way to see the tension between conscious, intended action and the involuntary physiology that supports it. A strong muscle is a great resource, but that same muscle, contracting in a way that
impedes you in what you’re trying to do, becomes a formidable adversary. The spastic muscle is a painful reminder that strength without control is a two-edged thing at best. Our idea of a strong man or woman is one that can perform feats that require coordination and team-work between powerful muscle groups.
I suppose we could say a given muscle is strong because it can generate a certain amount of pull with its contraction. But the person that has that muscle is not strong unless it can be applied intentionally. It is difficult or impossible to measure strength in the presence of spasticity, and impossible to utilize the strength of spastic muscles in most circumstances. This is why strength, as we generally recognize it, logically comes after spasticity.
Yet there are circumstances every hour, such as getting out of bed, or walking up stairs, in which hundreds of pounds of force are generated nearly without our consent usually not really consciously. And there are times that nerve blocks and other weakening measures, applied to spastic muscles of the legs, actually help people’s efforts to walk, turn and transfer.
First, we learn to walk or stand, and many other complex but standard applications of muscle strength. Then, over time, we learn to instigate and modify these patterns of muscle activation, paying almost no attention to what had previously been a major challenge. It is the basic necessity of creatures with limited breadth of attention: if we could not relegate learned actions to “auto pilot,” we could not keep advancing, given the finite number of things we can attend to at the same time.
Yoga reverses the process, bringing into consciousness, and under intentional control, what has been dropped from the spotlight, or had never been there at all. In MS, and many neurological conditions, yoga gets help, paradoxically, from the illness: weakness is the opposite of strength, but the twin of spasticity. Both stop us from doing what we purpose to do. But both come to our attention on their own. This section focuses on returning strength to the essential and delightful attribute it is in the largely human realm of intentional action.
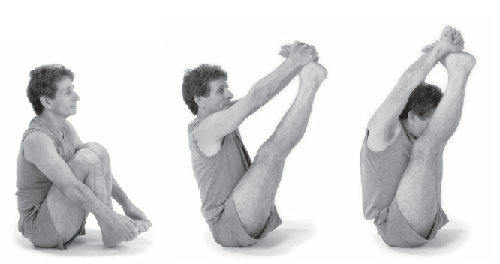
The Boat
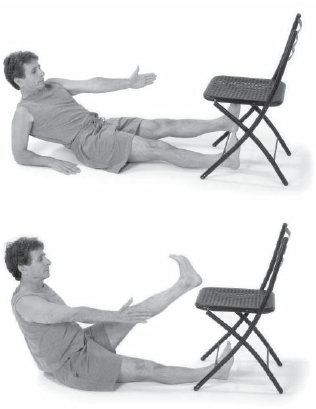
1. Sit in Dandasana.
2. Raise your legs up thirty degrees; the trunk will recline backwards to maintain balance. Your feet should be above eye-level. Keep both legs and back straight.
3. Raise both straightened arms to horizontal, palms facing one another.
4. Remain in the pose breathing regularly for 10-20 seconds.
5. Now inhale, bend the knees, interlock your fingers behind them, and straighten the legs again, pulling the legs and torso together with exhalation. Retain the straight back, keep shoulder blades close to each other and the spine.
6. Remain in this pose, forehead or face in contact with the shins, breathing quietly for 10-20 seconds.
7. Gradually, as balance and stamina permit, increase the time to 1 minute.
Entry-Level Navasana
1. Lie supine on a flat surface with torso elevated to 30 degrees by supports, and palms down, fingers pointing toward the feet.
2. Hook your ankles under a heavy piece of furniture, or have another person hold them down. Take two quiet breaths.
3. With the second exhalation raise the torso a few inches off the support.
The higher the torso supports, the easier this will be. Use your hands’ pressure against the surface to help raise your torso.
4. Breathe quietly for 10-20 seconds.
5. Gradually, over weeks, attempt to perform the pose with less and less help from the arms. Then work to reduce the height of the torso supports.
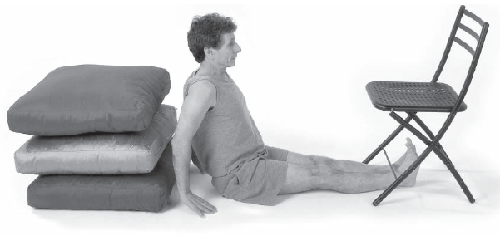
Perform the first part of Navasana without interlocking the fingers behind the feet. If balance is not up to the task, begin with one arm supporting, the other horizontal, and/or only one leg elevated.
UTTHITA AND PARIVRITTA PARSVAKONASANA
Extended and Revolving Lateral Angle Pose
1. Both poses begin in Tadasana. Spend a full minute equilibrating weight on the two feet, and balancing finely enough so that the act of breathing causes no sway in any plane.
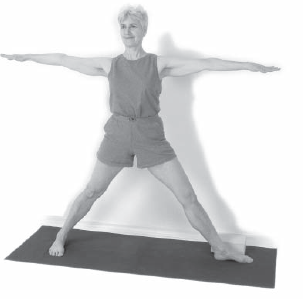
2. Now rapidly draw the feet apart, jumping up vertically as little as possible in order to land with the feet 4-5 feet apart without jostling the internal organs. Raise the arms to horizontal.
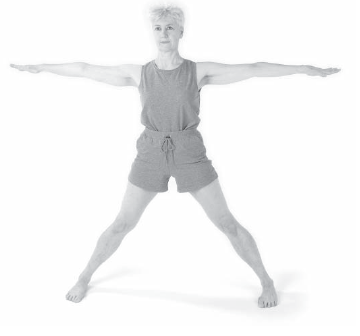
3. Turn the right foot outward 90 degrees, the left foot inward 30 degrees, then descend, retaining an entirely straight left leg while the right knee bends to 90 degrees. Keep the little toe side of the left foot on the floor.
4. Take a quiet breath.
The two poses are alike up to this point. After starting out the same way, they go separate ways from here on. They are presented one after the other.
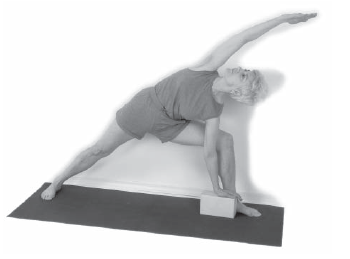
5. For Utthita Parsvakonasana incline the trunk to the right as you exhale, and place the right palm at the little toe side of the right foot, parallel with it. The right forearm and shin should be vertical, and in line.
6. Revolve the torso, the left flank, and the left shoulder upward. Keep the left knee straight. Extend the left arm behind the ear and over the head. The slanting line from the back of the left hand to the left outer foot should be straight.
7. Press the right biceps in against the right knee; press the knee outward against the biceps. These two forces, and the pressure they generate at their meeting point, serve as the fulcrum for rotating the left torso and hip upward.
8. Stretch the left fingertips forward and the little toe side of the left foot backward, maximally elongating and maximally revolving.
9. Breathe smoothly and symmetrically for 10-20 seconds.
10. Then return, retracing the steps back to Tadasana, and perform the pose on the other side. Each side should be built up gradually to 1 minute.
Entry-Level Utthita Parsvakonasana
1. Sit crosswise on a card chair with the right buttock and thigh.
2. Bend the right knee to 90 degrees, so the shin is vertical and the thigh horizontal.
3. Extend the left leg out behind you.
4. Straighten the knee as much as possible and invert the left foot to sustain the little toe on the floor. Use your hands for balance.
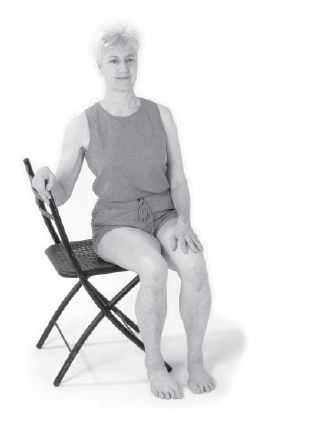
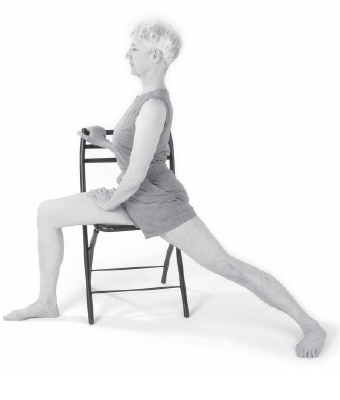
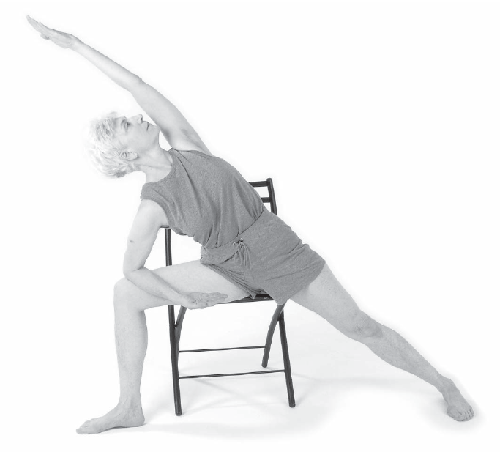
5. Incline your torso forward to the right, and lean on your right thigh with your right forearm. Raise your left arm over your head behind your ear, making as straight a line as possible from the back of the left hand to the outside of the left foot. Press the right elbow into the inside of the right thigh. Press the thigh forward against the elbow. This will help to revolve the right chest forward and raise the left shoulder.
6. Breathe smoothly and symmetrically for 10-20 seconds.
7. Then reverse the sequence, sit on the chair with the left buttock and thigh, and repeat the pose.
Intermediate Utthita Parsvakonasana
1. Stand facing a wall with feet 4-5 feet apart, the right foot parallel to the wall and 5-6 inches away from it.
2. Turn the left foot inward 30 degrees. Raise the arms to horizontal.
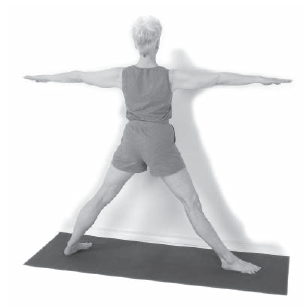
3. Breathe calmly for 20-30 seconds, then descend, retaining the straight left leg, but bending the right knee to 90 degrees, or as far down as your muscular strength allows.
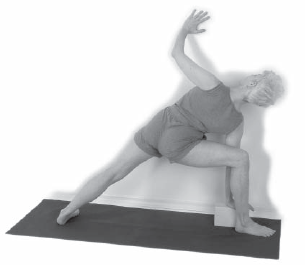
4. Place your right palm parallel to the right foot between it and the wall, with forearm parallel to the right calf. Press against the wall with your left hand, revolving the torso as much as possible.
5. Stay in the position for 10-20 seconds at first, gradually working up to 1 minute.
6. Repeat the pose on the other side.
7. This pose may also be done with your back to the wall if balance is a greater problem than mobility.
For Parivrtta Parsvakonasana, proceed through the first three directions, as in Utthita Parsvakonasana.Then revolve the trunk to the right while exhaling.
1. Bring the left shoulder over the outside of the right knee, and the left hand to the floor beside the fifth toe, left hand parallel to the right foot, left forearm parallel to the right shin.
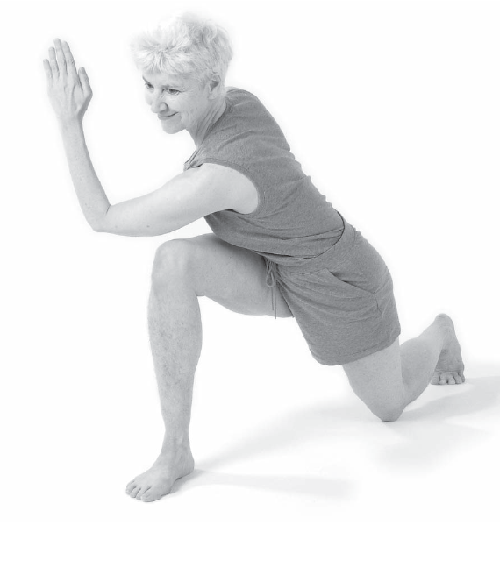
2. The right arm extends in a line with the left leg, and in the same plane as the right thigh, knee, and right lateral torso.
3. Use the left arm as a lever, the outer right knee as a fulcrum to move the chest, not the shoulder, to the right of the right leg.
7. Breathe calmly, without force and as symmetrically as possible for 10-20 seconds.
Here the fulcrum is the outside of the left arm, above the elbow, and the outside of the right knee. The opposition is quite natural, and working with it increases the twist of the torso strengthens both upper and lower extremities while improving just aboiut every major joint’s range of motion.
Entry-Level Parivritta Parsvakonasana
1. Straddle a card chair.[1]
2. Flex the right knee to 90 degrees, making the shin vertical and thigh as close to horizontal as the height of the chair allows.
3. Straighten the left knee behind you, turning the foot inward sufficiently to put some weight on the little toe side of the left foot.[2]
4. Distribute your weight to both feet equally and breathe calmly for 1 minute.
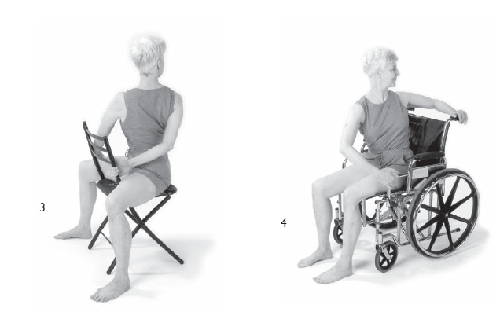
5. Then reach the left hand over to the left side of the chair back, and the right hand behind until it rests on the right chair support[3]
6. The positions of the arms and legs may be modified for wheelchair use and according to patients’ capacities.[4]
7. Use the left hand to revolve and incline the torso to the right. If possible, move the left hand onto the outside of the right thigh just above the knee and apply twisting pressure from there. The idea is to move the left chest past the chair back, and the left shoulder is just the right means to accomplish this. Paradoxical as it may seem, it is best to keep the shoulder blade close to the spine, and fixed there. When you pull or push to the right with your left hand, the shoulder blade does not move relative to the chest, rather, the left side of the chest moves to the right, and naturally, the shoulder blade moves with it. The left shoulder will move, of course, but the focus is on the left chest.
8. Once in the position, breathe slowly and carefully for 10-20 seconds.
9. Then release the left arm, sit vertically again, and repeat the pose by flexing the left knee and straightening the right.
Intermediate Parivritta Parsvakonasana
1. Stand facing a wall with feet 4-5 feet apart, the right foot parallel to the wall and 5-6 inches away from it. Appropriately place a block, if needed.
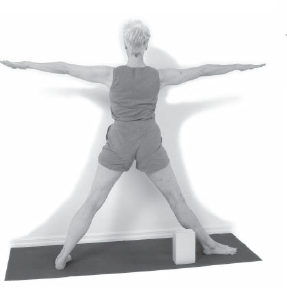
2. Turn the left foot inward 30 degrees. Raise the arms to horizontal.
3. Breathe calmly for 20-30 seconds, then descend, retaining an entirely straight left leg while the right knee bends to 90 degrees. Keep the little toe side of the left foot on the floor.
4. Take a quiet breath.
5. With exhalation revolve the trunk to the right, bringing the left shoulder over the outside of the right knee, sliding the left arm between the head and the knee.
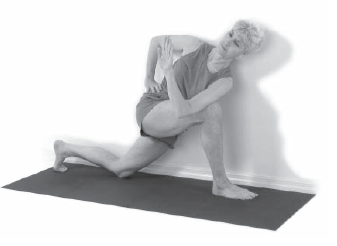
6. Then bring the left hand down, fingers pointing backward, onto the floor, left forearm close to parallel to the right shin.
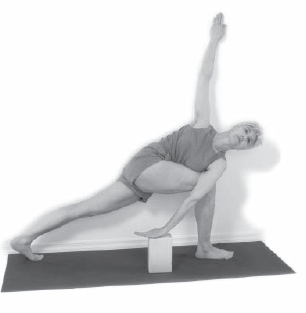
7. The right arm extends collinear with the right leg, in the same plane as the right torso.
8. Use the left arm as a lever, the outer right knee as a fulcrum to move the chest, not the shoulder, to the right of the right leg.
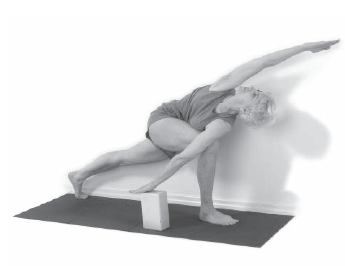
9. Breathe calmly and without force for 10-20 seconds.
10. Then release the left arm, return the torso to vertical, and repeat the pose with left leg bent to 90 degrees and right knee straight.
Alternative Parivritta Parsvakonasana
1. An alternate set begins with your back to the wall, with feet 4-5 feet apart.
2. Orient the left foot parallel to the wall. Turn the right foot 30 degrees inward.
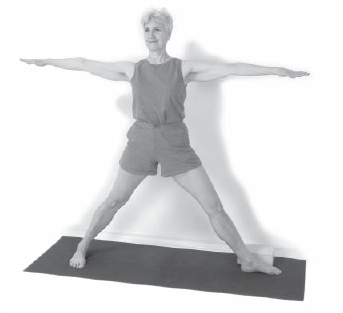
3. Bend the left knee 90 degrees. Lower the right knee to the floor while twisting toward the wall. This is the entry-level pose.
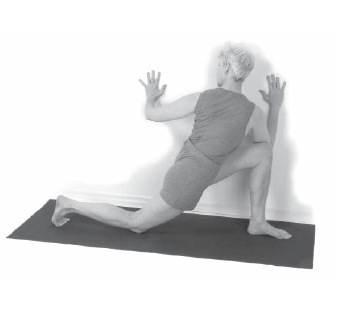
4. Place your right palm on the floor between your left foot and the wall. The back of your armpit should contact the outer left knee. Straighten the right knee.
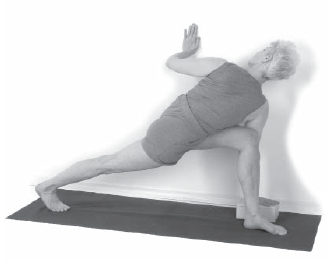
5. Press your left hand against the wall. Use it and your right shoulder to twist still further. Every part from the right ankle upward will revolve together.
6. Raise your left arm toward vertical, attempting to extend the entire left body in a straight line from outer ankle to fingertips. You may use the wall as shown. This is the intermediate pose.
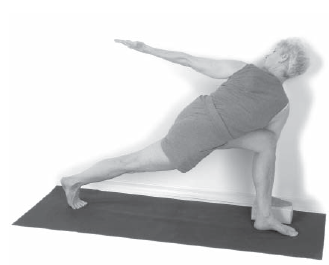
7. Stay in the pose 20-30 seconds.
8. Exit by bringing the right knee to the floor while sliding the right shoulder and arm away from the left knee.
9. Now repeat on the other side.
The Warrior Poses
Both poses start the same way.
1. From Tadasana, raise both arms laterally to vertical.
2. Step legs to 4-5 feet apart. Maintain a straightened spine from the sacrum to the base of the skull.
3. Exhale, turn your torso toward the left leg, and bring its foot 90 degrees to the right, while the right foot turns 30 degrees toward the left also. Your navel should point in the direction of the left great toe.[1]
4. During a few calm breaths, balance weight evenly between feet, and within each foot.
5. Bend the left knee to 90 degrees while exhaling.[2]
6. Still holding the spine erect, inhale and steady your hands in line with the entire spine.
7. Retain the straightened right knee and breathe calmly for 10-20 seconds.
8. Then straighten the left knee as the head returns forward, return to facing forward, lower the arms and breathe quietly for 1 minute.
9. Then reverse the legs. This is Virabhadrasana I.
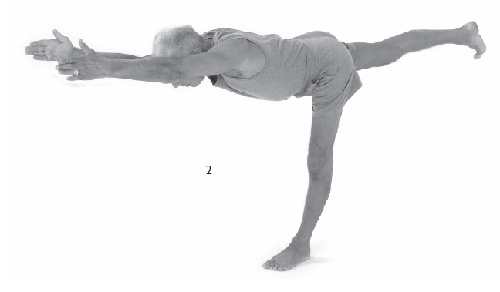
Virabhadrasana III
To perform Virabhadrasana III, continue through direction 7 in the last pose, but only hold it for 10 seconds.
10. Then draw the arms and torso forward at an angle of 45 degrees.[1]
11. Inhale and launch upward onto the left leg, bringing the right leg and buttock to horizontal and extending the arms fully horizontally as well. Lift, don’t drag the right leg.[2]
At this point Mr. Iyengar suggests that one stretch “as if two persons were pulling you from either end.”
12. Breathe calmly in the pose for 10-20 seconds, then descend in the opposite order and do the same steps with the opposite leg.
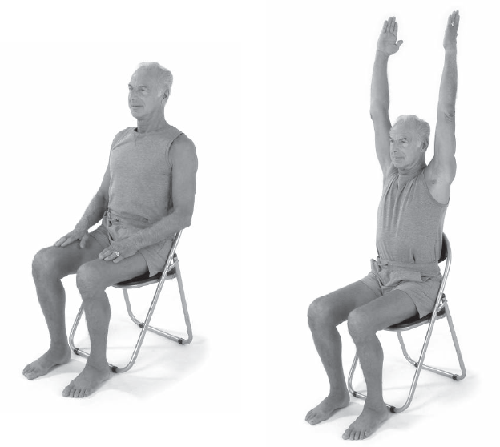
1. Sit well within a wheelchair or chair, balancing weight evenly between the ischial tuberosities.
2. Breathe in and straighten the spine from the coccyx to the top of the skull, making the torso as long as possible and looking straight ahead. Pull in the abdomen and open the chest.
3. Calmly take two breaths. Balance ischial weight-bearing once again.
4. Now inhale and bring the arms out to the sides and upward, elbows straight, until the palms and arms are parallel.
5. Breathe calmly for 10-20 seconds, then slowly return the arms to the armrests (if there are armrests).
1. Sit cross-wise on the seat of an armless chair with the left buttock and thigh.
2. Flex the left knee to 90 degrees, while placing the whole sole of the straightened right leg on the floor behind, on the other side of the chair, or straighten the right knee as much as possible (pictured).
3. Straighten the entire spine from its support at the left ischial tuberosity to the top of the head. Use your left hand for balance.
4. Breathe calmly for 1 minute.
5. Now bring the head back as far as possible, pulling in the abdomen and opening the chest. Straighten and slowly raise the right arm laterally, turning the palm until it is directly overhead and facing to the left.
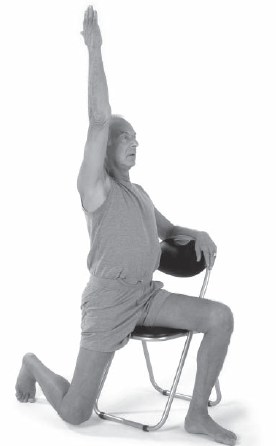
6. If balance permits, attempt to elevate the left arm in its mirror image, until the two palms are parallel. Keep the right little toe on the floor; put an equal and maximal amount of weight on each foot. Align the navel with the left thigh. In any case, stretch the torso and arms up as much as possible, without disturbing the breathing for 10-20 seconds.
Entry-Level Virabhadrasana III
1. Place a chair in front of your chair, as shown.
2. Follow entry level Virabhadrasana I through direction 4, the point at which the hands are parallel overhead and the head is extended backwards until the face is as close to horizontal as possible.
3. Calmly inhale, then exhale, bringing the entire torso forward as exhalation proceeds until the torso is as close to the thighs as possible, and the arms remaining fully extended. Move the arms and torso together, as though they were a single unjointed piece. Hold them as close as possible to a straight line.
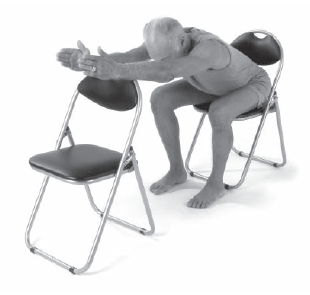
4. Breathe quietly for 10–20 seconds.
5. Then reverse these steps and return to Virabhadrasana I.
6. Then reverse the steps to leave this pose, and after a short rest, do the other side.
Intermediate Virabhadrasana III
1. Arrange two armless chairs facing in the same direction, approximately a body-length apart.
2. Stand midway between the two chairs in Tadasana facing the back of the foremost chair.
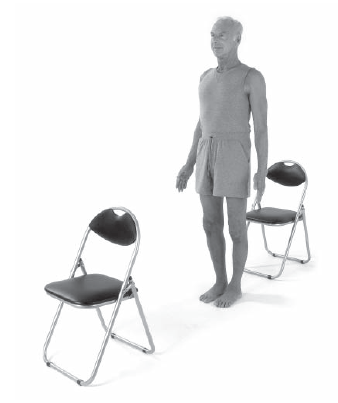
3. Take a calm breath.
4. Raise both arms laterally, palms parallel overhead, navel pointing toward the forward chair.
5. Step forward with the left leg and back with the right leg until your feet are 4-5 feet apart.
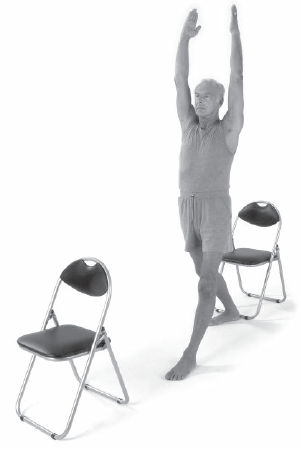
6. Maintaining a straightened spine from the sacrum to the base of the skull, turn the right foot 30 degrees toward the forward chair.
7. During a few calm breaths, balance weight evenly between feet, and within each foot.
8. Now bend the left knee to 90 degrees while exhaling.
9. Still holding the spine erect, inhale and bring the head back as far as possible, biceps close to the middle part of the jaw bone.
10. Retain the straightened right knee, keeping the little-toe side of the left foot on the floor and breathe calmly for 10-seconds. This is Virabhadrasana I.
11. Now tilt the arms and torso forward as a unit until they are inclined 45 degrees.
12. Bring your weight forward onto the left leg and straighten that leg, raising the right leg onto the chair placed behind, and resting the little finger sides of the arms on the back of the chair directly in front of you.
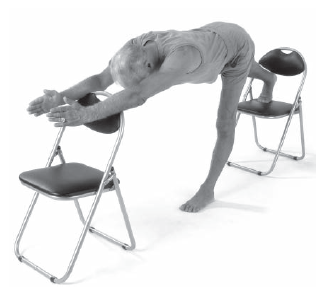
13. Stretch the back of the right leg and the entire back of the body including the wrists and thumbs maximally while breathing calmly for 10-20 seconds.
14. To deconstruct the pose, first place the right foot back on the floor, then return to Virabhadrasana I, then bringing the arms down.
15. Rest for 1-2 minutes before beginning again with the right leg forward.