Yoga acclimates muscle groups to working together. Coordination and balance have a lot in common. Good balance in motion requires coordination. Coordination relates one muscle group to another, balance relates the entire person to his or her environment. The person doing one of Mr. Iyengar’s standing poses gets used to balancing hamstrings with quadriceps; iliopsoas and adductors with glutei; maximally stretching the latissimus dorsi on one side and simultaneously contracting its contra-lateral partner. This is coordination.
At the same time he or she is equilibrating anterior and posterior deltoid groups, and all while maintaining forward-backward and left-right balance. This is what keeps us from falling. The stretching activates the complex check-system of the stretch reflex, the agonist-antagonist balance activates that reflex. Both of these serve, at the spinal cord level, to reduce spasticity. Both of these are integrated into the titration of one group’s strength with all others’, (coordination) and all groups’ efforts against gravity and other forms of acceleration (balance).
Increasing range of motion is critical to mobility; reducing spasticity is a sine qua non for voluntary and intentional action. Holding the same pose for any length of time takes (and therefore builds) a safe and estimable degree of strength and endurance as well.
But unless these groups of muscles can work together in mutually supportive and jointly sensitive ways, each adjusting to the others, and then adjusting to the others’ response to their adjustment, a recursive and continuous flow that still manages to focus on the goal of the action—unless they can do that—there is virtually no point in all our work—no point in muscle contractions at all!
It seems logical to start with our capacity to adjust muscles to each other’s efforts, coordination. After that we’ll examine how they attain one common goal: balance.
These asana combine several different extreme positions and balance skills. Because of this they also build strength, endurance and grace in movement. It has been said that we sculpt our movements out of larger, often instinctual patterns by inhibiting (and thereby eliminating) unwanted movements or parts of the pattern. If so, then these poses may be seen as the sculptor’s tools, helping one to leave parts of movements out of the picture, and only doing exactly what one intends.
Coordination is largely a matter of balancing the mixed intensity of contraction of some muscles with the varying degrees of relaxation of other muscles. As such it is the basis of good balance, ergonomic action and smooth movement, and the antithesis of spasticity. In particular acts, such as throwing or jumping, it can be practiced and learned. Yoga instills the general principles of coordination in the course of practicing some nearly universal examples of the differential contraction and relaxation of key muscle groups.
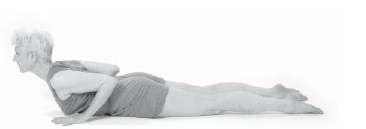
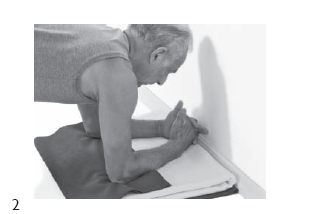
Shoulder Pressure Pose
1. Sit on the floor.[1]
2. Starting with the legs two feet apart, one foot on the floor, the other leg kneeling, slide arms behind the bent knees, palms on the floor, fingers facing forward. The palms are behind and further apart than the feet.[2]
3. Take a few slow, even breaths.
4. Bring your weight backward onto the arms, resting the backs of the thighs on the arms behind the shoulders.[3]
5. Raise your thighs and pelvis by straightening the elbows somewhat.
6. Breathe calmly for 10-20 seconds, then transfer enough weight onto the shoulders that first the heels, then the toes can be raised off the floor.
7. Straighten the arms as much as possible, interlock the ankles, straighten the spine and lift the head.[4]
8. Relax the head and neck, and breathe evenly for 10-20 seconds.
9. Then release the legs one at a time, reverse the ankles for another 10 second.
10. Reverse the movement sequence to return to sitting on the floor.
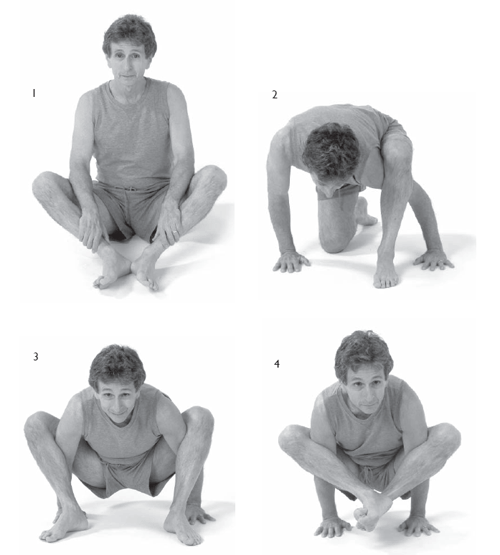
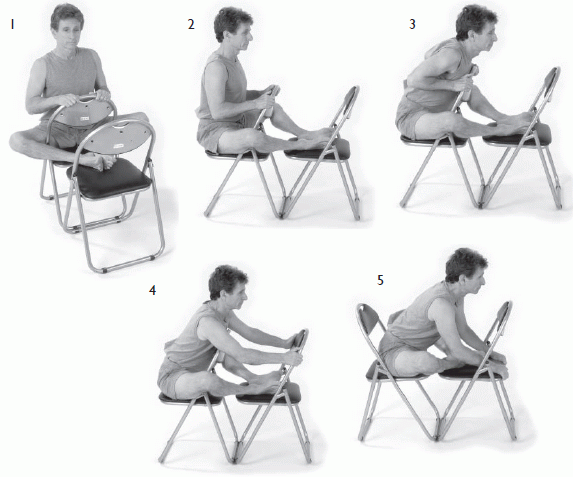
Entry-Level Bhujapidasana
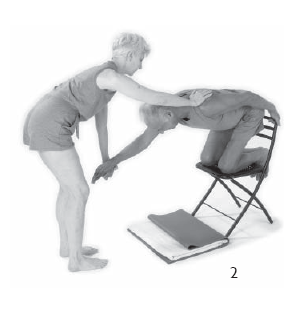
1. Line up two card chairs front to back.
2. Straddling the foremost chair, move close to the chair directly behind it.[1]
3. Bring the right heel onto the seat of the hindmost chair, then the left heel. Rest the sides of the feet, in contact with each other, on the chair seat.[2]
4. Smoothly inhale and grasp the seat back of the foremost chair.
5. With exhalation pull the chest toward the chair back, arms horizontal.[3]
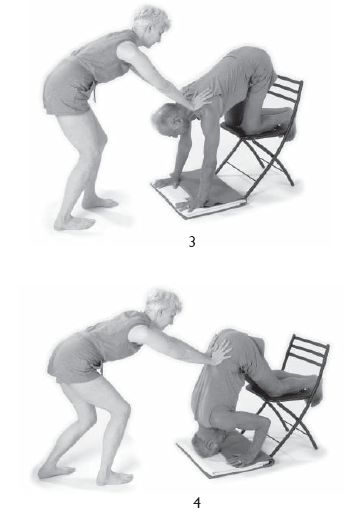
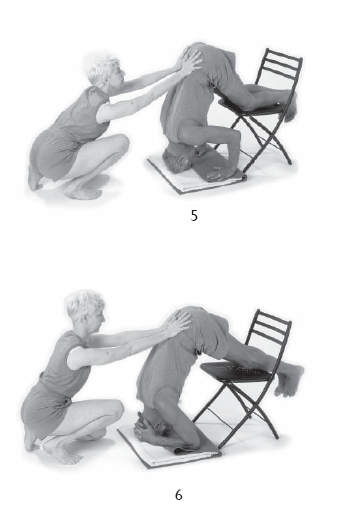
6. When this pose is no longer challenging, hold the back of the hindmost chair.[4]
7. To progress further yet, put both hands on the seat beside and behind the thighs, and lift the body upward.
8. Turn the chairs so that they face each other, pulling forward on the back of the opposite chair’s seat to flex the torso.[5]
9. When this is no longer a challenge, go to the intermediate pose.
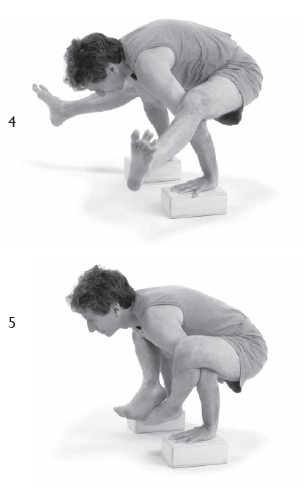
Intermediate-Level Bhujapidasana
1. Use two blocks approximately 4 inches high.[1]
2. Bring the knees out and the feet forward and toward each other.
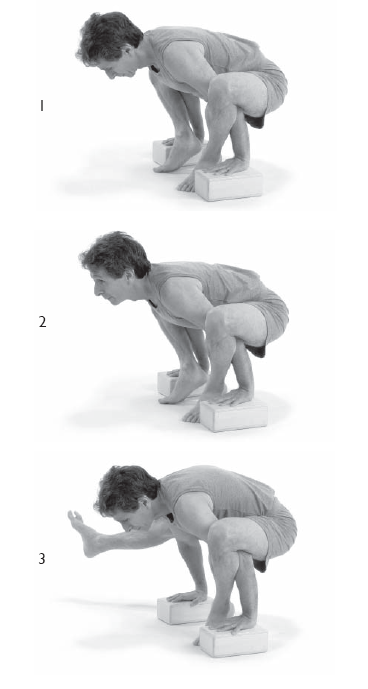
3. Place the arms at the inside of the knees, fingers facing forward, elbows bent 30 degrees.[2]
4. If the blocks are too low, it will prompt falling forward. If they are too high, the next part will be impossible. Put more and more weight on the palms, lifting first one foot and then the other.[3]
5. If it is impossible to lift both feet, place only the fingertips on the blocks and try again. If this does not accomplish the objective, then raise feet one at a time, breathing calmly for 10 seconds with each foot.[4]
6. Otherwise do this once with both feet aloft for 10-20 seconds, interlocking ankles.[5]
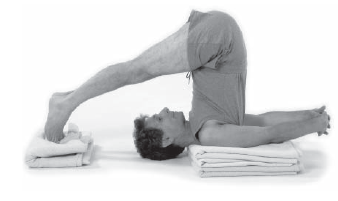
Shoulder Stand/The Plow
1. Use blankets as pictured.
2. After 1 minute slowly breathing in Savasana, place the palms at the kidneys and bend both knees as far as possible toward the chest.
3. Pressing forward with both hands, raise the torso and both legs to vertical, bending the elbows and supporting the trunk with the hands on the kidney region of the back.
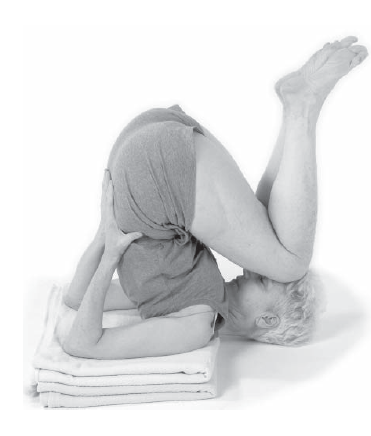
4. Only the head, the neck and the apex of the shoulders should be in contact with the floor. Fix the eyes on the toes and breath quietly for 30 seconds to 1 minute.
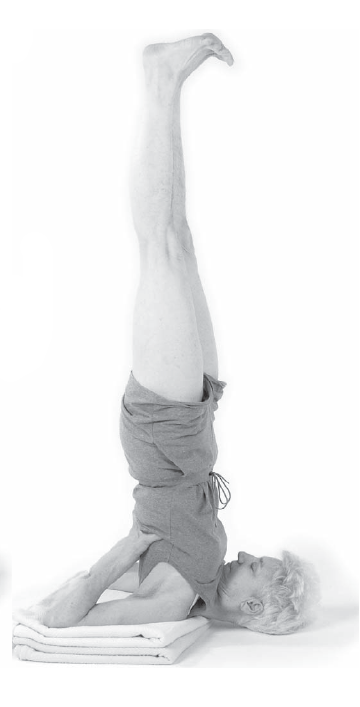
Begin with Sarvangasana, through direction 3 on the previous page.
4. Extend your arms behind you, fingers interdigitated. Exhale and bring the straight legs forward over your head and down to the floor, making an acute angle with the torso.
5. Raise up the ischial bones, arching the lumbar and thoracic spine slightly.
6. Open the chest and breathe calmly for 10-20 seconds.
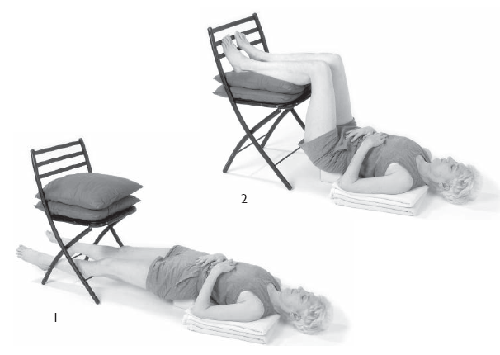
Entry-Level Sarvangasana
1. Lie on your back beneath a card chair.
2. Breathe softly for 30 seconds.
3. Bend both knees. One by one lift the calves onto the card chair.
4. You have the option to raise the arms up with inhalation and lay them down in parallel above the head, palms up.
6. Exhale and breathe quietly for 1-2 minutes.
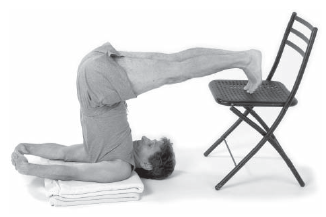
For individuals significantly challenged by this posture, Vitari Karani is a suitable lead-in. See the inclined pose in Chapter 7.
1. Assume Savasana diagonally beside a card chair.

2. Press palms down, swing the torso and “climb up” the seat of the chair with both legs while gripping the back legs of the chair from underneath.
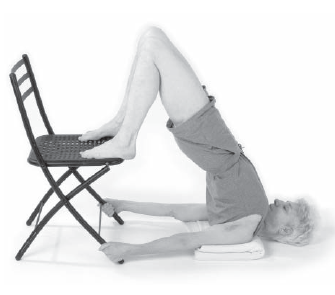
3. Straighten the legs and torso vertically. Pull the chair toward you and use the edge of the seat of the card chair to hold the sacrum in its forward position.
4. Transfer your weight carefully onto the head and neck and apex of the shoulders.
5. Lift the heels and pelvis upward, rest the eyes on the toes, the only part of the feet that should be visible, and breathe quietly for 10-20 seconds.
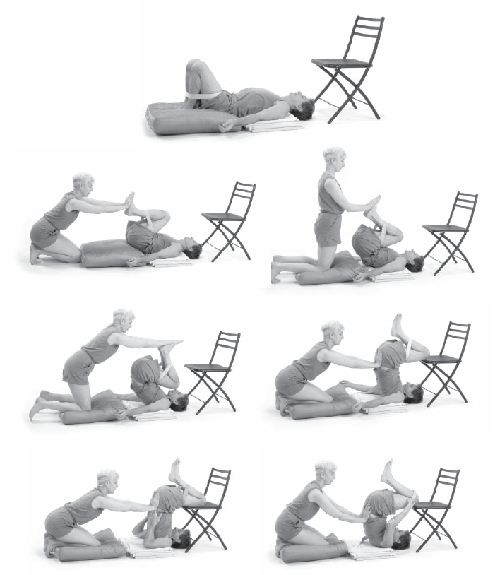
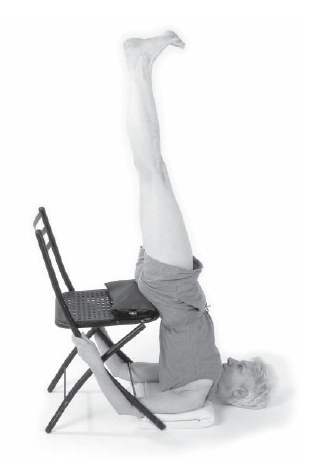
Entry-Level Halasana
Another surprisingly simple way to perform the pose uses a strap.See the series of photographs on the facing page, which include doing this pose with a partner.
1. Lie down in savasana, head toward a card chair.
2. Breathe quietly for 30 seconds.
3. Turn the palms down.
4. Bending the knees and simultaneously pressing downward on the floor with your forearms, bring the thighs over your head as the lumbar spine comes off the floor. You may need a helper.
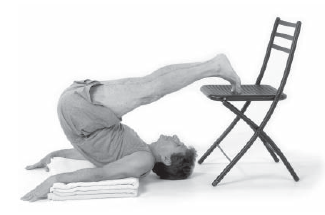
5. Rest the feet or shins on the seat of the chair. A helper, blankets and/or cushions may be needed to sustain the pose.
6. Straighten the knees to tolerance.
7. Breathe evenly for 1-2 minutes, attempting to make the legs straighter and to bring the torso up further in a mild but sustained and coordinated effort.
Dog Poses
....................................................................
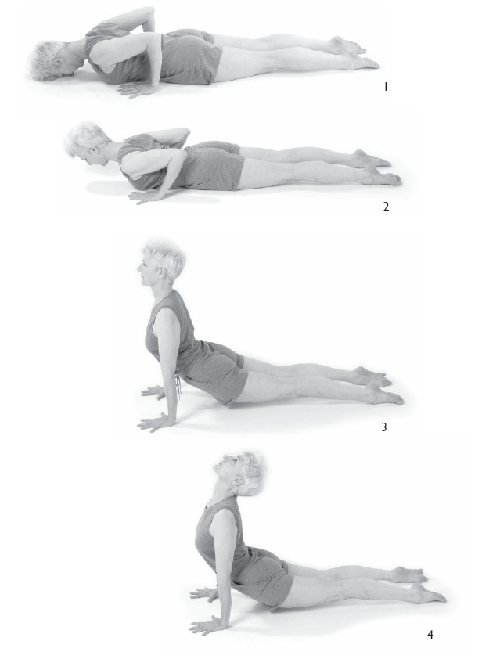
Upward-Facing Dog
1. Lie in prone position with toes pointed and feet one foot apart.[1]
2. Elbows bent, palms on the floor at shoulder-level, with fingers pointing toward the head, inhale, raising up first the head, the throat,[2] then the chest, abdomen, pelvis and legs, bringing the head and chest as far back as possible.
3. Only the palms and dorsal feet are on the floor, toes still pointed back.[3] The legs are as straight as possible; the entire body including the buttocks and the lumbar, thoracic and cervical spine arch backward as far as possible.[4]
4. Breathe deeply and slowly for 10-20 seconds.
5. Now return to prone position, hands feet and head as they were at the start of Urdhva Mukha Svanasana in step 1.
6. Take two breaths.
7. Pressing forward on the floor with both hands and straightening the elbows and wrists and forward raise the hips and chest ever farther from the floor.
8. Straighten the backs of the legs, toes still parallel, but now pointed in the same direction as the fingers, heels on the floor, knees and thoracic spine maximally extended, shoulders retracted, the top of the head toward or near the floor.
9. Breathe deeply, calmly, and slowly for 1 minute.
10. First lift the head, then carefully lower your head and chest and abdomen to return to the prone position on the floor.
Entry-Level Urdhva Mukha Svanasana
1. Lie in prone position with toes pointed and feet one foot apart.
2. Flex the left arm, palm down, and press the floor, rolling longitudinally into the supine position.
3. Press downward with the palms, pulling the shoulder blades back, together and toward the pelvis.
4. Relax the abdominal muscles, but straighten the knees and tighten the buttocks as much as possible.
5. Breathe quietly, being careful to balance the pressure on the two hands and the dorsal parts of both feet.
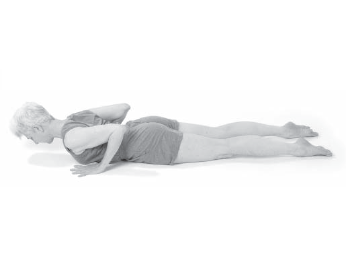
Reverse Downward-Facing Dog
1. Carefully return to the relaxed prone position.
2. Flex the left arm, palm down, and press the floor, rolling longitudinally into the supine position.
3. Now raise the arms overhead, so that both are parallel, palms upward, and stretch maximally from the waist to the fingertips.

4. Breathe in a controlled, even manner for 1 minute.
5. Now flex both knees, feet still on the floor, and lift one and then the other, or both of them, as possible, straightening the leg(s) and bringing the toes down (stretching the Achilles tendons) in parallel at maximal elevation of the heels.
6. Breathe quietly for 10-20 seconds.
7. Then flex the knees, return the feet, then the backs of the legs to the floor, relax the shoulders and remain supine for another minute resting.
8. Finally bend the left knee, pressing the foot on the floor to roll longitudinally to the right, back to prone position.
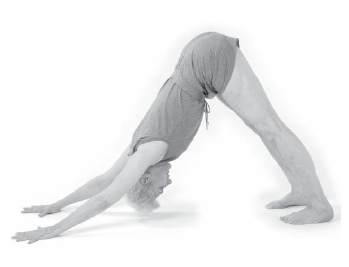
Intermediate-Level Urdhva Mukha and Adho Mukha Svanasana
1. Lie in prone position with toes pointed and feet one foot apart.
2. Elbows bent, palms on the floor at waist-level, with fingers pointing toward the head, inhale slowly and evenly, raising up first the head, then the neck, then the throat, then the chest.
3. Retain the navel’s contact with the floor at first as you arch the neck and chest back as far as possible.
4. Press the palms downward. Pull the shoulder blades back and raise your torso.
5. Relax the abdominal muscles, but straighten the knees and tighten the buttocks as much as possible.
6. Breathe quietly, carefully balance the pressure of the breath on the abdomen, and weight on the two hands and the dorsal parts of both feet.
7. Return to prone position by gently lowering the chest, throat, neck and head. Relax the buttocks and leg muscles.
A Standing Intermediate for Both Dog Poses
1. Take one quiet breath, then rise. Stand two feet from a wall or door, facing it. Feet should be parallel and 8-18 inches apart.
2. Place your palms on the wall above your head, fingers pointing upward, making a 45 degree angle between the wall and the wrists.[1]
3. Balance your weight evenly on the two feet, and maintain that balance while you draw the hips and buttocks backwards, and lean forward, approaching the wall with your armpits, lessening the angle between the wrists and the wall to a minimum.[2]
4. Equalize pressure on the two hands. Bring the shoulder blades back, together, and down, stretching the entire front of the chest and abdomen from the throat to the pubic bone. Emphasize arching the thoracic spine, not the lumbar spine, though both are concave in this position.
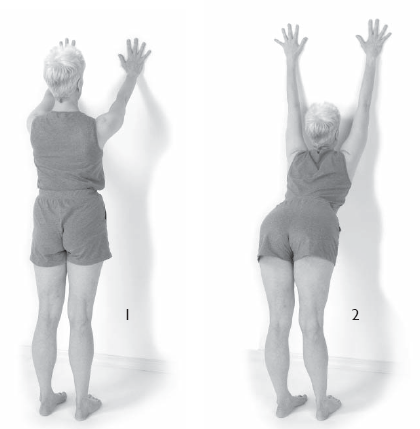
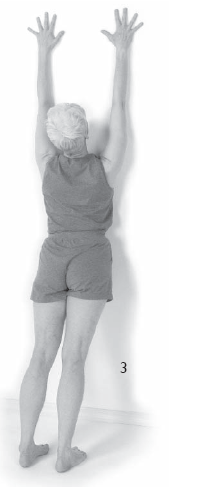
5. Breathe calmly and symmetrically for up to 1 minute.
6. Then smoothly reduce the pressure on your hands and return the shoulder blades to their resting position. Bring the head and chest back to vertical and pull the hips and buttocks toward the Tadasana position.[3]
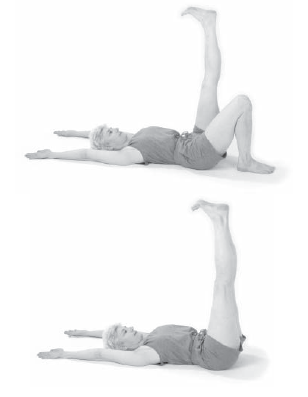
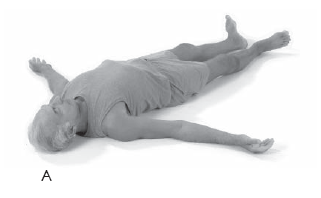
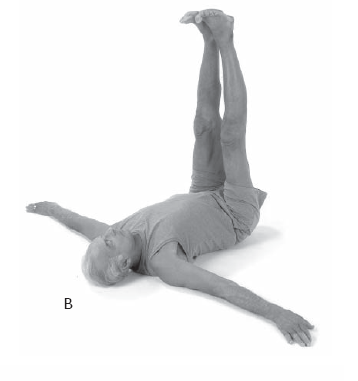
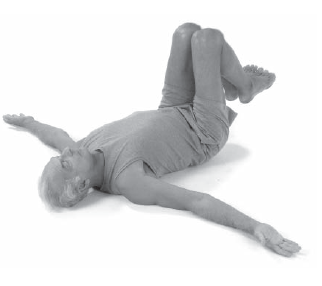
Abdominal Turning Pose
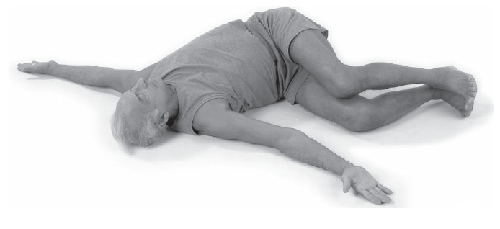
1. Lying in Savasana, abduct the arms 90 degrees, palms upward.[A]
2. With toes pointed, knees straight and ankles in contact, raise both legs together to vertical. In lower back pain, both knees can be bent in raising, then the knees straightened when the thighs are vertical.
3. Make your soles horizontal.[B]
4. Take a calm breath and turn palms upward.
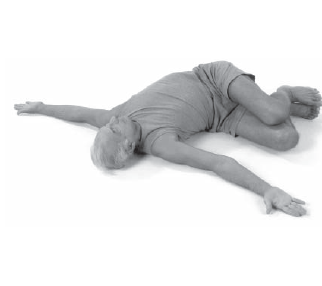
5. First move your hips slightly to the left as you inhale.
6. With exhalation lower both legs to the right, so that they are in contact both with each other and the floor, parallel to the right arm. Press downward with the right hand to retain contact of the left shoulder with the floor also. Keep as much of the thoracic and upper lumbar spine as possible in contact with the floor.[C]
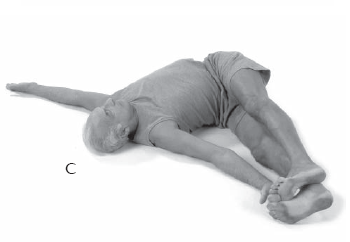
7. Breathe calmly for up to 1 minute.
8. Then, pressing with the right hand and forearm, raise the legs back to vertical.
9. Take a breath.
10. With exhalation, perform the same lowering on the left, keeping floor contact for the right shoulder and thoracic spine with left hand pressure.
11. After the legs are on the floor and parallel to the left hand, breathe calmly and symmetrically for 1 minute.
12. Then raise the legs to vertical again.
13. Bend your knees and lower your legs to the floor.
14. Return your arms to your sides, return to Savasana.
Entry-Level Jathara Parivartanasana
1. Lying in Savasana, abduct the arms 90 degrees, palms upward.
2. With toes pointed, knees bent and ankles in contact, raise both legs together to vertical. Take a calm breath.
3. Tilt your pelvis somewhat to the left.
4. Lower both legs to the right as you exhale. The legs should be in contact both with each other and the floor, with cushions that have been properly placed, in a position as close to parallel to the right arm as possible.
5. Press downward with the right hand to press the left shoulder down in contact with the floor, or as close to it as possible. Keep as much of the thoracic and lumbar spine as possible in contact with the floor.
6. Breathe calmly for 10-20 seconds.
7. Then, pressing with the right hand and forearm, raise the bent legs back to vertical.
8. Take a breath.
9. After tilting the hips somewhat to the right, exhale as you lower the legs to the left, keeping floor contact for the right shoulder and thoracic and lumbar spine with left hand pressure.
10. After the legs are on the floor (or cushions) and parallel to the left hand, breathe calmly and symmetrically for 10-20 seconds.
11. Then raise the bent legs to vertical again, and slowly lower them. When the soles are resting on the floor, slide the legs back until your knees are straight.
12. Return the arms to the sides.
13. Breathe calmly in Savasana for 20-30 seconds.
Intermediate Jathara Parivartanasana
1. Lying in Savasana, abduct the arms 90 degrees, palms upward.
2. With toes pointed, knees bent and ankles in contact, raise both legs together to vertical.
3. Take a calm breath.
4. Then tilt the hips somewhat to the left.
5. With exhalation lower both legs to the right, so that they are in contact both with each other and the floor, thighs parallel to the right arm. See picture on page 228.
6. Extend or flex the knees according to the strength and flexibility of the practitioner’s abdominal musculature.
Note: As practice continues over weeks and months, gradually straighten the knees, beginning with the sideward lowering phase, then in raising them from the side, and, if there is no back pain, later extend the knees in raising and lowering the legs from Savasana at the beginning of the pose, and back to it at the end.
7. Press downward with the right hand to keep the left shoulder in contact with the
floor also. Keep as much of the thoracic spine as possible in contact with the floor.
8. Breathe calmly for 1 minute.
9. Then, pressing with the right hand and forearm, raise the bent legs back to vertical. Take a breath.
10. After “cocking” the hips somewhat to the right, perform the same lowering on the left as you exhale, keeping floor contact for the right shoulder and thoracic spine with left hand pressure.
11. As with the right side, gradually extend the knees as practice continues and strength allows.
12. After the legs are on the floor and parallel to the left hand, breathe calmly and symmetrically for 1 minute.
13. Raise the bent legs to vertical again.
14. Slowly lower them to the supine position.
15. When the soles are resting on the floor, slide the feet back until the knees are straight, return the arms to the sides, and remain there.
16. Breathe calmly in Savasana for 20-30 seconds.
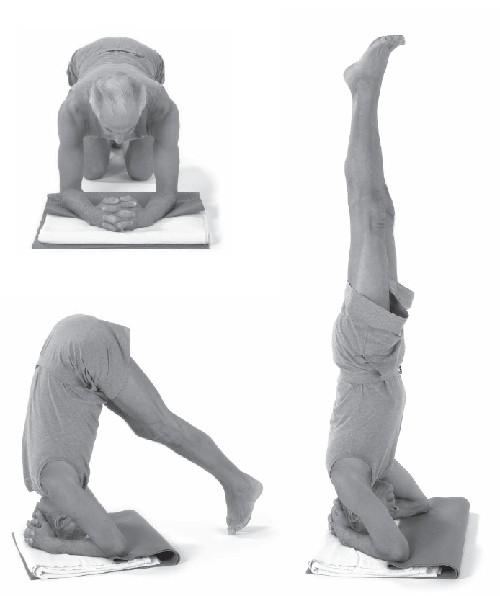
1. Kneel near a folded blanket.
2. Clasp the hands, interlocking the fingers, making an equilateral triangle with the clasped hands and two elbows as vertices. Keep the heels of the hands close together and wrists vertical throughout the pose.
3. Place the very top of the head in the center of the triangle formed by the forearms, straighten the knees, and walk in until your weight is predominantly on the head and forearms.
4. Breathe calmly for 20 seconds, and on inhalation, raise the straight legs together to vertical. Retract and raise the shoulders, but otherwise, all the weight should be supported by the top of the skull. Point the toes, narrow the body, pulling in the stomach, to avoid arching the back. Open the chest and extend the hips.
5. Resist the fear of falling backward. The fear promotes a tendency to keep the hips flexed and bear too much weight at the elbows. If in fact one does fall backward, simply loosen the hand grip and curl your back to roll innocuously into a supine position. Assistance of another person is advised at first.
6. When beginning, remain in the pose for 10-20 seconds and increase gradually to 5-6 minutes over the next year. Periodic checks with a teacher are strongly advised: A person may go seriously awry without them.
7. Exit the pose by lowering the still-extended legs from the hips until the toes reach the floor. Then bend the knees to the floor. Undo the hands and place the palms on the floor beside the ears, as far apart as the shoulders. Raise your head.
8. Remain for 10-20 seconds before arising.
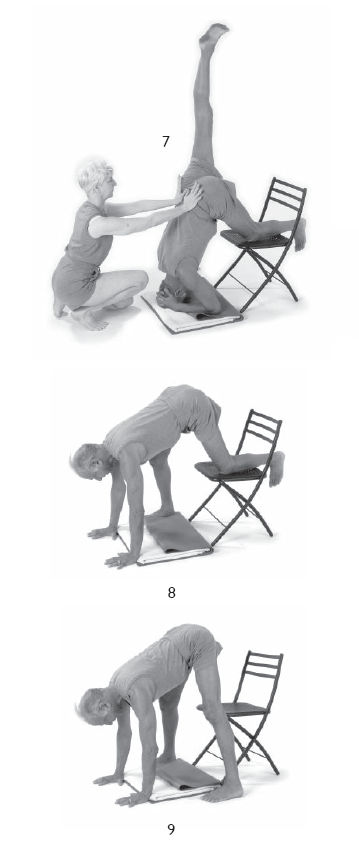
Entry-Level Sirsasana
1. Kneel on a low, stable plinth, chair or sofa, knees at the edge with a firm but soft and nonslipping surface on the floor below.[1]
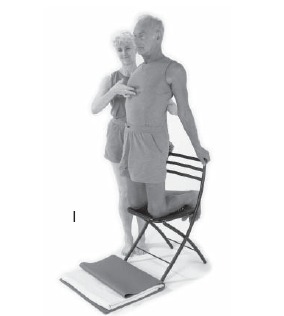
2. With the help of another person, place palms on the surface one by one.[2]
3. Breathe calmly for 20-30 seconds.
4. Gradually lower your head until the very top of it rests midway between the palms, slightly further from the furniture than the hands. Distribute the weight evenly between the hands, and also between the knees, shins and feet.[3,4]
5. Interlock hands, making an equilateral triangle with your head at the center. Straighten the legs as much as possible, the helper standing behind and restraining the thoracic spine to prevent rolling forward onto the floor.[5,6]
6. Point the toes. Raise the right leg as far toward vertical and as straight-kneed as possible.[7]
7. Breathe calmly for 10-20 seconds at first, gradually increasing beyond 3 minutes. Return the right leg to the plinth or furniture.
8. Repeat the procedure with the left leg, complete with breathing.
9. Then flex the knees and hips further, using assistance as necessary to return to kneeling on the plinth or couch. Follow this by placing the knees one by one on the floor, slowly moving your hands away from the furniture as you do so.[8,9]
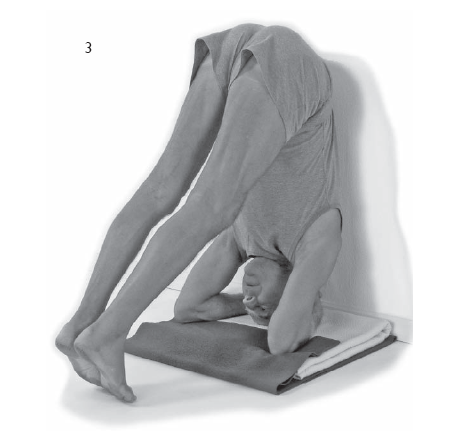
Intermediate-Level Sirsasana
1. Place a blanket in the corner of a room or against a wall.
2. Kneel near the blanket, shoulders four or five inches from the walls.
3. Clasp the hands, interlocking the fingers, making an equilateral triangle with the clasped hands and two elbows as vertices. The wrists should be 2-3 inches from the walls.[1]
4. Keep the fingers tightly interlocked and the heels of your hands close together throughout the pose.[2] Place the very top of the head in the center of the triangle formed by the forearms.
5. Straighten the knees and walk in until the weight is predominantly on the head and forearms.[3]
6. Breathe calmly for 20 seconds, and with the assistance of another person raise your legs on inhalation, knees bent to tolerance, to vertical. It is best to raise them together, but it is easier to do so one at a time.[4]
7. Balance yourself with the outside of the heels against the walls.
8. Retract and raise the shoulders. Most of your weight should be supported by the top of the skull.
9. Point the toes, bring the buttocks back close to the walls and pull in the stomach to avoid arching the back. Open the chest and extend the hips.[5]
10. Most importantly, keep on the top of your head. Balancing nearer the back of the head is dangerous for the neck; balancing too much toward the forehead is tiring and poor posture. You cannot fall backward here, so make use of your heels’ contact with the walls to develop a straight line from shoulder and lumbar spine through the hips and legs.