A well-made gantry can complement a yacht, while also positioning essential items where they can work most efficiently.
Gantries and goalposts
With so much extra equipment to carry, from solar panels to radars, the use of a gantry helps to place this equipment in its optimum position, while also keeping it safely out of the way. Gantries can range from a single mast arrangement to a custom-built ‘goalpost’ design.
The stern of a yacht, clear from the majority of the rigging, is the ideal place to erect a set of supports for all the equipment that helps with navigation and safety. Items such as radio aerials, radar scanners, GPS antennae, solar panels, dinghy hoists and wind generators can all be lifted clear of the deck to interact more efficiently with the sea and sky.
There are two main ways to make the best use of this space – a single pole gantry or a more complex ‘goalpost’ design.
A well-made gantry can complement a yacht, while also positioning essential items where they can work most efficiently.
Single pole gantry
A quick and practical method is to buy a retrofit pole (a ‘radar mast’), specifically designed for this task. Several companies can supply kits in lightweight aluminium alloy or GRP/carbon composite in a choice of finishes, with a cylindrical tube fitted with lugs for the attachment of collars, supports and ancillaries.
These poles are usually located on one corner of the stern, attached to a substantial base plate and well braced against the rolling motion of a boat at sea. They come in a range of popular lengths, with some being telescopic, so no cutting is required. Custom kits can also be provided. All the wiring enters the pole through pre-located waterproof glands, before running through another gland in the base plate and into the hull.
These proprietary systems are robust and very well made, with the option to add a whole range of modules such as a gimballed radar bracket, an articulated solar panel support or an outboard-lifting crane.
While not cheap, these single pole gantries are versatile in design, and enhance the functionality of a boat. A DIY solution would be to use a length of discarded tubular mast or spinnaker pole, or buy an extrusion from a manufacturer.
TIP
Some owners fit two gantry poles, one on each corner, linking them together with cross brace bars to support additional equipment such as rigid solar panels.
Planning a radar mast
Fitting a single radar mast is fairly straightforward. The biggest consideration is where the base plate will go, and whether you want it flush-mounted or through deck to a base plate fixed to the inside of the hull. The position of the cross braces also needs to be considered, as they mustn’t interfere with any of the rigging, such as the backstay, and must not prevent the opening of any hatches on the aft deck.
Ideally, the electronics should all be just above head height, and wind generators as high as possible for safety, but also to catch the best breeze. A simple mock-up using plastic wastepipe and lengths of timber will highlight any problems.
It is tempting to fit a wide array of electronic receivers and transmitters onto the same pole, but take care that these devices don’t interfere with each other. Powerful VHF transmissions can corrupt GPS signals, and radar output ideally needs to be above head height. Wind generators can also give off electromagnetic radiation that interferes with some signals. Get advice about which devices will cause problems in close proximity and how they should be placed, so you can consider alternative positions if there is a clash.
MAST IDEAS

A radar mast can be robustly braced into the corner of the pushpit rail and carry a wide range of accessories. This custom-made mast includes a wind generator and a crosstrees for GPS antenna.
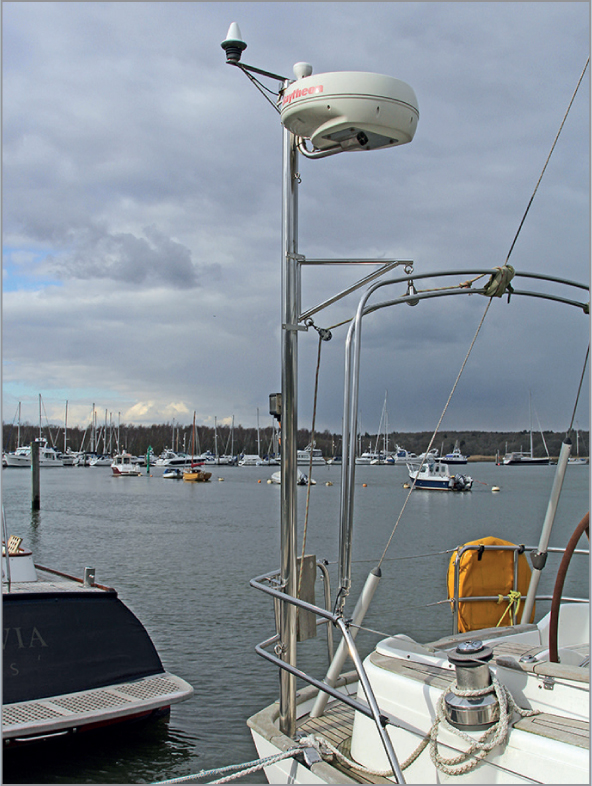
For greater strength, the radar mast base can go through the deck and attach to a plate in the bilge area. This will remove the need for cross braces. Note the outboard davits, and stern light raised above the deck.
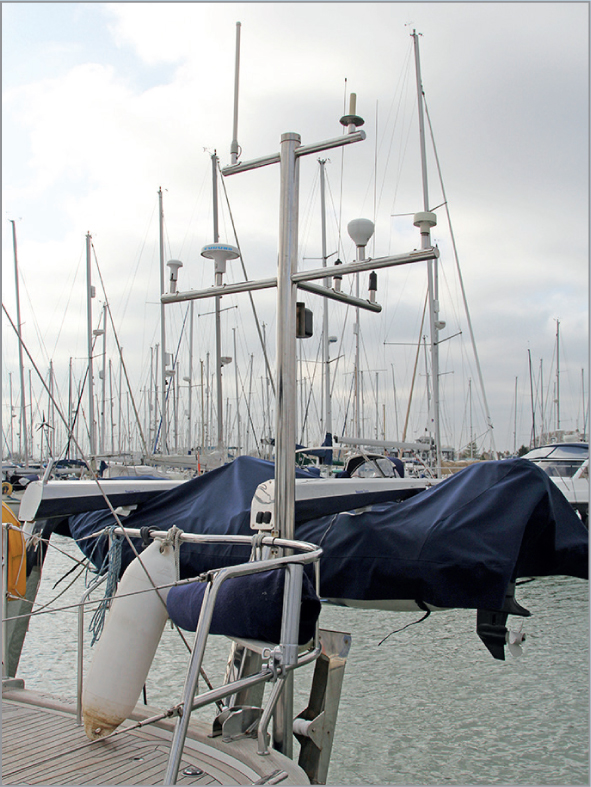
Shorter masts can simply be used for antennae. This one is mounted outboard, and the right-angled branches minimise interference. The polished stainless steel structure complements other deck fittings.

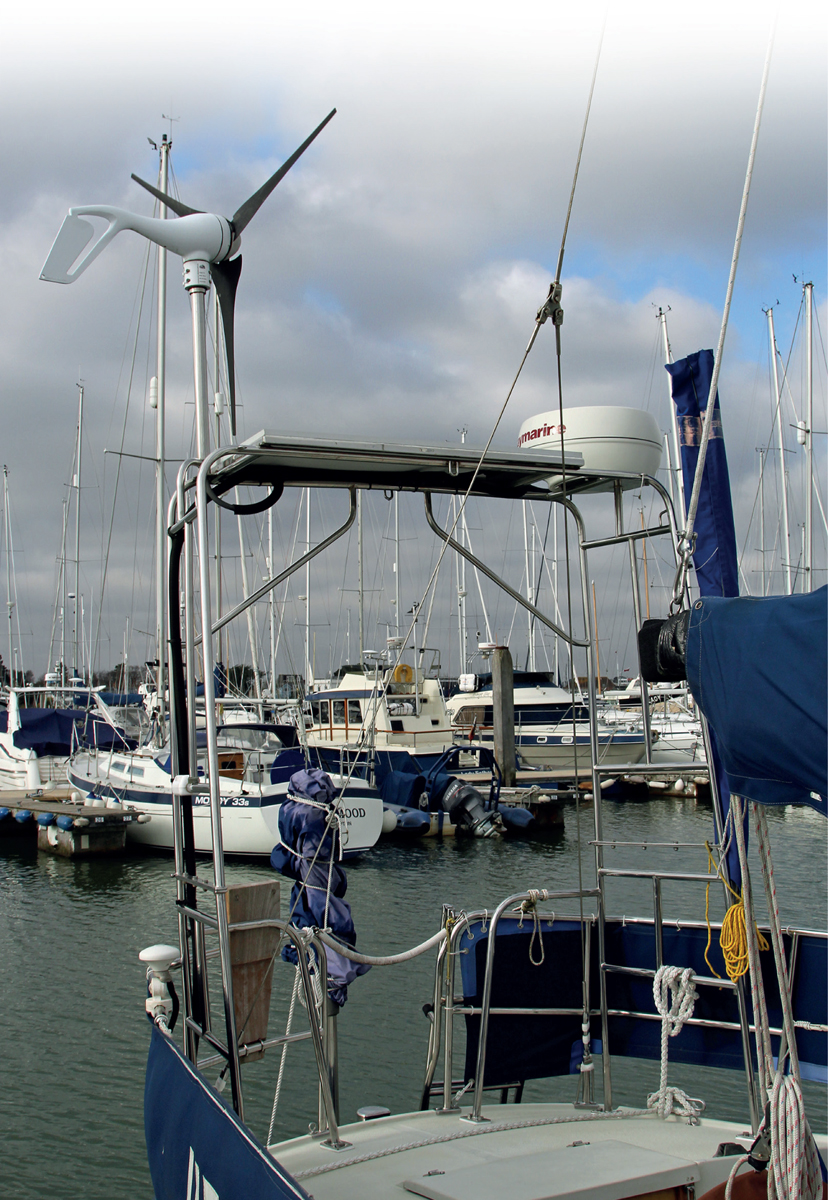
Two poles can be connected together to form a goalpost gantry. The wind generator is as high as possible, and the GPS aerials are above the radar transmitter. The whole framework supports a bathing platform.
The second method is to build a full-sized gantry, capable of taking a more substantial array of equipment, such as large, rigid solar panels. These ‘goalpost’ gantries are usually made from tubular stainless steel, but can also be made from carbon fibre, GRP/composite and even from laminated strips of wood.
By taking into account the lines of the hull and superstructure, the gantry can become a stylish addition to a cruising yacht, while also providing a robust and versatile platform for electronics and other useful hardware.
Planning a gantry
Before designing your gantry, you’ll need to ask yourself exactly what you want it to carry, bearing in mind that it will put significant weight quite high up and also add to the windage. The most critical part of any gantry system is the attachment points to the deck. These have to be able to support a substantial burden, while not interfering with any of the deck fittings or the boat’s interior structure.
The role of the pushpit rail also has to be considered. Some designs actually use the pushpit as part of the structure, whereas others will stand free of it.
The position of the backstay on a yacht will be a critical factor too, as will the reach of the boom, or the position of the mizzen mast on a ketch. This is why it is best to design your gantry when the yacht is fully rigged, so you can experiment.

Some gantries can become very substantial affairs, adding significantly to weight aloft. This French cruiser has created its own power station with angled solar panels and two powerful wind generators. Note also the two small davits.
Points to consider are:
 Any design should be able to keep radars and other antennae above head height, with as clear a view of sea and sky as possible.
The gantry shouldn’t impede anyone climbing on and off the boat over the stern.
Give consideration to weight, windage and cross bracing.
Can any wind-operated self-steering gear function without being blanketed? (This is why tubular stainless steel is often the preferred material, due to its low windage profile.)
Will the gantry be a permanent or a semi-permanent fitting? (Important for yachts that may be trailed or stored undercover.)
GANTRY FITTING IDEAS

The fabricator will need to know the exact position of the feet. This yacht has cleverly used a large base plate to support displaced deck gear such as the cleats, samson post and pushpit feet.

On motorboats that may have to negotiate low bridges, the gantry can be made to fold, as shown here. Note the strong hinges and simple release arrangement.

Some designs, such as on Hunter Yachts, have even used the gantry as an anchor point for the mainsheet, a move that has uncluttered the cockpit very effectively.
A good design can also rake the gantry to complement the lines of the boat, but thought has to be given to the extra strain placed on the feet beneath the overhang. If you own a popular model of yacht, you might be inspired by the solutions from like-minded owners.
Some designs use different thicknesses of stainless steel at the base, thinning towards the top to reduce weight higher up. Extra strength is added where needed with cross bracing. When itineraries have included venturing through inland waterways, a number of owners have designed the gantry to either fold in half or be easily detachable, plus provide support for the unstepped mast. Some bridge heights on smaller waterways would otherwise prove a problem.
Commissioning a design
Designs are usually commissioned from specialist stainless steel fabricators, who can work to accurate measurements or to a mock-up. Because of the weight the gantry will have to carry, on boats above 10m (30ft) in length, the structure is usually made from 40-mm (1⅝-in) stainless steel tubing, and a popular design is for two hoops set slightly apart. This gives a double rail at the top to support any solar panels.
While it is best to design the gantry with the rigging in place, allowances can be made for when the yacht is derigged for winter storage. Use scraps of wood or lengths of water pipe to check angles.
TIP
If you are having a gantry custom-built, make sure to add a number of strategically placed lugs or welded attachment points throughout the structure. These may prove useful for attaching gear for long-distance cruising.