
The new fridge fits perfectly into its modified space.
Fridge and cool box
Both a fridge and a cool box will keep food and drinks fresh, but which one to choose may depend on space and budget. Perhaps you want to replace an older fridge, while modifying the area where it is to be fitted. This is quite a similar job to fitting a fridge into a locker for the first time. The cool box is an alternative cooler when galley space is short.
While the design of a fridge and its components has improved greatly in recent years, the amount of electricity it uses still concerns many owners. You will need to include a dedicated battery with its own split charging system to avoid putting additional strain on the main battery banks. If you want maximum storage space, you should consider a model with an external compressor (the motor and pump). This means the equipment layout must be decided on before starting the work, including the runs for the pipework and cables. If overall space on board is tight, it may be better to opt for an inbuilt compressor.
Fridge and compressor installation
The equipment used in this installation consists of the fridge unit itself (Vitrifrigo), the compressor, a 70Ah battery and a DC-DC charger (which could equally well be a voltage sensitive relay) for providing a split charge feed.
The new fridge fits perfectly into its modified space.
To make sure the new fridge will fit, carefully measure the installation space. You will need various ventilation holes in the mounting area to allow the fridge to operate properly. Before you install the fridge, connect any electrical feeds. Once positioned and secured, cut holes through the locker bulkheads for the compressor pipework to run to the compressor mounted nearby. Next, connect the pipework from the fridge to the corresponding connections on the compressor before tightening it.
As you tighten each coupling, you will hear a slight hiss of gas as the stop valve opens before the coupling is fully tightened. This helps to blow out any remaining dirt in the coupling. Finally, fit the fridge into place.
TIP
A 15-amp fuse is required in the main positive feed to the fridge. As the fridge runs from its own battery, a dedicated single fuse holder is fitted onto the fuse board adjacent to the new isolating switch.
INSTALLING A FRIDGE
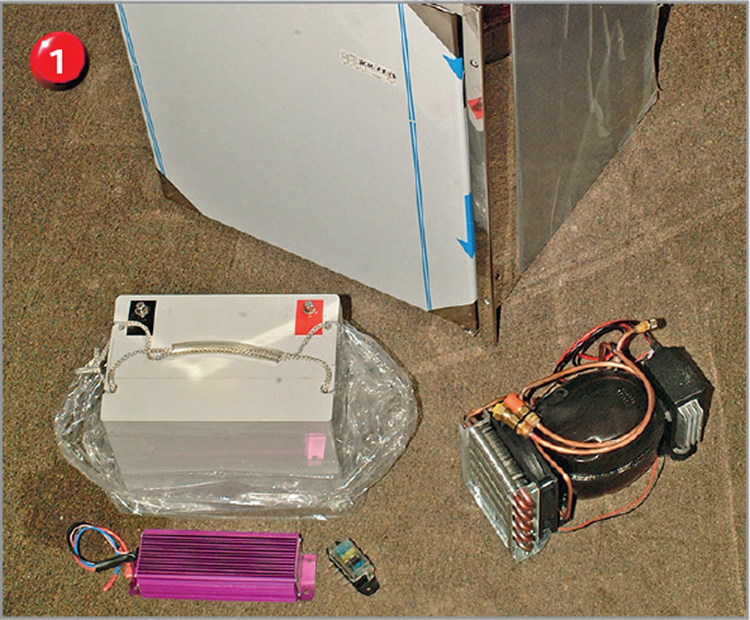
1 of 6 The main parts of the installation: fridge unit, compressor, battery, DC-DC charger (to charge one DC battery from another).

2 of 6 The fridge compartment prepared and ready to accept the new fridge.

3 of 6 Pipework is run through the boat to the compressor.

4 of 6 Connecting the compressor pipework to the compressor itself.

5 of 6 Dedicated fridge battery mounted next to the main batteries.

6 of 6 The DC-DC charger mounted and ready to connect.
Split charge system
The split charge feed ensures the fridge can’t ever run down the main battery banks. To include a split charge system you need to assemble a battery box, supported on an engine compartment stiffener and bolted to the side of the main battery box. The split charge module is a self-contained unit that connects between the main battery bank and fridge battery, and begins charging when the main batteries are receiving enough charge to raise the voltage level so it can cut in.
Cool box installation
If there is no room in the galley for a fridge then a cool box makes a viable alternative. For this installation, we bolted a large ice chest onto the top deck and fitted it with a supercool unit.
The simplest way to cool the box is to use a thermoelectric cooler unit. These small, self-contained, fully electronic coolers depend on the Peltier effect for their cooling operation. In simple terms this means that when an electric current is passed through the junction of two dissimilar conductors, it will either heat or cool the point of contact between them. Using this basic principle, very efficient cooling units have been produced requiring no gases or moving parts other than two long-life fans.
As with any fridge or freezer, the key to good performance is the thickness of the insulation, and the larger the capacity of the box, the thicker the insulation should be.

A large ice chest is used as the basis for the cool box.

The supercool unit along with a control panel, gasket and electrics.
Installing the unit
The first step when fitting the unit is to mark the cut-out on the side of the box as near to the top as possible. Then, cut out the hole carefully, ensuring the jigsaw blade is kept square to the side of the box.
Depending on the thickness of the box, you may need to make an angled cut (chamfer) of 45 degrees to allow an easy airflow through the hotside cooling fins on the outside. It is sensible to seal the raw edge of the insulation using a flexible marine adhesive, once the cutaway is completed. Check the fit of the cooler before sealing.
The cool box and supercooler viewed from above.
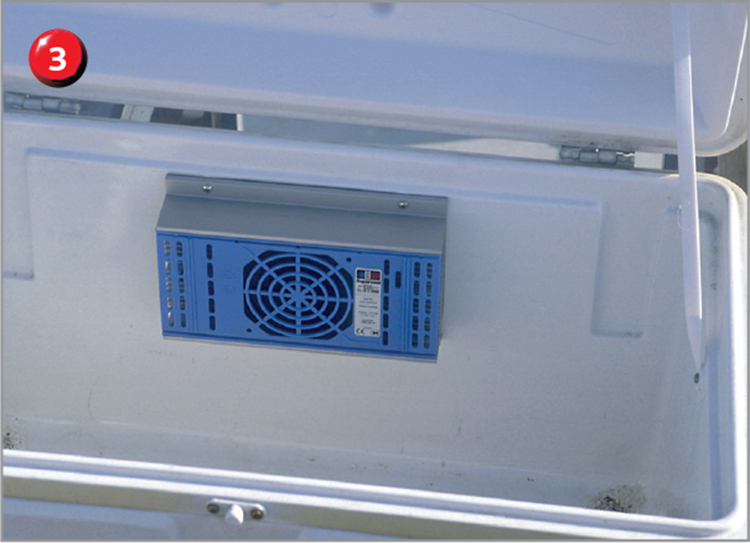
Install the unit from inside the box and secure it with four screws. The soft rubber gasket on the back of the cooler ensures a good seal between the box and the cooler unit. (If the inner skin is too thin to accept screws, you can use nuts and bolts instead, but be careful not to crush the skins together). From the outside, you can see the cutaways to allow a proper flow of air.
Unit protection
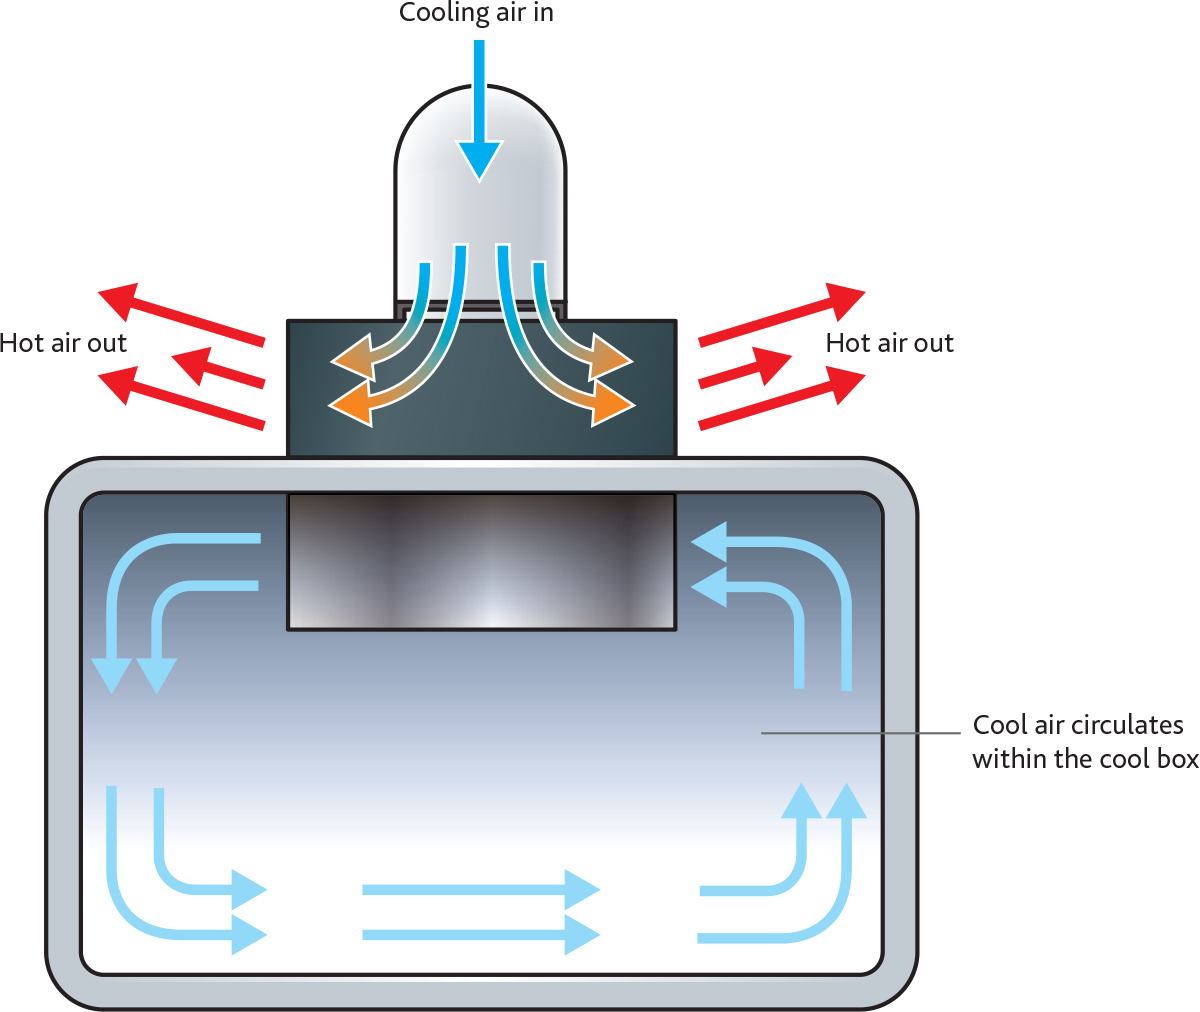
Although an installation may not require additional external cooling, it must be protected from the elements. To provide a flow of cool air, the warm side hose coupling is used to allow an intake hose to be fitted. Tumble dryer hose from a local DIY store can be used for this. The hose not only lets cool air in, but it also prevents warm air being recirculated into the unit.
The protective cover for the unit should enable hot air to escape, for example a stainless steel louvre vent on each side. The cool air intake hose protrudes through the bottom, providing a protected flow of cool air in with no possibility of recycling hot air.
Keeping cool
For the installation to operate well, warm air needs to disperse from the hot side of the cooler. The hot side requires a free flow of air, and where the unit is built into an enclosed locker, cooling air must be provided to expel warm air. This may require an additional small fan to move air through the locker, although a well-ventilated locker with large vents top and bottom should provide enough natural airflow. The only sure way is to try it and then decide whether fan cooling is needed.
To keep the unit working at peak efficiency, keep the airflow pathways clean and unobstructed, free from dust. Computer fans are cheap and quiet in operation and are often all that is required for an air-circulation boost.
INSTALLING THE COOLER UNIT

1 of 4 The cut-out in the cool box for mounting the cooler unit.

2 of 4 The cut-out edges are sealed with a flexible polyurethane sealant.
3 of 4 The self-contained supercool unit is installed from inside the box. In effect, it is a heat pump that transfers heat from one side of the unit to the other.

4 of 4 The chamfered edges of the outside of the cut-out, allowing a full flow of air over the cooling fins. The cool air-in hose prevents hot air from the outer fins entering the box.
TIP
Keep in mind that the most important elements of keeping the fridge cool are the amount of insulation and the condition of the seal on the door or lid. A top-opening lid helps to keep the cool air within a fridge, although a front-opening door with shelves inside may be quicker to use and less cool air will be lost from the inside.