Chapter 6
Painting Chrysanthemum

Along with orchid, bamboo, and plum blossom, chrysanthemum is one of the Four Gentlemen. It is a flower of proud disposition, standing strong against the cold winds of autumn, weathering the frost and cold of the climate. It is also associated with joviality, a life of ease, and a person who leads his own life.
China is known as the flowering country. The Chinese cultivated and developed hybrid flowers centuries ago, and these plants now grow all over the world. The literati and the retired officials of the government found pleasure in growing and developing many varieties and colors of chrysanthemum. They also enjoyed painting these flowers and were instrumental in having flowers be accepted as the subject of fine paintings. They painted the flowers in black, white, and gray, and it was a challenge to create interesting paintings without color. The painters understood not only the essence of the flower but also the importance of the bud, which contains the life force, the fragrance, and the qi spirit. There are about 37 varieties of chrysanthemum, many of which were hybridized by the literati. Some of these have been called Chinese asters. Many of the species were indigenous to Honan Province.
Early treatises described the medicinal uses of dried chrysanthemum flowers. They were used as a tonic, a sedative, a cosmetic, an eye wash, and an aid to counteract drunkenness. The ashes were used as an insecticide.

The character for chrysanthemum is composed of three radicals. The top set of strokes represent grass. The long curving stroke means to wrap up or around. The strokes within the curve represent rice. A chrysanthemum bud or flower viewed from above resembles grains of rice.
The chrysanthemum flower in full bloom was a popular emblem used on collars and belt buckles in the army. It is considered the symbol of the Emperor of Japan and suggests the rising sun. The chrysanthemum came to Japan from China around the 6th century when Japanese monks visited China and brought back many ideas and symbols. In Japan, the chrysanthemum is the most popular flower used in Ikebana flower arrangements.
The Chinese calendar associates a type of flower with each month depending on when the plant blooms. Chrysanthemum is the flower for the tenth month, in the autumn, even though many varieties grow well in late spring and through the summer and into late fall. During the tenth month, the people celebrate the chrysanthemum festival with flowers, dance, and music.

Because of the popularity of the flowers, some public buildings have strongly rooted plants with many varieties of chrysanthemum grafted to the stalk, producing a variety of types and colors of flowers. This grafting may represent the diversity of the people of China. One wall may have as many as ten different colors and varieties growing from the main root.
Varieties of Chrysanthemum Petals
Artists paint chrysanthemum petals of various shapes and at different stages of development and opening.

These examples show the various petals painted in the boned style, but they can also be painted in boneless style. The shapes of the blossoms change as they develop and open up. The flowers can also face in different directions and angles to add more interest to a composition.

Composition
No matter what variety of chrysanthemum you want to paint, you have to start with a general idea of positioning the plant and its flowers on the page.
Somewhere the painting should have an open space in a triangular form. The objects should be arranged asymmetrically using a set of three, five, or seven. Make each object a different size and shape. The objects should form a triangle.
Usually, you paint a large flower, called the host, with perhaps a slightly smaller, full flower, and then maybe several buds. It is desirable to have one or two flowers with a bud in a painting. The three flowers make a triangle, and the overall composition with the leaves is a triangle.
After painting the flowers, you usually add 5–7 leaves, where each leaf is slightly different in size and shape. In planning the leaves, you think of where the stem on the plant will come off the flower moving down to the bottom. After you paint the leaves, you add the stems and vestigial leaves alongside them.

Practicing Boned Petal Strokes
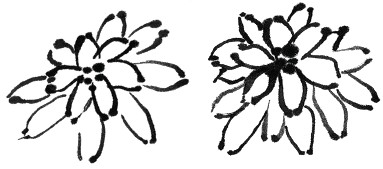
This exercise uses a style of boned stroke with a dot on each end of the petal. Using a dot can help you to make better curves for a petal. Some teachers instruct students to make the lines meet so that a dot is not used. Try doing that only after you can control the brush better and make curved lines rather than lines that are too straight in coming to a point.
1. Use a detail brush and dark ink. Use the brush in a vertical position. Press lightly to make a dot and swing the arm to the left to make a curved line. Go back to the top and make another dot and swing the arm to the right to make a curved line. This should look like a curved petal tapering in toward the bottom. Some teachers like to keep the top dot separate while others let them touch to make more of a point.
The base of the petals is held together by a peduncle, which has a stem and connects the blossom to the stalk of the plant. Notice how the petals radiate out like a fan.

2. Load the small brush with dark ink and make the central petal. Move to the left and make another petal that curves into the center area where the peduncle is located. Move to the right and make a third petal. With black ink, make a cup-shaped peduncle to hold the petals.

Planning the Fanning of the Petals
Draw a circle and divide it into four parts. The center part where the lines cross will be the center of the flower. That center can be off to one side if the circle is more of an oval shown at an angle. When you paint the petals, fan them out from the center, as shown in the second diagram.
1. To make an opening blossom, start like the bud and make one row of petals cupped in to the peduncle. Behind this row make a few short petals in between the petals in front row. This is the bud opening up and showing the back row of petals. Between the front row and the back row, add a few dots. This is where the center of the blossom is located.

2. Imagine a circle around which the petals fan outward. Divide this circle into four parts. Depending on the rotation of the circle, these four parts will vary in size and direction. Mark the center to the left and below the center. This will give the orientation of the petals from this off-center flower. From this center, make a short row of petals around the ring touching each other. Add a few dots in the center to remind you where the center is located. Add another ring of petals around the first ring making the top ones shorter and the bottom ones longer.
3. To make a fuller flower, add a few small petals between those in the second row. Those to the left and downward are longer.
4. Now that you can paint the petals for the flowers, plan a composition for putting the flowers together.
Practicing Boned Leaves
The leaves for the chrysanthemum vary in size and shape. Some tend to curl up on the ends and look short. Others fold in the middle and are narrow like a profile of the leaf. In nature, they have a variegated edge and a triangular shape, but in painting they may be stylized.
Chrysanthemum leaves have five sections, a center portion and two areas on each side of it. In the profile, the long vein is for the center portion and alongside it are two short petals. A vein is painted down the center of each portion. The outline can be left plain, or you can paint a wash within the outline.
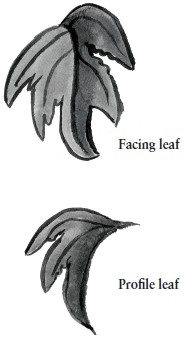
1. Using a small brush with dark ink held vertically, outline the five parts of a leaf facing you.
2. Paint the vein down the center of each portion.
3. To put a wash, use pale gray ink and carefully paint in one side of the leaf.
4. Use a darker gray ink to paint a wash on the other side of the leaf. Another method is to paint both sides of a leaf light gray and put a darker wash down the center vein.
5. Outline a profile leaf with parts.
6. Use a pale gray wash on the two top sections.
7. Paint a darker gray wash on the center section seen on the right.
Painting Boned Flowers and Boned Leaves
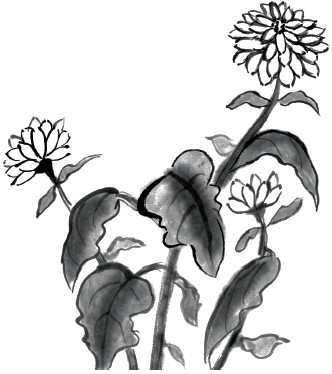
This picture has three boned flowers and boned leaves. The composition has a triangle, asymmetry, and open space.
Make the flowers first
1. With a detail brush with dark ink held in a vertical position, start with the circle of dots in the center and outline the full blossom on the upper right.
2. To the left and lower, outline an opening flower.
3. To the right and lower, outline an opening bud.
Add the leaves
1. Near the center, outline a full leaf facing right.
2. Below this leaf and to the left, outline another full leaf.
3. On each side of the center full leaf, outline a profile leaf.
4. Lower and to the right of the center full leaf, outline a profile leaf.
Chrysanthemum has small, vestigial leaves under the flower and along the stem. The stems are outlined to go from under the flowers curving to the bottom. The stems have interruptions where the leaves connect, and they also have bumps and ridges.
Add the stems and vestigial leaves
1. Use the detail brush with dark ink in a vertical position and paint a single line coming from under the top right flower, under the center leaf, and down to the bottom of the page.
2. Go back to the top and make a second line close to the first line at the top and moving further apart toward the bottom to make the stem thicker there.
3. At the top of the stem under the flower, outline the profile for a vestigial leaf on either side of the stem.
4. Further down the stem, add more outlines of vestigial leaves.
5. Make stems and vestigial leaves for the other two flowers using the same procedure.
The outlined composition with the flowers and outlined leaves can be left that way or light washes can be added. For the flower, make it darker in the center of the petal. The leaves have a center vein where you can put a darker gray to suggest that the leaf folds down in the center. The stem of the plant has dark and light areas due to the leaf joints and vestigial growth. With a detail brush held vertically, add the thin lines to represent the veins of the leaf.

Boneless Chrysanthemum
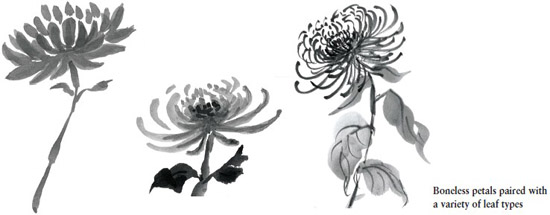
The freeform or boneless style can be used to paint several types of chrysanthemum, such as those shown. The popular spider variety is especially dramatic with its curling petals swirling outward from the center. This lesson teaches how to paint spider chrysanthemum.
Practicing Boneless Petal Strokes
The petal strokes for spider chrysanthemum resemble the letter C, or sometimes an S for more curly varieties.

1. Using a medium brush in a vertical position with gray ink, make a dot at the outer edge of a petal and then swing and lift the arm to make a curling petal toward the center in the form of a broad C.
2. Make many Cs going from the left to the center and then from the right to the center. Try all sizes. The petals are very long on the outer edges and smaller near the center.

Practicing Boneless Flowers
1. When you feel you can control the size and curl of the C stroke, try making a bud. Place a few dots of black where the center of the flower will be. Make a short row of small Cs curving to the dots. This makes the front row of petals. Reload with gray ink and make Cs curving inward from the left to the center and from the right to the center. This makes a back row of an opening bud. Add a few at the top to round up the bud top.

2. Next try an opening flower.
Make strokes as for the bud with a few dots of dark ink. After the two rows of tight-curled Cs, change to paler ink and add a longer row of Cs curling on the left to the center and curling from the right to the center. Because the flower is opening, add longer Cs at the bottom of the flower coming in below the center and out at the sides.
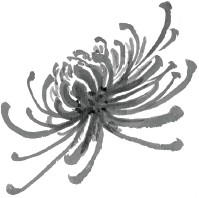
3. Finally, make a fully-opened flower. The full flower is similar to an opening flower, but it has another row of Cs behind the center group and longer and lower curved petals at the sides and below.
Make strokes as for the bud with a few dots of dark ink. Put another row of Cs behind the center group. Then make longer and lower curved petals at the sides and below.

Practicing Boneless Leaves
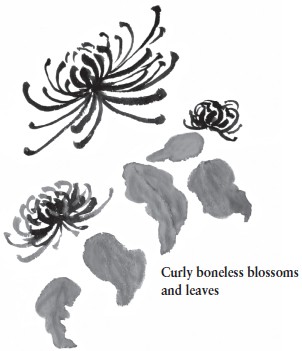
The boneless leaves are the same shape as those used in the boned chrysanthemum, but they are not outlined. The press-and-lift brush stroke is used to make the leaf sections.
1. To make a full leaf, use a large brush with medium ink held vertically. Press and make a stroke to the left and lift. Make a stroke next to it shorter than the other that curves at the end to the right. This makes one side of the leaf.
2. Load the brush and starting at the top on the right, press and lift to make the center of the full leaf. Make another stroke shorter than the first to the right. To the right, make a shorter stroke that curves to the left.
3. To make a profile leaf, paint a stroke at the top of the leaf representing the first section of the full leaf but rotated slightly to the right. Make the next stroke to the right down slightly shorter. Make the next leaf to the right shorter and curve it under. This represents the center section of a leaf shown in profile.
4. While the leaves are still slightly wet, use a detail brush with dark ink to paint in the veins down the center of each leaf section. The wetter the leaves, the fuzzier the veins will be. The drier the leaves, the sharper the veins will be.
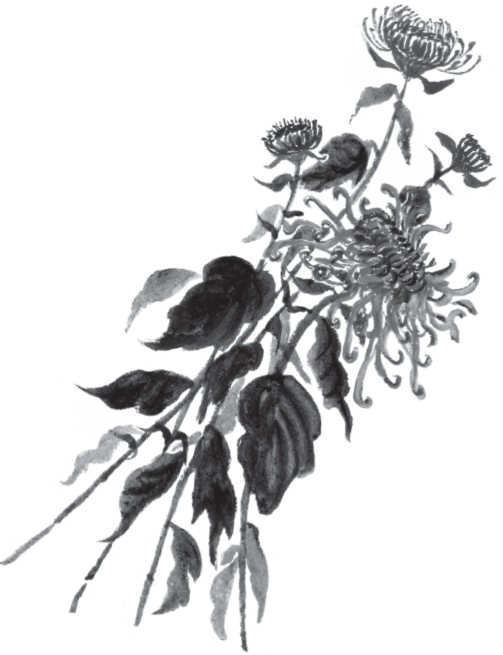
Painting Boneless Flowers and Boneless Leaves
Now you can paint a composition with a bud, an opening flower, a full flower, and leaves. The flowers should make a triangle with different spaces between them. You should have 5–7 leaves, and each leaf should be slightly different in size and shape.
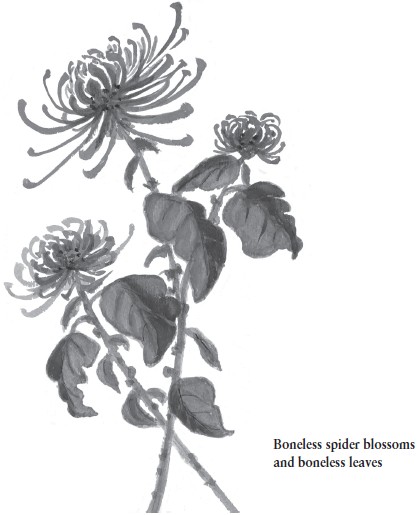
Paint in the flowers as you have practiced them, starting with the bud. The opening flower should be at a different level from the bud and to the left of it. The full flower should be larger above the others and off center.

Make the flowers first
1. Paint a bud at the right above the center of the page.
2. Paint an opening flower below the bud on the left side of the page.
3. Above and between the bud and opening flower, paint a full flower tilted to the left.
Add the leaves
1. Paint a large full leaf near the center of the page.
2. Make another full leaf above and to the right and another full leaf below and to the left.
3. Add a profile leaf under the bud.
4. Add a profile leaf under the opening flower.
5. Make a profile leaf towards the bottom of the page.

Add the stems and vestigial leaves
1. Using a medium brush with medium dark ink held vertically, stroke under the bud and under the leaf to make a stem to the bottom of the page.
2. Under the full flower, stroke a line under the leaf down to join the stem on the right.
3. Under the opening flower, stroke a separate stem that crosses over the other stem to the bottom of the page.
4. Make small strokes to connect the leaves to the stems.
5. When the flowers are connected with a light stem, add darker vestigial leaves of different sizes along the empty spaces along with dots of darker color to represent the sections of the stalk.
6. The stems of chrysanthemums have ridges where very small leaves come off. Add some dots and lines to represent these leaves.
Painting White Flowers
To paint white flowers, you can use outlines as in boned strokes or else use white paint on a tinted or tea-stained paper, making single stroke petals. The white paint must be thick enough to cover the tint of the paper.
