Chapter 4
Making Selections
You can move, color, or transform parts of your image independently from the rest of the image. The first step is to make a selection. This chapter shows you how to use the Photoshop selection tools to isolate portions of your images for editing. You can use different tools to select objects in your image or areas of similar color.

Select with the Magnetic Lasso Tool
Select with the Quick Selection Tool
Select with the Magic Wand Tool
Select with the Color Range Command
Select All the Pixels in an Image
Add to or Subtract from a Selection
Select with the Marquee Tools
You can select parts of an image for editing by using a marquee. You can then make changes to the selected area by using other Photoshop commands.
Two marquee tools are available: The Rectangular Marquee enables you to select rectangular shapes, including squares, and the Elliptical Marquee enables you to select elliptical shapes, including circles. You click and drag diagonally in your image to apply both tools. You can also use settings in the Options bar to define specific dimensions for your marquees such as a fixed size or ratio.
Select with the Marquee Tools
Using the Rectangular Marquee Tool

 Click the Rectangular Marquee tool (
 ).
).
 changes to
  .
.
 Click and drag diagonally inside the image window.
You can press and hold  while you click and drag to create a square selection.

A Photoshop selects a rectangular portion of your image. You can now perform other commands on the selection.
B You can deselect a selection by clicking Select and then Deselect.
Using the Elliptical Marquee Tool

Click and hold the Rectangular Marquee tool ().
In the list that appears, click the Elliptical Marquee tool ( ).
).
changes to  .
.
 Click and drag diagonally inside the image window.
You can press and hold while you click and drag to create a circular selection and then press  (
( on a Mac) to draw the circle directly out from the center.
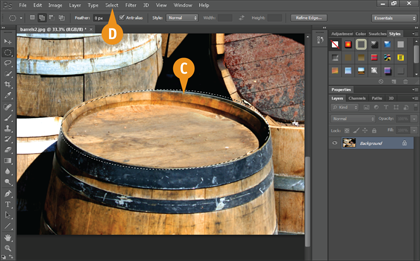
C Photoshop selects an elliptical portion of your image. You can now perform other commands on the selection.
D You can deselect a selection by clicking Select and then Deselect.
TIP
How do I customize the marquee tools?

Use the settings on the Options bar.
A Feather: The Feather value softens your selection edge, which means that Photoshop partially selects pixels near the edge.
B Style: Define your marquee tool as a fixed size or fixed aspect ratio.
C Height and Width: Add an exact width and height for a fixed-size selection or a ratio for a fixed-aspect-ratio selection by typing values in the Width and Height boxes.
Select with the Lasso Tool
You can create irregularly shaped selections with the lasso tools. You can then make changes to the selected area by using other Photoshop commands. Which lasso you use depends on the shapes and edges of the objects in your image that you want to select.
You can use the regular Lasso tool to create freehand selections. The Polygonal Lasso tool enables you to easily create a selection bounded by many straight lines. To select objects with well-defined edges, you can use the Magnetic Lasso tool, which is covered in “Select with the Magnetic Lasso Tool.”
Select with the Lasso Tool
Using the Regular Lasso

Click the Lasso tool ( ).
).
Click and drag your cursor ( ) to make a selection.
A To accurately trace a complicated edge, you can magnify that part of the image with the Zoom tool ( ).
).
Note: See Chapter 2 for more on the Zoom tool.

Drag to the beginning point and then release the mouse button.
The selection is complete.
Using the Polygonal Lasso

Click and hold the Lasso tool ().
Click the Polygonal Lasso tool ( ) in the list that appears.
changes to  .
.
Click multiple times along the border of the area you want to select.
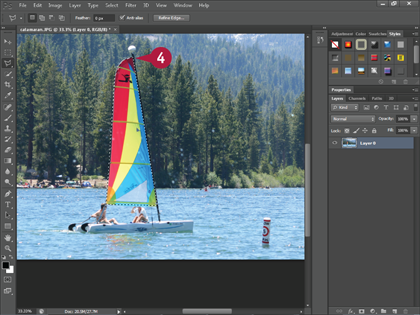
 To complete the selection, click the starting point.
You can also double-click anywhere in the image and Photoshop adds a final straight line connected to the starting point.
The selection is complete.
You can achieve a polygonal effect with the regular Lasso tool by pressing ( on a Mac) and then clicking to make your selection.
TIP
What if my lasso selection is not as precise as I want it to be?
Selecting complicated outlines with can be difficult, even for the steadiest of hands. To fix an imprecise Lasso selection, you can:
• Deselect the selection by clicking Select and then Deselect and then trying again.
• Try to fix your selection. See the section “Add to or Subtract from a Selection.”
• Switch to the Magnetic Lasso tool ( ). See the section “Select with the Magnetic Lasso Tool.”
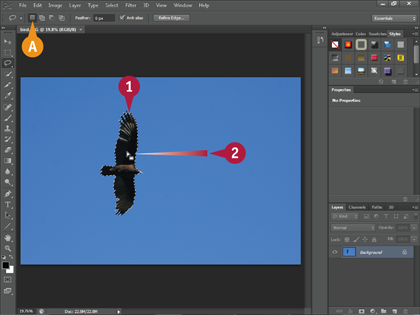
Select with the Magnetic Lasso Tool
You can quickly and easily select elements of your image that have well-defined edges by using the Magnetic Lasso tool. The Magnetic Lasso works best when the element you are trying to select contrasts sharply with its background. Some examples of good candidates for the tool include a bird in flight against a clear blue sky or a dark object against a light-colored wall.
As you drag the Magnetic Lasso along an edge, Photoshop places anchor points along the edge that fix the selection outline. You can press the Delete key to remove the anchor points as you draw to redraw the selection.
Select with the Magnetic Lasso Tool
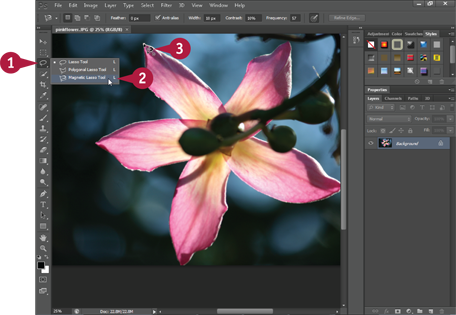
Click and hold the Lasso tool .
Click the Magnetic Lasso tool () in the list that appears.
changes to  .
.
Click the edge of the object you want to select.
This creates a beginning anchor point, which is a fixed point on the lasso path.

Drag your cursor () along the edge of the object.
The Magnetic Lasso’s path snaps to the edge of the element as you drag.
A To help guide the lasso, you can click to add anchor points as you go along the path.
You can press  to remove the most recently added anchor point. This allows you to restructure an incorrect lasso path.
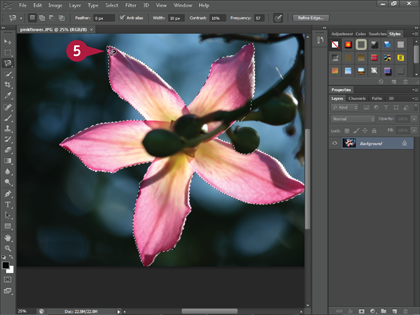
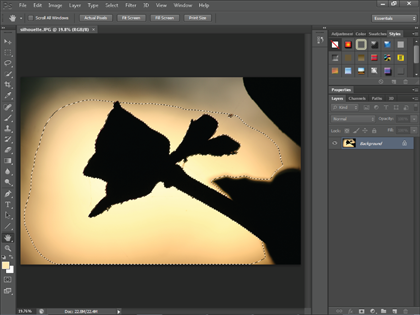
 Click the beginning anchor point to finish your selection.
Alternatively, you can double-click anywhere in the image and Photoshop completes the selection for you.
The path is complete.

This example shows that the Magnetic Lasso is less useful for selecting areas where you find little contrast between the image and its background.
TIP
How can I adjust the precision of the Magnetic Lasso tool?
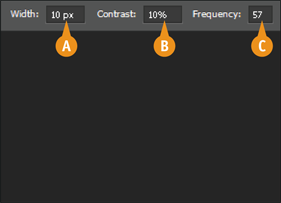
You can use the Options bar to adjust the Magnetic Lasso tool’s precision:
A Width: The number of nearby pixels the lasso considers when creating a selection.
B Contrast: How much contrast is required for the lasso to consider something an edge.
C Frequency: How often anchor points appear.
Select with the Quick Selection Tool
You can paint selections onto your images by using the Quick Selection tool. The tool automatically expands the area you paint over to include similar colors and textures. This tool offers a quick way to select objects that have solid colors and well-defined edges. You can control the size and hardness of the tool, similarly to how you define the characteristics of the Brush tool. This determines how much area the tool selects as well as the softness of the selection edges.
Select with the Quick Selection Tool

Click the Quick Selection tool ( ).
).
Click here ( ) to open the tool’s Brush menu.
The Brush menu opens.
In the Brush menu, you can specify the tool’s size and other characteristics. Decreasing the tool’s hardness causes it to partially select pixels along the perimeter.

Click and drag inside the object you want to select.

A Photoshop selects parts of the object based on its coloring and the contrast of its edges.
B After you make a selection, the Add to Selection button ( ) becomes active.
Click and drag to select more of the object.

C Photoshop adds to the selection.
TIP
How can I adjust the selection made with the Quick Selection tool?
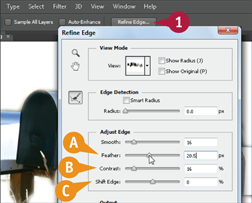
On the Options bar, click Refine Edge.
The Refine Edge dialog box opens, and Photoshop turns the unselected part of your image white.
A You can increase Feather to make the edges of your selection partially transparent.
B You can increase Contrast to heighten the sharpness of the selection edges.
C You can use Shift Edge to move the selection in or out slightly.
Select with the Magic Wand Tool
You can select groups of similarly colored pixels with the Magic Wand tool. You may find this useful if you want to remove an object from a background. The tool is especially handy for selecting a clear sky, a green lawn, or white sand at a beach.
By specifying an appropriate tolerance value, you can control how similar a pixel needs to be for Photoshop to select it. The Tolerance value for the tool can range from 0 to 255, with smaller numbers causing the tool to select a narrower range of colors.
Select with the Magic Wand Tool

Click and hold the Quick Selection tool ().
Click the Magic Wand tool ( ).
).
changes to  .
.
Type a number from 0 to 255 in the Tolerance field.
To select a narrow range of colors, type a small number; to select a wide range of colors, type a large number.

Click the cursor () in the area you want to select inside the image.
Photoshop selects the pixel you clicked plus any similarly colored pixels near it.
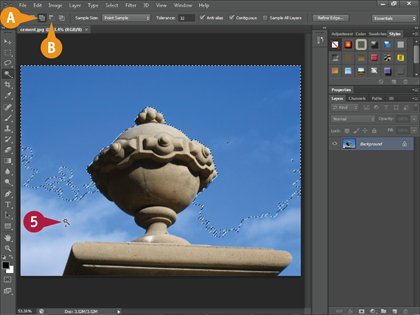
To add to your selection, press and then click elsewhere in the image.
A You can also click the Add to Selection button () on the Options bar.
B You can click the Subtract from Selection button ( ) to configure the Magic Wand to remove selected pixels.

C Photoshop adds to your selection.
Note: For more about editing a selection, see the section “Add to or Subtract from a Selection.”
TIP
How can I ensure that the Magic Wand tool selects all the occurrences of a color in an image?
You can deselect the Contiguous check box ( changes to
  ) on the Options bar so the Magic Wand tool selects similar colors, even when they are not contiguous with the pixel you click with the tool. This can be useful when objects intersect the solid-color areas of your image. You can also click the Sample All Layers check box ( changes to ) to select similar colors in all layers in the image, not just the currently selected layer.
Select with the Color Range Command
You can select a set range of colors within an image with the Color Range command. With this command, you can quickly select a region of relatively solid color, such as a sky or a wall.
You select a range of colors in two steps. First you click inside the image to specify an initial color. Then you click and drag the Fuzziness slider to control what similar colors you also want to select. Photoshop selects the colors and displays them graphically in a Color Range dialog box.
Select with the Color Range Command

Click Select.
Click Color Range.

The Color Range dialog box opens.
changes to  .
.
Click inside the image window.
A Photoshop selects all the pixels in the image similar to the pixel you clicked. These areas turn white in the Color Range window.
B The number of pixels that turn white depends on the Fuzziness setting.

To increase the range of color, click and drag the Fuzziness slider ( ) to the right.
You can decrease the color range by dragging to the left.
C You can broaden the selected area by clicking the Add to Sample icon ( ) and then clicking other parts of the image.
Click OK.
Photoshop makes the selection in the main image window.
Note: Sometimes, the Color Range command selects unwanted areas of the image. To eliminate these areas, see the section “Add to or Subtract from a Selection.”
Select All the Pixels in an Image
You can select all the pixels in a single-layer image by using the Select All command. With the entire image window selected, you can easily delete the image or copy and paste it into another window.
For multilayer images, Select All selects all the pixels in the currently selected layer. To merge multiple layers into a single layer so that all the content in the image can be selected, see Chapter 8.
Select All the Pixels in an Image

Click Select.
Click All.
You can also press  +
+ (
( + on a Mac) to select all the pixels.
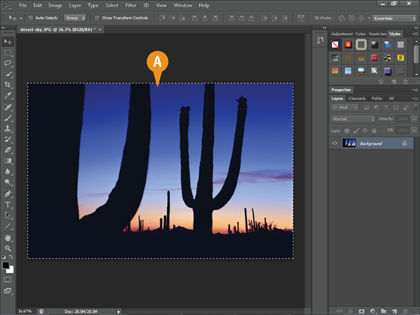
A Photoshop selects the entire image window.
You can delete the currently selected pixels by pressing .
To copy your image, press + (+ on a Mac).
To paste your image, press + (+ on a Mac).
Move a Selection Border
You can move a selection border if your original selection is not in the intended place. You can also move a selection border if you want to fill that area with content in a different part of your image.
Moving a selection border is different from moving the object selected by the border. For details about moving a selected object, see Chapter 5.
Move a Selection Border
Make a selection by using one of Photoshop’s selection tools (, , or ).
A Make sure the New Selection button ( ) is highlighted.
Click and drag inside the selection.

B The selection border moves.
To move your selection border one pixel at a time, you can use the arrow keys on your keyboard.
You can hide a selection outline by clicking View, Show, and then Selection Edges.
Add to or Subtract from a Selection
You can add to or subtract from your selection by using various selection tool options. Adding enables you to select a large object in your image by making multiple selections. By subtracting, you can fix a selection that includes extraneous pixels.
Most selection tools have add and subtract settings in the Options bar. You can also create a selection using one selection tool and then add to or subtract from the selection using other tools. See the other sections in this chapter to learn how to choose the appropriate tool for selecting elements in your photo.
Add to or Subtract from a Selection
Add to a Selection

Make a selection by using one of Photoshop’s selection tools (, , or ).
Click a selection tool.
This example uses the Magnetic Lasso tool ().
Note: See the previous sections in this chapter to select the appropriate tool for your image.
Click the Add to Selection button ().
Select the area you want to add.

Complete the selection.
A Photoshop adds to the selection.
You can enlarge the selection further by repeating steps 2 to 5.
You can also add to a selection by pressing as you make your selection.
To select an intersection, press + ( + on a Mac) as you make your selection.
Subtract from a Selection

Make a selection by using one of Photoshop’s selection tools.
Click a selection tool.
This example uses the Elliptical Marquee tool ().
Click the Subtract from Selection button ().
Select the area you want to subtract.
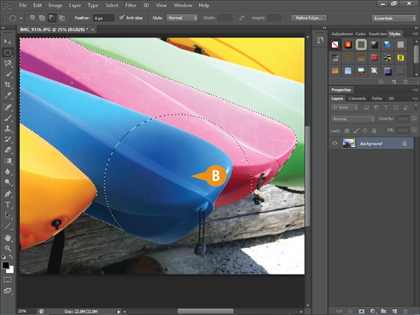
B Photoshop deselects, or subtracts, the selected area.
You can subtract other parts of the selection by repeating steps 2 to 4.
You can also subtract from a selection by pressing and holding ( on a Mac) as you make your selection.
TIPS
How do I add to or subtract from a selection by using the Quick Selection tool?
The Quick Selection tool features different option buttons for adding to or subtracting from a selection. On the Options bar, you can click  to add to a selection and
  to subtract from a selection.
How can I expand or contract a selection?
To expand a selection, click Select, Modify, and then Expand. A dialog box opens, enabling you to specify the amount of expansion in pixels. To contract a selection, click Select, Modify, and then Contract. You can also expand and contract via the Refine Edge dialog box. See “Select with the Quick Selection Tool” for details.
Invert a Selection
You can invert a selection to deselect what is currently selected and select everything else. This is useful when you want to select the background around an object. You can select the object with one of the Photoshop selection tools and then perform the invert command to switch the selection to the background.
The inverted selection has the same characteristics as your initial selection. For example, if the initial selection has a feathered edge, the inverted result will also have a feathered edge. For more information about selecting objects, see the other sections in this chapter.
Invert a Selection

Make a selection by using one of Photoshop’s selection tools (, , or ).
Note: For more on the various selection tools, see the previous sections in this chapter.
Click Select.
Click Inverse.

Photoshop inverts the selection.
Grow a Selection
You can increase the size of your selection by using the Grow command, which is useful when you want to include similarly colored, neighboring pixels. For example, if you select a sky with the Magic Wand and some areas with slightly different colors were left unselected, you can use the Grow command to finish the job.
The amount that the Grow command selects is controlled by the Tolerance setting for the Magic Wand tool. You can select the Magic Wand tool first to adjust that setting before executing the Grow command. See “Select with the Magic Wand Tool” for more.
Grow a Selection

Make a selection by using one of Photoshop’s selection tools (, , or ).
Note: For more on the various selection tools, see the previous sections in this chapter.
Click Select.
Click Grow.

A The selection grows to include similarly colored pixels contiguous with the current selection.
B To also include noncontiguous pixels, you can click Select and then Similar.
C You can change the number of similarly colored pixels the Grow command selects by selecting the Magic Wand tool () and changing the Tolerance setting.
Create Slices
You can divide a large image that you want to display on the web into smaller rectangular sections called slices. The different slices of an image can then be optimized independently of one another for faster download.
For example, photographic slices in a sliced image can be saved in the JPEG format, whereas solid-color graphics can be saved in the PNG or GIF format. When you save a sliced image, Photoshop creates a separate HTML file that assembles the slices as a single web page. See Chapter 14 for more.
Create Slices

Click and hold the Crop tool ( ).
).
Click the Slice tool ( ) in the list that appears.
changes to  .
.
Click and drag inside the image to create a slice.

A Photoshop creates a slice where you clicked and dragged.
Note: Slices you define are called user slices.
Photoshop fills in the rest of the image with auto slices.
Note: User slices remain fixed when you add more slices to your image, whereas auto slices can change size.

Click and drag to define another slice in your image.

B Photoshop creates another slice where you click and drag.
Photoshop creates or rearranges auto slices to fill in the rest of the image.
Note: For more on how to save the different slices for the web, see Chapter 14.
Note: To save a sliced image so you can edit the slices later, save the image in the Photoshop format. See Chapter 14 for more.
TIP
How do I resize or delete slices in my image?
First, click the Slice Select tool ( ), which you access by clicking and holding the Slice tool (). To resize a user slice, click inside it and then click and drag a border handle (
 ). To delete a user slice, click inside it and then press . When you resize or delete slices, Photoshop automatically resizes, creates, and deletes auto slices in the image to account for the change.