Chapter 7
Adjusting Lighting and Colors
You can fine-tune the colors in your image — darken them, lighten them, or remove them completely. This chapter introduces the tools that do the trick.

Change Brightness and Contrast
Using the Dodge and Burn Tools
Using the Blur and Sharpen Tools
Correct Shadows and Highlights
Change Brightness and Contrast
The Brightness/Contrast command provides a way to adjust the highlights and shadows in your image. To change the brightness or contrast of small parts of your image, use the Dodge or Burn tool. See the section “Using the Dodge and Burn Tools” for more.
If you make a selection before using the Brightness/Contrast command, changes affect only the selected pixels. Similarly, if you have a multilayered image, your adjustments affect only the selected layer. For more on making selections, see Chapter 4. For more on layers, see Chapter 8.
Change Brightness and Contrast

 Click Image.
 Click Adjustments.
 Click Brightness/Contrast.

The Brightness/Contrast dialog box opens with sliders set to 0.
 To display your adjustments in the image window as you make them, click the Preview check box (
 changes to
  ).
).
 Click and drag the Brightness slider (
 ).
).
Drag to the right to lighten the image, or drag to the left to darken the image.
A You can also lighten the image by typing a number from 1 to 100 or darken the image by typing a negative number from -1 to -100.

 Click and drag the Contrast slider ().
Drag to the right to increase the contrast, or drag to the left to decrease the contrast.
Note: Increasing contrast can bring out details in your image; decreasing it can soften details.
B You can also increase the contrast by typing a number from 1 to 100 or decrease the contrast by typing a negative number from -1 to -100.
 Click OK.

Photoshop applies the new brightness and contrast values.
Note: You can also apply brightness and contrast adjustments to an image with an adjustment layer. For more, see Chapter 8.
TIP
How can I adjust the contrast of an image automatically?
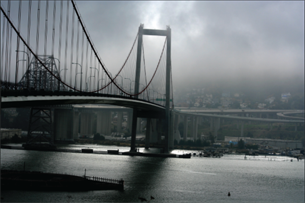
Click Image and then Auto Contrast. This converts the lightest pixels in the image to white and the darkest pixels in the image to black. Making the highlights brighter and the shadows darker boosts the contrast, which can improve the appearance of poorly exposed photographs. In this example, you can use the Auto Contrast command to bring out the colors in a bridge scene.

Using the Dodge and Burn Tools
You can use the Dodge and Burn tools to brighten or darken specific areas of an image, respectively. You use brush strokes to apply the tools. Dodge is a photographic term that describes the blocking of light when printing from a film negative. Burn is a photographic term that describes the addition of light when printing from a film negative.
These tools are an alternative to the Brightness/Contrast command, which affects the entire image. To brighten or darken the entire image, see the section “Change Brightness and Contrast.”
Using the Dodge and Burn Tools
Using the Dodge Tool

Click the Dodge tool ( ).
).
Click here ( ) to open the Brush menu.
Click the brush you want to use.
A You can also choose the range of colors you want to affect and the tool’s exposure or strength.

Click and drag over the area that you want to lighten.
Photoshop lightens the area.
Using the Burn Tool

Click and hold the Dodge tool ().
Click the Burn tool ( ) in the list that appears.
B You can select the brush, the range of colors you want to affect, and the tool’s exposure, or strength.

Click and drag over the area that you want to darken.
Photoshop darkens the area.
TIPS
How do I invert the bright and dark colors in an image?
Click Image, Adjustments, and then Invert. This makes the image look like a film negative. Bright colors become dark — and vice versa. Applying the Invert command a second time changes the colors back to how they were originally.
How can I add extra shadows to the bottom of an object?
Applying the Burn tool () with the Range set to Shadows offers a useful way to add shadows to the shaded side of an object. Likewise, you can use the Dodge tool () with the Range set to Highlights to add highlights to the lighter side of an object.
Using the Blur and Sharpen Tools
You can sharpen or blur specific areas of your image with the Sharpen and Blur tools. This enables you to emphasize or de-emphasize objects in a photo. You apply the tools with brush strokes over the area you want to affect. You can change the brush size to control how much area you want to cover.
You can blur or sharpen an entire image by using one of the Blur or Sharpen commands located in Photoshop’s Filter menu. For more, see Chapter 10.
Using the Blur and Sharpen Tools
Using the Blur Tool

Click the Blur tool ( ).
).
Click here () to open the Brush menu.
Click the brush you want to use.
A To change the strength of the tool, type a value from 1% to 100%.

Click and drag an area of the image.
Photoshop blurs the area you click and drag over.
Using the Sharpen Tool

Click and hold the Blur tool ().
Click the Sharpen tool ( ) in the list that appears.
B You can type a value from 1% to 100% to set the strength of the tool.

Click and drag an area of the image.
Photoshop sharpens the area of the image you click and drag over.
TIP
How do I use the Smudge tool?
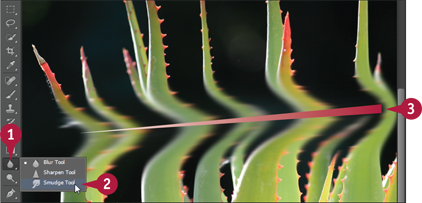
The Smudge tool ( ) simulates dragging a finger through wet paint, shifting colors and blurring your image.
Click and hold the Blur tool ().
Click the Smudge tool () in the list that appears.
You can adjust the tool’s brush size and strength on the Options bar.
Click and drag over an area of your image to smudge it.
Adjust Levels
You can use the Levels command to make fine adjustments to the highlights, midtones, or shadows in an image. Although more difficult to use, the Levels command offers more control over brightness than the Brightness/Contrast command, covered in the section “Change Brightness and Contrast.”
To change only selected pixels, select them before performing the Levels command. Similarly, in a multilayered image, your adjustments affect only the selected layer.
Adjust Levels

Click Image.
Click Adjustments.
Click Levels.
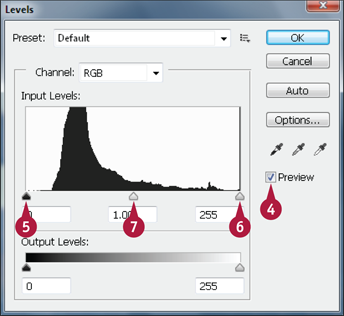
The Levels dialog box opens.
To display your adjustments in the image window as you make them, click the Preview check box ( changes to ).
You can use the Input sliders to adjust an image’s brightness, midtones, and highlights.
Click and drag  to the right to darken shadows and increase contrast.
Click and drag  to the left to lighten the bright areas of the image and increase contrast.
Click and drag  to adjust the midtones — the shades between the shadows and highlights — of the image.
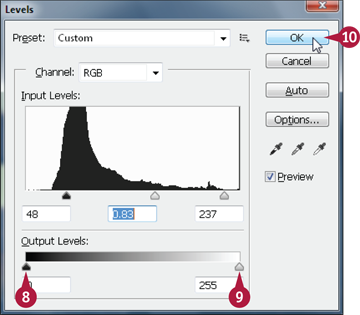
You can use the Output sliders to decrease the contrast while either lightening or darkening the image.
 Click and drag to the right to lighten the image.
 Click and drag to the left to darken the image.
 Click OK.

Photoshop makes brightness and contrast adjustments to the image.
In this example, adjusting the Levels has increased the contrast to bring out detail.
Note: You can also apply levels adjustments to an image with an adjustment layer. For more, see Chapter 8.
TIP
How do I automatically adjust the brightness levels of an image?

Click Image and then Auto Tone. This converts the lightest pixels in the image to white and the darkest pixels to black. This command is similar to the Auto Contrast command and can quickly improve the contrast of an overly gray photographic image. In this example, you can use the Auto Tone command to make the colors in this photo of leaves crisper.
Adjust Curves
You can manipulate the tones and contrast of your image with the Curves dialog box. In the dialog box, a sloping line graph represents colors in the image. The top right part of the line represents the highlights, the middle part the midtones, and the bottom left the shadows.
If you make a selection before performing the Curves command, only the selected pixels are affected. Similarly, if you have a multilayered image, your adjustments affect only the selected layer. For more on making selections, see Chapter 4. For more on layers, see Chapter 8.
Adjust Curves

Click Image.
Click Adjustments.
Click Curves.

The Curves dialog box opens.
A The dialog box includes a histogram of the existing colors in the image, with the dark colors represented on the left and the light colors on the right.
Click the line graph and then drag to adjust the lighting in the image.
Dragging the curve up and to the left lightens the image, and dragging it down and to the right darkens it.

Click and drag at additional points on the line graph to fine-tune the lighting.
To boost contrast, you can create a curve with a slight S shape. This lightens the highlights, darkens the shadows, and keeps the midtones relatively unchanged.
Click OK to apply the adjustments and close the dialog box.
B To reset the line graph, you can press  and then click Cancel, which changes to Reset.

Photoshop adjusts the tones in the image.
TIP
How do I apply automatic adjustments to my image with the Curves dialog box?

The Curves dialog box offers several presets that you can select from to apply common adjustments.
In the Curves dialog box, click a setting in the Preset menu.
Photoshop adjusts the shape of the line graph and adjusts the colors in the image.
Click OK to apply the adjustment.
Adjust Hue and Saturation
You can change the hue to shift the component colors of an image. You can change the saturation to adjust the color intensity in an image. The Hue/Saturation command is useful for correcting old photos whose colors have shifted or have become faded.
If you make a selection before performing the Hue/Saturation command, only the selected pixels are affected. Similarly, if you have a multilayered image, your adjustments affect only the selected layer. For more on making selections, see Chapter 4. For more on layers, see Chapter 8.
Adjust Hue and Saturation

Click Image.
Click Adjustments.
Click Hue/Saturation.

The Hue/Saturation dialog box opens.
To display your adjustments in the image window as you make them, click the Preview check box ( changes to ).
Click and drag the Hue slider () to shift the colors in the image.
Dragging left or right shifts the colors in different — and sometimes bizarre — ways.

Click and drag the Saturation slider ().
Dragging to the right or to the left increases or decreases the intensity of the image’s colors, respectively.
A Clicking the Colorize check box ( changes to ) partially desaturates the image and adds a single color. You can adjust the color with the sliders.
Click OK.
Photoshop makes the color adjustments to the image.
Note: You can also apply hue and saturation adjustments to an image with an adjustment layer. See Chapter 8 for more.
Using the Sponge Tool
You can use the Sponge tool to adjust the color saturation, or color intensity, of a specific area of an image. This can help bring out the colors in washed-out areas of photos or mute colors in areas that are too bright. You apply the Sponge tool by brushing strokes across your image. You can change the brush size to control how much area is affected.
To change the color intensity of the entire image all at once, you can adjust the saturation. See “Adjust Hue and Saturation” for details.
Using the Sponge Tool
Decrease Saturation

Click and hold the Dodge tool ().
Click the Sponge tool ( ) in the list that appears.
Click here () to open the Brush menu and then choose the brush you want to use.

Click here ( ) to choose Desaturate.
Click and drag the mouse ( ) to decrease the saturation of an area of the image.
Increase Saturation

Perform steps 1 to 3 under “Decrease Saturation.”
Click here () to choose Saturate.

Click and drag the mouse () over an area of the image.
Photoshop increases the saturation of that area of the image.
You can adjust the strength of the Sponge tool by typing a new Flow setting from 1% to 100%.
TIP
How can I easily convert a color image to a grayscale image?
Click Image.
Click Adjustments.
Click Desaturate.
Photoshop sets the saturation value of the image to 0, effectively converting it to a grayscale image.
In a multilayer image, only the selected layer is desaturated.
Note: For more control over your conversion, see the section “Convert to Black and White.”
Adjust Color Balance
You can use the Color Balance command to change the amounts of specific colors in your image. This can be useful if you need to remove a colorcast introduced by a scanner or by age. Certain types of indoor lighting can also cast colors in your photos.
If you make a selection before performing the Color Balance command, only the selected pixels are affected. Similarly, if you have a multilayered image, your adjustments affect only the selected layer. For more on making selections, see Chapter 4. For more on layers, see Chapter 8.
Adjust Color Balance

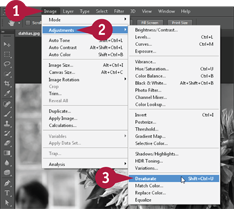
Click Image.
Click Adjustments.
Click Color Balance.
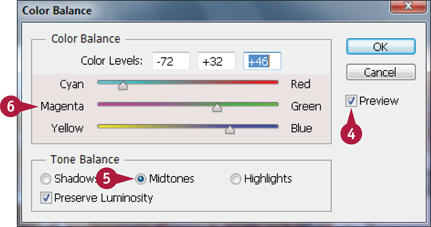
The Color Balance dialog box opens.
To display your adjustments in the image window as you make them, click the Preview check box ( changes to ).
Choose the tones in the image that you want to affect ( changes to
  ).
).
Click and drag a slider () toward the color you want to increase.
To add a warm cast to your image, you can drag toward red or magenta.
To add a cool cast, you can drag toward blue or cyan.

Choose another Tone Balance option.
Type a number from -100 to 100 in one or more of the Color Levels fields.
Note: Step 8 is an alternative to dragging a slider.
Click OK.
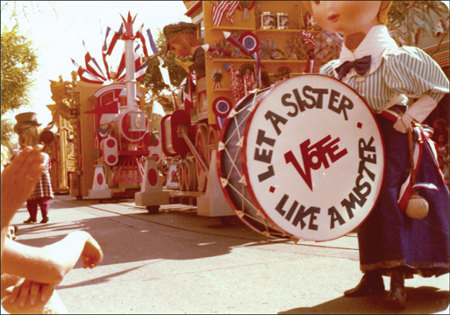
Photoshop makes color adjustments to the image.
Note: You can also apply color balance adjustments to an image with an adjustment layer. See Chapter 8 for more.
Using the Variations Command
The Variations command includes a user-friendly interface that enables you to adjust the color in your image. Image thumbnails show previews of how the image changes with different colors added. You click the thumbnails to add the colors. You can also adjust lightness in the Variations dialog box.
If you make a selection before performing the Variations command, only the selected pixels are affected. Similarly, if you have a multilayered image, your adjustments affect only the selected layer. For more on making selections, see Chapter 4. For more on layers, see Chapter 8.
Using the Variations Command

Click Image.
Click Adjustments.
Click Variations.

The Variations dialog box opens.
Choose a tonal range to adjust ( changes to ).
A Alternatively, you can choose Saturation, or strength of color ( changes to ).
Click and drag the slider () left to perform small adjustments or right to make large adjustments.
To add a color to your image, click one of the More thumbnails.

B The result of the adjustments appears in the Current Pick thumbnails.
To increase the effect, you can click the More thumbnail again.
C You can increase the brightness of the image by clicking Lighter.
D You can decrease the brightness of the image by clicking Darker.
Click OK.

Photoshop makes the color adjustments to the image.
In this example, a yellow colorcast is added.
TIP
How can I undo color adjustments while using the Variations dialog box?

If you clicked one of the More thumbnail images to increase a color, you can click the More thumbnail image opposite to undo the effect.
When you add colors in equal amounts to an image, the colors opposite one another — for example, Green (A) and Magenta (B) — cancel each other out.
Clicking the Original image in the upper left corner also returns the image to its original state.
Match Colors between Images
You can use the Match Color command to match the colors in one image with the colors from another. For example, you can apply the colors from a bluish shoreline to a reddish desert to give the desert image a cooler appearance. You can also apply colors from a vibrant photo to a less colorful photo to make the less colorful photo more interesting.
If you make a selection before performing the Match Color command, only the selected pixels are affected. For more on making selections, see Chapter 4.
Match Colors between Images

Open a source image from which you want to match colors.
Open a destination image whose colors you want to change.
Make sure the image window for the destination image is selected.
Click Image.
Click Adjustments.
Click Match Color.

The Match Color dialog box opens.
Click here () to choose the filename of the source image.

Click and drag the sliders () to control how the new colors are applied.
Luminance controls the brightness.
Color Intensity controls the saturation.
Fade controls how much color Photoshop replaces; you can increase the Fade value to greater than 0 to only partially replace the color.
Click OK.

Photoshop replaces the colors in the destination image with those in the source image.
A In this example, Photoshop applies the reds from a photo of a glove on a baseball diamond to a less colorful photo of an industrial tank.
TIP
How do I match colors by using colors from only a selected part of my source image?
Make a selection before performing steps 3 to 5 in this section and then click the Use Selection in Source to Calculate Colors check box ( changes to ) in the Match Color dialog box. Photoshop uses only colors from inside the selection to determine color replacement.
Correct Shadows and Highlights
You can quickly correct images with overly dark or light areas by using the Shadows/Highlights command. This command can help correct photos that have a shadowed subject because of backlighting. It can also bring out textures in bright areas of your image that appear washed out.
If you make a selection before performing the Shadows/Highlights command, only the selected pixels are affected. Similarly, if you have a multilayered image, your adjustments affect only the selected layer. For more on making selections, see Chapter 4. For more on layers, see Chapter 8.
Correct Shadows and Highlights
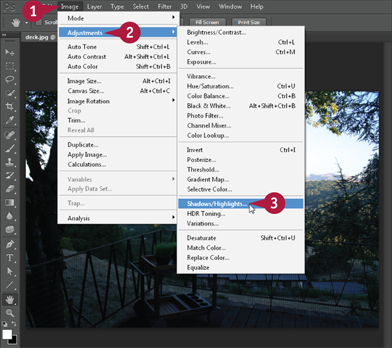
Click Image.
Click Adjustments.
Click Shadows/Highlights.

The Shadows/Highlights dialog box opens.
Click and drag the Amount slider () in the Shadows section.
The farther you drag to the right, the more the shadows lighten.
A You can also adjust the shadows by typing a number from 0 to 100.
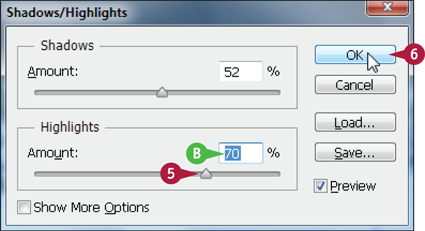
Click and drag the Amount slider () in the Highlights section.
The farther you drag to the right, the more the highlights darken.
B You can also adjust the highlights by typing a number from 0 to 100.
Click OK.

Photoshop adjusts the shadows and highlights in the image.
C Adjusting the Shadows setting brings out objects in darker areas.
D Adjusting the Highlights setting brings out objects in the lighter areas.
TIP
How do I get more control over how the Shadows/Highlights command affects my shadows and highlights?
Click the Show More Options check box in the Shadows/Highlights dialog box ( changes to ). Additional settings appear. Adjusting the Tonal Width sliders helps you control what parts of the image are considered shadows and highlights. The Radius sliders help you control the contrast in the adjusted shadows and highlights.
Create a Duotone
For an easy way to add some color to a black-and-white photo, you can convert a grayscale image to a duotone. A duotone is essentially a grayscale image with a color tint. To turn a color image into a duotone, you must first remove all the color by converting it to grayscale. Then you add the tint colors one at a time.
For ways to selectively add colors to just objects in your image, see Chapter 6.
Create a Duotone

Click Image.
Click Mode.
Click Grayscale.
In the message box that appears, click Discard.
Photoshop converts your image to grayscale.
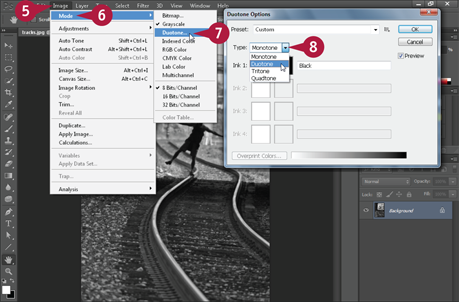
Click Image.
Click Mode.
Click Duotone.
The Duotone Options dialog box opens.
Click here () to choose Duotone.
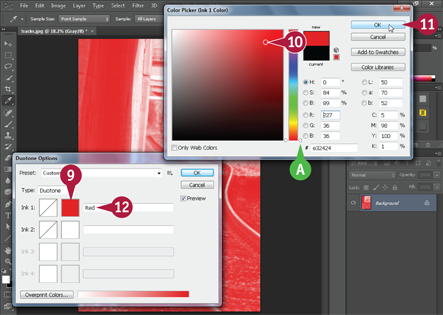
Click the first color swatch.
The Color Picker dialog box opens.
Click inside the window to choose your first duotone color.
A You can click and drag the slider ( ) to change the color selection.
 Click OK.
 Type a name for the color.
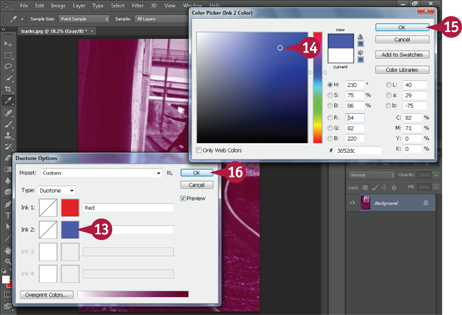
 Click the second color swatch.
The Color Picker dialog box opens.
 Click inside the window to choose your second duotone color.
 Click OK in the Color Picker dialog box.
 Click OK in the Duotone Options dialog box.
Photoshop uses the two selected colors to create the tones in the image.
Convert to Black and White
You can use the Black and White interface to remove colors in a photo and then adjust various sliders to control the lightness and darkness of the different areas of the photo. A Preset menu gives you a variety of settings combinations with which to experiment.
If you make a selection before performing the Black & White command, only the selected pixels are affected. Similarly, if you have a multilayered image, your adjustments affect only the selected layer. For more on making selections, see Chapter 4. For more on layers, see Chapter 8.
Convert to Black and White
Adjust Lighting with Sliders

Click Image.
Click Adjustments.
Click Black & White.

The Black and White dialog box opens.
Photoshop converts your image to grayscale.
Click and drag a slider () to adjust the lightness of a color in the image.
The sliders correspond to the colors in the original image.
Drag to the left to darken a color.
Drag to the right to lighten a color.
Photoshop adjusts the color.
A In this example, a kayak is darkened by clicking and dragging the Cyans slider to the left.
Click OK to apply the adjustments.
Adjust Lighting with the Mouse

With the Black and White dialog box open, click inside the image and then press and hold the mouse button ( changes to
  ).
).
B Photoshop reads the clicked color and then highlights the relevant color in the dialog box.
With the mouse button down, drag the cursor to the left or right to adjust the color lightness ( changes to  ).
).
Click OK to apply the adjustment.
TIP
How can I tint my image by using the Black & White tool?

Click the Tint check box ( changes to ).
Photoshop tints the image.
Click and drag the Hue slider () to control the color of the tint.
A You can also click the color box to choose a tint color.
Click and drag the Saturation slider () to control the intensity of the tint.
Click OK.
Adjust Vibrance
The Vibrance command can boost the intensity of the colors in an image, helping you improve the look of a faded or washed-out photo. You can also use the command to mute an overly colorful image. For another way to boost colors, see “Adjust Hue and Saturation.”
If you make a selection before performing the Vibrance command, only the selected pixels are affected. Similarly, if you have a multilayered image, your adjustments affect only the selected layer. For more on making selections, see Chapter 4. For more on layers, see Chapter 8.
Adjust Vibrance

Click Image.
Click Adjustments.
Click Vibrance.
The Vibrance dialog box opens.

To display your adjustments in the image window as you make them, click the Preview check box ( changes to ).
Click and drag the Vibrance slider () to adjust the intensity of the colors.
The Vibrance setting takes into account the current saturation of the colors, emphasizing colors that are less intense.
Click and drag the Saturation slider () to adjust the intensity of the colors in the image.
The Saturation setting changes the intensity evenly across all colors.
Click OK.

Photoshop applies the adjustments.
TIP
How can I improve an under- or overexposed image?
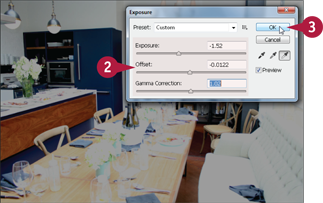
Click Image, Adjustments, and then Exposure.
Make exposure adjustments by dragging the sliders ().
Drag the Exposure slider to adjust highlights.
Drag the Offset slider to adjust shadows and midtones.
Drag the Gamma Correction slider to adjust the gamma brightness function, which can correct for varying monitor brightnesses.
Click OK to apply the adjustments.