6
Bathtub and Shower Fitting Design and Engineering
Although kitchens and bathrooms share a category of fittings for the sink or lavatory, the bathroom has additional fitting requirements for bathing and showering. Therefore, this chapter focuses on these two specific bathroom water centers.
Chapter 5 includes information on fabrication, finishing, and water control systems. This information is applicable for fittings specified for bathtubs as well as showers and is not reviewed again in this chapter. Because of the importance of water temperature control in showering activities, this chapter includes additional information about scald protection devices.
In addition to detailing the types of fittings available for bathtub and showers used daily, this chapter includes information on two additional specialty water therapy environments: steam rooms and sauna spaces.
- Learning Objective 1: Detail the water delivery and removal fitting and system component parts for bathing and showering.
- Learning Objective 2: Explain how fittings can protect the user from scalding hot water.
- Learning Objective 3: Provide a description, with detailed drawings, of popular types of multihead shower enclosures.
- Learning Objective 4: Review basic planning considerations for steam showers and saunas.
BATHTUB FITTINGS
Bathtub fittings include the valve, the spout, and (as a separate component) a wastewater component and an overflow protector. A separate hand-held personal shower may also be included for the bathtub.
Bathtub Valve and Spout Configurations
The bathtub valve may serve the bathtub only or may include a diverter, which transitions the water flow between the bathtub and an overhead shower. We first discuss valving for a bathtub that offers only a bathing experience.
The type of bathtub it is serving determines the component parts of the valve.
-
Bathtub in an alcove. The valve and spout normally are mounted on a wall at one end of the bathtub. The valve is typically a single-handle control. Figure 6.1 shows an alcove bathtub with a partial glass panel while Figure 6.2 shows an alcove bathtub enclosed by a shower curtain.
- Bathtub under-mounted in a platform or top-mounted on a platform. The valve and spout are installed in a specific location according to the bathtub’s design for top-mounted installations. The valve and spout may be placed anywhere along the deck perimeter if the bathtub is installed below the deck surface. The most popular valve configuration has three separate component parts.
- Separate hot and cold faucets mix the water, which enters the bathtub through a specially designed spout. Size the spout to extend over the bathtub. Based on ergonomic planning considerations, the valves should be placed away from the center of the bathtub. The bather then has more clear deck space to enter the bathtub safely.
-
Freestanding bathtub. Both contemporary and traditional freestanding bathtubs are available. They may be placed close enough to a wall to be partnered with a traditional wall-mounted bathtub valve and spout. Alternatively, a tower can be built to accommodate the traditional bathtub and valve configuration (see Figure 6.3). More commonly, these freestanding bathtubs are served by a floor-mounted filler system (see Figure 6.4). It may be designed to be a sturdy, single-column apparatus with bathtub spout and filler, accompanied by an adjacent hand-held shower. It also is available in very traditional two- or three-post systems. The designer and installation team should carefully review the manufacturer’s installation instructions before the bathroom’s rough framing or floor material is finalized to make sure proper support is provided for the fixture’s tower.
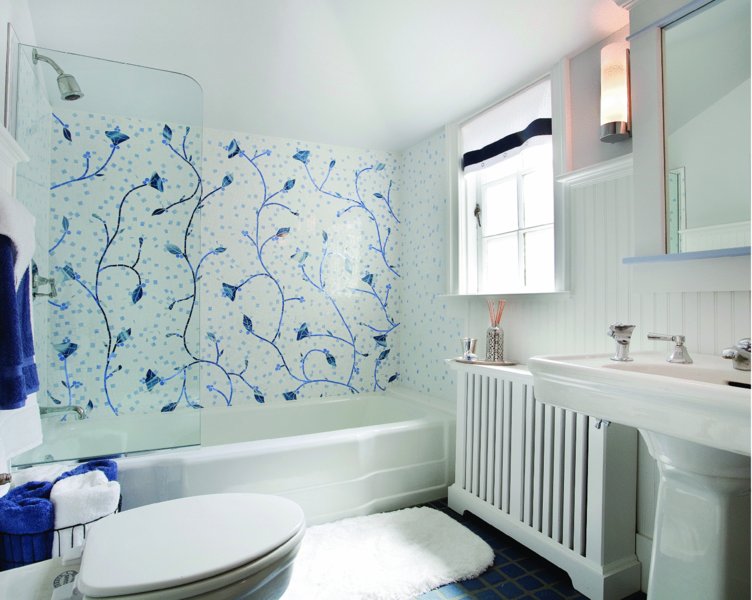
FIGURE 6.1 An alcove bathtub/shower combination with partial glass shower panel
Design by Cindy McClure, CKD,MCP, CGP, codesigner DC Design House Photo by John Tsantes
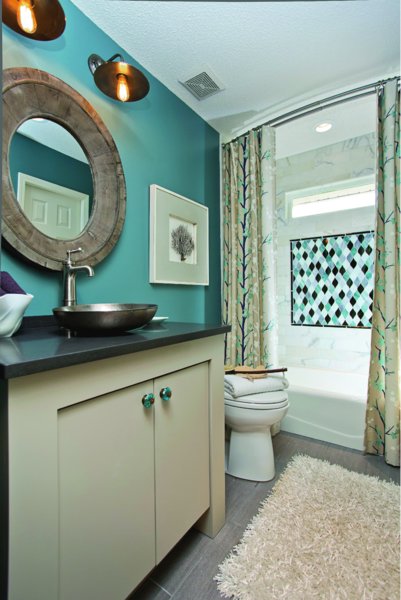
FIGURE 6.2 An alcove/bathtub shower combination enclosed with drape shower curtain
Design by Cheryl Kees Clendenon. Photo by Greg Riegler
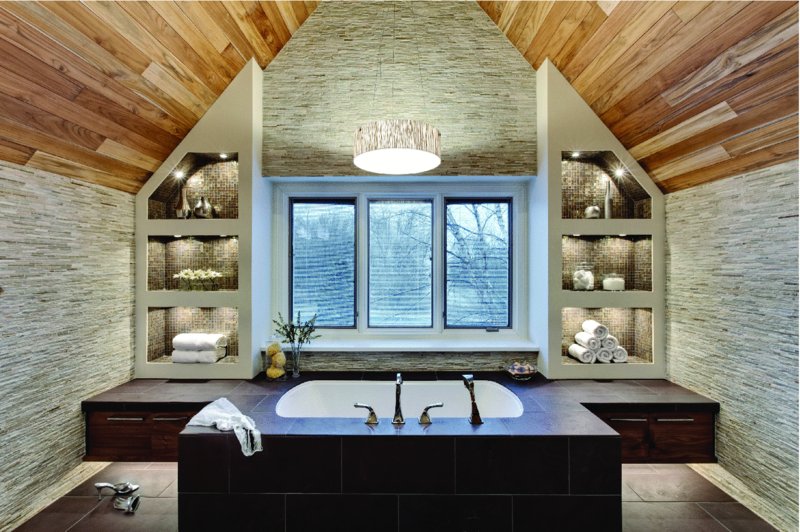
FIGURE 6.3 A freestanding bathtub in a platform with deck-mounted fittings
Design by Brigitte Fabi, CMKBD. Photo by Eric Hausman
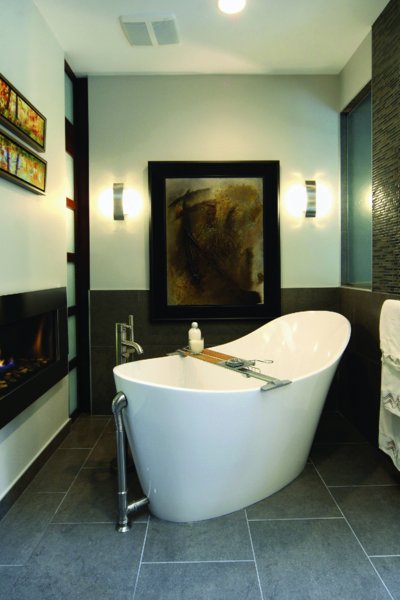
FIGURE 6.4 Freestanding bathtub with floor-mounted bathtub fittings
Design by Christine Salas, CKD, CBD. Photo by Brian Charlton/OBEO
Mounting the Fitting
In addition to making sure the supply line, valve, and spout are correctly sized to fill the bathtub in a reasonable amount of time, be sure the spout and valves can be properly connected on the fixture rim or on the surface deck.
Most deck-mounted fittings require connection from underneath the finished deck. This means you must also plan access for future servicing. Some manufacturers now provide quick connect systems, which allow you to attach the deck-mounted spout more easily than in the past.
Make sure the overall deck ledge depth is less than the overall dimension of the spout outlet. Note that the spout might actually be part of the bathtub.
Hand-held Shower
A hand-held shower is one of the most useful fittings you can suggest for a client planning a bathing space. It makes washing hair in the tub or rinsing off much more pleasant. It is extremely useful when bathing children or pets. In addition, it makes cleaning the bathtub much easier.
There are several systems from which to choose. The typical installation requires the use of a bathtub filler and a diverter valve to channel the water from the bathtub spout outlet to the hand-held spray. The diverter category offers two mechanical options: a rotary-action valve or a spring-loaded push- or lift-type valve. Bathtub valves with hand-held showers are outfitted with a vacuum breaker to prevent any backflow of used water into the potable house water supply system.
Wastewater Drain and Overflow Protector
There are two final elements to the bathtub fitting system. Wastewater is removed from the bottom of the bathtub by a drain located either in the center of the bathtub or at one end. An overflow protector fitting is located along the side of the bathtub: either at one end or in the center of a side wall. The overflow fitting limits the amount of water in the bathtub because when water rises to the overflow, it will begin to drain from the bathtub. Because the distance from the bottom of the bathtub to the waste overflow varies between fixture models, make sure you order the correct waste and overflow to fit the bathtub you have specified.
Types of Wastewater Drains
Pop-up and trip-lever drain. The standard North American pop-up or trip-lever types of waste and overflow are economical and fit most bathtubs. The trip-lever version has a stopper below the perforated drain. The pop-up version has a lift-up mechanism in the open drain. Either is activated when a lever is tripped or a rotary knob is turned.
Cable drain. An alternative is a cable drain that places no mechanical components in the tubular passageway of the system. Rather, a cable runs outside the system and connects the handle of the overflow to a plug-lift mechanism just below the outlet’s flange. It is important to provide access to the plumbing wall behind the bathtub when specifying a cable drain because the mechanism is not accessible from inside the bathtub.
BATHTUB/SHOWER COMBINATION FITTINGS
The bathtub may also serve as a combination bathtub/shower. In this installation, the fittings include the bathtub filler/spout, a diverter valve that allows the water to be directed down to the bathtub spout or up to the showerhead and the showerhead itself. These three are typically installed on one common wall in a straight line. However, installations can be more elaborate with the addition of a hand-held shower. Therefore, designers should be familiar with the preceding information on bathtub fittings and the information that follows regarding shower fittings when planning a combination bathing/showering enclosure.
Diverter
The diverter for a bathtub/shower combination can be a pull knob on top of the bathtub spout, a push or turn handle diverter placed between the hot and cold valve on the wall, or a button diverter on a single-handle shower control. A multihead shower enclosure may also have a diverter fitting if the showerheads are not used at the same time.
The section titled “Shower Fittings” presents a detailed discussion of shower fittings that are appropriate for either a separate, stand-alone configuration or a bathtub/shower combination.
Access to the Pipes
In all installations, shutoff valves service the supply lines. In many installations, an access panel, as illustrated in Figure 6.5, is included so these shutoff valves are accessible in a closet behind the bathtub or through an access panel in the wall that is camouflaged behind a piece of furniture. Alternatively, some have shutoff valves that are accessible from underneath the escutcheon plate. This feature eliminates the need for an access panel.
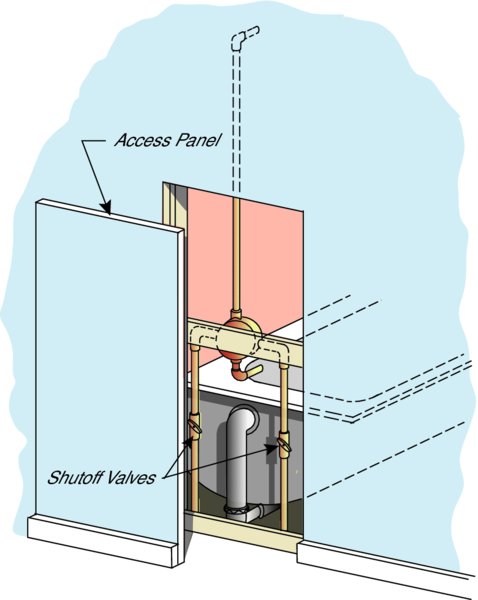
FIGURE 6.5 Bathroom fitting design: Bathtub/shower piping. Provide access to the bathtub/shower piping in a wall at the end of the fixture.
SHOWER FITTINGS
Safety in the Shower
Before we discuss shower valve or head placement, let us return to the issue of safety in the bathroom. The bathrooms you design must be functionally and ergonomically correct, and they must be safe.
The bathroom is one of the most dangerous rooms in the house. One source puts the number of scalding injuries alone in North America at more than 150,000 each year. Remember, children have thinner skin than adults have and are more easily burned in less time and by lower-temperature water. Additionally, showers and bathtubs ranked third among products associated with death among people 50 years of age or older due to slipping or falling.
Scald Protection Devices
Scalding accidents can be eliminated. Scald protection valves are available. Currently there are four broad categories of fittings that offer such protection.
Pressure-Balancing Valve
A pressure-balancing valve adjusts the mix of the hot and cold water in response to changes in relative supply inlet pressures. The valve compensates for the reduction of pressure in one supply line by increasing the flow coming from the supply and/or reducing the flow coming from the other supply. This type of valve does not compensate for changes in the temperature of hot and cold supplies. Therefore, the valve would not react to water temperature changes that occur because of a diminishing hot water supply.
Thermostatic Valve
The thermostatic valve system adjusts the mix of hot and cold water in response to changes in temperature. It automatically adjusts the flow of hot and cold water to maintain a relatively constant temperature. It can be slow to respond or it can briefly overcompensate for changes in supply pressures. This means you may have one to two seconds of a noticeable temperature change as the water supply cuts off or as the valve adjusts. This valve will supply a constant temperature shower because it will adjust the cold water supply as a reaction to a diminishing hot water supply.
Combination Valve
A combination valve combines pressure-balancing and thermostatic controls. This system compensates for both temperature and pressure fluctuations of supply inlets.
Temperature-Limiting Valve
A temperature-limiting valve is a high-temperature-limit stop that is adjustable by the installer or a family member. The high-temperature-limit stop prevents scalding by limiting the temperature of the water that can pass through the valve. The device is located under the lever and escutcheon of single-handle faucets and requires a simple screwdriver for access. A limit can be set for the hot water temperature delivered at the faucet and can be adjusted as the family’s life stage and safety standards change.
All of these systems are designed for use with a showerhead minimum flow rating of as low as 1.5 gallons per minute (gpm). They perform under supply pressures up to 125 pounds per square inch.
Any well-designed bathroom today should include pressure-balanced or thermostatically controlled valves at the shower and/or bathtub/shower combination. Check local codes as these may be required in your area.
Basic Shower Components
Pan with Drain
The shower enclosure will have some type of a base. This base may have a curb that the user steps over as well as a perimeter wall to protect against moisture damage (see Figure 6.6). These types of pans may be made from formed plastics, solid surfacing materials, or other types of man-made products. Alternatively, the pan may be constructed out of ceramic tile. They may be minimal in size, or they may extend up the shower walls and include a bench or footrest.
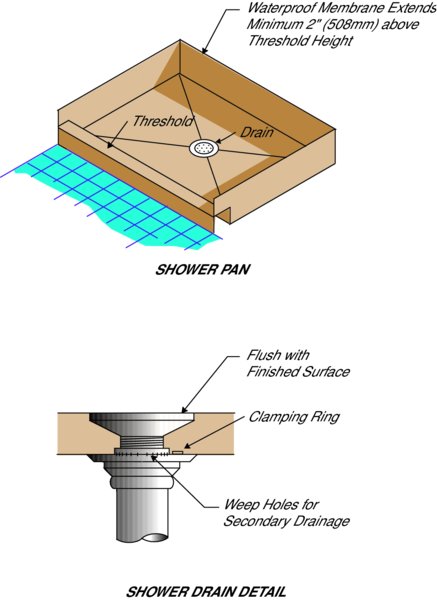
FIGURE 6.6 A shower pan and drain detail
A more detailed description of types of custom pans as well as planning considerations for curbless shower pans, as seen in Figure 6.7 and Figure 6.8, is included in Chapter 4.
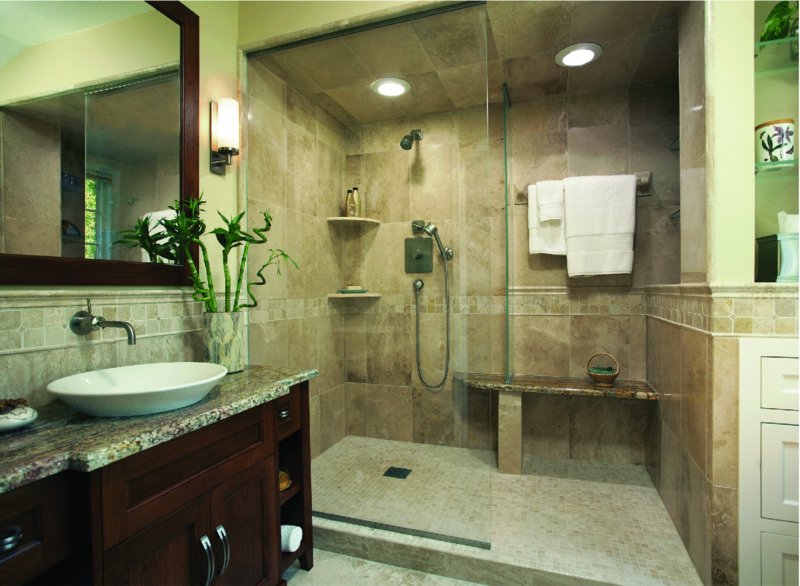
FIGURE 6.7 A curbless shower without a door. Note the shower seat extending into the shower area.
Design by John Sylvestre, CKD. Photo by Karen Melvin Photography
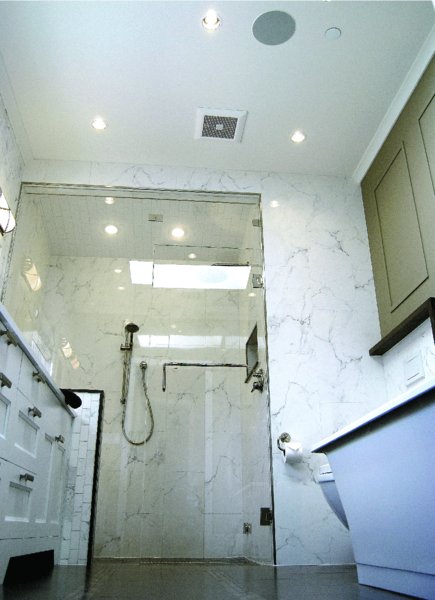
FIGURE 6.8 A master bathroom with separate freestanding bathtub and glass-enclosed shower
Design by Corey Shannon Klassen, CKD, CBD, codesigners Ian MacDonald, Scott Lumby. Photo by Jason Karman
The Valve
Manual mixing valves. Basic mixing valve options available for the shower are similar to those previously discussed for the lavatory: two-handle faucets and single-control faucets.
Electronic mixing valves Available for faucetry at the sink as well, electronic mixing valves are highly desirable in a shower. The valve acts as an electronic thermostatic valve because it maintains the temperature that has been programmed in by the user. When turned on, the unit always resets and delivers at an initial 98° F. Depressing either the up or down button shifts the readout display to the set point mode, causing the numbers to change in the direction of warmer or cooler until released. Once that button is released, the readout reverts to the actual temperature mode so the water temperature begins to move toward the selected setting and stops when it gets there. There is a hot limit device built into the valve as well as an integral pressure-balancing mode.
Shower Head
Water Energy Efficiency Dilemma
The U.S. Department of Energy limits the amount of water that can pass through a nozzle to 2.5 gallons per minute. This law was designed to limit both water and energy used to heat the water and to pump the water in a residential home. This limit of allowable gallons per minute has negatively affected the performance of the showerhead.
There is a sporadic, ongoing discussion about governmental limitations extending to the number of showerheads allowable in multi-nozzle enclosures. Currently, the requirement is that each individual nozzle meets the flow capacity limit. There are no legislative limits on the number of showerheads within the enclosure. The discussion continues.
While the government limits showerheads to 2.5 gpm, Energy Star showerheads are available that only use 1.5 gpm. When originally introduced, these showerheads conserved water by highly aerating the water as it exited the showerhead. By simply mixing air and water, the user had the impression of a more powerful shower, but many complained there was not enough actual water to experience an acceptable shower. For example, rinsing shampoo out of hair took longer. Due to the increased surface space of the aerated water drops, the water temperature cools dramatically from the time it leaves the showerhead until it reaches the bather’s body. Because humans are sensitive to a temperature drop of 2˚, showerhead engineers have looked for alternative systems.
New Showerhead Technology
New technologies have been introduced that reduce the amount of water by changing the way the water and air is mixed (see Figure 6.9). Showerheads are now available that control the water droplet’s shape, velocity, and thermal dynamics, resulting in larger water drops. These larger droplets retain their heat longer and provide a denser spray pattern. These showerheads may be quieter than conventional showers and do not include any moving parts. They are available in 1.5-gpm ratings, which results in a 36 percent decrease in water usage compared to the government-regulated maximum of 2.5 gpm.
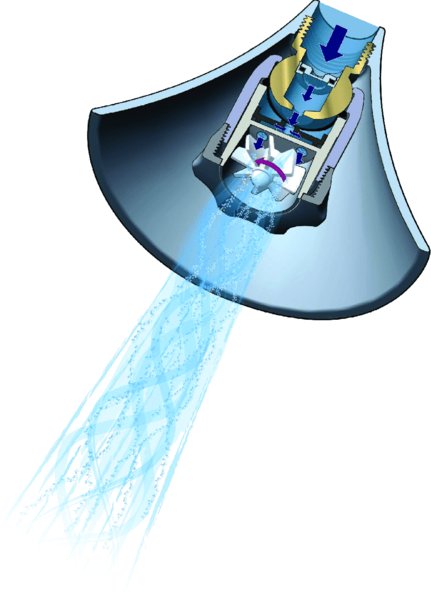
FIGURE 6.9 Diagram detailing new technology that mixes air with water
Courtesy of American Standard
Types of Showerheads
Ergonomic and usage considerations for showerhead design and placement are discussed at length in the Bath Planning volume of the NKBA Professional Resource Library. In this chapter, we identify the different types of showerheads.
There are numerous showerheads available today. Generally, there are four broad categories of showering options: personal hand-held shower, wall-mounted shower, overhead shower, and body spray shower.
-
Personal hand-held shower. The personal hand-held shower is ideal in showers used by people of varying heights as well as near a bench in the shower that is out of the stream of water (see Figure 6.10).
Hand-held showers are also a great addition to a shower used by an elderly person who may need assistance while bathing. Shower cleaning is also much easier with a hand-held shower. A hand-held shower can be incorporated into a wall-mounted showerhead as shown in Figure 6.11.
- Wall-mounted shower. The wall-mounted showerhead is the most typical installation (see Figure 6.12). It can offer several spray patterns, from a soft, gentle mist to a strong, invigorating spray. Some models integrate the personal hand-held shower into the center of the wall-mounted shower, simplifying plumbing yet offering two fixtures.
- Overhead shower (sometimes called rain-head shower). The overhead shower is placed on the ceiling. It may require a great deal of water to operate—check the manufacturer’s specifications.
- Body spray shower. A body spray is a group of individual showerheads, installed in a series of two or three, along opposite walls. They are normally directional, so the user can customize the showering experience.
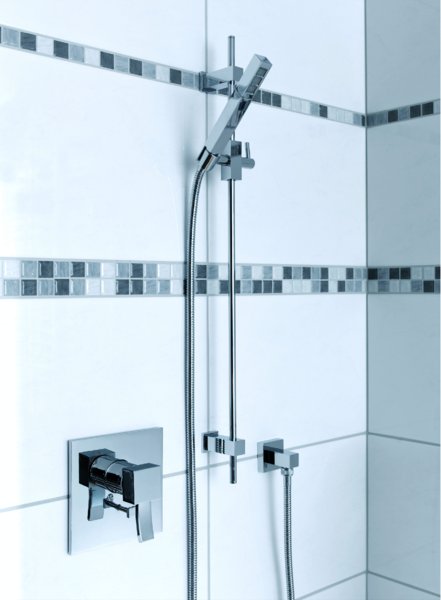
FIGURE 6.10 A hand-held shower can provide multifunctioning shower fittings.
Courtesy of ROHL
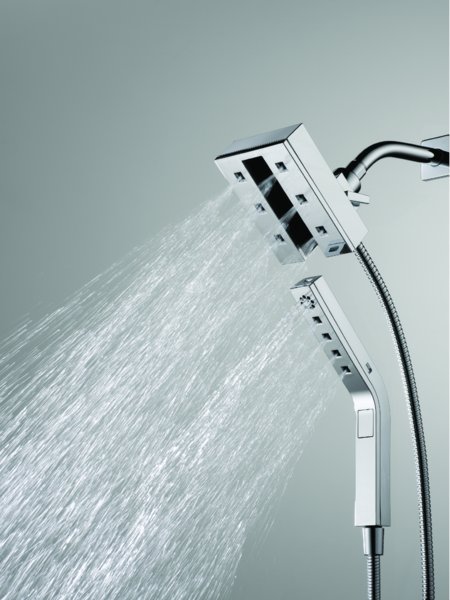
FIGURE 6.11 Hand-held shower incorporated into a wall-mounted showerhead
Courtesy of BRIZO
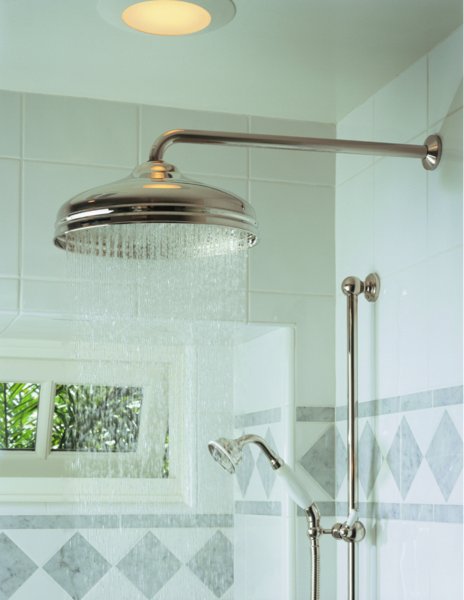
FIGURE 6.12 A wall-mounted shower on an extended rod provides a water experience similar to a ceiling-mounted showerhead. The hand-held shower is installed separately.
Courtesy of ROHL
As a designer, you may be asked to incorporate various types of showerheads into your shower design, as seen in Figure 6.13.
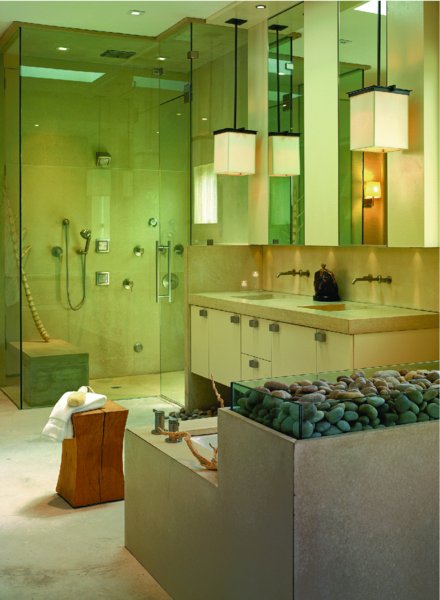
FIGURE 6.13 Shower enclosure with wall-mounted, overhead, and hand-held showers
Design by Ada Pagano. Photo by Everett & Soule
Special Showerheads
Innovations are constantly being introduced to enhance users’ showering experience. Chromatherapy lights can be part of a showerhead. The showerhead can provide a speaker for the user’s favorite music. Designers should confer with a plumbing fixture/fitting expert when working with a client who has expressed an interest in such new, innovative shower fittings.
Water Patterns
Sophisticated showering systems can be programmed to provide different water experiences in a selected sequence. These water options are typical:
- Adjustment. The basic spray adjusts from fine to coarse.
- Spray pattern. A full spray pattern is more desirable than one that only delivers water around the perimeter of the head, leaving a hollow in the center.
- Water action. Showerheads can offer a soft, gentle action, as seen in Figure 6.14, or a pulsating, invigorating massage.
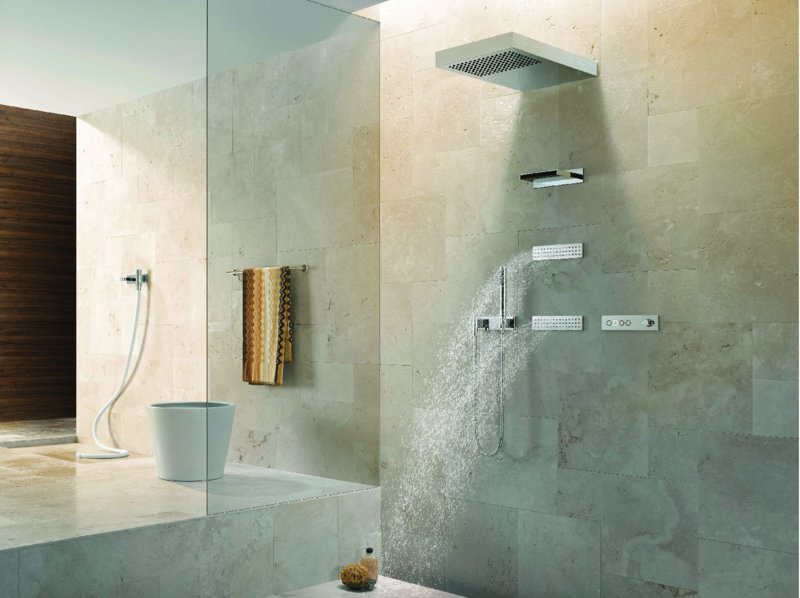
FIGURE 6.14 Shower systems are available that allow the user to set the different water patterns.
Courtesy of Dornbracht Americas Inc.
Designing a Multiple-Head Shower Enclosure
When specifying multiple showerheads in an enclosure, ask this key question: Is this enclosure designed for one person to use with multiple heads that offer a variety of shower experiences or is it a shower enclosure with multiple heads that will be used by more than one person at the same time? The planned usage determines how the various showerheads are controlled and if they are sequential or concurrent (a choice between which showerhead to turn on versus the choice of having all or some of the showerheads on at the same time).
Determine How the Shower Will Be Used
If the shower is for one person, a diverter system can be designed to offer the user a choice of the various heads. For example, an overhead showerhead could be used in place of body sprays rather than concurrently. This type of arrangement is designed with one mixing valve and a diverting device to direct the water to the various heads.
Or several users may enjoy the shower together. When two or more showerheads operate at the same time, you must pay particular attention to the water pressure, the size of the piping and the flow rate of the showerheads, and the mixer and diverter device. Designers should select a multiple-head system engineered by the manufacturer, with detailed schematic designs and installation requirements. Figure 6.15 is a plumbing schematic for a multiple-showerhead shower enclosure showing imperial measurements while Figure 6.16 shows the same schematic with metric measurements. Figure 6.17 is another plumbing schematic of the same multiple-head shower design.
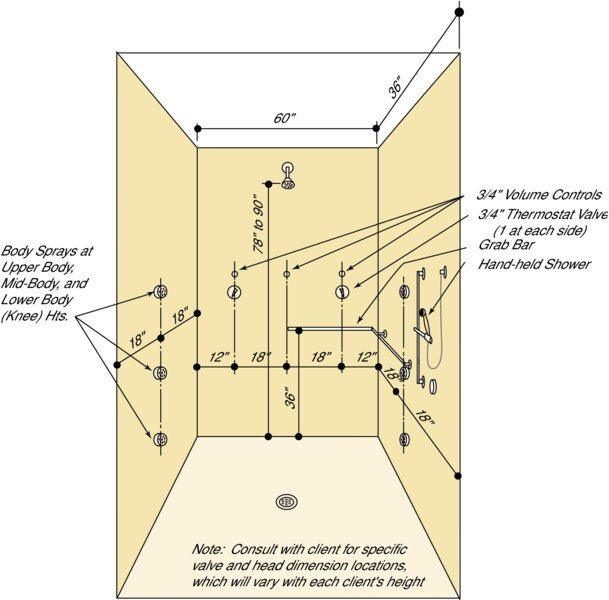
FIGURE 6.15 Plumbing schematic for multiple-head shower enclosure (Imperial)
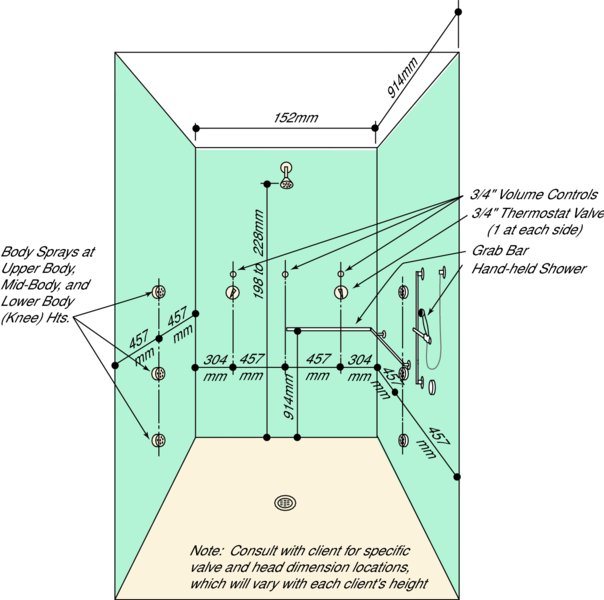
FIGURE 6.16 Plumbing schematic for multiple-head shower enclosure (metric)
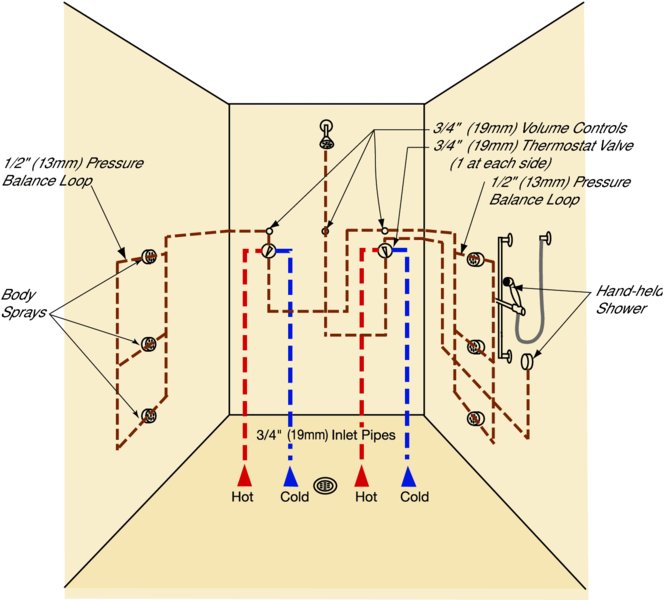
FIGURE 6.17 Plumbing schematic for multiple-head shower enclosure
Shower Tower
Both for the retrofit market and for custom enclosures, manufacturers offer shower towers connected to a single water source, as seen in Figure 6.18, which provide several or all of the types of showerheads just described as individual elements in one preengineered, predesigned system. Although the initial purchase price is high, the installation is simplified and installation costs are reduced.
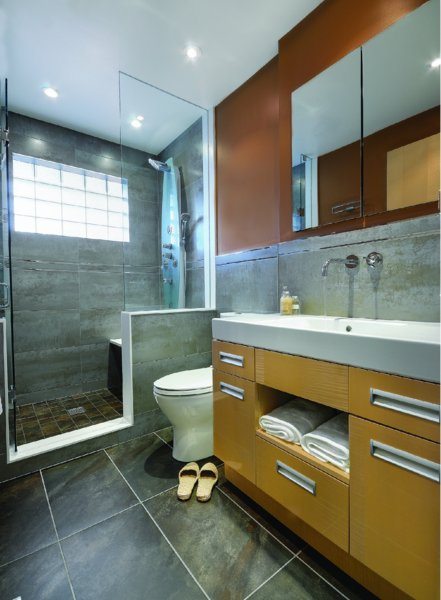
FIGURE 6.18 A shower tower incorporates all of the showerhead choices into a single fixture.
Design by Richard J. Farrell. Photo by Tim McClean Photography
STEAM SHOWERS AND SAUNAS
Jetted bathtubs were discussed in Chapter 4. This chapter concludes with an explanation of steam shower planning criteria and sauna planning guidelines.
Steam Showers
Steam showers are yet another way to provide a relaxing, refreshing experience. A steam bath invigorates the body’s systems and cleanses the skin by opening the pores and flushing out the dirt. The normal steam bath lasts from 10 to 20 minutes in an enclosed environment with high humidity and temperature levels. Following a steam experience, a lukewarm shower can be taken to further relax, or a cold shower can be taken to stimulate the body.
In the past, steam rooms were available only at the finest private clubs and spas. Today, including a steam bath as part of a stall shower is an affordable addition to even a modest bathroom space.
The steam shower is energy efficient and does not require any more floor space than the stall shower you are already planning.
Enclosure Design
The next constraints and/or planning concerns must be taken into account when considering a steam bath.
Wet Wall Material
Avoid specifying any material that may be subject to decay due to prolonged exposure to steam or moisture. Verify with the specific manufacturers if their wall surfacing material is acceptable in a high-heat, high-humidity environment. Also, use a waterproof substrate material behind the decorative surfacing material you select.
In all applications, use waterproof adhesives or silicone sealants as well as waterproof or epoxy paint.
Glass
Specify a completely enclosed, vapor-proof door. Fixed or operable transom panels are available as an accessory to standard shower doors to enclose the space to create a steam environment.
Seat Design
Place any permanent or portable benches well away from the steam nozzle. A person sitting in the steam room can be burned by an unexpected burst of steam.
Ceiling Slant
Slanting the steam room ceiling away from the seating area is recommended. A slanted ceiling ensures that as steam condenses on the ceiling, it runs down the slant, away from the seated user. The ceiling should be 7 high.
Sizing the Generator
Choosing the appropriate generator is the most important factor for a functional steam room in the home. A properly sized and engineered steam generator produces steam in the enclosure very quickly.
The cubic footage of the enclosure determines the size of generator needed. The construction and decorative surfacing materials also affect the size of generator you specify. The surrounding temperature must also be taken into account.
- Timer. A timer will be included to limit steam generation.
- Wall material. The porosity level of the material selected affects the cubic footage formula used to determine the generator size. Common surfacing materials and their effect in the cubic footage calculations are as follows.
- All glass or glass block: Add 20 to 40 percent to the actual cubic footage of the enclosure.
- Ceramic tile on water-resistant sheetrock: Add 15 percent to the actual cubic footage.
- Ceramic tile on cement board: Add 20 percent to the actual cubic footage.
- Ceramic tile on mortar bed (mud) substrate: Add 25 percent to the actual cubic footage.
- Ceramic tile on cinderblock or concrete: Add 75 percent to the actual cubic footage.
- Fiberglass, acrylic, or cultured marble: Decrease the actual cubic footage by 20 percent.
- Natural stone, marble, travertine, or slate: Add 100 percent to the actual cubic footage.
- Determine cubic footage. When calculating the cubic footage of the enclosure, do not deduct for the bench area, since it requires nearly the same surface area. Remember, heat is lost to the surface area in a steam enclosure.
- Surrounding temperature. Ambient room temperature should be between 68° F and 72° F (20° C and 22° C).
- If the steam room is installed against exterior walls, particularly in a cold climate, the walls should be insulated or the generator will need to be increased in size. Typically, it is recommended you add 10 percent to the generator size for each exterior wall, whether insulated or not.
- Pipe run length. Although the generator can be located in many different places, the closer it is to the steam enclosure, the better. (See Figure 6.19.) Some manufacturers will tell you it can be as far as 20 feet (6.10 m) away from the enclosure; others say as much as 50 feet (15.24 m). However, the farther the generator is from the enclosure, the longer it takes steam to get there. Add an additional 15 cubic feet (4.57 m) to the overall shower enclosure size for pipe runs between 15 and 25 feet (4.57 m and 7.62 m).
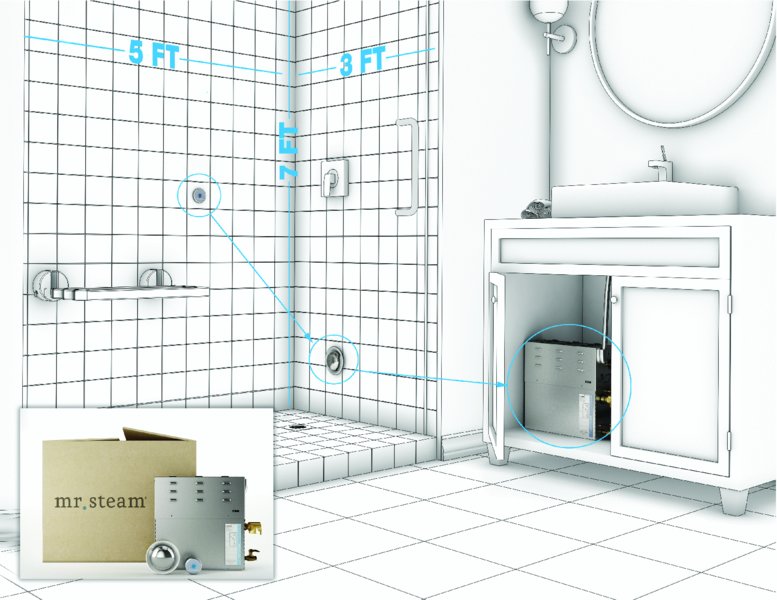
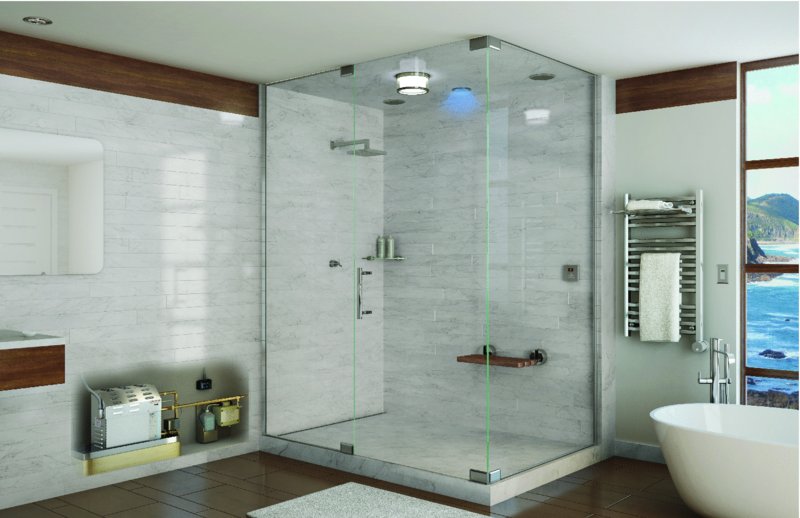
FIGURE 6.19 A steam shower
Courtesy of Mr. Steam®
After you determine the cubic footage of the steam room based on these additional criteria, refer to a specification chart provided by the manufacturer to determine the proper steam generator model.
If the calculated cubic footage capacity falls between two models, always choose the larger unit.
Saunas
Explanation of Use
Although sauna procedures are as varied as individual users, most enthusiasts recommend briefly showering, then entering the sauna for 5 to 15 minutes. The individual may sit or lie in the insulated wooden room. The lower bench is always cooler than the higher one. Next, a cool shower, a swim in the pool, or a roll in the snow invigorates the body’s system. A 10- to 15-minute rest follows. Finally, a second visit to the sauna for about 20 minutes is enjoyed. During the second visit, a brief whisking of the skin increases circulation.
Ladling water over hot stones can add a refreshing burst of humidity during the final moments. A second 20-minute rest is suggested, followed by a final shower and a light snack.
Enclosure Design
Sizing Recommendations
Popular family saunas range in size from 4 by 3 foot to 6 by 6 foot shapes. Regardless of the overall shape, a 7-foot ceiling is recommended to prevent heat from rising into unused space. A door 1 foot 8 inches to 2 feet wide and 6 feet 8 inches high and swings out without any type of locking device minimizes heat loss and maximizes safety.
Because showering and resting are an integral part of the sauna experience, this specialty fixture should be located near the bathroom or swimming pool, with a dressing and resting area nearby.
Wall, Floor, and Ceiling Materials
The overall sauna enclosure generally is built out of wood. Although the traditional sauna uses aspen wood, kiln-dried, clear, all-heart, A-grade redwood is an adequate substitute for the modern day sauna because of its ability to withstand extreme temperature changes. Redwood acts as an insulator on walls, ceiling, and floor. In addition, it diffuses the heat so the surfaces remain warm, but not hot, to the touch.
Ventilation/Lighting
The sauna should feature soft, subdued lighting and good ventilation to prevent people from becoming dizzy. Prefabricated units offer an ideal design solution for sauna planning.
Manufacturers provide easy-to-assemble, well-thought-out systems that generally include these parts:
- Intake vent. Located near the floor in the wall behind the stove or installed in the sauna door.
- Outlet. For cross ventilation, located at the opposite wall approximately level with, but not below, the intake vent, or a few inches from the ceiling.
- Lighting. A lighting system that is soft and controlled from the outside of the enclosure. The fixture selected must be approved for a wet-room environment. This normally means it must have a cover, and may have a very low lumen rating.
Fuel Sources
A stove used in the sauna may be electric or gas. The proper kilowatt (kW) rating for electric heaters, or British thermal unit (Btu) rating for gas heaters, is based on the size of the sauna as well as the wall insulation and the location of the sauna in relationship to air-conditioned or non-air-conditioned adjacent spaces.
For example, for a sauna 5 by 7 feet installed indoors with good insulation, 1 kW of electricity per 40 cubic feet of room space is adequate. For a gas heater, 1,000 BTUs planned for every 15 cubic feet of floor space will also do the job. (Of course, the traditionalist client may select a wood-burning stove with a chimney.)
The sauna must also include a temperature control, located just outside the sauna room.
SUMMARY
Bathing and showering can be dangerous activities. According to one study conducted by the Center for Injury Research and Policy of the Research Institute at Nationwide Children’s Hospital, more than 43,000 children 18 years and younger in the United States are treated in hospital emergency departments annually for injuries occurring in a bathtub or shower. The number of injuries remained consistently high over the 17-year study period from 1990 to 2007.
As a person ages, bathroom accidents become more common. Overall, mishaps near the bathtub, shower, toilet, and sink caused an estimated 234,094 nonfatal injuries in the U.S. in 2008 among people at least 15 years old, the Centers for Disease Control and Prevention reported. In addition, the injury rate rises with age. The report went on to state:
The highest rates were for injuries that occurred in or around the tub or shower (65.8 per 100,000) and injuries that happened on or near the toilet (22.5 per 100,000). The precipitating events in 37.3 percent of injuries were bathing (excluding slipping while bathing), showering, or getting out of the tub or shower; only 2.2 percent occurred while getting into the tub or shower. The precipitating event for 17.3 percent of injuries was slipping, which included slipping while bathing; 14.1 percent occurred when standing up from, sitting down on, or using the toilet.
A well-planned bathtub area or shower enclosure can provide a safe center for personal hygiene as well as restful, relaxing water therapy.
A word of caution is in order as we conclude this discussion of fittings for bathing and showering: Extreme temperatures stimulate the cardiovascular system. Individuals with high blood pressure, respiratory or heart disease, circulatory problems, or chronic illness, such as diabetes or epilepsy, should check with their physician about any concerns in regard to warm-water bathing or extended showering. A review by a physician is even more important for a client considering a steam room or sauna. In many cases, physical challenges will preclude an individual from enjoying these high-heat experiences. Additionally, pregnant women and individuals under the influence of alcohol or other drugs should avoid saunas or steam rooms.
Whatever your client’s choice—a comfortable bath, a revitalizing shower, a relaxing steam bath, or sauna—designers are challenged to carefully question the prospective client, be well versed in product availability, and have an in-depth technical knowledge of the fittings and component plumbing parts required to create well-designed bathing or showering environments for the bathroom.
REVIEW QUESTIONS
-
What is the difference between a wastewater drain and an overflow protector in a bathtub? See “Wastewater Drain and Overflow Protector” page 215)
-
Describe the difference between a pressure balance valve and a temperature-limiting valve. (See “Scald Protection Devices” pages 216–217)
-
What is the name of the fitting used to reroute water from one showerhead to the bathtub filler or between showerheads in a shower enclosure? (See “Bathtub Valve and Spout Configurations” pages 211–212)
-
What is the difference among a hand-held shower, a body spray, and a ceiling-mounted showerhead? (See “Types of Showerheads” pages 220–221)
-
Why should a steam enclosure have a slanted ceiling? (See “Ceiling Slant” page 227)
-
What three elements of the design determine the generator size needed for a steam room? (See “Sizing the Generator” pages 227–228)
-
What are the key planning criteria for the entry/exit door planned for a sauna room? (See “Enclosure Design” page 229)