13
STORING YOUR DRIED AND CANNED FOODS
You’ve worked hard to can or dry your food, and it would be a shame to waste all of that effort by not storing your foods in a manner conducive to extending their shelf life. Three factors play a huge role in how well your foods will stand the test of time: temperature, temperature fluctuation, and humidity. If you’ve dried or preserved your foods properly, humidity shouldn’t be much of an issue, but that still leaves temperature.
There’s a reason why cellars are often underground or built into the side of a hill: those places maintain a constant, cool temperature that’s conducive to extending the shelf life of practically all foods. As a matter of fact, the U.S. Food and Drug Administration (FDA) states that when storing seeds, each 10 degrees of temperature drop doubles the shelf life of seeds. This applies to food, too, at least to a certain degree.
Temperature fluctuation has a huge effect, too. Foods that are warmed and cooled several times will change color and even flavor and texture. Nutritional value is lost, too, and if it becomes warm enough to affect the seals on canned goods, you may lose your food to spoilage. Since light alters temperature, it’s best to make sure that your storage place is dark.
To put it in a nutshell, store your foods in a cool, dark place that doesn’t have temperature fluctuations if you want to get the longest shelf life possible. It’s still important to rotate your emergency food supply, too.
There are a couple of additional things that you can do to preserve your hard work. Dehydrated foods are great, but as mentioned previously, they still have a limited shelf life. To preserve them for much longer periods, you can opt to dry-can them or vacuum-pack them.
Dry-Canning
Dry-canning is super simple and requires only an oven. It’s a great way to preserve dry goods for even longer than what the original shelf life is. As a matter of fact, when dry-canned properly, goods can last for as long as 20 years. This is a great way to save a lot of money when building your emergency food supply, because you can buy in bulk and can your goods in portions that won’t go bad. It also makes sharing and bartering easier in survivalist situations. Just a few foods that can be dry-canned include:
- Jerky
- Dried fruits and veggies
- Flour
- Rice
- Potato flakes
- Cake mixes
- Cornmeal
- Any other dry food with a low moisture content
Dry-canning kills any bugs or eggs that may be in the flour and seals the product so that it’s impervious to any kind of infestation or even damage caused by exposure to moisture or humid conditions. All that you need are your jars, seals, bands, and an oven.
High-fat foods such as nuts can’t be dry-canned, because the fat goes rancid. If you’re dry-canning dehydrated foods, make sure they’re properly dried to eliminate as much moisture as possible from the product.
Steps to Dry-Canning
This is an extremely simple process. Follow your jar-prepping procedures by making sure that your jars are sterile, but make sure that for this process they’re also dry. Moisture in the jar can be absorbed by the dry product and cause spoilage. Follow these easy steps to ensure success.
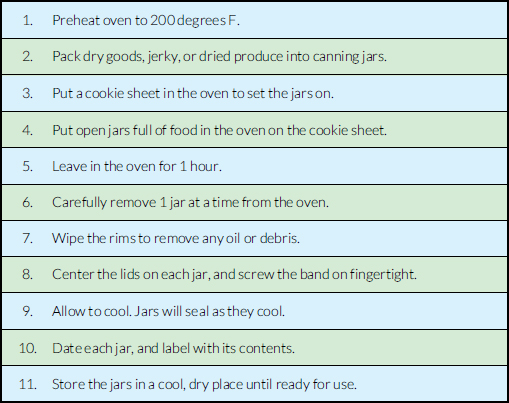
Now you know how to dry-can and have yet another food storage option to help you quickly build an emergency food supply.
Dry-Canned Butter
Dry-canning butter is a simple process and will be something that you’ll really thank yourself for in an emergency situation. Not only will it be a great cooking ingredient, but also it will be good for bartering because it’s a luxury item that most people won’t think to stock. Use full-fat, good-quality butter; this is one of those times that it just won’t do to cut corners. If you can get fresh organic butter, that’s even better. Storing in half-pint jars may be best if there are just a few people in your family, because it will begin to go rancid quickly without refrigeration.
|
• Full-fat butter, salted or unsalted |
• Half-pint jars, lids, and bands |
1. Heat your jars in the oven at 250 degrees F for 20 minutes. Meanwhile, prepare lids and bands by simmering them over low heat in a small saucepan.
2. Melt the butter over low to medium heat. Each half-pint will hold about ½ pound of butter.
3. Pour the butter into the jars using a funnel and perhaps a ladle.
4. Remove air bubbles, wipe rims, center the lids, and screw on the bands and adjust until they are fingertip tight.
5. Add the lids and bands. Tighten fingertip tight. Jars will seal as the butter cools. When jars are room temperature, put in the fridge or someplace cool so that the butter solidifies, and then store in a cool, dry place out of the sunlight. As long as it seals, it will be good for up to 3 years.
Yields ½ pound of butter per half-pint jar.
Vacuum-Packing
The enemies of dried foods are moisture and air. The previous section discussed how valuable dry-canning can be to combat moisture and air, but what if you need to leave in a hurry or don’t have a lot of space for storing food? You may want to consider vacuum-packing. You’ll need a vacuum-packing machine and bags. Here are some tips to get you started:
- If a food needs refrigeration prior to vacuum-packing, it’s going to need refrigeration afterward as well.
- Before you vacuum-pack your dried foods, do the moisture test on them: Place them in a jar with a lid or in a resealable bag for a few hours. If there’s condensation, the food isn’t dry enough and should be dehydrated some more. Spoilage is still an issue.
- Foods high in oil such as nuts will still go rancid even if you vacuum-pack them.
- Vacuum-pack single servings or daily servings only. Once they’re open, the spoilage clock is ticking.
- Make sure that all the air that you can possibly get out of the bag is out.
Vacuum-packing food is a fairly simple process but will vary slightly depending upon your vacuum-packing machine and bags. In general, however, all that you’ll need to do is put the food in the bag and seal it according to the manufacturer’s instructions. Date it and store in a cool, dry place until you’re ready to use. Remember to rotate your stock and follow storage directions.
One final point that is important to maintaining a good emergency food supply is proper rotation. To ensure that the older foods are being eaten first, date everything and place the newest food in the rear of your supply. That way, all you have to do when you access your stored foods is take the product that’s in front. And it’s one more way to make sure that your hard work isn’t wasted. After all, even food that you prepare yourself isn’t cheap, and wasting is an expensive proposition.