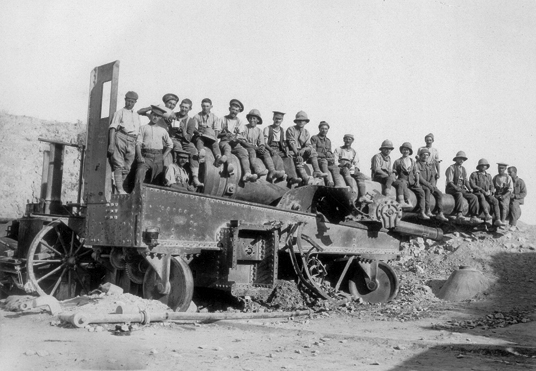

British Tommies sitting on a Turkish gun at Cape Helles. The destroyed Turkish forts at Sedd al Bahr were never repaired during the campaign, but made great photo opportunities for the Allied troops on the peninsula.
Concerned about their losses and their continuing inability to break through the Turkish lines at Gallipoli, the British had come to the belated conclusion that the small size of the Cape Helles and the Anzac beachheads negated the Allied manpower and reinforcement superiority. They therefore decided to conduct a second major amphibious operation in an attempt to outflank the Fifth Army.
Plans were set in motion to assemble a force that would conduct an invasion at Suvla Bay, immediately to the north of the Anzac beachhead, in conjunction with a large breakout by the ANZAC. The amphibious force would protect the left of the ANZAC as it outflanked Esat’s defensive lines and thrust across the peninsula to the Narrows.
The British were confident, knowing the area to be lightly held by the Turks. In fact, aerial reconnaissance and patrols indicated that not only was the northern shoulder of the Anzac perimeter lightly fortified, but the Suvla Bay area appeared to be almost completely unfortified and ungarrisoned. Moreover, in one of the driest years on record, the large Salt Lake (Tuz Golu) located just past the beaches was dry enough to support the weight of advancing troops.
Birdwood’s original plan simply envisaged a breakout from the Anzac perimeter, but once it became clear that London was making an entire additional army corps available, Hamilton’s staff began to re-examine the situation. The original architect of Birdwood’s plan, Colonel Skeen, was set to work to revise the operation. In its final configuration the plan comprised a two-part operation in which the ANZAC would launch an attack through the northern part of its perimeter, followed almost immediately by an amphibious landing at Suvla Bay. Skeen thought the combined force might then be in a splendid position to outflank the Turks and seize the high ground, making their position untenable. It was aggressive thinking and was devised to break the deadlock.
Kitchener sent IX Corps out to assist Hamilton in this endeavour. The corps was commanded by Lieutenant-General the Hon. Sir Frederick Stopford, who was then 61 years old. Stopford was a ‘dugout’ – an officer recalled from retirement (in this case, five years). He was a guardsman and had been on staff during the Sudan campaign, the Ashanti expedition and the Boer War. Surprisingly, Stopford had never personally commanded men in battle, but he was well liked and an expert in ceremonial affairs and military history. Compton Mackenzie found him courteous and fatherly, but a poor choice for commander of an army corps ‘that might change the whole course of the war in 24 hours’. Hamilton was dismayed when he found out that Stopford was coming out with IX Corps, and requested a more experienced and active commander, such as Byng or Rawlinson. Unfortunately, the tradition-bound system of seniority in the British Army made such a selection impossible and Stopford came anyway.

Suvla Bay viewed from the sea; to the right is Chocolate Hill. Behind the wide flat beaches of Suvla Bay lay a large salt lake, which in the summer of 1915 was dry and hard. The width of the Suvla beaches made them almost indefensible.
The principal formation available for the offensive was IX Corps, composed of the 10th (Irish), 11th (Northern) and 13th (Western) divisions, which were part of the first wave (K1) of Kitchener’s all-volunteer New Armies. Although these formations were activated in late August 1914, many of their senior officers were recalled from retirement and most of the junior officers were directly commissioned without proper training. There were a few battalion and brigade commanders who were regulars (mostly men on home leave from India). The 10th Division, the first all-Irish division in the army, was thought to be especially keen and was commanded by one of the best men available, Sir Bryan Mahon.
Kitchener also made two more divisions available. The 53rd and 54th divisions were put on orders for the operations, although they were sent without their artillery. The reason for this was the ongoing shell shortage that affected the entire British Army, and also there was the fact that the tiny Allied beachheads were already packed full of men, animals, guns and supplies, leaving no space to emplace more guns. The 53rd and 54th divisions were first-line Territorial divisions, part of Britain’s reserve force. Although these divisions were not as well trained as the regular army, they were commanded by regulars at brigade level and above, and contained a sprinkling of regular officers and NCOs throughout the battalions. A high percentage of the men were ex-regulars or serious reserve soldiers. These divisions had spent almost a year in training for war and were considered to be more ready for combat than the divisions of Kitchener’s New Army.
There were three basic elements to Hamilton’s revised offensive plan, which was scheduled to begin on 6 August. On that day, the troops at Cape Helles would start a demonstration attack with a view towards confusing the Turks as to Allied intentions, thus delaying their response and counterattacks. Simultaneously, Birdwood’s ANZAC would swing around through the northern perimeter, conducting a ‘left hook’ towards the high ground. Finally, at dusk, IX Corps (minus the 13th Division) would execute an amphibious landing at Suvla Bay. To say that there was confusion regarding priority of effort understates the failure of Hamilton and his staff to communicate with clarity his intent to each of his subordinates. Many senior officers were not even briefed about the operation until 30 July; this of course, was a knee-jerk reaction to the scandalously ineffective operational security that had exposed the25 April landings to the Turks.
Nevertheless, it was clearly a major flaw to exclude the men on the ground (who had to execute this difficult plan) from the staff work. Hamilton appears to have viewed the ANZAC breakout as the main effort and the Suvla and Helles operations as complementary. Certainly his directives to Stopford were ambiguous, causing Stopford to think that the establishment of Suvla Bay as a base for Hamilton’s forces operating in the northern area was his principal objective. Further, Hamilton continued by explaining that the role of Stopford’s corps was to assist the officer commanding the ANZAC by advancing on Buyuk Anafarta.
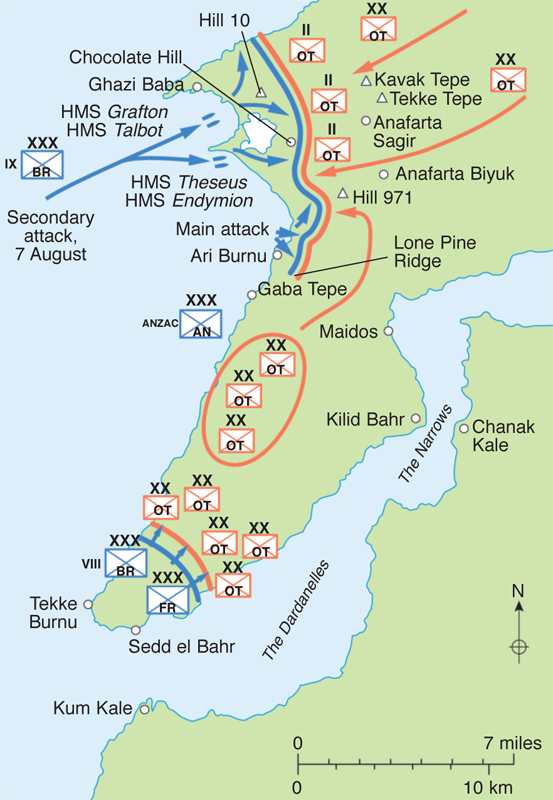
The August landings at Suvla Bay and the breakout from Anzac Cove. The offensive toward Buyuk Anafarta by the ANZAC and the supplementary landing by IX Corps was an attempt to outflank the Turks. By doing so, Hamilton hoped to break the deadlock between the armies.
Guarding the beaches in the Suvla Bay sector were two understrength infantry battalions, a Gendarmerie Regiment and four artillery batteries, under the Bavarian Major Willmer – a light force for such a critical area. Liman von Sanders (and Esat Pasha too) regarded the Gulf of Saros as a far more likely landing spot and stationed the entire 7th and 12th divisions in that location. Mustafa Kemal, in contrast, had pointed out the Suvla Bay vulnerabilities to Pasha in midsummer, and he was also alert to the profound weakness of the northern flank of the perimeter.
The Allied offensive began with an attack at Cape Helles, which started with an artillery preparation at 2.20pm on 6 August 1915 (the afternoon was hot and the sky cloudless). The 29th Division came out of its trenches at 3.50pm, but effective Turkish artillery fire inflicted heavy casualties and the division failed to achieve its objectives. The next day, the 42nd Division attacked with similar results, losing 3500 men. The Turks were well dug in and the group commander, Vehip Pasha, was able to mass decisively his reserves to attain local fire superiority. The attacks failed to convince the unfazed Turks that they were the British main effort.
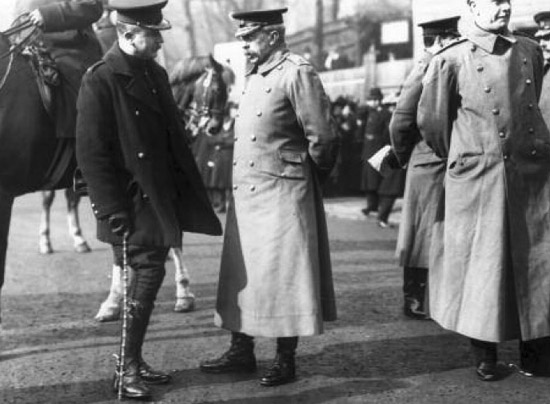
Sir Frederick Stopford (centre) at Crystal Palace, London, on Saint Patrick’s Day. Stopford had little actual experience commanding soldiers in combat. Brought back from retirement for the expedition, he proved to be a poor choice.
At Anzac Beach, the Australians had been shelling the Turks since 4 August, and by 6 August this had inflicted casualties and caused damage to their trench systems. At 2pm, three large mines were detonated in no man’s land. Then at 5.30pm the artillery bombardment ceased, and the Australians erupted from their trenches. Complete surprise was achieved, and the attacking infantry poured into the Turkish lines at Lone Pine. The Ottoman response was rapid: strong counterattacks stopped the Anzacs and fighting raged there for the next two days.
The ANZAC also staged an unprecedented night attack in two columns that would climb up the steep ravines (or dere in Ottoman Turkish). The right assault column was composed of New Zealanders, who went forward at 9.30pm with bayonets fixed. Surprise was complete and the enemy outposts were quickly overcome. As dawn broke the column was 915m (1000 yards) from the summit of Chunuk Bair. The left assault column was Australian and that night it became lost and overextended in the Aghyl Dere. As dawn broke it was nowhere near its objective. Reacting to imprecise reports, Esat Pasha ordered German Colonel Hans Kannengiesser to occupy Sari Bair Ridge, which was undefended. Kannengiesser arrived on Chunuk Bair about 6am on 7 August, and was stunned to see the full Allied fleet in Suvla Bay, as well as the assault columns threatening the empty high ground. Needless to say, by the time the New Zealanders continued the advance, the Turks had a firm hold on Chunuk Bair. The price of failure was high, as the New Zealanders were to form the northern arm of a pincer movement that would converge with a southern arm composed of Australian light horsemen, who began their attack on the Nek at 4.30am. After a heavy bombardment, the light horsemen went over the top and were obliterated by the alert Turks, who had no threat to their rear. This attack was made famous in the film Gallipoli.
In spite of accurate intelligence that the coast was undefended, except for several observation posts, the main landings at Suvla Bay began after dark at 9.30pm on 6 August. The 11th Division landed first and resistance was slight, but as the New Army battalions moved forward they encountered snipers and Ottoman Gendarmes. The darkness negated the British advantage of surprise, and as dawn broke 11th Division was two-thirds ashore and one-third afloat. The advance stalled as the division commander, Major-General Hammersley, lost his nerve and failed to push his men forward. Stopford did nothing.
Willmer’s tiny force held the high ground but could not effectively guard the long sandy beaches, which were put under observation by individual posts. The British came ashore in force very quickly, but, inexplicably from the Turkish point of view, failed to rapidly seize the lightly held dominant terrain of the Kuchuk and Buyuk Anafarta ridgelines. Willmer sent accurate reports to Fifth Army, and reacting with his typical sense of urgency, Liman von Sanders put the 7th and 12th divisions of XVI Corps on the road south towards Suvla on 7 August. The nearby 9th Division was also ordered into action to assist Willmer’s troops. That morning, the Irish 10th Division began to come ashore in piecemeal fashion. Its commander landed to find his brigades in the wrong places and observed 11th Division troops stationary and awaiting orders. The brigades of both divisions became intermingled and a critical attack on Chocolate Hill failed. Willmer’s detachment of about 1500 men had held up a British Army corps for 24 hours. Stopford seems to have suffered from a lack of urgency and remained onboard ship. When his reports indicating that his troops remained near the beaches reached the dismayed Hamilton, he likewise did nothing.
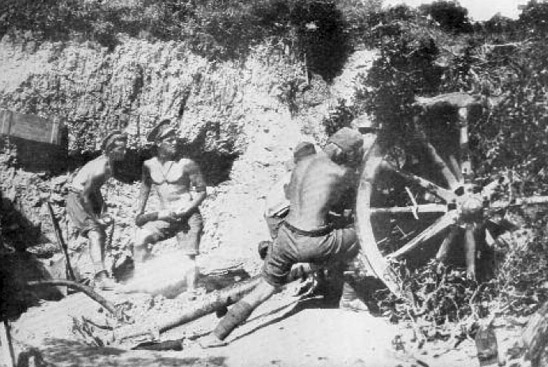
Australian gunners in action. Artillery did not play as decisive a role in the Gallipoli campaign as it did in France. The Turks had few guns and scant ammunition while the British had little ground on which to emplace their guns.
One of the most dynamic personalities on the peninsula was Bernard Freyberg, who was born in Britain but raised in New Zealand. He was a talented athlete who received a commission in the New Zealand Territorials in 1912. In London when war broke out in 1914 Freyberg received a commission into the Hood Battalion of the Royal Naval Division. He served in the debacle at Antwerp in August 1914 and was a member of Rupert Brooke’s burial party on Skyros the following spring. Freyberg swam to shore in the darkness on 25 April 1915 to light flares as part of the Bulair deception operation, earning himself a DSO. He was wounded numerous times and went to the Western Front after Gallipoli. Freyberg earned a Victoria Cross for refusing to leave the Hood Battalion in spite of suffering no fewer than four wounds in the space of 24 hours. He had earlier led his battalion’s attack at Beaucourt which resulted in the capture of 500 prisoners. He was promoted to to brigadier-general in 1917, making him at 27 the youngest in the British Army. During the war Freyberg was wounded no fewer than nine times. In April 1941 Freyberg commanded during the withdrawal from Greece and the subsequent defeat on Crete. He served in Eighth Army as a corps commander and later with distinction in Italy. After the war he was appointed Governor-General of New Zealand and died in 1963.
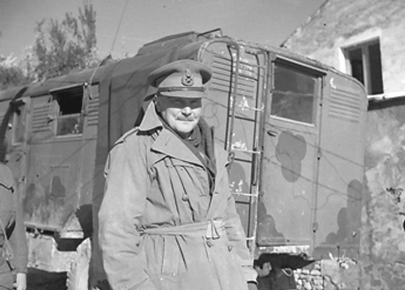
Bernard Freyberg, photographed near the town of Cassino, Italy, in January 1944.
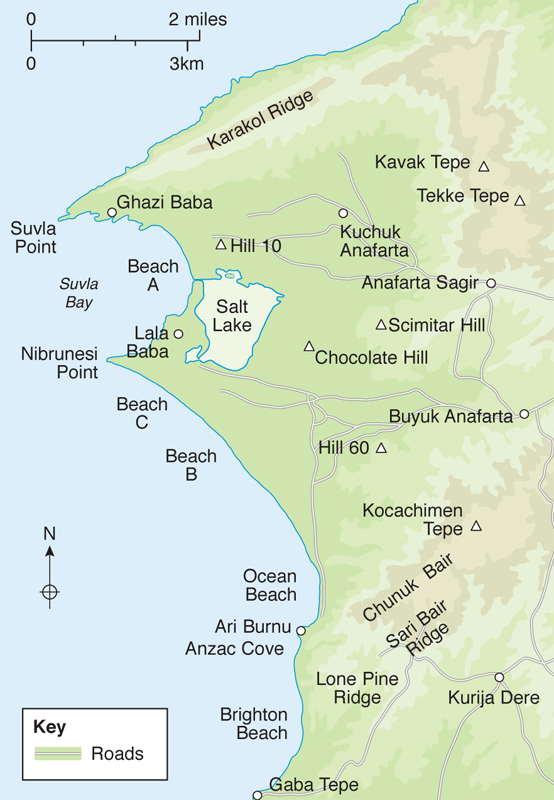
The key terrain features of the Suvla Bay area. The bed of the Salt Lake was completely dry in the summer of 1915. Stopford’s IX Corps should have enjoyed a quick and easy advance from the undefended beaches.
The following day, to the surprise of Liman von Sanders, the XVI Corps commander appeared early and reported that he had double-marched his corps southwards and that he was ready to join the fight a day earlier than expected. He was immediately ordered to bring his 7th and 12th divisions into line; however, due to the exhausted condition of his troops, he failed to execute this order in a timely manner. Liman von Sanders now determined that he needed to energize this critical sector and he gave command of the newly formed Anafarta Group to Colonel Mustafa Kemal, in whom the German commander had full confidence. The Anafarta Group controlled XVI Corps, the 9th Division and the Willmer Group. Liman von Sanders now had Esat Pasha’s group focused on the ANZAC and Mustafa Kemal’s group focused on Stopford’s IX Corps.
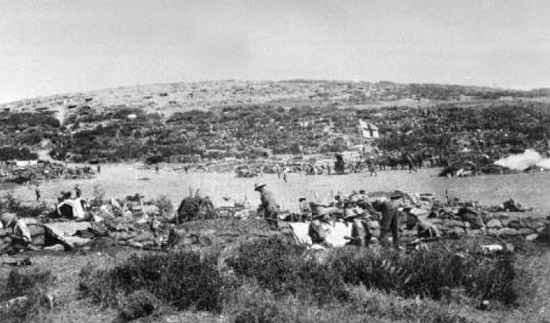
The Suvla Bay perimeter was larger and composed of less broken terrain than the corresponding Anzac and Helles perimeters.
Stopford spent another comfortable night onboard ship and on 8 August sent dispatches to his men congratulating them on their splendid achievement. By this time Hamilton was burning to know what was happening at Suvla Bay and sent Lieutenant-Colonel Aspinall to look over the situation. Aspinall went ashore and was stupefied to see men of 11th Division relaxing; some were even swimming. Aspinall went to the Jonquil, Stopford’s floating command post, to query the IX Corps commander as to why his corps was simply sitting on the beaches. Stopford happily told him that his men had done splendidly. Aspinall frantically but unsuccessfully signalled Hamilton, who became increasingly agitated.
Finally, late in the day, Hamilton personally came to Suvla and directly ordered Stopford to advance and seize the high ground. Stopford demurred, saying that 11th Divison needed rest first. In fairness, water supplies had not landed in quantities sufficient to compensate for the torrid heat. An angry Hamilton then went ashore to find Hammersley (Stopford was invited to accompany him, but due to a wrenched knee remained on board the Jonquil). Hamilton tracked down Hammersley and ordered him to attack the next day. That night, in pitch-black conditions, the scalded 11th Division commander and his staff attempted to issue a coherent attack order.
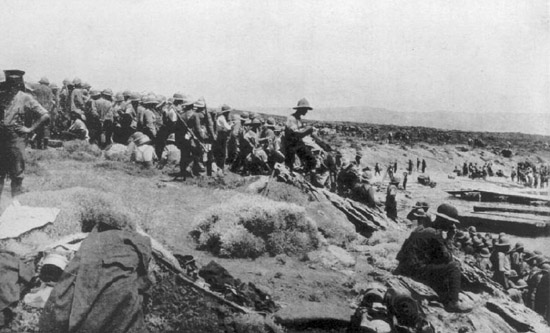
The British troops involved in the Suvla Bay operation were mostly Territorials, who had been called to the colours in the late summer of 1914, rather than regular soldiers. Although well trained, they achieved little.
It was Hamilton’s inability to properly supervise Stopford that wrecked the reputations of both officers.However, in the greater scheme of the overall plan, Stopford’s mission was a complementary, limited operation supporting the main effort at Anzac Beach. Between 6 and 8 August, Hamilton was focused on the main effort and only became energized when he understood that IX Corps had stalled. However, after heavy criticism for failing to personally intervene in the 25 April landings, Hamilton’s actions are difficult to understand. In the end, Hamilton’s method of command mirrored command in the BEF in France, which suffered from a similar ‘hands-off’ approach. This institutional focus in the British Army of 1915 that trusted the man on the spot to demonstrate initiative and good judgement was unsuited to the twin demands of trench warfare and a mass continental army. Hamilton might have changed this dynamic had he given the Suvla Bay operation to the superb and seasoned 29th Division.
Unfortunately for the 11th Division, by the morning of 9 August the Turks had four infantry divisions from their reserve in line against the British. The results were predictable as 11th Division’s poorly coordinated attacks foundered on the hastily dug Turkish trenches. A third British division, the 53rd, came ashore under heavy Turkish artillery fire. Again command and control were non-existent, as the incoming division was assigned neither a mission nor a sector of front. Finally, towards the end of the day its lead brigade received a hand-written scrap of paper from the division stating simply ‘Attack the Turks.’ Parts of the 159th Brigade were issued orders at 3am to attack three hours later. Again poor coordination ensured that the British were soundly thrashed at what would become known as the First Battle of Scimitar Hill. By 10 August IX Corps was disorganized and leaderless – even the energetic Mahon was demoralized at this point – and the Turks still held the high ground. There were some successes, notably when the troops from Suvla made contact with the troops from Anzac Beach, thus creating a sizeable two-corps beachhead.
While IX Corps was stumbling over itself at Suvla, the ANZAC main effort, commanded by Major-General Godley, was bogged down by the failure of the night attacks by columns. Futile attacks continued on 7 and 8 August. Godley had been reinforced by 29th Indian Brigade and 13th Division (from IX Corps), but was unable to achieve a decisive success, despite having heavy artillery and naval gunfire support. By 9 August the main effort had effectively disintegrated into a soldiers’ battle for individual points such as No. 2 Outpost, Point 971 and HillQ. Moreover, in addition to the large numbers of dead and wounded, many men (10,000 in the first week alone) were evacuated as seriously sick. Most historians believe that the failure to take Sari Bair Ridge and Chunuk Bair ended any real hope that Britain and her allies might have had to win the Gallipoli campaign.
‘Driving power was required, and even a certain ruthlessness, to brush aside pleas for a respite for tired troops. The one fatal error was inertia. And inertia prevailed.’
General Sir Ian Hamilton, Report on the Suvla Landings, 1915
On 10 August the 54th Division came ashore at Suvla; Hamilton, having learned of the dispersion of the 53rd Division, gave Stopford clear orders to keep the division together. The next day, Hamilton came to Suvla and lectured the hapless Stopford about the need for aggression, to which Stopford replied that the 53rd Division was poorly trained. Hamilton gave him 24 more hours and ordered the renewal of the attack on 13 August. This attack, also haphazardly planned, failed. One noteworthy incident involved an infantry company of the 5th Norfolks, which was recruited from the king’s estate at Sandringham, led by Captain F.R. Beck. Captain Beck (who had been issued the wrong maps showing an entirely different part of the peninsula) veered off with his company and disappeared into the smoke of battle. Most were never seen again. Because of the connection of the men with the king, a post-war commission scoured the battlefield in 1919 for evidence of their fate. It appears that Beck and others were surrounded in a farmhouse, and fought to the last round. It also appears that some were captured and summarily executed by the Turks in violation of the laws of war.
Hamilton paid a further visit to Suvla on 13 August and again ordered Stopford to attack, but by now Stopford was ignoring his commander’s direct orders. Belatedly, Hamilton recognized that he must make major changes in his command structure and he decided to start relieving subordinate commanders. The first to go was Egerton of the 52nd Division who was sent home earlier in August. Several brigade commanders were also relieved and sent home. Hamilton now decided to replace the unfortunate Stopford. With Kitchener’s approval he gave command of IX Corps to Major-General Sir Beauvoir DeLisle, commander of 29th Division. Unfortunately, DeLisle was junior to Mahon of 10th Division, who immediately resigned in protest. Stopford was relieved on 15 August and sent home with his chief of staff Brigadier Reed. The next casualty was Major-General Lindley of the 53rd Division, who told Hamilton that he was not the man to pull the dispirited division back together. Finally, Hammersley of the 11th Division collapsed completely on 23 August and was invalided home.
Mustafa Kemal launched immediate counterattacks, personally leading one himself on 10 August, which pushed the British back to within a kilometre of the landing beaches. Although the Turks were outnumbered in the new Anafarta sector, the British had committed every unit available to the fight. This allowed Liman von Sanders to bring in critical reinforcements from the Asiatic side.
While Hamilton considered DeLisle a tough fighter and a competent commander, he recognized that he was unpopular with the men of 29th Division, personally characterizing him as ‘rude to everyone’ and a ‘brute’. Nevertheless, Hamilton resolved to continue the attacks, now making DeLisle’s IX Corps carry the main effort. To add mass to DeLisle’s demoralized force, Hamilton brought the veteran 29th Division from Helles as well as the incoming 2nd Mounted Division from Egypt to the Suvla perimeter.The mounted division was composed of dismounted British yeomanry regiments – ‘curious semi-feudal relics of the militia’ recruited from the rural fox-hunting counties of England. This would be the final serious British offensive of the campaign. DeLisle demonstrated enthusiasm for his new assignment and developed a plan quickly, which in its final form threw the 29th Division at Chocolate Hill, 11th Division at the centre and a composite ANZAC brigade against Hill 60. The newly arrived yeomanry division was in immediate reserve. For his part, Hamilton, requested 75,000 reinforcements from Kitchener; the latter had had enough of the campaign and did not respond.
Final orders from DeLisle went out to his units on 20 August. The mid-afternoon attack (2.30pm) was strongly supported by artillery and by naval gunfire, but as the men left their trenches visibility deteriorated, as haze and low cloud obscured the battlefield – and thus the targets of the artillery observers. The Turks, on the other hand, were fully alert and were able to fire their pre-registered and preplanned barrages onto the oncoming enemy. DeLisle’s men were slaughtered, although the revitalized 11th Division was able to take the forward line of trenches. Under heavy shrapnel fire the 2nd Mounted Division was sent forward around 5pm. Its attack was poorly organized with no clear objective and, essentially, it moved forward into the haze and smoke towards the sound of the guns on Scimitar Hill, disappearing into the approaching darkness. Casualties were heavy and included Brigadier-General Kenna, VC, Colonel Sir John Milbanke, VC, and Brigadier-General Longford. By 9pm the attack had clearly failed, with that on Hill 60 faring no better. For their part, in spite of the large-scale British attacks, the well dug-in Turks in the Anafarta Group suffered relatively few casualties during this period.
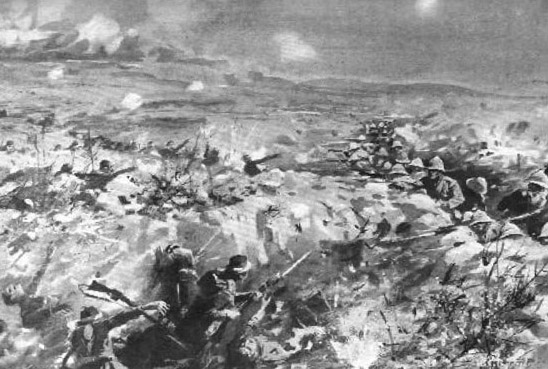
Lieutenant W.T. Forshaw, VC, exposes himself to enemy fire to launch bombs at the enemy in the Vineyard, 7–9 August 1915. Many of the battles at Gallipoli took place at the tip of the bayonet. The trenches were close together and the density of machine guns and barbed wire was much lower than in France.
Both sides were now exhausted, physically and psychologically. While hard fighting continued and attacks were maintained at the tactical level, the fighting on the Gallipoli Peninsula slowly atrophied into a dogged stalemate with no end in sight. The Fifth Army held the key terrain in every sector, which compensated for its lack of artillery, artillery ammunition and machine guns. The ever-changing Turkish command arrangements had now solidified into four operational groups of various sizes: the Anafarta Group under Colonel Mustafa Kemal, the Ari Burnu (ANZAC) Group under Esat Pasha, the Sedd el Bahr (Cape Helles) Group under Vehip Pasha, and the Asia Group under Mehmet Ali Pasha. During August further Turkish reinforcements had reached the peninsula: VI Corps with the 24th and 26th divisions and XVII Corps with the 15th and 25th divisions.
It might be said that the British press quashed the nation’s will to maintain the campaign. An influential British journalist named Ellis Ashmead-Bartlett was present during the disastrous final offensive. He had been also been present at the initial landings and had formed his own negative opinions about the campaign’s prospects of success. His reports through the summer cast a pall on the enterprise. However, it was 29-year-old Australian journalist Keith Arthur Murdoch who prepared a ‘long and highly coloured’ statement about the horrid conditions on the peninsula and the wasteful frontal attacks, which caught the attention of the Dardanelles Committee. Fuelling the fire, Major Guy Dawnay, a member of Hamilton’s staff, returned to London in late August and began to talk to anyone in Whitehall who would hear him. Although he had been sent by Hamilton to plead for reinforcements, Dawnay felt that the truth should be known at home. Hamilton reinforced the uneasiness in London by asking for some 95,000 reinforcements and by maintaining that, if he had to evacuate the peninsula, he would lose half his army.
On 14 October, the Dardanelles Committee met and decided to replace Hamilton. A telegram was sent to him two days later. Hamilton appeared to take this in his stride, thanking all his subordinates and staff for their hard work while preparing to depart. His replacement was General Sir Charles Monro, fresh from the Western Front, who arrived on Imbros on 28 October. Monro was an ardent advocate of beating Germany in France in order to win the war. Nevertheless, he received intensive briefing on the situation in the Mediterranean and met four times with Kitchener. He was then sent off with instructions to evaluate the situation and recommend a course of action to London. Kitchener promised to support him with reinforcements if Monro thought the campaign could be won, and also promised full support if he thought the peninsula ought to be evacuated.
Monro arrived to find the divisions of the army reduced to less than half of their authorized bayonet strength. Moreover, sickness and disease, particularly dysentery, were talking a daily toll on the army. Monro immediately toured the fronts and, surprisingly, maintained an optimistic attitude. His initial report to London proposed the idea that it was too soon to consider an evacuation and he asked for priority in resupplies of winter kit and fortification material. However, Monro followed this with a lengthy report at the end of October, carefully weighing up the poor condition of the men, the fact that the Turks dominated the high ground entirely and that the small beachheads were exposed to observation and offered no room to mass or achieve tactical surprise. Moreover, all intelligence indicated that Germany was about to reinforce the Ottoman Army massively. His conclusion was that an evacuation was the only feasible course of action.
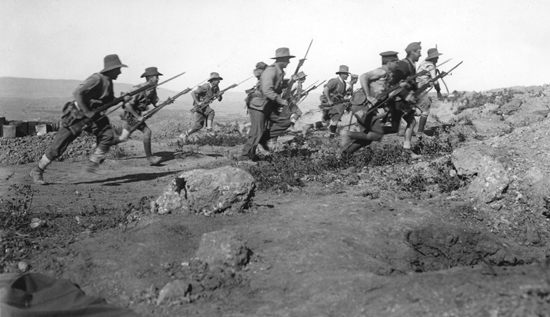
ANZAC troops advancing with bayonets fixed. This well published photograph has come to characterize the Australian participation at Gallipoli. The men are athletic and fit, but are obviously an easy target, indicating that the photo was almost certainly posed.
In the late summer of 1915, Bulgaria had joined the Central Powers. This opened up an overland route for German material assistance to reach the Dardanelles, especially for much-needed artillery ammunition and spare parts. In addition, vital reinforcements began to arrive in September, including a 150mm howitzer battery from Germany and a 240mm howitzer battery from Austria-Hungary. Along with the artillery came German and Austrian technical specialists, as well as three German general staff officers. Although the tempo of the campaign was slowing down, the Ottoman general staff sent the 20th Division, stationed at Smyrna, to the peninsula, and the operations division of the staff alerted a cavalry brigade and two infantry regiments to prepare for deployment to the battlefront. This was in response to reports that the Italians were poised to invade the Asiatic coast in support of the British. Well into the autumn of 1915, Liman von Sanders remained convinced that the Allies might conduct further landings in Saros Bay or on the Asian side, and he maintained substantial forces there until the end of the campaign.
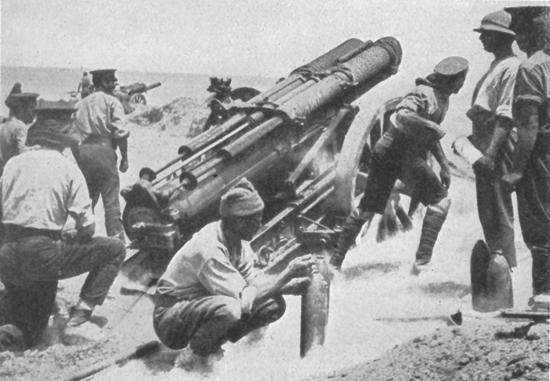
The British howitzer shown here is in full recoil and was probably firing at maximum charge. The massive hydraulics needed to return the gun barrel to its firing position are clearly visible above the barrel.
The long-awaited artillery ammunition began to arrive in November, along with several additional batteries of heavy Austrian howitzers. Encouraged by these reinforcements, Enver and the Ottoman general staff began to lobby for an all-out offensive to push the Allies back into the sea. However, as the winter season set in, they decided against such an operation.
On 3 November Monro went to Cairo, from where he was abruptly sent to command the British forces then flowing into Salonika, Greece, to salvage what remained of the Serb Army and the Balkan situation. This left Birdwood in overall command on the ground at Gallipoli. Kitchener was initially opposed to an evacuation and came out to the peninsula on 9 November to evaluate the situation in person. He was taken aback by the harsh terrain and the cramped beachheads, but Birdwood maintained that the British ought to hang on to what they had gained. Kitchener went next to Salonika, finally signalling to London on 22 November that the Gallipoli operation should be abandoned.
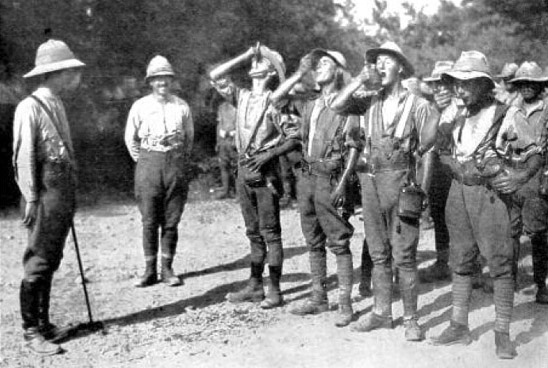
Allied troops taking medication under supervision. The campaigns in the Middle East were characterized by high casualty rates from tropical endemic diseases. These soldiers are probably taking quinine, a preventative against malaria.
To make things worse for Birdwood, who now understood that he must evacuate his men, a terrific winter gale struck the peninsula, destroying piers and stores and filling the trenches with cold water. At Suvla, the winter storm had even refilled the dry Salt Lake and cases of frostbite began to appear. The Turks, for their part, settled down on the high ground and continued with small local attacks and constant shelling. It was apparent that they too had no desire to continue with major assaults in the muddy, harsh conditions.
Birdwood’s staff began to craft one of the most remarkable operations of the war, which sought to withdraw his army intact. The first phase was an evacuation of the combined Suvla–Anzac beachhead, and its success turned on maintaining all routines so that the Turks would be unaware of the impending withdrawal. As preparations were made to pull out, there was no perceptible change in the British position, but by December Birdwood was thinning his lines and pulling out men. This was a giant undertaking, as 85,000 men lay inside the perimeter, as well as 5000 animals and 200 guns. Movement and loading were done after dark, and by 18 December half the men had gone. The remainder took up the job of deceiving the Turks with great enthusiasm, fabricating numerous devices to maintain the charade. Self-firing rifles using weighted tins of water were set up to convince the Turks that men still inhabited the trenches, and food was left cooking on fires. In the meantime, the animals that could not be evacuated were killed and the huge dumps of supplies were rigged for demolition. On the night of 19 December only 5000 men manned the perimeter; Birdwood thought that most of these would not make it onto the ships. The evacuation quietly continued, and by 10pm only a rear guard of 1500 picked men remained. The Turks remained silent, and at 1.30am on 20 December the final withdrawal began, reaching completion at2.40am. The self-firing rifles and fires maintained the deception until about 4am, when the demolitions began to go off.
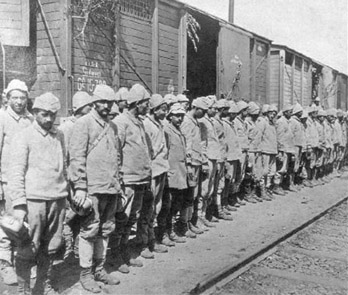
Turkish infantrymen lined up besides railway wagons. The Ottoman railway system was inefficient and did not service the fighting fronts. As a result, the Turks were never able to shift large numbers of reserves as quickly as the European powers could.
‘The entire evacuation of the peninsula had now been completed. It demanded for its successful realization two important military essentials: good luck and skilled, disciplined organization.’
Sir Charles Monro’s first dispatch, 1916
Within minutes of the detonations, Captain Ali Remzi was notified by field telephone from his forward outposts that the enemy trenches appeared empty. News was immediately relayed to the Fifth Army headquarters and the captain was ordered to investigate. He went forward and penetrated 150m (164 yards) into the British trench system, finding it empty and manned by dummy soldiers. At this point the Fifth Army staff awoke Liman von Sanders and told him the news. The entire enemy force, and most of the artillery, had withdrawn successfully, but not all of the demolitions went off as planned and large quantities of stores and supplies fell into Turkish hands. Overall, the evacuation was a remarkable operation.
Cape Helles remained a source of concern for the British, who were now convinced that the Turks were on to their evacuation plans and would make a final attempt to overwhelm the remaining beachhead. The 29th Division, pulled out of Suvla, was sent back to Helles to stiffen the defence. There were mixed opinions about whether the position should be held or abandoned. The navy wanted the army to retain the beachhead because it eased the burden of blockading the mouth of the Dardanelles.
As the New Year approached, it seemed certain that the Allies would evacuate the Cape Helles position as well. Despite intense Turkish observation and interest, the Allies repeated their successful deception efforts through a very aggressive tactical posture by General Davies’s VIII Corps. The withdrawal of surplus supplies and guns took place during the hours of darkness, but incessant winter storms interfered with this process. By 7 January 1916, there were fewer than 17,000 Allied men on the peninsula. The divisions remaining until the end were the 13th, 29th, 52nd and the Royal Naval Division. The 29th Division, at full strength in August, had been reduced down to just over 4000 men. On the night of 8/9 January, the Allies again produced a remarkable feat of tactical deception and tricked the Turks into believing that the lines were strongly held. By3.45am the final rearguards were safely away, and carefully laid charges destroyed the substantial abandoned stores. Thousands of mules, which could not be evacuated in time, were shot standing in their lines. Once again, large amounts of military supplies, horses, tents and rations fell into Turkish hands. Liman von Sanders noted that it took two years for the Turks to organize and carry away the material that they captured.
By 9am on 9 January 1916, Liman von Sanders was able to report to the Ottoman general staff that the British had abandoned the peninsula, and the Turks began moving their forces out of the area immediately thereafter. Within 10 days, 11 Ottoman divisions left the peninsula for garrison towns in Thrace. Liman von Sanders returned to Constantinople on 15 January 1916. The Fifth Army gradually reduced its strength to pre-invasion levels as its divisions were sent to active fronts. By the end of January 1916, the Fifth Army was composed of only VI Corps with the 24th and 26th divisions and XIV Corps with the 25th and 42nd divisions. The strength of the fortress command remained more or less the same. Later in the war, as the Gallipoli divisions recuperated and were brought back to full fighting strength, they were sent to more active fronts.
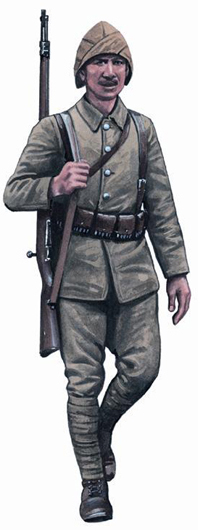
Private, Turkish Army, at Gallipoli in 1916. The Turks affectionately called their soldiers Mehmetcik or ‘Mehmets’, which corresponded to the British term ‘Tommy’. The Mehmetciks were similarly hardy and rarely complained.
The cream of the British divisions was sent to the Western Front, including the 29th Division and the Royal Naval Division, which was assimilated into the army as the 60th Division in 1916, and the ANZAC, which expanded into a small army in its own right. The Territorial and Kitchener divisions were sent to the newly formed Salonika bridgehead, to take on the Bulgarians and Germans. Most would find their way to Egypt in 1916 and 1917 for another round with the Turks. Ian Hamilton returned to London and was never offered an active command again. Of note, four future field marshals served on the peninsula: Birdwood, Slim, Harding and Blamey (an Australian). Politically, the campaign damaged Churchill, Kitchener and Asquith’s government, leading the historian Alan Moorehead to characterize it as ‘a mighty destroyer of reputations’.
A parliamentary commission was assembled to review the evidence of the campaign and to take testimony from those who had planned and fought it. The preliminary report found that errors in administration and logistics doomed the effort. However, the final report in 1919 apportioned blame to Hamilton and Stopford, and highlighted the ability of the Turks to mass forces effectively. Later, the official British account of the campaign drew attention to the dogged defensive qualities of the Ottoman soldiers and the brilliant leadership in the Fifth Army.
The campaign was, perhaps, the greatest ‘What if…?’ of the war. Although many histories credit the Allies with inflicting greater casualties on the Turks, in truth losses were about equal. The British (and colonials) lost about 205,000 men, including 43,000 killed or missing. The French lost 47,000 men of the 79,000 they sent to the peninsula. Liman von Sanders states the Turks lost 66,000 killed. Many histories, including the official British version, speculate that the Turks lost over 350,000 men and suggest that because of careless Turkish record keeping, the exact number cannot be ascertained. In fact, Ottoman Army record keeping was very good, and the final total for the period 4 April 1915 through to 19 December 1915 was 56,643 killed, 97,007 wounded and 11,178 missing. Actual losses between Turks and Allies were, therefore, approximately the same.
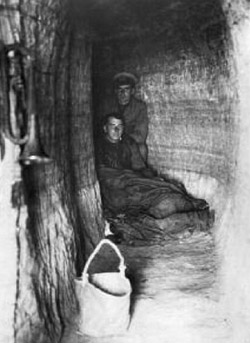
The British Royal Naval Division was one of the best Allied formations to fight on the peninsula. It was later sent to France where it was absorbed into the Army as the 61st Division. Here, two men of the RND are shown inside a cave position on the peninsula.
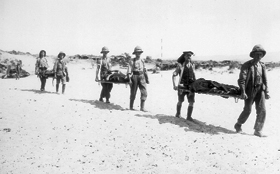
Allied stretcher bearers evacuating casualties from the peninsula. The British evacuation process was slow and manpower intensive. The wounded had to be brought to the beaches, loaded onto lighters and then transported by ship to hospitals in Egypt.
The Allies sent about 490,000 men to the Dardanelles over the course of the campaign. Most Western historians and authors note that the Ottoman Army committed about 500,000 men to the campaign over the nine-month course of the battle. However, given the known dispositions of the Ottoman Army in 1915, this figure is, perhaps, on the high side, and disguises the Allied humiliation suffered at the hands of the Turks. From the Ottoman records and from Liman von Sanders’s memoirs, it is doubtful whether the Turks ever had equal numbers of combat troops engaged during the campaign. In fact the opposite was probably the case: the Turks were outnumbered most of the time. The highest strength that the Turks had on the peninsula was in October 1915 when a total of 315,500 officers and men were assigned to the rolls of the Fifth Army.
By 1917 the French and German armies had discarded their pre-war infantry division architecture of two brigades each of two regiments (totalling 12 infantry battalions). Both armies adopted the triangular three-regiment architecture (totalling nine battalions). In 1918 the British also reverted to a nine-battalion division. The new organizations were able to put two regiments in the trenches while keeping one in reserve. In fact, the Ottoman Army created what became known as the ‘triangular division’ in 1910 in a massive reorganization. The new Ottoman divisions contained three infantry regiments of three battalions supported by an artillery regiment of three battalions. This basic configuration was tested in combat during the Balkan Wars of 1912–13. Command and control was streamlined as the division commanders talked directly to regiment commanders without going through a brigadier. The new arrangement proved flexible and highly successful in the war. The Ottoman Army retained this architecture as the army mobilized in 1914. By the beginning of World War II the triangular division had become the world’s standard.
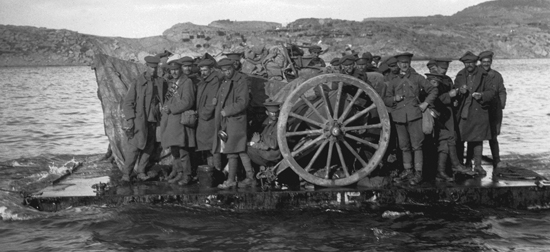
Allied troops on a raft during the evacuation. Very little British equipment was taken off during the evacuations. Most of the inventory was blown up or burned. Nevertheless, the Turks captured huge quantities of abandoned supplies.
The Gallipoli campaign produced a number of significant outcomes. Despite some favourable opportunities late in the war around Alexandretta, the British never attempted another amphibious attack on the Ottoman Empire. The campaign refocused the leadership in London on the idea that the war must be won on the Western Front while those advocating peripheral campaigns fell from power. From the Ottoman perspective, there were several other important outcomes, which were generally ignored by the world at large. The most significant outcome for the Ottoman Army was the emergence of a group of capable commanders of proven ability who were tested in combat. Many of these individuals would make important contributions to the empire’s war effort as well as playing major roles in the War of Independence (1919–22). Another important outcome for the Ottoman Empire was that the Young Turk leadership drew renewed inspiration for the continuance of the war and the ultimate victory of the Central Powers. In 1916, Enver Pasha would send the Ottoman Army into battle on three additional fronts in Europe, reflecting his belief in victory. Finally, there emerged from the Gallipoli campaign a group of veteran Ottoman infantry divisions that quickly became an effective cadre around which Ottoman commanders built successful operations in subsequent campaigns.
The Third Army commander, Brigadier-General Hafiz Hakki Bey, died in the spotted typhus epidemic in early February and was replaced by Mahmut Kamil Pasha. After the disastrous winter offensive, replacements were arriving monthly from the First and Second armies. The 36th Division arrived from Mesopotamia and took up positions along the southern flank of the Third Army near Lake Van. Moreover, the 3rd Logistics Inspectorate was able to restore much of the combat capability of the Third Army by mid-March 1915. Although their combat strengths were scarcely that of normal infantry divisions, X and XI corps were in the line and fighting. Built around the surviving remnants of artillery and combat trains, a reconstituted IX Corps moved back to the front as well. The best reserve light cavalry regiments were consolidated into a single stronger division (3rd Reserve Cavalry Division). By April the strategic situation appeared to have stabilized along the frontier, although the Russians maintained control of a salient projecting into the Eliskirt Valley.
This stability enabled the Turks to maintain defensive lines and move the still shattered IX Corps to the rear near Erzurum for reconstitution and training. Only a thin screen of 2nd and 3rd Cavalry divisions held the long vulnerable front between Lake Van and Erzurum. The Van Gendarme Division and the 1st Expeditionary Force held the front to the south of Lake Van. The Russians launched a major offensive down the Tortum Valley towards Erzurum on 6 May. This offensive was beaten back and stalled later that month, but the Turks lost about 15km (nine miles) of ground. Determined to regain this territory, the Turks began a flanking attack on the Russian salient on 11 June and pushed the Russians all the way back to their starting positions.
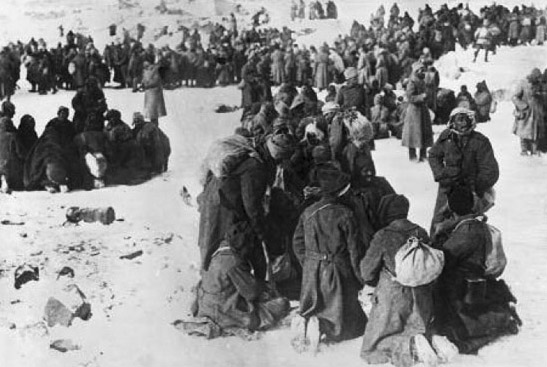
Turkish troops captured by the Russians. The climate conditions experienced by Ottoman forces in the war were extreme, particularly in the high Caucasus regions, and caused considerable suffering.
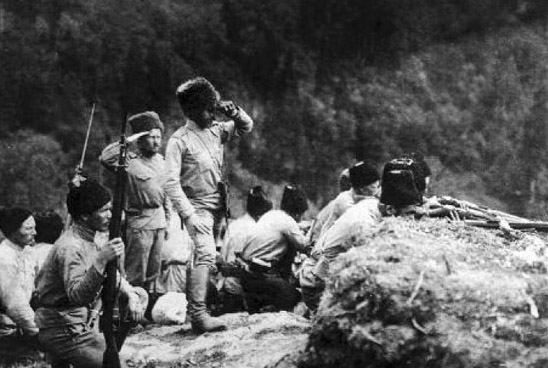
Russian sharpshooters. This posed photograph shows an officer with binoculars fully exposed to enemy fire. The men appear well cared for and fit.
The Turks had less success in the south. During May, their position on the southeastern frontier crumbled as the Russians took the city of Van on the 13th. To the north of Lake Van, the Turks lost Malazgirt two days earlier. In early June, the Russian Army swept around the north shore of Lake Van and threatened the approaches to Mus. Effectively, the Russians created a large salient in the southern sector of the Caucasian front. In part, these losses may be explained by the gathering logistical shortages that were beginning to affect the Third Army’s combat effectiveness. Accelerating the deterioration of the Ottoman logistics situation was a growing Armenian insurgency, which threatened the lines of communications to the rear areas.
The most contentious problem in the historiography of World War I in the Middle East revolves around the events relating to the destruction of the Armenian population of eastern Anatolia in 1915. Today, the Armenians, as well as most Western historians, assert that the Young Turks conducted a premeditated campaign of extermination (amounting to genocide) on the Armenians. The Turks claim that the Armenians, in active revolt during wartime, were a threat to national security and were relocated from the war zone, where many died of starvation.
The campaigns in the Caucasus region were fought by armies that appeared strong on paper, but which were actually very weak. In theory, the Russians had about 130,000 infantry, 35,000 cavalry and 340 cannon, but their actual strength was only around 70,000 infantrymen, 9000 cavalry and 130 cannon. Against this, the Turks fielded about 53,000 infantry and cavalry combined, accompanied by 131 guns. Because the Turks could not be strong everywhere along the 720km (447-mile) front, the Russians shifted their centre of gravity to the southeast for a concerted push, and began a major offensive. Unknown to the Russians, the Turks had sent the reconstructed IX Corps to the area as well as two expeditionary forces and the cavalry divisions. It was a skilful assembly of forces, conducted in secret under difficult circumstances, in an area where the Russians did not expect to see Turkish strength. By 16 July the Russian attacks had collapsed, and Turkish counterattacks forced the Russians back with heavy losses. The enthusiastic Turks continued their counter-offensive and liberated the city of Malazgirt; then, in early August, they attacked into the Eliskirt Valley. The Russians counterattacked and threatened to encircle the Turks, who called off the attack and retreated. Once again Malazgirt fell into Russian hands, but the front soon stabilized. Both sides suffered heavy casualties, which could not easily be made good, leading to a lull in campaigning until January 1916.
There had been considerable recent conflict between the Armenians and the Ottoman Government dating back to the 1870s, which saw the creation of the Armenian revolutionary committees. These were modelled on the successful Macedonian and Bulgarian committees and were supported by many Europeans. In the immediate aftermath of the Young Turk revolution of 1908–09, Ottoman restrictions against minorities first relaxed and then tightened. The hopes of the minorities, especially the Armenians and the Greeks, who had thought that the ending of the sultanate and the establishment of a modern constitutional structure would lead to greater autonomy and political inclusion, were shattered. Disorder broke out throughout the empire amongst minorities disappointed by this development and by increased taxes and restrictions of civil rights. In particular, Armenians in Adana rose in revolt on 14 April 1909, and the army and the Gendarmerie killed many thousands in quelling the uprising.
In 1914, the Armenian population of the Ottoman Empire amounted to several million people, with those in eastern Anatolia totalling some 1.3 million. There had been numerous Armenian uprisings in the latter from the late 1700s and culminating in the infamous and widely reported massacres of the 1890s. While many of the Armenians were loyal and law-abiding citizens of the empire, subversive societies dedicated to the establishment of an autonomous Armenia had existed for many years. After 1909, internal dissent accelerated interest in these groups. In 1910, the Dashnaks (a revolutionary Armenian nationalist society) launched a campaign of terror in eastern Anatolia. Thousands of Turks and Armenians were killed before the army was able to restore order and the rule of law. In Albania, Kosovo and Macedonia similar patterns of killing evolved as other minorities became disaffected as well. The Balkan Wars of 1912–13 brought Ottoman control of its European provinces to an end, which effectively ended a substantial part of its minority problem. However, the Armenians remained in the Anatolian provinces of the empire. As World War I approached, well organized and effective Armenian revolutionary committees operated openly in Europe and in Russia. These committees were sponsored and supported by the Great Powers and advocated the establishment of an independent Armenia.
Inside the Ottoman Empire many Armenians were becoming alarmed by a new political philosophy known as Turanism, based on the pan-Turkic nationalist theories of Ziya Gökalp, who advocated the imposition of a Turkic identity, language and culture on the empire. It is certain today that some members of the Committee of Union and Progress, especially Enver Pasha and Talaat Pasha, were ardent enthusiasts for Gökalp’s ideas. This new Turkic nationalism became intertwined with the modernity advocated by the CUP and found many adherents within the army as well. Gökalp’s supporters even made contact with non-Ottoman Turks living in Russia’s Trans-Caspian regions. Naturally, the Christian, linguistically and culturally different Armenians were very concerned about the impact of Gökalp’s theories on their lives. Gökalp’s advocacy of greater Turkic participation in the empire’s economy was equally worrisome to the hard-working and industrious Armenians. By 1914 the Armenians had cause to believe that the Turks intended to consolidate their hold on the Anatolian heartland by sending Muslim refugees from the Balkans to live there, and that some kind of cultural and economic Turkification programme was about to be imposed on the empire’s non-Muslim peoples.
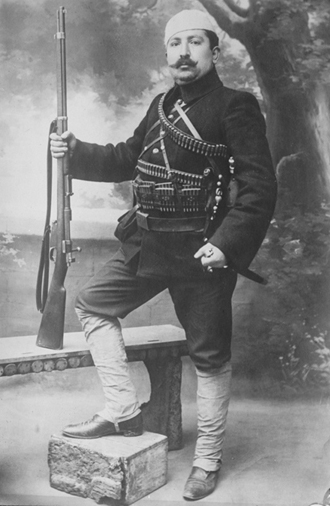
An Armenian volunteer. This photograph shows the signature kit of the Armenian nationalist committeeman: a modern military rifle, bayonet and several bandolier ammunition belts.
By the spring of 1914, the activities of the Armenian committees had reached the point where formal offices opened in Tiflis and Paris, comprising a kind of government in exile. These expatriate groups were actively involved in smuggling weapons and explosives into the empire, and the Turks intercepted some shipments. In late July, the Armenian committees held the important eighth party congress under the leadership of the Dashnaks in Erzurum. The congress was conducted to peacefully advance Armenian concerns through legitimate political processes and the CUP even sent its own representatives. However, as Europe went to war in August 1914, the congress dissolved when some of the more important Armenian leaders departed for Europe and Russia. The Ottomans became convinced thereafter that the congress led directly to agreements between the Armenians and the Russians aimed at the establishment of an independent Armenia in eastern Anatolia. In fact, immediately after the German declaration of war on Russia, many of the influential leaders went to Tiflis to begin raising the Druzhiny, or Armenian regiments.
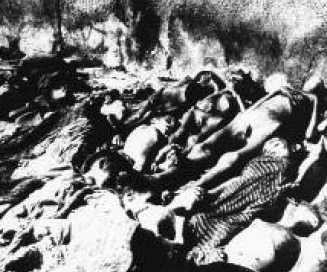
Tens of thousands of helpless Armenian civilians were massacred in the brutal relocations of 1915. Even more died of starvation and neglect en route to the deserts of Syria.
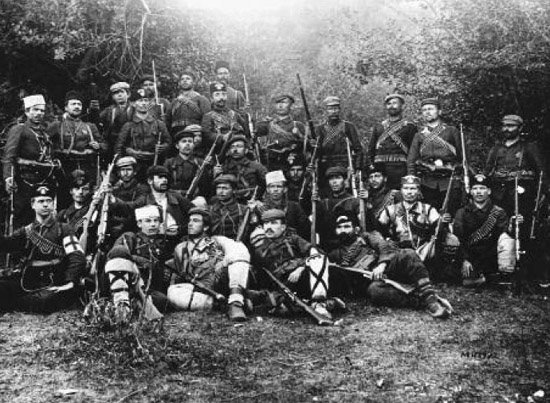
Armenian volunteers. The Armenian nationalist revolutionary committees were very well organized and heavily armed. They rose in revolt in many Eastern Anatolian cities in the spring of 1915.
In September, evidence of violent intent accumulated as Turkish authorities found bombs and weapons hidden in Armenian homes. By early October 1914 (prior to the commencement of hostilities), the Turks received reports of Armenians returning to Turkey with maps and money, and aggressively nationalist Armenian meetings attended by thousands. Late in the month, Third Army cabled the capital that large numbers of Armenians with weapons were moving into the eastern frontier cities of the empire. Reports also arrived in the capital claiming that large numbers of Ottoman Armenian citizens were leaving their homes in the empire and travelling into Russian-held territory. Although the Ottoman Empire was still officially at peace with the Entente, many staff officers became convinced that Russia and France were actively conspiring to initiate an Armenian rebellion.
The situation worsened as war broke out in November 1914. Throughout the winter and into 1915 incidents of terrorism increased, particularly bombings and assassinations of civilians and local Turkish officials. In February, the general staff cabled the armies noting increased activity by Armenian dissidents in the central Anatolian cities and along the Mediterranean coast; moreover, these reports identified Allied agents, influence and activities in these areas. As a result, all ethnic Armenian soldiers were removed from important Turkish headquarters. The Turks also learned that the Armenian Patriarchy in Constantinople was transmitting military secrets to the Russians. From February through to July 1915, a great many additional reports reinforced this pattern of Allied intelligence gathering.

A monument to Ziya Gökalp. His nationalist writings were responsible for forging much of the modern Turkish identity. Many of the Young Turks were ardent advocates of Turanism, which was a form of pan-Turkism.
A massive Russian offensive was expected following the spring thaw in 1915, and the Turks became convinced that an Armenian rebellion in the rear areas of the Ottoman Third Army was imminent. The main Armenian centres of population (and thus of potential armed resistance) lay directly astride the only two all-weather roads leading into the eastern front. These cities included substantial Armenian populations and some contained Armenian majorities. Moreover, Armenian activity in southern Anatolia interdicted the only railroad as well. Since the logistically poor Turks had only limited quantities of food, medicine and military stores to hand, interdiction of these key lines of communication spelled disaster. These concerns over security drove the army staffs as they planned their operations.
It is hard to pinpoint when the rebellions broke out first. Many historians have concluded that the Turks themselves deliberately instigated the revolts by massacring Armenians as early as December 1914, in order to provoke an Armenian reaction. The Turks deny this and claim that it was the Armenian committees, encouraged by the Russians, who began the violence.
As a matter of record, armed revolts by the Armenians broke out in April 1915, the most visible incident of which was a rebellion in the city of Van. Heavily armed committees seized most of the city and the Turks responded by rushing troops to besiege it. Simultaneously the Russian Army, led by Armenian Druzhiny, began its long-awaited offensive into the region. The situation around Van seemed so critical that the Turks sent regular army reinforcements to the city. In May the Russians broke the siege and relieved the Armenian defenders of the city. Other Armenian centres of population soon followed suit, and in the following months revolts broke out in many of the central Anatolian cities. These revolts were instigated by the Armenian nationalist committees.
Massacres of Armenians of all ages were widely reported by numerous neutral observers, many of whom claimed to know that local Ottoman officials had received secret orders to exterminate the entire Armenian population. Other witnesses, including neutral Americans and Germans with direct access to the ruling elite, claimed to have been told about similar orders. Modern historians note that there is very little surviving documentary evidence to support these allegations. It should also be noted that the Armenians were heavily armed and that thousands of Muslim villagers were slaughtered in turn as a quasi-civil war erupted among the people of Anatolia.
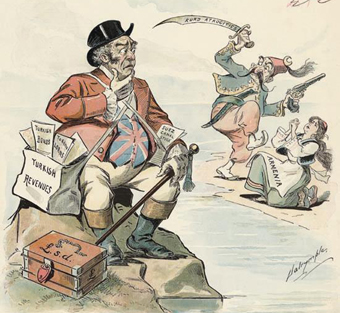
‘John Bull’s Dilemma.’ While the Allies were aware of the Armenian massacres and relocations of 1915, there was little they could do about it. They watched in helpless horror as the Ottomans erased the Armenian presence in eastern Anatolia.
In the late spring and summer of 1915, Turkish reaction to these armed rebellions escalated from localized to regional relocations. Unfortunately for both sides, the Turks, then heavily involved at Gallipoli, had few forces in place with which to suppress the insurrection. On 24 April, Enver Pasha wrote a directive noting that the Armenians posed a great danger to the war effort, particularly in eastern Anatolia, and outlined a plan to evacuate the Armenian population from the region. At the same time, he ordered the Armenian intelligentsia in the capital and major cities to be imprisoned. This directive specifically identified the six eastern Anatolian provinces as the operational area affected by the evacuation plan. The intent was to move the Armenians to the Euphrates Valley, Urfa and Süleymaniye. Confirming the worst fears of the Armenians, the directive ominously specified that the goal was to create an eastern Anatolian demographic situation in which the ratio of Armenians would drop to 10 per cent of the local total of Turks and tribes. It would appear from this directive that the general staff intended this evacuation to be an orderly one.
April and May brought massive Allied offensives at Gallipoli and in Mesopotamia. The expected Russian offensive started in early May towards Erzurum, following close on the heels of the earlier attack on Van. The timing of the Allied attacks – all but simultaneous on three widely separated fronts – indicated to the Turks cooperation on a level previously unseen. In the geographic centre of these attacks lay the heavily armed Armenians, who were in a position to throttle the Ottoman lifelines.
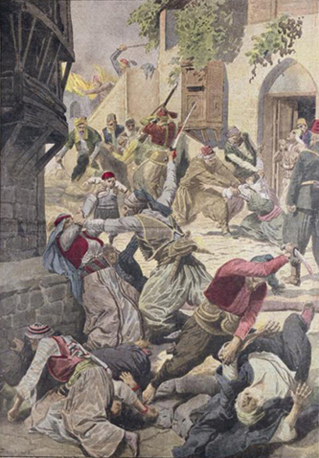
Thousands of innocent Armenians were killed resisting relocation. Thousands more were wantonly massacred by their captors for their possessions.
This caused a major shift in the government’s policy towards the Armenians, with the Young Turks taking a different approach. Enver Pasha thought it necessary either to drive the Armenians then living around Lake Van into Russian territory, or to disperse them throughout the Ottoman Empire. Enver also wanted to resettle the area with Muslim refugees from abroad (Turkey had still not fully assimilated the millions of Turkish and Muslim refugees from the Balkan Wars). The military now began to press for a complete evacuation of the Armenian population from the area affected by the insurgency. This was a contemporary counter-insurgency strategy, evolved by the Spanish in Cuba and the British in South Africa (against the Boers), which sought to separate the people from the rebels. This would, in theory, buy time for the hard-pressed Ottoman Army to deal with the insurgents. A provisional law was passed on 27 May that established military responsibility for crushing Armenian resistance, but the law stated that direct action against Armenians would only be out of military necessity or in reply to hostile behaviour.
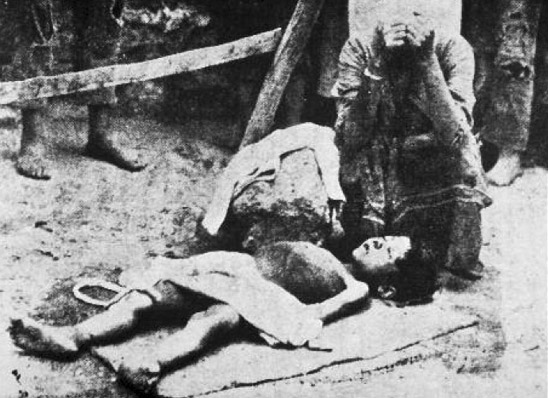
An Armenian mother mourns over the body of her dead child. A number of Armenian relief societies were organized in the United States to alleviate the effects of suffering and starvation.
On 30 May 1915, the infamous regulation directing the relocation of the Armenians was promulgated in the Ministry of the Interior. The regulation was the basis for the establishment of a series of concentration camps in the Syrian deserts along the Euphrates River. There is nothing in the record to indicate that the military, the Ministry of the Interior and local officials coordinated their efforts to alleviate the horrible conditions suffered by many of the deportees. Importantly, such a scheme wildly exceeded Turkish capabilities. Even if the Turks had been inclined to treat the Armenians kindly, they simply did not have the transportation and logistical means necessary with which to conduct population transfers on such a grand scale.
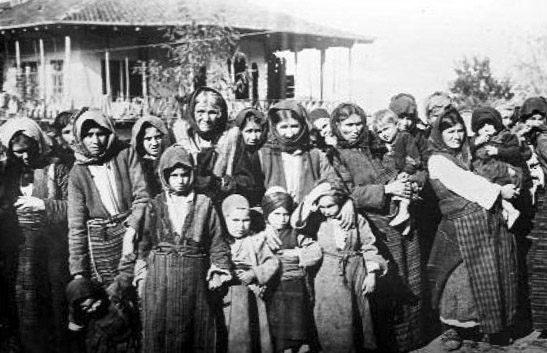
Armenian women and children. Atrocities against women and children began almost immediately and were well documented by neutral observers. Many of the survivors were forcibly converted to Islam.
Making things worse, the continuing rebellion grew more intense as many Armenians, often loyal citizens who were anti-nationalists, now took up arms to defend their lives and homes. In some places the Armenians gained the upper hand, notably in Urfa, Kayseri and on Musa Dag. The hard-pressed Turks now mobilized the local Kurdish and Circassian population by arming irregular bands to combat the Armenians. This, in turn, led to a brutal series of massacres and atrocities. In the end, by the late autumn of 1915, most of the Armenians had been forcibly removed from eastern Anatolia. Hundreds of thousands had fled to Russian-controlled territory and tens of thousands more were massacred or starved. The Armenian population of Constantinople and the Aegean region was not relocated, and the army continued to use Armenian manpower in its labour battalions until the end of the war. Hundreds of thousands of Armenians died during the rebellion and deportation and a similar number of Muslim Turks also died in the revolts and during the Russian occupation. Controversy over responsibility continues today and affects contemporary political affairs between the Republic of Turkey and the West.