1.2 Why is process awareness key?
An important factor of success in design thinking is to know where you stand in the process. For Lilly, Peter, and even Marc, the transition from a divergent to a convergent phase is a special challenge:
At what point in time have we gathered sufficient information, and how many ideas are necessary before we begin to transform the cavalcade of ideas into possible solutions?
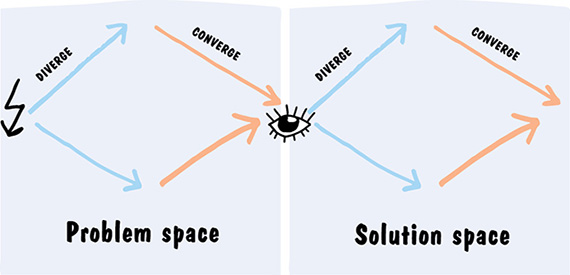
Alongside the current level of development, the tools must be constantly kept in mind in design thinking. Which of them are the most effective in the current situation? There are generally two mental states in the “hunt for the next big opportunity”: Either we develop many new ideas (i.e., we “diverge,”) or we focus on and limit ourselves to individual needs, functionalities, or potential solutions (i.e., we “converge”). This is usually depicted in the shape of a double diamond.
For Lilly, it is a little easier to meet this challenge, because she knows how long her design thinking course at the university lasts, and she can control, as early as with the definition of the design challenge, how open or restrictive the question should be (i.e., how broad the creative framework for the participants is to be). With regard to real problem statements, things are somewhat different. Normally, we force ourselves at the beginning to leave our comfort zone and define the creative framework broader than we actually wish to. In the divergent phase, the number of ideas is infinite, so to speak. The tricky part here is to wrap up this phase at the right time and focus on the most important functionalities that ultimately lead to an optimal user solution. Of course, there are many examples of all sorts of ideas being launched on the market, and chance contributes to success—well-known examples include a number of services offered by Twitter. But chance does not often work this way; hence, in the process, converging is decisive for success.
Steve Jobs was a master when it came to managing the “groan zone” optimally. He had the right instinct to choose the time for a change of mindset and for leaving the divergent phase. This way, he led his teams to brilliant solutions. At Apple, Bud Tribble established the term “reality distortion field,” standing for Steve Jobs’s ability to master the mental leap. The term stems from an episode of the original Star Trek series, “The Menagerie,” in which aliens create their own world by means of their thoughts.
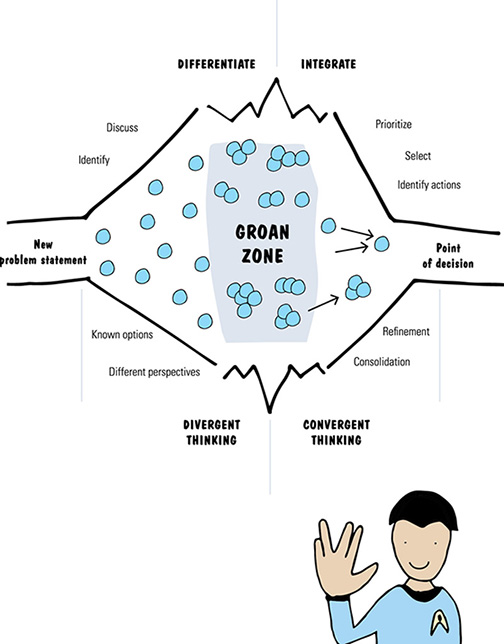
One good influencer that helps us change our mindset is a limited period of time. If the final deadline for an innovation project is pushed forward or the first prototype is expected earlier than scheduled, the mindset must be automatically changed as well. In addition, it is advisable to lay down the functionalities and characteristics in an early phase of the design thinking process. During the transition to the convergent phase, we take them up again and attempt to match them to a great number of varying ideas. This selection makes it possible to eliminate some ideas at this stage. It can be useful for consolidating or combining ideas into logical clusters. But, even then, we won’t be spared from selecting and focusing in the end. It is helpful during this phase to present the remaining ideas to other groups and participants. Then Post-its can be distributed, and the community can decide which is the best idea. If we only involve our own group, the decision is often not objective enough because we always risk falling in love with a certain idea. It’s up to you how ideas that have not entered the convergent phase ought to be dealt with. Some facilitators encourage participants to throw the ideas written on the Post-its on the ground, while others keep the ideas as a knowledge reservoir until the end of the project.

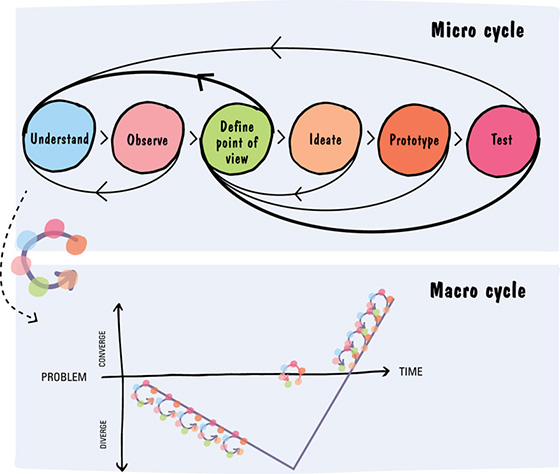
Before we deal with the process in greater depth, we need to clarify the various design thinking processes, which basically all pursue the same goal but use different terms. Basically, there’s a problem statement at the beginning and a solution at the end, and the solution is reached in an iterative procedure. The focus is decidedly on the human being, so design thinking is often referred to as Human-Centered-Design. Most people who have already grappled with design thinking know the process. Nonetheless, we decided to address briefly the phases in the micro cycle and the macro cycle as well as the core idea of each phase. Lilly would probably identify with the six-step depiction used at the HPI (Hasso Plattner Institute) that presents, as most universities do, the process of design thinking that follows. Subsequently, we will discuss the macro cycle.
At some universities, the process was simplified still more. In Japan, for instance, at the chair for Global Information Technology at Kanazawa Technical College, they work with four instead of six phases: Empathy—Analysis—Prototype—Co-Creation. D.school consolidates the process steps of “Understand” and “Observe” into “Develop empathy.”
The IDEO design and innovation agency had originally defined five simple steps in the micro cycle in order to get to new ideas through iterations. In addition, they put a strong focus on implementation, because the best ideas are ultimately of no use if we haven’t established them on the market as a successful innovation:
UNDERSTAND the task, the market, the clients, the technology, the limiting conditions, restrictions, and optimization criteria.
OBSERVE and ANALYZE the behavior of real people in real situations and in relation to the specific task.
VISUALIZE the first solution drafts (3D, simulation, prototypes, graphics, drawings, etc.).
EVALUATE and OPTIMIZE the prototypes in a fast succession of continuous repetitions.
IMPLEMENT the new concept in reality (the most time-consuming phase).
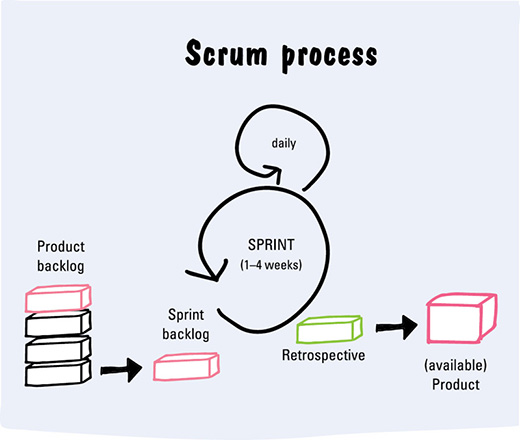
Anybody working at an actual business ought to know iterative procedures in a different context, such as from software development (ISO Standard 13407 or Scrum). In this case, the user suitability of software is ensured by an iterative process or improved incrementally through sprints.
In ISO 13407, the following phases are spoken of:
Planning, process—Analysis, use context—Specifications, user requirements—Prototype (draft of design variants)—Evaluation (evaluation of solutions and requirements)
With Scrum, the individual iterations are called sprints. One sprint takes 1 to 4 weeks. So-called product backlogs serve as inputs into the sprints. They are then prioritized and processed in the sprints (sprint backlogs). The requirements are documented in the form of user stories in the product backlog. A ready-to- deliver product that has already been tested with the user during the sprint is what should exist at the end of each sprint. In addition, the process itself is reviewed and continually improved in the Retrospective.
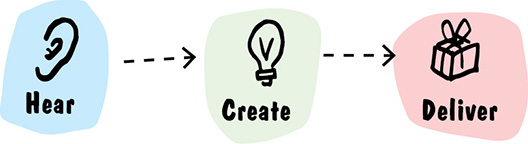
At most companies, a micro design thinking process is broken down into three to seven phases, often based on the steps of IDEO, d.school, and the HPI. The Swiss ICT company Swisscom has designed a simplified micro cycle that allows for integrating the mindset quickly into the organization.
The phases are: Hear—Create—Deliver.
Phase |
Description |
Basic tools |
 |
|
Design challenge Customer interview |
 |
|
Core beliefs Target customer experience chain |
 |
|
Need, Approach, Benefit, Competition (NABC) Prototyping plan Self-validation |
DESCRIPTION OF THE INDIVIDUAL PHASES OF THE MICRO CYCLE

UNDERSTAND:
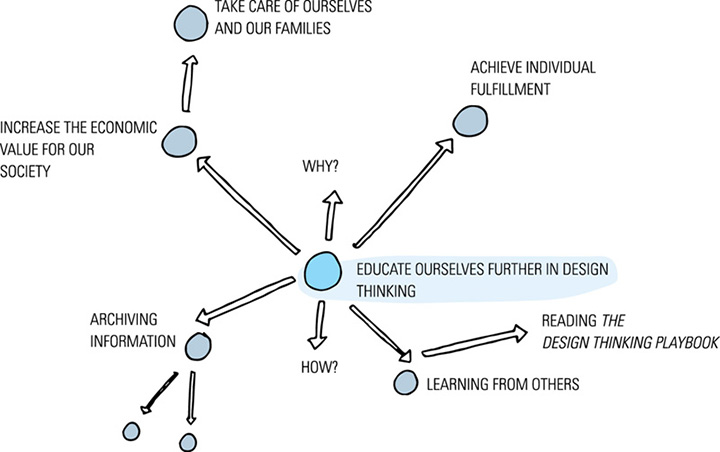
This phase was already touched upon in Chapter 1.1. Our starting point was not a goal to be achieved but a persona that has needs or is facing the challenge of having to solve a problem. Once the problem has been recognized, the problem statement must be defined at the right level of comfort. With two types of questions, we can either expand (WHY?) or narrow down (HOW?) the creative framework. The principle can be illustrated most easily on the basis of the need to educate ourselves further:
Alongside the problem statement, it is important to understand the overall context. Answering the six WH questions (who, why, what, when, where, how) yields fundamental insights:
- Who is the target group (size, type, characteristics)?
- Why does the user think he needs a solution?
- What does the user propose as a solution?
- When and for how long is the result needed (time span of the project or life cycle of the product)?
- Where is the result going to be used (environment, media, location, country)?
- How is the solution implemented (skills, budget, business model, go-to market)?
More on this in Chapters 1.4 and 1.5.


OBSERVE:
We have already initially dealt with the Observe phase to some extent. We tried to be experts and better understand the needs of our readers. We took a closer look at people from three different environments who apply design thinking and observed the groups of persons at work. To do so, we took advantage of various opportunities: at the HPI in Potsdam, at the d.school in Stanford, interacting with coaches from the ME310; in workshops with the DTP Community at Startup Challenges; in internal workshops at companies as well as in co-creation workshops with the objective of inspiring customers for digitization; and so on.
It is always important to document and visualize these findings so they can be shared with others at a later time. So far, most of those involved in design thinking focus on the qualitative method of observation. Documentation is done by means of idea boards, vision boards, daily story based on photos, mind maps, mood pictures, and photos of life situations and people. All this is important information we can use to create and revise personas and to build up empathy for the user, as will be described in more detail in Chapter 1.5.

DEFINE POINT OF VIEW:
For the point of view, the important thing is to draw upon, interpret, and weight all the findings. The facilitator is urged to encourage all members of a group to talk about their experience. The goal is to establish a common knowledge base. This is done best by telling stories that have been experienced, showing pictures and describing the reactions and emotions of people. Again, the aim is to develop further or revise the personas in question. We will discuss this step in detail in Chapter 1.6.

IDEATE:
In the phase of Ideation, we can apply various methods and approaches that heighten creativity. Irrespective of this, we normally use brainstorming or the creation of sketches in this phase. The goal is to develop as many different concepts as possible and visualize them. We present a number of techniques for this in Chapter 1.7. The phase of Ideation is closely associated with the subsequent phases in which prototypes are built and tested. The next Expert Tip will give depth to this approach. In this phase, our primary goal is the step-by-step increase of creativity per iteration. Depending on the problem statement, a general brainstorming session on possible ideas can be held at the onset. Presenting individual tasks in a targeted manner for the brainstorming session has proven successful; this way, creativity and thus the entire diverging phase can be controlled. Examples include a brainstorming session on the critical functions, benchmarking with other industries or situations, and a dark horse that deliberately omits the actual situation or combines the best and worst ideas. A funky prototype that simply ignores all limiting factors can also generate ideas. We will specifically address the matter in the depiction of the macro cycle.

PROTOTYPE:
In the previous phase, we already pointed out the next steps of “Build prototype” and “Test prototype” because they are always connected to ideation. Chapter 1.9 will show what makes up a prototype.
At any rate, we should make our ideas tangible as early as possible and test them with potential users. This way, we receive important feedback for the improvement of ideas and prototypes. The motto of the options for action is simple: Love it, change it, or leave it.

TEST:
This phase comes after each developed prototype and/or after each drafted sketch. We can do the testing with colleagues, but the interaction with potential users is what’s really intriguing. Alongside traditional testing, it is possible today to use digital solutions for testing. Prototypes or individual functionalities can be tested quickly and with a large number of users. We will present these possibilities in Chapter 1.10. We receive mostly qualitative feedback from this phase. We should learn from these ideas and develop them further until we love our idea. Otherwise: discard or change.

REFLECT:
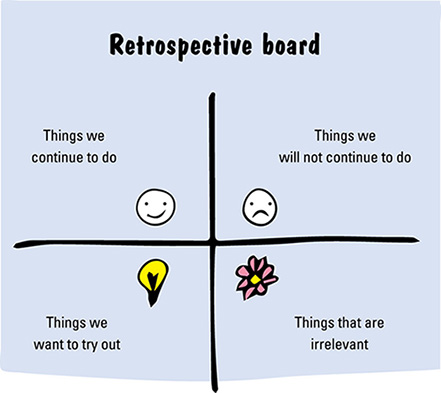
Before starting a new cycle of the iterative process, it is worthwhile to reflect upon the chosen direction. Reflection is best triggered by questioning whether the ideas and test results comply with claims of being socially acceptable and resource-efficient. With agile methods such as Scrum, the Reflect phase wraps up the process in retrospection. The process and the last iteration are reviewed, and a discussion follows on what went well and what should be improved. The questions can be played through in a “I like—I wish” feedback cycle, or feedback can be obtained in a structured way using a feedback capture grid. Naturally, we also use the Reflection phase to consolidate the findings if this hasn’t yet occurred in the Test phase.
We update the personas and, if necessary, other documents on the basis of these findings. In general, reflecting helps to explore new possibilities that might lead to better solutions or improve the process as a whole.
Phase |
Shortcut to examples of tools & methods |
Page |
Understand |
|
26 30 31 34 |
Observe |
|
28 29 60 63 66 69 75 76 77 |
Define point of view |
|
82 85 87 |
Ideate |
|
91 93 94 96 98 105 |
Develop prototype |
|
108 111 113 115 |
Test |
|
118 123 124 128 |
Reflect |
|
44 |
In the micro cycle, we go through the phases of Understand, Observe, Define point of view, Find ideas, Develop prototype, and Test prototype. They must be seen as a unit. In the divergent phase, the number of ideas we gather through various creativity techniques increases constantly. Some of these ideas we want to make tangible in the form of prototypes and test with a potential user. The respective creativity methods and tools are used depending on the situation. The journey toward the ultimate solution is not certain at the onset.
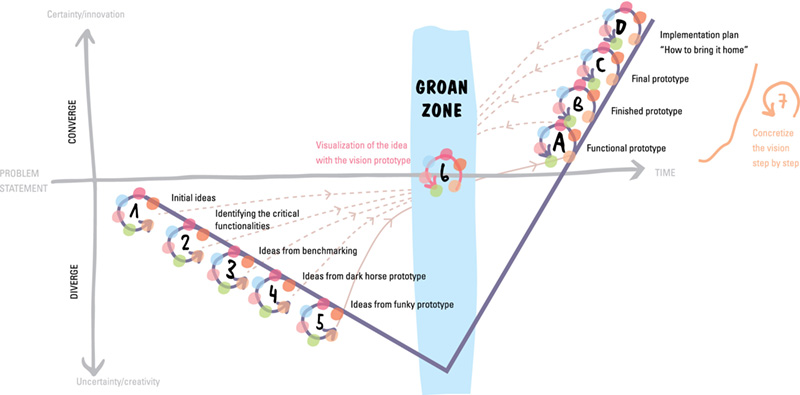
The issue in the macro cycle is to understand the problem and concretize a vision of the solution. To do this, many iterations of the micro cycle are run through. The initial steps in the macro cycle are of a divergent character (steps 1–5 in the figure). In the case of simple problems or if the team possesses comprehensive knowledge of the market and the problem, the transition to the groan zone (step 6) can be pretty fast. Transition to the groan zone can be effected from any one of the five divergent steps. The sequence of ideas to be elaborated can and must be adapted to the situation and the project. The suggested sequence has been successfully applied in many projects, though. The vision of the solution or idea is concretized in the form of a vision prototype and tested with different users. If the vision gets generally positive feedback, it is concretized in the next iteration (step 7).
The hunt for the next big market opportunity often follows these steps:
(1) Initial ideas are worked out in a brainstorming session
An initial brainstorming session about potential ideas and solutions helps the group to place all sorts of ideas and get them off their collective chest. Frequently, the levels of knowledge of the individual team members in terms of the problem statement and a possible solution spectrum are quite different. An initial brainstorming session helps in approaching the task and learning how the others in the group think.
Instruction: Give the group 20 minutes for a brainstorming session. The issue here is quantity, not quality. Every idea is written on a Post-it. When writing or sketching on the Post-it, the idea is expressed aloud; afterward, the note is stuck to a pin board.
Ask the group to answer the following key questions:
- Which ideas come to mind spontaneously?
- Which solution approaches are pursued by the others?
- What can we do differently?
- Do we all have the same understanding of the problem statement?

(2) Develop critical functionalities that are essential for the user
This step can be crucial for the solution. The facilitator has the task of motivating the groups so they identify exactly these “important things” and prepare a ranking in the context of a critical user.
Instruction: Give the group one to two hours—depending on the problem statement—to draft, build, and test 10 to 20 critical functions.
Ask the group to answer the following key questions:
- Which functionalities are mandatory?
- What experience is absolutely necessary for the user?
- What is the relationship between the function and the experience?

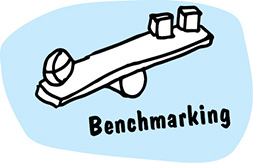
(3) Find benchmarks from other industries and experiences
This step is a very good tool when teams are not able to tear themselves away from an original solution concept.
Benchmarking helps participants think outside the box and adapt ideas from these areas for the solution of the problem. The facilitator broadens the creative framework by motivating the groups to hold the brainstorming session, taking into account a certain industry/sector or a particular experience. You can proceed in two steps, for instance: (a) brainstorming of ideas relating to the problem, and (b) brainstorming of industries and/or experiences. Subsequently, the three best ideas from each step are identified. Based on the combination of these, the facilitator invites the participants to develop two or three ideas further, build them physically, and test them with the user.
Instruction: Give the group 30 minutes for a brainstorming session, 30 minutes for finding benchmarks, and 30 minutes for clustering and combining ideas. Depending on the task, the group is given enough time to build two to three prototypes.
Ask the group to answer the following key questions:
- Which successful concepts and experiences can be applied to the problem?
- Which experiences can illuminate the problem from another perspective?
- What is the relation between the problem and other experiences?
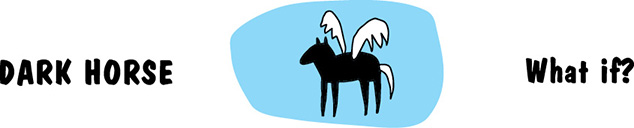
(4) Heighten creativity and find the dark horse among the ideas
This step helps many teams to boost creativity further—not least because, for the dark horse, borders are lifted, which might have limited us in the previous steps. The facilitator motivates the groups to strive for maximum success and thus develop a radical idea. Now the time has come for the teams to heighten creativity and accept the maximum risk. One possibility for the creation of a dark horse is to omit essential elements of a given situation, such as, “How would you design an IT service desk without IT problems?” “What does a windshield wiper look like without a windshield?” or “What would a cemetery look like if no one died?” The main point is to leave the comfort zone and “do it in any case,” no matter what will occur.
Instruction: Give the group 50 minutes to build a dark horse and enough time for building a corresponding prototype depending on the task.
Ask the group to answer the following key questions:
- Which radical possibilities have not been considered thus far?
- Which experiences lie outside anything imaginable?
- Are there products and services that would expand value creation?
(5) Implementation of a funky prototype to give free rein to creativity
In many cases, you have to go one step further because the team has not come up with disruptive ideas so far. The building of a funky prototype cranks up creativity one more notch. It encourages the teams to maximize the learning success and at the same time minimize costs in terms of time and attention. The goal is to develop solutions that mainly focus on the benefit. Potential costs and any budget restrictions are completely removed.
Instruction: Give the group an hour to build a funky prototype.
Ask the group to answer the following key questions:
- What crazy ideas are super cool?
- For which idea would you have to ask forgiveness in the end?
- What does an idea look like that is realized ad hoc and has not been planned?

(6) Determine the vision of the idea with the vision prototype
The groan zone is the transition from the convergent to the divergent phase. The phases can be changed at any time. Experienced facilitators and innovation champions recognize this point in time and lead their teams in a targeted way to the convergent phase.
In the vision prototype, we make an initial combination of
- prior knowledge (caution is advisable here),
- best initial ideas,
- most important critical functionalities,
- new ideas of other industries and experience,
- initial user experience,
- intriguing insights (e.g., from the dark horse), and
- the simplest possible solution.
Instruction: Give the group about two hours (depending on the complexity of the problem) for building a vision prototype. It should then be tested with at least three potential users; the feedback is to be captured in detail. In the best-case scenario, these users are then involved in the subsequent concretization of the design thinking project. If so-called lead users are known in a field of innovation, they are perfect as references because they are often highly motivated to satisfy their needs.
Ask the group to answer the following key questions:
- Does the vision generate enough attention so a potential user absolutely wants to use this solution?
- Does the vision give sufficient leeway for a user’s dreams?
- Is the value offer of the vision convincing?
- What else would the users wish for in order to make the experience perfect?

(7) Concretize the vision step by step
In the following convergent phase, we want to focus on the concretization of the vision.
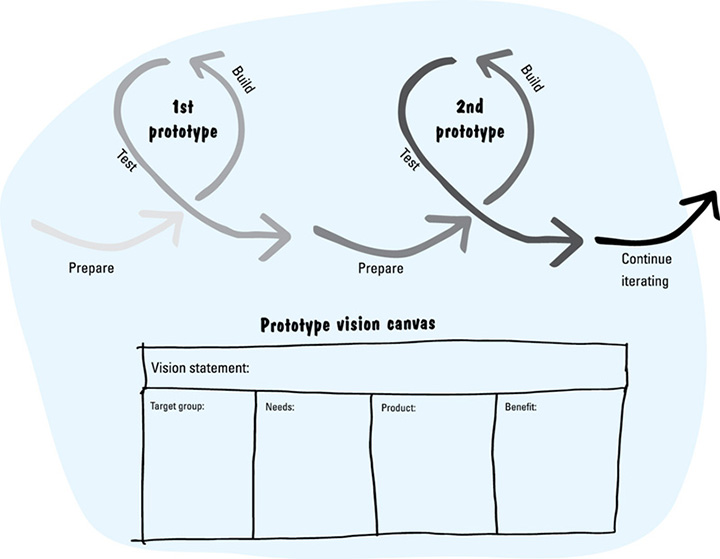
The theme of this phase is the specific elaboration of the selected idea. It is iteratively improved and expanded. It is advisable here first to build and test the most important critical functionalities as integral parts of a functional prototype. With this prototype as a starting point, more elements are supplemented and finally the prototype is built. Different ideas can be tested in the convergent phase, and the best ones are integrated into the ultimate solution. Individual features or various combinations can be developed and tested, for instance. Once the prototype has a certain maturity, we can describe it in a “prototype vision canvas.” This way, we can formulate and compare various visions.
It is all about the iterative detailing and elaboration of the selected idea.
The maturity of the prototypes increases with every individual step.
- Functional prototype
With respect to the functional prototype, it is important to concentrate on the critical variables and test them intensively with potential users. Critical functions must be created for critical experiences. Not all functionalities must be integrated at the onset. The crucial point is to ensure minimum functionality in order to test the prototype under real conditions. These prototypes are frequently referred to as “minimal viable product” (MVP). These MVPs serve as a foundation to build upon, and step by step a finished prototype emerges that combines several functions.
- Finished prototype
The creation of a finished prototype is crucial for the interaction with the user, because only reality yields truth. Enough time must be scheduled for building a finished prototype, and the respective functionalities must be integrated.
- Final prototype
The final prototype excels by the elegance of the thoughts invested in it as well as in its realization. Prototypes that are convincing with simple functionality are usually also successful when launched on the market. It is advisable to obtain as much support from suppliers and partners in any and every possible way. The use of standard components increases the likelihood of success and massively reduces development costs.
- Implementation plan: How to bring it home
Not only the quality of the product or service is decisive, but also its implementation. Important things to know: Who might put obstacles in the way of the implementation process and try to influence decisions? The credo: Turn those affected into people who are involved and create a win-win situation for all parties. Chapter 3.4 describes what is important in the implementation process.