1.9 How to create a good prototype
Prototyping is an important element of design thinking. It encourages us to test functions and solutions in reality, in conjunction with the desire to learn from users how to improve an offer on an ongoing basis. For this to succeed, all those involved in the process must keep an open mind so an idea can be changed or discarded. What is crucial here is the willingness to make radical changes. With a prototype, an idea is brought into a form that allows potential users to experience and evaluate it. At the outset, the prototype must be only good enough to make the relevant basic features of a future offer comprehensible to a target audience. Prototyping makes it possible to obtain quick and inexpensive targeted feedback from potential customers and users.
Physical prototypes can be made from aluminum foil, paper, or Lego bricks; in the case of services, they can be expressed in the form of a role play. Digital prototypes can be built, designed as videos, clickable presentations, or landing pages. Of course, the various types can be combined; for example, integrating a smartphone into a cardboard box so it works as a display and thus serves as the prototype for augmented reality glasses.
First principle:
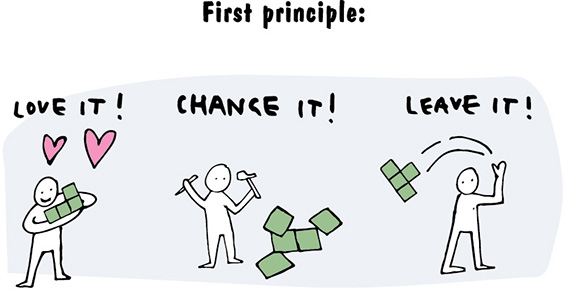

In general, ideas are based on many different assumptions. The task is to question these assumptions and confirm them in the real world by testing, or to discard them—that is, disprove them with a counterexample on the basis of observations and an experiment. During the prototyping process, prototypes are further developed and tested in a number of iterations until a usable offer emerges. Ideally, we begin with enough insights from trend and market research and a solid understanding of the needs and challenges of our potential customers or users.
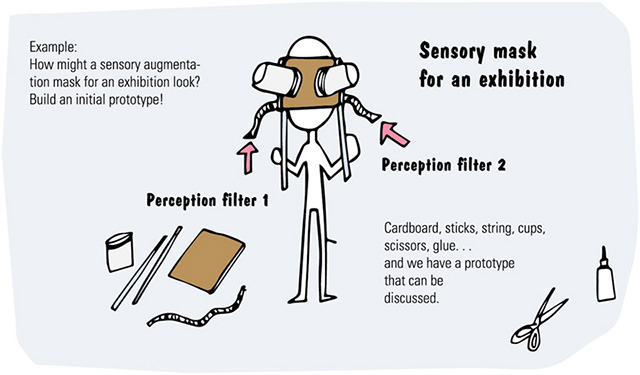
An initial prototype is characterized by the fact that it can be made using the simplest available materials and as quickly as possible. The simpler, faster, and cheaper we produce a prototype, the less it will hurt us when we have to reject it. An initial prototype can be developed from cardboard, paper, plastic cups, string, tape, and other materials and then assessed.
In prototyping, a second principle applies:
Over time, the degree of maturity of our prototypes will be higher, and it will be more elaborate. We must therefore schedule plenty of time for prototyping and testing. The more sophisticated our prototype is, the more accurate and meaningful the tests will be. The degree of maturity of the prototype depends on how much time and money we can invest in it. Our intention, however, must be to drive the prototype only as far as necessary in order to attain our set goals.
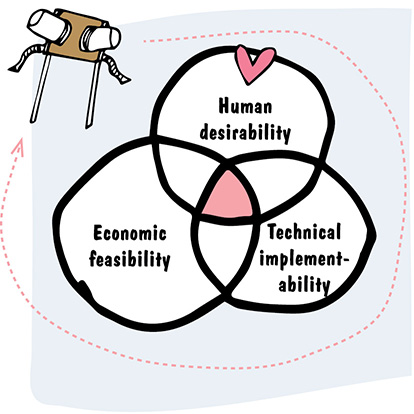
The test results of the prototype serve the project team as a basis for decision making in order to make the right, balanced decisions in terms of human desirability, economic feasibility, and technical implementability. Only once all these criteria have intersected are we on the right path for generating a market opportunity. We always begin with the human being and his needs.
The focus of prototyping is always on learning. As described in Chapter 1.2—in the macro cycle—prototyping is possible at any time. The added value of individual functions, a new product, or the result of a customer interaction can be tested with a prototype.
Thus we come to the third principle of prototyping:

Lilly and Jonny are still dreaming of their company, which offers design thinking consultancy services. After Lilly has come up with some initial ideas for a value proposition and possible consultancy priorities, she wants to test these ideas on a potential Web site that can also be used on mobile devices. Later in the book (see Chapter 3.2), we will discuss in greater detail how a good value proposition is defined and why Lilly mainly focuses on the usability of the Web site for the time being.
Back to the prototype: Lilly outlines every page of her Web site on paper. She can’t do anything wrong when building her prototype—unless she wants to get it all right the very first time, which is impossible—but she can learn a a great deal from the subsequent tests with potential users. She thinks in variants: What might be an alternative for “this or that”? She detaches herself from one variant and tries out something completely different once again—the first idea doesn’t always have to be the best!
Three key questions arise when building the prototype:
- What are the basic functions for the user?
- What hasn’t she taken into consideration at all yet?
- How has nobody ever done it before?
Now Lilly tests and iterates the mobile version of her Web site with potential customers until they like it and are satisfied with its navigation and the scope of its contents. She refines the prototype all the way up to the finished design, which is only programmed at the end.
Generally, the following applies: The simpler the prototype of an offer can be operated, the better.

Whatever it is we want to develop—a product, a service, an organization, a system, a space or environment, a start-up, a create-up, or a Web site—we can use different types of prototypes during the development. Our overview presents common kinds of prototypes and can encourage us as a project team to try out different things. The low, medium, or high degree of resolution (i.e., the level of detail of a prototype) helps us find out what is suitable at what point in time over the course of the development.

Type |
Description |
Degree of resolution | Suitable for/examples |
||
| low | medium | high | |||
Sketch |
Paper or digital, sketched or scribbled, on a flip chart or on smaller sizes of paper such as DIN A3 or A4 (11x17 or 8.5x11 in.) or even on a Post-it. |
Practically everything |
|||
Mock-up |
Shows the overall impression of a system without its necessarily having to work. |
Products, digital or physical |
|||
Wire frame |
Early conceptual design of a system. Shows the functional aspects and the arrangement of the elements. |
Web sites |
|||
Chart |
For showing correlations. This allows you to check how ideas are linked to one another and how the experience changes over time. |
Spaces, processes, structures |
|||
Paper |
Building or upgrading of objects and products with paper or cardboard. |
Products, digital or physical Furniture, accessories |
|||
Storytelling and story writing |
Communication or presentation of sequences and stories. |
Experiences |
|||
Storyboards |
Shows the end-to-end customer journey of a series of images or sketches. Can also be used as a basis for a video, for storytelling, or in a funny way like a comic strip. |
Experiences |
|||
Video |
Recording and presentation even of complex scenarios. |
Experiences |
|||
Open hardware platforms |
Analog and digital interfaces for the combination with motors and sensors. |
Electromechanical systems |
|||
Photo |
Photo montage for the simulated depiction of a situation, using photo editing software. |
Products, digital or physical Experiences |
|||
Physical model |
Shows a two-dimensional idea in three dimensions. Can be done in the form of 3D printing, or else with other materials, e.g., Lego bricks. |
Products, spaces and environments |
|||

| Type | Description | Degree of resolution | Suitable for/ examples | ||
| low | medium | high | |||
Service blueprinting |
Structured description of services for the comprehensive design of the experience in the end-to-end customer journey. |
Products, digital and physical services |
|||
Business model |
Systematic depiction of business contexts and relations, e.g., with the business model canvas or lean canvas. |
Business models |
|||
Role playing |
Emotional experience of the customer with a product or service, acted by project team members. |
Experiences |
|||
Bodystorming |
Reproduction of specific situations, with the project team members doing the physical acting. |
Physical experiences |
|||
Pinocchio |
Rudimentary, nonfunctioning version of a product. |
PalmPilot (personal digital assistant) |
|||
Minimum viable product (MVP) |
Executable version of a system or a version, with only the most necessary functions. |
Digital products, software |
|||
Fake door |
Deliberate, fake access to a product that does not yet exist. |
Zynga, Dollar Shave Club |
|||
Pretend to own |
Pretending you own it (space, product, offer, etc.); actually, however, it is procured from somewhere else, has been rented or leased, before you have invested in a big way. |
Zappos, Tesla |
|||
Relabel |
Another product equipped with its own brand and packaging. |
Products, services |
|||
Wizard of Oz (also referred to as “mechanical Turk”) |
User interacts with the interface of an application that does not exist. The reactions of the system are simulated by the people acting. |
IBM’s speech-to-text experiment |
|||
Minimum viable ecosystem (MVE) |
Working collaboration on the basis of a key functionality between initial partners in the ecosystem |
Blockchain applications, platform solutions (e.g., WeChat) |
|||
During the prototyping phase it is important to make the services, products, and solutions tangible so that they can be experienced. Two methods help us to realize this: The “boxing principle“ tries to use the analogy of packaging to illustrate the most important information. The “shelfing“ aims to discuss a whole product portfolio and to organize the “boxes.“
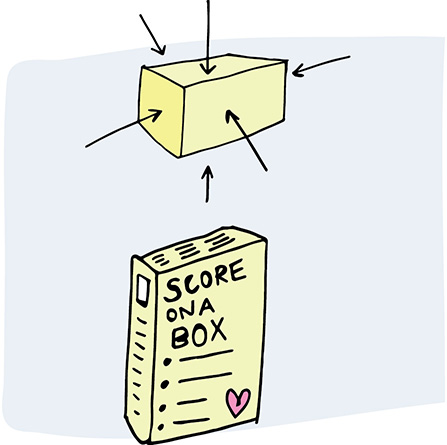
Boxing principle:
The basic idea behind “boxing“ is to create a physical box, which can be used, for example, for the marketing of the product. Let‘s imagine a cereal box.
Each side of the box contains information that summarizes the benefits and characteristics of the cereal mix and the brand. The name, logo, and slogan are on the front, as well as a few points that highlight the key benefits of this brand. On the back you will find more detailed information about the ingredients and attributes of the product and some information about the company.
Core questions in boxing:
- Front: what is the product name, image, slogan and two to three promises about the product?
- Back: which details about the feature, application, and content are important?
On the remaining sides the WH questions are answered by means of text or visualizations:
- Who is the target customer or user?
- Which goals should be achieved? Which problems are solved ?
- When is the product available and how can we get it?
- Where and under what circumstances is the product used?
- Why should the user use the product?
The boxing principle can be used in other ways than as a product box as described. The added value of boxing is that the situation can be viewed from different perspectives. Similar to the product box, a problem box, a solution box, a project box (e.g., per project or working package), a process box (e.g., per process step) can be created.
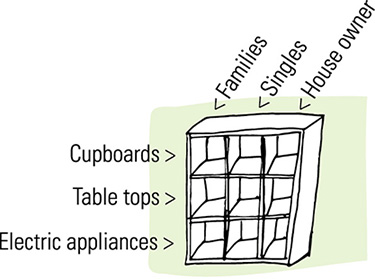
Shelfing principle:
When it comes to describing a whole portfolio, often a structure is missing for the discussion. One possibility is to sort all products, services, and solutions into three shelves: the product, service, and solution shelves.
We have had a very good experience by sorting the offerings in the respective shelves. Above the shelves, we write the categories that the customer would most likely look for. Afterward we arrange the products, services, and solutions accordingly.
The advantage of this method is that gaps in the offering portfolio, and also synergies, can be detected quickly. New ideas can be described as boxes as explained (see “boxing“) and then can be sorted on the shelf. The discussion may relate to attributes such as attractiveness, novelty, strategy contribution, differentiation, etc.
How does our offer for the perfect kitchen look?
IKEA‘s portfolio in the area of kitchen can be explained well with three shelfing portfolios.
1) Solution portfolio |
2) Product portfolio |
3) Service portfolio |
 |
 |
 |
We offer kitchens in...
|
Our products range from...
|
Our services include...
|
The most important benefit of this technique is that it forces the team to construct their own understanding of the product in a very direct and visual manner.
This exercise provides a playful yet insightful method to pass on a deeper understanding of the product vision, while promoting discussion and collaboration between all the stakeholders.
Because we have already done a great deal of the preliminary groundwork, we assume we have developed a solid understanding of the problem statement, have verified certain assumptions, and given some thought to possible solutions. Now the focus must be transferred from the world of ideas to the real world.
Possible steps of a prototyping workshop
Step 1
In the beginning, we have a number of functions or initial solution scenarios that we would like to test. On the team, we ponder what functions are absolutely critical to a user. They are the functions we would like to integrate in the solution and test in the real world. As discussed in the previous chapters, prototypes exist in different manifestations and can be processed in different ways. What is important is that we implement something tangible and that an interaction with a potential user can come into being.
Step 2
The team thinks about which variant should be built.
Step 3
Now the team builds one or multiple prototypes. At this point, it is important to provide enough material for building the prototype.
Step 4
Performing the prototyping in several groups already allows us to obtain feedback from the others. A good way of obtaining feedback is through “green” or “red” feedback. The feedback is given in the form of “What I like about the prototype is. . .” (green feedback) or “I wish that the prototype. . .” (red feedback). This helps to maintain a positive basic mood and cultivate improvements.
Step 5
Based on the initial feedback, the prototypes as well as the way of presenting them are improved. It is important here to concentrate on the essential features and solutions.
Step 6
Before we go out and confront real users with our revised prototype, we carefully prepare our testing (see Chapter 1.10). One successful method is to go out in pairs for the prototype testing. One team member can ask the questions, and the other makes observations. After returning from the tests, all team members document and share their findings.
Step 7
Based on the findings, the prototypes are improved and/or some variants are discarded. If none of the prototypes work, it is useful to obtain more facts and customer needs and adapt the prototypes accordingly. The new variants of prototypes, in turn, serve for tests with potential users.
