Thermofax screens are a wonderful way to make multiple images of one of your sketches or photos. It doesn’t require an expensive machine as there are many places online that will make custom screens of your designs for a reasonable price. See Part 2 of this project if you want to go old-school and make your own screen from scratch. Whichever way you decide to play, screenprinting on paper is a fun way to explore your sketches as you combine them with mixed-media techniques.
11" × 71⁄2" (28cm × 19cm) Tiepolo paper
Acrylic Paint
colors of your choice
Brushes
1-inch (25mm) flat
no. 8 round
Other Supplies
clear wax crayon, dish soap, dry wax deli paper and book pages for additional prints, extra print paper, Matisse print paste, Fluid Matte Sheer Acrylics or acrylic washes, Mixed Media Adhesive, neutral collage materials, palette, palette knife, paper towels, shallow water pan, soft brush (corncob or other), squeegee, Thermofax screen

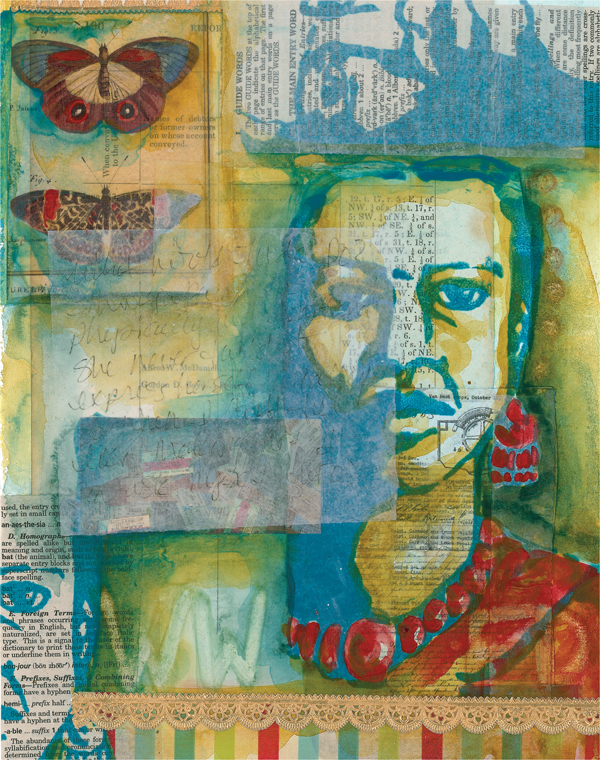
Use Mixed Media Adhesive or gel medium to adhere collage elements to the Tiepolo paper. Apply the adhesive with a 1-inch (25mm) flat to the back of the elements, to the substrate and then over the top of the elements once you’ve applied them. Make sure all of the collage materials are neatly and securely glued down, but you don’t need to cover all of the substrate. Let dry.
Thermofax is 3M’s trademarked name for a photocopying technology that was introduced in the 1950s. A screen is created by placing a thin sheet of heat-sensitive copy paper over the design and exposing it to a special lightbulb. Thermofax machines are still widely used by textile and printmaking artists.


Use a palette knife to mix print paste 1:1 with acrylic paint in a color of your choice (I’m using two parts Southern Ocean Blue to one part Cobalt Teal) on a palette. It will look “orange peely” at first and smooth when completely incorporated. You can make custom colors, using as many acrylic colors as you like.
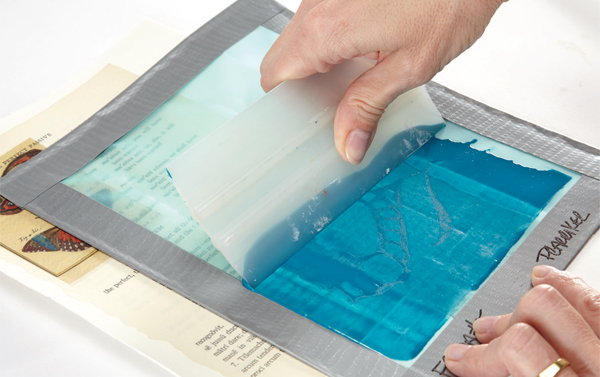
Place a Thermofax screen right side up on the substrate. Use a palette knife to load a squeegee with the print paste mixture. Lay the squeegee tool on top of the bottom of the screen, holding it at an angle, and pull upward in one smooth stroke.

Lift the screen, being careful to lift straight up to avoid smearing the image. Work on extra print papers first to make sure the image is well inked and to create additional materials to work with later. Print on the main piece when you’re confident the screen is well-inked.

Wash the screen immediately (you can place it in a tub of water temporarily). Use a soft brush (I like corncob brushes) and mild soap with water to clean the screen. Remove all of the paint. The paint may stain the screen, which isn’t a problem. Lay the screen flat on a towel to dry.

Add an additional layer of collage material, including interesting bits of papers and partial images of the prints pulled on various papers. You can also collage plain dry wax deli paper or journal on the deli paper and adhere that. Use Mixed Media Adhesive or gel medium and a 1-inch (25mm) flat to adhere, applying the adhesive to the back of the elements, to the substrate and then over the top of the applied elements. Let dry.
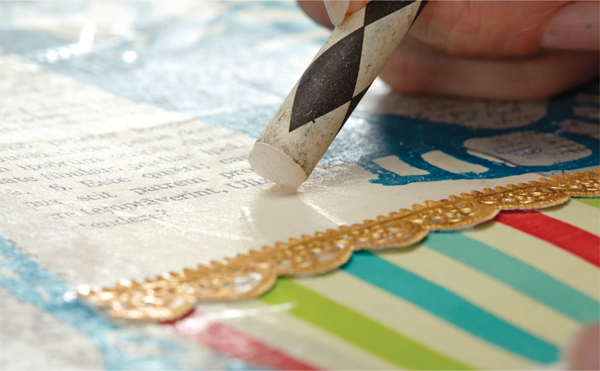
Apply clear wax crayon to the areas of your design that you want to remain white. You can write words or doodle as well. I wrote, “WWFD?” (What would Frida do?)

Use Fluid Matte Sheer Acrylics or acrylic washes and a no. 8 round to paint around the collage and print work. (I used Turquoise for added pop and Mustard Seed and Golden Rod for the background, tying the images together.) Use a lot of water for a watercolor effect, and let the paint dry between layers. Using a no. 8 round, apply very diluted paint over the wax crayon areas, and let it sit for a few minutes. The crayon will resist the paint, and you can blot with a paper towel to remove excess paint. Paint over the silk-screen prints and around them to tie them together with the collaged elements.