
Creating a 3-D portrait bust takes portraits to a whole new level. This bust is like a dimensional self-portrait journal page, incorporating collage, journaling, sculpting and painting. We will bring a Styrofoam wig form to life and create a work that is reflective of who we are at this moment in time, what we stand for, and where we want to go. Layers of under-journaling represent the layers that form us. Most of us can put on a pretty good outward face, but it’s what’s underneath that matters most and defines who we are. We’ll dig down to find out what’s behind the face the world sees.
Surface
Styrofoam wig form
Conté Pencils
Sanguine or your choice of colors
Inktense Blocks
blue
Faber-Castell Big Brush Pen
Warm Gray
Brushes
1-inch (25mm) flat
nos. 6, 8 round
Other Supplies
1-gallon (3.8l) plastic bag, baby wipes, CelluClay or other paper clay, collage material, gesso, Mixed Media Adhesive or gel medium, paper flowers or embellishments, paper towels, permanent black pen, sandpaper or small sanding block, Stabilo All pencil or other water-soluble pencil

Using a little piece of sandpaper or a sanding block, sand off the mold line around the sides and top of the bust.

Prep the surface by applying a layer of gesso with a 1-inch (25mm) flat, covering the entire bust.
You can also use CelluClay to alter the wig form. Adjust the nose, chin, cheekbones and so on before the gesso stage (Step 2), then gesso over the clay.

Tear small pieces of collage material (newspaper, tissue, other thin papers with text), and apply them to the entire head except for the hair area. Using a 1-inch (25mm) flat, apply Mixed Media Adhesive or gel medium to the back of the papers, to the surface of the head and then over the papers after they are applied. Let air dry. Caution: do not use a heat tool on Styrofoam.

If your papier mâchéd scraps look particularly busy, use a 1-inch (25mm) flat to apply a wash of gesso (1 part gesso to 4 parts water) to obscure some of the text. You should be able to see through the gesso. Let air dry.

Use a permanent black pen to write or journal on the bust. I call this “under-journaling” as most of what you write won’t actually be visible when the project is finished. This is a very free form of writing. You can literally empty your thoughts onto the artwork. Don’t worry about penmanship—just open up your mind and allow your hand to unload your thoughts.

Use a 1-inch (25mm) flat to add another wash of gesso (1 part gesso to 4 parts water) over the whole head including the scalp area to help obscure the writing. Add more gesso if you want a more opaque surface or less if you want more of the writing to show through. Let air dry.
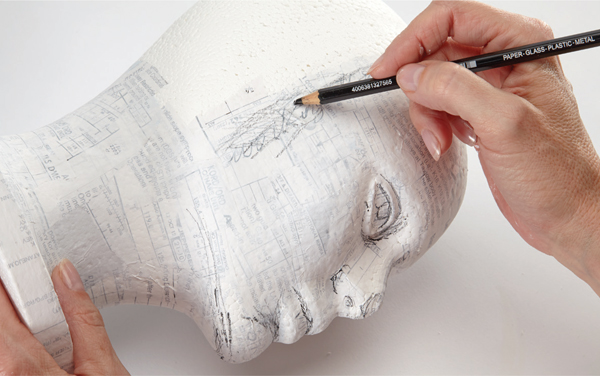
Use a water-soluble pencil such as a Stabilo All pencil to color shaded areas of the face, including the hairline, the eye sockets, lash lines, pupils, sides of the nose, under the nose, the upper lip, underneath the bottom lip and under the chin. Apply water with a no. 8 round to activate the pencil.

Begin painting the face with gesso and a wet no. 8 round. The paint will blend with the water-soluble pencil to create tonal value on the face. Vary the intensity by increasing or decreasing the amount of gesso. Repeat pencil applications as needed to deepen the shading.


Use a Sanguine Conté pencil to add color to all of the shaded areas. (You can use any color of Conté to create the skin tone of your choice.) Apply the Conté in crosshatching motions, then blend with a wash of gesso and a wet no. 8 round. Vary the amount of gesso to create different skin tones. You can also use a baby wipe to lighten and blend the color. Add more pencil to redefine the dark areas as needed. Let air dry.

Use a Warm Gray Big Brush pen to color really dark areas. Apply the pen to one small area at a time and blend out with a wet no. 6 round before it dries. Darken the eyebrows, inner corners of the eyes, the pupils, the irises, the nostrils and the midline of the lips. Make sure the paint is dry before adding more pen.

Apply Inktense Artists Blocks for more color. Touch a wet no. 8 round to the block to lift color, and apply Iris Blue to the hairline, around the eyes in the deep shadow areas, underneath the chin and to the irises (if you want blue eyes). Also use the blue to lightly shadow under the upper eyelids on the whites of the eyes. Let air dry. If the colors look too mottled, apply a wash of gesso with a 1-inch (25mm) flat to help blend the colors and let dry.

Mix 1⁄2-lb. (227g) of CelluClay (or use other paper clay and mix according to directions on package) with 16 oz. (.47l) of water in a sealed 1-gallon (3.8l) bag. Massage the bag to mix the clay and water, adding more water if it seems too dry. The clay is ready once the water is completely incorporated.

I taught this project as a workshop at an Art for Healing retreat. Many of the women had cancer and had lost their hair due to the treatment. Working on these bald Styrofoam heads was a way for them to express what they were experiencing in their battle against the disease. They created beautiful art, and many left their ladies bald. It helped them to see that they were beautiful. Hair did not make them beautiful, but rather the strength with which they fought did. I will never forget that experience and what it taught me about the importance of art, healing and self-acceptance.


Place paper towels under the bust and keep warm water on hand to wet your hands as needed. Grab a handful of the clay and knead it in your hands. Flatten it in your hand and lay it over the head. Keep your hands wet and form it to the head (keep the clay bag closed while working). Wet the palm of your hand and smooth the bumps out of the clay as you go. (The clay is sandable once it’s dry, so you will be able to smooth out any remaining irregularities.) Once you’ve covered the entire scalp with about a 1-inch (25mm) layer of clay, you can shape the hair as desired, creating buns, long hair, bangs and so on. (I made Princess Leia buns by rolling out two ropes of clay and coiling one over each ear, blending the edges into the scalp.) Let dry overnight.
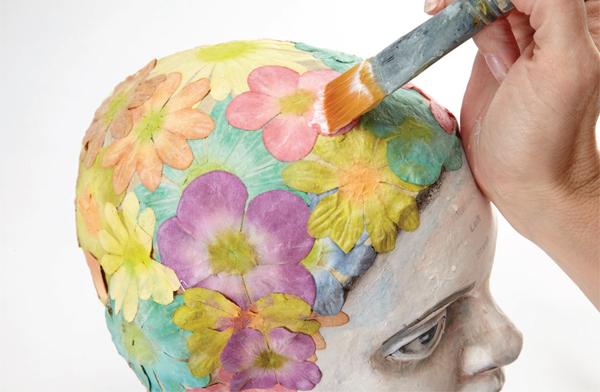

Add other elements such as flowers and buttons, using Mixed Media Adhesive or gel medium and a 1-inch (25mm) flat. Apply the adhesive to the back of the elements, to the scalp and then over the elements after they are positioned. Paint the hair as desired.
Journal on the neck area as desired with a black permanent pen.