This process always reminds me of combining the paint-by-number and scratch art that I made when I was young. First you will block in the colors side by side, then you’ll cover the whole thing with ink and rinse to reveal the final image. It’s fun because you never know exactly what the outcome will be, and it takes a little bravery to cover your painting with ink. I think these pieces have the look of wood- or linoleum-block prints, but they don’t require nearly as much time or effort.
8" × 6" (20cm × 15cm) 300-lb. (640gsm) cold-pressed watercolor paper
Sienna, Violet, White, Yellow Ochre
2-inch (51mm) flat
no. 6 round
2H pencil, dry wax deli paper or newspaper, gloves, India ink, lightbox, painter’s tape, palette, pan of water or sink, small disposable container

Lay a sketch under 300-lb. (640gsm) cold-pressed watercolor paper on a lightbox and trace with a 2H pencil to create light lines.
Caran d’Ache Gouache and India ink create the look of a block print.


Tape the paper to your work surface, overlapping all the edges of paper by 1⁄4–1⁄2 inch (6–13mm) to create a border.

Paint on gouache blockstyle with a no. 6 round, laying the colors next to each other rather than overlapping them. Don’t thin the paint—apply it thickly so it will block the ink. Leave space unpainted around all of the line details. Remember that the color you lay down first is the color that will show in the final painting. Any subsequent colors laid on top won’t show.
Apply White to the highlight areas, including the whites of the eyes, eyelids, nose, above the upper lip, below the lower lip, the ball of the chin and the jawline with a dry no. 6 round. Avoid covering the pencil lines.
Mix Yellow Ochre and White on the palette, and paint the mixture in blocks around the white highlights with a no. 6 round.
Mix Violet and White on the palette, and paint the mixture in the shadow areas, including the inside corners of the eyes, the irises, around the bottom of the nose, the bottom of the upper lip, underneath the lower lip and underneath the chin.
Mix Sienna with White on the palette to form several skin tones. Paint the darker skin tone mixture beside the nose, underneath the nose, on the upper lip and a little bit on the outer edges of the lower lip. Paint a midtone skin color above the eye, under the eye and a little on the lower lip (up to the white highlight). Use light skin tone to fill in everything else, leaving the pencil lines open for the black ink. It’s OK if you overlap the white highlights a bit as long as you don’t scrub or you may remove paint.
Make a gouache-resist color wheel to see how the colors show once rinsed and to get the hang of the technique. This will help you determine how dark you want the gouache colors to be. They will come out lighter than they look originally. You can see in this portrait that the colors were a little too light.
Lightly draw a color wheel with a pencil on a piece of watercolor paper. Apply gouache colors to each space and let dry. Apply a layer of India ink over the entire paper and let dry overnight. Rinse off the gouache and see how the colors look to determine which ones you might want to use in your portrait.

Wear gloves and protect your work area and clothes for this step. Lay the painting on top of dry wax deli paper or a stack of newspaper. Pour the India ink into a small disposable container. Use a cheap 2-inch (51mm) flat brush to apply India ink at full strength. Apply the ink gently, painting one even stroke from the bottom to the top. Lay the next stroke right beside the first, trying not to overlap or go back and forth in the same area (overworking may remove the gouache). Let air dry, preferably overnight. The gouache may crack a bit as it dries, but this is normal.

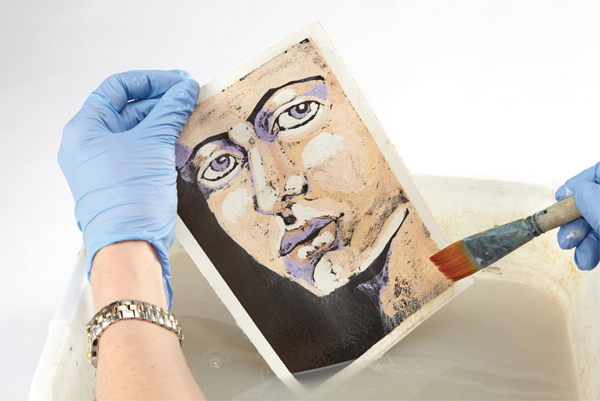
Gently peel off the tape from the edges of the painting. Rinse the ink from the painting in a pan of warm water or in a sink with a steady stream of water or a spray nozzle. Rinse off as much as you like. Let the painting dry completely on a flat surface.
If you want a black border, remove the tape before applying the ink. If you prefer a white border, remove the tape after applying the ink.