Chapter 10: Connecting to a Network

A network consists of two or more connected computers. You can connect multiple computers to a network to share files and equipment. A network connection can be set up through cables or by using a wireless connection. Most laptops have built-in wireless capabilities.
Wireless networks abound and you can connect to the Internet from a variety of places. Wireless networks are commonplace at home or in the office, as well as out and about when you travel. Wireless networks offer laptop users the most mobility. Using your laptop with a wireless network is the focus of this chapter.
Review a Home-based Network Setup in Windows 8
Share Files and Folders via Public Folders
Review a Home-based Network Setup in Windows 8
Creating a network on Windows 8 is easy, but you must understand what components you need to make sure you have everything before starting. Thanks to vast improvements in technology and the Windows 8 operating system, establishing a home-based network, particularly a wireless one, is pretty straightforward and easy to accomplish without a lot of headaches. In fact, Windows 8 does a lot of the work for you, recognizing when your wireless router is up and running and ready to connect you to your Internet account. Broad support for many types of wireless devices and connectivity is built into the new operating system.
Determine a Network Setup in Windows 8
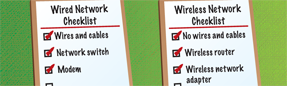
The first step for setting up a network at home is determining whether you want a wireless or wired scenario. Although wired can sometimes be more reliable, all the equipment must be in a fixed location when cables are involved. With a wireless scenario, you are not tethered to one place and there is no need to hook up cables and wires. For most users these days, a wireless network makes more sense, particularly for the home or small office.
Check for Necessary Hardware
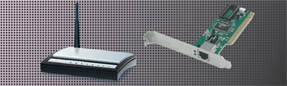
A router is key to the network, and a wireless router makes it easy for every computer in the household to connect with each other. Every computer that is part of the Windows 8 network needs a network adapter card to receive and transmit data.
Establish an Internet Account
If you want all the computers on your home-based network to connect to the Internet, you need an account with an Internet Service Provider (ISP). Internet accounts come in different formats and packages, such as DSL, cable, or wireless. Some ISPs even provide the essential connection equipment you need, such as a broadband modem. If you do not yet have an Internet account, you will need one for online access; without one, you can still create a network and share files between computers.
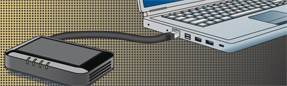
Set Up the Router
Using Windows Connect Now (WCN) technology, Windows 8 can configure your router and laptop to establish a network for you. All you have to do is plug the router in. Lots of WCN-compatible devices are available in the marketplace, including routers and printers. If your router is not WCN-compatible, it probably comes with instructions and a setup CD to help you connect the device.
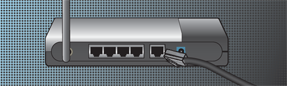
Connect the Router to the Internet

When the time comes to actually connect your network to the Internet, you must follow any special instructions from your ISP to make the proper connection, including using passwords, security keys, and other special settings. If you do not have the information, you may need to contact the provider for help. Depending on your setup, connecting your router to the Internet may be as simple as plugging an Ethernet cable into the router and into the broadband modem.
Connect Other Computers and Devices to the Network
The next phase in a home network setup is to connect all the computers and devices to the network. If all your devices, such as a printer, are compatible with Windows, all you have to do is connect them and Windows does the rest. Windows-compatible hardware typically features the Windows logo to the phrase “Compatible with Windows.” If a device is not Windows-ready, you can follow the setup instructions that come with the device.
Create a Homegroup and Share Files
A Homegroup is an amazingly simple way to share files on a home-based network. To utilize the technology, all the networked computers need to be running Windows 8 or Windows 7. One computer takes the lead and creates the Homegroup, and others join in using a password. You can decide which data to share. If you are networking with computers using older versions of Windows, you can still share files using the Public folders. Anything in a Public folder is viewable on the network.
New to Windows 8

You can use a Microsoft account, which is your Windows Live ID or your Live e-mail address, to create an account in your Windows 8 network. Doing so allows you to synchronize user settings and data among networked computers. If you do not want to participate with a Live account, you can use a standard local account — a conventional logon account for your computer.
Connect to a Wireless Network
After you set up your wireless network, you can connect to it with your laptop — assuming your laptop has a wireless card installed. If your wireless network is connected to the Internet, you can then access the Internet from your laptop. You may also be able to access files other computers are sharing on the wireless network.
In addition to connecting to your own wireless network, you can connect to public wireless networks, often found in airports, hotels, cafes, libraries, and other public places. You can also connect other computers and devices to the network, such as a printer.
Connect to a Wireless Network
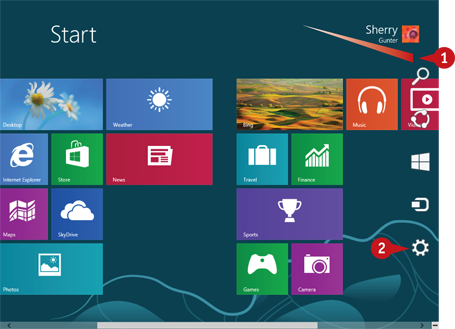
 From the Start screen, swipe the right edge of the screen or move the mouse pointer to the lower-right corner.
Windows displays the Charms bar.
Note: You can also press  +
+ to display the Charms bar.
 Click Settings (
 ).
).

 Click the Network icon (
 ).
).
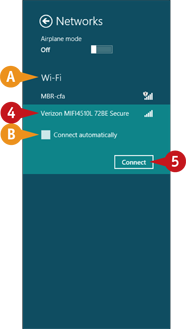
A A list of wireless networks in your area appears.
 Click the wireless network you want to use to connect.
A Connect button appears.
 Click Connect.
B You can click here to always connect automatically to this network.
If prompted, enter the network password or network security key.
Note: If this is the first time you have connected to this wireless network, Windows may prompt you to specify sharing status.
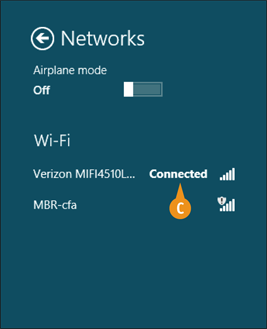
C Windows 8 verifies and indicates your connection.
Share Files and Folders via Public Folders
Windows 8 offers special folders, called Public folders, which you can use to share files with other users. There are four Public folders: Public Documents, Public Music, Public Pictures, and Public Videos. These folders are subfolders of the main Documents, Music, Pictures, and Videos folders, respectively.
When you place an item in a Public folder, any other person with a user account on that same computer can view it by default. In addition, you can make these folders accessible to other users whose computers are connected to your network. To do so, you must enable sharing.
Share Files and Folders via Public Folders

From the Windows 8 desktop, right-click the Wireless Networks icon ( ) in the taskbar’s notification area.
Note: You can press + to quickly access the desktop at any time.
Click Open Network and Sharing Center.
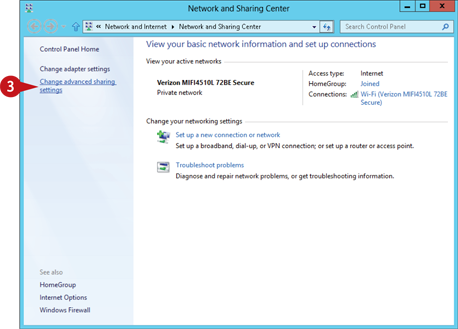
The Network and Sharing Center window opens.
Click Change advanced sharing settings on the left side of the Network and Sharing Center window.
The Advanced Sharing Settings window opens.
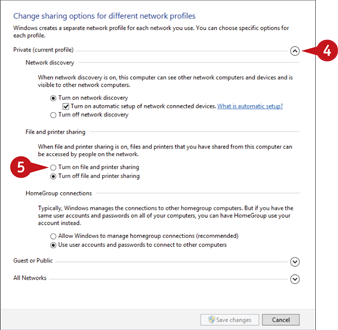
If necessary, click the  to the right of your current profile to expand it.
Click Turn on file and printer sharing.
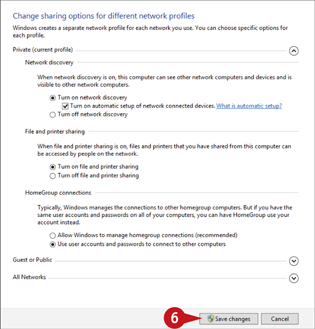
 Click Save changes.
File and printer sharing is now activated.
Set Up a Homegroup
You can share files and folders by creating a Homegroup, which other computers running Windows 8 or Windows 7 on your network can join. One computer takes the lead and creates the Homegroup, and others join in using a password. When you create
or join a group, you specify which of your items you want to share and which should remain private.
A Homegroup is a great way to share files in a home-based network or a small office network. To create a Homegroup, your network must be a home network, as opposed to a work or public network.
Set Up a Homegroup

From the Windows 8 desktop, right-click the Wireless Networks icon () in the taskbar’s notification area.
Note: You can press + to quickly access the desktop at any time.
Click Open Network and Sharing Center.
The Network and Sharing Center window opens.
In the Network and Sharing Center window, click HomeGroup.
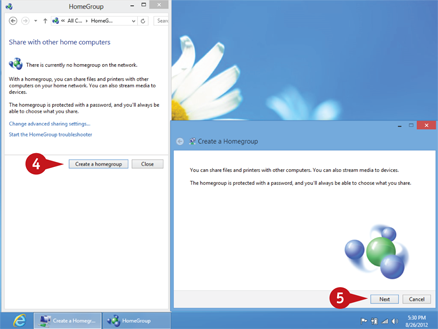
Click Create a homegroup.
The Create a Homegroup Wizard starts.
Note: You may already have a default Homegroup ready to go. You can always add new ones as needed.
Click Next.
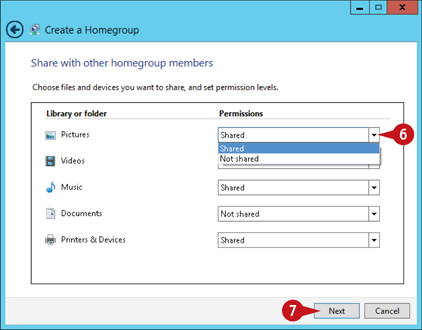
Click the drop-down arrow ( ) next to each library or folder you want to share with the Homegroup and choose Shared.
Note: You can also share a printer with your Homegroup.
 Click Next.
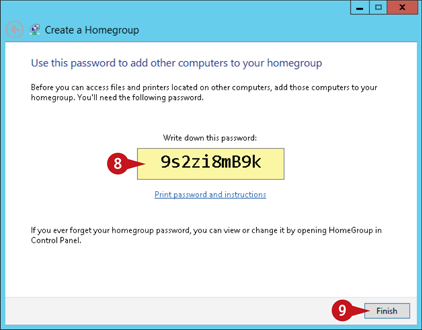
 Write down the password.
Note: You need this password to add other PCs to the Homegroup.
 Click Finish.
Windows 8 creates the Homegroup.
Note: To add another Windows PC to the Homegroup, open the PC’s Control Panel and click Choose Homegroup and Sharing Options under Network and Internet. Click Join Now in the screen that appears and follow the on-screen prompts.
Share Within Your Homegroup
When you set up a Homegroup, you specify what top-level folders should be shared. You can also opt to share individual files and subfolders with others. These resources can be shared with Read permissions, enabling others to simply open and view your files. Alternatively, you can share with Read/Write permissions, enabling others to both view and modify your files. You can share with everyone in your Homegroup or with specific individuals. Shared resources appear under Homegroup in the File Explorer Navigation pane. Of course, if you change your mind, you can always unshare a resource.
Share Within Your Homegroup

Open the File Explorer window.
Press + to open the Explorer window.
Navigate to the resource you want to share.
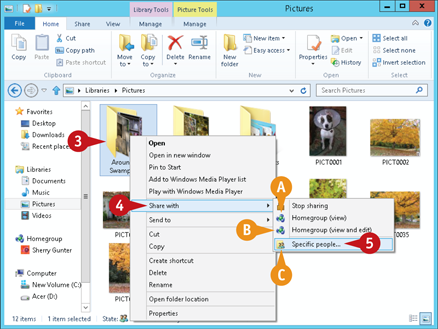
Right-click the resource.
Click Share with.
Choose a sharing option.
A Click Homegroup (view) to share the resource with Read permissions with everyone in your Homegroup.
B Click Homegroup (view and edit) to share the resource with Read and Write permissions with everyone in your Homegroup.
C Click Specific people to share the resource with specific people in the Homegroup, as shown here.
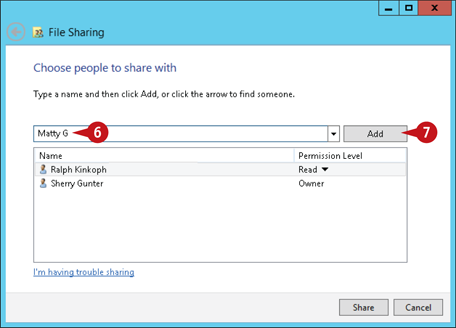
If you choose to share with specific people, Windows launches the File Sharing Wizard.
Type the username of the person with whom you want to share the resource.
Click Add.
Note: If you are not sure what the person’s username is, click the to the left of the Add button and select the user from the list.
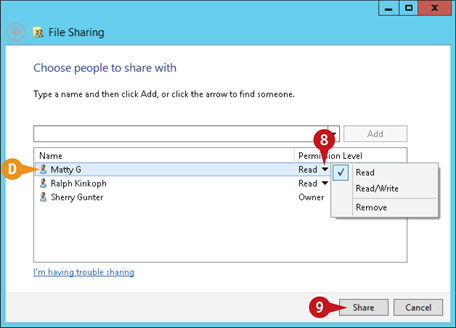
D Windows adds the selected user to the list of users with access to the resource.
To set the permission level, click the next to the current permission and select Read or Read/Write.
Click Share.
The resource you selected is shared.
Note: To stop sharing a resource, right-click the resource you want to keep private, click Share with, and select Stop Sharing.