Chapter 14: Working with Audio and Video
You can work with media files in a variety of ways in Windows 8. Using the new Music and Video apps, you can purchase music and videos online. You can use Windows Media Player, bundled with Windows 8, to organize your media collection, rip music from CDs in your personal library, create your own music CD mixes, create playlists of your favorite songs, and more.
In this chapter, you learn about the tools available to work with audio and video files on your laptop.
Use the Music and Video Apps
You can use the Music and Video apps on the Windows 8 Start screen to play music and videos on your laptop. Both apps offer access to online content you can purchase through the Marketplace. You can peruse through recommendations or search through genres to find music or videos. You can choose whether to download files or stream them, or use them on your Xbox if you are linking your laptop to a gaming device. You can also use the apps to play music or videos from your own libraries.
Your laptop’s default libraries include a folder for music and another for videos. You can use these to organize your media files.
Use the Music and Video Apps
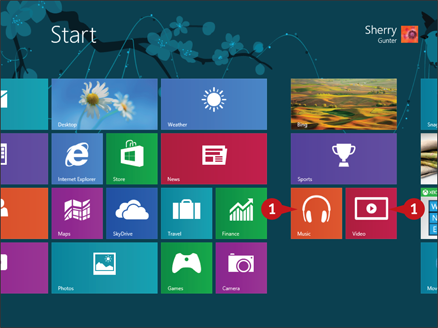
 From the Windows 8 Start screen, click the Music or Video app tile.
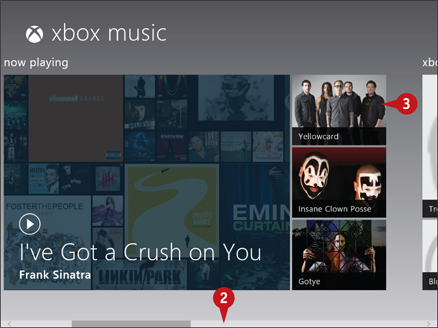
Windows opens the Music or Video app, in this example, the Music app.
 Scroll through the featured artists, your own library, or the Marketplace.
Note: Mouse users can use a scroll bar located at the bottom of the screen to move left and right.
 Click an item to open it.

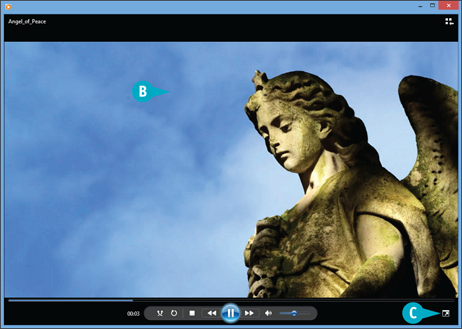
A If you click an item from your own library, the app plays the file on its own screen.
B Use the playback controls that appear to control how the clip plays.
C Click outside of the item display to return to the app’s main screen.
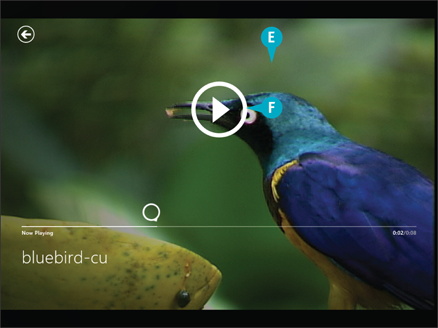
D In this example, a video plays in the Video app in its own screen with its own set of playback controls.
E Use the playback controls to control how the clip plays.
Simplify It
How do I buy music or videos?
When you find a video or album you want to purchase, click the name of the item and click Buy Album. The first time you attempt to purchase music or video online, the app asks you to set up an account by creating an Xbox LIVE membership, which is free to set up. You can buy Microsoft Points to purchase music and videos.
How do I change the app’s settings?
If you swipe the right side of the screen while using the Music or Video app (or move the mouse pointer to the bottom-right corner) and click Settings ( ), a list of settings relating to the app appears. You can use these settings to change accounts, edit permissions, or rate and review the app.
Open Windows Media Player
You can use Windows Media Player to organize your media collection, including music and sound files, videos, and pictures. You can listen to CDs, watch DVDs, rip music from CDs in your personal library, create playlists of your favorite songs, sync your audio and video files to a portable media player, and more.
You can find Windows Media Player listed among your computer’s apps, or you can type its name to access it more quickly, as shown in this section. Windows Media Player is one of several accessories built into the Windows 8 operating system.
Open Windows Media Player
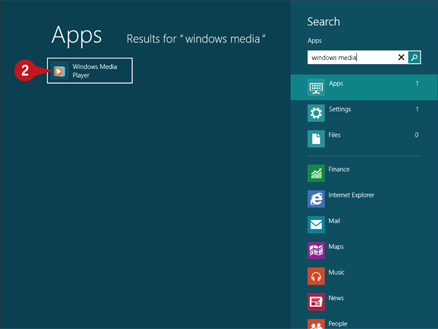
From the Start screen, type Windows Media Player.
The Apps screen opens and displays a list of possible matches.
Click Windows Media Player.
Note: You can also open the Apps screen and scroll to Windows Accessories to find the Windows Media Player.
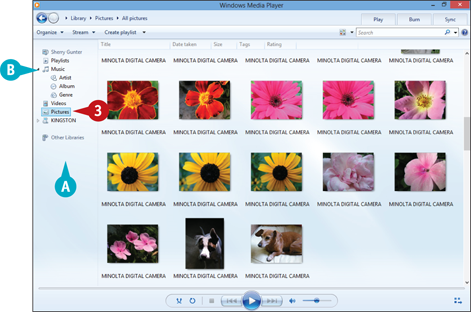
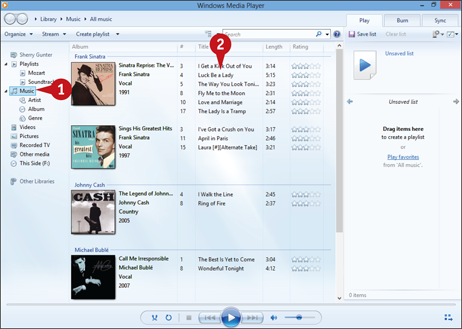
Windows Media Player opens on the desktop.
A Media folders are listed in the left pane.
B You can click here to expand a folder and view subfolders.
Click a media folder to view its contents.
Note: You can also use Windows Media Player to organize image files.
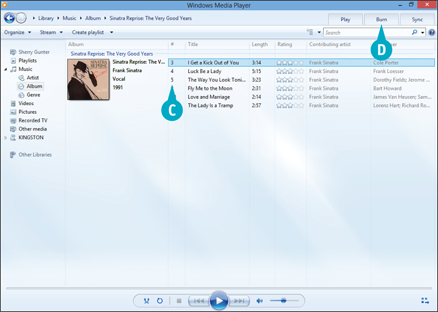
C If you select a music folder, tracks are listed here.
D You can use these tabs to create playlists, burn tracks to a CD or DVD, or sync with a portable player device.

E You can use this area to create a playlist.
 Click Close (
 ) to exit Windows Media Player.
Simplify It
How do I find Windows Media Player through the Apps screen?
Press  +
+ to display the Apps bar, then click the All Apps icon (
 ). This opens the Apps screen listing all the apps on your laptop. You can scroll through the list to find Windows Media Player listed under the Windows Accessories category.
Where can I shop for more music?
You can shop for more media content on Microsoft’s web portal. Visit www.windowsmedia.com for music, movies, and Internet radio selections.
Build Your Media Library
Audio and video files in your Windows 8 Music and Video folders appear in the Windows Media Player library by default. To further build your media library, you can use Windows Media Player to rip, or copy, tracks from CDs in your collection (assuming your laptop has a CD drive) or to obtain content online.
If your laptop is connected to the Internet, you can also use Windows Media Player to shop for music online, listen to Internet radio broadcasts, and access video content such as movie previews and video clips.
Build Your Media Library
Rip Tracks from a CD
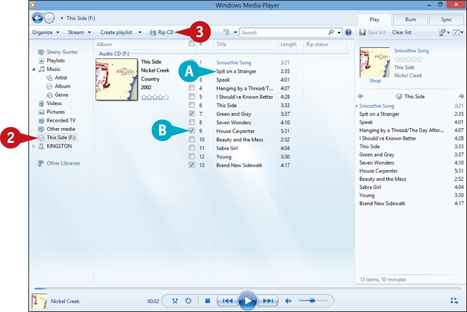
With Windows Media Player open, insert the CD that contains the tracks you want to rip in your computer’s CD drive.
Select the drive.
A Windows Media Player displays a list of the tracks on the CD.
B By default, all tracks on the CD are selected. To deselect a track, click its check box ( ).
).
Click Rip CD ( ).
).
Note: You may need to maximize the Windows Media Player window to view all the toolbar buttons on the Ribbon.
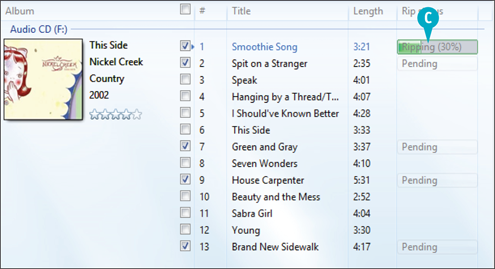
C Windows Media Player rips, or copies, the selected tracks to your music library.
Note: Although Windows Media Player makes it easy to rip, burn, store, and organize your digital media, it is up to you to avoid copying or otherwise using copyrighted material without authorization. Unauthorized use of such materials may subject you to criminal and/or civil penalties.
Access Online Content
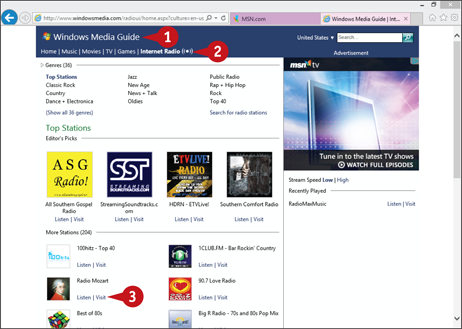
Using Internet Explorer, navigate to the Windows Media Guide: www.windowsmedia.com
Click the content you want to listen to.
Click the link you want to play.
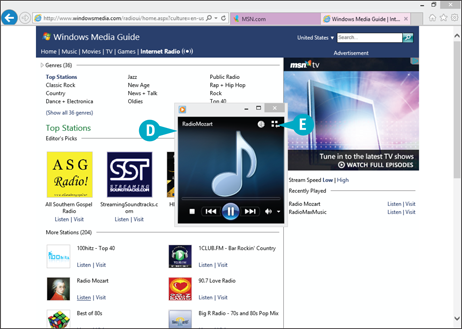
D Media Player opens the Now Playing window, a much abbreviated player window with playback controls
E Click here to return to the full-size Windows Media Player window.
Simplify It
Can I pin the Windows Media Player to my Start screen?
Yes. To do so, display the Windows 8 Start screen (press ) and type Windows Media Player. The Apps search screen opens and displays a list of matches. Right-click the Windows Media Player app name from the list to display the Apps bar at the bottom of the screen. Click the Pin to Start button ( ) to add the Windows Media Player as an app tile on the Start screen.
How do I import content from a video camera?
You can import video content from a digital video camera, but not with Windows Media Player. Instead, you use Windows Live Photo Gallery. To import items, follow the steps in Chapter 13. After you import your video, it appears in Windows Media Player by default.
Listen to Music
You can use Windows Media Player to listen to music on your laptop in a few different ways. One approach is to play back audio files stored on your laptop’s hard drive. Alternatively, if your laptop has a CD drive, you can insert a CD into the CD drive and use Windows Media Player to listen to tracks on that CD.
You use the same controls when playing a music CD as you do when playing back music files on your hard drive. You can also use Windows Media Player’s Media Guide feature to access Internet radio stations.
Listen to Music
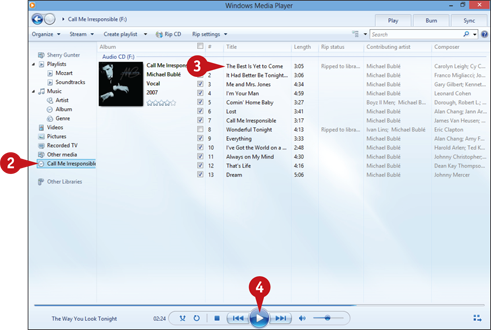
Listen to Music on Your Hard Drive
From Windows Media Player, click the Music folder.
Double-click the song or album you want to hear.
Windows Media Player plays back the song or album.

A The Play button ( ) changes to a Pause button (
 ).
).
B Drag the Volume slider to adjust the volume.
C To mute the volume, click the Mute button ( ). The Mute button changes to a No Sound button (
 ); click it to unmute the volume.
Note: To listen to music while performing other tasks on your laptop, click the Switch to Now Playing button ( ). To switch back, click the Switch to Library button (
 ).
).
D To shuffle the order in which songs are played back, click the Shuffle button ( ).
).

E To play back a song or playlist more than once, click the Repeat button ( ).
).
F To stop playback, click the Stop button ( ).
).
G To return to the previous song, click the Back button ( ).
).
H To skip to the next song click the Next button ( ).
).
Play a CD
With Windows Media Player open, insert into your computer’s CD drive the CD that contains the tracks you want to hear.
Click the drive.
Windows Media Player displays a list of the tracks on the CD.
Click the track you want to play or double-click the album name.
Click .
Windows Media Player automatically plays back the selected songs on the CD.
Watch Video Content
As with audio, you can watch videos in a few different ways in Windows Media Player: by playing back the video files stored on your computer’s hard drive, or by playing a DVD inserted into your computer’s DVD drive. You can also use Windows Media Player’s Media Guide feature to access video content online.
When you play a video, Windows Media Player automatically switches to Now Playing mode; to view the player controls, simply position your mouse pointer over the Now Playing window. You use the same controls to play back videos as you do to play back music.
Watch Video Content
Watch Videos on Your Hard Drive
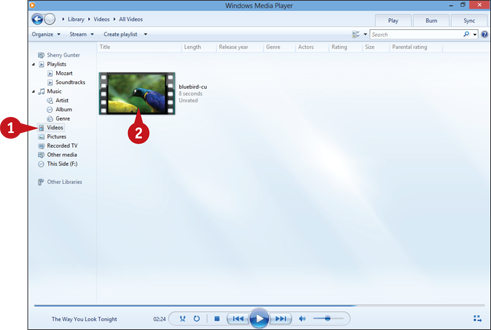
From Windows Media Player, click the Videos folder.
Double-click the video you want to watch.
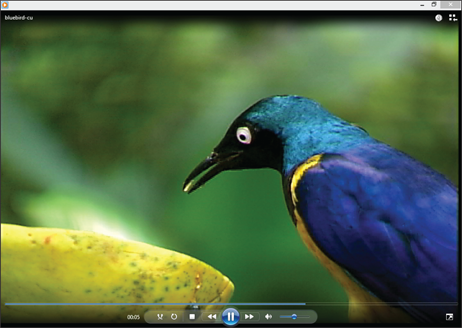
Windows Media Player plays back the video in Now Playing mode.
Note: You use the same controls when playing a video file as you do when playing back music files.
Play a DVD
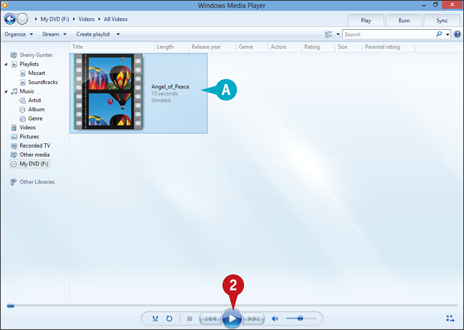
With Windows Media Player open, insert into your computer’s DVD drive the DVD you want to watch.
Click .
If the DVD menu does not appear automatically, right-click the DVD in the folder list and click Play.
A To play a single file on the DVD, select it and then click .
Note: To play commercial DVDs on your laptop, you may need third-party software for decoding the movie. You can find plug-in decoders you can download.
B Windows Media Player displays the DVD in Now Playing mode.
If applicable, select the desired option from the DVD menu that appears.
C To view the DVD in full-screen mode, click the View Full Screen button ( ).
).
Create and Save Playlists
If you want to listen to more than just a single song or a single album or watch multiple videos in a row, you can stack up files in a playlist. Windows Media Player then plays the songs or videos in your playlist in the order you specify.
If you develop a playlist you particularly like, you can save it. When you save a playlist, you can then open it in a later session to listen to the set of songs or view the videos it contains. You can also burn saved playlists to CD or DVD.
Create and Save Playlists
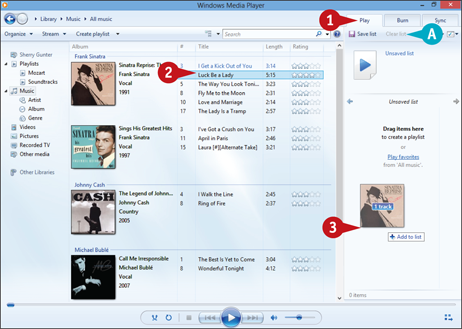
From the Windows Media Player window, click the Play tab to display it.
A If the Play tab already contains other items, click Clear list to remove them.
Click an audio or video file you want to include in your playlist.
Drag the selected file to the Play tab.

B Windows Media Player adds the item to the playlist.
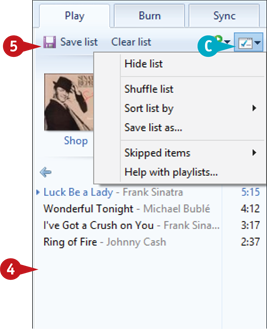
Add more files to the playlist.
C To sort the playlist, click the List Options button ( ), click Sort list by, and select a sort parameter (for example, Title).
Note: To move a file in the playlist, click it and drag it to the desired location in the list.
Note: To remove a file from the playlist, right-click it and select Remove from list from the menu that appears.
 Click Save list.
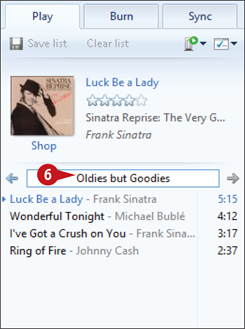
 Type a name for the playlist and press
  .
.
Burn CDs and DVDs
If your laptop has a CD/DVD drive capable of recording to disc, you can use Windows Media Player to create an audio CD that can be played back on any standard CD player. In addition, you can burn music as data files to a disc; this enables you to fit many more songs on a single disc. You can also burn video files in this way.
When you burn audio or video files to disc as data files, they can be played back only on a computer or other device that supports the data format used.
Burn CDs and DVDs

Click the Playlists folder.
Right-click the playlist you want to burn to a disc.
Click Add to.
Select Burn list.
Note: Another way to specify what files to burn is to click the Burn tab to open it and then simply drag items from your Windows Media Player library into it.
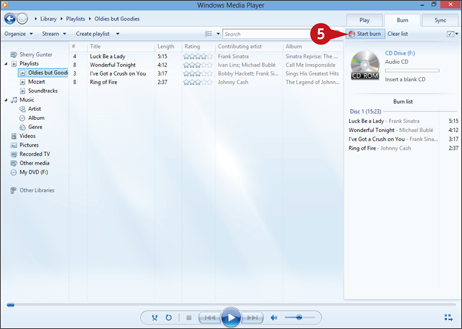
Windows Media Player opens the Burn tab, with the contents of the playlist shown.
Click Start burn.
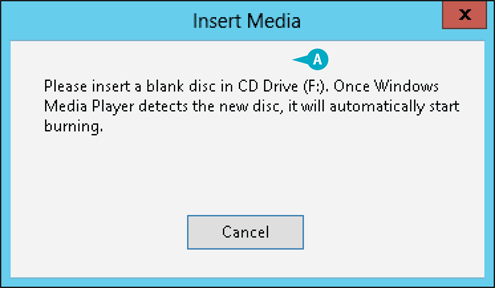
A Windows Media Player prompts you to insert a blank disc.
Insert a blank recordable disc into your laptop’s CD/DVD drive.
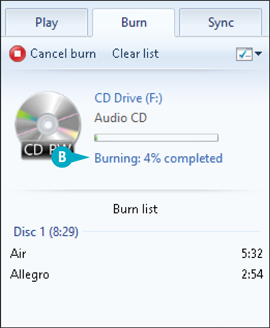
Windows Media Player burns the contents of the Burn tab onto the blank disc. (Note that this may take several minutes.)
B Windows Media Player tracks the progress of the burn operation.
Note: If the contents of the Burn tab will not fit on a single disc, Windows Media Player gives you the option of burning the remaining items on a second blank disc.