3
Sustainable Construction
Sustainable construction methods can vary greatly. Some of these construction methods are responses to state energy codes. California leads the way with its adoption of the 2012 International Energy Conservation Code (IECC) code and its own CalGreen initiative. (CalGreen is a shortened name for the California Green Building Standards Code.) CalGreen is the first statewide green building code in the United States. Established in 2010, it was revised in 2014 with considerable changes in the residential building sector (www.bsc.ca.gov/Home/CALGreen.aspx).
In this chapter, we outline how to create your own list of best practices for a sustainable approach to the construction of your kitchen and bath projects. These best practices are inspired by progressive codes, such as CalGreen and others. There are many incentive programs to encourage implementation of these measures and upgrades. These incentives can help offset the cost of the project. As a designer, part of your scope of work on a project can include the navigation of incentives.
- Learning Objective 1: Apply building component ratings to a remodeling project.
- Learning Objective 2: Identify the basic building science of remodeling projects.
- Learning Objective 3: List the best practices for individual projects to facilitate the creation of a sustainable remodel.
It is important to achieve a basic understanding of building science. The term “building science” can be defined as the study of how a building operates in terms of energy efficiency. Basic calculations are used to create rating systems for building components: windows, walls, and roofs for example. Knowledge of these rating systems will allow you to understand more precisely how a building will perform and, thus, save energy.
All sustainable construction methods are concerned with accomplishing four things:
- Energy conservation
- Material conservation and material use that is environmentally responsible
- Water conservation
- Healthy indoor air quality (IAQ)
Home Energy Rating System
As a sustainably minded designer, you will want to get your client’s home energy efficiency rating. This can be easily done by contacting a certified Home Energy Rating System (HERS) rater in your area. HERS is maintained by Residential Energy Services (RESNET), and is available in the United States and Canada. There are various tests that a HERS rater will perform. The audit observes how well the house performs as a system. Where are there air leaks? How well to do the walls insulate from the outside? At the end of the audit, the rater will produce a report with a list of suggestions to increase the energy efficiency of the home. How important is HERS? HERS provides specific data on the energy efficiency of a home. Many real estate listings include a HERS rating in the listing. The Appraisal Institute’s new form, Form 820.04: Residential Green and Energy Efficient Addendum, includes the HES, or Home Energy Score, achieved with a HERS audit as part of the overall sustainability character of a property. Around the United States, various organizations promote HERS testing and knowledge; one such organization is the Northeast Energy Home Energy Rating System Alliance (NEHERS), which promotes HERS testing and knowledge in New England, New Jersey, and New York. NEHERS advocates for the use of the HERS test for all residences. The organization creates educational opportunities for real estate agents, designers, and builders. Although you are most likely working with only part of an existing home, having a HERS rating conducted for your client’s home is the beginning of the conversation regarding insulating walls and ceilings and changing out energy-wasting windows. It is a great place to begin, as people can see exactly how efficient (or inefficient) a home is. The lower a house is on the HERS scale, the closer it is to net-zero energy use. A net-zero home creates as much or more energy than it consumes over one year.
Plan your sustainable project from a holistic perspective. This means getting all of the information you can about the existing conditions before you begin. It means educating yourself on overall approaches and setting goals prior to focusing on details.
When planning for a kitchen or bath remodel, you should begin with the big picture, such as the siting of a new addition to an existing home, and work down to the details such as specifying water-conserving toilets.
Best practices covered in this chapter:
- Practice clean site management, including on-site recycling, and the creation of a healthy construction site.
- Site your project for passive daylight, warmth, and cooling.
- Plan for window location and the specification of windows with low U-value for energy conservation.
- Specify of alternative wall types with high R-value construction to reduce heat loss.
- Insulate outlets in walls appropriately to prevent air loss.
- Plan carefully for the heating and cooling of new and renovated spaces.
- Plan for the conservation of water and a look into the use of gray water.
- Recommend on-demand water heaters to reduce energy draws.
- Use deconstruction techniques rather than demolition to preserve embodied energy in materials and appliances with some use still in them.
- Specify sustainable construction materials.
- Design with lighting techniques that align themselves with energy conservation.
- Look at the ENERGY STAR program and other sources of information on appliances and fixtures.
- Plan for environmental stewardship: Establish recycling centers in the kitchen and cities with recycling/composting programs.
This list serves as an outline for the chapter, but it also can serve as an outline for your project. What will your best practices be? What will you add to or remove from this list?
THE PATH YOU TAKE—BEYOND CODE
There are many builders, architects, and designers who work beyond their state’s energy code requirements. In Chapter 2 we quoted C. R. Herro of Meritage Homes, who said the company builds for projected code requirements; this is known as future proofing. When you follow the best practices outlined in this chapter, the resulting project will be one that surpasses local code compliance.
Green Hammer Design Build, located in Portland, Oregon, takes inspiration from passive house design along with a practice of making the soundest environmental building decisions it can make. (See “Interview: Alex Boetzel of Green Hammer Design Build.”) The company’s kitchen remodel can be seen in Figure 3.1. Its practice is constantly evolving as the company seeks to employ new techniques in green building.

Figure 3.1 This kitchen by Green Hammer Design Build, based in Portland, Oregon, is made with locally made cabinets and reclaimed wood.
Courtesy of Green Hammer Design Build
Clean Site Management
Recognize that most of your kitchen and bath projects will be remodeling projects. Construction dust and debris can be harmful to the installers but also to the inhabitants of the home. Be sure to seal all ducts to the rest of the home from the renovation site. Provide adequate ventilation when painting and other finishing tasks take place to keep the IAQ as healthy as possible.
Every job site should maintain on-site reclamation areas for scrap construction materials. Pieces of framing lumber and plywood scrap should be collected and taken to a facility where they can be incorporated into new material.
Before recycling construction waste, identify who will accept it. This is important in designating types of waste to separate and in making arrangements for drop-off or delivery of materials.
The next list, taken from the “Construction Waste Recycling” portion of the Sustainable Sources website (www.sustainablesources.com), describes what can be recycled from a construction site.
- Appliances and fixtures
- Brush and trees
- Cardboard and paper
- Lumber and plywood (in reusable form)
- Masonry (in reusable form or as fill)
- Metals
- Plastics—numbered containers, bags and sheeting
- Roofing (in reusable form)
- Windows and doors
Work with the general contractor to install leftover insulation in areas where it is needed rather than throwing it away. Ask that the job site be cleaned every day and that work areas be well labeled and organized.
The donation of salvaged materials is discussed later in this list of best practices.
Siting Your Project
Depending on the location of your project, the direction of openings in the building envelope can greatly augment or hamper your attempts at getting good passive heating, cooling, and daylighting. In the northern hemisphere, the north-facing direction receives less direct light than the south-facing direction. East-facing walls benefit from morning light; west-facing walls benefit from afternoon light. In warmer parts of the northern hemisphere, the southern direction can be a source of heat gain (desired) in the winter and (undesired) in the summer. Figures 3.2 and 3.3 show the different paths of the sun depending on the hemisphere you are in.

Figure 3.2 This diagram shows the sun’s northern hemisphere path.
NKBA

Figure 3.3 This diagram shows the sun’s southern hemisphere path.
NKBA
Rarely does an existing space have windows and doors that are appropriately placed for any good application of the NKBA’s planning guidelines. Paths of circulation in older homes often include movement to basement spaces and the backyard, which greatly hampers the design application of planning guidelines.
When planning for a new addition, consider these four points:
- Warming from the prevalent west or east direction
- Cooling from the northern or southern directions. In North America, for example, north-facing windows are sources of cool daylight for most of the year.
- Southern exposure in the northern hemisphere can promote great passive daylight and warmth in the winter months but will need to be mitigated in the summer months.
- Consider prevalent wind directions. From which direction does the home need protection? From which direction can the home harness passive cooling in warm months?
Daylighting
Sustainable design needs to include daylight harvesting. The term “daylight harvesting” refers to the practice of maximizing the natural light entering the home. When planning for a kitchen or bath design project, a designer must consider both task illumination and ambient illumination. Task illumination is concerned with optimizing the amount of light so that a task can be performed easily; ambient light is concerned about overall light levels. Access to natural light creates balanced circadian rhythms. Every living thing has a circadian rhythm that follows the amount of daylight and responds to the sun’s presence. Healthy circadian rhythms have been credited with better moods (particularly in months with less sunlight), better sleep, and better nutrition. The hormone melatonin that is stimulated by exposure to daylight is responsible for the better moods. The vitamin D created by exposure to daylight is responsible for the better nutrition. Interruptions of the circadian rhythm due to lack of daylight/ sunlight have been blamed for conditions such as insomnia and depression. Good amounts of daylight in an interior mean that there is less reliance on electric sources. Daylight is a passive source of illumination; therefore, it is something we are really interested in having in our interiors. You can harvest daylight during daytime hours by installing windows above countertops but below upper cabinets. Figure 3.4 shows how to design the countertop work surface so that it is illuminated throughout the day, reducing the need for electric lighting. There are two examples of this. The Breeze-Kondylis kitchen (Figure 3.5) has windows installed in this way, while the Carriage Way house (Figure 3.6) has glass block to provide this type of daylighting while also providing privacy.

Figure 3.4 Consider designing a window that will provide passive lighting onto the kitchen countertop from daylight. Install electric sources, such as light-emitting diode (LED) under-cabinet lights for illumination as needed.
NKBA

Figure 3.5 Windows between the upper and lower cabinets in the Kondylis-Breeze kitchen provide passive lighting during daylight hours.
NKBA

Figure 3.6 Glass block between the upper and lower cabinets in this kitchen provides passive lighting during daylight hours.
NKBA
Solar
A zero-energy home or a net-zero home creates as much power as it consumes. When considering a green approach to any project, the installation and use of a passive and renewable energy source should be at the top of the list. There are a few different approaches to harnessing solar energy, but the two we examine are solar collecting and the use of a photovoltaic system.
One of the most popular solar collecting methods is solar hot water. It is important to understand that this is an assistive method for most parts of the world; it is not the main source of hot water for most homes. A solar collector warms the water in its tankand then stores it in a tank separate from the conventional hot water heater. A simple monitor notes the temperature on the solar tank. When the temperature dips during cooler months, the hot water system relies on the conventional hot water heater. Solar hot water systems are straightforward and relatively easy to install. Consider consulting with a builder well versed in sustainable building systems.
A home cannot become a net-zero home without creating its own energy. Photovoltaic panels (or solar panels) are installed on a home’s roof to collect radiant energy from the sun. Location is important. Climates with considerable sunlight do much better with fewer panels than those in wetter climates. This does not mean that a net-zero home is not possible in Seattle, Washington. It just means that more higher-performance panels will be required.
WINDOW SPECIFICATION
It is important to understand the climate in which your project is to be constructed. In the Northwest, where it rains most of autumn, winter, and spring, it is easy to consider that “more is better” when it comes to daylight. But before you design for a north-facing picture window in the breakfast area of your client’s kitchen, ask yourself, “What type of daylight is coming in?” For example, in the Northwest, light from the north is very cool and gray. Choosing colors for the interior can warm the quality of the light.
When looking for windows, you should specify those with a low U-value. U-value is a measure of heat loss through a building component, such as a wall, floor, roof, door, or window. Windows are where we see U-value used the most because window manufacturers publish the U-values for their products. Also, thanks to the ENERGY STAR program designers can easily select a suitable product. The National Fenestration Rating Council (NFRC) publishes ratings to help with the selection of windows. Most windows achieve a U-value between 0.20 and 1.20. The lower the U-value, the more energy efficient the window is.
Windows should also protect your clients from heat gain. In the Northwest, this is not too great an issue, but in the late summer months, heat through windows is felt even in that climate, particularly through windows with southern and western exposures. The solar heat gain coefficient (SHGC) is a number between 0 and 1. The lower the number, the better the window is at reducing solar heat gain and creating thermal comfort for your clients. Figure 3.7 shows a window energy label from the NFRC. A lower SHGC means less energy will be needed to cool the interior during warm weather. Figure 3.8 shows how the U-value and the SHGC work on a home’s exterior.

Figure 3.7 The labeling from the National Fenestration Rating Council explains the U-value and SHGC of windows to help consumers make decisions.
Courtesy of National Fenestration Rating Council

Figure 3.8 How U-value and SHGC affect the thermal and energy efficiency within a residence
Courtesy of National Fenestration Rating Council
Both U-value and the SHGC are required to be published for all windows that are endorsed by the Energy Star program. The ratings are an important place to begin when specifying new windows. Interestingly, according to the NFRC, another value, air leakage (AL), is an optional rating. As a designer you will want to get an idea of the AL rating of the windows you are specifying. Like the other two window ratings, a lower AL is preferred and falls between 0.1 and 0.3 for most windows.
Replacing windows on a remodeling project can be a tough decision to make. Due to the expense of new windows and their installation, homeowners can decide to utilize the existing windows. This is, of course, unfortunate, as older windows are big sources of interior heat loss and heat gain. For this reason, many incentive plans have been established to help offset the cost of window replacement. The Efficient Windows Collaborative (www.efficientwindows.org) provides a list of incentive plans to help client save money.
WALLS AND INSULATION
Green building focuses on how well a building performs. Earlier green building techniques tended to focus only on creating energy and saving resources. These are great concepts! But when you add building methods that can keep your energy in and the climate you are protecting against out, you have a much better chance of lightening the load of a home’s energy consumption. Green builders use this saying: Build tight and ventilate right.
Recently, great developments in alternative exterior wall construction methods mean that there are a few ways to create well-insulated walls. Whichever you choose, the important factors will be the same: Reduce air leaks, increase the R-value or insulation in your walls, and specify a system that works with your client’s budget.
The R-value over an area such as a wall or a ceiling is a determination of thermal resistance. Depending on where your project is located, you can determine what the local code is for the R-value required on your project. But in keeping with the perspective of kitchen and bath design and the subject of remodeling, insulation retrofits are an important part of your client’s project. See the return on investment discussion in Chapter 2.
Green Wall Construction
To begin the topic on alternative walls, we’ll look at Meritage Homes again. On Earth Day 2013, Meritage Homes established a pilot program called MGV5 that created six homes using insulated concrete panels (ICPs). This was groundbreaking for three reasons:
- The houses looked like other houses in the area.
- The ICP panels were created nearby (local economy, less transport fuel necessary).
- This type of wall is superior to conventional wall construction in energy efficiency.1
Insulated Concrete Panels
ICPs are prefabricated (made off-site) wall components. The panels are made of structural steel reinforcement, concrete sheathing, and expanded polystyrene foam in the middle of those two sheets (see Figure 3.9). An ICP wall system is very well insulated, and the installation time is much shorter than that of a traditional stick framing wall system. In much the same way commercial buildings are built with a tilt-up wall construction system, an ICP wall system comes to the site ready to install. You can see this in Figure 3.10. This method is particularly helpful when remodeling in wetter climates or during cooler months when the time frame to enclose the building is shorter. To find a contractor who can help with the installation of an ICP wall system, research green builders in your project’s area. Installer experience is an important part of your project’s success.

Figure 3.9 An insulated concrete panel is heavily insulated and ready to go.
NKBA

Figure 3.10 ICPs delivered to a job site make construction go quickly and efficiently.
Courtesy of Meritage Homes
Structural Insulated Panels
Structural insulated panels (SIPs), like ICPs, are prefabricated wall units made custom for each project. They are a sandwich of oriented strand board (OSB) on either side of a layer of expanded polystyrene foam or EPS. (See Figure 3.11 to understand how a SIPs wall is constructed.) The formaldehyde level of the OSB used should be checked. SIPs panels boast many of the same attributes of ICP panels but tend to be more affordable and lighter in weight. Check with a green builder about this wall system, which can cut construction time and energy costs for clients.
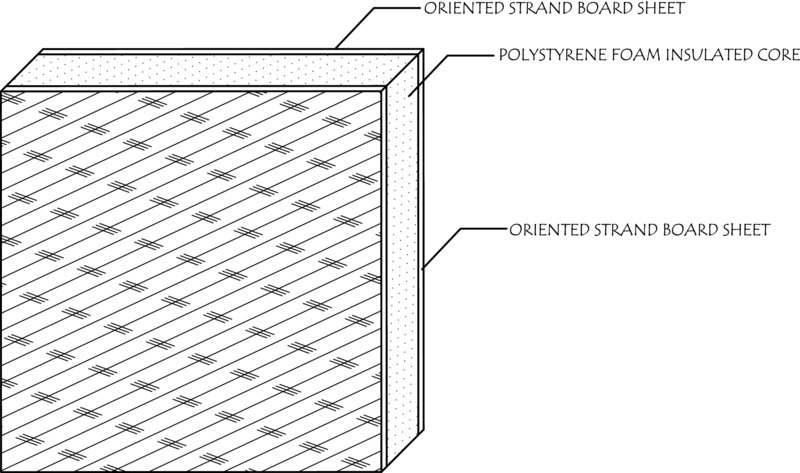
Figure 3.11 Structurally insulated panel cross-section
NKBA
Advanced Framing
The term “advanced framing” refers to methods that improve on conventional wood-stud-and-sheathing construction, which is the predominant way our homes and our additions are created. Figure 3.12 diagrams one method of advanced framing. Some ideas that fall under the category:
- Use wood members carefully to maximize the material and minimize waste.
- Use 2- by 6-inch studs spaced 24 inches apart (saves more wood than 2- by 4-inch studs spaced 18 inches apart and allows for more insulation).
- Apply rigid insulation to the outside to prevent conductivity in exterior walls.
- Utilize staggered-stud construction to increase the mass of an exterior wall and improve the insulation of the interior
- Use recycled steel studs (but with rigid insulation on the exterior to cut down on conductivity).
- Recognize that wood is a resource that should be conserved wherever it is possible. Consider the use of engineered wood products over large dimensional lumber that requires the felling of larger, older (and rarer) trees.

Figure 3.12 This approach to advanced framing shows insulation at the window headers and a conservative use of materials.
NKBA
Regardless of when your client’s home was built, the best advice you can give when considering energy savings is to increase the insulation in the home. Adding insulation to existing, older homes greatly increases the R-value of walls and reduces the number of heat exchanges in the space and the entire home.
Traditional batt or fiberglass insulation is familiar and very affordable. It is easily rolled over attic floors (when floors are not in use) or into cavities between studs in exterior walls. This is the traditional way of insulating an exterior wall (see Figure 3.13).
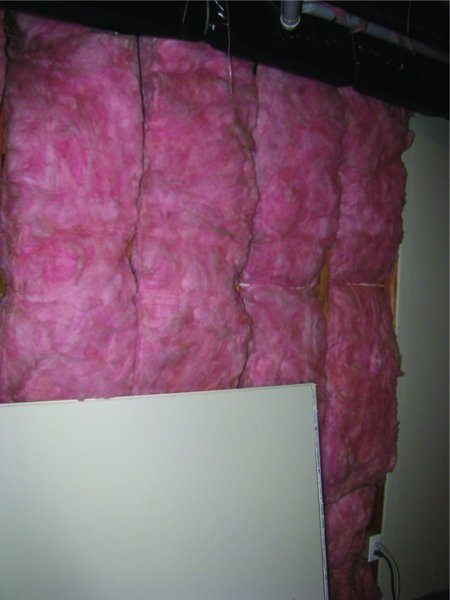
Figure 3.13 Wall with batt insulation
NKBA (Photo by Amanda Davis)
Blown-in insulation (see Figure 3.14) is relatively easy and is commonly done to existing structures. Cellulose-based products have less off gassing than the petroleum-based foam used in foamed-in insulation. If you are looking for a product with recycled content, some options use recycled denim fiber that has been treated with fire retardants and insecticides. Do your research; refer to Chapter 5 and a third-party evaluator, such as the Pharos Project Index (www.pharosproject.net), for information about how green a product is.
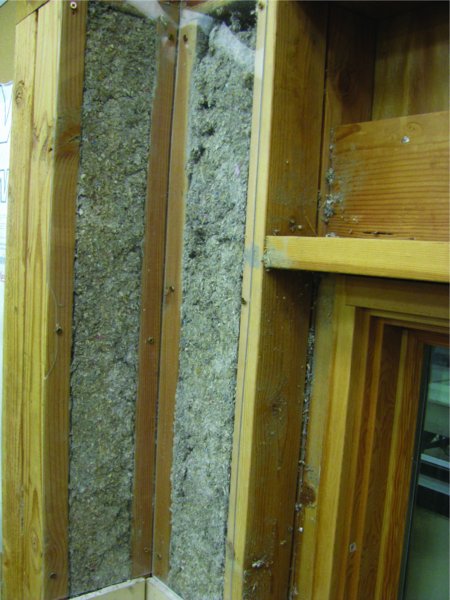
Figure 3.14 Blown-in insulation installation using recycled cotton
NKBA (Photo by Amanda Davis)
Like blown-in insulation, foam insulation goes into existing walls with relative ease, as shown in Figure 3.15. Its ability to conform around nooks and crannies makes it an ideal product for reducing leaks in and around electrical outlets, windows, and door frames. By nature, foam insulation does not permit airflow, so IAQ in nonvented spaces can become poor. This is important to consider in attics, for example. Foam does not become compressed over time, as do batt and blown-in types of insulation. There are tax incentives for installing foam and other types of insulation in a remodel.

Figure 3.15 CertainTeed spray-foam insulation installation
Courtesy Spray Polyurethane Foam Alliance
It is very important to reduce the number of air leaks in a home. The loss of warm air in the winter and cooled air in the summer is just wasted energy, pure and simple. In the 1980s, the use of plastic house wrap became popular to reduce the number of air leaks and create a tight building envelope. What resulted was buildings that were very tight but lacked controlled air exchangers. This resulted in sick building syndrome for many homeowners: increased allergies, chemical sensitivity, and fatigue. Coupled with the use of toxin-producing materials, such as conventional carpet, homes became incredibly toxic environments. (See Chapter 4, “Indoor Air Quality.”) Today green building shores up homes with walls that have an R-value that exceeds that of the local code and utilizes air exchangers that will bring fresh air into the home and send stale air out. This approach keeps the conditioned air inside, where it is meant to be.
Wall Outlet Insulation
The insulation of outlets in the wall is part of the weatherization process necessary for a high-performance remodel. Traditionally, large holes are left behind the faceplate of an electrical outlet or a light switch. The technique in Figure 3.16 shows how to prevent air flow at an outlet. Weatherizing an outside wall against heat loss through outlets and switches is easily done by installing a gasket around the electrical box.

Figure 3.16 Wall plate, gasket, outlet, and box
NKBA
Take the insulation against heat loss (or cool-air loss in warmer months) a step further and use caulk or spray-foam insulation to seal the gaps around the electrical box and the finish wall prior to installing the faceplate.
HEATING AND COOLING
The highest energy draw in the home is energy used to create climatic comfort in the interior. This takes the form of heat in the cold months and cooling in the warm months.
A HERS rating includes an audit of your client’s heating and cooling systems. An old furnace, particularly one in a detached garage funneling warmed air across uninsulated metal ductwork, will be tagged for an upgrade. Interesting enough is the fact that a detached garage is best for IAQ within a home. (Parking a carbon-monoxide-producing machine within a home is worth rethinking.) There is more to planning and advising clients on how to heat and cool their new kitchens and bathrooms than just one, simple answer. Budget can and should play a role. Understanding zonal heat is important as well.
According to the RESNET website, a home with a HERS index of 70 is 30 percent more energy efficient than a standard new home.(www.resnet.us/hers-index). Conversely, an older home with a rating of 130 is 30 percent more inefficient than a standard new home.
According to the LEED for Homes Reference Guide, duct leakage accounts for 15 to 25 percent of total heating and cooling use in new homes.2 If all ducts are contained within the insulated interior of the home, duct leakage is not considered an issue. Duct leakage becomes an issue when ducts are located in crawl spaces or within any uninsulated area.
Consider recommending a radiant heat system in renovated areas if appropriate. A radiant-heated floor can be constructed using a mat of conductive filaments under the finished floor. Conductive flooring materials, such as ceramic tile, work best. Do your research to ensure that use of a radiant system does not invalidate the warranty for various flooring materials.
Zonal heating and cooling is a concept whereby interiors are designed with user-controlled areas to provide custom thermal comfort and to conserve energy. Consider this concept when designing your project. Place thermostats for individual zones in easy-to-reach locations, typically near the light controls.
There are whole house systems that can aid in this zonal thermal control plan. Consult with a specialist to get an idea of pricing and other information. Whole-house systems can be used to control lighting, music, and communication within the home.
Heat pumps are heating and cooling devices that replace conventional forced-air furnaces and traditional air conditioners. A heat pump transfers heat from a colder area to a hotter area using mechanical energy. Heat pumps are engineered to be much more efficient than forced-air systems because they work with the existing air in the space rather than creating new warmed air. They can often be a great solution when running new ductwork to an addition proves difficult.
Heat Recovery Ventilators
Most homes have a simple exhaust system installed: fans in spaces where the air needs to be replaced, such as bathrooms and kitchens, serve to pull used air out of the home. But what about that air being conditioned? It is wasteful to send cooled air out of the home in the summer and warmed air out in the winter. The focus on high performance in a building or addition means fewer air leaks and a tighter home. Conventional means of ventilation (already in question in regard to performance) are not enough to keep good air coming in and poor air going out. A heat recovery ventilator (HRV) can provide recover between 60 and 80 percent of heat from warmed air. The concept is that as the cool air moves in to the home (during cooler months), it is warmed against the used but much warmer stale air. The process is reversed in the summer months. It is a straightforward method of optimizing conditioned air. This process can be seen in Figure 3.17.
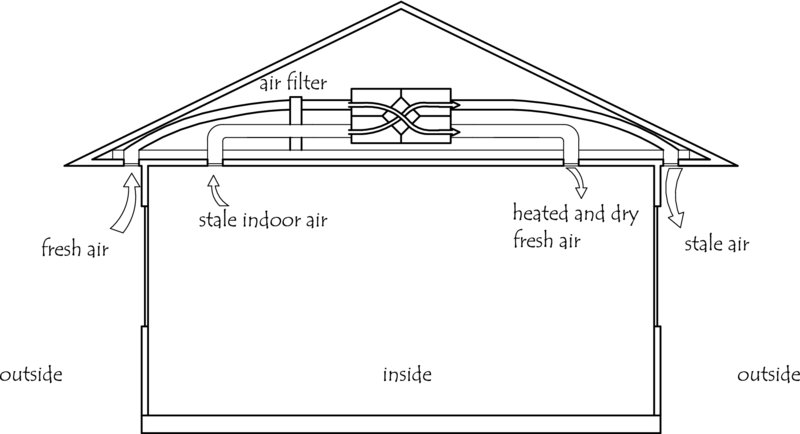
Figure 3.17 Air exchange with a heat recovery ventilator
NKBA
Energy Recovery Ventilators
Like the HRV, an energy recovery ventilator (ERV) helps to condition fresh air as it moves into the home, whether it is to be cooled or warmed. An ERV takes it a step further and traps energy from the humidity of the air exchange. Traditionally ERVs have been recommended for use in warm, tropical climates; they are a great help to the cooling system, which does not have to work as hard to get the moisture out of the cooled air it is delivering to the interior. The management of humidity by an ERV will support any furnace, which could extend the life of a forced air system.
Chapter 4 discusses the benefits that ERVs can bring to IAQ.
WATER CONSERVATION AND DISTRIBUTION
According to the Environmental Protection Agency (EPA), 36 states face water shortages at the time of this book’s publication. Single-family homes use more than half of the available treated water in the United States. And according to their website, an average family can easily consume more than 300 gallons of water a day.3 You can see the breakdown of water use in a typical home in Figure 3.18.
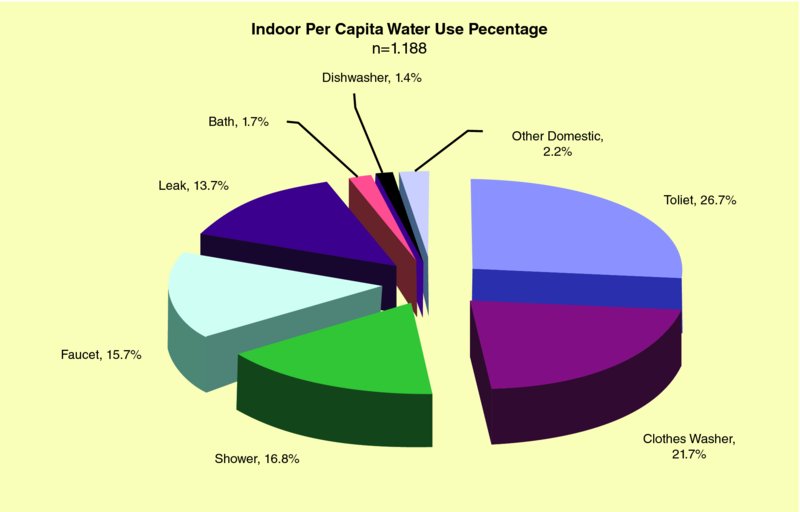
Figure 3.18 Water use in the home
Courtesy of Water Research Foundation
The EPA sponsors the WaterSense program to aid designers and consumers in the selection of water-saving plumbing fixtures, particularly toilets. WaterSense is a great nonprofit third-party evaluator. According to their website, the average American home (presumably with two toilets) can save 13,000 of gallons of water a year.4 The site offers easy links to see if the municipality in which your project is located offers any rebate to add incentive to your choice for replacing and installing water-saving devices. The city of Hillsboro, Oregon, for example, offers a rebate of $75 per toilet replaced or installed up to two toilets. That’s $150 that can be used elsewhere in the project, and it really helps to motivate clients.
As mentioned in Chapter 1, first-generation low-flow toilets were problematic, but thanks to new designs and technology from companies such as Kohler and Toto, the current generation functions as well as old toilets did.
WaterSense also labels bathroom sink faucets and showerheads. Look for the WaterSense label to help you make choices in your project.
In addition to saving water, you will want to consider the distribution of water in your project. New innovations in cross-linked polyethylene (PEX) plastic tubing makes it a great alternative to copper pipe installation. PEX saves money because it does not need to be welded. It can be maneuvered around stubborn structural obstacles and it can easily work with a boiler if you want to consider a radiant heating system for your client. Another problem with copper pipe is that it is very conductive; it loses heat easily.
On-demand heated water is one of the most important steps a person can take to creating a greener project. Conventional tank water heaters continually heat between 20 and 80 gallons of water for consumption when needed. This means that the water is being heated at night and when the users are away on vacation. This is a huge waste of energy. A tankless or on-demand water heater heats water only when demand is there. Such heaters are mounted to a wall, which frees up floor space. Although the initial cost is considerable, clients will save up to 30 percent of energy costs from heating water. Also, in a large remodel, you can place more than one tankless water heater close to where it is needed. This will cut down on waste of cold water in the pipes that needs to be sent down the drain in order to get to the warmed water.
Still want to use a tank-style water heater? Ask for a California Builder’s model, which is heavily insulated to reduce heat loss. Also be sure to look for the energy factor (EF) on the appliance. Tank water heaters are rated by their EF. Look for an EF close to 1. This is published information, much like the number you will look for regarding window selections.
One very simple way to cut down on energy loss in plumbing is to insulate the hot water pipes, especially if they run in unconditioned spaces.
The use of graywater is currently not widely practiced by many green designers and builders. Although most plumbing codes do not allow it, there is a movement to plumb ahead for it in new construction. As mentioned in Chapter 2, water that has already been used in laundry, showering, and dishwashers defines gray water. Today some municipalities allow it to be used for irrigation. Not surprisingly, water-starved areas like Arizona have guidelines on the books for consumers who want to use gray water to water their yards and gardens.5
Collecting rainwater for irrigation is an excellent way to harvest a natural resource that can help maintain a garden or a yard. Many at-home chefs have herb and vegetable gardens. Figure 3.19 shows a water cistern in Portland.

Figure 3.19 Garden rainwater cistern
Duehmig-Greisar Residence, Portland, OR. Photo by Amanda Davis
Currently graywater–fed toilets are in the experimental stages. A specialized toilet comes with a repository for water used to wash hands (Figure 3.20). The toilet captures the used or graywater from an integrated sink and faucet combination. The wastewater fills the tank and is used to flush the toilet.

Figure 3.20 This Caroma Profile smart toilet uses graywater from hand washing to flush.
Courtesy of Sustainable Solutions
Point-of-Use Water Heaters
How long do you wait for warm water to reach your shower: thirty seconds? an entire minute? Even with a low-flow shower head that has a 2.5-gallon-per-minute (gpm) flow, that 30 seconds means 1.25 gallons down the drain. Shower every day, and that adds up to 465 gallons per person in the home annually. It isn’t just a poorly functioning water heater that is to blame. Uninsulated hot water pipes and long runs from the water heater (even with an on-demand tankless fixture) to the bathroom add to the wasted water. Consider speaking with your client about a point-of-use hot water heater, which creates hot water instantly while your main water heater gets to work. These are discussed at length in Chapter 5.
Trapping Heat
When you consider the amount of energy required to warm the water that is delivered to our showers and tubs, washing machines, and dishwashers, it makes little sense not to try to recover some of the energy remaining as heat in the wastewater. One of the simplest and most straightforward energy-gleaning techniques is a drain water heat recovery system (DHR) (see Figure 3.21). A DHR is comprised of a heat exchanger that wraps around the cold water supply to the hot water tank. The heat of the wastewater is transferred to the cold water source, which raises the temperature of the water before it enters the hot water tank. A DHR can be used with a conventional tank water heater or a tankless one. (A point-of-source water heater is discussed in Chapter 5.)

Figure 3.21 Trapping heat from water before it goes down the drain
NKBA
DECONSTRUCTION
According to the deconstruction services at the ReBuilding Center in Portland, Oregon, a non-profit organization that specializes in reused building materials, the implementation of deconstruction over demolition on a remodeling project is one-to-one cost. Many believe the practice of deconstruction far exceeds the cost of a Dumpster. What is deconstruction and why is it a good idea?
According to the Deconstruction Institute, deconstruction is defined as follows:
Deconstruction is a process of building disassembly in order to recover the maximum amount of materials for their highest and best reuse. Reuse is the preferred outcome because it requires less energy, raw materials, and pollution than recycling does in order to continue the life of the material. As a consequence of deconstruction, there are also many opportunities for recycling other materials along the way.6
The recovery of building materials can be done by local deconstruction services. It is crucial to preserve the embodied energy of these materials. Habitat for Humanity is behind the ReStore program that provides deconstruction and salvage services for consumers and builders. There are ReStore locations in every state in the United States. ReStore is also represented in Canada, Guam, and Puerto Rico.
According to Metro, a government agency in Portland, Oregon, that aids in the disposal of materials taken from construction sites, Oregonians created 3 million tons of garbage in 2012. Twenty percent of that was construction and demolition waste. That is 600,000 tons of waste from our related professions. If the state fabricators, designers, architects, and builders were to reduce this amount by just 10 percent, 60,000 tons of waste could be diverted from landfills, and the embodied energy of that waste could live on in new projects.7
Look for local sources and salvage yards that perform this important task for any project. You should be able to secure a free estimate that will aid you and your client in making budgetary decisions. Although the materials and other items that are recovered from your project likely will not be exchanged for cash, the company should provide donation values that your clients use as tax write-offs.
In cases where your project’s contractor can utilize regraded lumber, you can save embodied energy by using building materials that have been salvaged from other places. The new opening in Figure 3.22 shows a header created from salvaged lumber. To be used in this manner, lumber must be regraded by an engineer. Check with your local building salvage yard to ask about this important building material.

Figure 3.22 New opening framed with salvaged lumber
NKBA
Donation of Salvaged Materials
As described, your project’s implementation of deconstruction will render building materials that can be reused in other projects. Habitat for Humanity ReStores sell toilets, sinks, cabinetry, and all kinds of building materials and components that are removed from existing homes (see Figure 3.23). What about old appliances or materials that are not accepted by a salvage yard? In Portland, Metro works to ensure that the embodied energy in these old components and materials can be put into a recycling system. In your project’s area, find an organization that specializes in this kind of information.

Figure 3.23 Salvaged cabinetry donated from a remodeling project: This cabinet can be reused in a storage room or garage.
Courtesy of Habitat for Humanity ReStore, Portland, Oregon; photo by Harvey Thomas
Lead
Lead was a common component in paint and adhesives prior to 1978. The federal government banned the use of lead-based paint in 1978; some states banned its use before then. If your project is in a home built before 1940 there is an 87 percent chance that there is lead in the home. If the project was built between 1960 and 1977, there is only a 24 percent chance of lead in the home. If your project in in a home that was built before 1978, your client’s contractor must be in compliance with the EPA’s 2010 measures to curb lead poisoning.8 The measures are part of Subpart E–Residential Property Renovation. This EPA requirement outlines specific activities that must be conducted during a residential renovation to create an environment that is devoid of lead-based paint hazards. Lead dust can collect on surfaces when lead paint, even from many decades ago, is disturbed. The measure stipulates that contractors must be certified and trained in the implementation of lead-safe work practices. Additionally, contractors doing work (including, but not limited to, renovation, repair, and painting) on projects that are determined to have lead on the site are to be EPA certified. These requirements became fully effective on April 22, 2010.
Lead poisoning affects everyone but is particularly damaging to small children, whose developing bodies are more susceptible to lead poisoning. Due to their small size, poisoning is possible with low levels of lead inhalation or ingestion. Children’s height also places them around lead-containing dust at windowsills, and they may pick up paint chips and ingest them.
To be certified, contractors must complete the Lead Safe Program. (Figure 3.24). You must be able to advise your client on how to find a contractor who is familiar with the construction of older homes and the hazards of lead on a project. A Lead Safe–certified contractor will take the important steps to minimize dust on a project and keep the building site as clean as possible. From the EPA’s website (http://cfpub.epa.gov/flpp/searchrrp_firm.htm), you can locate a Lead Safe–certified contractor in your project’s area.

Figure 3.24 The EPA provides certification for lead removal work.
Courtesy of EPA
Lighting Choices and Design
Planning a well-designed and beautiful lighting scheme is important for any kitchen or bath project. To put all the time, money, and labor into a beautiful renovation only to have it improperly illuminated is a terrible waste.
Kitchen and bath lighting is both crucial for the functional aspects of the space as well as the aesthetics. No other rooms in the home (other than a hobby shop with power tools) poses a greater risk for injury than kitchens and bathrooms. This next section gives designers pointers on how to plan for energy and resource conservation in you lighting scheme.
Lamping is important for energy conservation. Where author Amanda Davis, NCIDQ, teaches, the school plans for 10 percent or fewer of lamps (the industry term for “bulb”) to be halogen or incandescent. (Halogen is a high-performance option in the incandescent family.) This means, for example, that you should reserve the use of incandescent lamping for your accent layer: where a piece of art needs fine illumination with a great point source or some flattering, warm light at the bathroom mirror. In all other places, you should use high-efficiency sources: fluorescent, LED, and in some places, ceramic metal halide (which today are used only in track applications because of the need for an attached ballast). There is concern over the presence of mercury in fluorescent sources. Proper disposal of fluorescent lamps is necessary to prevent contamination of landfills, surface soil, and water. For this reason, many green-minded designers do not use fluorescent sources. Look at Figure 3.25 for different lamp shapes and technology. Figure 3.26 is an excellent example of using passive daylighting in a bathroom by designing a skylight into the room.

Figure 3.25 LED lamps are energy efficient and have the longest life of all electric light sources used residentially.
Creative Commons 3.0, Geoffrey.landis at en.wikipedia

Figure 3.26 Daylighting in a bathroom
Courtesy of Squaredeal Remodeling, Portland, Oregon
Residential lighting should look to the retail sector, where commercial energy code restrictions have curtailed the use of incandescent lighting and new, innovative, and flattering sources are employed.
Controls and the placement of controls are just as important as lighting choices. Preset dimmers that allow for a constant 10 percent decrease in the amount of light output (lamps discharged at 90 percent or less) will lengthen the life of any lamp and reduce landfill waste. Placing controls in easy-to-reach places will encourage users to turn lights off when not in use. Motion sensors are great for walk-in closets and storage areas of the home where the area is not illuminated for long.
Last, consider your fixture choices. It’s back to ENERGY STAR for sourcing green choices in fixtures. All ENERGY STAR sources are lamped with fluorescent, LED, or ceramic metal halide lamps. The program lists hundreds of compliant fixtures, and many have recycled content in them such as recycled steel.
Lamp choice, control placement, the use of dimmers, and the selection of green fixtures will add to the sustainability approach in your project.
SPACE PLANNING
A kitchen dedicated to sustainable practices will look just about the same as any kitchen but will have a few characteristics that set it apart. In the NKBA Professional Resource Library volume Kitchen Planning there is thoughtful discussion of the importance of creating a layout that encourages recycling and composting. Specific space planning layouts are provided.
Recycling programs vary from city to city so plan the recycling center accordingly. For example, some cities require that glass be separated from other materials while some municipalities allow all items go in the same container, to be sorted later at transfer station.
Specific bins and accessories for recycling and composting are available from cabinetry companies.
Recycling Center
The two most important considerations for locating the recycling center are ease of use and ease of removal. Do your clients have any physical limitations that would get in the way of taking out the recycling? Be mindful not to specify bins that are too large. It is better to have to make more trips to the main container or sidewalk than risk injury from lifting an overly heavy container.
Note that in Kitchen A shown in Figures 3.27 and 3.28, the recycling center is located near the door to the garage. The dimensions are small and are contained in a 24-inch-wide cabinet. There is room for three bins: garbage, glass, and combined.

Figure 3.27 Floor plan Kitchen A
NKBA

Figure 3.28 Elevation Kitchen A
NKBA
Recycling Center Plus Composting
Kitchen B, shown in Figures 3.29 and 3.30, has the recycling center conveniently located near the cleanup/prep center. The interior dimensions of the cabinetry are larger than the example in Kitchen A. The bins are small and are contained in a 24-inch-wide cabinet. There is room for three bins: garbage, glass, and combined. The city in which this kitchen is located provides for curbside composting. The city provides bins for composting that are 14 inches long by 9 inches wide by 10 inches high. The drawer in the island was designed with a depth that could accommodate the bin. This is a great location as food scraps can be placed directly in the bin. The island is topped with a butcher block counter material.

Figure 3.29 Floor plan Kitchen B
NKBA

Figure 3.30 Elevation Kitchen B
NKBA
SUMMARY
The construction and remodeling sectors of our economy have an opportunity to move in a sustainable direction with a focus on designing for benefit, not austerity. Designing with the perspective of saving materials, saving energy, and saving water means saving money for your client. As designers move ahead with careful choices and responsible practices, it is more important than ever that we see ourselves as stewards of the environment. This stewardship demands that we be educators. Education is the best tool our industry has to be more mindful of the environment. Recommended building codes are a place to begin. Stay involved in the sustainable design community by attending webinars or other learning opportunities offered by nonprofit organizations, such as 365GreenExpo, the NKBA, or the National Association of Home Builders (NAHB), which are dedicated to sustainable design education.
There is a real opportunity to create a specialization in a field that is quickly becoming the expected norm. Designers who spend the time to educate their clients to future proof their home are simultaneously future-proofing their careers.
REVIEW QUESTIONS
-
What is a HERS rating, and why is it important? (See “Home Energy Rating System” page 62)
-
What does the term “future-proofing” mean? (See “The Path You Take–Beyond Code” page 44)
-
What does it mean when a house is “net zero” in energy use? (See “Solar” page 48)
-
What are two criteria for determining the energy-conserving character of windows? (See “Window Specification” page 52)
-
List two advantages to using SIPs or ICP walls on an addition or new construction. (See “Green Wall Construction” page 56)