
Chapter 3
The Kitchen
WHIP UP SOMETHING GREAT IN EVERYONE’S FAVORITE SPACE.
WHETHER YOU COOK EVERY DAY or you’re more of a special-occasion chef, arranging the right setup for your workspace is the first step to any great recipe, no matter how major or minor the meal. Without a well-thought-out setting, important tools disappear, and well-intentioned sous chefs can’t find what they need. But in a cleverly organized space, the work just flows. Making items visible and accessible means it’ll be easier for whoever’s making breakfast to do it in less time and with less hassle.
Keep in mind that your kitchen isn’t just utilitarian. If the growing popularity of open floor plans with spacious islands is any indication, a kitchen is also a popular hangout during parties (it’s usually where the apps are, after all) or on weeknights before the food hits the table. Making it an inviting spot gets the good vibes going right away. Dotting clutter-free counters with a few entertaining treats—small bowls of chips or veggies with dip—can transform your go-to cooking spot into a place that no one will want to leave. Here’s how to make the heart of your home work for you.

Keep open shelving neat and airy. Fill clear bins with dry goods for a display that’s as practical as it is pretty.

Show off your space-saving skills. Hang coffee mugs from hooks, and use shelf risers for bowls so you don’t have to lift a stack to get to the plates.
THE KEY TO AN ULTRA FUNCTIONAL SPACE IS KNOWING WHERE TO FIND EVERYTHING. PUT LIKE WITH LIKE, AND KEEP ALL THE ESSENTIALS WITHIN ARM’S REACH. THEN STORE AWAY ITEMS YOU DON’T NEED ON A DAILY BASIS—BUT MAKE SURE THEY’RE STILL EASY TO FIND WHEN THE HOLIDAYS HIT.
Make Countertop Magic

With a little rearranging, you can make everything on your countertop work for you. After all, you don’t want to waste precious time during dinner prep looking for things. Make a place in the hot zone (around the stove and sink) for the essentials: oil, vinegar, knives, cutting board. Move special-occasion cookware, like a fondue pot, out of cabinets in the zone so that what’s left can be neatly organized and easily spotted. And don’t just place ingredients and tools where they seem to fit. Instead, think about where you will be using them. Keep the basket of potatoes near the cutting board, the sugar and flour near the stand mixer, and your best-loved pan on the front burner.
Fix the Fridge Door

A clean fridge, free of photos and papers can seriously open a room. It’s almost like adding a window.
Rethink Your Servingware
Serving pieces like cake stands and serving bowls can still be put to work when you’re not entertaining. A cake stand can hold spices and oils and lift them off the counter while you’re cooking. Or, a salad bowl can store fresh fruit when it’s not being used at dinnertime. Putting them on display also saves precious cabinet space.
Hang Only Essential Pots
A good frying pan, a saucepan, a large sauté pan, a cast-iron skillet, and a stockpot will handle the majority of your needs. Hang everything except the stockpot from a small ceiling-mounted rack or pegboard. Displaying pots and pans means you’ll want to keep them looking fresh and clean with a gentle abrasive cleaner like Bar Keepers Friend. Oh, and because cutting boards are a pain to store, buy a hangable one and add it to the hanging pans.
Keep Your Tools Close at Hand

Instead of panicking when you can’t find a whisk when the béarnaise begins to boil, stash your most-used items in an easy-to-reach container next to the stove. Wooden spoons, tongs, a ladle, and spatulas can all find a home there. Or, add hooks to a pot rack to give slotted spoons a home.
Free Up Drawers
Measuring spoons, whisks, and pot holders are the types of tools that jam up kitchen drawers. Instead of cramming them in, hang them on adhesive hooks on the insides of cabinet doors. Just make sure to position the hooks in the spaces between the shelves so the doors can close properly. For everything else, add an expandable insert with adjustable compartments, and then fill the insert strategically: gadgets you use the most in front and the rest in back.
“File” Away Your Cookware

Instead of shoving skillets and lids in wherever they fit (cabinet chaos!), store them in a pan rack or organizer. It can also keep sheet pans and cutting boards in check and upright.
Use Under-Cabinet Space

Under-cabinet lighting strips (attached with screws or double-stick Velcro) keep the focus on the onions at hand. A battery-operated version won’t dangle a cord or steal an outlet from the microwave. An under-shelf cookbook holder pulls down when you need it and folds up when you don’t.
Make the Right Cut
Protect knives, and your fingers, with individual knife guards so that you can stack them next to each other without damaging them. Ideally, store them flat in a drawer separate from other silverware. A wall-mounted magnetic strip near where you’re going to be doing your chopping is also a good option. If you like the look of a knife block, buy one where the slots are horizontal, as in parallel to the counter rather than perpendicular. Resting them on the blade’s edges can dull them over time.
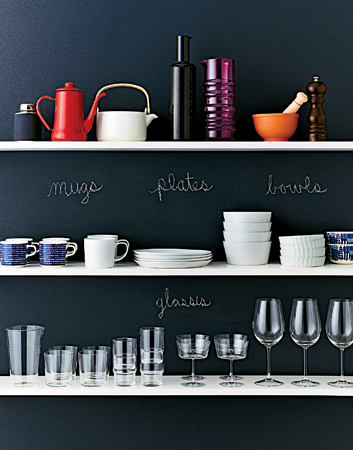
Put Dishes in Plain Sight
Short on cupboard space? Get things out in the open. Display everyday dishes against a well-marked chalkboard wall. The dark backdrop allows you to clearly (and creatively) indicate a home for each item, encouraging others (as in not just you!) to help restock once the dishwasher is finished. Draw outlines of shapely pieces if you’re the artistic type, or just say it like it is with words.
Toss Missing Tupperware Parts
Purge ruthlessly, keeping only containers you use all the time. Toss anything missing a top or a bottom. Split the space with a drawer divider to impose order: glass on one side, plastic on the other. Tuck the biggest glass piece in one corner, and find snug spaces for all other angular glassware; then, slip round pieces in last. Leave tops on glass containers, and stack pieces (don’t nest—glass might stick together and break). Nest plastics, storing sideways if upright is too high for the drawer. Store plastic tops separate from their bases since a seal can create a stale smell.
Or Consider This Cabinet Trick
Shelves stay neater if you divide cabinets into categories (everyday plates in one, most-used cookware in another). Walk yourself through your usual kitchen routine and consider how many steps you’re taking from a cabinet to its corresponding task. If a switch-up will shorten the distance, do it.
Make Your Vase Supply Vanish

You need only three kinds of vases: a bud vase for one or two stems; a cup-shaped vessel for small bouquets; and a cylindrical vase for bunches of long-stemmed flowers. But if you like a larger collection, nestle vases inside one another with a paper towel between them so they don’t rattle. And never store them under the kitchen sink where they can easily be knocked over. Instead, put them up on a shelf where they’re better protected.
Put the Walls to Work
Create a nonfridge spot for schedules or artwork, like a magnetic board. Oversize Post-it Notes or hanging rolls of paper, which you can find at a stationery or an art-supply store, are also useful for jotting down reminders. Simply tear them off when it’s time to shop or move on to your next great idea.
Keep Party Gear Handy
When it’s time to entertain, create a place for platters and trays—with dividers to maintain order—so you don’t have to hunt for them while the bruschetta turns soggy. Give candles, place mats, and other table toppers a dedicated drawer. Use an index card box to store recipes, past menus, friends’ food preferences, or wine labels. (Soak a bottle to remove the label, let it dry, paste it on an index card, and jot down tasting notes.)
Make Recycling & Composting Efficient, Too

Having a bin for compost and one for bottles and cans right next to the regular trash, instead of out in the garage or in the mudroom, streamlines end-of-meal cleanup. Speaking of trash, line the bin with four or five bags in one go, so the task of taking out the trash is a breeze. When you notice the receptacle getting full, you can snatch the top bag on your way out of the room without needing to dig through the pantry for a replacement.
Think Seasonally
Tweak organization according to the season. In the fall and winter, keep your Dutch oven on the stove and a basket of soup ingredients at the ready in the pantry. In the summer, when you’re always reaching for your blender and water pitchers, move them front and center.
Go Under the Kitchen Sink
Oh the irony of having messy cleaning supplies, right? Make sure the cabinet under the sink doesn’t turn into the Bermuda Triangle by making a small investment in a pull-out organizer. That way, sponges and supplies don’t get lost in the back behind the pipes. You’ll be able to see all “of your cleaning products at a glance and can grab them even faster when messes happen.
Pretty Up Your Pantry

Organized people think in zones. Arrange things by usage rather than type. In the pantry, group breakfast items: pancake mix, syrup, nut butters, jams. Use airtight, stackable containers to arrange dry foods, and add a canned-food storage rack, especially if your shelves are deep and wide. See-through containers allow you to quickly see what you have (and how much).
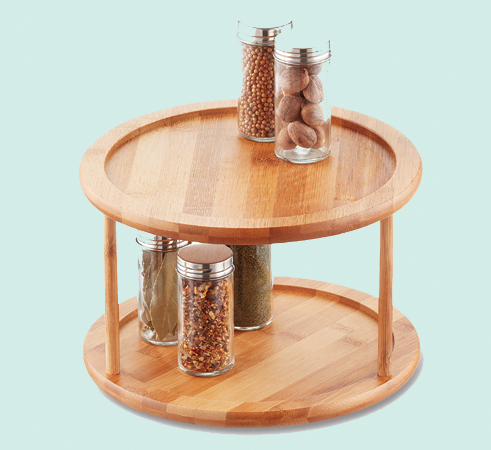
Keep Your Condiments and Spices in Order
Consider a two-tier Lazy Susan, which fits on a cupboard shelf and features a tray that can fit bottles of ketchup or vinegar. Store spices on the Lazy Susan or in a drawer. Transfer them from various spice jars to uniform containers, and mark each with a label.
Rearrange Your Library

Organize your cookbooks in a way that reflects your own inner logic and tastes. It may make sense to alphabetize one section by author, create another section for a favorite ingredient (tomatoes, lemons, herbs) or theme (barbecue, dessert), and a third by region. One shelf could be arranged by world cuisines while another goes from breakfast to dessert. Just don’t keep your books over the stove or sink where they could absorb humidity.
Round Up Your Recipes
Take the notecards stuffed in the front covers of your favorite cookbooks and scan them. Then catalog them using online tools or apps like Evernote, Paprika Recipe Manager, Basil, or Eat Your Books. This will allow you to save, categorize, search, and even add notes for your favorite recipes. Or, if you’re old-school, buy an accordion binder where you can store the cards by course (appetizers, mains, sides, and desserts).
Take a Big Step Up

Pop quiz: What’s in your highest kitchen cabinets? Odds are, the highest shelves are either empty or storing something you’ve either forgotten about or don’t really need. A stepladder can be a kitchen MVP so that you can utilize all your room’s space.
Pro Tip
“Keep countertops clutter-free by storing only things that you use at least a couple of times a week, like the coffeemaker, a utensil crock, and a small tray with your go-to oils, vinegars, and salt and pepper. One exception? A big stand mixer, which can be too heavy to easily move. Tuck it in a black hole corner of a countertop beneath a cabinet where it’s out of the way. But if you never bake, give it away. Even if it was a wedding present!”
—LISA ZASLOW, ORGANIZER, FOUNDER OF GOTHAM ORGANIZERS
Organize This
MAKE YOUR DAILY DIVE INTO THE REFRIGERATOR A TREAT.

DON’T FORGET YOU CAN ADJUST THE SHELVES SO YOUR BIG BOTTLE OF COLD-BREW COFFEE DOESN’T HAVE TO LIE ON ITS SIDE.
PUT LIKE WITH LIKE
A good rule of thumb: Group similar items together. Designate a shelf for beverages (and use a can organizer to keep them in line) or a spot where all dairy products should live to make them easy to find.
MAKE SPACE FOR PREPPED ITEMS
Once a week, cut up fresh produce to have on hand for snacks and mealtime. Stash it at eye level in stackable, clear, airtight containers; then grab and go.
PACK THE FREEZER SMART
Make designated sections (prepared meals, vegetables, desserts). Use dividers or multilayer ice caddies to keep containers neat and accessible, and label everything.
DESIGNATE YOUR DOORS
The storage space on the door should be used to stash condiments and sauces. That frees up shelf space, which stays cooler, for more perishable items.
CREATE INSTANT ORDER
Reduce shelf clutter (and avoid losing items in the back of the fridge) by employing acrylic bins to corral awkward-shaped packages, like yogurt pouches or deli meat.
USE FLEXIBLE LABELS
Make the contents easy to identify at a glance by labeling bins with chalk markers.
The Tools

SHELF RISER

PAN ORGANIZER

STACKABLE BASKETS

SLIDING SHELVES
You’ll never wonder what hidden appliance or pot is lingering in the back of your bottom cabinets ever again.

PARTITIONED TRAY
Prevent utensil pileup and make use of every inch of drawer space with an expandable divided insert.

RECYCLING BIN

TRASH CAN

LID RACK

DOOR ORGANIZER
ORGANIZING ESSENTIAL
The mighty Lazy Susan is a game changer in the kitchen. Use it in the pantry for spices, in shelves for coffee mugs, or on the counter near the stove for cooking oils.

AIRTIGHT, CLEAR, SQUARE CONTAINERS
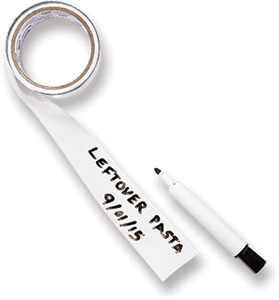
LABELS
Wondering how old those leftovers are? From freezer storage to shelving, use labels that say what everything is. Reusable dry-erase tape makes this necessity even easier.

CLEAR PLASTIC BINS

MONTANA JARS
Small-Space Solutions
EVEN TINY KITCHENS REQUIRE SO MUCH STUFF. AVOID DROWNING IN POTS AND PANS WITH THESE TRICKS FOR KEEPING IT ALL TOGETHER.

Buy a Floating Island
A rolling cart with a wooden cutting-board top and drawers down below is a genius way to add countertop space wherever you need it. Store utensils in the drawers, use the top as a prep space, and roll the cart away (and use it as a mini bar cart) when it’s not needed in the kitchen.
Utilize Your Walls
Mount your dishwashing rack on the wall to clear up countertop space near the sink. Install grids, pegs, or rails to hang utensils and dish towels.
Look Up
Fruit bowls are pretty, but they take up precious counter space. Instead, hang your produce in a three-tier wire fruit basket where it will be on display but out of the way.
Hang Dry Goods
Mount Mason jar lids underneath your cabinets and fill the jars with dried pasta, pretzels, and popcorn kernels. Then lift the jars into the lids and rotate the jars to secure them into the lids. Suddenly you’ve got a chic floating display that won’t clutter up your space.
Stick Your Spices
Fill magnetic tins with spices, label them with a permanent marker, and place them on the side of your fridge. It’s also a great way to take inventory before starting a recipe and realizing you’re out of cinnamon.
Use the Doors

Install a rack or organizer on walls or inside pantry or cabinet doors.
The Real Simple Method Checklist
If You Have . . .
15 Minutes

◻ HIDE WHAT YOU CAN. This is not the time for an overhaul. Throw dirty dishes in the dishwasher; heck, throw anything in the dishwasher, as long as you remember not to turn it on. Then, use the pantry to store cabinet overflow and random bags of snack foods that were out on the counter before a surprise guest announced they were on their way over in about 15.
◻ WIPE DOWN SURFACES. A sparkling countertop makes the whole room look spiffy.
1 Hour
◻ EDIT YOUR KITCHEN DRAWER. It takes mere minutes to round up duplicate tools. Test them all, keep the one that works best, then donate or toss the rest. Extra credit: Move rarely used pieces (turkey baster, melon baller) to a bin on a high shelf.
◻ PARE DOWN THE PANTRY. Toss any expired foods, and consolidate doubles into one container. As you’re slimming down your supply, store like items with like to avoid doubling up again.
◻ CLEAR OFF COUNTERTOP SPACE. Move any appliances you don’t use every day (food processor, blender, toaster) to bottom shelves so they’re not taking up precious prep-work space.
A Weekend

◻ FIX YOUR FRIDGE. It’s time to invest in clear bins for your food items so you can see exactly what you have at any given moment. In that same spirit, pull out the crisper drawer if it’s possible with your model. The minute that thing is closed, it’s like the food in there doesn’t exist because you’re not seeing it. Without the drawer, you have a nice, open shelf that keeps items visible, prompting you to use them. The same logic goes for food-storage containers. Get rid of the large yogurt tubs or opaque lidded bowls you use for leftovers. If you’re not seeing what’s inside, you’re likely to forget about what’s in them. Invest in a uniform set of clear glass containers—square or rectangular ones take up less space than round ones.
◻ PICK APART THE PANTRY. Remove everything and wipe down the shelves. Then, organize items in clear jars or plastic boxes, arranged by food type. (Pastas in one, beans in another.) Stash the stuff you reach for most often at eye level.

◻ Pick Your Fave Pots and Pans. Chances are, you don’t use every pot or pan in the 10-piece set you bought, and it’s easy to stockpile saucepans without realizing it. Sift through your collection and keep only the ones you use on a regular basis. (If one looks too clean, it’s probably not one you use often.) Edit your collection, wash your faves, and hang them up. Donate the rest, or give them to a niece or nephew on their way to college.
DISHWASHER DO’S AND DON’TS
Fork tines up or down? Plates facing right or left? Welcome to your ultimate dish-loading directives.
Do
Run the Dishwasher at Night
Some utility companies charge more at peak usage times, and night is a less demanding time, so it can lower your bills.
Do
Organize Utensils
Sorting by type is a time-saver for unloading. Put forks with forks and knives with knives, with handles facing up to avoid getting poked or punctured when you take them out. Spoons will stay dirty if they’re “spooning,” so insert some with handles facing down (or separate them in a slotted holder).
Do
Make a Game Plan
You’ll use the space best if you first scan the kitchen and form a loading strategy, like putting big pieces in first and filling in with the smaller ones. When in doubt, take something out. If pieces are overlapping or keeping the spray arms from spinning, they won’t get clean.
Don’t
Face Plates All in the Same Direction
Instead, place them on the bottom rack facing inward toward the spray arms, with smaller plates in front of large ones, so the spray can reach all of them.
Don’t
Rinse Plates
Prerinsing wastes water and isn’t necessary if you run the machine within a day. And today’s machines can handle food residue. One exception is rice, which is worth rinsing off because it can clog the drain hose.
Don’t
Unload from Top to Bottom
A piece on the upper rack may have a pool of water, so if you unload the top rack first, the water can spill onto dry dishes below.
Ask the Organizer
Q: What’s the best system to keep my kitchen sink items in order?
A: The neater this area is, the less likely you are to consider dishwashing a chore. Use a sponge holder that suction cups inside the edge of the sink so your sponge drips dry neatly. Also, decanting dishwashing liquid and hand soap into matching pump dispensers is a pretty way to keep your space looking intact. The final step? Add a hook to keep a dish towel close at hand.
—LISA ZASLOW, ORGANIZER, FOUNDER OF GOTHAM ORGANIZERS
Keep It That Way
The good news about keeping your kitchen in order is that it’s a space you use every day, so there’s less of a chance of you creating a system and not sticking to it. Still, there are a few tricks to maintaining your organizational masterpiece.
Plan It All Out
When it comes to keeping the fridge organized, meal planning (weekly or half-weekly) is super important. Buy food for specific meals or recipes so that you know pretty much exactly when you’re going to use it. Replenish pantry staples as needed.
Put Away Your Haul
It can be tempting to quickly put groceries away once you get home from shopping—who doesn’t want to just shove everything randomly in cabinets and move on with life? But you made this new system for a reason, so take care to put items away in their designated places. That way, the next time you need to find the rice, you won’t have to call on a search party.
Make Labels
Using labels to assign out shelving doesn’t just help you in the short run, it also instructs the family (and thoughtful visitors) on where to put things back when they’re done using them. Plus, putting labels in your pantry is another easy way to take inventory of what you need to add to the grocery list when stock runs low.
End on a High Note
When you get to the end of the recipe, don’t stop when the cooking is done—take time to put away your ingredients, wash pots, and wipe down the counter. Even just cleaning your prep items while the main dish is in the oven is an easy way to keep your kitchen sanity.
IF YOU DO ONE THING EVERY DAY
Clear off the countertop. Not only will you love the look of wide open spaces, but putting together your next meal will be a total breeze because the first step won’t involve finding homes for loose mail and your garlic press.
Stick to a Cleaning Routine
This seven-step weekly cleaning plan means you won’t panicwhen a friend stops by and stays for dinner.

THE HACK
Stash extra trash bags at the bottom of your kitchen garbage can. With a clean supply at the ready, swapping in a new bag is less of a chore.
1 Going in the direction of the grain, wipe cabinet fronts from top to bottom with a microfiber cloth dampened with water and a few drops of mild cleaner. Rinse the cloth, wring it out well, and repeat without the cleaner, taking care to remove cleaner residue that can dull the finish.
2 Wipe the stovetop with a microfiber cloth moistened with water and cleaner.
3 Wet a microfiber cloth with water and mild cleaner, and wipe the countertops in a circular motion. To get rid of the soap film, mist the entire area with water from a spray bottle and wipe it down again with a clean cloth. Wash the tile backsplash using the same method, scrubbing any food splatters from the grout.
4 Wipe the outside of the refrigerator, the dishwasher, and the microwave.
5 Disinfect the garbage can by spraying all-purpose cleaner on both the inside and the outside of the bin and wiping it with a clean cloth.
6 With cloth and cleaner, scrub the sink basin in a circular motion from the top to the drain. Use an old toothbrush to remove any mold lurking in the edges of the drain and the faucet. Rinse the entire area with water, and wipe it down with a clean cloth to bring out its shine.
7 Sweep the floor with a broom using long strokes and working from the walls to the middle of the room. Try not to lift up the broom at the end of each stroke or dust will be kicked into the air. Make several piles of debris as you go, picking them up with a dustpan and dumping them in the garbage. To clean corners, blow out the dust with a hairdryer, then sweep up or vacuum using a crevice attachment to reach tight spots and underneath cabinet bases.