Chapter Nine
Sweets
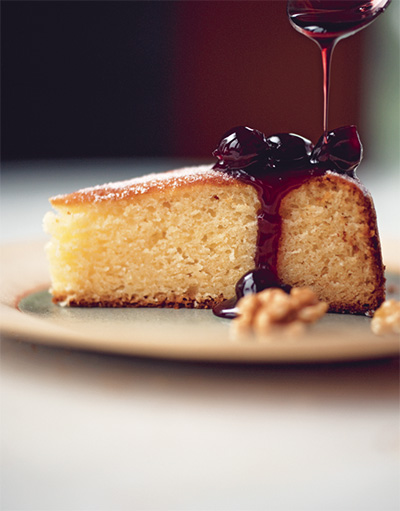
Endlessly Moist
greek yogurt cake
serves 8
This yogurt cake has a flavor and texture reminiscent of a delicious pound cake. The
yogurt creates a moist yet delicate crumb, and the honey sweetens while adding a touch
of floral flavor. Make the cake the night before, and it will still be moist the next
day if well wrapped—a boon for the do-ahead needs of bake sales and potlucks. Serve
with any fresh fruit topping, stewed dry fruits, or lemon curd.
2 cups all-purpose flour
2 teaspoons baking powder
½ teaspoon baking soda
½ teaspoon coarse salt
1 cup fat-free Greek yogurt
¼ cup honey
12 tablespoons (1½ sticks) unsalted butter, at room temperature
1 cup sugar
3 large eggs, at room temperature
1 teaspoon pure vanilla extract
Walnuts for garnish (optional)
Sour cherries in syrup for garnish (optional)
- Preheat the oven to 350°F with a rack in the middle position. Butter and flour a 9-by-2-inch
springform pan.
- Whisk together the flour, baking powder, baking soda, and salt in a medium bowl. Stir
together the yogurt and honey in a small bowl.
- In the bowl of a stand mixer or in a large bowl using a hand mixer, beat the butter
and sugar until pale and fluffy. Beat in the eggs, one at a time, beating until fully
incorporated. Beat in the vanilla extract.
- Add the flour mixture to the butter mixture in 3 additions, alternating with the yogurt
and beginning and ending with the flour.
- Transfer the batter to the prepared pan and smooth the top. Bake for 35 to 40 minutes,
until the top is golden brown and a toothpick inserted into the center of the cake
comes out clean. Cool the cake in the pan on a wire rack for 10 minutes. Remove the
sides of the pan and invert the cake; lift off the pan bottom and let the cake cool
completely.
- Slice the cake and serve plain, sprinkled with sugar, or with the topping of your
choice, such as walnuts or cherries.
Calder’s Cake
strawberries and cream chocolate birthday cake
serves 8 to 10
Sure, you can buy a cake from a bakery or the grocery store, but this cake is the
quickest, most foolproof way to say happy birthday I know. It’s my go-to cake when
I need to pull a dessert from up my sleeve for someone’s special day. The cake layers
can be baked ahead, but assemble the cake just before serving. The cake pans do not
need to be oiled or floured.
Cake
3 cups all-purpose flour
2 cups sugar
¼ cup plus 2 tablespoons unsweetened cocoa powder
2 teaspoons baking soda
1 teaspoon coarse salt
¾ cup safflower oil or other vegetable oil
2 teaspoons pure vanilla extract
2 tablespoons white vinegar
2 cups cold water
filling
2 pints heavy cream
¼ cup confectioners’ sugar
1 teaspoon pure vanilla extract
1 quart strawberries, washed, hulled, and thinly sliced
- Preheat the oven to 350°F with a rack in the middle position. Whisk together the flour,
sugar, cocoa, baking soda, and salt in a large bowl. Make a well in the center of
the mixture, and add the oil, vanilla, vinegar, and cold water. Whisk until well combined.
- Divide the batter between two 8-inch cake pans.
- Bake the cakes, side by side, for 35 to 40 minutes, until a toothpick inserted in
the center comes out clean. Cool completely in the pans on a wire rack.
- Whip the cream to soft peaks in a large bowl. Add the sugar and vanilla and whip again
until just stiffened; do not overwhip.
- Slice the domed top off 1 cake round to make a flat surface and put it on a serving
plate. Spread with a thick layer of the whipped cream. Top with a layer of half the
strawberries. Top with the other cake round, domed side up, and spread it with another
thick layer of whipped cream. Top with the remaining strawberries.
- Slice and serve with any extra whipped cream and berries on the side.
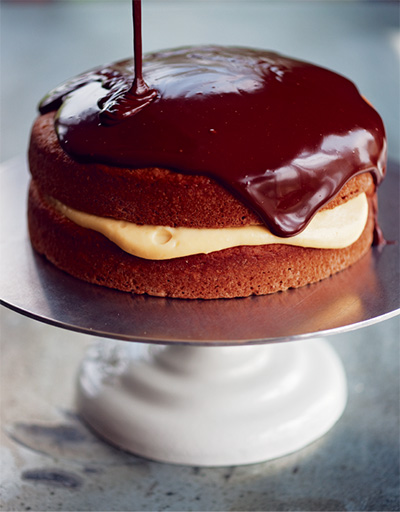
Eclair Meets Cake Meets Pie
boston cream pie
serves 12
It’s called pie, but let’s face it, it’s a cake—with an oozy, luscious pastry cream
filling between moist layers and chocolate ganache dripping down the sides. It so
gripped the taste buds of nineteenth-century Bostonians at the Parker House Hotel
that it became a classic dessert—in fact, in 1996 it was named the state dessert of
Massachusetts. A good way to tackle this cake is to make the cake layers and the pastry
cream in advance. When ready to assemble, make the ganache topping.
Cake
2½ cups all-purpose flour
½ teaspoon baking powder
½ teaspoon baking soda
1 teaspoon coarse salt
1 cup safflower oil
1½ cups sugar
4 large eggs, at room temperature
1 teaspoon pure vanilla extract
1 cup sour cream
Pastry Cream
1 large egg
4 large egg yolks
⅓ cup sugar
¼ cup all-purpose flour
1½ cups whole milk, heated
½ teaspoon pure vanilla extract
Topping
8 ounces semisweet chocolate, finely chopped
1 cup heavy cream, hot
- For the cake, preheat the oven to 350°F with a rack in the middle position. Oil and
flour two 8-inch round cake pans. Whisk together the flour, baking powder, baking
soda, and salt in a medium bowl.
- Whisk together the oil and sugar in a large bowl. Whisk in the eggs and vanilla. Add
the flour mixture in 3 additions, alternating with the sour cream in 2 additions (begin-ning
and ending with the flour). Divide the batter between the prepared pans.
- Bake for 30 to 35 minutes, until the cakes pull away from the sides of the pans. Cool
in the pans on a wire rack for 10 minutes, then remove from the pans to cool com-pletely,
right side up.
- For the pastry cream, lightly beat the egg and yolks together in the bowl of a stand
mixer fitted with the paddle attachment or in a large bowl using a hand mixer. Add
the sugar a little at a time, and continue beating until the mixture falls in ribbons
when the beater is lifted, about 5 minutes. Mix in the flour, then add the milk in
a steady stream.
- Transfer the mixture to a saucepan, bring just to a boil, and boil gently over medium
heat, whisking, until the mixture thickens, 8 to 10 minutes. Strain the pastry cream
through a fine sieve into a large bowl. Stir in the vanilla. Press plastic wrap against
the surface. Cool for at least 1 hour.
- For the chocolate ganache topping, put the chocolate in a medium bowl. Pour the cream
over it and leave undisturbed for 1 minute. Stir gently, until the chocolate is melted
and smooth. Let cool for 10 minutes.
- Slice off the domed top of 1 cake layer to level it. With your fingers, remove some
of the cake to make a ½-inch hollow, leaving a ½-inch border around the edge. Place
on a cake stand or plate. Fill with the pastry cream. Top with the second cake layer,
domed side up. Pour the topping over the cake, letting it run down the sides. Chill
for at least 5 hours or as long as overnight, before serving.
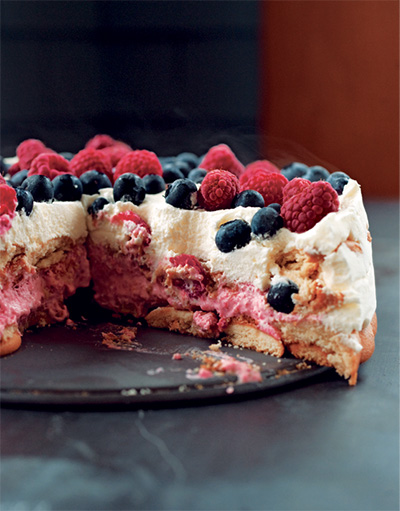
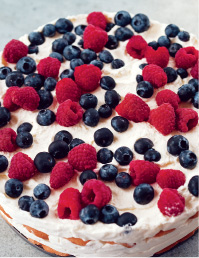
Old Glory
independence day icebox cake
serves 8 to 10
It takes a patient decorator and a little time to pull off a big, beautiful holiday-themed
icebox cake. Arrange the blueberries and raspberries on top of the strawberry-puree-spiked
whipped cream to make the Stars and Stripes and celebrate the Fourth in style. But
even if you scatter the berries recklessly, you will capture the rogue spirit of the
USA!
One 12-ounce box vanilla wafers
1 pound strawberries, washed and hulled
3 cups heavy cream
⅓ cup sugar
1 cup blueberries
1 cup raspberries
- Line the sides of a 9-by-3-inch springform pan with strips of parchment paper. Lay
half the vanilla wafers on the bottom of the pan in overlapping concentric circles.
- Puree the strawberries in a food processor.
- Whip the cream to soft peaks in a large bowl. Add the sugar and whip again until just
stiffened; do not overwhip. Transfer two-thirds of the whipped cream to another bowl.
Fold the strawberry puree into the remaining whipped cream.
- Put 1 cup of the whipped cream in a large resealable plastic bag. Snip off a bottom
corner of the bag and pipe the cream over the wafers and around the inside edge of
the pan to create a 1-inch-high dam. Pour the strawberry whipped cream into the center
of the pan and spread it out level with the dam.
- Arrange the remaining cookies over the cream in overlapping concentric circles. Top
the cookies with the remaining whipped cream, spreading and smoothing it level with
the edge of the pan. Arrange the blueberries evenly over one-third of the cream. Arrange
the raspberries in four or five strips to create a flag pattern. Chill for at least
8 hours, or as long as overnight.
- To serve, remove the sides of the springform pan and the parchment. Cut the cake into
wedges.
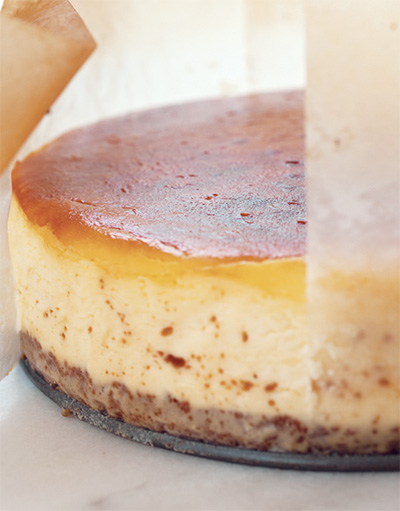
Double-Down Diner
new york–style cheesecake
serves 12
“New York style” means heavy on cream—sour cream and cream cheese—for a decadent,
swoon-worthy cheesecake that will send you to your fainting couch! The trick is to
cook it enough to set without cracking the top. And don’t cheat on the chill time.
When you’ve come this far, you want perfectly set slices on your dessert plate.
Crust
4 ounces graham crackers, broken into pieces
⅓ cup sugar
¼ teaspoon coarse salt
4 tablespoons unsalted butter, melted
Filling
2½ pounds cream cheese (five 8-ounce packages), at room temperature
8 tablespoons (1 stick) unsalted butter, at room temperature
One 8-ounce container sour cream, at room temperature
1¾ cups sugar
5 large eggs
2 large egg yolks
Grated zest of 1 lemon
1 teaspoon pure vanilla extract
- Preheat the oven to 375°F with a rack in the lower third position. Butter a 9-inch
spring-form pan. Line the sides of the pan with 4-inch-wide strips of parchment, and
butter the parchment.
- For the crust, pulse the graham crackers, sugar, and salt to fine crumbs in a food
processor. Add the butter and pulse until fully incorporated. Press the mixture evenly
onto the bottom of the prepared pan. Bake for 15 minutes, or until the crust is golden
brown and set. Transfer the pan to a wire rack to cool for 10 minutes. (Leave the
oven on.)
- For the cheesecake, in the bowl of a large stand mixer or in a large bowl with a hand
mixer, beat the cream cheese, butter, sour cream, and sugar until light and smooth.
Beat in the eggs one at a time, beating until fully incorporated. Beat in the egg
yolks, zest, and vanilla extract.
- Crisscross two 18-inch-long pieces of foil. Put the springform pan in the center of
the foil and wrap the foil tightly around the bottom and sides of the pan to create
a watertight seal. Transfer to a roasting pan. Pour the filling into the springform
pan and smooth the top.
- Pour enough boiling water into the roasting pan to come halfway up the sides of the
springform pan and carefully transfer to the oven. Bake for about 1 hour 15 minutes,
or until the top of the cheesecake is golden brown and the edges are set but the center
still jiggles slightly. Remove from the oven and allow the cheesecake to stand in
the water bath for 1 hour.
- Lift the cheesecake from the water bath and remove the foil and parchment. Chill the
cheesecake for at least 8 hours and up to 24 hours.
- To serve, remove the sides of the springform pan and the parchment strips. Cut the
cheesecake with a long thin-bladed knife.
Bistro Baby
chocolate mousse
serves 6 to 8
If I were allowed just one dessert choice for the rest of my life, it’d be some kind
of chocolate-moussey type of thing, like this. Mousse sounds like it’s a fancy, hard-to-make
dessert, but it’s little more than chocolate, cream, eggs, and sugar. Once made, it
just requires some time to chill and firm up—so it’s a good choice for a do-ahead
dinner party dessert.
3 cups heavy cream
1 vanilla bean, halved lengthwise, seeds scraped out, and reserved, or 1 teaspoon
pure vanilla extract
4 large egg yolks
3 tablespoons sugar
⅛ teaspoon coarse salt
8 ounces bittersweet chocolate, chopped and melted
- Combine 1 cup of the heavy cream, the vanilla bean pod, and seeds in a 4-quart saucepan
and heat until the cream simmers. Remove from the heat and discard the vanilla pod.
(If using extract, stir it into the simmered cream.)
- Whisk the egg yolks with the sugar and salt in a medium bowl until pale yellow and
doubled in volume. Gradually whisk in ¼ cup of the hot cream and then add the egg
mixture to the saucepan. Cook over medium heat, stirring constantly, until the custard
thickens, about 3 minutes. Remove from the heat.
- Whisk the custard and the chocolate together and let cool to room temperature.
- Whisk the remaining 2 cups cream to stiff peaks in a large bowl. Stir one-quarter
of the whipped cream into the chocolate custard, then gently fold the lightened custard
into the whipped cream. Divide the mousse among custard cups or ramekins and cover
with plastic wrap. Refrigerate for at least 4 hours, or as long as overnight.
- Remove from the fridge 30 minutes before serving.
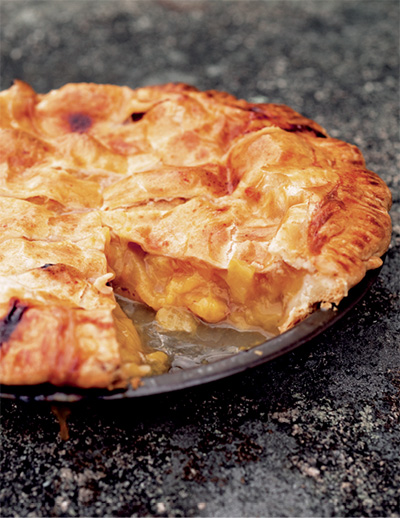
Summer Slice
peach pie
serves 8
My mom is an excellent cook, but even she’d admit she never bakes. When I was growing
up, it was the pie at the Rendezvous Tavern in Windsor, Ontario, that hooked me—so
much so that I’ll choose it over cake any day. Finishing our dinner meant we could
pick a piece of our favorite pie: peach in summer, apple in fall, cherry in spring,
key lime, pecan, or coconut cream in winter. Here’s my own peach pie.
Dough
2 cups all-purpose flour
1 teaspoon course salt
½ pound (2 sticks) very cold unsalted butter, cut into pieces
½ cup cold water
Filling
8 to 10 ripe peaches, peeled, pitted, and sliced
Grated zest and juice of 1 orange (⅓ cup juice)
¼ cup cornstarch
¾ cup sugar
3 tablespoons cold unsalted butter, cut into small pieces
1 egg, beaten with 1 teaspoon milk
- For the dough, combine the flour and salt in a large bowl or a food processor. Add
the butter and mix in (with your fingertips) or pulse until the mixture resembles
coarse meal. Pour in the water and mix or pulse just until the dough comes together
in a ball.
- Cut the dough in 2 pieces. Wrap each one in plastic wrap and chill for at least 15
minutes. (If refrigerated longer, remove 15 minutes before proceeding with the next
step.)
- Preheat the oven to 375°F with the racks in the center and lower third positions.
On a well-floured surface, roll out 1 piece of dough to a 12-inch-diameter circle.
Fit it into a 9- or 10-inch pie plate. Trim the edges of the dough flush with the
edges of the pie plate.
- For the filling, combine the peaches, orange zest and juice, cornstarch, and sugar
in a bowl. Pile the peaches into the dough-lined pie plate. Scatter the butter over
the peaches.
- Roll out the top crust to a diameter of 12 inches. Lay it over the peaches. Trim the
edges of the crust so it extends over the bottom crust by at least ¾ inch. Tuck the
top crust under the bottom and pinch together to seal. Crimp the edges with a fork.
Chill the pie for a few minutes.
- Brush the egg mixture over the crust. Cut a few slits in the top to allow steam to
escape during baking.
- Put a baking sheet on the lower oven rack to catch any overflowing juices from the
pie. Put the pie on the center rack and bake for 60 to 70 minutes, until the crust
is golden and the juices are bubbling. Cool on a wire rack for at least 1 hour before
serving.
Mocha-ness
individual tiramisu
serves 6
Tiramisu gets better with a little age. As the dessert sits, the separate layers meld
together for a glorious symphony of flavor. But all tiramisus are not created equal—good-quality
coffee, cocoa powder, and liquor make all the difference.
1 cup strong espresso
½ cup sweet vermouth or Marsala
4 large eggs, separated
½ cup plus 2 tablespoons sugar
1 cup mascarpone
36 ladyfingers
1 tablespoon unsweetened cocoa powder
- Combine the espresso and vermouth in a wide shallow dish. Whisk the egg yolks with
½ cup of the sugar in a large bowl until pale yellow and doubled in volume. Whisk
in the mascarpone until incorporated.
- Whisk the egg whites with the remaining 2 tablespoons sugar to stiff peaks in another
large bowl. Fold the whites into the yolk mixture in 2 additions.
- Soak half the ladyfingers in the espresso mixture, turning once. Divide among serving
glasses, working quickly so the ladyfingers don’t become too soggy. Top with half
the cream mixture. Repeat with a second layer of soaked ladyfingers and the remaining
cream. Sift the cocoa over each tiramisu. Refrigerate overnight before serving.
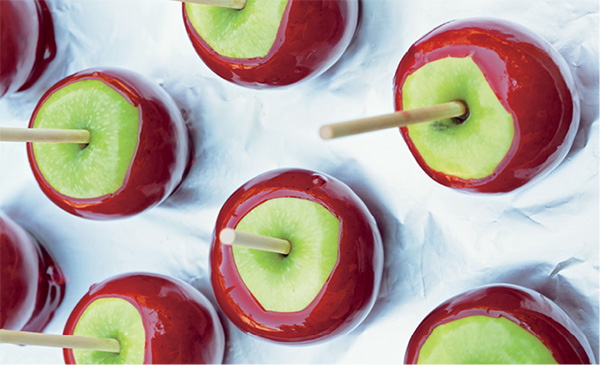
Crackly and Juicy
candied apples
makes 8 candied apples
Red Hots give the candied coating that classic cinnamon flavor and color. Use Granny
Smiths, and you’ll have an awesome contrast between green apple and candy-red color.
You need to be careful when working with hot sugar, but the payoff is worth it. This
is a showstopper of a dessert or treat for an after-school snack. You’ll need a candy
thermometer.
2 cups sugar
½ cup light corn syrup
½ cup water
½ cup Red Hots or other red cinnamon candies
15 drops red food coloring
8 tart apples, such as Granny Smith, stems removed
8 candy apple sticks or wooden craft sticks
- Combine the sugar, corn syrup, and water in a small heavy saucepan and gently stir
with a fork over medium heat just until the sugar is dissolved. Raise the heat to
medium-high and bring to a boil, without stirring. Add the cinnamon candies, insert
a candy thermometer, and continue boiling, washing down the sides of the saucepan
with a wet pastry brush occasionally to dissolve any sugar crystals. When the mixture
registers 302°F (hard crack) on the thermometer, remove from the heat and stir in
the food coloring. Let stand until the candy stops boiling.
- Line a rimmed baking sheet with foil and coat with nonstick cooking spray. Insert
the candy apple sticks into the stem ends of the apples. Carefully tilt the saucepan
and dip each apple into the candy, swirling to coat the bottom and sides; allow the
excess candy to drain back into the saucepan, and transfer the apple to the prepared
baking sheet. Let cool and harden.
- Candied apples are best served within 24 hours.
Passed The Teenage Test
dark-chocolate peanut butter pretzel squares
makes 12 large or 18 smaller squares
My youngest son, Luca, called me one day from school and said, “Mom, we have a bake
sale today for the soccer team and I need you to make something dank.” Apparently
the word “dank” now means something amazingly good. Being that it was last-minute,
I was forced to be creative with what I had in the pantry: marshmallows, dark chocolate,
peanut butter, pretzels, and puffed rice. His verdict? “Mad dank.”
4 tablespoons unsalted butter
6 cups mini marshmallows
12 ounces (½ cup) crunchy peanut butter
6 cups puffed rice cereal
2 cups mini pretzels or pretzel sticks, broken into pieces
8 ounces dark chocolate, chopped (or semisweet chocolate chips)
- Line a 9-by-13-inch baking dish with parchment paper, leaving an overhang on two opposite
sides, and coat with nonstick cooking spray.
- Melt the butter in a large pot over medium-high heat. Add the marshmallows and peanut
butter and cook, stirring occasionally, until the marshmallows are melted and the
mixture is combined and beginning to bubble, about 3 minutes. Remove from the heat
and stir in the remaining ingredients until well combined. Scrape into the prepared
baking dish and smooth the top with a spatula. Let cool to room temperature.
- Use the parchment to lift the bars from the baking dish. Transfer to a cutting board
and cut into squares.
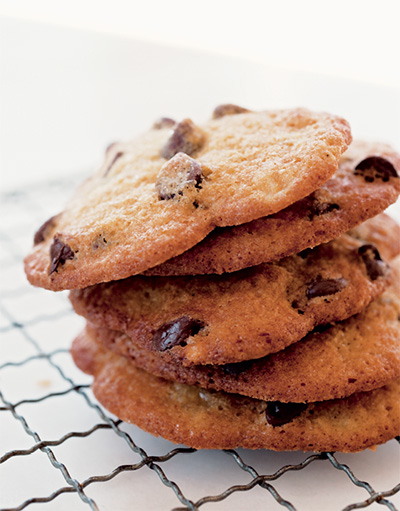
Bake-Sale Bonanza
banana chocolate chip cookies
makes about 16 cookies
This is probably my sons’ favorite cookie. When the kids were young, I started making
these for them because I felt the banana was bringing a healthful bump to a cookie.
Little did I realize the power the banana-chocolate flavor combo would have over the
crumb-dusted faces of those smiling boys.
1 cup all-purpose flour
½ teaspoon baking soda
1 teaspoon coarse salt
8 tablespoons (1 stick) unsalted butter, at room temperature
¼ cup plus 2 tablespoons granulated sugar
¼ packed cup plus 2 tablespoons light brown sugar
1 large egg
1 teaspoon pure vanilla extract
1 very ripe banana, peeled and slightly mashed
¾ cup semisweet chocolate chips
- Preheat the oven to 375°F with the racks in the upper and lower third positions. Butter
two baking sheets or line with parchment.
- Whisk together the flour, baking soda, and salt in a bowl.
- In the bowl of a stand mixer or in a large bowl with a hand mixer, beat together the
butter, sugars, egg, and vanilla. Add the flour mixture and stir to combine. Mix in
the banana and chocolate chips until just combined.
- Drop the batter by the tablespoon onto the baking sheets, spacing the cookies 1½ inches
apart. Bake for 10 to 12 minutes, until lightly golden brown. Transfer to wire racks
to cool.
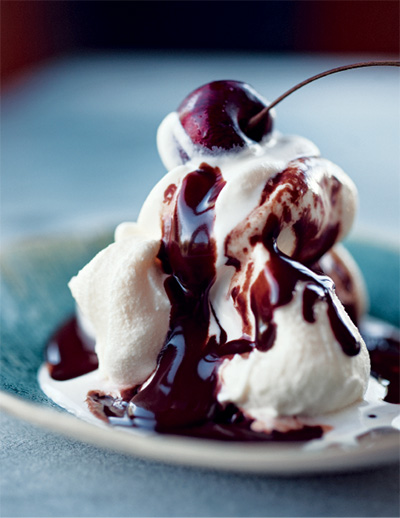
Unimfudgable
hot fudge sundaes
serves 2, with sauce left over
Truth be told, ice cream is my all-time day-in and day-out guilty pleasure. But I
can never keep it in the house, because the kids eat it all immediately. It’s the
only treat I covet that I can’t hide from them. Cookies are in the sock drawer, chocolate
bars in the produce crisper, but there’s just no place for ice cream except the freezer.
So, sundae making is a planned activity that I love. As for this chocolate sauce,
I could (and do) eat spoonfuls of it straight out of the fridge for a chocolate fix.
5½ ounces semisweet chocolate, chopped (1 cup)
1 cup heavy cream
2 tablespoons water
1 tablespoon corn syrup
½ pint vanilla ice cream
2 fresh or jarred cherries
- Put the chopped chocolate in a medium bowl. Combine ½ cup of the cream with the water
in a small saucepan and bring to a slight simmer. Pour the cream mixture over the
chocolate and allow to sit undisturbed for 1 minute. Stir until the chocolate is melted
and smooth, then stir in the corn syrup until smooth.
- Whip the remaining ½ cup cream to soft peaks in a small bowl.
- Place 2 scoops of ice cream in each of two bowls. Spoon some sauce over the ice cream.
Top with the whipped cream and a cherry.
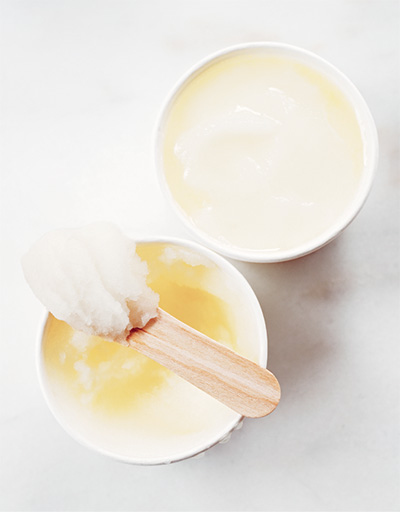
Frosty Sweet and Tart
lemon icey
serves 6
A favorite summertime classic found at summer camps, on street corners, and at Popsicle
stands. This frozen treat has a texture somewhere between an ice pop and sorbet, achieved
by pureeing the ice crystals after they’ve formed. It’s cool and bracingly refreshing.
1 cup sugar
1 cup water
1 cup fresh lemon juice (from 5 to 6 lemons)
1 cup ice-cold water
- To make the simple syrup, combine the sugar and water in a small saucepan and stir
over medium heat until the sugar dissolves. Remove from the heat.
- Combine the lemon juice and 1 cup of the simple syrup in an 8-inch square glass baking
dish. Transfer to the freezer and freeze, raking the mixture with a fork every 30
minutes, until flaky and frozen, about 3 hours.
- Transfer the frozen mixture to a blender and puree with the ice-cold water. Divide
among six 4-ounce ramekins or disposable paper cups and freeze until firm, at least
4 hours or up to 2 days.
- Remove from the freezer 15 to 20 minutes before serving.
Kid in Us
strawberry lemonade popsicles
makes 16 ice pops
I was never in a park playground with the kids when they didn’t beg for pops when
the ice cream truck came around. Made with real fruit and no food coloring, these
are a much healthier version. Swap out other berries or peaches for a change of flavor
and color.
1 pound strawberries, washed and hulled
¼ cup sugar
2 cups lemonade
16 ice-pop molds
- Combine the strawberries, sugar, and lemonade in a blender and blend on the lowest
setting just until combined, with small pieces of strawberries still visible, 5 to
10 seconds. Divide the mixture among the ice-pop molds and freeze.