Experienced Windows Server administrators and consultants might feel the urge to skip this chapter. You might be thinking that you don’t need to go through this material again. We urge you to think twice about that. We will be covering the fundamentals, but we will also be going through some details that you will probably not already know and that you will find useful.
Your first experience of Windows Server is probably going to be a manual installation of the operating system on a lab or virtual machine. Depending on the complexity of your environment and your upgrade/migration plans, you may decide to continue with manual installations or even consider automated installations. No matter what you choose, you’ll probably want to read this chapter to understand what the typical installation steps are.
In this chapter, we’ll cover a clean manual installation and a manual upgrade of Windows Server. From there we’ll delve into installation and upgrade strategies for Active Directory. If you are performing many installations of Windows Server, then you will like this next piece. We will discuss how you can save some time and keyboard wear and tear by automating your installations of Windows Server 2012 R2 using an unattended installation answer file that you will create using Windows System Image Manager.
In this chapter, you’ll learn to:
We think you’ll find installing Windows Server 2012 R2 much simpler than installing any previous version of Windows Server. If you have installed Windows 8 or Windows Server 2008, then you have a good idea of what to expect from Windows Server 2012 R2 installations. The installation routine really has been trimmed down to ask for just the basics to give you a secure installation that you can then customize.
Let’s look at that last sentence. It’s something we’ve heard before, but you might not have noticed much of a difference. You’ll see it straightaway with Windows Server 2012 R2. What does that mean? There is much less functionality installed. Microsoft has not made any assumptions about what you will need this server to do. A clean, default installation of Windows Server 2012 R2 can’t really do very much. It has no functionality installed. It’s actually up to you to decide what this server will do on your network and what functionality should be installed. The result of this is that the server has a much smaller attack surface. What does that mean? The more functionality you install on a computer, the more targets you present to attackers. The goal should be to install only the functionality you require, in other words, to reduce the number of targets or minimize your attack surface. Furthermore, on the security side, the operating system is locked down by default. The first thing it does when it initially boots up is request a new administrator password. You’ll also find that the Windows Firewall is on by default. This operating system pretty much isolates itself from the network until you configure it. Microsoft puts you in total control of how this new server interacts with your network and/or the Internet.
Does this sound like it is going to be a lot of work to get a server up and running? Maybe, but actually Microsoft has made it pretty easy. If you are doing a few manual installations or upgrades, then you can quickly configure your servers using Group Policy and Server Manager. We’ll talk about Server Manager later. If you’re deploying many servers, then you’ll want to look at automated solutions such as Windows Deployment Services or your favorite third-party solution. Again, you can use Group Policy to deploy policies and use the command-line version of Server Manager, called PowerShell, in a scripted manner to customize the roles and features of the server.
How are you going to deploy Windows Server 2012 R2? There are some complications here. Windows Server 2012 R2 is available with only 64-bit architectures. Microsoft is shifting all of its server products to be 64-bit only. This means you cannot upgrade from 32-bit installations of Windows Server 2008. You’ll have to do a clean install on new hardware and move any services or data. If you have 64-bit server deployments, then you can do an in-place upgrade. This can be a time-saver, but it’s not usually recommended. Microsoft pretty much urges you to do a clean install every time. However, if your server is running just Microsoft features, roles, and applications (all being 64-bit), then an in-place upgrade is possible. We’ve done this and had reliable servers afterward.
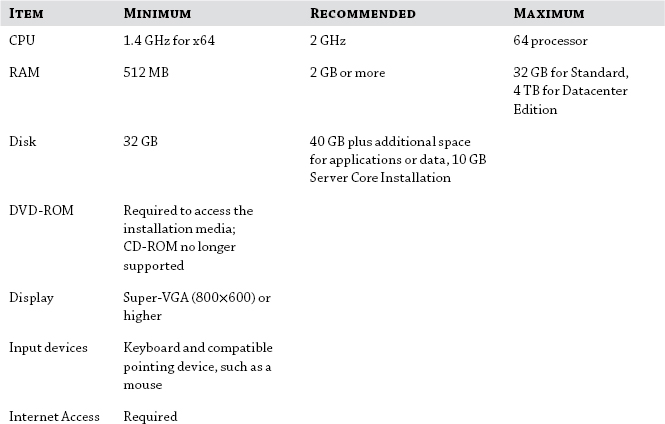
In previous versions of Windows Server, there would be different requirements for each edition of Server you wanted to install, that is, Enterprise versus Standard edition. In Windows Server 2012 R2, Enterprise edition is no longer available and the requirements have been scaled down to just one set for all editions.
As usual, you are given a set of minimum and recommended requirements with the operating system. Be aware that minimum means exactly that; the operating system will run, but it will not necessarily run very well. You should also take account of the applications that will be installed and the load that will be placed on your server.
This can vary wildly depending on applications and organizations, so there are no hard-and-fast rules on what your server specifications should be. The best thing to do to get accurate specifications is to develop a pilot environment and generate loads on your “proof-of-concept” servers while monitoring the performance and responsiveness of the servers and applications. However, if your server is going to have moderate loads in a small environment, then you’re probably going to be OK with the recommended specifications.
Table 2.1 describes the requirements from Microsoft for Windows Server 2012 R2.
Table 2.1: Windows Server 2012 R2 Requirements
Windows Server 2012 R2 is available only as a 64-bit product. We’ll reinforce that: there are no x86 or 32-bit versions of Windows Server 2012 R2.
Here are some notes on deploying x64 servers:
As with any project, preparation is the key to success. Review the hardware requirements, and check out application and service compatibility before moving forward with any deployment of Windows Server 2012 R2.

Your first installations of Windows Server 2012 R2 in your live or laboratory environment will probably be either a clean installation or an upgrade installation. There are some other, more advanced ways to install Windows:
We’re going to look at the clean installation and the upgrade installation processes now. We’ve already mentioned that the installation process is pretty simple.
The clean installation process is very simple in Windows Server 2012 R2. You’re pretty much only being asked to do the following:
There are some options during this flow:
In the next section, we’ll cover completing this flow for a clean installation and an upgrade installation. Then we’ll cover some of the options that are presented during the installation and follow that up with showing how to customize the installation of the operating system.
A clean installation refers to installing the operating system onto a computer that does not have an installation present or one that you want to keep. In our example, we are dealing with a computer that has no previous installation. We are assuming that you have not done any of this before, so we are going to get back to basics. More advanced readers might be tempted to skip ahead to another section, but we recommend that you at least skim this section to see what has changed.
Windows Server 2012 R2 comes on a DVD. It’s a pretty large installation. Ensure your server has a DVD-ROM drive, and then insert the DVD media. Alternatively, if you are using a virtual machine, you can redirect the virtual CD/DVD to the Windows Server DVD ISO image that you have downloaded from Microsoft or created from your original media.
Once the media is loaded, you should power up your server and ensure that your server boots from the DVD drive. Normally, a computer with a blank hard disk will boot from the DVD drive by default. If the computer fails to boot from the DVD, then there may be one of a few things going on. There may be a valid operating system on the hard disk that is booting up by default. You might have a boot menu available in your computer that is briefly made available during or after the Power-On Self Test (POST). Alternatively, your server might not get the option to boot from DVD because of a boot configuration. You can alter this by entering the BIOS and making a change there. These two options will vary depending on your hardware, so you should consult your hardware vendor’s documentation or contact their support desk. In most cases it will show something like “Boot Order.” We have also seen situations where we have burned the DVD from an ISO file but we used a write-speed that was too fast to ensure a good burn.
In the following examples, we’ll cover how to install Windows Server 2012 R2.
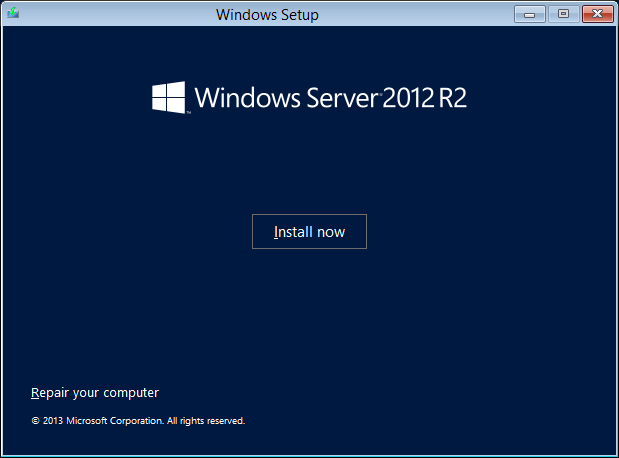
Figure 2.1 is the first screen you’ll see. It allows you to customize the installation language, time and currency format, and the keyboard settings of the server. You’ll need to change some settings here if the defaults do not match your language, region, and keyboard. For example, if you are in Ireland using an Irish-based keyboard, then these defaults won’t suit you at all! The time zone won’t work correctly, currency symbols will be wrong, and the keyboard layout will be totally wrong. For example, you will struggle to find the backslash (\), which is kind of important in the Windows world.
Figure 2.1 Setup environment to install Windows

The “Language to install” option will vary depending on the languages supported by your DVD. Most people reading this book will probably deal with English-based media, even those in non–English speaking nations. But you may be choosing Spanish, French, German, Chinese, and so on, depending on where you are and what your company standards are.
The “Time and currency format” setting affects how Windows presents and formats those regional-specific settings. You’ll probably always want to ensure that this matches the location where your server is located.
The “Keyboard or input method” setting should match the keyboard that is physically attached to the computer. Keyboards can often vary from country to country, so make sure that this is correct. Don’t worry; it won’t affect your ability to manage a server using Remote Desktop. An RDP session will use the keyboard settings of the client computer that connects to the server.
The screen shown in Figure 2.2 allows you to do a couple different things:
Figure 2.2 Install Windows now.
In this example, you’ll install Windows Server 2012 R2, so click the Install Now button.
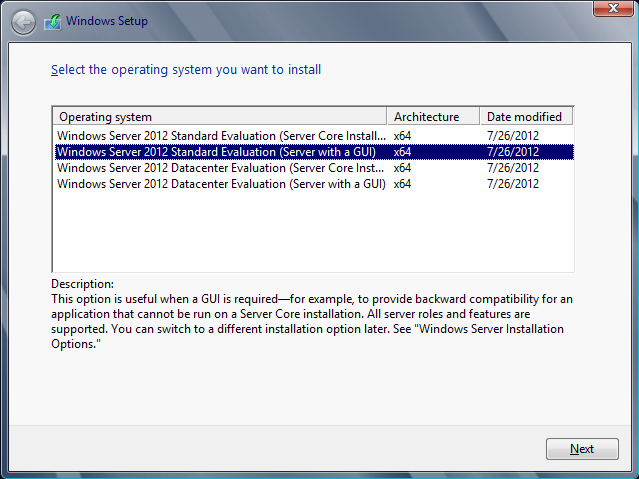
In this example, we’ll show how to set up a lab, so we want most of the functionality available in Windows Server 2012 R2. Select the Windows Server 2012 R2 Standard Evaluation (Server with a GUI) option (see Figure 2.3).
Figure 2.3 Choosing an edition and installation type
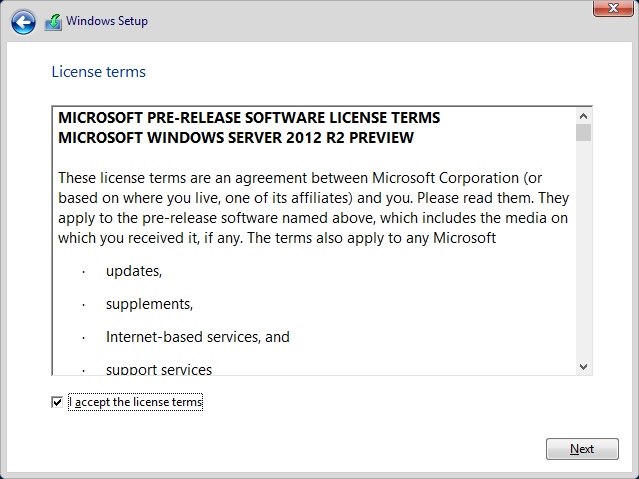
You now get the opportunity to read the legendary Microsoft end user license agreement (EULA), as shown in Figure 2.4. Most techies are going to just click “I accept the license terms” and click Next without ever reading it.
Figure 2.4 Agreeing to the EULA
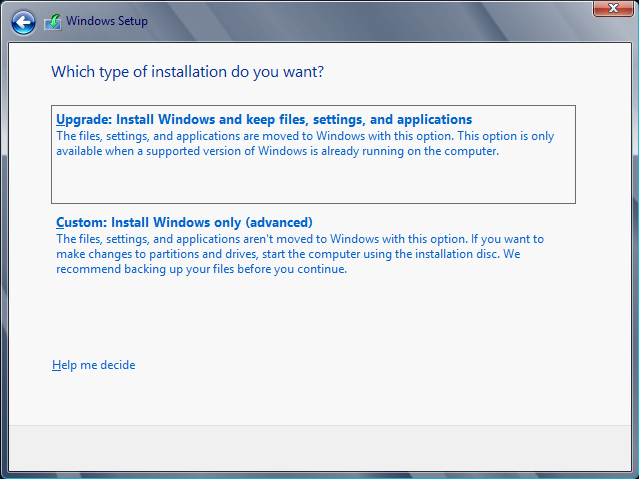
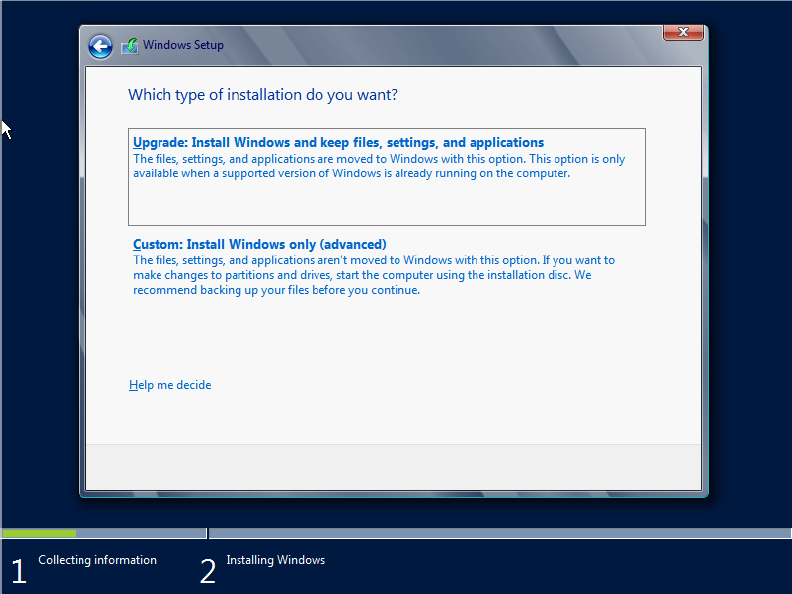
This screen in Figure 2.5 allows you to choose between a new or custom installation of Windows Server 2012 R2 and an in-place upgrade. You can choose to do an upgrade only when you have a previous version of Windows Server 2008 R2 to upgrade. Remember that you cannot upgrade from x86 to x64. You also cannot upgrade from a Server Core installation to a full installation, or vice versa. For this example, you’re doing a clean or new installation, so choose Custom. Click Custom to continue.
Figure 2.5 Upgrade or clean installation?
A few different things are going on in Figure 2.6. You’ll probably click Next if you’re dealing with a simple server where you want all the space in your first disk to be in your C drive. Clicking Next will cause Windows to create a volume called C that will consume the entire first disk in the server.
Figure 2.6 Setting up the drive to install Windows

However, what will you do if you want to partition that disk into different volumes? For example, you might want to create a volume to separate web content from the operating system for security reasons. To do this, you would click Drive Options. The screen shown in Figure 2.7 opens.
Figure 2.7 Drive options

On this screen, you can delete, create, and format volumes as you need them. You’ll find yourself coming in here when you don’t want to accept the default of using the entirety of your first disk (Disk 0) for the C drive. If you choose to add a new partition, simply click New and then select the size of the partition you need and select Apply.
But what if your installer fails to find any disks at all? You’ve double-checked your hardware and found nothing wrong. The cables are fine, and your BIOS can see all of your disks. Well, odds are the installer doesn’t have the required driver to access your storage controller. As time goes by, this will become more and more common as newer storage controllers are released into the market. You can add a driver by clicking Load Driver. The dialog box shown in Figure 2.8 opens.
Figure 2.8 Adding a mass storage controller driver
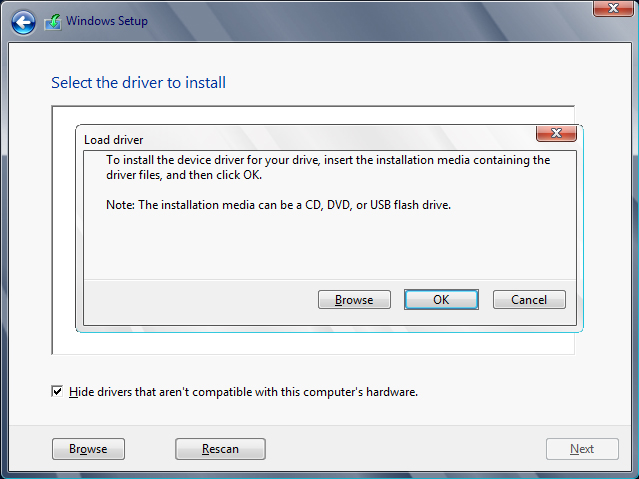
It used to be that the storage controller had to be present on a floppy drive. That would be a problem considering that servers usually don’t come with a floppy drive anymore and Microsoft really wants to kill off the need to use disks. This dialog box allows you to navigate to a floppy disk, CD, DVD, or even a USB flash drive to access the required storage driver. Make sure your driver media is inserted, wait a few moments, and then navigate to find it.
Return to the “Where do you want to install Windows?” screen, and then configure your disk before continuing.
You’re getting close to the end now. The dialog box in Figure 2.9 is where the installer actually installs Windows Server 2012 R2 for you. It takes a little while, depending on your install media and destination drive. You can probably get a coffee or answer some of those emails that never seem to stop arriving in your inbox.
Figure 2.9 Windows installation progress
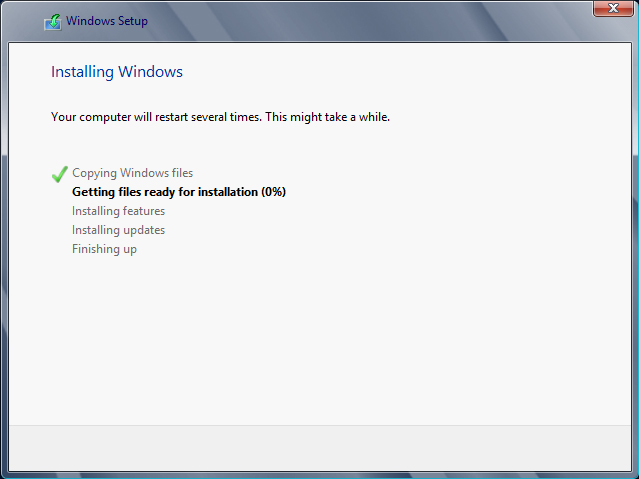
Figure 2.10 shows the first screen you’ll see when you come back from your break. Before you can log in, Windows Server 2012 R2 wants you to set the password of the local administrator account. A complex password is required, comprised of eight or more characters with a mix of uppercase and lowercase letters and numbers.
Figure 2.10 Setting the administrator password

Set your password to something strong. In fact, use a passphrase. We suggest you read, “The Great Debates: Pass Phrases vs. Passwords” at http://tinyurl.com/3hrbg.
Setting the new password will log you on as the local administrator.
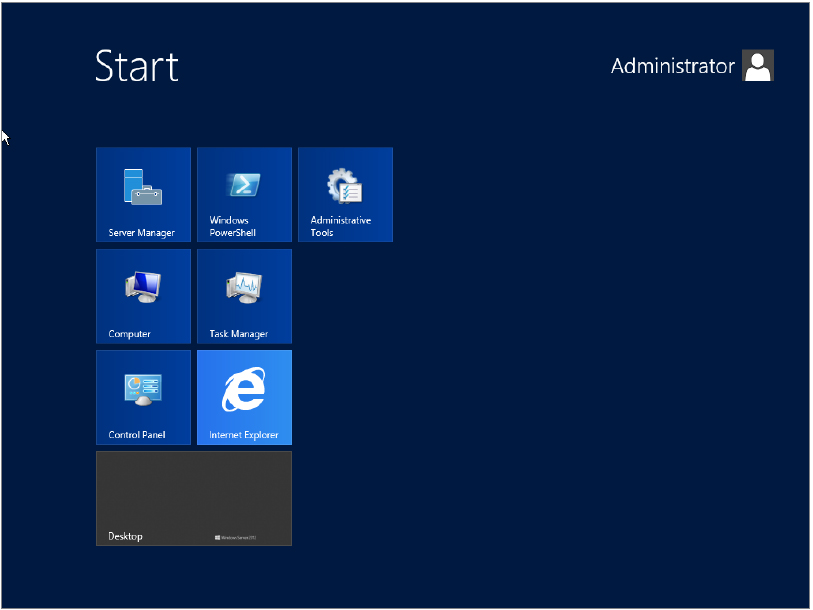
You are eventually logged in. Before I continue I want to point out in Figure 2.11, the return of the “START” button in the lower-left corner. I would have to make an assumption and say that this is back by popular demand! The first thing you’ll see, other than the start button I just pointed out, is the Server Manager dashboard so that you can customize your server. We will configure the server using both Server Manager and the command-line alternative, PowerShell, a little later in the chapter.
Figure 2.11 Logged in as administrator
So, that’s your first Windows Server 2012 R2 machine up and running. Congratulations! It doesn’t do very much, but it is a minor victory. Grab a celebratory drink of something, and then we’ll take a look at upgrading an existing installation of Windows Server to Windows Server 2012 R2.
Most organizations will have existing servers in production, and they will want to know how they can deploy Windows Server 2012 R2 onto those networks without needlessly rebuilding their servers or migrating applications to new hardware.
Although Microsoft says that you should try to avoid in-place upgrades, there just seem to be certain scenarios where it just makes sense:
We think it is realistic to expect that any move toward Windows Server 2012 R2 is likely going to include a mix of clean and upgrade installations. OK . . . the good news is that upgrade installations are supported, and they do work. It has been done before with production servers, but we believe in being selective about which servers to upgrade, wanting them to be without problems and completely supporting the new operating system. Table 2.2 shows the supported upgrade scenarios. Note that these are outline scenarios. Any upgrade that you are planning should be tested and cleared with vendors before you proceed.
Table 2.2: Windows Server 2012 R2 Supported Upgrade Scenarios
| Existing Operating System | Supported Upgrade |
| Windows Server 2008 Standard with SP2 or Windows Server 2008 Enterprise with SP2 | Windows 2012 R2 Standard or Datacenter |
| Windows Server 2008 Datacenter with SP2 | Windows Server 2012 R2 Datacenter |
| Windows Web Server 2008 | Windows Server 2012 R2 Standard |
| Windows Server 2008 R2 Standard with SP1 or Windows Server 2008 R2 Enterprise with SP1 | Windows Server 2012 R2 Standard or Datacenter |
| Windows Server 2008 R2 Datacenter with SP1 | Windows Server 2012 R2 Datacenter |
| Windows Web Server 2008 R2 | Windows Server 2012 R2 Standard |
| Windows Server 2012 Datacenter | Windows Server 2012 R2 Datacenter |
| Windows Server 2012 Standard | Windows Server 2012 R2 Standard or Windows Server 2012 R2 Datacenter |
There are various upgrade scenarios to consider when you think about the combinations of x86, x64, Server Core, and full installations.
Here are some things to note:
Getting from x86 servers to x64 servers is going to require some sort of migration. The likely process will involve introducing new hardware. This might be done as part of a scheduled recycling of all hardware that is no longer supported by the manufacturer. It could be part of a migration to a virtualized datacenter. Or it might be a rolling process, something we have seen done before because it minimizes hardware spending. Here’s an example:
Plenty of Windows 2000 machines are still knocking around. What are you going to do with them? To upgrade to Windows Server 2012 R2, you will first have to upgrade them to Windows Server 2003 and then 2008 R2. Realistically, that’s probably not going to happen in most situations. Windows 2000 had no x64 release for Intel and AMD chipsets. There was an Itanium release, but that’s not the same as x64. That means there is no in-place upgrade path from Windows 2000 to Windows Server 2012 R2.
Before you even look at doing an upgrade, you have a few chores to go through first:
We cannot recommend enough that you try this upgrade process in a virtual lab first. You can do this pretty cheaply using TechNet or demonstration licenses and with one of a myriad of free virtualization solutions you can try. If you are testing Windows Server 2012 R2, then you can use the following:
Note that you must use a virtualization technology, such as those just listed, that will support 64-bit virtual machines or guests when testing Windows Server 2012 R2.
All of the formalities are out of the way, so now let’s take a look at an upgrade in action. You cannot perform an in-place upgrade if you boot up your server from the DVD or USB device. This method allows only a clean installation. If you want to do an upgrade, then you will have to boot up your Windows Server and insert the DVD or USB or, in the case of a virtual machine, mount your Windows Server 2012 R2 media ISO image. This allows the upgrade program to download updates from Microsoft and to properly scan your server before any changes are made.
This is an existing Windows Server 2008 R2 x64 machine that we are planning to upgrade to Windows Server 2012 R2 (see Figure 2.12). We ran winver.exe to check the version and build of the installed operating system. The presence of a C:\Program Files (x86) folder means that the installed operating system is a 64-bit one. The process is similar to upgrading from Windows Server 2003 x86 to Windows Server 2008 x86. To get moving, log into the server you want to upgrade, and insert or mount your Windows Server 2012 R2 media.
Figure 2.12 Windows 2008 R2 is installed.

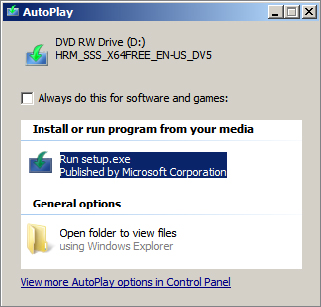
The dialog box in Figure 2.13 will appear automatically if you have AutoPlay enabled on your DVD drive. If it doesn’t appear, then run setup.exe from the root of your Windows Server 2012 R2 media.
Figure 2.13 setup.exe startup screen
You’ll notice that the upgrade process is almost identical to that of a clean install. It’s pretty light on the keyboard and mouse work that you have to do.
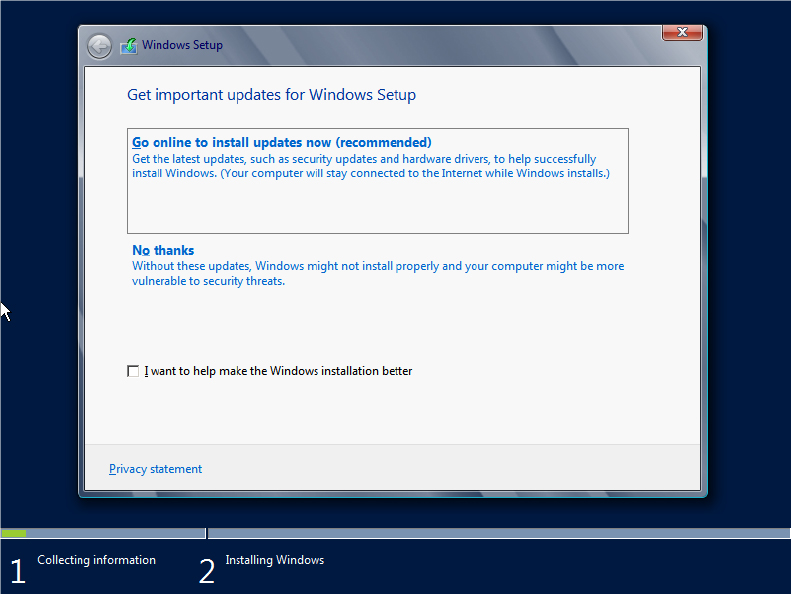
Click Install Now when you are ready to proceed with the upgrade as seen in Figure 2.14.
Figure 2.14 Getting updates for the setup
Setup will begin copying temporary files; this may take a few minutes as Windows Server 2012 R2 prepares to install.
The screen in Figure 2.14 allows you to download updates from Microsoft to improve the installation process. The process relies on the server and the currently logged-in user having access to the Internet. Microsoft gives four reasons to go through an installation update:
Our advice is that you should go through this process if your server is important to you. If you are just doing lab work, then you might not be concerned unless your installation fails, and an update can resolve the issue.
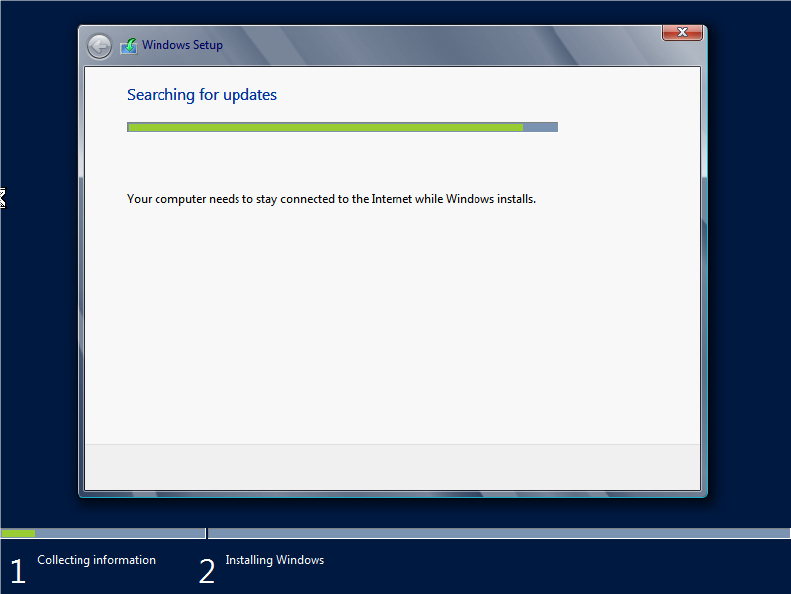
As you can see in Figure 2.15, we’ve chosen to go through the update, so the installer connects to Microsoft to download any available updates.
Figure 2.15 Updates are downloading.
We’ve already discussed the options here; they’re the same as in the clean installation process.
You have to choose the required installation, and you must also confirm that you have a license for it. Let’s do that now.
Hold on! Why are you seeing the screen in Figure 2.16? Aren’t you doing an upgrade? Well, you haven’t actually told the installer that yet. You could be installing a new operating system at this point. Make sure you pick a valid edition choice for your upgrade. Please refer to Table 2.2, which describes valid upgrade paths to Windows Server 2012 R2 if you are actually doing an upgrade.
Figure 2.16 Choosing an edition and installation type

You will have, of course, poured over the EULA and have completely understood it before accepting the licensing terms (see Figure 2.17). Seriously, you will not be able to install Windows Server 2012 R2 if you do not agree to Microsoft’s terms.
Figure 2.17 Accepting the EULA

The dialog box shown in Figure 2.18 presents you with the option to do either an upgrade or a custom or clean installation of Windows Server 2012 R2. If you have followed the instructions correctly so far, then both options will be available to you. However, if you selected an invalid edition of Windows Server 2012 R2 to install, then you will not be able to upgrade.
Figure 2.18 Choosing to perform an upgrade
In this example, we are upgrading from Windows 2008 R2 Standard edition to Windows 2012 R2 Standard edition with GUI, so click Upgrade.
The installer now scans the existing installation to see whether there are any known incompatibilities with Windows Server 2012 R2.
The installer will check to see whether the existing server is compatible. If it isn’t, then you will get a reason why in a compatibility report, such as an error when trying to upgrade an evaluation version of Windows Server 2008 R2, as shown in Figure 2.19, and you will have to start the upgrade from the beginning after resolving any issues.
Figure 2.19 The compatibility report

You have now arrived at the “last-chance gas station.” You had better pull in here and fill up before proceeding. The installer is now giving you your last opportunity to confirm that all the hardware, software, and drivers on the existing server installation will work when you have completed the upgrade. After clicking Next, there is no going back! But seriously, any known incompatibilities with Windows Server will be listed here.
If you get a warning that one of your drivers might not work after the upgrade, you can fix that after the upgrade is completed.
It is break time again! The installer now has enough information from you to proceed. It will perform the upgrade and reboot when required. Your next action will be to log into your shiny new Windows Server 2012 R2 server—assuming that all goes to plan. Don’t stray too far because you will need to log in to make sure everything is working correctly and to make any required configuration modifications.
The server will reboot several times; after a while, the server automatically will reboot into Windows Server 2012 R2 and wait for you to log in (see Figure 2.20). How long it takes to get here depends on your hardware. Your server might be quick or slow; for example, a computer with cheap and slow storage will obviously take longer to upgrade. That’s why you are warned that the upgrade may take several hours.
Figure 2.20 The upgrade is complete.
You may have noticed an “eye” shaped icon inside the password field in Figure 2.20. That is the password peekaboo feature allowing you to see the password you typed, this is actually a handy little feature in case you typed the wrong password. Go ahead and log in, and you will eventually see what your upgraded server looks like.
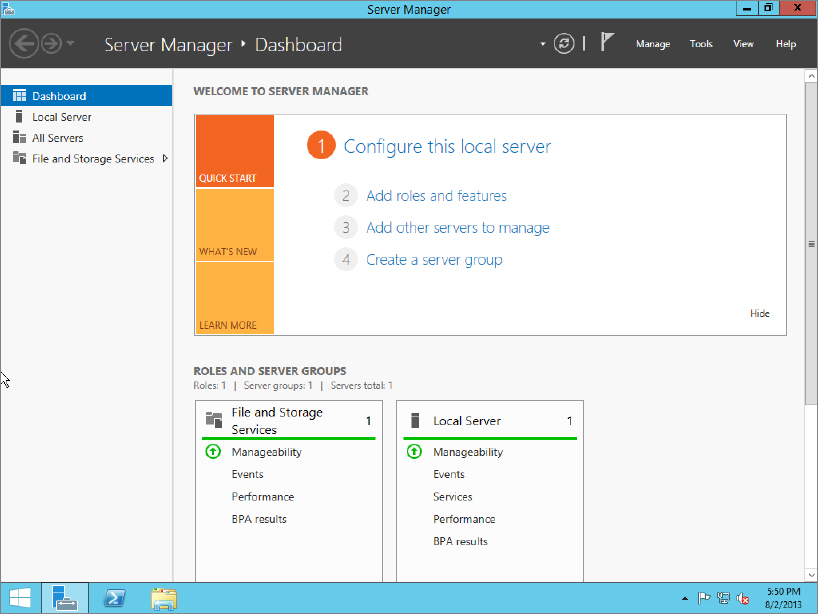
Instead of getting the Initial Configuration Tasks utility, you get to see Server Manager when you log in (see Figure 2.21). For now, don’t worry too much about Server Manager; you’ll take a much better look at it in a little while. That’s the first difference you’ll see between a clean installation and an upgrade. As you scroll through the details pane in the middle, you’ll see that your Windows Firewall status is inherited from the previous installation.
Figure 2.21 Server Manager

You can also see that some roles and features are installed. You may remember that we said that a Windows Server 2012 R2 installation has nothing installed by default. That’s true. But in this example we just upgraded a server. The server that we just upgraded had no additional components installed. But Windows Server 2012 R2 saw it very differently. It saw important functionality that it believed should be retained in case it is being used. You’ll later learn how to use Server Manager or PowerShell to add or remove roles and features.
You will probably want to ensure at this point that you complete the following:
That’s an upgrade completed. It wasn’t all that painful, was it? This would be an appropriate time for you to customize your server.
The Server Manager dashboard is the default screen you will see the first time you log in (see Figure 2.21). When you do a clean installation or upgrade of your server, this tool will allow you to quickly get some essential tasks done.
Before we go into detail let me just summarize what we will cover later in this chapter. Clicking Local Server opens the property settings window shown in Figure 2.22. We will be setting up our computer in the next section and will cover the following items:
Figure 2.22 Local Server Properties window

By default, Server Manager will continue to appear whenever you log into the servers that you performed a clean installation on.
You’ll now take a look at that tool and how you can manage your server with it.
For many years, Microsoft has been trying to get people to use a single tool for managing the configuration of servers. In the past, when we logged into the newest version of Windows Server, we were greeted by some tool that promised to do pretty much that. We looked at it briefly and saw a little check box that said something like “Do not display this again at logon,” selected that, and then closed the tool so it would never again see the light of day. The only other time we heard of that tool was while studying for some sort of Microsoft certification exam. We just knew better . . . why use that tool when we could get exactly what we wanted from Control Panel’s Add/Remove Programs in a much shorter time?
You probably noticed early on that Windows Server 2012 R2 is quite different from its predecessors. Before 2012 the default tool was the Initial Configuration Tasks utility. Now you are greeted by the Server Manager dashboard every time you log in. Trust us; you will want to use Server Manager (see Figure 2.21) instead of the old utility.
Now another tool pops up all by itself. Welcome to Server Manager. It’s in the superbar (or the taskbar) in Windows Server 2012 R2. You will find additional ways to access Server Manager by starting it from Administrative Tools, by running compmgmtlauncher.exe, or by using Programs and Features in Control Panel.
Server Manager is the tool that you will use to manage the configuration of your Windows Server 2012 R2 machines. Using it, you can add and remove native functionality, manage that functionality, and diagnose problems. You can also use a command-line alternative called PowerShell to manage the native functionality that is installed on Windows Server 2012 R2.
There are some differences between Server Manager in Windows Server 2008 and Windows Server 2012 R2:
This sounds like a lot of differences, but Server Manager is more alike than different on Windows Server 2008 and Windows Server 2012 R2.
When you have installed a new server, you need to go through some common tasks to get the server onto the network. We’ll now walk you through some samples using Server Manager.
You can see a link on the left of the dashboard called Local Server. If you click it, you will see a large Properties window with all the server properties listed (see Figure 2.22).
As you can see, next to each item listed is a text link. This text link opens up the properties window for that item. Let’s get started configuring your new server.
If you are using an OEM license, then it will be on a sticker that is affixed to the case of your computer. That license and product key are tied to that computer and can be used only with that computer. If you purchased a retail or individual copy of the license, then the key will likely be in the DVD container. If you have volume licensing from Microsoft, then you will obtain your single reusable license key either from a Microsoft licensing website or from your channel supplier or large account reseller (LAR).
Depending on your license agreement, you can activate each installation directly with Microsoft or via a locally hosted product activation service. Volume licensing and activation are pretty complex subjects, and they are subject to change over time. It’s best to go directly to the latest materials that Microsoft has. Currently that’s the Volume Activation Overview, which you can find at http://technet.microsoft.com/en-us/library/hh831612.aspx.
Next to Product ID is a linked product key. Click the link to open the Windows Activation screen. To complete the activation process, simply add your key into the text box shown in Figure 2.23, and click the Activate button.
Figure 2.23 Windows Activation screen

One of the first things you will commonly do with a server is to give it a static IPv4 network configuration. This is required in an IPv4 network so that the server can see other network devices and services.
As stated earlier, next to each listing is a link to change the setting. In this particular case you want to select the link next to Ethernet. Here you can see each of the network interface cards (NICs) on your server. Our server is pretty simple. It only has one network interface for us to configure (see Figure 2.24).
Figure 2.24 Network Connections

Your server may have two. You might want to look into binding those two NICs into one fault-tolerant and/or load-balancing virtual interface. Your hardware vendor probably supplies software and instructions for doing that.
Here’s a handy trick. You can run ncpa.cpl in PowerShell to quickly open the Network Connections properties sheet.
To configure your server’s NIC, right-click it, and choose Properties. That opens the dialog box shown in Figure 2.25.
Figure 2.25 Local area connection properties

Next select Internet Protocol Version 4 (TCP/IPv4), and click Properties. The dialog box shown in Figure 2.26 will open.
Figure 2.26 IPv4 properties

By default, a new Windows Server 2012 R2 server will not have a configured IP address. It will attempt to obtain a TCP/IPv4 configuration from a DHCP server. This is normally not desired for a production server, so you will want to change this to a static configuration (see Figure 2.27).
Figure 2.27 Configured IPv4 properties

Obtain a configuration for the new server from your network administrators, and then enter the details similar to how we have entered them in Figure 2.27. Click OK to save your settings, and close all the remaining dialog boxes.
There is a command-line way to do this too using the netsh command. You’ll need to find the name of your network interface, and you can use the ipconfig command to get it:
C:\>netsh interface ip set address name="Local Area Connection" static 192.168.1.49 255.255.255.0 192.168.1.1The syntax for the netsh command is as follows:
C:\>netsh interface ip set address name="<Name of the Network Interface" static <Desired IP Address> <Desire Subnet Mask> <Desired Default Gateway>That saves the address configuration of the server. You’ll also want to set the DNS server addresses. This first netsh command will set the primary DNS server:
C:\>netsh interface ip set dns "Local Area Connection" static 192.168.1.21

C:\>
The syntax is as follows:
netsh interface ip set dns "<Name of the Network Interface>" static <IP Address of the Primary DNS Server>If you have a secondary DNS server, then you should also configure it. The command is slightly different:
C:\>netsh interface ip add dns "Local Area Connection" 192.168.1.22

C:\>
Your new IPv4 configuration should now be applied. You might want to run the ipconfig command from command prompt to verify your work:
C:\>ipconfig
Windows IP Configuration

Ethernet adapter Local Area Connection:
   Connection-specific DNS Suffix  . :
   Link-local IPv6 Address . . . . . : fe80::5819:d35b:1b24:de7f%10
   IPv4 Address. . . . . . . . . . . : 192.168.1.49
   Subnet Mask . . . . . . . . . . . : 255.255.255.0
   Default Gateway . . . . . . . . . : 192.168.1.1

Tunnel adapter Local Area Connection* 8:
   Media State . . . . . . . . . . . : Media disconnected
   Connection-specific DNS Suffix  . :

Tunnel adapter Local Area Connection* 9:
   Connection-specific DNS Suffix  . :
   IPv6 Address. . . . . . . . . . . : 2001:0:4137:9e50:1817:3f21:3f57:fc97
   Link-local IPv6 Address . . . . . : fe80::1817:3f21:3f57:fc97%12
   Default Gateway . . . . . . . . . : ::

C:\>
You can see that the adapter with the name Local Area Connection now has the new IPv4 configuration. Note that you can get lots more information by running ipconfig /all.
The next step is to test connectivity. You can do this from the command prompt by using the ping command to send a test packet to a network device or a server:
C:\>ping 192.168.1.1

Pinging 192.168.1.1 with 32 bytes of data:
Reply from 192.168.1.1: bytes=32 time=13ms TTL=128
Reply from 192.168.1.1: bytes=32 time<1ms TTL=128
Reply from 192.168.1.1: bytes=32 time<1ms TTL=128
Reply from 192.168.1.1: bytes=32 time<1ms TTL=128

Ping statistics for 192.168.1.1:
    Packets: Sent = 4, Received = 4, Lost = 0 (0% loss),
Approximate round trip times in milli-seconds:
    Minimum = 0ms, Maximum = 13ms, Average = 3ms

C:\>
In our example, we tested using the default gateway that was defined in our IPv4 network configuration. That’s normally a good first step. You can see that we got a response for every test packet that was sent. If you get no responses, then there is a problem with the hardware, drivers, network configuration, cables, or maybe even the network itself.
If you have devices beyond the local gateway, then you should try to ping one of them, assuming that your network administrators allow for such ICMP traffic. This test will confirm that your server can route to remote network nodes.
Every Windows computer should have a unique computer name to uniquely identify it on the network. Every organization has its own practice. Some have tightly structured names that describe the location and function, some use nondescriptive names with incremental numbers, and some use names of characters from their favorite TV show or players from a team that they support.
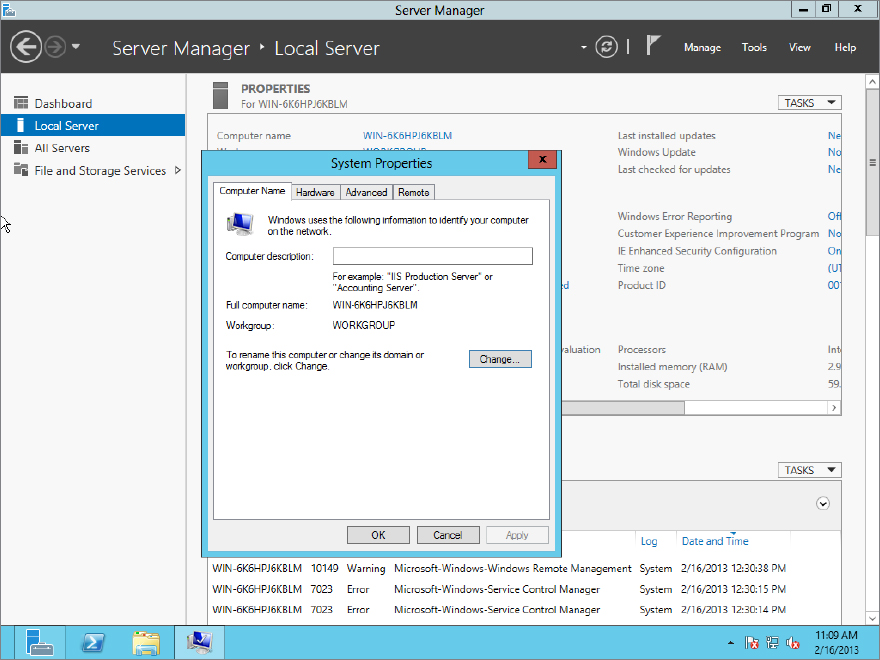
Click the link next to Computer Name, which you can find in the details pane of Server Manager, as shown in Figure 2.28, to control the name of this server and the domain or workgroup membership of this server. You should name this server according to the naming standards of the organization. You should click Change to do this in the dialog box shown in Figure 2.29.
Figure 2.28 Local server properties
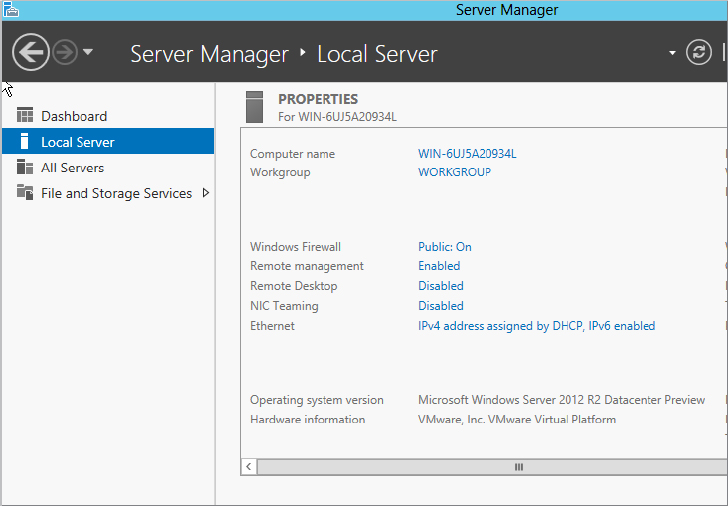
Figure 2.29 Computer name
This was a clean installation of Windows. You may remember that the install routine didn’t ask you for a computer name. Instead, the server was given a randomly generated name. Some security experts like this, but we like to be able to keep track of our servers, so we try to give them structured names.
To do this, you should change the name under “Computer name,” and click OK (see Figure 2.30). Make sure that the name is unique on the network; otherwise, you will encounter problems.
Figure 2.30 Configure the computer name.
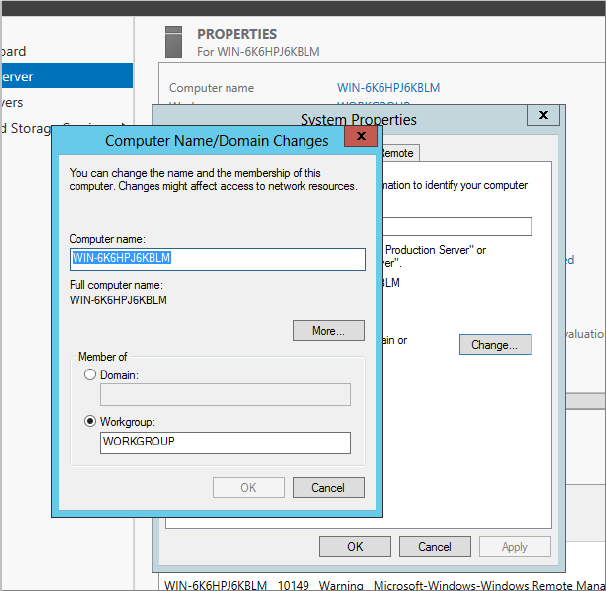
You’re now told that you need to reboot in order for this change to be applied (see Figure 2.31). Close down the remaining dialog boxes, and reboot the server when you are prompted to do so. The server will assume the new computer name that you have assigned once the reboot is completed.
Figure 2.31 Restarting after the computer name change

You can alternatively accomplish the previous renaming procedure by running the netdom command from the command prompt:
C:\>netdom /renamecomputer WIN-DCL9MRNLVOH /newname:BIGFIRMAPPSVR1
This operation will rename the computer WIN-DCL9MRNLVOH
to BIGFIRMAPPSVR1.

Certain services, such as the Certificate Authority, rely on a fixed machine
name. If any services of this type are running on WIN-DCL9MRNLVOH,
then a computer name change would have an adverse impact.

Do you want to proceed (Y or N)?
y
The computer needs to be restarted in order to complete the operation.

The command completed successfully.
C:\>
The syntax for the command is as follows:
netdom /renamecomputer <Current Computer Name> /newname:<Desired Computer Name>You will need to manually reboot the server after running this netdom command.
After the reboot, log in again, and fire up Server Manager. You’ll see that your new computer name is present in Computer Information.
Odds are you will want to join the server to a domain so that it can use shared resources and be centrally managed. Return to the Computer name properties.
We are joining this server to a domain that has the DNS name of BigFirm.com (see Figure 2.32). Once you’ve entered that name, click OK. You will then be asked to enter the username and password of a user who has permission to add this server to the domain. That might be bigfirm\administrator, or it might be bigfirm\jbloggs if the user jbloggs has been given those delegated rights in Active Directory. Close all the dialog boxes and reboot, and you’ll soon have a server that is a member of the domain and able to take advantage of Group Policy, Active Directory user accounts and security groups, centralized administration, and so on.
Figure 2.32 Domain membership change

Alternatively, you can also do the previous procedure from command line:
C:\>netdom join bigfirmappsvr1 /Domain: bigfirm.com /UserD:bigfirm\administrator /PasswordD:*
Type the password associated with the domain user:
The computer needs to be restarted in order to complete the operation:
The command completed successfully.
C:\>
The syntax for the command is as follows:
netdom join <name of computer joining domain> /Domain:<domain to be joined> /UserD:<name of domain user with permission to join the domain> /PasswordD:*After you run this command, you are prompted for the username of the user account. Once the join command is run, you are told that you need to reboot. You could initiate an automated reboot by adding the /REBoot flag, as shown here. You might prefer to control the timing of reboots as much as possible and instead initiate a manual reboot.
netdom join bigfirmappsvr1 /Domain: bigfirm.com /UserD:bigfirm\administrator /PasswordD:* /REBootMost Windows administrators want to be able to manage their servers from their desktops. Who really wants to go trotting off to the computer room every time you need to make some change on a server? You can do this by enabling Remote Desktop on your server. You can then use the Remote Desktop tool on your PC or laptop to connect to it over TCP 3389, in other words, the Remote Desktop Protocol (RDP). Your organization’s security policies will define when this remote administration can be enabled, if at all.
If you want to enable RDP access, inside the Local Server Properties window click the link next to Remote Desktop, which should currently be labeled Disabled.
You can see in Figure 2.33 that RDP is disabled by default.
Figure 2.33 Configuring Remote Desktop

There are two other options:
By default, only those people who are members of the local Administrators group on your server will be able to access it via RDP. That suits most scenarios. However, you might want to delegate certain low-level functions to non-administrators. If so, you will need to click Select Users and add the user account names or, preferably, the security group names of those to whom you are granting RDP connectivity rights.
At this point, your server is on the network, you have added it to a domain, and you have enabled Remote Desktop so that you can work on it from your desktop. It’s time to add some functionality to your Windows Server 2012 R2 machine.
So far, you have installed a new Windows Server 2012 R2 machine, and you have configured it so that it is on the network and can be managed remotely. You’re ideally sitting at your desk with a nice drink. You can complete the rest of the configuration in relative comfort. That sounds much better than standing in front of a tiny monitor in a noisy and cold server room.
Before you go forward with Server Manager, we’ll define some terminology that you’ve seen several times in this chapter already:
One important note that we should mention is that Features is now part of the Add Roles and Features Wizard. In Windows Server 2008 R2 it was a separate tool. This set is extensible. This means that other roles and features can be made available by Microsoft as time goes by.
A role can be described as a major function that a server can play in your network. When you install a role, you are installing a set of components to enable that functionality. There is a default set of components for each role that you can customize.
You’ll now learn how you can add a role using Server Manager and PowerShell. First, fire up Server Manager. You can see on the left side of the Server Manager dashboard the menu items Dashboard, Local Server, All Servers, and File and Storage Services. What you don’t see are any roles or features, not yet anyway. Under Welcome To Server Manager is the link “Add roles and features” (see Figure 2.34). Just click the link to launch the Add Roles and Features Wizard.
Figure 2.34 Roles in Server Manager

Lots of these new wizards have a welcome screen that describes the role of the wizard (see Figure 2.35). You can disable the welcome screen from popping up again by selecting the “Skip this page by default” check box.
Figure 2.35 “Before you begin” screen

On the next wizard screen (see Figure 2.36) you can select between “Role-based or feature-based installation” and “Remote Desktop Services installation”; this is all new in Windows Server 2012 R2.
Figure 2.36 “Select installation type” screen

On the “Select installation type” page, you have two choices. You may need a role-based installation if you want to install (all parts) roles or features on a single server. Or you may select “Remote Desktop Services installation” to install either a virtual machine-based desktop or a session-based desktop for Remote Desktop Services. The “Remote Desktop Services installation” option distributes (only logical parts of) the Remote Desktop Services role across different servers. We are going to use role-based for a single server.
When you select the role-based installation you arrive at the “Select destination server” screen (see Figure 2.37). This too is a new wizard screen in Windows Server 2012 R2.
Figure 2.37 Server Selection
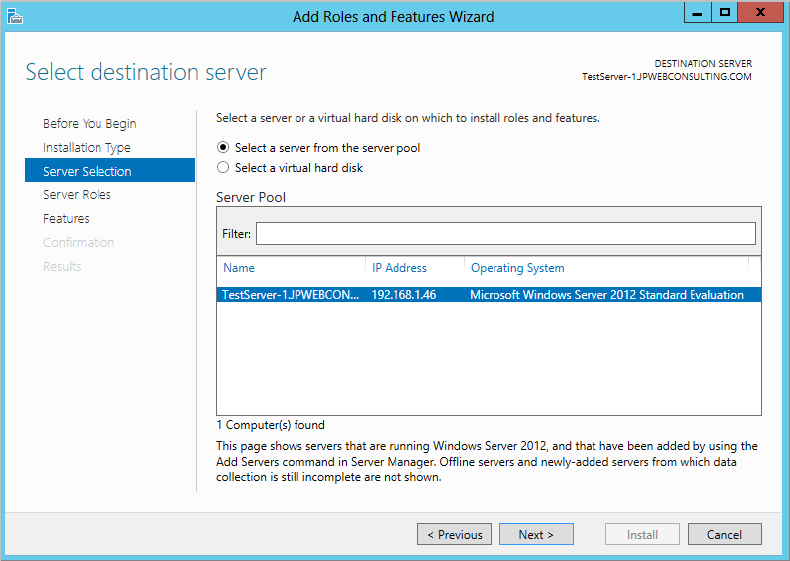
For now, click the top radio button to select a server from your server pool. Then, from the list of servers highlight the server you wish to use and click Next.
You’ll now see a listing of all the available roles that you can install (see Figure 2.38). Clicking each one gives you a brief description of that role. The new server we set up is going to be a web server, so select Web Server (IIS).
Figure 2.38 Selecting the server roles to install
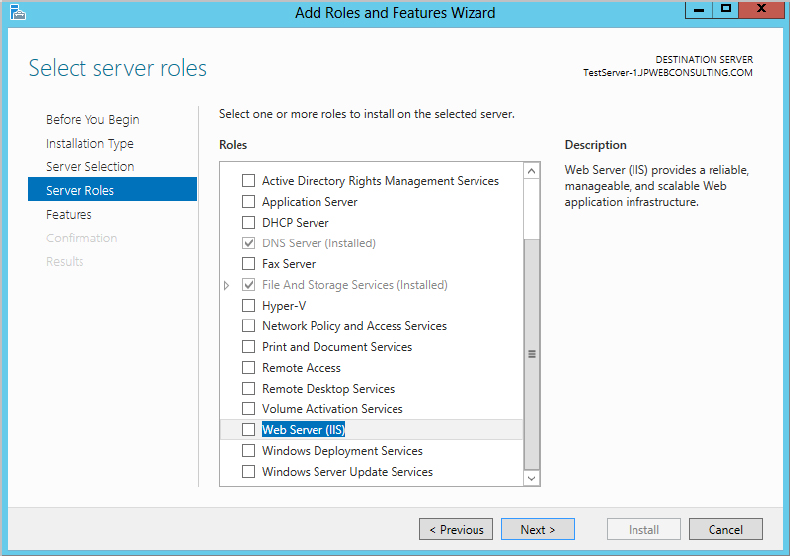
A pop-up screen appears when you select the Web Server role, informing you that additional management tools will need to be installed with your selection (see Figure 2.39). Click the Add Features button; then click Next on the “Select Server roles” screen.
Figure 2.39 IIS: Additional tools required

As you can see, the wizard dynamically changes with your selections. This is really handy because the wizard keeps an eye out for additional features that are needed for the server to do its job in that role.
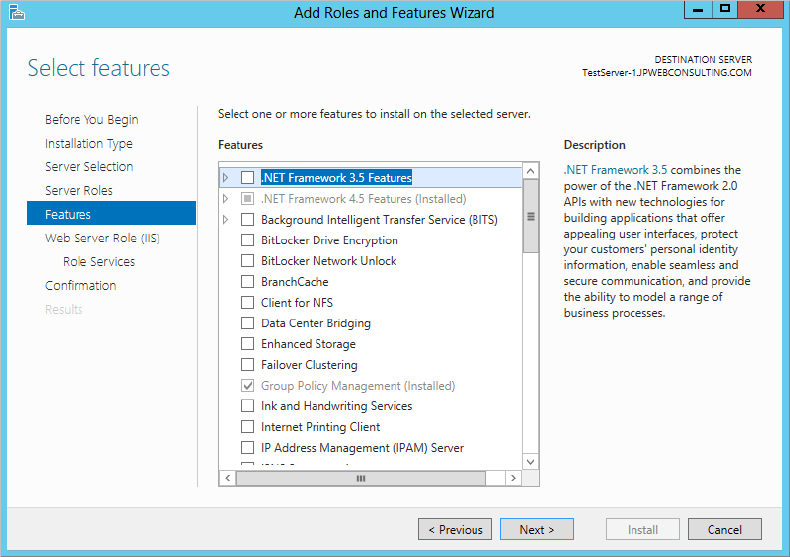
As shown in Figure 2.40, you now have a list of features you can install. Just like the roles, you can click each one to get a brief description of each feature. Click the Next button to continue the wizard.
Figure 2.40 Install features for IIS
You now get a summary of the role you’ve chosen to install, which is IIS in this example (see Figure 2.41).
Figure 2.41 Web Server Role summary

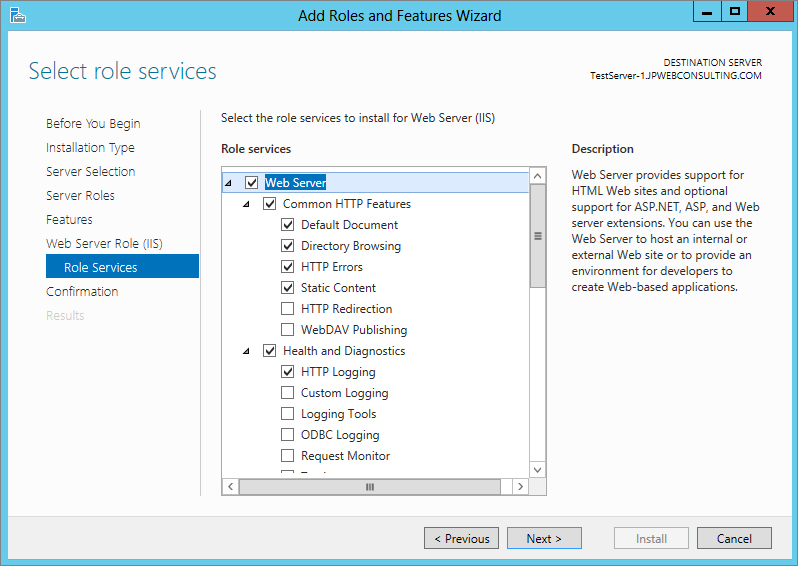
A role service is a subcomponent of a role. It is either the core component of the role or an optional component. Each role has one or a set of default role services. You can see in Figure 2.42 that the Web Server role has several additional services checked by default. Also shown are a number of optional role services that you can install if you require them.
Figure 2.42 Role Services
Microsoft has modeled all the available roles, role services, and features. It knows the relationships, the dependencies, and the conflicts. This is applied in Server Manager. For example, if a role requires a certain role service, then clearing that role service will result in clearing the role. It removes the guesswork for administrators, which is a good thing.
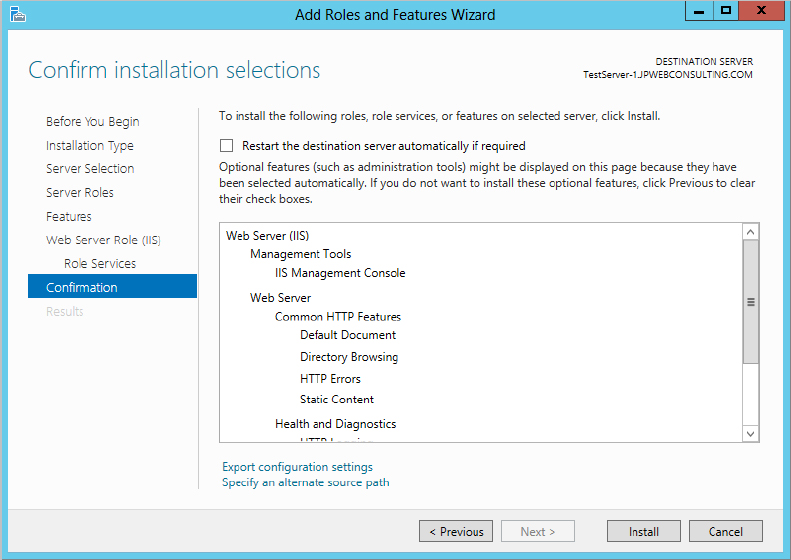
You get a confirmation screen where you can verify your new configuration before anything is installed (see Figure 2.43). Click Install to kick that off.
Figure 2.43 Confirming the installation
Some roles and role services can take a little time to install. You get a progress screen so you can track the progress.
The installation will eventually finish. You can see that our role installation succeeded. Since you have not configured automatic updating for patching this server yet, you may receive a warning depending on the role you install. You’ll probably see this while playing in a lab, so you can safely ignore it. It is a valid warning, though. You should configure your updates either manually or via Group Policy and then deploy them as soon as possible.
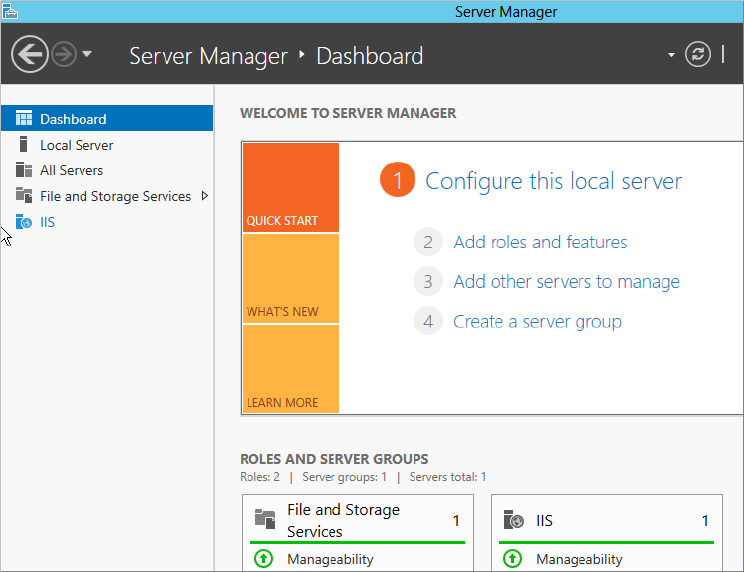
You can see that the left menu on Server Manager now lists the IIS Services role that you’ve just installed (see Figure 2.44).
Figure 2.44 Viewing the roles in the Server Manager dashboard
So, that’s how you can add a role and role services by using the GUI. You can also do this using the command prompt in PowerShell. This is where a lot of Windows administrators start skipping pages. Don’t do it! Trust us; you will want to know this stuff.
You can install roles and features using PowerShell. If you are managing Windows Server 2012 R2, then you’ll need to use PowerShell, Microsoft’s scripting and command language. The subject of PowerShell is pretty huge. We’ll just cover the relevant Server Manager–related cmdlets (pronounced “command-lets”) here.
At first, PowerShell might seem a bit clunky to use. But you will find that after a little while it is quicker to use than the GUI. Not only that, but you can also use it in a scripted form for customizing servers. That’s very handy if you use a cloning or unattended mechanism for installing Windows or even if you are building loads of servers by hand. You just deploy one image and run the appropriate script or unattended answer file to customize that generic image to be the server you require.
You can launch PowerShell from the superbar, or a really cool way to open it is by pressing the start button and then right-clicking the large PowerShell button-box. You will see a new menu bar appear at the bottom. Make sure you launch it with administrative rights. The PowerShell modules related to Server Manager are not loaded by default. Run this command to load them:
PS C:\Users\Administrator> import-module ServermanagerYou can run the command with the Get-WindowsFeature cmdlet to report on what roles, role services, and features are installed:
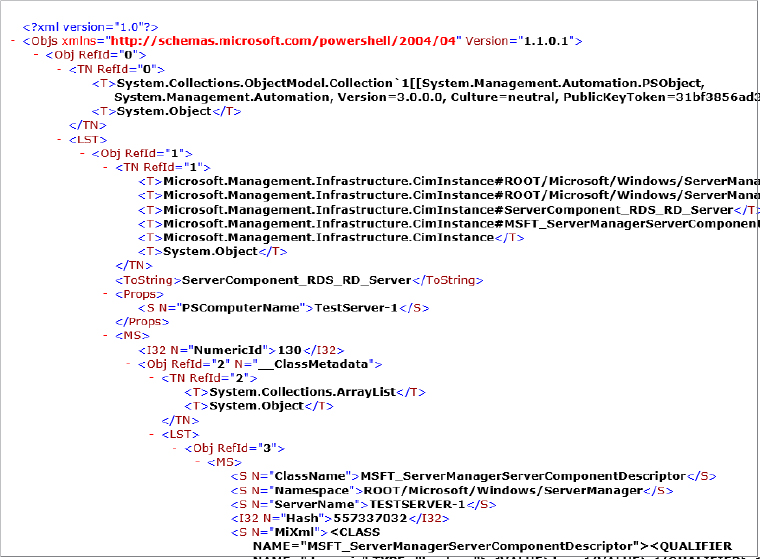
PS C:\Users\Administrator>Get-WindowsFeatureThe generated report is pretty long, so you’ll have to forgive us for not including the entire thing (see Figure 2.45)! We have rain forests to think about, so we’ve only included snippets of the query results.
Figure 2.45 PowerShell Get-WindowsFeature

None of the roles, role services, or features have an X next to them. That X designates that the role, role feature, or feature is installed as is with our IIS since we already added that one. Hence, we are working with a fairly blank server. You will see in Figure 2.46 that our Web Server IIS is installed.
Figure 2.46 Checking our installed role

For this example, you want to install an FTP server, which as you can see at the bottom of Figure 2.45 is still available to be installed. Note in that figure that the role has a Name column. The FTP Service name listed is Web-Ftp-Server. We’ll use that designation with the Install-WindowsFeature cmdlet.
PS C:\Users\Administrator> Install-WindowsFeature –Name Web-Ftp-Server -Restart..

Success    RestartNeeded    Exit Code     Feature Result
---------  --------------   ---------     --------------
True       No               Success       {Web-Ftp-Server, Web-Ftp-Service}

PS C:\Users\Administrator>
That was pretty simple, eh? And it was much faster than using the GUI wizard. We knew what we wanted, and we could run it as fast as we could type it, which, depending on your typing skills, may not have been all that fast!
Some roles, role services, or features will require a reboot. You can have this be automatic by adding the -restart flag to the end of your command.
Let’s verify the installation. Run PowerShell again with the Get-WindowsFeature cmdlet to check the results, as shown in Figure 2.46:
PS C:\Users\Administrator> Get-WindowsFeatureThe roles and role services that you requested are designated with an X, which means that they are installed. You can also see that the required features for the FTP Service are also installed. You can ensure that the results are identical to those obtained using the GUI by launching Server Manager.
Anyone who was a little scared of command-line administration might now be getting a little intrigued.
If you want a text report on your server configuration, then you could run this next command. It will export the report to a file called c:\InstalledFeatures.txt:
PS C:\Users\Administrator> get-windowsfeature > C:\InstalledFeatures.txtA nice feature is that you can check out what would happen if you ran the command without actually running it. You can do that by adding the -whatif flag:
Add-WindowsFeature Name -whatifIf you’re going to add the File-Services role and the FS-Resource-Manager role service, for example, here’s what would happen if you ran that command:
PS C:\Users\Administrator> add-windowsfeature File-Services,FS-Resource-Manager -whatif
What if: Checking if running in 'WhatIf' Mode.
What if: Performing operation "Add-WindowsFeature" on Target "[File Services] File Server Resource Manager".
What if: Performing operation "Add-WindowsFeature" on Target "[File Services] File Server".
What if: This server may need to be restarted after the installation completes.

Success Restart Needed Exit Code Feature Result
------- -------------- --------- --------------
True    Maybe          Success   {}
Nothing has been changed on the server thanks to the -whatif flag. Notice that you might need to reboot? It is good to know that once this command executes, you’ll need to do a reboot. This will allow you to plan for the reboot and warn users of any services hosted by this machine.
Imagine that you were setting up many more roles, role services, and features. You could bundle everything into this one script and run it as required. With that command-line option in PowerShell, you could automatically reconfigure hundreds or thousands of servers using something like Microsoft System Center Configuration Manager. You should now understand the power of PowerShell. You could easily save hours of work on your server deployments or configuration projects.
Before you go too far into setting up a script installation, you need to first check to see if you are allowed to run scripts. Open PowerShell and run the following cmdlet:
PS C:\Users\Administrator> get-executionpolicy
Restricted
This command shows that scripts are disabled on our server. That’s the default in PowerShell. To run the script if scripts are disabled on your server, you’ll have to run this command:
PS C:\Users\Administrator> set-executionpolicy unrestricted

Execution Policy Change
The execution policy helps protect you from scripts that you do not trust. Changing the execution policy might expose
you to the security risks described in the about_Execution_Policies help topic. Do you want to change the execution
policy?
[Y] Yes  [N] No  [S] Suspend  [?] Help (default is "Y"): Y
You can verify the change by rerunning the Get-ExecutionPolicy command:
PS C:\Users\Administrator> get-executionpolicy
Unrestricted
Your server is now set up to allow scripts. For security reasons, I would suggest when you’ve finished installing your scripts that you change it back to Restricted.
Let’s look at using a script with PowerShell. You’ll find it handy when you want to add roles, role services, or features to multiple servers. You will need a configuration file to achieve this. Just to show you how to do this, we will use the Add Roles and Features Wizard and export the role installation to an XML file.
Since the previous pages explained how to add a role using the wizard, go ahead and add a Remote Desktop Services role, but stop when you get to the role confirmation page. On the confirmation page (the last screen in the wizard), there is a link at the bottom allowing you to export the configuration to a file (see Figure 2.47).
Figure 2.47 Exporting a role to a configuration XML file

Save the file as RemoteDesktopConfig.xml on your C drive root or any convenient location you choose. If you want to open it with Internet Explorer to see what it looks like, feel free. In Figure 2.48 is a partial screenshot of the file. You can go ahead and cancel the wizard now that you’ve saved the file. Do not hit the Install button!
Figure 2.48 XML configuration file
OK, you are ready to install the Remote Desktop Services role to multiple computers using a script file. Open PowerShell by right-clicking the PowerShell icon in the taskbar, and select Run as Administrator.
Inside PowerShell add the following function:
function Invoke-WindowsFeatureBatchDeployment {
    param (
        [parameter(mandatory)]
        [string[]] $ComputerNames,
        [parameter(mandatory)]
        [string] $ConfigurationFilePath
    )

    # Deploy the features on multiple computers simultaneously.
    $jobs = @()
    foreach($ComputerName in $ComputerNames) {
        $jobs += Start-Job -Command {
            Install-WindowsFeature -ConfigurationFilePath $using:ConfigurationFilePath -ComputerName $using:ComputerName -Restart
        }
    }

    Receive-Job -Job $jobs -Wait | Select-Object Success, RestartNeeded, ExitCode, FeatureResult
}
As you can see, this function is expecting a few parameters, a list of computer names that will receive the Remote Desktop role, and the file path of your script. So to invoke this function you will use the following code snippet to pass in the parameters you need.
# Sample Invocation
$ServerNames = 'TestServer_01', 'LabServer_02'
Invoke-WindowsFeatureBatchDeployment -ComputerNames $ServerNames -ConfigurationFilePath C:\RemoteDesktopConfig.xml
The following line from this snippet is the server names you will change to match yours. As you can see, my servers are TestServer_01 and LabServer_02 and are comma delimited. You can add as many servers as you wish to this line:
$ServerNames = 'TestServer_01', ' LabServer_02'The next line from this snippet you will edit is the path of your XML file. Just change it to the path you saved your file to:
-ConfigurationFilePath C:\RemoteDesktopConfig.xmlOnce you make your edits, hit Enter and you will see the install begin. It takes a little while to execute.
You can now verify the installation by running:
PS C:\Users\Administrator> Get-WindowsFeatureOnce again, any role, role service, or feature that is installed will be marked with an X. Take note of the Name column. You’ll be using that for future commands. If you already know what role or feature you’re interested in learning about, try running something like this:
PS C:\Users\Administrator> get-windowsfeature RSAT-RDS-Tools

Display Name                           Name            Install State
------------                          ------           -------------
[X] Remote Desktop Services Tools    RSAT-RDS-Tools   Installed
Removing roles, role services, and features with PowerShell is just as easy as it was to install them. The Remove-WindowsFeature cmdlet is similar to the Install-WindowsFeature cmdlet:
Remove-WindowsFeature <Role>,<RoleService>,<Feature> -restart -whatifHere’s the syntax:
This command will simulate removing the FTP server you installed earlier:
PS C:\Users\Administrator> remove-windowsfeature Web-Ftp-Server -whatif
What if: Continue with removal?
What if: Performing uninstallation for "[Web Server (IIS)] FTP Server".
What if: Performing uninstallation for "[Web Server (IIS)] FTP Service".
What if: The target server may need to be restarted after the removal completes.

Success Restart Needed Exit Code      Feature Result
------- -------------- ---------      --------------
True    Maybe          Success        {FTP Server, FTP Service}
Once you are happy that the command will run OK, you can remove the -whatif flag:
PS C:\Users\Administrator> remove-windowsfeature Web-Ftp-Server
Success Restart Needed Exit Code      Feature Result
------- -------------- ---------      --------------
True    Yes            SuccessRest... {FTP Server, FTP Service}
WARNING: You must restart this server to finish the removal process.
Success Restart Needed Exit Code Feature Result
You now need to reboot. You can automate the reboot with this line:
PS C:\Users\Administrator> remove-windowsfeature Web-Ftp-Server
 -restart
That completes the role removal. To install just features, repeat the role-installation process. When you get to the roles screen, click Next to skip adding any roles. You will then arrive at the features screen, where you can select any features you need. Just complete the process as you would with a role.
As an IT administrator, one of your jobs is to maintain the health of your servers. This includes monitoring all the roles and features of your network to make sure the servers are performing at their peak levels.
Server Manager can help you do this. For starters, the Server Manager dashboard is now color-coded. If a problem exists, it will appear in red. If you take a look at Figure 2.49, you will see we have three issues with BPA results in DNS. We should, as the awesome administrators that we are, start investigating these issues. We are going to click DNS in the left menu to see all the performance tools available to help us find the problem.
Figure 2.49 New color-coded warnings in Server Manager

Inside each role you can view the following information:
Figure 2.50 Servers dialog box
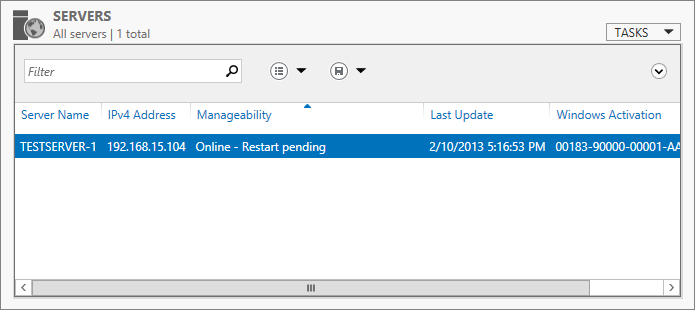
Figure 2.51 Adding columns of information

Figure 2.52 The Events window

Figure 2.53 The Services window

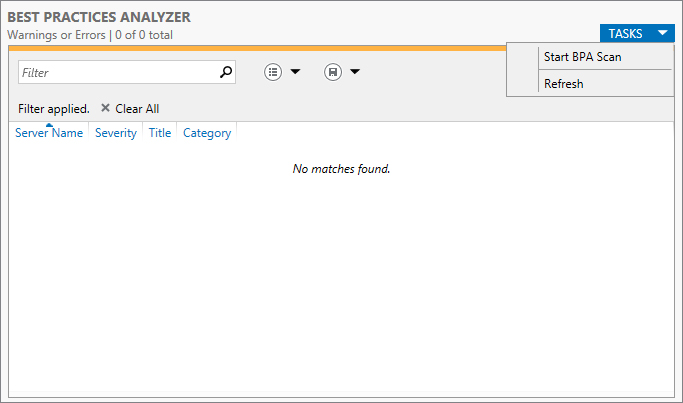
Running a scan is easy. Just click the Tasks button in the Best Practices Analyzer window of the role, as shown in Figure 2.54.
Figure 2.54 Running Best Practices Analyzer
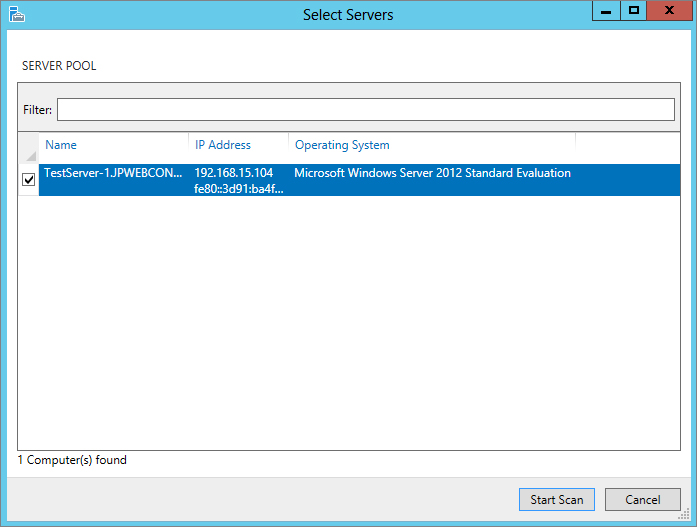
You now need to select a server to run the scan against (see Figure 2.55).
Figure 2.55 Selecting a server to scan
The scan will take a few minutes to run. Just like in the Event Viewer, you will get a list of errors and warnings, as shown in Figure 2.56.
Figure 2.56 Best Practices Analyzer results

You can click the warning or error and get a detailed description of the error. At the bottom of the description is also a link to more information about the issue.
Figure 2.57 Performance analyzer
Figure 2.58 Performance settings
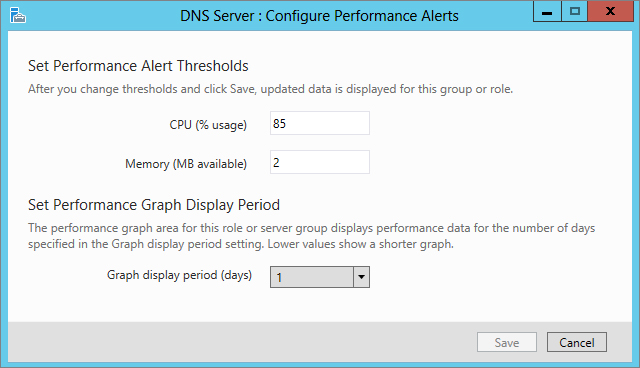
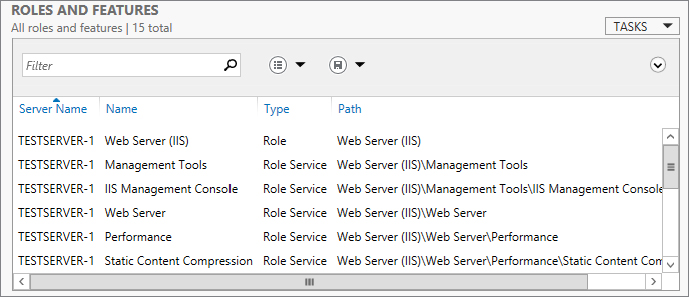
Figure 2.59 Roles And Features window
These tools help you manage and troubleshoot your installed roles and features without having to open up five different programs as you had to do in legacy servers.
You’ve learned that servermanagercmd is being deprecated by Microsoft, and you’ve learned how to install and remove roles and features using PowerShell and the Server Manager GUI. You have also seen how you can use Server Manager to diagnose roles and features including using the Best Practices Analyzer.
So it’s time we mentioned domain controllers and Active Directory—cue the Jaws-like dramatic music.
OK folks, some good news. We’re not going to cover this subject in detail yet. That will be covered in Chapter 7, “Active Directory in Windows Server 2012 R2,” but we wanted to mention it here for the readers who have worked with Active Directory (AD) in the past. If you haven’t, then don’t worry about it—feel free to skip the next couple of pages, and you’ll learn about AD in Chapter 7.
As usual, a new version of Server comes along, and you get new functionality and design opportunities in Active Directory. A lot of this new functionality will be pretty exciting to people because it appears to be based on customer feedback. Some of these new options will definitely answer some of those questions we frequently see on Internet support forums.
Active Directory Domain Services (AD DS) allows you to deploy domain controllers either locally or on your cloud. There are a host of administration tasks in deploying domain controllers that can be easily completed using AD DS. Let’s discuss some of the new features you may find useful.
Do you hear that? That’s the cheering of Active Directory administrators all around the world. Every domain administrator’s worst nightmare has been the deletion of objects. When Windows Server 2008 R2 added this feature, it became possible to recover objects if they were recently deleted without going through nasty backup and recovery processes. The Active Directory Recycle Bin allowed you to quickly recover accidentally deleted objects with a new simpler and supported process. The only problem was that it did not have a user-friendly user interface (UI). Windows Server 2012 R2 addresses this problem with a rich UI that simplifies object recovery. Recovery time is reduced since you have a consistent view of the deleted objects.
One of the most common questions since the initial release of Active Directory has been, “How can I have more than one password policy?” The official Microsoft answer was that you needed more than one domain to do this. Of course, this contradicts the basic design goal of trying to reduce the number of domains in networks. It also muddied the waters when it comes to no longer thinking of the domain as a security boundary—the domain is a policy boundary, and the forest is a security boundary.
The solution, without using third-party products that Microsoft might not support, was to create a domain for every password policy that you needed (which could create a lot of child domains) or to turn to a third-party solution that would allow you to have more than one password policy in a single domain.
The objective of fine-grained password policies is to associate stronger policies with user accounts of greater significance, in other words, where they have greater access to systems or to valuable data. What ended up happening, however, was that manually defined policy values did not behave as desired and became very time consuming. Windows Server 2012 R2 now allows you to manage policies using the Active Directory Administrative Center, which makes the management of password-settings objects easier.
Cloning, by definition, means “making an identical copy of.” So how is cloning used with AD DS? The short answer is you can now make an exact replica or clone an existing virtual domain controller in AD DS.
You can promote a single virtual domain controller by using the domain controller promotion interface in Server Manager and then rapidly deploy additional virtual domain controllers within the same domain, through cloning. First, create a copy of an existing virtual domain controller and authorize the original domain controller to be cloned in AD DS. Using PowerShell cmdlets you can create a configuration file with detailed promotion instructions such as name, IP address, and DNS servers. By cloning you can save time by eliminating repetitive tasks of deployment.
Many of the following areas were addressed with the intent of making the AD DS management experience easier:
If you have been following along in this chapter, then you are practically a PowerShell expert. PowerShell will be getting a lot of developer love in this release and future releases of Windows Server. This is because more and more administrators are learning and using PowerShell.
At some point you’re going to realize that performance, security, and deployment speed are the way to manage instead of a fancy graphical UI (and the overhead that goes with it). Remember DOS? Well, think of PowerShell as DOS on steroids! Once you start using it, you will start to see the benefits. Windows PowerShell History Viewer will help with the learning curve associated with PowerShell and will get even more administrators using it.
For example, using the Active Directory Administration Center you add a user. The UI displays the equivalent Windows PowerShell for Active Directory command. The admin can then copy the syntax that can later be used in scripts.
Let’s discuss the new and enhanced features that came out in this version in Active Directory Certificate Services (AD CS). First off, let’s just go over briefly what AD CS is. This very important security tool provides services for managing and dispensing public key certificates. This is primarily used on software security systems that use public key technologies. These services are customizable to enhance your security by binding the identity of a device, person, or service to a private key.
You can now install AD CS and its six associated roles using Server Manager. So just like we did earlier in the “Adding a Role Section,” you can easily add AD CS using the Add Roles and Features Wizard. It will then appear in the Server Manager dashboard like any other role. And just like any other role, you can manage it on multiple servers from one location.
AD CS role services can be deployed using PowerShell cmdlets just as we discussed earlier in this chapter about using PowerShell to add a role. Here are the new install and uninstall cmdlets with the AD CS and associated roles:
The role of Active Directory Rights Management Services (AD RMS) is to help you develop and maintain security solutions. Authentication, encryption, and certificates can all be maintained by AD RMS. Let’s take a look at what is new in AD RMS.
In previous releases of Windows Server you would need local administrator permissions to install AD RMS on any SQL Server machine if you planned on storing the AD RMS data. This was because you had to be able to read the SQL Server settings from the registry to do the install. The requirements for configuring SQL Server with AD RMS have changed. The installer account for AD RMS must have sysadmin permissions in the SQL Server installation.
You will also need to have the SQL Server browser running so AD RMS can see there is a SQL Server instance running.
Another fault AD RMS had in previous releases of Windows Server was that it only could be deployed at the same server it was to be installed on. With the vast improvements made to Server Manager and its integration with AD RMS, it now supports remote deployment at targeted server computers.
As described in the previous section on how to use Windows PowerShell commands to install roles, you can now install AD RMS the same way. In the following list we provide you with the new cmdlets to get the job done:
There are a few different scenarios for upgrading Active Directory. You cannot do a direct upgrade from 32-bit Windows 2008 to Windows Server 2012 R2. You can do an in-place upgrade from Windows 2008 R2 to Windows Server 2012 R2 because both versions are x64.
The following are some Active Directory upgrade scenarios from Windows 2008:
All of these strategies have a pair of steps in common. A tool called adprep is used to upgrade the forest schema, in other words, prepare the forest. This is done once by a user who is a member of Schema Admins, Enterprise Admins, and Domain Admins in the domain that contains the Schema Master forest-wide FSMO role. The same tool is also used to prepare any domain that will contain Windows 2008 domain controllers. This will be done by a user who is a domain administrator of that domain.
The side-by-side approach, of upgrading from Windows Server 2008 to Windows Server 2012 R2, requires one more step. It is necessary to apply permissions to Group Policy objects so that they can be managed by the Group Policy Management console.
Your final way to get to Windows Server 2012 R2 is a drastic one. You may find that your network is not in a healthy or known state. Sometimes it’s better to cut your losses and start again with a new Active Directory that is well planned, documented, controlled, and maintained. You can build a new forest/domain. You can then migrate users, data, and services to the new Active Directory. We’ve done that in the past when we joined a new company that was going through a spin-off closely followed by a series of mergers. It paid off with a much more stable and manageable working environment.
This all sounds very high level, and it is meant to be. It is just a taste of what you can expect in Chapter 7.
We bet you thought you were finally getting to the end of this chapter. Surely, there is no more we could discuss about installing Windows Server 2012 R2, right? Well, think again.
Smaller organizations will be happy with the manual approach for installing or upgrading Windows Server 2012 R2 that we discussed earlier in the chapter. However, you may want to invest some effort in alternative approaches. You could use a cloning solution such as Windows Deployment Services, as found in Windows Server since Service Pack 2 for Windows Server 2003, or the free Microsoft Deployment Toolkit 2012. Maybe you already use a third-party solution. There is another way that might be of interest for you that does not require a server to manage the process.
Unattended installations of Windows extend the installation media by customizing their installation. Part of the process is to answer those questions that you probably get sick of answering all the time. The idea is that you can start an installation and walk away knowing that you will not have to answer any questions. Your new server will install all by itself according to your predefined answers. The new installation routine for Windows 8 and Server 2012 R2 is quite small, but if you are building lots of machines, you will soon get tired of entering product keys, selecting OS editions, and so on. The other, more powerful part is the ability to tweak the installation in ways that are not revealed in the manual installation process. How would you like to install some components of the operating system that are not revealed in the GUI? This could simplify your post-installation customization and streamline your deployments.
All of this is possible by using an answer file that you supply to the installation routine. This approach might be familiar to engineers who have deployed older versions of Windows. In the past you might have used a tool called Setup Manager to create a simple text-based answer file, which you probably then had to customize a fair bit in Notepad.
The release of Windows Vista changed all that. With Vista came the release of the Windows Automated Installation Kit (WAIK), which has seen some updates including support for Windows Server 2008, Windows 7, and Windows Server 2008 R2. With the release of Windows Server 2012 R2, this kit’s name has changed to Windows Assessment and Deployment Kit (Windows ADK). ADK is a very powerful set of tools that include the ability to create a boot DVD. This boots up using Windows PE, a trimmed-down version of Windows that you can use for many tasks including OS deployment and troubleshooting. More important for this chapter, it includes Windows System Image Manager (WSIM). WSIM is the replacement for Setup Manager and is used to create answer files for Windows 8 and Windows Server 2012 R2.
The other big change you’ll see is the format of the answer files that you are going to use. It used to be pretty simple to edit text files. Heck, Setup Manager actually did little other than set up the skeleton of the answer file. You generally had to do a lot more work on the answer file in Notepad. WSIM creates XML files. Uh-oh! There’s that word: XML! Don’t let it scare you. It scares many administrators at first because they are far from being programmers. But the WSIM interface does pretty much everything you’ll need. You can still go in and edit the file by hand in Notepad or whatever your favorite XML editor is. The only time you might really do that is to jump in and change a product key.
We’ll now cover how to deploy Windows Server 2012 R2 in an unattended fashion. You’ll see how to install ADK, use WSIM to create an answer file, and then use that answer file to get a silent installation working.
Note that much, if not all, of what is covered in this section can also be used to deploy Windows 8.
The exercise that you are now going to go through will demonstrate how to deploy an edition of Windows Server 2012 R2 with very little human intervention. You need to deploy several Windows Server 2012 R2 Standard edition servers. It makes sense to automate those builds. You do this by using an answer file to answer the questions that you encountered during the manual installation of Windows Server 2012 R2. We’ll show how to create that answer file using Windows System Image Manager, and then we will go through the process of deploying Windows in an unattended fashion.
ADK is a free set of tools that you can download from Microsoft. We are hesitant to include a URL for a download here because Microsoft has updated its deployment kits a few times since the initial release. Your best bet is to visit www.microsoft.com/downloads and search for Windows ADK. This will ensure that you get the latest version of ADK.
You’ll be asked by the setup program whether you would like to set up on the computer you’re using or to download the setup program to be loaded on another machine. If you select to install on the computer you’re using to download the ADK, it will download and install it at the same time. For this reason, we suggest you download it to be installed on another computer, which does not do an install and only downloads the software. This way you have a complete copy of the software should you need to reinstall it.
The next thing you are going to need is an administrative workstation. An administrative workstation is a PC that you will use to prepare future builds. This might just be your PC, but that might not be a good location because you’re going to be messing around with ADK and WSIM once you start getting to know them; you’ll likely be making a mess of the administrative PC, so using your day-to-day machine might not be sensible!
Ensure you have lots of disk space to play with. You’ll soon see why. Our preference is to have either a dedicated machine or, even better, a virtual machine. The latter offers the benefit of being economical and having the ability to save and restore states. With virtual machines, you can also mount ISO files, which is of great benefit because you won’t waste time messing with utilities and blank disks. Speaking of virtual machines, you’re going to need something to test your new answer files with. Virtual machines are great for testing for the same reasons that we like them as administrative workstations.
You will have support if you are running Windows Vista or later. The .NET Framework 4.0 (it will install 4.0 for you) is the only prerequisite.
Using Windows Explorer, navigate to the directory where you downloaded your ADK software and run adksetup.exe.
The first screen will appear, asking for an install location (see Figure 2.60). After you enter a location or use the default, click the Next button to continue.
Figure 2.60 ADK setup splash screen
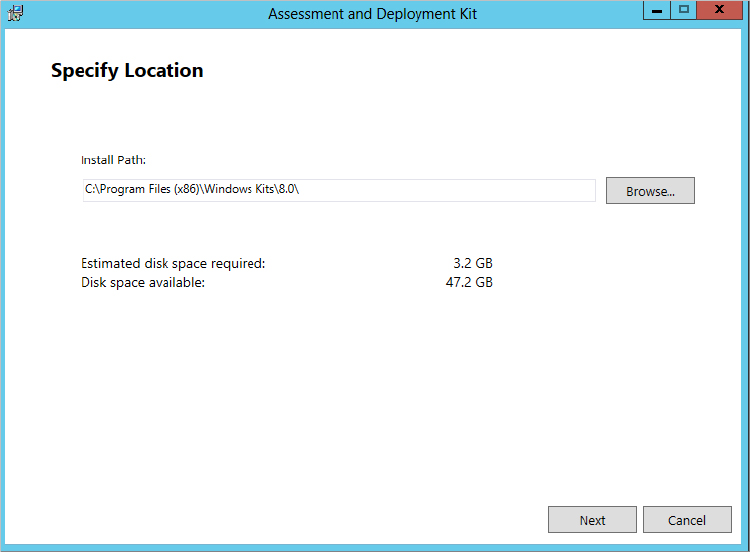
The next screen is the Microsoft Customer Experience Improvement Program (CEIP); see Figure 2.61.
Figure 2.61 ADK Customer Experience Improvement Program
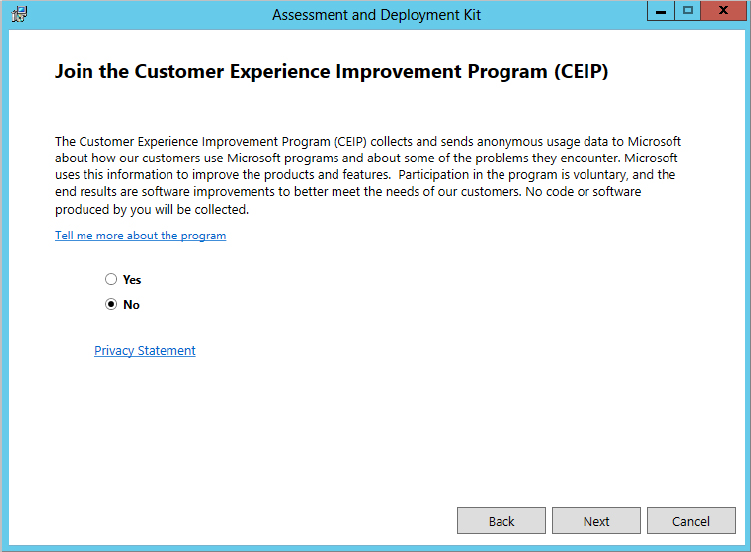
The next screen you see is the License Agreement. Select Accept to agree to the licensing terms that are set out by Microsoft for ADK (see Figure 2.62).
Figure 2.62 ADK EULA

You have arrived on the ADK select features screen. Let’s take a moment to discuss these features. You will notice in the list in Figure 2.67 that SQL Server Express is not shown. This is because I already have SQL Server on my computer. If you do not have SQL Server, then the SQL Server Express option will be in the list and is required for the Application Compatibility Toolkit (ACT).
Figure 2.63 ADK features
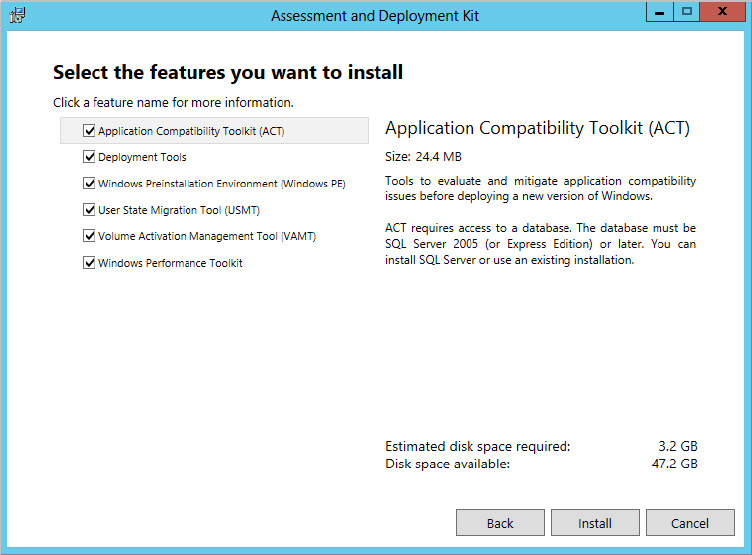
Click Install if you are ready to commit to the installation of ADK. It can take several minutes for ADK to install (see Figure 2.64). You now have yet another opportunity to respond to some emails.
Figure 2.64 ADK installation progress

Eventually ADK is installed (see Figure 2.65). You will notice a check box on this screen to launch the Getting Started Guide. This is an excellent guide to each of the tools in the ADK. We suggest you take a look at it.
Figure 2.65 Completed ADK installation

You can find the tools that you’re after by hitting the start button on your task bar (see Figure 2.66).
Figure 2.66 ADK on the Start menu

Before you actually create an answer file, you should understand a little of what it is and what’s going on behind the scenes.
You have been reading about it thus far, but what exactly is an answer file? An answer file is an XML file that answers installation questions for you during the installation process. If you have ever installed an operating system, then you know at some point you will need to set the time zone, for example. Instead of setting your time zone manually, you could specify the time zone in the answer file. Then where the installation would normally prompt you for the time zone, the answer file will answer this question for you. This may not mean that much to you if you’re installing just one or two computers, but when you have many computers to do, this process will really shine, and you will be glad you read this section.
When Windows 8 or Windows Server 2012 R2 is installing, the installation routine goes through some or all of seven configuration passes, described in Table 2.3. Each of these passes is responsible for carrying out certain tasks. You can think of them as stages. Some tasks can be performed in more than one of the passes. Typically only three of those passes actually need to be executed for Windows to install.
Table 2.3: The Configuration Passes
| Pass | Description |
| windowsPE | Boots up the Windows PE installation environment, configures the product key, and configures the installation disk. |
| offlineServicing | Applies updates to the Windows image, including packages, patches, and languages. |
| Specialize | Configures settings that might be unique to the system, such as network configuration, regional, and domain. |
| Generalize | Removes system-specific information. It is executed only when you run sysprep /generalize. |
| auditSystem | Processes unattended setup steps before a user logs on. This pass runs only if you boot into audit mode. |
| auditUser | Processes unattended setup steps after a user logs on. It runs only if you boot into audit mode. |
| oobeSystem | Applies settings before the Windows welcome screen can start, in other words, before you log on. |
You will see some of these passes when you create your answer file in WSIM. This will start to get a little clearer once you get into WSIM.
For this section you will need your Windows Server 2012 R2 DVD. Inside the \Sources folder on your installation media you will find a WIM file called install.wim. This file contains everything needed to install the new operating systems. The clever thing about this WIM file is that it contains everything required to install all editions of the operating system on the media. For example, Standard Full, Datacenter Full, Standard Core, and Datacenter Core are all on the Windows Server 2012 R2 DVD. This is because the WIM file uses single-instance storage; instead of having the same identical file six times, it stores it once and creates a reference point for each of the five subsequent copies.
WSIM is going to need a copy of that file on your administrative PC. WSIM uses this install image to know what tasks can be performed for the version and edition of Windows that you are working with. These will vary depending on whether you’re using Windows 8, Windows Server 2012 R2 Standard, Windows Server 2012 R2 Datacenter, and so on. Why put this on the hard disk and not use the one on your DVD? WSIM needs to create a catalog of the contents of the image file, and it uses the folder containing the image as a working folder. You cannot write to read-only media such as a DVD.
For this example, say you are working with the DVD for Windows Server 2012 R2. You have copied \sources\install.wim into C:\W2012\install.wim on your administrative PC.
Now launch WSIM and get this process rolling by selecting File  Select Windows Image.
Navigate to your install image (see Figure 2.67), which is C:\W2012\install.wim, and open it.
Figure 2.67 Adding a Windows image to WSIM
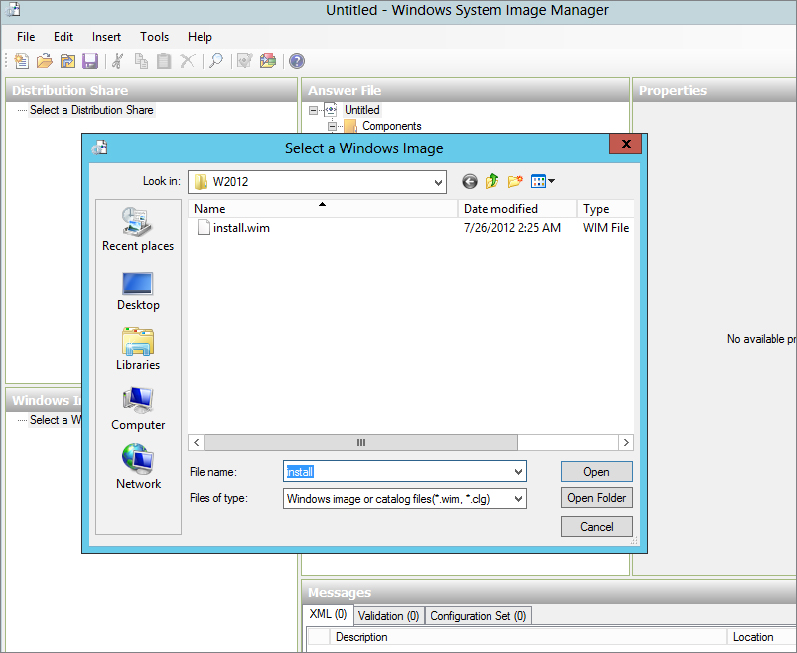
You can now see a little of the magic of the WIM file in action. The installation media has a number of different versions of Windows in it. Select the version of Windows that you want to install in an unattended fashion. We have selected the Standard edition of Windows Server 2012 R2 in Figure 2.68.
Figure 2.68 Selecting the Windows image

You are now warned that a catalog file of this image cannot be opened because it does not exist. You can either create a catalog file or cancel this process. Click Yes in the dialog box shown in Figure 2.69 to create a catalog file. Note that you must be a local administrator on an administrative PC.
Figure 2.69 Building a catalog file
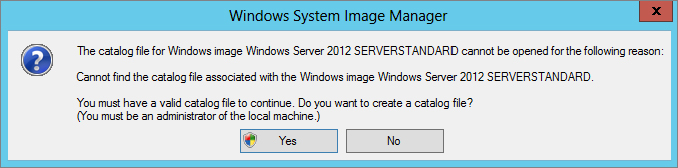
User Account Control (UAC) might trigger a request before proceeding depending on the security configuration of your administrative workstation. It takes a little while for a catalog file to be created (see Figure 2.70). We really hope you have a lot of email to respond to or like to drink lots of coffee. Operating system deployment has been sometimes correctly referred to as “progress bar engineering”!
Figure 2.70 Generating the catalog file
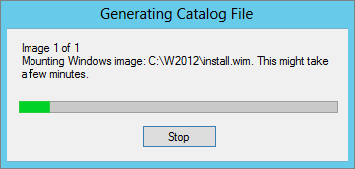
Eventually the catalog is created in C:\W2012 alongside the image file. You can see that the Windows Image pane in WSIM has been populated with Components and Packages (see Figure 2.71). You’re not going to be working with distribution shares, so you might as well expand the Windows Image pane to give it more space.
Figure 2.71 Added Windows image

You’re interested in working with Components here, so go ahead and expand that (see Figure 2.72). A component is a set of related settings that are used as building blocks for constructing an answer file. Each component answers a question or a set of questions during the installation. You can selectively choose components to create your desired unattended installation. The manual installation had only a few questions to answer; strangely, with an unattended installation, more answers are required to get the same results. If you take the time to navigate around the components, you’ll also notice that there are more options available. We highly recommend that you read the documentation that is installed as part of ADK. The Unattended Windows Setup Reference goes into great detail on what each of the components is responsible for.
Figure 2.72 Browsing the Windows image components

The next step is to create a new answer file within WSIM. Open the File menu, and click New Answer File. It will prompt you to save the answer file. Save it in the same directory, C:\W2012.
The Answer File pane is now populated (see Figure 2.73). Does what you see look familiar? It should. You can see each of the available configuration passes that are used for installing Windows underneath the Components object. You’ll add components to the necessary passes to build up the answer file now.
Figure 2.73 Starting a new answer file
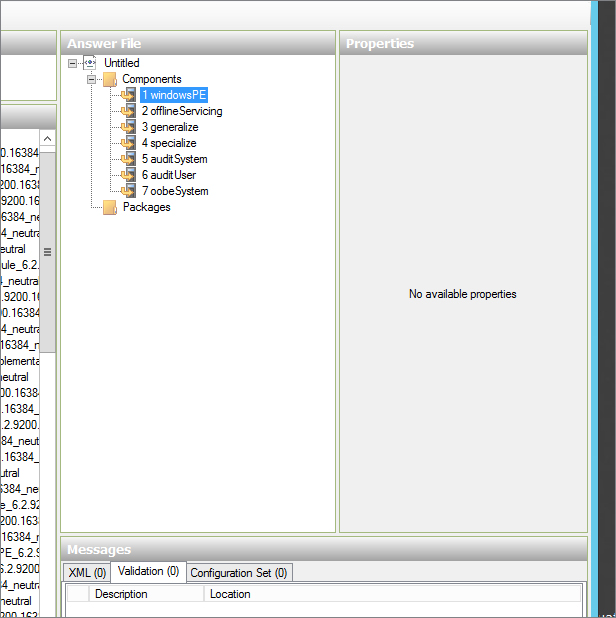
Under Components in the Windows Image pane, navigate to amd64_Microsoft-Windows-International-Core-WinPE (Figure 2.74).
Figure 2.74 Select component to add to the answer file
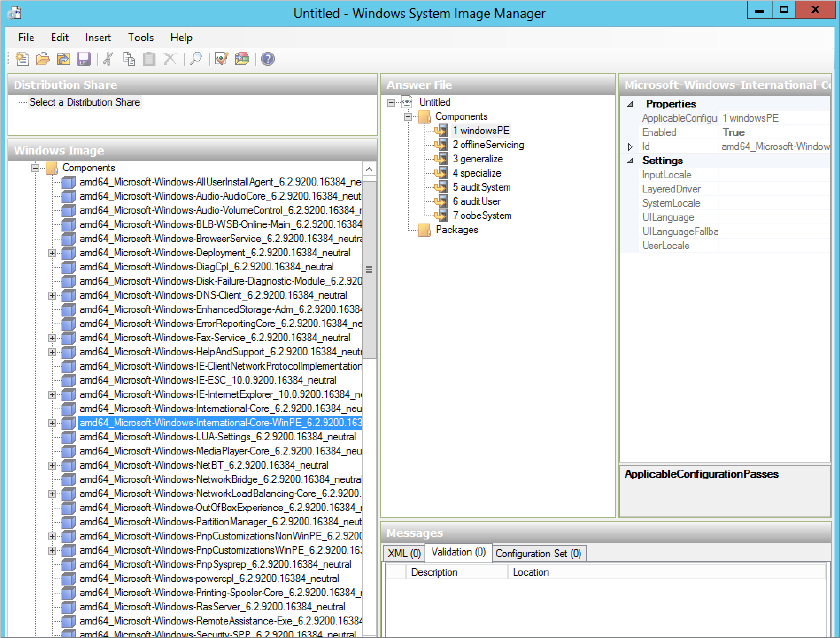
This component is responsible for configuring the Windows installation environment settings. You’ll remember how you had to configure language settings in the manual clean installation at the start of the chapter. This component will automate that step. Right-click the component, and select Add Setting to Pass1 windowsPE.
You can now see that this component has been added to the new answer file in the Answer File pane under pass 1 windowsPE (see Figure 2.75). You can also see that the properties of the component are now available to edit in the top-right details pane. Notice that this component can be expanded to reveal a child object. It also can have properties that can be edited. You select an edit box of a property value and press F1 on your keyboard to access the help on that property. As you progress, you will need to do that to find out what the property does and what its possible values are.
Figure 2.75 Configuring the answer file component

You can now edit the component. Add the following values:
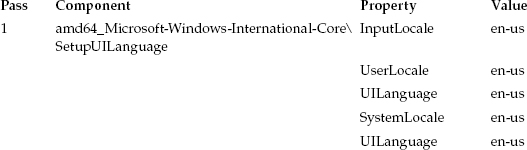
What you have done here is configured each of these settings to be US English (see Figure 2.75). Pressing F1 on any one of those properties will lead you to the help that gives the codes for alternative regional settings. Note that you have also edited the UILanguage property in the child component SetupUILanguage.
You’ll now add some more components and edit their properties. (We will continue to use the previous table format; make sure you add the components to the pass mentioned in the first column of each table.)

This Disk subcomponent that you are adding to the answer file in pass 1 tells the installer to manage Disk 0 in the server. Remember that in Microsoft-speak Disk 0 is the first disk in the computer. You have also told the installer to wipe this disk.
In the Answer File pane, you should expand the Disk subcomponent. You’ll see two subcomponents called CreatePartitions and ModifyPartitions. Right-click each of those two subcomponents, and select Insert New. This will allow you to create a volume on your newly wiped Disk 0 and then format it using the following subcomponent property settings:

Here you are instructing Windows Installer to create a partition and extend it, in other words, fill the entirety of Disk 0 with the new volume. Order instructs the installer to label the volume as 1 because you will refer to this label again in a moment.
You might not want to fill Disk 0 with one partition because it is signified by the setting Extend = True. You can instead set Size to whatever size in megabytes you want partition 1 to be, such as 40960 for a 40 GB volume. You should not set a value for size and set Extend = True because that would cause a conflict.
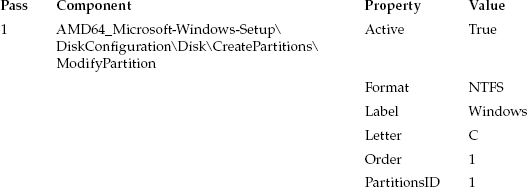
Here you can see where we refer to Order again. You’re instructing the installer to format the previously created volume for you. It is set up as partition 1 using PartitionsID. In Microsoft-speak, partition 1 is the first partition; there is no partition 0. You set the volume as Active because you want to be able to boot from it. You format it with NTFS, label the volume as Windows, and give it the letter C.
The next part is a bit tricky. We’ve found that using the help documentation that we have already referred to is useful. But you’ll also see how you will need another tool from ADK.
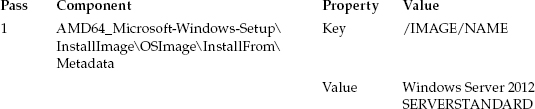
When we originally tried to install Windows Server 2012 R2 using an unattended approach, the install would always stop to ask us to choose between the available editions of Windows on the DVD. This was obviously not what we wanted; we wanted an unattended installation. A search through the help file in ADK found that this subcomponent could help us select the correct edition. Unfortunately, it did not tell us what we should put in the property values. What it did tell us was that the values we needed were contained within our install image, install.wim.
So, we opened the Deployment and Imaging Tools Environment (command prompt), which is part of ADK and can be accessed using the start button on our task bar. We then ran the following command:
IMAGEX /info C:\W2012\INSTALL.WIMThe IMAGEX command is an ADK utility that allows you to manage WIM files. The syntax for the previous command is as follows:
IMAGEX.EXE /info <Path to Desired WIM File>This produced a report on the contents of the Windows Server 2012 R2 x64 install image (see Figure 2.76).
Figure 2.76 Server name image snippet
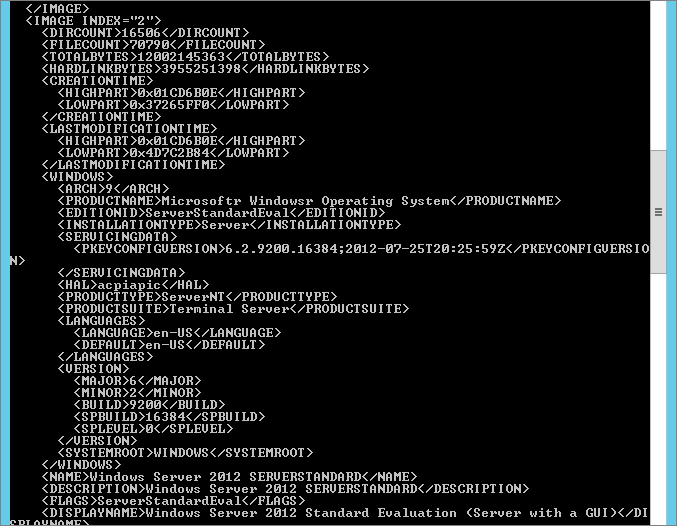
Here’s the snippet from Figure 2.76 that you need:
    <NAME>Windows Server 2012 SERVERSTANDARD</NAME>
    <DESCRIPTION> Windows Server 2012 SERVERSTANDARD</DESCRIPTION>
The Metadata subcomponent allows you to specify a key to search for in these results and then a value to match. In the previous snippet, you can see that there is a NAME key. It is under the path /IMAGE/PATH. The NAME key is used to uniquely identify each of the available editions of Windows contained within the install image. You can see the one you want for this example under IMAGE INDEX=“2”. That NAME key is set to Windows Server 2012 SERVERSTANDARD. Therefore, you set your Metadata component to search for and match a key called /IMAGE/NAME with a value of Windows Server 2012 SERVERSTANDARD. That image will be the one that the installer should install on the server. Phew! That’s the hardest thing you’ll do here; we promise.
The following tells the OS installer to install the selected image into the disk you previously selected and into the volume you have just created and formatted, in other words, the first partition on the first disk.

You use the UserData subcomponent to enter licensing information for this installation of Windows. You accept Microsoft’s licensing terms by setting AcceptEula to True. Enter the name of the company for FullName and Organization, which is a common practice to signify ownership of the license. And our product key, which is shown only for illustrative purposes, is entered into Key in the subcomponent:

Add the following component into pass 4, “4 specialize.” You use ComputerName, well, to set the name of the computer. That’s not very mysterious. Set it to *. This tells the OS installer to generate a random name. You could type in something there if you wanted. Use TimeZone to configure the system clock. In this example, we’ve set it to the USA Eastern Standard Time Zone. A list of available zones is available by pressing F1:

Add the following subcomponent to pass 7, “7 oobeSystem.” Configure the Windows Firewall using NetworkLocation. Setting it to Work configures the firewall to be enabled but loosened suitably for a typical corporate network. ProtectYourPC turns on automatic updates and configures it to install updates automatically.
This component shows you how you can add a little extra to your installation that is not otherwise available in a manual installation:

The last component you’ll set up is a good one to keep in mind for laboratory environments where you might be using MSDN or TechNet licensing. Those subscriptions give you a limited number of activations for every license key. Your typical lab machine has a very short life, so it is pointless to use up your valuable activations.
This component allows you to disable the default process of autoactivation of your installation:

Those are all the components you want to add. What you’re now going to do is validate the answer file. On the Tools menu, select Validate Answer File. This will go through the properties and the values that you have entered. Anything that is glaringly wrong will lead to an error in the Messages pane. Everything should be OK if you’ve entered the components and property values as illustrated so far (see Figure 2.77).
Figure 2.77 A validated answer file

You can save your answer file now. Click the File menu, and select Save Answer File As.
Save it as autounattend.xml in a location of your choice, such as C:\Answer\autounattend.xml (see Figure 2.78).
Figure 2.78 Saving the answer file

You might as well take a look at the XML file that you’ve created. Using Notepad, open your new answer file. You should have something like this:
<?xml version="1.0" encoding="utf-8"?>
<unattend xmlns="urn:schemas-microsoft-com:unattend">
    <settings pass="windowsPE">
        <component name="Microsoft-Windows-International-Core-WinPE" processorArchitecture="amd64" publicKeyToken="31bf3856ad364e35" language="neutral" versionScope="nonSxS" xmlns:wcm="http://schemas.microsoft.com/WMIConfig/2002/State" xmlns:xsi="http://www.w3.org/2001/XMLSchema-instance">
            <InputLocale>en-us</InputLocale>
            <UserLocale>en-us</UserLocale>
            <UILanguage>en-us</UILanguage>
            <SystemLocale>en-us</SystemLocale>
            <UILanguageFallback>en-us</UILanguageFallback>
        </component>
        <component name="Microsoft-Windows-Setup" processorArchitecture="amd64" publicKeyToken="31bf3856ad364e35" language="neutral" versionScope="nonSxS" xmlns:wcm="http://schemas.microsoft.com/WMIConfig/2002/State" xmlns:xsi="http://www.w3.org/2001/XMLSchema-instance">
            <DiskConfiguration>
                <Disk wcm:action="add">
                    <CreatePartitions>
                        <CreatePartition wcm:action="add">
                            <Extend>true</Extend>
                            <Order>1</Order>
                            <Type>Primary</Type>
                        </CreatePartition>
                    </CreatePartitions>
                    <ModifyPartitions>
                        <ModifyPartition wcm:action="add">
                            <Active>true</Active>
                            <Format>NTFS</Format>
                            <Label>Windows</Label>
                            <Letter>C</Letter>
                            <Order>1</Order>
                            <PartitionID>1</PartitionID>
                        </ModifyPartition>
                    </ModifyPartitions>
                    <DiskID>0</DiskID>
                    <WillWipeDisk>true</WillWipeDisk>
                </Disk>
            </DiskConfiguration>
            <ImageInstall>
                <OSImage>
                    <InstallFrom>
                        <MetaData wcm:action="add">
                            <Key>/IMAGE/NAME</Key>
                            <Value>Windows Server 2012 SERVERSTANDARD</Value>
                        </MetaData>
                    </InstallFrom>
                    <InstallTo>
                        <DiskID>0</DiskID>
                        <PartitionID>1</PartitionID>
                    </InstallTo>
                </OSImage>
            </ImageInstall>
            <UserData>
                <ProductKey>
                    <Key>HFG76-34GFT-O6ID9-MNBW4-IYUSD</Key>
                </ProductKey>
                <AcceptEula>true</AcceptEula>
                <FullName>BigFirm</FullName>
                <Organization>BigFirm</Organization>
            </UserData>
        </component>
    </settings>
    <settings pass="specialize">
        <component name="Microsoft-Windows-Shell-Setup" processorArchitecture="amd64" publicKeyToken="31bf3856ad364e35" language="neutral" versionScope="nonSxS" xmlns:wcm="http://schemas.microsoft.com/WMIConfig/2002/State" xmlns:xsi="http://www.w3.org/2001/XMLSchema-instance">
            <ComputerName>*</ComputerName>
            <TimeZone>Eastern Standard Time</TimeZone>
        </component>
    </settings>
    <settings pass="oobeSystem">
        <component name="Microsoft-Windows-Shell-Setup" processorArchitecture="amd64" publicKeyToken="31bf3856ad364e35" language="neutral" versionScope="nonSxS" xmlns:wcm="http://schemas.microsoft.com/WMIConfig/2002/State" xmlns:xsi="http://www.w3.org/2001/XMLSchema-instance">
            <OOBE>
                <HideEULAPage>true</HideEULAPage>
                <NetworkLocation>Work</NetworkLocation>
                <ProtectYourPC>1</ProtectYourPC>
            </OOBE>
        </component>
    </settings>
    <cpi:offlineImage cpi:source="wim:c:/w2012/install.wim#Windows Server 2012 SERVERSTANDARD" xmlns:cpi="urn:schemas-microsoft-com:cpi" />
</unattend>
You now have an answer file that is capable of answering all the questions that will be asked while installing Windows. All you need to do now is supply it to the OS installer.
This process is easy enough. You need to store the file autounattend.xml on the root of some form of removable storage. You will then boot up the new server using the correct Windows Server 2012 R2.
In our example, that will be the Windows Server 2012 R2 DVD. As soon as the server starts to boot from the DVD, you should also insert the removable storage that contains your answer file. The supported forms of removable storage are as follows:
Pick your choice of media that is suitable for the server that you are going to build, and copy the answer file onto the root of that storage device.
If you are using a virtual machine, then here’s a neat trick. Add a second virtual CD/DVD to the virtual machine where you intend to install Windows Server 2012 R2. Make sure your boot DVD has mounted the correct ISO for installing Windows. Create an ISO file that contains only your autounattend.xml file. You don’t have a tool for that? That’s OK, because there is one in ADK. Try running the following from your Deployment and Imaging Tools command prompt:
oscdimg -n C:\Answer C:\answer.iso
This will create an ISO file on C:\ called answer.iso using the contents of the folder C:\Answer. Please make sure you have not placed your autounattend.xml in C:\ and are trying to make an ISO file from your entire hard disk! It’s an easy trap to fall into. The syntax for the previous is as follows:
oscdimg -n <Folder to Use as a Source> <Location and Name of the New ISO Image>OK, let’s get rocking! Insert your Windows Server 2012 R2 DVD into your boot DVD drive on your server.
You should insert your answer file media as soon as the server has started to boot from the DVD. The first few times you do this you should watch what goes on to make sure the process runs cleanly. What should happen is that Windows Server 2012 R2 silently kicks off an installation, reboots, and waits for you to set the administrator password so you can log in. If the answer file has a mistake, then something else will happen such as the following:
You will need to revisit your answer file in WSIM if any of these happen.
If you have gotten everything right, then you now have an answer file that will completely automate your manual installations of Windows Server 2012 R2. You’ve also gotten a peek into some of the steps required for automated installations.
You are going to need a laboratory or test network to practice what you learn in this book.
To follow along with the examples, build two servers using the clean installation or unattended installation method. Our recommendation is that you use both methods for your first attempt to build this lab network. You can then use the unattended installation method for all future builds to speed things along.
Customize each of the two servers using the following settings:
Server 1
| Item | Configuration |
| Full Computer Name | bf1.bigfirm.com |
| IPv4 Configuration | Address: 192.168.1.51 |
| Subnet mask: 255.255.255.0 | |
| Default gateway: 192.168.1.1 | |
| DNS1: <blank> | |
| DNS2: <blank> |
Server 2
| Item | Configuration |
| Full Computer Name | bf2.bigfirm.com |
| IPv4 Configuration | Address: 192.168.1.52 |
| Subnet mask: 255.255.255.0 | |
| Default gateway: 192.168.1.1 | |
| DNS1: <blank> | |
| DNS2: <blank> |
At this point, you will be the proud owner of your very first Windows Server 2012 R2 server network.