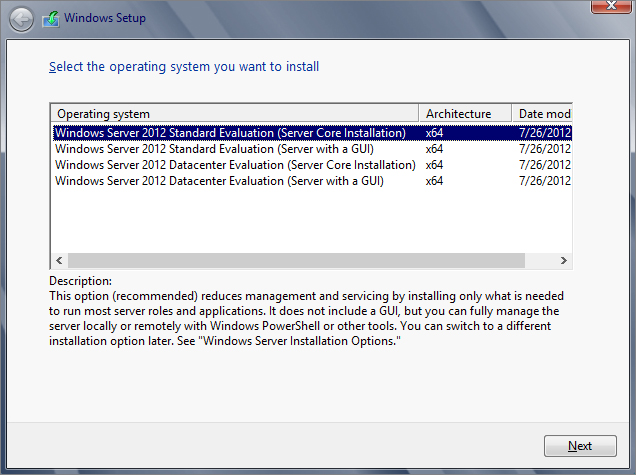
Figure 3.1 Selecting to install Server Core from the various editions of Windows Server 2012 R2
Microsoft designs and develops the next version of its products based on what the market demands. In addition, it fends off the competition by integrating the strengths and features the others have to offer. Thus, with Server Core, introduced in Windows Server 2008 and improved in Windows Server 2012 R2, Microsoft has enhanced its Windows operating systems to combat its competitors’ and meet the demands of system administrators who want to work from the command line. Within this chapter, we’ll explore what’s new in the Windows Server 2012 R2 operating system and how to manage it using PowerShell.
In this chapter, you will learn to:
You’re installing Windows Server 2012 R2 for the first time, and a couple of screens into the installation you see the installation options. Should you use the GUI or not? You like the benefits Server Core has with regard to security and overhead savings, but you like the point-and-click UI that comes with the GUI version. We have good news for you: In Windows Server 2008 R2, once Server Core was set up you couldn’t switch back, but in Windows Server 2012 R2 you can now switch back and forth between Server Core and the GUI. The default installation choice is Server Core, but should you choose to install using the GUI, you will still have PowerShell available. Once you have the server set up and ready to run in production, you can simply switch over to Server Core.
Keep in mind as you read this chapter that even though you can switch to the GUI version to accomplish the same tasks, we will be using Server Core to do those tasks. For example, we will be showing you how to validate your copy of Windows using Server Core. You may find it easier to switch to the GUI version to accomplish this, and that’s fine if you choose to do it that way. Most of the samples in this chapter are also in Chapter 2, “Installing and Upgrading to Windows Server 2012 R2,” if you want to use the GUI for these tasks. PowerShell 3.0 now offers you more cmdlets to administer your Server Core server. The cmdlets’ syntax is now simpler to understand. Many of the existing cmdlets have had parameters added to extend their functionality. See the Survival Guide later in this chapter for a complete list of the new cmdlets added in Windows Server 2012 R2.
Before you install Server Core, keep in mind that since you can switch between Server Core and the GUI, it does not matter which version you initially set up. This allows you to set up the server in the GUI, as we showed you in Chapter 2, and then switch it over to Server Core.
The process for installing Windows Server 2012 R2 Server Core is as straightforward as other Windows Server 2012 R2 installations. You pop in the installation DVD and allow the server to boot from it. Then you “follow the bouncing ball.” You can use an unattended installation .xml file to configure the OS all the way down to the installed features. You can generate the file with the Windows Automated Installation Kit, which we won’t cover in this chapter.
The Setup program lets you select the operating system to install, as shown in Figure 3.1.
Figure 3.1 Selecting to install Server Core from the various editions of Windows Server 2012 R2
Figure 3.2 Choosing the installation partition

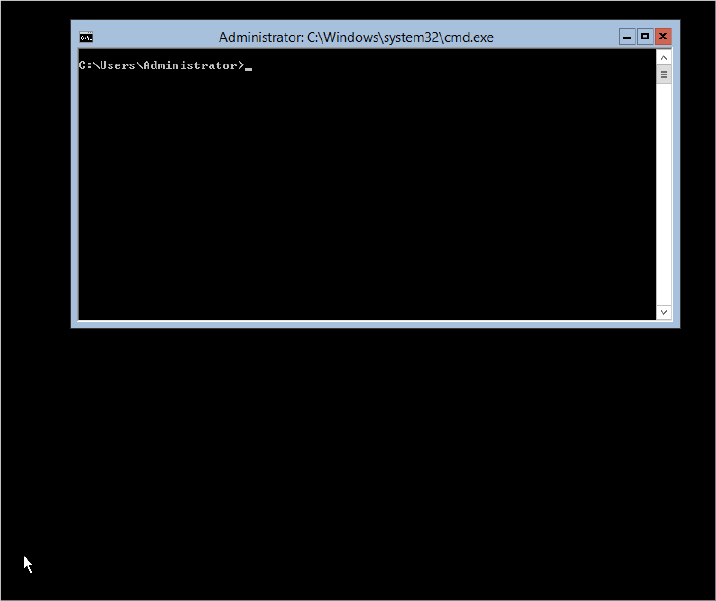
Once the installation finishes building the administrator’s profile, the desktop appears, as shown in Figure 3.3, which looks very spartan. There’s no Server Manager, no taskbar, no system tray—no nuttin’. There’s just an open command prompt.
Figure 3.3 The barren Server Core user interface
For this book, we’ve changed the default settings for the PowerShell command prompt for readability. The default is white letters on a black background. You can make similar changes by right-clicking the upper-left corner of the screen and selecting Properties. Then you can modify the color of the fonts and backgrounds on the Colors tab, as shown in Figure 3.4.
Figure 3.4 Modifying the command prompt window

Before getting into the details, you need to learn a few survival tips for handling this operating system. We’ll discuss accessing Task Manager to control processes, start tasks, and view performance. Then we’ll cover basic commands that we typically neglect when a flashy GUI is available. These will help you perform routine administration tasks and allow access to the network.
I’m placing this at the top of the Survival Guide because it may prove to be very handy should you need to switch from Server Core to the GUI and vice versa. Many administrators complete the initial setup using the GUI and switch over to Server Core for production.
You will need to download the script located here: http://gallery.technet.microsoft.com/scriptcenter/Switch-between-Windows-9680265d/file/70875/1/SwitchGUIServerCORE.zip.
This script is used no matter which version you are switching to. Before you run the script, you need to enable scripts on the server; they are disabled by default. To do this, run the following cmdlet:
PS C:\>Set-ExecutionPolicy AllSignedUsing PowerShell, you can now run the script from the location where you downloaded the file, as shown in Figure 3.5.
Figure 3.5 Running the PowerShell script

Where prompted, add the integer value as follows:
Be patient; this process takes a few minutes to complete. Once it has finished, you will be prompted to reboot the server. When the server reboots, you should be in the version you need.
Server Core provides a few graphical user interfaces. The most important is Task Manager. It’s the same one you have come to know and love with other Windows versions. There are two primary ways to open Task Manager:
As a good system administrator, you close applications when you’ve finished using them so as not to consume valuable resources, such as memory and CPU cycles, right? So, you will probably close the command prompt after completing a task while logged onto Server Core.
After realizing that you just closed your only interface to the OS, you can perform the following steps to return to the command prompt:
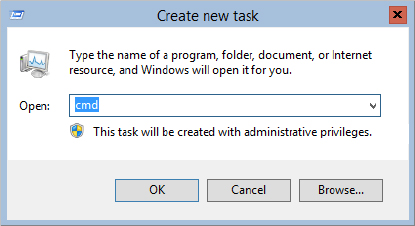
 New Task (Run). This is just like the Run prompt you find on the Start menu.
You’ll use PowerShell for most administration tasks, but there are still a few command-line tools that are easier to use, and so we include them in our examples.
After logging onto a Server Core installation for the first time, you might be wondering how you can change the administrator password in the future.
You can do so with the net user command:
PS C:\Users\Administrator>net user administrator *
Type a password for the user:
Retype the password to confirm:
The command completed successfully.
The asterisk prompts you for the new password.
The net command is a really old one. It was old when NT was new technology.
One of the newer ways to change a password is using the PowerShell cmdlet Set-ADAccountPassword. The following is the complete cmdlet with properties:
Set-ADAccountPassword [-Identity] <ADAccount> [-AuthType {<Negotiate> | <Basic>}] [-Credential <PSCredential>] [-NewPassword <SecureString>] [-OldPassword <SecureString>] [-Partition <string>] [-PassThru <switch>] [-Reset <switch>] [-Server <string>] [-Confirm] [-WhatIf] [<CommonParameters>]Given that Windows Server is a network operating system, you will have to access shares on the network. If you’re dependent on Windows Explorer, you may have never attempted to connect to a shared folder with the command prompt. First, to display the shares on a server, use the net view command:
PS C:\Users\Administrator>net view \\bf1
Shared resources at \bf1

Share name  Type   Used as  Comment

-------------------------------------------------------------------------------
isos        Disk
netlogon    Disk
Public      Disk
SYSVOL      Disk
temp        Disk
The command completed successfully.
Then, to access a volume, use the net use command, which maps a share to a drive letter:
PS C:\Users\Administrator>net use Z: \\bf1\temp
The command completed successfully
Within the command prompt, you can switch to that drive by entering the drive letter, like Z:. Then use your MS-DOS commands to get around the folders.
To remove the mapped drive, use the following command:
PS C:\Users\Administrator>net use Z: /del
Z: was deleted successfully
You can also use PowerShell’s get-psdrive cmdlet to get drive information and New-PSDrive to map a new drive. Here is the complete New-PSDrive cmdlet for your reference:
New-PSDrive [-Name] <String> [-PSProvider] <String> [-Root] <String> [-Credential <PSCredential> ] [-Description <String> ] [-Persist] [-Scope <String> ] [-Confirm] [-WhatIf] [-UseTransaction] [ <CommonParameters>]Command-line references are very handy. There is one in Windows Server 2012 R2 for help on the full installation; however, it has Internet hyperlinks to the explanations for all of those commands. The best location for finding a list of available commands is the Command-Line Reference (http://technet.microsoft.com/en-us/library/cc754340.aspx), which offers an A–Z menu. To find a command that will do the job, this is the first place to go.
Most of the PowerShell cmdlets can be located from this parent page (http://technet.microsoft.com/en-us/library/hh801904.aspx).
You will see all the administration categories with links to hundreds of cmdlets.
In a full installation, you use Notepad to edit text files. It’s also available in Server Core as well. This Notepad utility is “old-school”; it was a rerelease of a very early version. It’s not as old-school as VI, but it has been resurrected from the days of NT. (If you get that comment, you are old.)
Incredibly, the designers of Server Core were actually thinking about dropping this handy tool until the marketing guys got feedback from users. This would have been a huge mistake. Notepad is an essential tool for Server Core.
We have a sample text file called ipconfigCommand.txt. To open the text file, use the following command:
C:\Users\Administrator>notepad documents\ipconfigCommand.txtWe like using Notepad to construct complex commands. At the bottom of a help text file like this one, you can cut, copy, paste, and edit the examples to get what you need. Then you can copy and paste them into the command prompt. The output can be copied from the command window using the Mark command in the context menu, which you display by right-clicking the window. Then paste it back into Notepad.
SCRegedit.wsf is a script developed by the Server Core team to perform common tasks that involve editing the registry. You can use the parameter /cli to list common tasks on Server Core. It may not be all-inclusive for what you need to do, but it does list the MSCE secret handshake for opening Task Manager.
Since scregedit.wsf is a VB script, you have to run it through an interpreter. It’s located in the System32 folder, so you have to change the directory to it:
C:\Windows\System32>cscript scregedit.wsf /cliThere’s also a PowerShell command to reboot and shut down the server. You can even enter the reason for the reboot or shutdown as a remark. Use the following command for rebooting a server:
PS C:\> Restart-ComputerTo restart remote computers you can use this example, which shuts down two remote computers (Server01 and Server02) and the local computer (localhost):
PS C:\> Restart-Computer -ComputerName Server01, Server02, localhostAs we stated earlier in this chapter you can activate the GUI and manage your server via Server Manager, as shown in Figure 3.7, and then switch back to the command line when you’re satisfied with the configuration. We want to show you how to configure the Server Core server should you choose not to install the GUI, so we will walk you through using the command prompt to get the server running.
Figure 3.7 Server Manager local properties window on a standard Windows installation

First, we’ll examine four of the most basic configuration tasks you would normally perform in Server Manager when doing a fresh GUI installation of Windows Server. All of these can also be performed from the command line:
If you haven’t noticed, the Windows Server 2012 R2 installation process doesn’t require a product key. The operating system will require it eventually; for Windows Server 2012 R2, the time frame is 60 days. On full installations when the grace period is up, you will experience reduced functionality mode (RFM). This will give you a black desktop and persistent notifications, and Windows Update will apply only critical security patches.
The slmgr.vbs script provides the product key and activates the server. The traditional process includes entering the key followed by activating the server online. Note in the following command example and later ones that rem is a remark that isn’t processed by the command prompt or batch files:
rem Entering the product ID key
cscript c:\windows\system32\slmgr.vbs
-ipk q7y83-w4fvq-6mc6c-6qqtd-tpm88
Microsoft (R) Windows Script Host Version 5.8
Copyright (C) Microsoft Corporation. All rights reserved.

Installed product key q7y83-w4fvq-6mc6c-6qqtd-tpm88 successfully.
The online activation is also performed with the same script:
rem online activation
cscript c:\windows\system32\slmgr.vbs -ato
In larger environments, volume licensing is the predominant method of obtaining Microsoft software. This process can include the Key Management Service (KMS), which centralizes the activation to a server within the organization. Since the scenario we’ll be discussing is for a branch-office deployment, we’ll discuss setting up the KMS on this server later in the section, “Managing Licenses with the Key Management Service.”
Server Core isn’t completely devoid of control panel GUIs: the Time and Date control panel remains. The following command opens it:
control timedate.cplAfter you set the time and date settings you can verify the change, by using this command:
PS C:\Users\Administrator>w32tm /tz
Time zone: Current:TIME_ZONE_ID_DAYLIGHT Bias: 300min (UTC=LocalTime+Bias)
  [Standard Name:"Eastern Standard Time" Bias:0min Date:(M:10 D:5 DoW:0)]
[Daylight Name:"Eastern Daylight Time" Bias:-60min Date:(M:4 D:1 DoW:0)]The primary item that needs to change for the network is the static IP address.
You can use ipconfig or use a PowerShell cmdlet to get some basic network configuration info:
PS C:\Users\Administrator> get-netipconfiguration

InterfaceAlias       : Ethernet
InterfaceIndex       : 12
InterfaceDescription : Intel(R) 82574L Gigabit Network Connection
NetProfile.Name      : Network
IPv4Address          : 192.168.1.20
IPv6DefaultGateway   :
IPv4DefaultGateway   : 192.168.1.1
DNSServer            : 192.168.1.1
By default, the configuration uses the Local Area Connection. You can use the PowerShell New-NetIPAddress cmdlet to change it. Here is the cmdlet with properties:
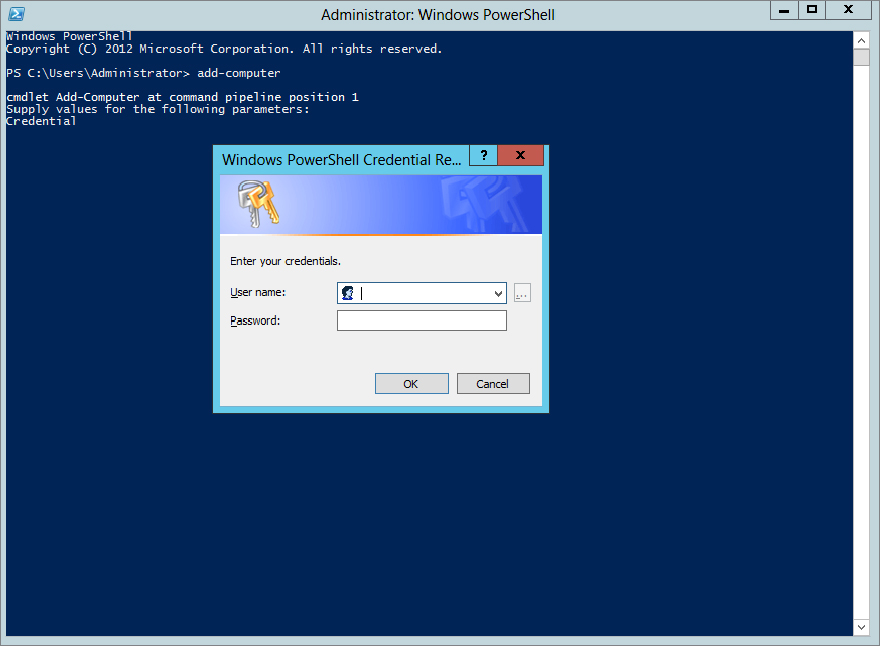
New-NetIPAddress [-IPAddress] <String> -InterfaceAlias <String> [-AddressFamily <AddressFamily> ] [-AsJob] [-CimSession <CimSession[]> ] [-DefaultGateway <String> ] [-PolicyStore <String> ] [-PreferredLifetime <TimeSpan> ] [-PrefixLength <Byte> ] [-SkipAsSource <Boolean> ] [-ThrottleLimit <Int32> ] [-Type <Type> ] [-ValidLifetime <TimeSpan> ] [-Confirm] [-WhatIf] [ <CommonParameters>]To add a computer to a domain, what PowerShell cmdlet should you use? Hmm . . . add a computer, how about Add-Computer? Too easy!
PS c:\Users\Administrator>Add-ComputerWith PowerShell cmdlets you do not have numerous switches and parameters. Many of the cmdlets prompt you for the parameter, making the learning curve much easier, because you need to remember only the cmdlet, not all the parameters. With that said, you will see a pop-up prompting you for the login credentials (Figure 3.8).
Figure 3.8 Enter your login credentials.
After you log in, you will be asked for the domain name:
cmdlet Add-Computer at command pipeline position 1
Supply values for the following parameters:
Credential
DomainName: BigFirm.com
By default, the Windows Setup program assigns a really imaginative computer name. You can find that using the hostname command:
PS c:\Users\Administrator>hostname
WIN-AG6PVO7DM2A
Since that name isn’t very user friendly, we’ll change it to Bfsc1. (It’s not a huge improvement, but at least you can type it without your fingers getting in a knot.) The following command tells PowerShell that you want to rename the computer:
PS c:\Users\Administrator>Rename-ComputerPowerShell will then prompt you for the new computer name:
cmdlet Rename-Computer at command pipeline position 1
Supply values for the following parameters:
NewName:bfsc1Next, you’ll perform the typical housekeeping chores to update the server with the latest revisions and security patches. This consists of two steps:
You can modify how automatic updates behave with just a few commands using SCONFIG. At the command prompt type SCONFIG. You will see a menu appear in your command window. Select option 5, Windows Update Settings. It will first tell you the current setting, which is Manual by default. To change it to Automatic, simply type the letter A. Figure 3.9 shows the Server Configuration menu and the alert telling us that automatic updates have been set.
Figure 3.9 Automatic updates using SCONFIG
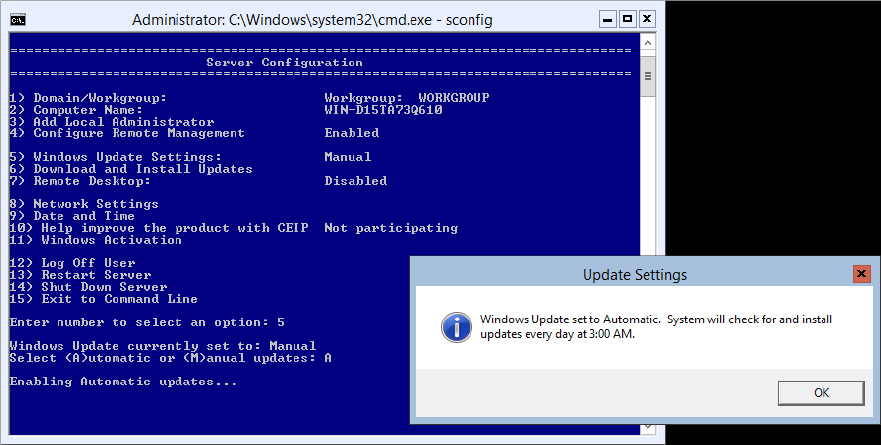
You can also see in Figure 3.9 all the different tasks you can use SCONFIG for. We have covered some of these tasks using different tools like PowerShell, but this tool is another option to accomplish the same thing.
For this step on a full installation, we prefer to open the system properties of the computer and navigate to the Automatic Updates tab. Then we click the hyperlink Windows Update Web Site to kick off the download and installation of patches. However, this uses Internet Explorer, which isn’t installed on Server Core. If you look back at Figure 3.9, you will see that option 6, Download and Install Updates, can take care of this for you.
After you enter 6 at the command prompt, SCONFIG will ask you if you want to search for all updates or just recommended updates. When you make your selection, it will return your results. You can then choose to install all, none, or just individual updates.
In this stage, you get into applying the infrastructure roles and enabling for remote administration. Here are the steps:
The Server Manager console introduced in the full installation of Windows Server 2012 made the installation of roles and features straightforward. Basically, you select the box, and it’s installed. If there are prerequisites that need to be installed in addition to the desired role, the Add Roles and Features Wizard will notify you. Then it will install them as you move through the wizard. In Server Core, the process is similar. The command results will notify you of any prerequisites but won’t install them. Then you will have to issue multiple commands to add the prerequisites and roles.
The roles we are going to add are a domain controller (Active Directory Domain Services), DNS, DHCP, and Print and Document Services. Basic file services are already installed and supported with the File Server role service. We’ll add a couple of features as well, including Windows Server Backup to provide backup capability.
The following PowerShell cmdlet lists the available roles and features:
rem list available (enabled and disabled) roles
PS C:\Users\administrator>Get-WindowsFeature
Now that you have the list in front of you, you can see the name of the role to add to the next cmdlet. The following list shows the DHCP Server role. You want to use the entry in the Name column as a parameter for the cmdlet.
Display Name                         Name               Install State
[ ]DHCP Server                       DHCP                available
[ ]Active Directory Domain Services  AD-Domain-Services  available
[ ]DNS Server                        DNS                 available
[ ]Print and Document Services       Print-Services      available
PS C:\Users\administrator>Add-WindowsFeature DHCP
Each role may take a few minutes to install. PowerShell will let you know if there are any problems with the installation. It will also let you know if any prerequisites are required. After you add the role, you can run Get-WindowsFeature again to see if the status shows Installed. Let’s install the remaining features:
PS C:\Users\administrator>Add-WindowsFeature AD-Domain-Services
PS C:\Users\administrator>Add-WindowsFeature DNS
PS C:\Users\administrator>Add-WindowsFeature Print-ServicesAgain, SCONFIG comes to our assistance. If you refer back to Figure 3.9, you will see this as option 7, Remote Desktop. After you enter 7 at the command prompt, it will ask you to enable or disable Remote Desktop. Select Enable by typing the letter E. You will be prompted whether to allow clients running any version of Remote Desktop or only clients running Remote Desktop with Network Level Authentication.
Enter your choice; it will send you a confirmation pop-up and you’re finished!
You have some firewall configurations to perform. The firewall needs to allow Remote Administration protocols through it. This includes configuring the ports to allow communication that the Microsoft Management Console snap-ins require. The following command enables protocols associated with the Remote Administration group:
netsh advfirewall firewall set rule group="Remote Administration" new enable=yesThis group includes all the MMC ports that can be accessed on the server. There are subsets of the protocols so you can have fine-grained firewall policies to remotely manage specific MMC operations, such as Event Viewer, Disk Management, File and Print Services, and Task Scheduler.
Surprisingly, this group doesn’t include Remote Desktop. It is part of its own group of the same name. It should be enabled with the following command, which, by the way, is the example in the embedded help of netsh advfirewall firewall set rule. No real wizardry is performed in generating this one. (The new parameter indicates adding a new setting to the rule.)
netsh advfirewall firewall set rule group="Remote Desktop" new enable=yesIf you want to administer the firewall from the MMC, you will need to also run the following command:
netsh advfirewall set currentprofile settings remotemanagement enableAlthough the firewall should stay enabled, there may be times, such as testing a new application, when you may want to disable it. Here are the commands for turning it on and off:
netsh advfirewall set allprofiles state on
netsh advfirewall set allprofiles state off
You can also reset the firewall with this command should you make a configuration mistake:
netsh advfirewall resetThe last firewall command we will show you is probably the most commonly used, which is to enable or disable a port. Here is an example of how to add and delete port 1433 for SQL Server:
netsh advfirewall firewall add rule name="Open SQL Server Port 1433" dir=in action=allow protocol=TCP localport=1433

netsh advfirewall firewall delete rule name="Open SQL Server Port 1433" protocol=tcp localport=1433
We also need to show you the PowerShell cmdlet with properties that you can use to configure the firewall. You can use this cmdlet to set rules, modify rules, and control behavior by changing the properties:
Set-NetFirewallProfile -Profile Domain,Public,Private -Enabled TrueTo remove a firewall rule just use this:
Remove-NetFirewallRule –Action BlockBefore you get into configuring the roles you installed on the server, you need to be aware of the options for remote administration. We’ve touched on them briefly, and you will see them being used in the configurations of the roles in the following sections.
Remote Desktop is a very reliable and secure method of administering remote standard installations, and it is available on Server Core as well. The Microsoft Management Console and its snap-ins are excellent for Server Core administration as long as the network supports it. A new option is Windows Remote Shell, which provides a command-line connection to the remote server.
Terminal Services (Administration mode) was released with Windows 2000. It was a welcome addition because it provided a virtual desktop environment of the computer you connected to. Windows Server 2003 improved it by making it a default installation. It is an essential method to perform remote work on servers. We have commonly installed and configured applications on Windows servers located on the opposite side of the North American continent using this method. This is a reliable option for Server Core.
With Windows Server 2012 Server Core, you have to realize the desktop is still just the command prompt and a few GUI tools. It’s the same as being logged on locally. There are methods for publishing just the command prompt of Server Core to your desktop as a RemoteApp, but we don’t recommend doing so. You will still need GUI tools such as Task Manager, Notepad, and the Registry Editor, which are part of your Server Core essentials.
Remember, Remote Desktop and its firewall policy must be enabled to be available. We did this earlier in the “Initial Configurations for Server Core” section.
Administrators have found the Microsoft Management Console to be a versatile method of managing remote computers. Its strength lies in the use of the RPC protocol and integrated Windows authentication, making it quick and efficient in managing domain-based computers within a LAN.
You can work around the authentication with alternate credentials. On the workstation, you can run the following command to register these credentials:
cmdkey /add:bfsc1 /user:Administrator /pass:P@ssw0rdYou could opt to leave the /pass parameter off to be prompted for the password. After registering your credentials, you can connect to the server through the snap-in.
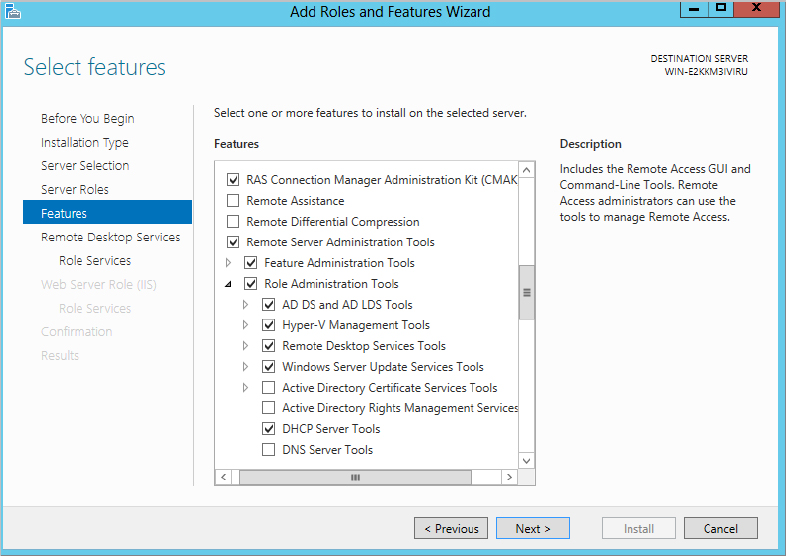
In previous versions of Windows Server, you needed to install the adminpak.msi package to have the snap-ins manage all the Windows services. In Windows Server 2012, the adminpak.msi package is replaced by the Remote Server Administration Tools feature. This makes its installation easier and more fine-tuned. In Figure 3.10, you can see that Remote Server Administration Tools has been enabled through the Add Roles and Features Wizard.
Figure 3.10 Installing the Remote Server Administration Tools feature
If you like, you can connect to another computer when you add a snap-in to a new MMC. Some snap-ins allow multiple servers to be added into one tree for consolidated administration. The following steps create an MMC for managing the DHCP service on the Windows Server 2012 Server Core installation. Please note that these steps can be performed only after the DHCP service is started and authorized. This is discussed in the “Configuring the DHCP Service” section.
Figure 3.11 Adding a DHCP server to an MMC

Figure 3.12 DHCP console focused on the Server Core instance

Windows Remote Shell allows commands to be sent to a server. Similar to Telnet, this will allow you to connect to a server and then run a command from a remote command prompt. However, it doesn’t allow a continuous connection like the one Telnet provides. It sends the command, receives the results, and then closes the connection.
This is a light client-server application based on Simple Object Access Protocol (SOAP) technology. For this service, all you really need to understand about SOAP is that the client uses XML-formatted text to send the command to the server, and the output sent back to the client is in the same format using HTTP. Text-based communication can be easily read with text editors like Notepad, and HTTP is easy to sniff with a protocol analyzer. So, don’t consider it a secure method of managing a server. You have to lock it down.
Microsoft offers an option for test-driving Windows Remote Shell with the winrm quickconfig command. However, it sets it up with HTTP and TCP port 5985. This setup, as they recommend, is not meant for production environments. To lock it down, you need to ensure that the communication is encrypted and the server is authenticated. IPsec provides this security, but you may not have that available. You can set Windows Remote Shell for HTTPS (SSL) communication, which uses a server-based certificate to authenticate the server and encrypt the connection.
We will go through the basic steps to get this flying.
There are two options in getting a certificate: buy one from a repudiated certificate authority or set up your own certificate authority and request a certificate from it. The latter is much less expensive, especially using Windows Server.
Your own certificate authority is also not hard to set up; however, you should have a fully baked plan on how this will be accomplished for a production Active Directory environment. You need to consider decisions that will have lasting effects throughout the organization. And these effects will require manual administration to remove them. We won’t go into detail about this in this section. We’re going to be “quick and dirty” on this as in a lab environment.
On the full-installation Windows Server 2012 domain controller, the Active Directory Certificate Services role is installed. A typical installation of this role would include the web enrollment component. This would require Internet Information Services (IIS). We won’t go through getting that installed. We will only select the Certificate Authority service. This will allow the creation and administration of certificates. In addition, it will allow the computers of the domain to request certificates using the RPC protocol and Kerberos authentication. We will install a trusted root enterprise certificate authority. Root is selected because it is the first and only domain in the organization. Enterprise is selected because it uses Active Directory to verify servers and users are trustworthy. Because it uses Active Directory, it automatically issues verified users and computers. Since Bfsc1 is a domain controller, it automatically requests a certificate. Quick and dirty.
We want to view the certificate using Server Core. (We first tried using the MMC remotely, but for security reasons, this is not an option.) There are two methods of viewing certificates on the Server Core installation—the certutil command or PowerShell’s dir command:
rem using certutil
PS C:\Users\Administrator.BIGFIRM\Documents>certutil -viewstore my
my
The my refers to the local machine store’s own certificates. When you run certutil, a window appears listing the installed certificates, as shown in Figure 3.13.
Figure 3.13 Certificates displayed by certutil

Notice the hyperlink underneath the only installed certificate, “Click here to view certificate properties.” This will open the certificate information.
PowerShell offers another route to get to the certificates through its providers. Generally, the provider is a group of objects that PowerShell navigates through. The file system is an example of a provider, so you can do operations on file and folder objects within it. Another provider is the certificate store. You can navigate through the certificate store to view and manage certificates.
The dir command is an alias created by the PowerShell developers for the get-items command. Thus, you can use your standard MS-DOS command prompt to navigate through the file system. The following command lists the same location as the certutil command did earlier:
rem starting powershell
C:\Users\Administrator.BIGFIRM >powershell

PS C:\Users\administrator.BIGFIRM> dir cert:\localmachine\my | FL

Subject      : CN=BFSC1.bigfirm.com
Issuer       : CN=bigfirm-BF1-CA, DC=bigfirm, DC=com
Thumbprint   : 03ADB670C63E8D1CDB764CD7AA589C51D854307C
FriendlyName :
NotBefore    : 7/23/2009 6:55:41 PM
NotAfter     : 7/23/2010 6:55:41 PM
Extensions   : {System.Security.Cryptography.Oid, System.Security.Cryptography
               .Oid, System.Security.Cryptography.Oid, System.Security.Cryptogra
               phy.Oid...}
The | FL parameter is actually another command in shorthand. It formats the output of the dir command into a line-delimited list. We like using this format because the values are not truncated as the table format tends to do. In this specific case, the table format (not shown) doesn’t truncate the most important value, the thumbprint.
The listener tells the Windows Remote Shell service which port and IP address to listen to and respond to client requests. By default, the HTTP port is 5985, and the HTTPS port is 5986. You can view the default settings with the following command. In the output, the attributes <cfg:HTTP> and <cfg:HTTPS> indicate the port settings. Despite what you may think about XML, the parameter of the command is format:pretty. The output appears redundant. However, the top half starting with <cfg:Client> is for the client settings that would send requests to other servers. The lower half starting with <cfg:Service> is for the service that receives the requests to run on this server.
PS C:\Users\administrator.BIGFIRM>winrm get winrm/config -format:pretty
<cfg:Config xml:lang="en-US" xmlns:cfg="http://schemas.microsoft.com/wbem/wsman/
1/config">
    <cfg:MaxEnvelopeSizekb>150</cfg:MaxEnvelopeSizekb>
    <cfg:MaxTimeoutms>60000</cfg:MaxTimeoutms>
    <cfg:MaxBatchItems>32000</cfg:MaxBatchItems>
    <cfg:MaxProviderRequests>4294967295</cfg:MaxProviderRequests>
    <cfg:Client>
        <cfg:NetworkDelayms>5000</cfg:NetworkDelayms>
        <cfg:URLPrefix>wsman</cfg:URLPrefix>
        <cfg:AllowUnencrypted>false</cfg:AllowUnencrypted>
        <cfg:Auth>
            <cfg:Basic>true</cfg:Basic>
            <cfg:Digest>true</cfg:Digest>
            <cfg:Kerberos>true</cfg:Kerberos>
            <cfg:Negotiate>true</cfg:Negotiate>
            <cfg:Certificate>true</cfg:Certificate>
            <cfg:CredSSP>false</cfg:CredSSP>
        </cfg:Auth>
        <cfg:DefaultPorts>
            <cfg:HTTP>5985</cfg:HTTP>
            <cfg:HTTPS>5986</cfg:HTTPS>
        </cfg:DefaultPorts>
        <cfg:TrustedHosts></cfg:TrustedHosts>
    </cfg:Client>
    <cfg:Service>
        <cfg:RootSDDL>O:NSG:BAD:P(A;;GA;;;BA)S:P(AU;FA;GA;;;WD)(AU;SA;GWGX;;;WD)
</cfg:RootSDDL>
        <cfg:MaxConcurrentOperations>4294967295</cfg:MaxConcurrentOperations>
        <cfg:MaxConcurrentOperationsPerUser>15</cfg:MaxConcurrentOperationsPerUs
er>
        <cfg:EnumerationTimeoutms>60000</cfg:EnumerationTimeoutms>
        <cfg:MaxConnections>25</cfg:MaxConnections>
        <cfg:MaxPacketRetrievalTimeSeconds>120</cfg:MaxPacketRetrievalTimeSecond
s>
        <cfg:AllowUnencrypted>false</cfg:AllowUnencrypted>
        <cfg:Auth>
            <cfg:Basic>false</cfg:Basic>
            <cfg:Kerberos>true</cfg:Kerberos>
            <cfg:Negotiate>true</cfg:Negotiate>
            <cfg:Certificate>false</cfg:Certificate>
            <cfg:CredSSP>false</cfg:CredSSP>
            <cfg:CbtHardeningLevel>Relaxed</cfg:CbtHardeningLevel>
        </cfg:Auth>
        <cfg:DefaultPorts>
            <cfg:HTTP>5985</cfg:HTTP>
            <cfg:HTTPS>5986</cfg:HTTPS>
        </cfg:DefaultPorts>
        <cfg:IPv4Filter>*</cfg:IPv4Filter>
        <cfg:IPv6Filter>*</cfg:IPv6Filter>
        <cfg:EnableCompatibilityHttpListener>false</cfg:EnableCompatibilityHttpL
istener>
        <cfg:EnableCompatibilityHttpsListener>false</cfg:EnableCompatibilityHttp
sListener>
        <cfg:CertificateThumbprint></cfg:CertificateThumbprint>
    </cfg:Service>
    <cfg:Winrs>
        <cfg:AllowRemoteShellAccess>true</cfg:AllowRemoteShellAccess>
        <cfg:IdleTimeout>180000</cfg:IdleTimeout>
        <cfg:MaxConcurrentUsers>5</cfg:MaxConcurrentUsers>
        <cfg:MaxShellRunTime>2147483647</cfg:MaxShellRunTime>
        <cfg:MaxProcessesPerShell>15</cfg:MaxProcessesPerShell>
        <cfg:MaxMemoryPerShellMB>150</cfg:MaxMemoryPerShellMB>
        <cfg:MaxShellsPerUser>5</cfg:MaxShellsPerUser>
    </cfg:Winrs>
</cfg:Config>
The listener also allows the mapping of a certificate to the port and IP address. So, using the trusty technique of copying the example from the embedded documentation from the winrm /? command, we crafted the following command to create a listener:
winrm create winrm/config/Listener?Address=*+Transport=HTTPS @{Hostname="bfsc1.bigfirm.com";CertificateThumbprint="03ADB670C63E8D1CDB764CD7AA589C51D854307C"}Here’s an explanation of the parameters:
The next requirement is to enable an inbound firewall rule to receive the client requests. There is one available for the unsecure HTTP, which would be set up with the /quickconfig option, but you need to build one for the HTTPS port.
If you’re a burly, leatherneck system admin type, you might be inclined to torture yourself learning the extensive parameters of the netsh advfirewall firewall command. The MMC snap-in is for those French-vanilla-latte-sipping, pencil-neck-geek system admins. In this book, we appease both the leathernecks and the pencil necks.
We’ll start with the latte-sipping style. It helps to see the essential parameters in constructing a rule. Wizards like the New Inbound Rule Wizard are useful because they walk you through configurations without missing important ones. They will assist you in constructing a command line to create the same rule. Just as in the “Server Core Survival Guide” section, we recommend creating the rules through a wizard first on a standard installation and then trying it with the command line. Another option is to take the easy way out and create it on a standard installation and simply convert it to Server Core, as explained in the survival guide section.
Using Windows Firewall with Advanced Security focused on the Server Core installation, we’ll walk you through the New Inbound Rule Wizard.
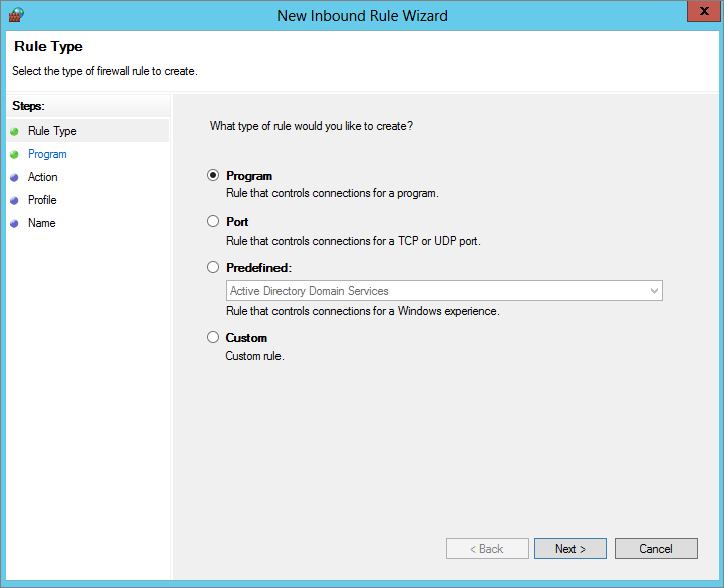
The first page, shown in Figure 3.14, allows you to select a port rule.
Figure 3.14 Selecting the type of inbound rule
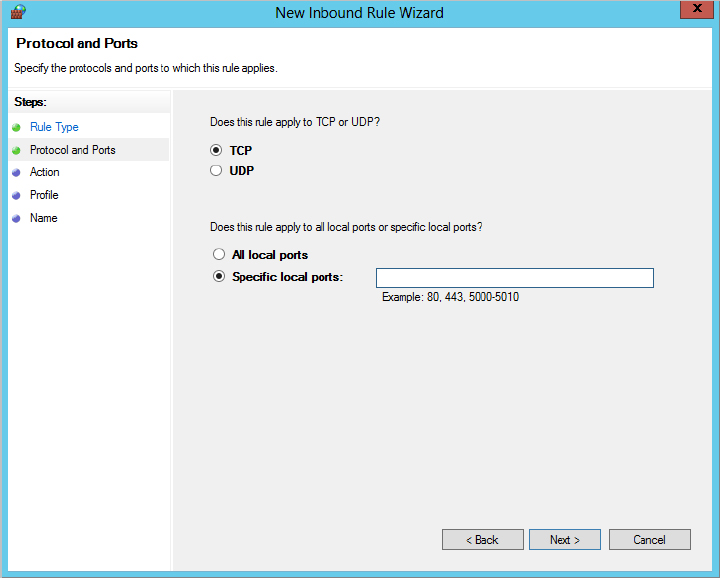
On the Protocol and Ports page, select TCP and enter 5986 for the port, as shown in Figure 3.15.
Figure 3.15 Entering the protocol and port for the inbound rule
The Action page provides three options, as shown in Figure 3.16:
Figure 3.16 Selecting the action for the inbound rule

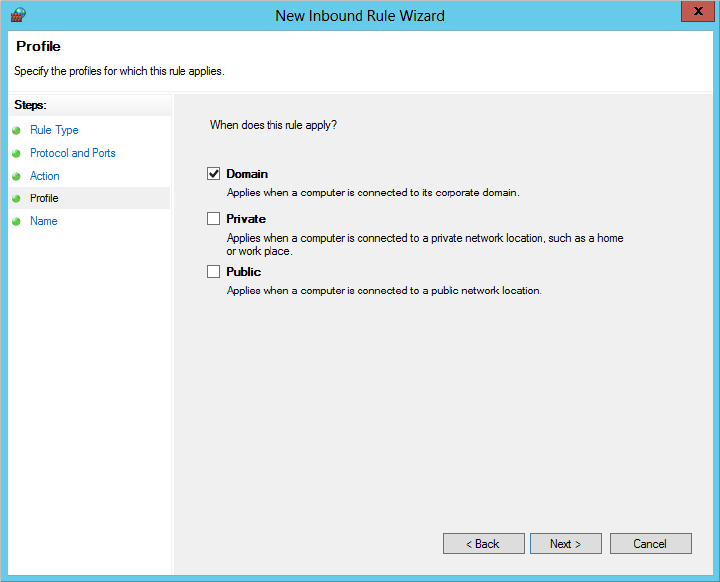
The Profile page applies the rule to any of the three profiles you select, as shown in Figure 3.17. The public and private profiles are meant for computers that are mobile so you can work at home or at a wireless hotspot. Since this server is a domain controller, the concepts of private and public don’t apply. We’ll stick with the domain profile just to be secure.
Figure 3.17 Limiting the rule to domain communication
The Name page allows you to enter the name and optional description for the new rule, as displayed in Figure 3.18.
Figure 3.18 Providing a descriptive name for the rule

Now that you know the parameters required to create an inbound rule, we’ll look at the leatherneck method. The embedded help information provides the following syntax for creating a firewall rule. Note that this was performed in the netsh interactive shell. It could be done as one command line as well:
netsh advfirewall firewall>add rule ?

Usage: add rule name=<string>
      dir=in|out
      action=allow|block|bypass
      [program=<program path>]
      [service=<service short name>|any]
      [description=<string>]
      [enable=yes|no (default=yes)]
      [profile=public|private|domain|any[,...]]
      [localip=any|<IPv4 address>|<IPv6 address>|<subnet>|<range>|<list>]
      [remoteip=any|localsubnet|dns|dhcp|wins|defaultgateway|
         <IPv4 address>|<IPv6 address>|<subnet>|<range>|<list>]
      [localport=0-65535|<port range>[,...]|RPC|RPC-EPMap|IPHTTPS|any
(default=any)]
      [remoteport=0-65535|<port range>[,...]|any (default=any)]
      [protocol=0-255|icmpv4|icmpv6|icmpv4:type,code|icmpv6:type,code|
         tcp|udp|any (default=any)]
      [interfacetype=wireless|lan|ras|any]
      [rmtcomputergrp=<SDDL string>]
      [rmtusrgrp=<SDDL string>]
      [edge=yes|deferapp|deferuser|no (default=no)]
      [security=authenticate|authenc|authdynenc|authnoencap|notrequired
         (default=notrequired)]
The list of parameters is long and intimidating. However, the “Server Core Survival Guide” section told you that you could look for examples at the end of the embedded help. You can edit them in Notepad to create what you need. Notice that the command line doesn’t give you much fanfare for your accomplishment:
PS C:\Users\administrator.BIGFIRM> netsh advfirewall firewall add rule
name=”Windows Remote Management HTTPS”
description=”Opens  Port 5986  for remote management using WinRM” protocol=TCP dir=in localport=5986 profile=domain action=allow
Ok
Here’s an explanation of the parameters that translate to the earlier wizard pages:
Note in Figure 3.15 that the type of rule is implied with the selection of a local port. A rule that is based on a program or a service has its own structure that has examples listed in the embedded help text.
The current client available for Windows Remote Shell is winrs.exe. It is available on Windows 7 and 8 and Windows Server 2012 installations. We hashed out the following command using the winrs.exe help for testing the service:
rem test winrs with fire wall enabled.
PS C:\Users\Administrator.BIGFIRM>winrs -r:https://bfsc1.bigfirm.com:5896 ipconfig

Windows IP Configuration

Ethernet adapter Internal:

   Connection-specific DNS Suffix  . :
   Link-local IPv6 Address . . . . . : fe80::b5a1:157f:7220:4f4c%3
   IPv4 Address. . . . . . . . . . . : 192.168.1.11
   Subnet Mask . . . . . . . . . . . : 255.255.255.0
Default Gateway . . . . . . . . . : 192.168.1.254Now you are ready to get this lean, mean infrastructure machine into production. The plan for this Server Core instance is to set up a branch-office infrastructure server. This will provide authentication, file and print services, and other common network support for a small group of computers in a corporate network isolated by WAN links.
The roles that were installed on the computer during the initial tasks are Active Directory Domain Services, DNS, DHCP, and Print and Document Services. Each of these roles needs to be configured. We’ll primarily cover the initial tasks for each service using both command-line and GUI tools.
Two additional services already installed are the File Server role service and the Key Management Service. You will configure the File Server role service to provide network access to local folders. The Key Management Service will manage the activation of the volume-licensed operating systems within a network. As a branch-office server, it may prove to be the best platform to obtain the activation information from the Microsoft licensing servers for the branch.
Since the branch-office server is isolated from the corporate datacenter, it needs to perform backup operations of the data residing on the shared folders. The Windows Server Backup feature was installed in the initial configurations as well, and we’ll run through the commands to adequately back up the data.
Throughout the book, you will find additional details on configuring Server Core for a given feature.
In previous versions of Windows Server, you would use DCPromo from the command line to create and promote domain controllers. In Windows Server 2012, DCPromo has been deprecated and can only be used with an answer file. Therefore, we are going to teach you the newer way—using PowerShell—to create a domain controller. Since you already installed Active Directory Domain Services (AD DS) earlier in this chapter, much of the work is already done.
You will need to use a prerequisite check that is new in Windows Server 2012. This check will help show you what the server needs to properly install the domain controller.
Test-ADDSDomainControllerInstallation checks the prerequisites for the domain controller installation as if you were performing the actual installation. You will be prompted for domain and login credentials, as shown in Figure 3.19.
Figure 3.19 Running Test-ADDSDomainControllerInstallation

You’re ready to install the domain controller. The cmdlet Install-ADDSDomainController will install DNS at the same time. If you do not add any parameters, the following default settings will be used:
There are plenty of scripts that you can download and use to configure all the different parameters. Here is the complete parameter format in case you need to change the configuration:
Install-ADDSDomainController -DomainName <String> [-ADPrepCredential <PSCredential> ] [-AllowDomainControllerReinstall] [-ApplicationPartitionsToReplicate <String[]> ] [-CreateDnsDelegation] [-Credential <PSCredential> ] [-CriticalReplicationOnly] [-DatabasePath <String> ] [-DnsDelegationCredential <PSCredential> ] [-Force] [-InstallationMediaPath <String> ] [-InstallDns] [-LogPath <String> ] [-MoveInfrastructureOperationMasterRoleIfNecessary] [-NoDnsOnNetwork] [-NoGlobalCatalog] [-NoRebootOnCompletion] [-ReplicationSourceDC <String> ] [-SafeModeAdministratorPassword <SecureString> ] [-SiteName <String> ] [-SkipAutoConfigureDns] [-SkipPreChecks] [-SystemKey <SecureString> ] [-SysvolPath <String> ] [-Confirm] [-WhatIf] [ <CommonParameters>]Go ahead and run the cmdlet:
PS C:\Users\administrator> Install-ADDSDomainControllerYou will be prompted with the following:
The target server will be configured as a domain controller and restarted when this operation is complete.
Do you want to continue with this operation?
[Y] Yes  [A] Yes to All  [N] No  [L] No to All  [S] Suspend  [?] Help (default is "Y"):Y
When you select Yes, the installation will begin (Figure 3.20). This process may take several minutes to complete.
Figure 3.20 Installing the domain controller

When Windows Server 2003 came out, Microsoft was starting to kick up sand onto the ultra-geek’s Linux system. It increased the available suite of commands to provide ultra-geek wannabes with the tools to configure as much as possible. That’s when the netsh command came into fashion.
When considering how to manage this service, this command came to mind. We looked up the command on TechNet’s Command-Line Reference A–Z list and then printed out the documentation for netsh dhcp. After collating the 40 pages, we logged onto the Server Core instance to get busy. With netsh, you can construct one-line commands or use the interactive shell within the command prompt. In this instance, you’ll use the latter.
A branch office requires a basic DHCP implementation, including a single scope with standard scope options of default gateway, DNS servers, and DNS domain name. But before setting that up, you need to authorize it in Active Directory, by using the add server option. In the following code, interactive mode is utilized to enter the commands:
netsh> dhcp
netsh dhcp>add server bfsc1.bigfirm.com 192.168.1.11

Adding server bfsc1.bigfirm.com, 192.168.1.11

Command completed successfully.
netsh dhcp>show server

1 Servers were found in the directory service:

        Server [bfsc1.bigfirm.com] Address [192.168.1.11] Ds location: c
n=bfsc1.bigfirm.com

Command completed successfully.
To add a scope, you need to switch to the netsh dhcp server prompt and use the add scope command. The required parameters are the subnet and subnet mask that the scope represents, the scope name, and any comments:
netsh dhcp>server
netsh dhcp server>add scope 192.168.1.0 255.255.255.0 “Branch Office 1”
 “Sample DHCP scope”

Command completed successfully.
netsh dhcp server>show scope

=================================================================================
 Scope Address  - Subnet Mask    - State    - Scope Name      -  Comment

=================================================================================

 192.168.1.0    - 255.255.255.0  -Active    -Branch Office 1  -Sample DHCP scope

 Total No. of Scopes = 1
Command completed successfully.
The scope needs a range of IP addresses to serve to DHCP clients and the standard scope options. The scope options are identified with the option code, a three-digit identifier. You can see the code identifiers in the DHCP Management Console. The options have values in byte, word, dword, string, or IP address format. For our example, we have the following options, identifiers, and values:
netsh dhcp server>scope 192.168.1.0

Changed the current scope context to 192.168.1.0 scope.
netsh dhcp server scope>add iprange 192.168.1.50 192.168.1.100

Command completed successfully.
netsh dhcp server scope>set optionvalue 003 IPADDRESS 192.168.1.254

Command completed successfully.
netsh dhcp server scope>set optionvalue 006 IPADDRESS 192.168.1.11

Command completed successfully.
netsh dhcp server scope>set optionvalue 015 STRING bigfirm.com

Command completed successfully.
netsh dhcp server scope>show optionvalue

Options for Scope 192.168.1.0:

        DHCP Standard Options :
        General Option Values:
        OptionId : 51
        Option Value:
                Number of Option Elements = 1
                Option Element Type = DWORD
                Option Element Value = 691200
        OptionId : 3
        Option Value:
                Number of Option Elements = 1
                Option Element Type = IPADDRESS
                Option Element Value = 192.168.1.254
        OptionId : 6
        Option Value:
                Number of Option Elements = 1
                Option Element Type = IPADDRESS
                Option Element Value = 192.168.1.11
        OptionId : 15
        Option Value:
                Number of Option Elements = 1
                Option Element Type = STRING
                Option Element Value = bigfirm.com
Command completed successfully.
After running through these commands on Server Core, you can also connect to the service from a remote server and verify the configuration with a GUI.
The File Server role service provides basic file-sharing capabilities. We didn’t have to install any specific role or feature to support this. Like many of the other roles, the procedures to share folders on full installations are typically handled by the MMC or other GUI-based applications, such as Windows Explorer. We’ll explore the command-line alternative for this.
The first task is to provide a data partition. In the following example, we decided to set the size to 10 GB.
The DiskPart command is perfect for this operation. It manages all the functionality of the Disk Management Console in a command-line format or an interactive shell format. The following is in the interactive shell format. The first set of commands displays the disks and volumes on the computer. Notice that the listed volumes include volumes on other disks. Our data partition has not yet been allocated, so it is not listed in the volumes. To create the data partition, you have to select the disk, which is indicated by the value in the list disk output.
PS C:\Windows\system32>diskpart

Microsoft DiskPart version 6.1.7000
Copyright (C) 1999-2008 Microsoft Corporation.
On computer: BFSC1

DISKPART> list disk

  Disk ###  Status         Size     Free     Dyn  Gpt
  --------  -------------  -------  -------  ---  ---
  Disk 0    Online         75 GB    55 GB

DISKPART> list volume

  Volume ###  Ltr  Label        Fs     Type        Size     Status     Info
  ----------  ---  -----------  -----  ----------  -------  ---------  --------
  Volume 0    D    GB1SXFRE_EN  UDF    CD-ROM      2850 MB  Healthy
  Volume 1                      NTFS   Partition    200 MB  Healthy    System
  Volume 2    C                 NTFS   Partition     19 GB  Healthy    Boot
DISKPART> select disk 0

Disk 0 is now the selected disk.
Now, you will create the primary partition. The help information is displayed first. Noting that the size is listed in MB, you have some mental calculations to perform: 10 GB = 10,000 MB. After the primary partition is created, you need to select it. This allows you to assign a drive letter to it:
DISKPART> help create partition primary
.....
Example:

    CREATE PARTITION PRIMARY SIZE=1000
rem size is in MB so 55 gb is 55000
DISKPART> create partition primary size=10000

DiskPart succeeded in creating the specified partition.

DISKPART> list partition

  Partition ###  Type              Size     Offset
  -------------  ----------------  -------  -------
  Partition 1    Primary           200 MB   1024 KB
  Partition 2    Primary            19 GB    201 MB
* Partition 3    Primary            10 GB     20 GB

DISKPART> select partition 3

Partition 3 is now the selected partition.

DISKPART> assign letter=e

DiskPart successfully assigned the drive letter or mount point.
With the partition created, you can view it as an available volume. You need to select it and then format it with NTFS:
DISKPART> list volume

  Volume ###  Ltr  Label        Fs     Type        Size     Status     Info
  ----------  ---  -----------  -----  ----------  -------  ---------  --------
  Volume 0    D    GB1SXFRE_EN  UDF    CD-ROM      2850 MB  Healthy
  Volume 1                      NTFS   Partition    200 MB  Healthy    System
  Volume 2    C                 NTFS   Partition     19 GB  Healthy    Boot
* Volume 3    E                 RAW    Partition     10 GB  Healthy

DISKPART> select volume 3

Volume 3 is the selected volume.

DISKPART> format fs=ntfs label=”Data volume” quick

  100 percent completed

DiskPart successfully formatted the volume.In this example, you’ll create a Sales folder. To make your folder, you’ll use the PowerShell cmdlet New-Item: NEW-ITEM E:\Sales -type directory. You then have to trim the security for the folder. You will assign the Administrators group Full Control to the Sales folder.
When a home folder is designated in user properties through Active Directory Users and Computers, the home folder is created automatically with the user having Full Control. Inherited permissions are applicable on this folder, so the default Users group with Read permissions are also assigned. You will need to remove the Users group’s permissions from the Sales folder and give the Administrators group Full Control.
rem spelled correctly
C:\>echo %username%
Administrator

rem not spelled correctly
C:\>echo %uesername%
%uesername%The following are the PowerShell cmdlets to modify the permissions on the Sales folder. The first cmdlet, Get-Acl, will retrieve the folder permissions. If you notice, the Format-List property we used will lay out the results in a clear, readable format for you. You will then use the Set-Acl cmdlet to set the permissions on the folder:
rem Display the permissions to the sales folder
Get-Acl E:\sales | Format-List
 Path   : Microsoft.PowerShell.Core\FileSystem::C:\sales
Owner  : BUILTIN\Administrators
Group  : BFSC1\None
Access : NT AUTHORITY\SYSTEM Allow  FullControl
         BUILTIN\Administrators Allow  FullControl
         BUILTIN\Users Allow  ReadAndExecute, Synchronize
         BUILTIN\Users Allow  AppendData
         BUILTIN\Users Allow  CreateFiles
         CREATOR OWNER Allow  268435456
Audit  :
Sddl   : O:BAG:S-1-5-21-4204471083-1189308523-3240350476-513D:AI(A;OICIID;FA;;;SY)(A;OICIID;FA;;;BA)(A;OICIID;0x1200a9;
         ;;BU)(A;CIID;LC;;;BU)(A;CIID;DC;;;BU)(A;OICIIOID;GA;;;CO)
Here is a handy little script that allows you to modify group permissions on a folder. It will change the permissions on the Sales folder to allow only the Administrators group Full Control.
$acl = Get-Acl "E:\Sales"
$Group1 = "Administrators"
$rule1 = New-Object System.Security.AccessControl.FileSystemAccessRule -ArgumentList @($Group1,"FullControl","ContainerInherit, ObjectInherit", "None","Allow")
$acl.SetAccessRule($rule1)
$acl |Set-Acl
$acl.SetAccessRuleProtection($true,$false)
$acl |Set-Acl
Here are the results of running that script on the Sales folder. As you can see, only the Administrators group now has Full Control:
Path : Microsoft.PowerShell.Core\FileSystem::E:\sales
Owner : BUILTIN\Administrators
Group : BFSC1\None
Access : BUILTIN\ Administrators Allow FullControl
Audit :
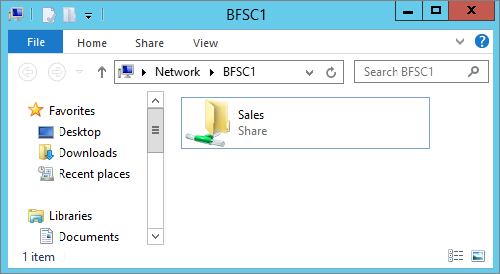
Sddl : O:BAG:S-1-5-21-4204471083-1189308523-3240350476-513D:PAI(A;OICI;FA;;;BU)Sharing the folders is a piece of cake with the net share command. Yes, it’s that venerable command introduced in the ancient days of LAN Manager. The following command creates the share. The name of the share equals the path, followed by the permissions. The /Unlimited parameter is the number of connections allowed to this share.
rem create shares
E:\>net share SALES=e:\sales /grant:bigfirm\sales,FULL /Unlimited
Sales was shared successfully.
Of course, we needed to verify the share. So we went to a client and typed the UNC path in the Run prompt, and the results are displayed in Figure 3.21.
Figure 3.21 Verifying shares on Server Core
e-Print services require components of the Print and Document Services role to be installed. Then, like the other roles, you have to configure the role. In previous versions of Windows, adding a printer was wizard driven, with all components rolled up into one routine. These components included the driver selection and port selection and possibly creating a TCP port and printer configurations. The functionality hasn’t changed that much—just the look has, so we won’t be going into too much detail on this.
There may be commands to perform each of these procedures within the command prompt, but as in the Miller’s tale, it would be “a pain in the arse.” With Windows Server 2012, the printer configurations are managed in the Print Management console, another MMC snap-in. We’ll eagerly take that route first and then engage in our own Miller’s tale.
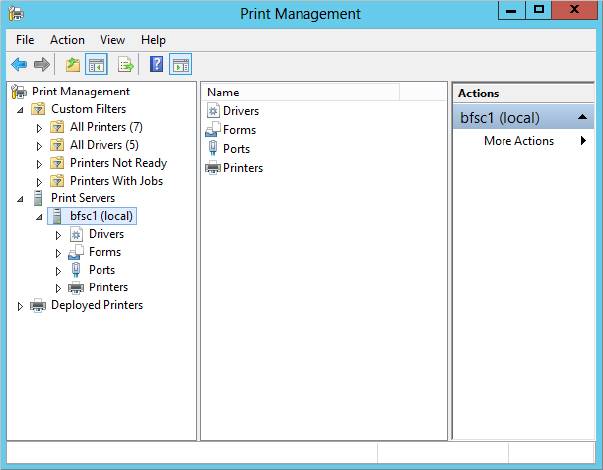
An administrator responsible for printers will have to install the console by installing either the Print and Document Services role or just the Print and Document Services tool in Remote Server Administration Tools on a compatible workstation.
Once you’ve installed the Print Management console, you can open it and add the Server Core instance, as shown in Figure 3.22. Each component is separated into its own object category, so now you have a wizard for each of them.
Figure 3.22 The Print Management console for configuring the print service
To add a driver, you right-click Drivers and then opt to add the driver. The wizard looks similar to the ones in previous Windows operating systems.
Forms are pretty standard, so there’s no need to mess with them; however, ports are very important. Typically, office printers are not locally attached to the server; they’re connected to the network. So, you need to create a standard TCP port. Again, it looks eerily familiar, as shown in Figure 3.23.
Figure 3.23 Adding a TCP port

You can then create the printer with the specific driver, port, name, share name, permissions, and other configurations using the Network Printer Installation Wizard, as shown in Figure 3.24.
Figure 3.24 Network Printer Installation Wizard

Now let’s look at how to configure a printer using PowerShell cmdlets instead of using the older script methods in Server Core. You can still use the .vbs scripts if you choose, but as we said earlier, Microsoft is pushing hard to have PowerShell as its primary command-prompt administration.
To add a printer, use the Add-Printer cmdlet. This cmdlet can be used for either a local printer or network printer. We’ll show you both examples.
First, adding a local HP 5150 printer for the Sales department:
PS C:\> Add-Printer -Name "Sales Printer" -DriverName "HP 5150"Now, add a network printer to the print server you set up earlier:
PS C:\> Add-Printer -ConnectionName \bfsc1\192.168.1.253There may be times when you may not have the driver on the server. Adding a print driver to the server is a snap with PowerShell using the following cmdlet:
PS C:\> Add-PrinterDriver –Name "HP 5150"You now have a printer installed, but you need to configure the print properties, such as color. First, take a look at the current properties so you can see what needs to be changed:
PS C:\> Get-PrintConfiguration –PrinterName " HP 5150"

PrinterName     ComputerName    Collate    Color      DuplexingMode
-----------     ------------    -------    -----      -------------
HP 5150                          True       True       OneSided
Now that you have the configuration, you can change the Color property to false, as follows:
PS C:\> Set-PrintConfiguration –PrinterName "HP 5150" -Color $falseMicrosoft has introduced the Volume Activation 3.0 process with Windows 8 and Windows Server 2012. This differs from the familiar online activation. Volume-licensed installations connect to a central Key Management Service server within the LAN, which will register an activation “license” for the client with Microsoft over the Internet. This allows Microsoft to control the number of activations under the same volume product key.
By default, the Windows 8 and Windows Server 2012 servers are configured to connect to the KMS server prior to attempting to connect online. If the server can’t find one but does activate online, it acts as a KMS server. You might want to control this process by getting ahead of it.
When considering deploying a KMS server into a branch office, there are two key decision points. The first is secure TCP/IP connectivity. This process is seriously lightweight, so it isn’t a tremendous drag on WAN connections; however, you still need connectivity that isn’t the big white cloud to centralize activations to one site. The other factor is “25.” A KMS server doesn’t start communicating with Microsoft until there are 25 qualified licenses to activate. This means 25 Windows 8 installations. A Windows Server 2012 license counts as five Windows 8 installations. So one Windows Server 2012 server and 20 workstations would be enough to trigger communication.
Before the communication is triggered, the computers are running under a grace period and eventually will time out. This turns on “reduced functionality mode.”
In a branch office that has more than 25 licenses but not a secure TCP/IP connection to headquarters, setting up a KMS server is a realistic option. If you don’t meet the “25” threshold, Microsoft offers the Volume License Multiple Activation Key (MAK), which works similarly to the online activation of product keys.
The following sections detail the steps to set up the KMS server on a branch-office Server Core installation.
SRV records are found in DNS and publish the existence of services within a network. This will be discussed in detail in Chapter 5, “IP Address Management and DHCP Failover.” By default, the KMS server publishes the service with an SRV record in the primary DNS domain. For our Windows Server 2012 Server Core example, this is BigFirm.com.
In the BigFirm.com DNS domain, you would see an SRV record for _VLMCS._TCP.Bigfirm.com. It would have the following properties:
If you want this to happen, you would need to add permissions on the DNS zone to allow updates to the KMS servers. We recommend using a domain controller as the KMS server. The service is light, and the domain controller already has permissions to register SRV records in DNS.
However, with SRV records, there is no control over which KMS server the clients will go to if they are located in a branch office. They would query DNS and receive a response for a server located elsewhere. To keep the communication local, the KMS server must be registered on the client. In addition, DNS SRV publishing should be disabled for the branch-office server. This is done by creating a DisableDNSPublishing dword value of 1 in the HKEY_LOCAL_MACHINE\SOFTWARE\Microsoft\Windows NT\CurrentVersion\SL key.
There is already an inbound rule listed in the Windows Firewall configurations, and it’s part of the Key Management Service rule group. You need to enable it. The command for this is as follows:
netsh advfirewall firewall set rule group="Key Management Service" new enable=yesJust as you activated the Server Core instance, the branch-office KMS server needs to be activated with the slmgr.vbs /ipk and /ato options.
By default, Volume Activation 3.0 clients (Windows 8 and Windows Server 2012) attempt to connect to the KMS automatically using the SRV records. Since the process isn’t site aware, it will go to any provided KMS server. You can manually assign the KMS host on each client of the branch location with the following command:
cscript c:\windows\system32\slmgr.vbs /skms bfsc1.bigfirm.com:1688You could use a Group Policy object–assigned startup script to distribute this throughout the site.
This is the one of the features we added in the Server Core installation. It’s a good idea to back up data. Your environment may pooh-pooh the use of native backup tools and prefer a third-party enterprise-class backup solution. We don’t blame it. However, there’s always a point in between installation and full production when the enterprise-class backup solution’s client isn’t installed or configured. We have found through experience that NTBackup Utility is excellent for CYA data backups.
Microsoft reengineered its native backup utility and named it Windows Server Backup. It takes advantage of the Volume Shadow Copy Service to freeze the state of the data for the backup. Originally, it was designed to provide only off-site backups on a set of portable hard drives. Tape backups were eliminated, so removable hard drives were the only backup option. Fortunately, Microsoft broadened the application to include UNC paths to shared folders and locally attached hard drives by time of the release.
In this discussion, we’ll explore the PowerShell cmdlets that manage Windows Server Backup. First, you need to install the Windows Server Backup feature. We provided the proper name for you but you can run Get-WindowsFeature to see the list of names. You can also get a list of all cmdlets associated with Windows Server Backup if you run get-command *wb* -commandtype cmdlet.
PS c:\Users\Administrator>Install-WindowsFeature Windows-Server-BackupIf the feature installed properly, you will see the following output in PowerShell:
Success Restart Needed Exit Code      Feature Result
------- -------------- ---------      --------------
True    No             Success        {Windows Server Backup}
You will need to create a new backup policy. The backup policy is the set of instructions for automating your backup. When you create a new one, it is empty by default. So you will create it and then fill it with instructions. These instructions include scheduling the backup and setting the backup target location, files, and several others parameters, which you will see as soon as you install the policy. To install it you will use the New-WBPolicy cmdlet:
PS  c:\Users\Administrator> New-WBPolicy

Schedule              :
BackupTargets         :
VolumesToBackup       :
FilesSpecsToBackup    :
FilesSpecsToExclude   :
ComponentsToBackup    :
BMR                   : False
SystemState           : False
OverwriteOldFormatVhd : False
VssBackupOptions      : VssCopyBackup
Now that you see the New-WBPolicy properties, you can use the following script to set them. This script will set the policy to back up everything in the Sales folder every morning at 9 a.m.:
PS C:\Users\Administrator> $policy = New-WBPolicy

$fileSpec = New-WBFileSpec -FileSpec C:\Sales
Add-WBFileSpec -Policy $policy -FileSpec $filespec

Add-WBBareMetalRecovery $policy

$disks = Get-WBDisk
$backupLocation = New-WBBackupTarget -Disk $disks[2]
Add-WBBackupTarget -Policy $policy -Target $backupLocation

Set-WBSchedule -Policy $policy 09:00

Set-WBPolicy -Policy $policy
That will get you started using PowerShell to handle your Windows Server Backup. You can reference the complete cmdlet listing for Windows Server Backup at http://technet.microsoft.com/en-us/library/ee706683.aspx.