Figure 9.1 The Local Group Policy Editor—local machine
When you talk about Active Directory, you must also talk about Group Policy. Group Policy is not a new technology for Active Directory, but it has grown and improved with every iteration of the operating system and service pack since it was first introduced in Windows 2000. The Group Policy technology and features that are delivered with Windows Server 2012 R2 are such drastic improvements from the original version that they can almost seem like new technology. Changes and enhancements have come for managing Group Policy (the Group Policy Management Console and the Group Policy Management Editor), managing available settings (with now more than 5,000 settings), controlling targeting objects, and troubleshooting your Group Policy infrastructure. If you are a veteran of Group Policy, you will certainly want to focus on the Group Policy preferences, GPMC, and troubleshooting sections in this chapter.
In this chapter, you will learn to:
Let’s start with some important concepts, terms, and rules you need to know to master Group Policy. In the process of explaining the functionality of Group Policy, we will mention several settings without actually showing you how to turn them on in the Group Policy snap-in. Just focus on the concepts for now. Later in this section, we’ll take you on a full tour of the Group Policy Management console (GPMC); we will cover the Group Policy application (including settings such as Enforce and Block Inheritance) and the expanded settings.
Administrators configure and deploy Group Policy by building Group Policy objects (GPOs). GPOs are containers for groups of settings (policy settings) that can be applied to user and computer accounts throughout Active Directory. Policy objects are created using the Group Policy Management Editor (GPME), which is invoked by editing a GPO from within the GPMC. The same GPO could specify a set of applications to be installed on all users’ desktops, implement a very strict policy of disk quotas and restrictions on the Explorer shell, and define domain-wide password and account lockout policies. It is possible to create one all-encompassing GPO or several different GPOs, one for each type of function.
A GPO is made up of two parts:
However, there is a good bit of overlap between the two, especially now that Group Policy preferences have been introduced (more on Group Policy preferences later in this chapter). It’s not unusual to find the same policy available in both the User Configuration and Computer Configuration nodes. Be prepared for a certain amount of head scratching as you search for the policy you want to activate and decide whether to employ the user-based policy or the computer policy. Keep in mind that you can create a policy that uses both types of settings, or you can create separate GPOs to control the User Configuration and Computer Configuration settings.
Contrary to the name, Group Policy objects aren’t group oriented at all. Maybe they are called GPOs because a bunch of different configuration management settings are grouped together in one location. Regardless, you cannot apply them directly to groups. You can apply them locally, to sites, domains and to OUs (Microsoft abbreviates these collectively with LSDOU in the correct order, which stands for (1) Local, (2) Site, (3) Domain, (4) OU) within a given forest. This act of assigning GPOs to a site, domain, or OU is called linking. The GPO-to-LSDOU relationship can be many-to-one (many GPOs linked to one OU, for example) or one-to-many (one GPO linked to several different OUs). Once linked to an LSDOU, user policies affect user accounts within the OU (and sub-OUs), and computer policies affect computer accounts within the OU (and sub-OUs). Both types of policy settings apply at a periodic refresh rate, which is approximately every 90 minutes, for the most part.
When we said GPOs were stored in the AD, that wasn’t exactly accurate. GPOs are stored in two parts—a Group Policy container (GPC) and a Group Policy template (GPT), which is a folder structure. The container part is stored in the Active Directory database and contains property information, version information, status, and a list of components. The folder structure path is Windows\SYSVOL\sysvol\<Domainname>\Policies\GUID\, where GUID is the globally unique identifier for the GPO. This folder contains administrative settings, security settings, information on available applications, registry settings, scripts, and much more.
Each GPO contains many possible settings for many functions; usually you’ll configure only a handful of them in each GPO. The others will be left “inactive,” sort of like putting REM (for a remark) in front of a command in a script or using a semicolon at the beginning of a line in an INF file. Once you’ve configured policy settings and told AD that “this GPO is linked to the Bigfirm.com domain,” for example, the individual settings or types of settings cannot be selectively applied. All User Configuration settings will be applied to all user accounts logged onto Windows 7, 8, and Server 2012 R2 systems in the linked domain. All Computer Configuration settings will be applied to all Windows 7, 8, and Server 2012 R2 machines in the domain. Now, let’s say you’ve created a GPO that deploys a set of standard desktop applications such as Word, Excel, and Outlook, and you threw in a bunch of shell restrictions to prevent users from changing their configurations. If you don’t want your IT support group users to be subject to those ridiculously stringent shell restrictions (although those users may need them most of all!), you can do a couple of things:
Group Policy settings are cumulative and inherited from parent Active Directory containers. For example, the Bigfirm.com domain has several different GPOs. There is a GPO linked to the domain that sets password restrictions, account lockout, and standard security settings. Each OU in the domain also has a GPO linked to it that deploys and maintains standard applications, as well as folder redirection settings and desktop restrictions. User accounts and computer accounts that are located in the OUs receive settings from both the GPO linked to the domain and the GPO linked to the specific OU. So, some blanket policy settings can be applied to the entire domain, while others can target accounts according to OUs upon which they are linked.
Policies apply in the background every 90 minutes, with up to a 30-minute “randomization” to keep the domain controller from getting hit by hundreds or even thousands of computers at once. DCs are different from normal computers and refresh group policies every five minutes. There is, however, a policy to configure all of this, as you’ll see later in this chapter. Exceptions to the refresh interval include folder redirection, software installation, script application, Group Policy preference printers, and Group Policy preference drive maps. These are applied only at logon (for user accounts) or system startup (for computer accounts); otherwise, you might end up uninstalling an application while someone is trying to use it. Or a user might be working in a folder as it is being redirected to a new network location. In essence, for data integrity these policy settings apply only in the “foreground” refresh of Group Policy.
To better understand how Group Policy technology works in your Active Directory environment, it is best to understand how some of the Group Policy technology works “under the hood.” If you are just becoming familiar with Group Policy, you will quickly see that many of the features that Group Policy possesses are benefits over older technologies, such as system policies.
GPOs replicate themselves automatically, with no work required on your part. Active Directory is replicated using AD Replication (controlled by the Knowledge Consistency Checker and the Intersite Topology Generator) and is controlled by the File Replication Service or Distributed File Replication Service.
All the administrative template GPO settings write their information to certain parts of the registry and clean up after themselves when the policy setting is removed or the GPO is deleted.
This fixes the dreaded “tattooing” issue that has plagued “policy management” since it was first introduced. For example, suppose you had created a system policy on a legacy system that set everyone’s background color to some nauseating hue and also set up a policy that kept them from changing the color. Those changes were written into the system’s registry. If you then deleted the policy, the entries in the registry would not be removed, and therefore the ugly background would remain intact on the system. This is called “tattooing”. You’d actually have to write a second policy to undo the registry effects. With GPOs, that’s not necessary. Just removing the policy will undo its effects.
The true glory of Group Policy is related to the “background refresh.” Since all domain-based computers check in to see whether there are any changes every 90 minutes or so, policy settings are constantly being applied. This means that a setting that you make at 6 A.M. on a Monday morning to control some security setting on each desktop won’t require that the computers be up and running. Rather, the background refresh will apply to the computer before the user arrives at 8 A.M.
On Windows 2000 and later with Active Directory, machines get their policy settings from the domain they have membership in when they power up (recall that machines log on also), and users get policies from their domain when they log on.
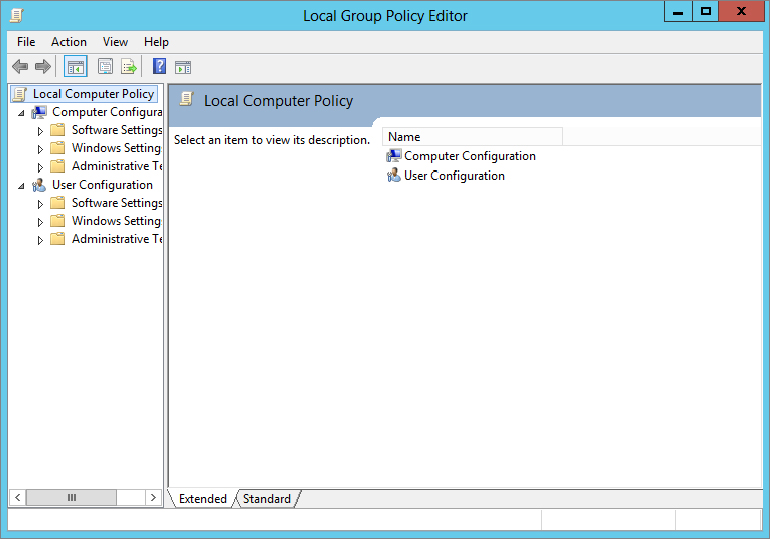
When you open the Group Policy tool (gpedit.msc), it automatically focuses on the local machine GPO, as shown in Figure 9.1. Administrators can use the tool to configure account settings (such as the minimum password length and number of bad logon attempts before locking the account), to set up auditing, and to specify other miscellaneous settings. However, the domain-based policy editor, the Group Policy Management Editor, includes a number of settings (including software installation and folder redirection) that are not available for local policies.
Figure 9.1 The Local Group Policy Editor—local machine
If you happen to be working on a Windows Server 2012 R2 or Windows 8 computer, you have more than the local GPO (LGPO) that you can configure. On these computers, you also have GPOs that can target groups of local users (Administrators or Non-Administrators LGPO) and individual users (User Specific LGPO).
As their names represent, the settings in the Administrators and Non-Administrators LGPOs will target either the users in the Administrators group or the users in all other groups. The idea is that when a user has membership in the local Administrators group, that user should have more privileges than a user who is not in this group.
Note that the LGPOs that control these settings modify user-based settings only. There are no settings under these LGPOs that control computer-based settings, which are located under the Computer Configuration node.
Since there are two “types” of groups, there are two LGPOs that control them. For you to control both of these types of users, you will need to configure both LGPOs. To access these LGPOs, you must use the MMC. The steps are similar to those discussed previously, with a slight alteration in the scoping of the Group Policy object that is loaded in the MMC. Instead of choosing Local Computer from the Group Policy Objects list, use the Browse button to look for the Administrators or Non-Administrators group listed on the Users tab, as shown in Figure 9.2.
Figure 9.2 You can view the Administrators and Non-Administrators LGPOs using the MMC.

To access both of these local GPOs for editing, follow these steps:
 Run.
Run.Repeat steps 4–12 for the Non-Administrators LGPO, replacing Non-Administrators for Administrators in the appropriate steps.
Finally, you can configure a very granular LGPO on every Windows Server 2012 R2 and Windows 8 computer. This policy is geared to target individual user accounts. There are only user-based policy settings in the LGPO, and the settings target only a single user.
The caveat to using this LGPO is that the user must have an account in the local SAM of the computer that you are configuring.
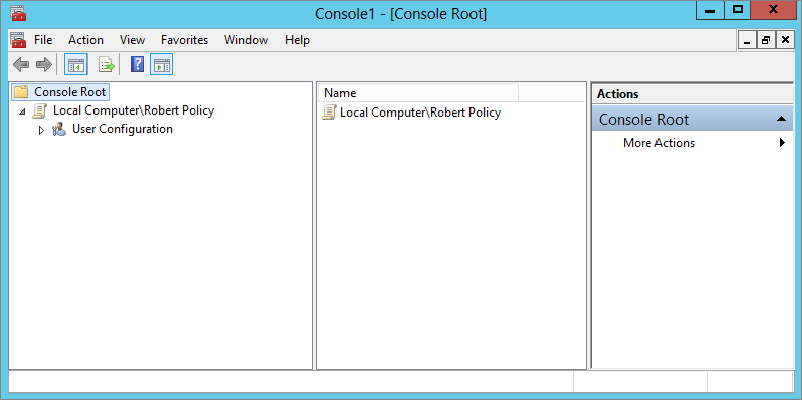
To view and configure this LGPO, you will also use the MMC and follow the same steps as you did for the Administrators and Non-Administrators LGPOs; however, you will select the user account on the Users tab for which you want to create the LGPO when adding the Group Policy Object Editor snap-in to the MMC. If you have selected the Administrator account, it will show up in the MMC similar to Figure 9.3.
Figure 9.3 Once a user is selected for management of the LGPO, it will show up in the MMC with all the User Configuration settings exposed.
Here are the steps to follow to access the local user-specific GPOs:
Run.Now that you understand the major concepts involved with Group Policy and know the difference between local GPOs and domain-based GPOs, let’s go through the steps of creating and editing a domain-based GPO. In this section, we’ll show you all the settings we discussed in the preceding “theory” section.
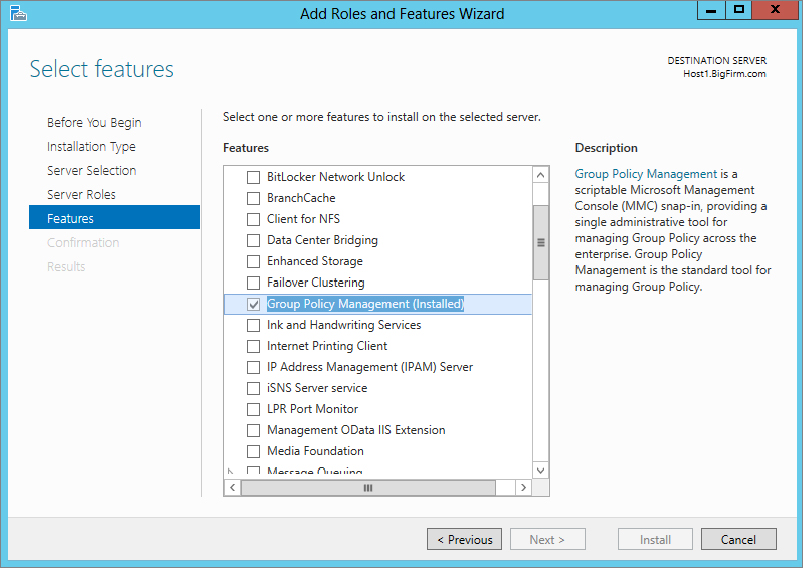
You will be using the GPMC to manage all domain-based GPOs. With Windows Server 2012 R2, you will need to install the GPMC using Server Manager, as you saw in Chapter 2, “Installing and Upgrading to Windows Server 2012 R2.”
After the GPMC is installed, it shows up under the Start Administrative Tools menu. Once you select it from this list, the GPMC tool opens and displays the domain in which your management computer has membership, as shown in Figure 9.4.
Figure 9.4 GPMC is the preferred GPO management tool.

To create a new GPO in the domain, you will need to expand the GPMC structure such that you can see all the nodes that exist under the domain, as shown in Figure 9.5.
Figure 9.5 GPMC expands to display all the nodes under the domain.

To create a GPO in the domain, follow these steps:
This will create a blank GPO called Desktop Security, which is not linked to any container in the domain yet. At this point, you will want to configure the GPO settings and then link it to the site, the domain, or an OU. To link a GPO to a node in Active Directory, follow these steps:
Figure 9.6 GPO tabs and properties in the right pane of the GPMC
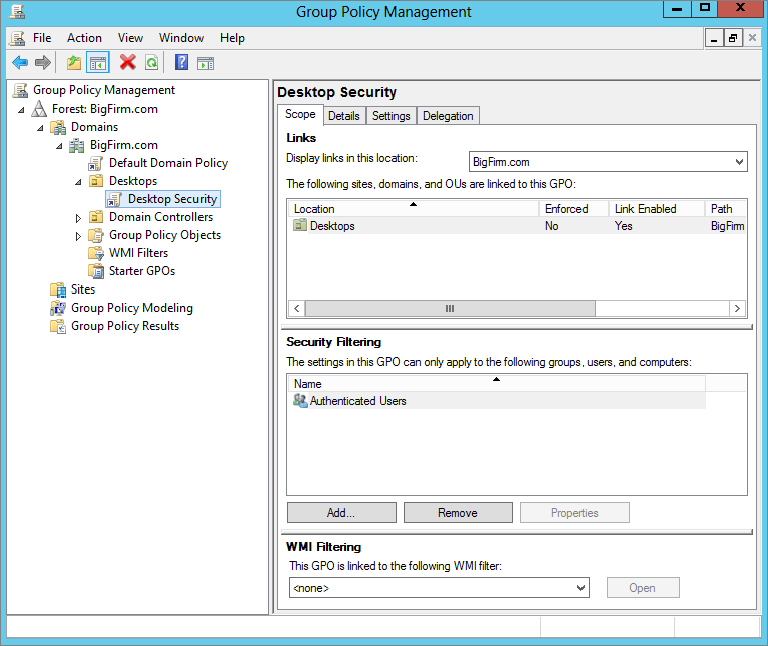
The Scope tab helps keep track of many aspects of the GPO. The most important of these details includes where in Active Directory it is linked to the uppermost area of the tab named Links and the middle area named Security Filtering. The Links area is rather obvious, listing the sites, domains, and OUs the GPO is currently linked to. The Security Filtering area clearly indicates which groups and users have the permission to apply the settings in the GPO. This filtering was referenced earlier, when it was used to control which users in the domain would have the settings from the GPO applied, just by adding or removing them from this tab. The final area of the tab, WMI Filtering, lists the WMI filter that the GPO has a link to, if any. WMI filters allow the targeting of GPOs to computer accounts dependent on the state of the computer at the time the WMI query is run.
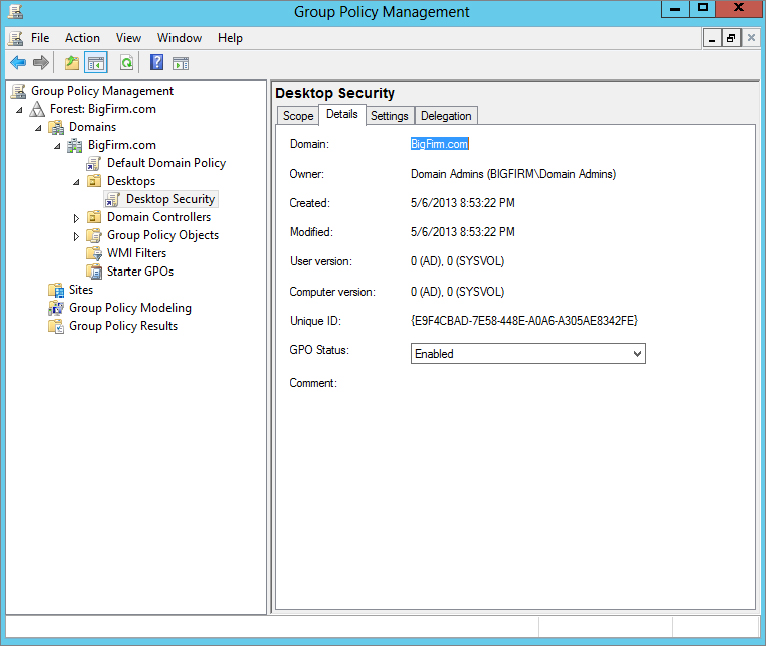
The Details tab, as shown in Figure 9.7, helps keep track of the GPO information that is associated with the creation and state of the GPO. Here you will be able to track down the GUID, creation date, version, and so on related to the GPO. You can also configure whether all or part (computer and/or user) of the GPO is enabled or disabled.
Figure 9.7 The Details tab of the GPMC provides key information about the GPO.
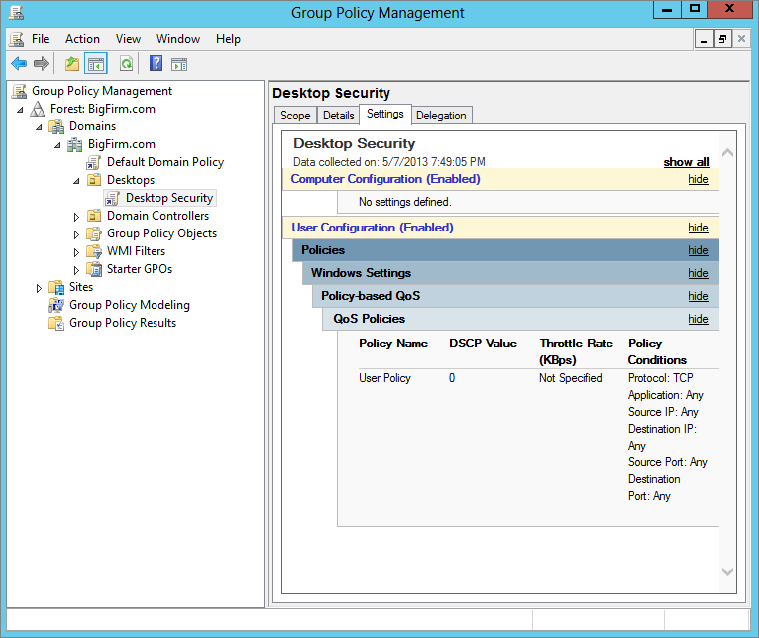
The Settings tab contains dynamic data related to the settings that are configured in the GPO. The tab displays an HTML version of the settings report, as shown in Figure 9.8.
Figure 9.8 The Settings tab of the GPMC displays the current settings in the GPO.
Finally, the Delegation tab shows the current security controlling the administration of the GPO. There are three different levels of administration of the GPO on this tab, as shown in Figure 9.9. Two include editing the GPO, where one is just reading the settings of the GPO.
Figure 9.9 The Delegation tab of the GPMC displays the level of administration permissions per group and user.

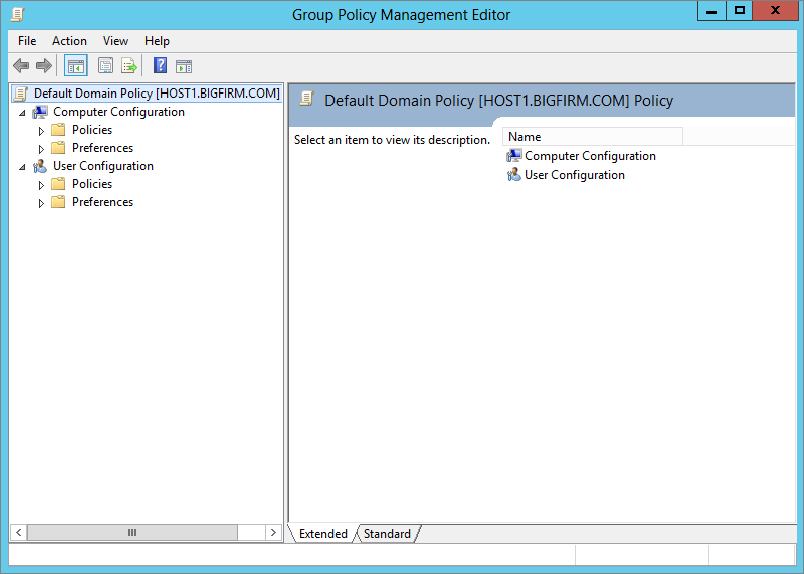
Now let’s view and modify the new GPO. Back under the Group Policy Objects node in the GPMC, right-click the GPO, and click Edit. This will open the GPME in a separate window, and you’ll see the policy object name at the root of the namespace, in this case Desktop Security [HOST1.BIGFIRM.COM] Policy. This indicates what policy is being viewed and edited. Figure 9.10 shows the policy expanded in the console tree to show the major nodes of the GPO. Remember that HOST1 is the domain controller for the Bigfirm.com domain.
Figure 9.10 Group Policy being edited in the GPME

There are two major types of settings, as we mentioned earlier. Computer Configuration settings are applied to computer accounts at startup and during the background refresh interval. User Configuration settings are applied to the user accounts at logon and during the background refresh interval.
Once you’ve configured your Group Policy settings, simply close the GPME window. There is no Save or Save Changes option. Changes are written to the GPO when you click OK or Apply on a particular setting, although the user or computer will not actually see the change until the policy is refreshed.
Group Policy is fantastic all by itself, but there are some behaviors that you might want to tweak or control. It might seem cyclical, but there are GPO settings to control the behavior of Group Policy and some of its settings. You will find that many of these settings don’t need to be configured, but in the instances where you need to make some minor adjustments, they will come in handy.
You can find the GPO settings to control Group Policy under Administrative Templates of both the User Configuration and Computer Configuration nodes (Policies\Administrative Templates\System\Group Policy). The Computer Configuration node contains most of the policies we’ll be discussing. Figure 9.11 and Figure 9.12 show the User Configuration and Computer Configuration options for Group Policy. The following paragraphs summarize the most important configuration options.
Figure 9.11 User Configuration settings for Group Policy

Figure 9.12 Computer Configuration settings for Group Policy

Like most technologies, Group Policy has logic associated with it to ensure that it applies in a reliable manner. For the most part, the application of Group Policy will be straightforward. It is only when you start to have conflicting settings in multiple GPOs and you start to modify the default behavior that the logic becomes more complex. Regardless, when you sit down to design and implement your policy settings, you will need to fully grasp what the end result will be for all of your computers and users.
In this section, we will cover the default Group Policy application, which will resolve all your questions regarding GPO setting conflicts. You know, questions like, “What if I have a GPO at the domain that removes the Run command from the Start menu but a different GPO linked to the Desktops OU that adds the Run command to the Start menu?”
We will also delve into areas that will help you “target” your GPO settings for when too many users and computers (or not enough users and computers) are receiving the policy settings. With WMI filters, enforcement, blocking inheritance, and more, you will certainly not be without options.
Now that you have a GPO or two running, you’ll soon find the troublesome part of Group Policy: figuring out what the end result is for each computer and user. Imagine, for example, that a user calls up and asks, “Why is my background purple?” You then realize that there are a lot of places that your system gets policies from, and they might disagree on things such as background color. So, which one wins?
Let’s start by considering a simple situation: just policies in a domain. Suppose you look at the domain node using the GPMC and see that it has many GPOs linked to it, as shown in Figure 9.13.
Figure 9.13 Domain node and linked GPOs
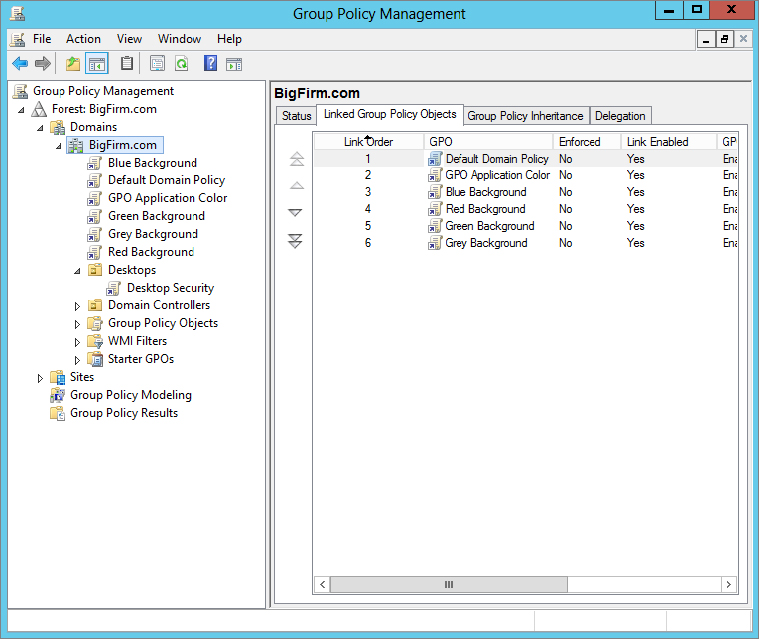
In this (admittedly fanciful) situation, the domain has five group policies, four of which attempt to set a workstation’s background color to gray, green, red, or blue. (The other is the Default Domain Policy, which has nothing to say on the issue.) To see the order in which the GPOs have preference, you can click the domain node and view the Linked Group Policy Objects tab in the right pane. So, based on Figure 9.13, which one wins? Gray, red, green, or blue?
The answer lies in two basic conflict-resolution rules for GPOs:
Reading from the bottom of the dialog box up, you see that the system will first see the policy that sets the background gray, then the one that sets it green, then the one that sets it red, and finally the one that sets it blue. Because blue is the last one heard from, it wins, and the effects of the previous three are obviated.
You can also click the Group Policy Inheritance tab, which will display the order in which the GPOs apply from all locations within Active Directory. As you can see in Figure 9.14, the blue background policy wins out over the others.
Figure 9.14 GPO inheritance for the domain node

But what if you want the red background policy to win? Notice the up and down arrows to the left of the Linked Group Policy Objects tab? You can shuffle them around to your heart’s content.
But we’re not nearly finished here. It could be that although it looks as if many policies apply to your system, in fact, only a small number do. The reason: GPOs have ACLs.
Click any GPO in the GPMC (in our example, the Desktop Security GPO), and view the Scope tab in the right pane. Here, in the Security Filtering section, you see the ACL for the GPO, as shown in Figure 9.15.
Figure 9.15 ACL for a GPO in the GPMC

As we pointed out before, Domain Admins and Enterprise Admins have Read and Modify permissions, and Authenticated Users have Read and Apply Group Policy. However, notice that you only see Authenticated Users listed in the list. Why is that? Well, this is a list of only the users, computers, and groups that have the permission to apply the GPO settings. To view the full ACL, you must first select the Delegation tab and then click the Advanced button. The good ol’ Security Settings dialog box will display, as shown in Figure 9.16.
Figure 9.16 Security Settings dialog box for a GPO

It may happen that you create a GPO to restrict desktops and you don’t want to apply it to a certain group of people. The group Authenticated Users includes everyone (user and computer accounts) but guests, so by default the GPO will apply to everyone but guests; that means even Domain Admins and Enterprise Admins will receive the policy settings. To prevent Domain Admins and Enterprise Admins from receiving this policy, you must select the Deny box next to Apply Group Policy (Figure 9.17). A member of both groups will only need the Deny setting for one of the two groups, but you’ll need to select the Deny box for both groups if the members of Domain Admins and Enterprise Admins are not the same people. To “excuse” others from receiving the policy, put them all in a security group and add that group to the list. It is not enough to deselect the Allow box for Read and Apply Group Policy; the users in your special security group are also members of Authenticated Users, so you actually need to choose the Deny option for them as well. Deny takes precedence over Allow.
Figure 9.17 Denying the Apply Group Policy permission

As an alternative to all that ACLing, you can also remove the Authenticated Users group from the Security Filtering part of the Scope tab, add all the users who need to have the settings to a security group, and then add the security group to the Security Filtering part of the Scope tab. This is shown in Figure 9.18.
Figure 9.18 Group Policy security filtering without Authenticated Users

By the way, there is nothing to prevent you from adding individual users to the permissions list for a GPO. However, it is a horrible security and management practice to do so, because it is impossible to track individual users who are placed on ACLs throughout the enterprise! We’ll stress, then, that policy filtering is incredibly powerful—you might say that it’s the tool that lets you oppress individuals or groups. In the real world, however, adding ACLs to a policy can be a nightmare for the poor fool trying to figure out two years later why a policy is attached to a domain but isn’t bloody applying to most of the people in the domain!
Just as security filtering can be used to counter the blanket application of policy application, the Block Inheritance setting is a special setting on an AD node (domain or OU) to prevent higher-level GPOs from trickling down. When the Block Inheritance setting is enabled, the settings of higher policies will not be applied to lower containers at all. For example, if you create a GPO for a specific OU, say Brunswick, and set up all the necessary settings for the Brunswick OU, and then you want to prevent the Bigfirm domain GPOs from affecting the Brunswick OU, you’d enable the Block Inheritance setting on the Brunswick OU. The only GPOs applied will be those linked to the Brunswick OU.
There is also a counter to the block inheritance configuration. When Enforce is turned on for a GPO, the Block Inheritance setting is neutralized for the enforced GPO. Also, the settings in subsequent GPOs are prevented from reversing the ones in the Enforce-enabled GPO. For example, if domain admins have a set of highly disputed settings turned on at the domain level and those renegade Brunswick admins set up their own OU with its own policy settings and select the Block Inheritance setting, the Brunswick OU effectively escapes the disputed settings, but only until the domain admins get wise and select the Enforce setting. Then the domain admins win, and the Brunswick OU people have to live with the same restrictions as everyone else. Enforce beats Block Inheritance (just like paper covers rock).
Like all secret weapons, the Enforce and Block Inheritance settings are best used sparingly. Otherwise, in a troubleshooting situation it becomes rather complicated to determine what GPOs are applied where. This could be detrimental to the mental health (and potentially the job security) of a network administrator.
Whew! Here’s a summary of the factors that can decide which Group Policy object wins:
You can do basically anything with Group Policy settings that you can do to the local system registry and most configurations. Here are a few examples:
There’s lots more to work with in policies, but that was a basic introduction to get you started.
Windows Server 2012 R2 and Windows 8 come with a completely new look and feel for the User and Computer Configuration settings in the GPME. The reason for this is that Microsoft has done us all a huge favor! The favor is that it has introduced nearly 3,000 more GPO settings. To give you a better grip on the volume of settings, Microsoft has also adjusted how the settings are presented in the GPME.
As you see in Figure 9.19, there are two main nodes to the GPME interface: User Configuration and Computer Configuration. Both nodes have the following subnodes: Policies and Preferences. The Policies subnode is further broken down into the following subnodes: Software Settings, Windows Settings, and Administrative Templates. The Preferences subnode is broken down into these subnodes: Control Panel and Windows Settings.
Figure 9.19 Group Policy nodes and subnodes
The difference between the two levels of nodes is this: settings for User Configuration apply to user accounts, and settings for Computer Configuration apply to computer accounts. For example, if registry settings are involved, as is the case with administrative templates, the changes will be written to HKEY_CURRENT_USER (HKCU) for User Configuration and to HKEY_LOCAL_MACHINE (HKLM) for Computer Configuration settings. You may want to create separate GPOs for machines and users to keep things straight. If a value set in the computer settings is also specified in the user policy settings, the Computer Configuration settings usually take precedence by default. To ensure the behavior, check out the Explain tab within the GPO setting, but the best solution would be to test!
With more than 5,000 settings in a Windows Server 2012 R2 GPO, it’s impossible to go over every setting. However, to help you through the settings, you should check out the Excel spreadsheet that Microsoft has provided at:
We will go over some of the more useful policy settings and policy categories in the following sections.
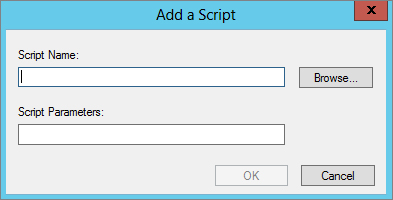
You can specify logon and logoff scripts, as well as scripts to run at system startup and shutdown, using Windows Settings in either the User Configuration node or the Computer Configuration node. Expand Policies\Windows Settings to reveal Scripts, and then select the script type (Startup, Shutdown, Logon, or Logoff) in the details pane on the right; Figure 9.20 shows the scripts available in User Configuration. From here, double-click the script type (such as Logon), or highlight it and choose Action Properties. Add Scripts to the list using the Add button, supply a script name and parameters when prompted (see Figure 9.21), and click OK. To edit the script name and parameters (not the script itself), choose Edit. If more than one script is specified, use the up and down buttons to indicate the order in which the scripts should run.
Figure 9.20 Group Policy logon scripts
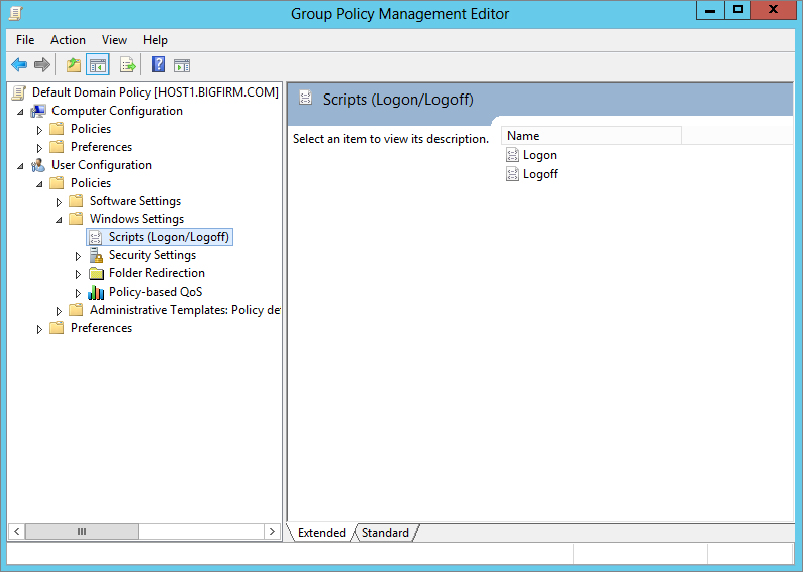
Figure 9.21 Adding a script to Group Policy
The scripts you create and assign should be copied to the following path in the directory: \Windows\SYSVOL\SysVol\domainname\Policies\{GUID}\Machine\Scripts\Startup (or Shutdown). (Or they can be copied to User\Scripts\Logon or User\Scripts\Logoff, depending on whether you are assigning scripts to the Computer Configuration node or to the User Configuration node.) The GUID for the Group Policy object is a long string that looks like {FA08AF41-38AB-11D3-BD1FC9B6902FA00B}. If you want to see the scripts stored in the GPO and possibly open them for editing, use the Show Files button at the bottom of the properties sheet. This will open the folder in Explorer.
As you may know, you can also specify a logon script in the properties sheet of the user account in dsa.msc. Microsoft calls these legacy logon scripts and encourages you to assign scripts with Group Policy for Windows AD–aware clients. The advantage to using the Group Policy scripts is that they run asynchronously in a hidden window. So, if several scripts are assigned or if the scripts are complex, the user doesn’t have to wait for them to end. Legacy logon scripts run in a window on the desktop. On the other hand, you might not want the scripts to run hidden (some scripts stop and supply information or wait for user input). In that case, several policy settings are available to help you define the behavior of Group Policy scripts. These settings are located in the System\Scripts\Administrative Templates node. There you’ll find settings to specify whether to run a script synchronously or asynchronously and whether it should be visible or invisible.
One of the more useful things you can do with User Configuration settings in Group Policy is to arrange for a user’s AppData, Desktop, Start Menu, Documents, Favorites, and Links folders to follow the user around from computer to computer. These folders are important elements in a user’s working environment. AppData stores application-specific user information (Internet Explorer uses it, for example), and Desktop may contain important folders and shortcuts that need to be just one click away for the user. The Start Menu folder contains program groups and shortcuts to programs, and My Documents is the default place to save and retrieve files, sort of like a local home directory.
There are several good reasons to use folder redirection. For one thing, it’s convenient for users who log in from several different machines. Also, if you specify a network location for some or all of these folders, they can be backed up regularly and protected by the IT department. If roaming profiles are still in use, setting up folder redirection speeds up the synchronization of the server profile with the local profile at logon and logoff, since the redirected folders need not be updated. Redirecting the Desktop and Start Menu folders to a centralized, shared location facilitates standardization of users’ working environments and helps with remote support issues, because help-desk personnel will know that all machines are configured in the same way. Best of all, you can mix and match. It’s possible to specify a shared location for the Desktop and Start Menu folders while allowing each user to have their own Documents and AppData folders. Let’s take a look.
To set a network location for the Documents folder in Group Policy:
Figure 9.22 Policy to redirect the user’s Documents folder
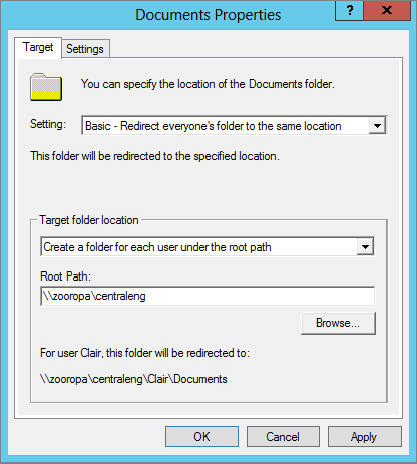
Figure 9.23 Additional settings in Group Policy to redirect the user’s Documents folder
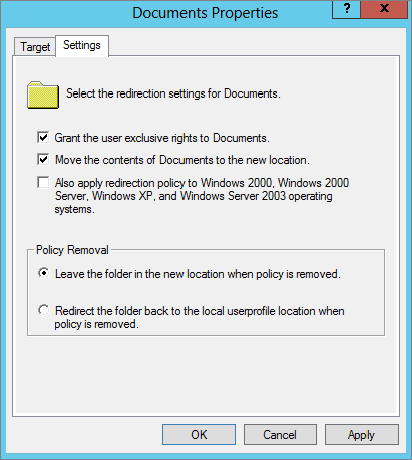
The options you see in Figure 9.23 show default selections for the Documents folder. Notice that the user will have exclusive access to the folder by default. The contents of the corresponding folder will be moved to the new location by default. Even after the policy is removed, the folder will remain redirected unless you say to “unredirect” it.
Security settings, along with administrative templates, make up a significant part of Group Policy. The default security settings are purposely open to minimize administrative headaches and to ensure that users and applications work as intended. As security increases, users and applications have more restrictions, and support time goes up. In other words, security is inversely proportionate to convenience. As you start locking down systems, something is bound to stop working. Hey, regular users can’t even install applications on a Windows Vista system by default. When you start enforcing passwords that are eight characters or more, contain both letters and numbers, can’t use any part of a user’s name, and cannot be reused until 15 other passwords have been used, things get complicated for the everyday Joe. For organizations that want to increase security, there are tools and guidelines.
For example, if you have ever “hardened” a Windows server according to established military or other high-security guidelines, you know that you have to set particular permissions on particular folders, change the default permissions on certain registry keys, and change or create other registry entries as well. All in all, it takes a few hours of work on a single server, even for an efficient admin. What if you have 50 servers and 500 workstations? Some things can be scripted, but others can’t. There is no Microsoft or third-party tool that does everything automatically for all machines.
Here’s where Group Policy comes to the rescue. Assuming you are going to standardize throughout a grouping of servers or workstations, or even a portion of the organization, you have to change those sticky registry permissions and settings only once using Group Policy. You only have to set the NTFS permissions once. The permissions can even be set up in one policy and copied to another. Whether you need a lot of security or just a little more than the default, chances are you’ll want to make at least some standardized changes, and the Security Settings node will certainly make your life easier. The bulk of security settings are found under Computer Configuration\Policies\Windows Settings\Security Settings, although public key policies and software restriction policies are also found in the User Configuration node in the same path. The following are the major categories of settings under Security Settings:
To accomplish your “mass” security rollout from the previous example, you will need some way to get the settings “entered” and then “deployed.” The deployment is rather easy, since you have AD and Group Policy. The question then becomes how do you “enter” the security information so it can be tracked, reused, and quickly modified? The answer is security templates. We suggest that if you’ve been overlooking them, then you have to start using them. In this section, you’ll see why.
Let’s say that you’ve decided you want to ensure that the Power Users groups on your workstations should be empty—you don’t want anyone in those groups. You also are awfully tired of stomping out the latest web server worm on all of those computers that installed IIS, so you’re going around and disabling Web Publishing Service on all servers that don’t need it.
But, man, that’s a lot of work. So, you adopt Plan B: the security requirements document. In this document, you outline exactly what must be done for any workstations or servers approved at Acme Corporation. You distribute the document. And no one has time to read it. Nor is there any easy way to check up on systems to see whether they meet the requirements. Or so it seems.
Wouldn’t it be great to just click a button and make those changes on every system? You can, with a few tools: secedit.exe, which is an MMC snap-in named Security Configuration and Analysis, and security templates.
Basically, a security template is an ASCII file that you feed into a program named secedit.exe. That template is a set of instructions—basically a script—that tells secedit to make various kinds of changes in your system.
Templates don’t let you modify anything that you couldn’t modify otherwise; they just provide a nice, scripted, reproducible way to make modifications and then easily audit systems to ensure that they meet the template’s requirements. You could make any of these changes by hand with the GUI, but it’d be time-consuming. With templates, you can change the following:
It’s easiest to show you how to work with templates with an example, so let’s build a template to do three things:
First, you’ll need some tools. Let’s build an all-in-one tool using the MMC. Also, you’ll need two snap-ins: Security Templates and Security Configuration and Analysis. Set it up like so:
Your tool should look like the one in Figure 9.24.
Figure 9.24 MMC with Security Templates and Security Configuration and Analysis snap-ins
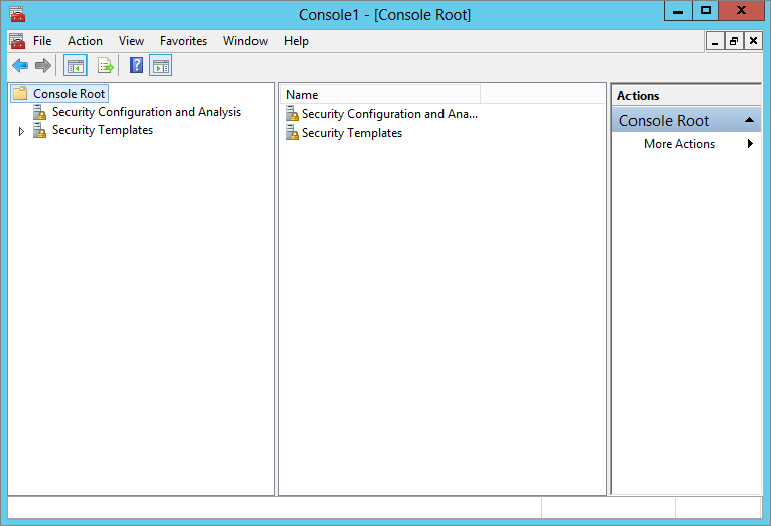
Expand the Security Templates node, and add a new template search path. The path you want to add will be C:\Windows\Security\Templates. Expand that, and you’ll see a DC security.inf prebuilt template.
But you’re interested in building a new template from scratch. To do that, right-click the template path, and choose New Template from the context menu. Type in a name for the template and a description if you want. The new template will appear as a folder in the left pane, along with the prebuilt template. We’ve named ours Simple. First, let’s clean out the Power Users group:
By default, including a group in a security template tells the template to remove everyone from the group, so you’re finished. If you wanted to use the security template to put someone in the group, then just right-click the group and choose Properties, which lets you specify members of the group.
Next, let’s set up the security template so that any system with a folder named C:\SECRET will be accessible only to the local administrators.
Finally, let’s shut down IIS:
Now save the template—right-click Simple or whatever you called the template, and click Save. Unless you set up a separate folder for your templates as we described earlier, you now have a file named simple.inf in your \Windows\Security\Templates folder.
To see how this template will modify a system or to apply the template setting using the MMC snap-in, you must create a security database. To do this, you have to essentially compile it from its simple ASCII form to a binary form called a database. You do that from the other snap-in, Security Configuration and Analysis.
That’s all very nice, you may be thinking, but how do I apply it to dozens of computers? Do I have to visit each one? Well, you do if you want to use this tool! If you want to use other options, one would be to use a command-line tool. A command-line program called secedit.exe will both convert templates into databases and apply databases. To read a template, apply, and then create a database in the process, use the following syntax:
Secedit /configure /cfg templatefilename /db databasefilename/overwrite /log logfilenameTo apply an existing database without first reading the template, just leave off the /cfg switch and argument. To apply the template to your workstations, you could include the secedit command in a logon script (be sure to specify full path names for the template, database, and log files) that will reapply it with every logon. You could also use the Task Scheduler service to run a batch file and reapply the template at specific intervals. Or you could enable the Telnet server on your Windows server machines and just apply the template whenever you like.
Automation and scripting are nice, but what if you want to take advantage of the “automatic” background refreshes that Group Policy provides, as well as the 16-hour forced security settings update? That’s right, you use Group Policy! You’ll learn about this in the next section.
secedit is nice, but it has to be invoked manually or from a batch file, which means a lot of messy editing of logon batch files or fiddling with the scheduled tasks on all your systems. If you use a login script, the security template gets applied at logon time only. How do you enforce security settings more often? With a GPO.
Domain-based GPOs have a few benefits:
You already have your security template, simple.inf, which you created in the previous section. Now, you want to leverage the deployment of the security settings in the template by using a GPO.
The steps to import the template are very simple. Follow these steps to import the simple.inf template into a GPO:
The big question is, what do you do now? Well, if you can just wait 90 minutes, you don’t have to do anything! Just allow the standard background policy refresh to take over and—bam!—all your settings will apply to all computers in the Desktops OU.
The old-style administrative templates were OK, but they had issues. In fact, these ADM templates were plagued with size issues, scripting complexity, and language barriers. To solve all these issues, Microsoft developed a new type of file that replaces the ADM template, which originated with Windows Server 2008. The new templates are XML based and come in pairs. The new file extensions are ADMX and ADML.
The ADMX and ADML files are now stored in C:\Windows\PolicyDefinitions. When you crack open this folder location, you will see more than 100 ADMX files, along with a default folder for English, which is named en-US. The en-US folder contains all the language-specific information for displaying the settings in the GPME.
The new ADMX/ADML files have a few benefits:
Creating a central store for the storage and administration of these files is as easy as making a copy of the folder structure! That’s right—all that needs to be done to centralize the management of these files is to copy the folder structure to the domain controllers. In short, follow these steps to create the central store:
The end result will be that you have now duplicated the ADMX/ADML folder structure and files on the domain controller, as shown in Figure 9.25. Since the folder exists in the domain controller, it will automatically be replicated to all the other domain controllers in the domain.
Figure 9.25 Central store for ADMX/ADML files

To verify that you are now consuming the ADMX files from the central store, just edit a GPO and view the text after the Administrative Templates node from within the GPME.
If you have a custom ADMX/ADML file combo after creating the central store, all you need to do is copy the ADMX file to the PolicyDefinitions folder and the ADML file to the en-US folder. The new settings will show up in the GPME!
For every setting in Internet Explorer, there seems to be policy to disable it. Considering that a good deal of time at work is spent surfing the Web, it’s a particularly cruel and clever thing to impose such control over IE settings (unfortunately, many companies use Firefox instead of Internet Explorer). Here are a few settings that we find useful:
While we’re on the subject of preventing users from installing software, enable the policy named Prevent Removable Media Source for Any Install found under User Configuration/.../Windows Components/Windows Installer to keep users from running installations from a CD-ROM or a floppy drive (remember those?). And if you are going to do that, you should also enable the policy to hide the “Add a program from CD-ROM or floppy disk” option in User Configuration/.../Control Panel/Add or Remove Programs. The Control Panel node includes several options to disable or remove all or part of the Add/Remove Programs applet.
Disabling Add/Remove Programs will not prevent users from running setup routines in other ways, however. Anyone who can use a command line can circumvent these restrictions, so you’d need to open the System node of the User Configuration policies and enable the policy called “Prevent access to the command prompt.” If you are looking for that infamous policy called “Run only specified Windows applications,” it’s found in the System node of the User Configuration templates (shown in Figure 9.26). Be careful with this one, though; you have to make a list of all applications that can be launched from Windows Explorer. There is also a setting in the same location called “Don’t run specified Windows applications.” For this one, you’d need to make a list of disallowed programs.
Figure 9.26 Policy to run only specified applications

The same principle applies to the Start menu and taskbar option called “Run from the Start menu.” Experienced users will not be prevented from running nonapproved programs just because Run is removed from the Start menu, so you have to seek out all the other ways of launching programs and disable them as well (users can also launch programs from Task Manager unless you disable it in the Ctrl+Alt+Del options).
One of the most misunderstood and complex aspects of Windows AD is how and where password policies are configured and managed. In this section you will get the skinny on how it works to remove all doubt moving forward. Here is a list of truths and myths about Account Policy settings that should answer all of your FAQs:
Truths
Myths
By default in a Windows Server 2012 R2 domain, the Default Domain Policy is used to establish the Account Policy settings for all user accounts in the domain. (This includes both domain user accounts and all local SAM user accounts for computers joined to the domain.) Password and account lockout policy settings are located under Computer Configuration/Policies/Windows Settings/Security Settings. The password policy includes the following options:
Account Lockout Policy, once enabled, prevents anyone from logging in to the account after a certain number of failed attempts. The options are as follows:
One of the most impressive aspects of Windows Server 2012 R2 (not just Group Policy related, but of the entire new OS) is Group Policy preferences (GPP). Group Policy preferences are extensions to Group Policy, which in normal speak is “new settings in a GPO.” These new settings add more than 3,000 policy settings to a GPO, and some of them are just amazing! For example, now you can modify the local Administrator password on every desktop in your environment, within about 90 minutes. You can also control the membership of the local Administrators group on all desktops and servers, without removing the key service accounts and other domain groups that are unique to each computer.
The GPP settings are a bit different from the other Group Policy settings, primarily because they exist in duplication under both the computer and user areas of a GPO. This gives you great flexibility and power over which setting you want to unleash on the desktops and users in the environment.
For the GPP settings, you will see the list of options displayed in Table 9.1.
Table 9.1: Group Policy Preferences Settings
| Group Policy Preferences Setting | Available Under Computer Configuration? | Available Under User Configuration? |
| Applications | No | Yes |
| Drive Maps | No | Yes |
| Environment | Yes | Yes |
| Files | Yes | Yes |
| Folders | Yes | Yes |
| Ini Files | Yes | Yes |
| Network Shares | Yes | No |
| Registry | Yes | Yes |
| Shortcuts | Yes | Yes |
| Data Sources | Yes | Yes |
| Devices | Yes | Yes |
| Folder Options | Yes | Yes |
| Internet Settings | No | Yes |
| Local Users and Groups | Yes | Yes |
| Network Options | Yes | Yes |
| Power Options | Yes | Yes |
| Printers | Yes | Yes |
| Regional Options | No | Yes |
| Scheduled Tasks | Yes | Yes |
| Services | Yes | No |
| Start Menu | No | Yes |
Most of the settings in Table 9.1 are self-explanatory. However, we’ll give you a jump-start on how some of these settings might be used. For example, security is always on the top of the IT staff members’ minds when it comes to securing desktops, but there is never enough time, right? Take the issue of resetting the local Administrator password on every desktop in your company. We know, we know . . . that is just crazy talk! However, when was the last time that this task was accomplished for your desktops? At installation? Two years ago? We have heard all of the possible answers, but now with GPP, you can change it as often as you like. To make this setting occur, follow these steps:
Local User, which will open the New Local User Properties dialog box, as shown in Figure 9.27.
Figure 9.27 Group Policy Preferences New Local User Properties dialog box
 User option for GPP. Instead, think about it as creating a new user policy! You can create a new user, but there are many more options than just creating a new user. Use this “New XYZ policy” mentality when you create any new GPP setting, and it will help you figure out what you want to do with the setting.
Voilá! This will reset the password for the local Administrator account on every desktop that falls under the Scope of Management to receive the GPO. After about two hours, all of the desktops that are connected to the domain and network will have the setting updated.
Now, wasn’t that easy? The rest of the settings are just as easy, and the power that you now have at your fingertips is quite impressive. To give you an idea of what we have seen and what others have already done with GPP, here is a list of ideas per policy setting to get you started:
One of the most impressive aspects of GPP is the item-level targeting capabilities. You can now target and apply any GPP setting by first querying different aspects of the computer environment, only applying the setting if the environment is what you want it to be. For example, let’s say you have the HR department running an application that exists in a Terminal Services environment. When they launch this application, they need to have a mapped drive for the application. The solution that most companies must use today is to map the drive for the user account, so they have a “bogus” drive mapping even when they are working on their desktop. GPP item-level targeting allows you to provide the drive mapping only when they are in the Terminal Services environment.
You can obtain this type of control by leveraging one of many different item-level targeting options. The full list of item-level targeting options is as follows:

The GPMC has been around for quite a while now. The first generation of the GPMC was revolutionary and made administration of GPOs much easier. This generation of the GPMC continues to make the administration of GPOs easy, efficient, and stable. No more are the days when you needed to launch the Active Directory Users and Computers to see, create, link, and manage GPOs. That was archaic to say the least. Now, the new GPMC can run on Windows Server 2012 R2 and Windows 8.
You will need to install the GPMC, because it is not installed by default. For your Windows Server 2012 R2 computers, you can install the GPMC from Server Manager.
Figure 9.28 The GPMC is installed via Server Manager.
For your Windows 7 or 8 desktops, installing the Remote Server Administration Tools is needed for GPMC. You will need to follow these steps to get the GPMC installed:
Microsoft is making strides to make GPO management easier and more efficient. The first attempt at this is Starter GPOs. You can use a Starter GPO to re-create a suite of GPO settings, only to use the Starter GPO again and again and again. Say, for example, that you are in charge of ensuring that Internet Explorer is configured properly for your organization. You could create a Starter GPO that includes all of the required Internet Explorer settings and save the Starter GPO. Then, when any new GPO is created, it uses the IE Starter GPO you created to ensure the Internet Explorer settings are included.
To create a new Starter GPO, select the Starter GPO node in the GPMC. Then, follow these steps:
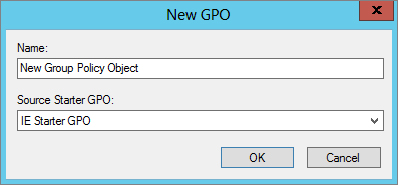
Now that your Starter GPO is created, everyone who has the ability to create a GPO in the domain can use it as a “starter suite of settings.” When any new GPO is created in the GPMC, there is a drop-down list for Source Starter GPO in the New GPO dialog box, as shown in Figure 9.29. Keep in mind, however, that one significant limitation of Starter GPOs is that they only include the administrative template settings of the GPO.
Figure 9.29 New GPOs can use a Source Starter GPO during creation.
The GPMC is a one-stop shop for all GPO management. One of the most important aspects of protecting your GPO assets is to back them up. (It is like anything in a computer world; you are only as protected as the last time you backed up your data!)
The GPMC provides both backup and restore capabilities, which allows you to archive every version of the GPO that you create and implement. It is very convenient that the GPMC provides these capabilities directly in the interface, because there is no need to launch another application or tool to do this job.
Backing up a GPO is simple:
There will be a time when you want to view the list of GPOs that you have backed up. To see this list, right-click the Group Policy Objects node within the GPMC and select the Manage Backups menu option. This will launch the Manage Backups interface, shown in Figure 9.30.
Figure 9.30 GPMC allows you to manage the GPOs that you have backed up.
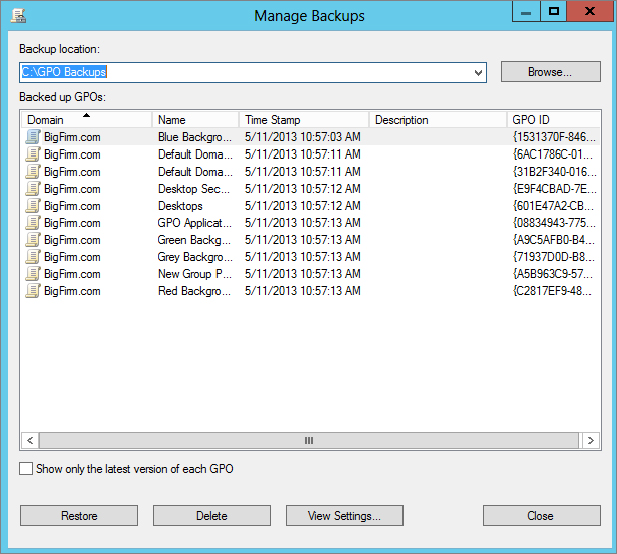
From here, you can restore, delete, and view the settings of a backed-up GPO.
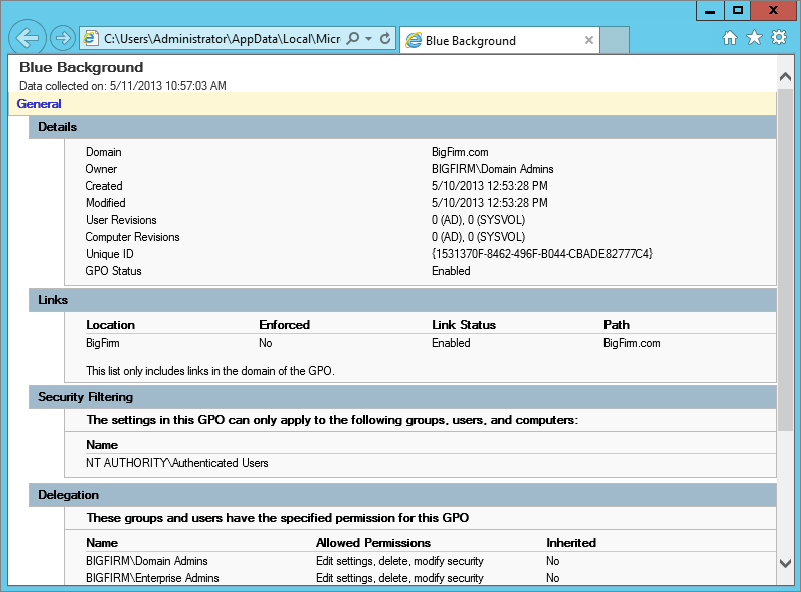
Figure 9.31 The View Settings option in the backup tool allows you to see all the GPO information.
In case it’s not clear by now, group policies are powerful . . . and also complex. And they can be kind of opaque—sometimes you create a bunch of policy settings for a domain controller that you intend to control some desktop and then restart the desktop, log in, and wait to see the effects of the new policies . . . but nothing happens.
A few troubleshooting tools are included to assist you in troubleshooting Group Policy issues. The Resultant Set of Policy (RSOP) snap-in and console tool provides a graphical interface, and gpresult.exe performs equivalent functions from the command line. gpotool.exe is a Windows Resource Kit tool, and it looks for inconsistencies between GPOs that are stored on domain controllers. This little utility can help you identify replication issues that are causing a problem with Group Policy application.
Troubleshooting group policies has been, for administrators, a major obstacle to complete control and domination of the network environment. The problem was the inability to view the cumulative policy settings that were in effect for a user or computer. This little capability to display actual policy settings, the Resultant Set of Policy tool, is built into Windows Server. Using RSOP you can run “What-if” scenarios to diagnose problems. Without RSOP, you have to look at the properties of each site, domain, and OU to see which policies and containers are linked. Then you must view the ACLs and WMI information to see whether there’s any filtering and also check out the Disabled, Block Inheritance, and Enforce options. Don’t forget the item-level targeting, which can get very granular, thus confusing to try to evaluate by hand. Finally, you need to view the settings of the policies in question before you can get to the bottom of things. You’ll need to take notes. Personally, we prefer the RSOP tool.
The RSOP tool is easily launched by typing rsop.msc at the command prompt. When it is launched, you will see it working away, determining the resultant set of policy that has been applied based on the computer you are running it on and the user account that is logged in at the time the tool is run.
The result is a window that’s similar to that shown in the GPME, as shown in Figure 9.32.
Figure 9.32 rsop.msc generates a real-time view of the policy settings that have been applied.

Here are a few things to note about using the rsop.msc tool:
Inside the GPMC is a tool that is similar to that of the localized version of the RSOP, but it allows you to query any computer and user on the network to get the RSOP. Imagine that a user calls to indicate that they can’t access a website that is required for their job. You could visit their desk, but that would only take time, when you are sure that they are getting their Internet Explorer proxy settings from a GPO. So, instead, follow these steps:
Figure 9.33 Group Policy Results Wizard in the GPMC
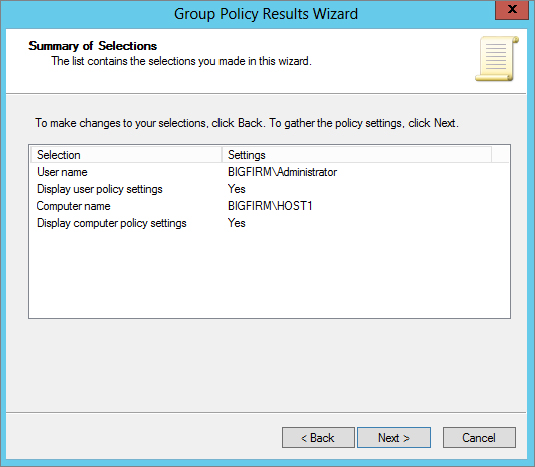
The results from the wizard will display in three different tabs on the right pane—Details, Summary, and Policy Events:
Figure 9.34 The Group Policy Results Wizard displays information on three tabs in the GPMC.

If you can see that there is an issue with an applied setting, you can use the contents of all three tabs to track down the issue.
The Group Policy Results Wizard in the GPMC is powerful, allowing you to view the existing state of the GPOs and their settings on any computer and user on the network. However, what if you have a scenario where you want to move a computer to a different OU or move a user to a different OU because they are being promoted? You would not want to just move the account and hope that the settings are correct based on the new location in AD.
gpresult.exe is a Group Policy troubleshooting and reporting tool that complements the RSOP snap-in by adding command-line and batch file capabilities to the RSOP arsenal. When run without arguments or options, gpresult will generate the following RSOP information for the current user at the local machine:
To generate RSOP information for a remote user on a remote machine, use the /S systemname and /USER username arguments. For instance, to get RSOP information on the remote workstation WINDOWS8CLIENT1 for the user dmelber, type gpresult /S WINDOWS8CLIENT1 /USER dmelber.
You can get more detailed information with options:
gpresult /S WINDOWS8CLIENT1 /USER dmelber /Z > c:\gpinfo.txtYou can stop chuckling now! We’re serious! There are times that you need to really pat Microsoft on the back, and this is one of those times. Event Viewer has been completely overhauled, and now, to the shock of many, there is an entire node dedicated to Group Policy!
The Group Policy Operational log is a replacement for the Userenv.log file that was generated by Group Policy in the past. Now, you don’t need to set up any verbose or auditing settings; it just happens. To view the Group Policy log files in the new Event Viewer, just launch Event Viewer. Once Event Viewer is open, expand the Applications and Services Logs\Microsoft\Windows\GroupPolicy node. Here, you will find the Operational log for Group Policy. After clicking the Operational log, you will see the list of events on the right pane.
Here are a few tips and features of the new environment:
We predict that, even with the RSOP tool, working with group policies will not be a walk in the park for most. Here are a few suggestions to help minimize troubleshooting time:
Active Directory delegation is a powerful solution to the old-world style of legacy Windows domains, where you had to create multiple domains to create separate control over users, groups, and computers. By implementing delegation within a single Active Directory domain, you don’t need multiple domains, you can save money by reducing the number of domain controllers, managing the enterprise is easier with a single domain, and so on.
This feature of Active Directory is so compelling that many companies and enterprises have moved to Active Directory to take full advantage of the benefits that Active Directory delegation provides. One of the most compelling benefits of using delegation is the ability to grant one or more groups the privilege to reset passwords for user accounts. This means you can allow a group of users to reset passwords for just a subset of the users in a domain. For example, you can allow the HR manager to reset passwords for all the employees in the HR department—no more privilege, no less privilege.
The ability to delegate creation and configuration of GPOs and their settings to administrative personnel (or to others, for that matter) is extremely useful, especially in a large organization. In this section, we’ll explain how to allow persons who are not members of Domain Admins or Enterprise Admins to create and manage GPOs for designated sites, domains, or organizational units.
The GPMC provides a simple yet distributed array of options to ensure that you are providing the correct delegation to the correct set of administrators. There are five primary delegations that you will want to configure:
All of these are configured in the GPMC. The major confusion about establishing delegation in the GPMC for GPO management is scoping. This means that you need to know where to set up the delegation; then once you are there, you need to know how far the delegation will extend. For example, suppose that you are the HR OU administrator. This means that you control everything for HR, including user accounts, group accounts, and even which GPOs are linked to your OU. How do you ensure that you are the only administrator who can link a GPO to your HR OU? Well, this is one of the delegated tasks that the GPMC can control. Let’s take a look at each delegation and the scope.
GPOs, by default, can be created by a member of the Administrators group for the domain or by members of the global group called Group Policy Creator Owners. However, although members of Administrators have full control of all GPOs, members of Group Policy Creator Owners can only modify policies they themselves have created, unless they have been specifically granted permission to modify a policy. So, if you put a designated Group Policy administrator into the security group Group Policy Creator Owners (that’s almost as awkward as Active Directory Users and Computers), that person can create new policy objects and modify them.
To delegate who can create a GPO in your domain, you will head down to the Group Policy Objects node in the GPMC. Once you click this node, you will select the Delegation tab in the right pane to view the list of users and groups that have been granted the ability to create GPOs in the domain, as shown in Figure 9.35.
Figure 9.35 Delegation of the creation of GPOs using GPMC

It’s one thing to create a GPO; linking that GPO to a site, domain, or OU is another matter. Administrators have this power by default, but a special delegation can be configured, per AD node, to grant other administrators this capability. Here, the scoping is very important to follow. Unlike the ability to create a GPO, which is per the entire domain, the ability to link a GPO to an AD node is per AD node, which makes logical sense. How about the configuration of this delegation?
To configure who can link a GPO to an AD node, you need to select the target AD node in the GPMC. Then, in the right pane, select the Delegation tab. Each AD node has one. Notice that the default list of users and groups can link a GPO to this node, as shown in Figure 9.36. One key issue to keep in mind is that the delegation of linking to an AD node does not inherit down through the AD structure. Therefore, if you delegate the ability to link a GPO to the domain node, this does not grant the ability to all OUs in the domain.
Figure 9.36 Delegation to link a GPO to the domain

The final three delegations have the same scope, which is per GPO. Again, this makes logical sense, but sometimes logic does not always make it to the keyboard for some people. If this is logical, you should be able to select a GPO in the GPMC; then, in the right pane, you can select the Delegation tab to see the delegations per GPO. This is exactly the case, and you can see the three levels of delegation per GPO in Figure 9.37. Here, you need to right-click the GPO to see the full list of delegations.
Figure 9.37 Delegations to manage, edit, and read a GPO

The interface does not say “Manage GPO.” Instead, it says “Edit settings, delete, modify security” for the GPO.
Certainly one of AD’s strengths is that it can let you grant partial or complete administrative powers to a group of users, meaning that it would be possible for a one-domain network to subdivide itself into, say, Uptown and Downtown, Marketing and Engineering and Management, or whatever. Let’s look at a simple example of how to do that.
Let’s suppose that there are five people in marketing: Adam, Betty, Chip, Debbie, and Elaine. They want to designate one of their own, Elaine, to be able to reset passwords. They need this because “I forgot my password—can you reset it for me?” is probably the number-one thing that marketing calls the central IS support folks for. The central IS folks are happy to have someone local to marketing take the problem off their hands, freeing them up to fight other fires.
Here’s the process:
If you want to follow this along as an exercise, get ready by creating accounts for Adam, Betty, Chip, Debbie, and Elaine, except don’t make them administrators. Or do it from the command line; type net user username /add, and you’ll get a basic user account built in the Users folder. For example, create Adam like so:
net user Adam Pa$$word /addYou’ve got to be sitting at the domain controller to do this. You can create domain users from any other system at the command line, but you must then add the option /domain, as follows:
net user adam /add /domainCreating a new OU is simple. Just open Active Directory Users and Computers (ADUC), right-click the domain’s icon in the left pane, and choose New Organizational Unit. A dialog box will prompt you for a name of the new organizational unit. Enter Marketing, and click OK. You’re done.
Next, to move Adam, Betty, Chip, Debbie, and Elaine to the Marketing OU, open ADUC, open your domain (ours is Bigfirm.com; yours might have another name), and then open the Users folder. (If you created the five accounts somewhere other than Users, then look there.)
You can move all five users by clicking Adam and Ctrl+clicking the other four accounts. Then right-click one of the five accounts, and you’ll get a context menu that includes a Move option; select Move, and you’ll get a dialog box asking you where to move the “object.” It’ll originally show you your domain name with a plus sign next to it; just click the plus sign, and the domain will open to show the OUs in your domain. Choose Marketing, and click OK; all five accounts will move to the Marketing OU. In ADUC, you can open the Marketing OU, and you will see that all five accounts are now in that OU.
Or . . . you can use the drag-and-drop capability. In ADUC, click the Users folder in the left pane. You will be able to see the contents of Users in the right pane. In the left pane, you’ll not only be able to see Users, but you should be able to see the Marketing OU as well. Select the users, and then drag them from the right pane to the Marketing OU. Instant OU movement! (What’s that you say? You’re not impressed? Well, believe us, when you do a lot of user management, you’ll find this to be a lifesaver. Trust us on this.)
Next, you’ll create a group for the folks who can reset Marketing passwords. Again, work in ADUC. First click the Marketing OU to highlight it, and then select Action New Group. (You can also right-click the Marketing OU and select New Group.) You’ll see a dialog box like Figure 9.38.
Figure 9.38 Creating a new group
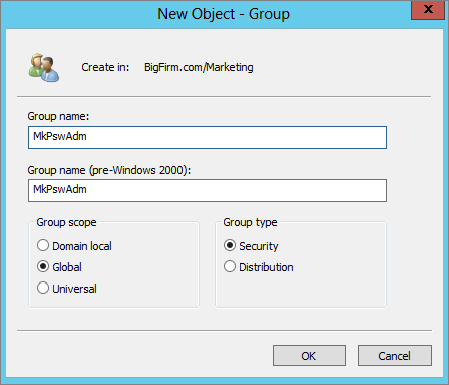
You see that the dialog box gives you the option of creating any one of the three types of groups in Active Directory. A global group will serve our purposes well, although in this particular case—the case of a group in a given domain getting control of an OU in that same domain—either a domain local, global, or universal group would suffice. We’ve called the group MktPswAdm. Click OK, and it’s done.
Next, put Elaine in the MktPswAdm group. Right-click the icon for MktPswAdm, and choose Properties. Click the Members tab, then the Add button, then Elaine’s account, then Add, and then OK. You’ll see that Elaine is now a member of MktPswAdm. Click OK to clear the dialog box.
Now let’s put them together. In ADUC again, right-click the Marketing OU. Choose Delegate Control, and the first screen of the Delegation of Control Wizard will appear.
The wizard is a simplified way to delegate, and it’ll work fine for this first example. Click Next, and you’ll see Figure 9.39.
Figure 9.39 Before selecting a group
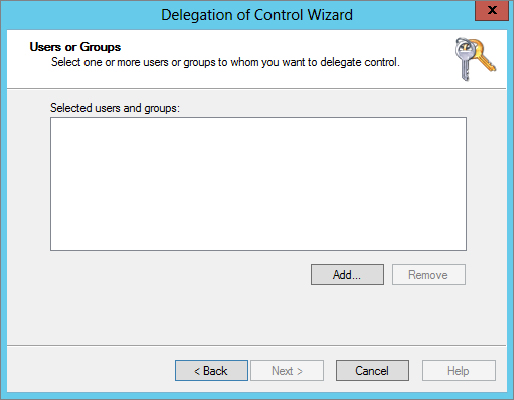
Next, you have to tell it that you’re about to delegate some power to a particular group, so you have to identify the group. Click Add, and choose the MkPswAdm group. After choosing MkPswAdm and clicking OK to dismiss the Add dialog box, the screen looks like Figure 9.40.
Figure 9.40 MkPswAdm selected
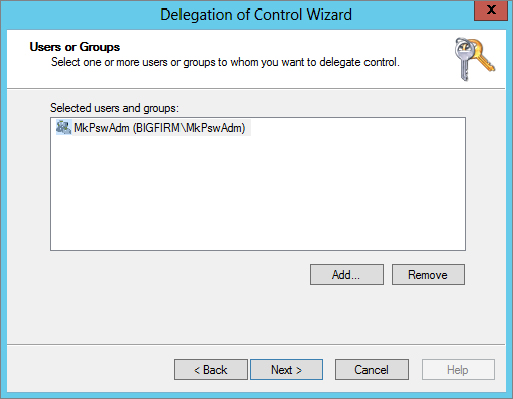
Now click Next, and you’ll get a menu of possible tasks to delegate, as you see in Figure 9.41.
Figure 9.41 Options for delegation

Once you do a bit of exploring here, you’ll see that there are many, many functions that can be delegated. Rather than force you to wade through a long list of things that you’ll never care about, however, Microsoft picked the top dozen or so things that you’d be most likely to want to delegate, one of which is the ability to reset passwords. We’ve selected that in the figure; click Next, and the final screen in the wizard appears, as you see in Figure 9.42.
Figure 9.42 Confirming your choices

Click Finish, and it’s done.
Remember, delegation lets you designate a set of users who have some kind of control over a set of users and/or computers. You accomplish that by putting the controlling users into a group, putting the things that you want them to control into an OU, and then delegating control of the OU to the group.
Although the previous scenario is a nice—and useful—example, it only hints at the power of delegation. You actually needn’t use the wizard to delegate; it just makes things simpler for a range of common tasks.
Here’s how you can directly manipulate delegation:
Advanced Features. New items will appear on the screen, as in Figure 9.43.
Figure 9.43 ADUC with View Advanced Features enabled

Figure 9.44 Security tab on Marketing OU
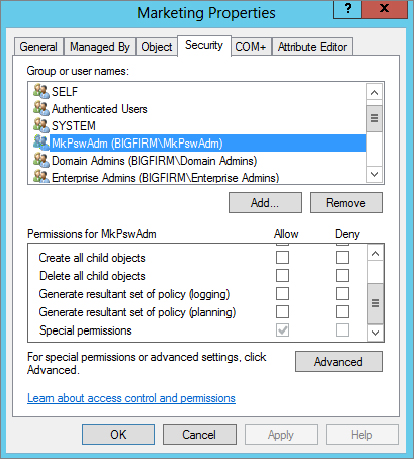
Figure 9.45 Advanced security settings for Marketing OU

Figure 9.46 Specific MktPswAdm abilities

Figure 9.47 Giving the power to reset passwords

As you can see from the figure, there are a lot of powers that you can grant to a particular group in controlling a particular OU! Believe it or not, you can set more than 10,000 individual permissions for just one OU. And that’s counting only the Allow permissions—it’s double that for both Allow and Deny.
Where might you make use of this? Well, you gave MkPswAdm the ability to change passwords, but you didn’t take it away from the groups that originally had it—the Domain Admins members, the Enterprise Admins members, and the like can still reset passwords. That’s not a bad idea, but if you really ever do come across a “feuding departments” scenario, wherein marketing wants to be sure that they’re the only people who can administer accounts, then you’d first delegate the Marketing OU to some group and then go in with the Security tab and rip out all of the other administrators.
It’s time for some not-so-good news and some bad news.
Suppose you’re not the administrator who set up Active Directory. Suppose, instead, you’re the second administrator—the person hired to clean up the mess that the first administrator made. You know these kinds of administrators; they’re the “mad scientist” variety—the guys who just click things in the administrative tools until they solve the problem . . . they think. And document? Heck, real administrators don’t document; there is never time to document. After all, this network was hard to design; it should be hard to understand!
So, you’re wondering what this guy did. How did he change the company’s AD from the default AD that you get when you run DCPromo? That’s a hard question to answer. First, of course, the OUs that he created are obvious—just look in Active Directory Users and Computers, and you’ll see the new folders. But what delegations did he do?
Here’s the not-so-good news. Sad to say, but there is no program you can run that will compare the standard AD structure and delegations to the current AD structure and delegations and spit out a “this is what has changed” report. Considering this limitation, we’ll offer a really heartfelt piece of advice: always document delegations. Always. Try to control who can do delegations, and make clear that delegations are authorized only sparingly. So, why is this news about comparisons not-so-good news, instead of bad news? The reason is a small tool called dsacls.exe. This tool, part of the core Windows Server 2012 R2 command-line utilities, provides you with detailed listings of the directory service (the ds portion of the tool name) ACLs (the acls portion of the tool name).
To use the tool, you must get to a command prompt:
Run.When you open the marketing_OU_delegation.txt file, you will see a result similar to that in Figure 9.48.
Figure 9.48 Giving the power to reset passwords

Now, here’s the really bad news. The Delegation of Control Wizard is a nice little tool, but it’s only a delegation wizard, not an undelegation wizard. If you want to remove MkPswAdm’s ability to change marketing passwords, you have to go into the Security tab, find the references to MkPswAdm, and rip them out. We warn you, if there are some delegations you want to keep and others you want to remove, you will have to manually determine which ones correspond to the delegated task you configured.