Figure 18.1 Using the Windows 8 Start screen to access Control Panel
You’ve built your server, created users, and shared network resources. Now you need to configure your client systems to connect to the network and use those resources. In this chapter, we’ll show you how to set up various client systems with networking components, how to log on to the network, how to find and connect to shared resources, how to manage your passwords, and, when applicable, how to find and connect to Active Directory.
We also cover ways to connect your Mac clients to your Windows Server 2012 network and how to access various features such as file shares and printers from the Mac.
In this chapter, you’ll learn to:
Before you connect workstations to the domain, you should know a few things about client computers and the network environment. If you are new to Microsoft networks, you may want to review some other chapters before attempting to configure clients:
If you’ve read these chapters or are generally familiar with the concepts, then read on to learn more about the client networking stack and about the kinds of accounts you’ll need.
Throughout this chapter, we’ll connect to the same server, on the same domain, and with the same user account:
In the past, for each client you would have to configure three basic software components: a driver for the network interface card (NIC), a network protocol, and a network client. The good news is that, these days, everything you need is built in except on a rare occasion you will need to install an NIC driver.
So that you will have a clear understanding of the underlining technology that makes all of this work, we will review these three basic components.
The NIC driver allows the operating system to communicate with the NIC. Before loading any network protocol or client software, the operating system must recognize the network card and load the appropriate driver. Because of the advancement of Universal Plug and Play (UPnP) and built-in driver libraries, most of the client systems discussed in this chapter can automatically detect the NIC and load a driver included with the OS. If the driver is not included with the OS or if your client system fails to detect the network card, you must use the driver and installation instructions for your OS that are provided by the manufacturer.
The network protocol, built into the operating system, allows nodes on the same network to communicate with each other. To communicate, the nodes must all use the same protocols. TCP/IP is the de facto standard for Microsoft networks today. Since most networks use IPv4, we’ll use that version throughout this chapter. Having a good understanding of IPv6 is becoming much more relevant in today’s networks and we recommend that you become knowledgeable on this subject.
The clients in the examples throughout this chapter will obtain a unique IP address and other necessary protocol configuration information from a Dynamic Host Configuration Protocol (DHCP) server on the network. Most servers in production will have a static IP address. Workstations, however, most often have dynamically assigned IP addresses. Not only does a DHCP server assign IP addresses to client workstations, but it can also supply all of the other values required in your particular TCP/IP environment (including a subnet mask, DNS servers to use, the default gateway to route through, and the domain suffix to apply to the connection). DHCP also keeps track of IP assignments and updates clients dynamically when you want to make IP configuration changes. (There will be cases where you won’t use a DHCP server to assign address information to the client. This chapter will also cover how to set this information manually for each client operating system.)
The network client locates network resources and connects to them. For any given flavor of file-mounting, printer-sharing software that runs on a server, there is a client connection counterpart.
Two kinds of accounts are key to using a client workstation and getting to network resources: domain accounts and local accounts. In general, domain accounts are used to authenticate access to shared domain resources, and local accounts are used to authenticate access to use or manage the local computer.
A domain is a logical grouping of computers, user accounts, and related network resources, all with a common security database called Active Directory. Domains provide centralized security, along with the resource grouping function of workgroups. Domain user accounts permit people to use a single login name to log on to any workstation and access resources on any server that belongs to the domain (provided that the user has permission to access the resources). All Microsoft operating systems can join domains with the exception of the Tablet RT version of Windows (http://windows.microsoft.com/en-US/windows/rt-welcome). A user account that is not a member of the domain or a member of a trusted domain cannot access network resources protected by domain security. For more information about domains, see Chapter 7, “Active Directory in Windows Server 2012 R2.”
A workgroup is a logical grouping of computers with no central security database but organized under a single name. Although today’s operating systems can join workgroups, this isn’t common in production environments; even in smaller offices, domains are typically built for security purposes. It’s much harder to manage access to workgroup resources, and they lack the discoverability that Active Directory provides.
Workgroup access is the method by which Windows RT devices access each other or broadcast out to the network. Since Windows RT devices can not join an Active Directory domain, they are left in a workgroup, which is the default.
Although domain membership is key to accessing centralized resources, local accounts also have their purposes: you need them for the local management of the workstation. All current Microsoft operating systems maintain local security databases. The configuration changes you are about to perform require administrative privileges, so you must log on using the local Administrator account (or an account in the local Administrators group) to make the changes.
The first step in joining a domain is to connect to the domain’s network so the client computer can communicate with the domain controller. The steps for connecting to a network are basically the same for each of the client operating systems we discuss in this chapter:
We will address any UI (or other) differences between client operating systems as we go, but for now let’s get ready to join a domain.
Log on to the system using a local Administrator account. Before trying to join the domain, it’s good to verify that the NIC and its associated driver were installed correctly, and you’ll need administrative rights to check everything.
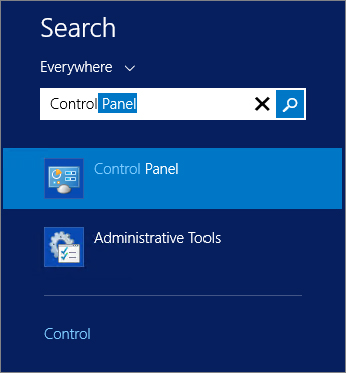
Devices that your computer detects show up in Device Manager. To get there, go to Control Panel and open Device Manager (you can open the Start menu, start typing “Control Panel,” as shown in Figure 18.1, and then select Control Panel, and it will open). The Computer Management console will open. The left side of your screen will show a list of all devices; expand the Network Adapters folder, and your NIC should be there.
Figure 18.1 Using the Windows 8 Start screen to access Control Panel
If you have problems with the NIC, such as a driver issue, you will know it clearly because the network adapter will be missing or could be “banged out” (the device will be there but will have a yellow exclamation point next to it). The NIC could also be banged out and located in the Other Devices folder. Refer to the NIC manufacturer’s documentation and the operating system’s Help and Support features to help you resolve hardware problems.
If you accept the typical network settings during the installation, Setup will install and create a software representation of the NIC, called a local area connection. The installation will also install the following local area connection components:
By default the local area connection will be configured to obtain the following configuration settings from a DHCP server:
The fastest way to tell whether your NIC obtained the appropriate settings automatically is to open a command prompt and type the following:
ipconfig /allYou should get results similar to those shown in Figure 18.2.
Figure 18.2 ipconfig command results
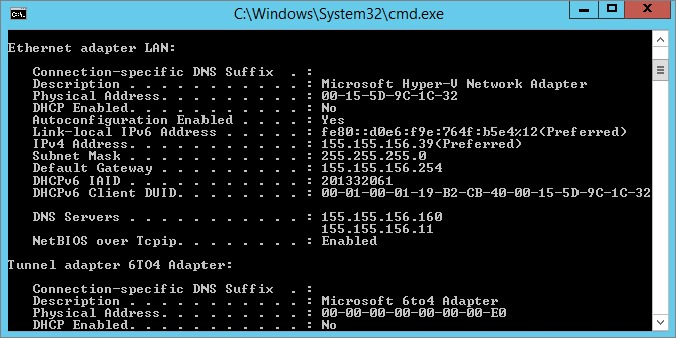
The lines from these results that will tell you that your NIC is configured properly are located in the Ethernet Adapter Local Area Connection Ethernet Adapter LAN section:
If the ipconfig results come up empty, then you may not have a DHCP server to allocate IP addresses, in which case you will need to configure your local area connection settings manually. To do this, you will need to open the local area connection associated with the NIC and enter the information by hand. For now, assume that the ipconfig results show that the NIC has the address information assigned.
To be absolutely certain that your network card and TCP/IP are working properly and that the IP information assigned to the NIC is correct, open a command prompt, and use the ping command to test basic network connectivity.
If you are unfamiliar with ping, you can review the command and all the common switches here: http://tinyurl.com/c18PingCommand.
Here are typical ping commands that you can use to test network connectivity:
Knowing how to get to the client local area connection is important for these reasons:
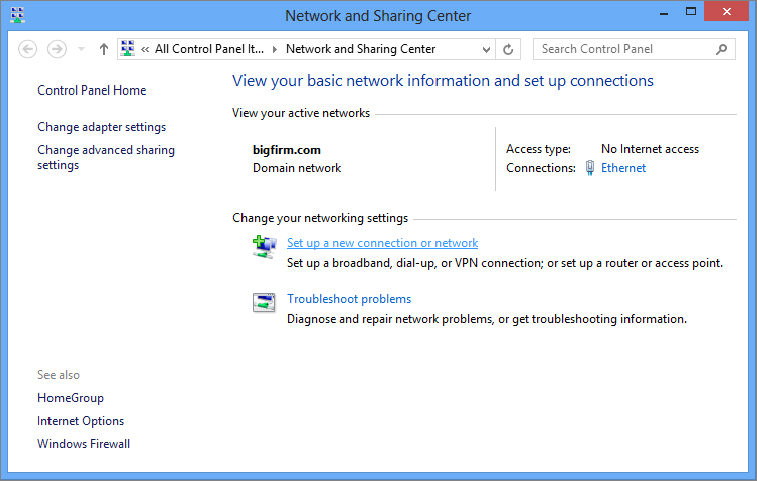
To locate the local area connections on a Windows 8 client, select Start, type Control Panel, click Control Panel, and select Network and Sharing Center (shown in Figure 18.3).
Figure 18.3 The Windows 8 Local Area Connection icon in the Network and Sharing Center
The local area connection information will be the same on your Windows RT devices. The Windows networking interfaces are common across the Windows 8, RT, and Windows Server 2012 operating systems.
If you do not see a Local Area Connection icon in your active networks, your NIC may not have been properly detected. Use Device Manager to isolate the problem, or try to add the network adapter manually using the Add Hardware Wizard in Control Panel.
Figure 18.4 The Windows 8 Local Area Connection Status window
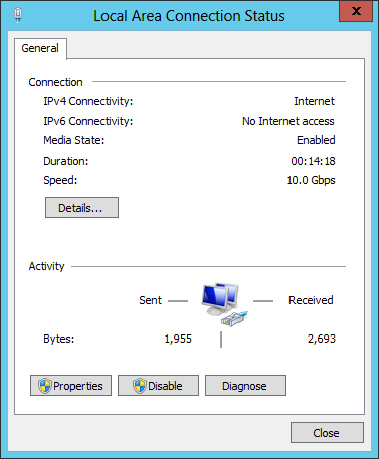
Figure 18.5 The Windows 8 Network Connection Details window

The network connection details show that the local area connection is DHCP enabled, so you know it is getting its configuration from a DHCP server. The connection is configured with the DNS suffix bigfirm.com, the IP address 192.168.1.132, the subnet mask 255.255.255.0, the default gateway address 192.168.1.1, and DNS server address 192.168.1.125. You can also see when the DHCP information was given out (by the date in the Lease Obtained value) and when it will expire (the date in the Lease Expires value).
Close the Network Connection Details window and click the Properties button on the Local Area Connection Status page to open the Local Area Connection/Ethernet Properties page shown in Figure 18.6.
Figure 18.6 The Windows 8 Local Area Connection Properties page
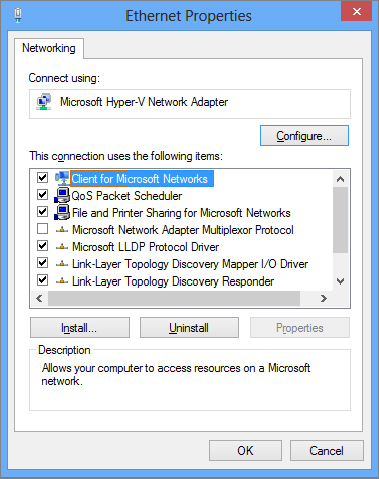
The Local Area Connection Properties page shows which NIC it’s associated with, as well as the components it uses. This is where you would manually give the local area connection a static IP address should you need to do so. Follow these steps:
Figure 18.7 The Windows 8 Internet Protocol Version 4 (TCP/IPv4) Properties page
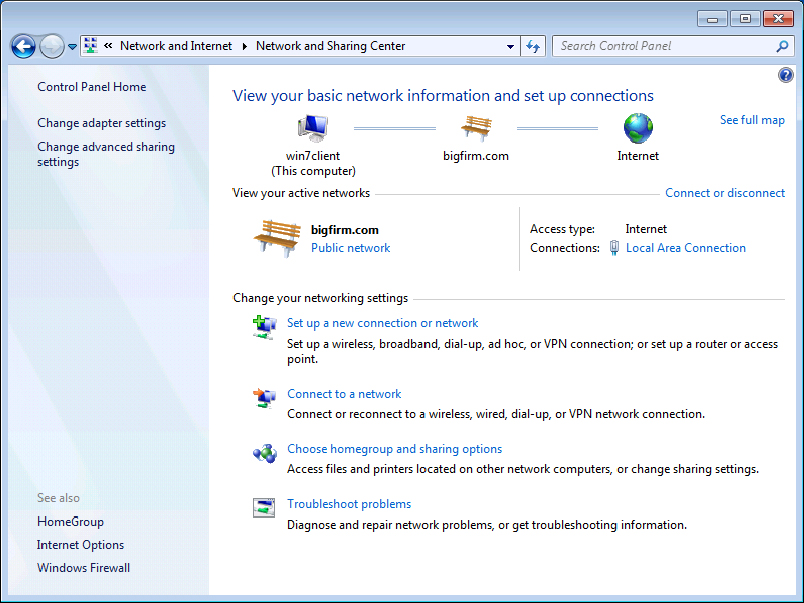
To locate the local area connections on a Windows 7 client, select Start  Control Panel Network and Internet, and go to the Network and Sharing Center (shown in Figure 18.8). To get there faster, type the word Network in the search area at the bottom of the Start menu, and then click Network and Sharing Center in the top portion of the Programs menu.
Figure 18.8 The Windows 7 Local Area Connection icon in the Network and Sharing Center
If you do not see a Local Area Connection icon, your NIC may not have been properly detected. Use Device Manager to isolate the problem, or try to add the network adapter manually using the Add Hardware Wizard in Control Panel.
Figure 18.9 The Windows 7 Local Area Connection Status window
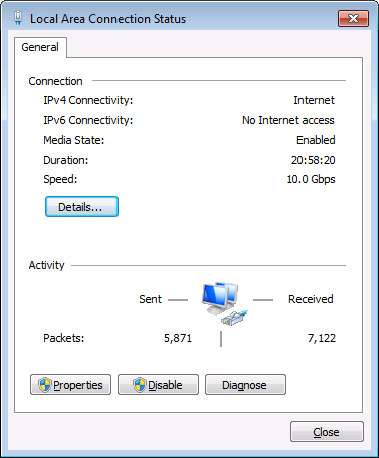
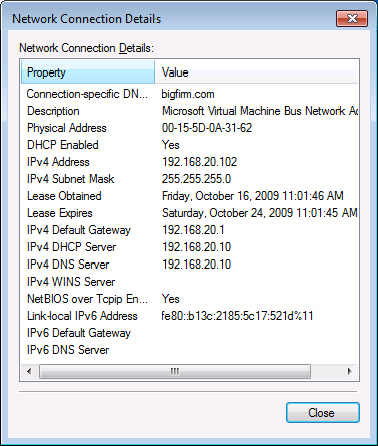
Figure 18.10 The Windows 7 Network Connection Details window
The network connection details show that the local area connection is DHCP enabled, so you know it is getting its configuration from a DHCP server. The connection is configured with the DNS suffix bigfirm.com, the IP address 192.168.1.132, the subnet mask 255.255.255.0, the default gateway address 192.168.1.1, and DNS server address 192.168.1.125. You can also see when the DHCP information was given out (by the date in the Lease Obtained value) and when it will expire (the date in the Lease Expires value).
Close the Network Connection Details window and click the Properties button on the Local Area Connection Status page to open the Local Area Connection/Ethernet Properties page shown in Figure 18.6.
The Local Area Connection Properties page shows which NIC it’s associated with, as well as the components it uses. This is where you would manually give the local area connection a static IP address should you need to do so. Follow these steps:
To locate the local area connections on a Windows 7 client, select Start Control Panel Network and Internet, and go to the Network and Sharing Center (shown in Figure 18.8). To get there faster, type the word Network in the search area at the bottom of the Start menu, and then click Network and Sharing Center in the top portion of the Programs menu.
If you do not see a Local Area Connection icon, your NIC may not have been properly detected. Use Device Manager to isolate the problem, or try to add the network adapter manually using the Add Hardware Wizard in Control Panel.
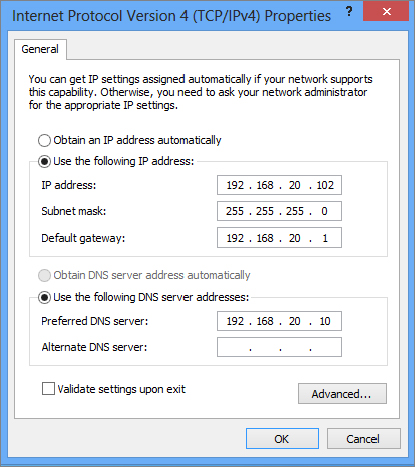
The network connection details show that the local area connection is DHCP enabled, so you know it is getting its configuration from a DHCP server. The connection is configured with the DNS suffix bigfirm.com, the IP address 192.168.20.102, the subnet mask 255.255.255.0, the default gateway address 192.168.20.1, and DNS server address 192.168.20.10. You can also see when the DHCP information was given out (by the date in the Lease Obtained value) and when it will expire (the date in the Lease Expires value).
Close the Network Connection Details window and click the Properties button on the Local Area Connection Status page to open the Local Area Connection Properties page shown in Figure 18.11.
Figure 18.11 The Windows 7 Local Area Connection Properties page
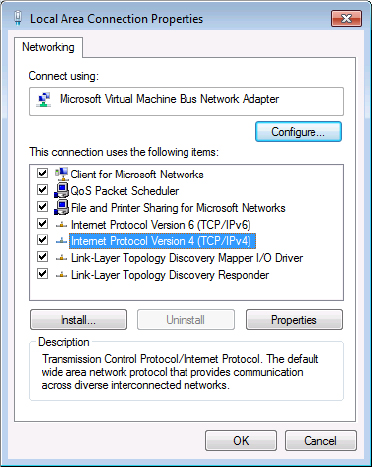
The Local Area Connection Properties page shows which NIC it’s associated with, as well as the components it uses. This is where you would manually give the local area connection a static IP address should you need to do so. Follow these steps:
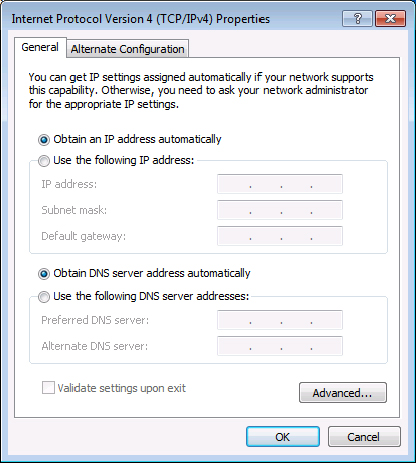
Figure 18.12 The Windows 7 Internet Protocol Version 4 (TCP/IPv4) Properties page
To join a domain from any Windows operating system, you’ll need the following information:
Joining a domain is easy. The main places you’re likely to run into trouble are not knowing the right domain credentials and supplying the wrong computer name. Local administrators can’t join computers to the domain, and you shouldn’t join a computer to the domain using the same name as a different computer that previously joined and that has a computer account object in Active Directory. In replacement scenarios, utilizing the same computer account can be acceptable; for example, if a laptop has its hard drive replaced, the computer names are asset numbers, and you would want to use this name again. Using the Active Directory Users and Computers Snap-In to properly delete the old computer object is the best practice for this. Additionally, making sure you have given the system enough time to replicate the change to other domain controllers so you have no conflict in the name can be equally important. Make sure that the computer name is unique and that you have the right credentials to join the domain.
By default, Windows Server 2012 domains allow regular domain users to join up to 10 computers to a domain. Beyond that, domain admin accounts, of course, can add computers to a domain, and you can also delegate this right to other users via Group Policy. For information on how to delegate this right, see http://technet.microsoft.com/library/dd392267(WS.10).aspx.
Client computers always start out belonging to a workgroup called WORKGROUP. That’s the beginning setting for all client operating systems discussed in this chapter.
Typically, you’ll join the domain from a computer connected to it, but Windows 7 and Windows 8 support both online joins and offline joins.
To join a domain from Windows 8 when connected to the network, follow these steps:
Figure 18.13 System information for the Windows 8 client

Figure 18.14 System Properties dialog box
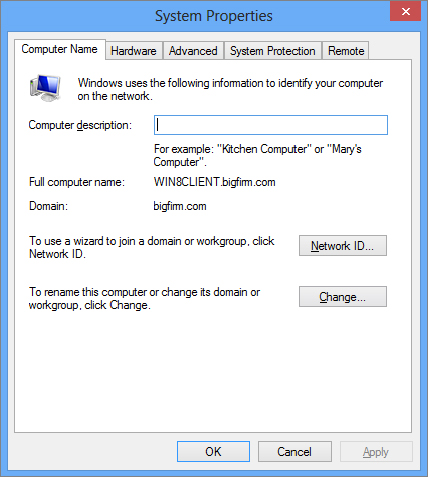
Figure 18.15 Type the domain name to join the domain.
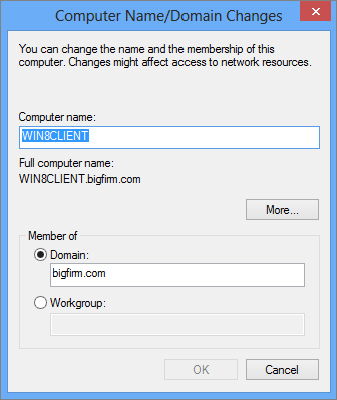
Figure 18.16 Provide credentials to join the domain.
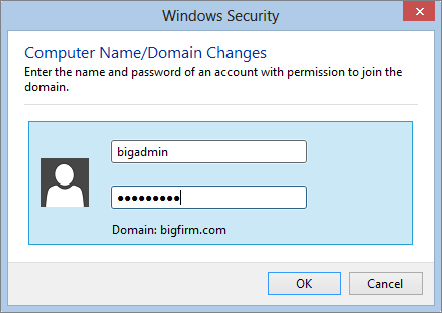
If you don’t join successfully, check the credentials you used.
Domain joining has one problem: what if you can’t get to the domain controller to create the computer account or you can’t write to it? You may also not be able to contact a domain controller if you’re staging a group of client computers before deploying them or installing a client OS while offline.
Introduced in Windows 7 and available still in Windows 8 and Windows Server 2012 is the djoin.exe utility, which lets you join a computer to a domain even when the client computer can’t communicate with the domain controller.
This section will show you how to use djoin.exe to join a new Windows 8 client computer (WIN8CLIENT) to the domain bigfirm.com when the client is offline.
In a nutshell, djoin.exe provisions a computer account in AD and then exports the data (called a blob, which is needed for the computer with that computer name to join the domain) to a text file. The offline computer then imports the blob and joins the domain. The blob can also be added to an unattended setup answer file in order to join a computer to a domain (offline) as part of the OS installation.
One thing about the blob: if you provision the computer account in AD using djoin.exe and then open the resulting text file expecting to read it, you will be disappointed because it’s not human-readable. However, it contains sensitive data, such as the machine account password and other important domain information.
These are the steps to join an offline computer to the domain:
You can run djoin only on Windows 7 and above and Windows Server 2012 computers. It’s possible to use djoin to join a Windows 8 or Windows Server 2012 computer to a down-level DC (via the /downlevel parameter), but the example in this chapter will join a Windows 8 client to a Windows Server 2012 domain.
There are a few other general requirements as well. First, the user who runs djoin on the provisioning machine must have the right to add computers to the domain. Again, domain users have this permission although they can add only up to 10 computers to the domain by default.
You should also be familiar with the djoin parameters to understand the commands issued in the following example. Table 18.1 describes these parameters.
Table 18.1: djoin Parameters
| Parameter | Description |
| /provision | Creates the computer account in Active Directory |
| /domain | Specifies the domain the computer will be joining |
| /machine | Specifies the name of the computer that will be added to ADDS and that you want to join the domain |
| /savefile <filepath> | Specifies the location and file to save the provisioning metadata |
| /dcname (optional) | Specifies the name of a specific DC you want to use to create the computer account |
| /reuse (optional) | Reuses an existing machine account (the machine account password will be reset) |
| /downlevel (optional) | Provides support for using a DC that runs Windows 2008 or older |
| /printblob (optional) | Creates a blob correctly encoded for use in an unattended answer file |
| /defpwd (optional) | Uses the default machine account password—not recommended |
| /requestodj | Requests an offline domain join (ODJ) on reboot |
| /loadfile <filepath> | Specifies the file (created with the /savefile parameter) to be imported to the offline computer |
| /windowspath | Specifies the path of the Windows directory in an offline image, typically %systemroot% or %windir% |
| /localos | Specifies a local OS as opposed to an offline image (requires a reboot) |
To use djoin to join a computer to the domain, you will need to execute djoin commands on two different machines. In this example, they are as follows:
Djoin djoin /provision /domain bigfirm.com /machine win7client11
/savefile c:\join.txt

Provisioning the computer account...

Failed to provision [win8client11] in the domain [bigfirm.com]: 0x216d.

Computer account provisioning failed: 0x216d.
Your computer could not be joined to the domain. You have exceeded
the maximum number of computer accounts you are allowed to create
in this domain. Contact your system administrator to have this
limit reset or increased.First, log onto the client computer win8client.bigfirm.com with a domain administrator account, and start an elevated command prompt. Then run the following command to create a computer account in Active Directory and also to create the provisioning text file:
C:\Users\bigadmin>djoin /provision /domain bigfirm.com
/machine win7client2 /savefile c:\join.txt
The results of this command are as follows:
Provisioning the computer account...
Successfully provisioned [win8client2] in the domain [bigfirm.com].
Provisioning data was saved successfully to [c:\join.txt].
Computer account provisioning completed successfully.
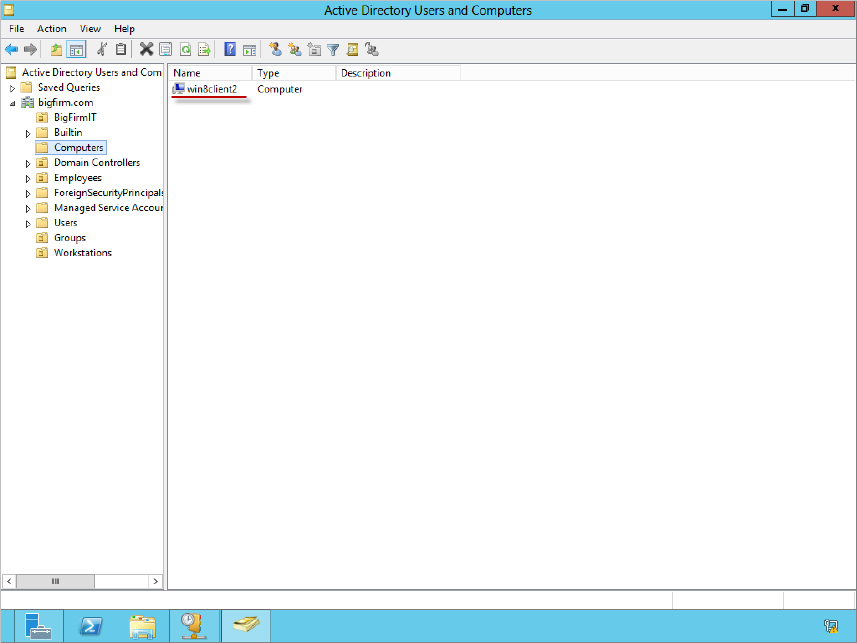
The operation completed successfully.Active Directory Users and Computers on the DC (bf1) will now contain the computer account win8client2 stored in the default Computers folder, as shown in Figure 18.17.
Figure 18.17 Running djoin adds a computer account to AD DS.
Next, move the resulting text file join.txt from the provisioning computer (win8client) to the computer you want to join (win8client2). In this example, the file is placed in the root of the C drive. Then on the client computer (win8client2), open a command prompt with elevated permissions, and type the following:
Djoin /requestODJ /loadfile c:\join.txt /windowspath %systemroot% /localosReboot the computer, and when it comes back up, it will be joined to the domain.
For more information on using djoin with unattended setups and delegating the right to join computers to the domain, refer to http://technet.microsoft.com/en-us/library/ff793312.aspx.
The additions to PowerShell in Windows Server 2012 and the fact that Windows 8 has a solid foundation everywhere PowerShell is used are very valuable to an IT pro. It is uncommon that you would be sitting at a client computer and joining it to the domain via PowerShell, but since you can run this command remotely and might want to have it as part of a script, we’ll review the process.
To join a computer to the domain from PowerShell, you will be using the Add-Computer cmdlet:
Figure 18.18 Add-Computer PowerShell cmdlet and authentication box
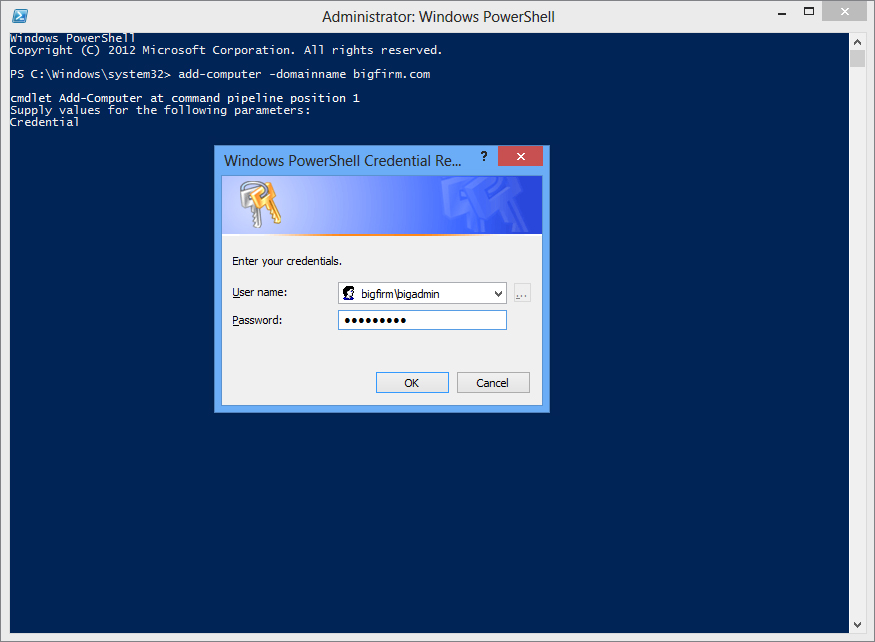
For more information on the Add-Computer cmdlet see http://tinyurl.com/c18PSAdd.
Good security practice demands that passwords be changed regularly and known only to the user. The operating system users employ to connect to a Windows Server 2012 domain requires user intervention to change the passwords.
Although most of this book is geared toward the administrator, this section has information that the administrator will need to convey to the user population so they can do it themselves. The good news is that changing passwords is extremely simple, and the UI gives all the guidance the user needs:
If a user forgets their old password, they will not be able to change it themselves, and if the administrator has followed best security practices, they won’t know the password either. The administrator will need to update the password on the domain user account and then set the password to be changed at first logon.

Most often, users will change passwords under two circumstances:
Windows 7 and Windows Vista follow the same process and have the same GUI for this, so we’ll combine the information about changing domain passwords for these two operating systems in the following sections.
When the administrator forces a password reset (for security reasons or on a new account), the user will be prompted for the new password when they attempt to log on for the first time, as shown in Figure 18.19. The default password applied by the administrator is simply to prevent a user account from being unprotected before it’s used.
Figure 18.19 Changing the password before logging on for the first time
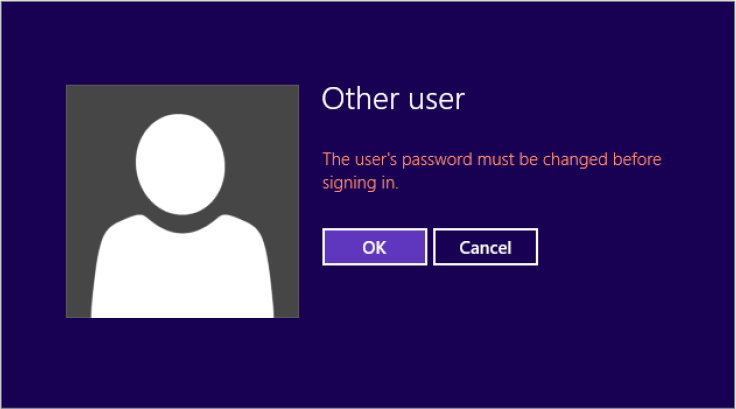
When the user clicks OK, they’ll be prompted for the new password, as shown in Figure 18.20.
Figure 18.20 Changing to the new password
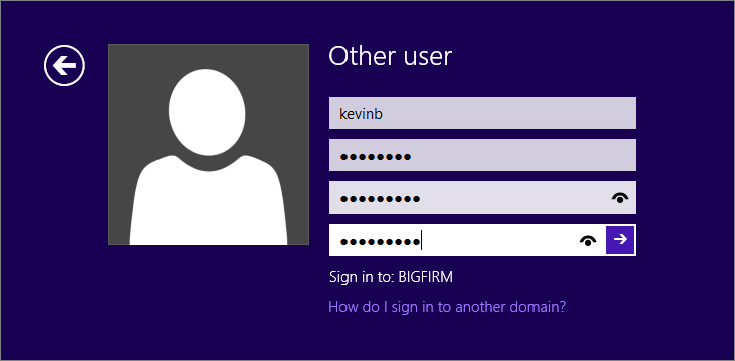
The user fills in the old password and types a new password. According to the Default Domain Group Policy the new password cannot be the same as the old password and must meet length and complexity requirements, or else the user will be nagged for a password that meets the security guidelines and told how to meet them. When the user has successfully changed the password, they’ll see a message telling them that the password has been changed. When they click OK, they’ll be able to log on with the new password. That’s it. After the password is changed, the user can log on normally.
When a password is about to expire, users will start seeing messages a few days ahead of time telling them that their passwords are about to expire and telling them how to change them. A user might also want to change their password on demand. The simplest way to change a password is to press Ctrl+Alt+Del to open the Windows Security GUI and choose the “Change a password” option, as shown in Figure 18.21. You can also get to this screen from the Windows Security button located in the Start menu.
Figure 18.21 Changing a password from the Security GUI

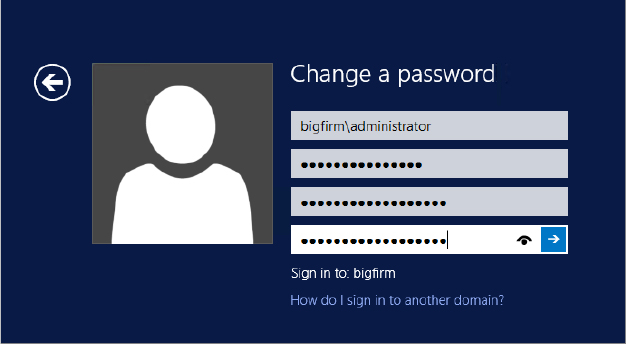
When the user chooses to change a password, they’ll see the Change a Password screen, as shown in Figure 18.22, prompting them to type the old password and the new one. Again, if the new password does not meet the security requirements, then they’ll see an error message advising them of the password policies. Once the user enters their old and new password (twice) and clicks the arrow button, the password is changed.
Figure 18.22 The change password form
One of the main reasons to join a domain is to access resources on the domain, such as the printer down the hall or some documents that you need to work on. You could access company photos, slide shows, and other media needed to make a marketing campaign. Whatever your need, the point is that you don’t need to have these items and devices hooked or stored directly on your client machine. In fact, having them stored on the network is ideal because they are more secure there (access is centrally controlled, and ideally the files are backed up regularly). Examples of network resources include the following:
Connecting to shared resources is easy for users, thanks to many of the changes in Active Directory and Group Policy. You can still use features like Network Discovery as a way for your computer to find resources on the network easily, although in most enterprises this is not recommended. With the introduction to Group Policy: Preference Policies, IT pros can now publish resources more easily for employees or departments through Group Policy objects and membership in domain groups. Users can continue to search Active Directory for published resources they may need. This means that the user doesn’t need to know where the device is installed or contained. The user might not even know the exact name of a shared folder or printer or the server where it’s stored. As long as the resource is published to Active Directory, with a little searching the user will most likely be able to find and utilize the resource.
There are several ways to access shared resources. This section will expand on these more common ways for each of the client operating systems addressed in this chapter:
The following examples will access resources located on the bigfirm.com domain. Table 18.1 lists those resources and their locations on the network.
Table 18.1: Network Resources Used in This Section’s Examples
| Network Resource Type | Network Resource Path | Network Resource Machine Location |
| Marketing file share | \\bf1\BF_Marketing | bf1.bigfirm.com |
| Black-and-white printer | \\bf1\BF_Main_Printer | bf1.bigfirm.com |
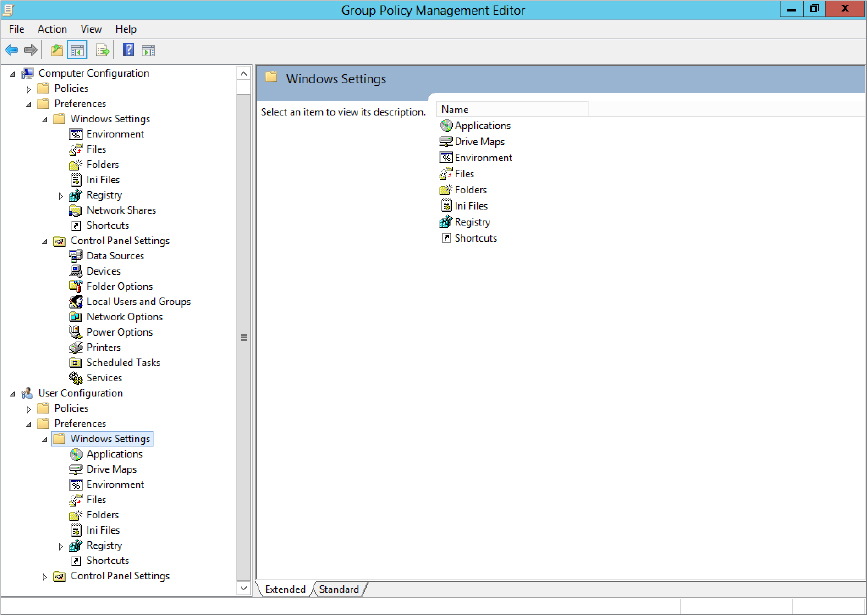
Starting with Windows 2008’s version of Active Directory, you are able to publish all the most common resources to client (and server) devices in a centralized way. The new feature as discussed in Chapter 9 is Group Policy: Preference Policies. These policies allow you to perform such operations as setting up drive mappings, creating shortcuts, and configuring environment settings, as shown in Figure 18.23. You can do this for both users and computers that are located in specific organizational units (OUs) or domain groups.
Figure 18.23 Group Policy Management Editor with Preference Policies
Configuration of resources in any organization should be managed centrally and controlled by the membership of Active Directory groups. Once you have these groups established, you can then manage the access to file shares, printers, and applications with policies. The approaches of the past of allowing Network Discovery and sharing resources on local computers have gone away because security and compliance requirements are audited in organizations. In the next section we will be walking through the creation and publishing of some resources to our workstations. In the next examples we will be focusing on the Marketing department of bigfirm.com and publishing the required resources to the WIN8CLIENT device that is used by the marketing team.
Usually, domain administrators keep company files in centralized, secure, and fault-tolerant locations that can be backed up easily (that is, not stored on individual computers). To gain access to these resources, you need to make sure that the appropriate Active Directory (AD) groups are applied to the file shares and begin to configure your Group Policy objects (GPO) for publishing.
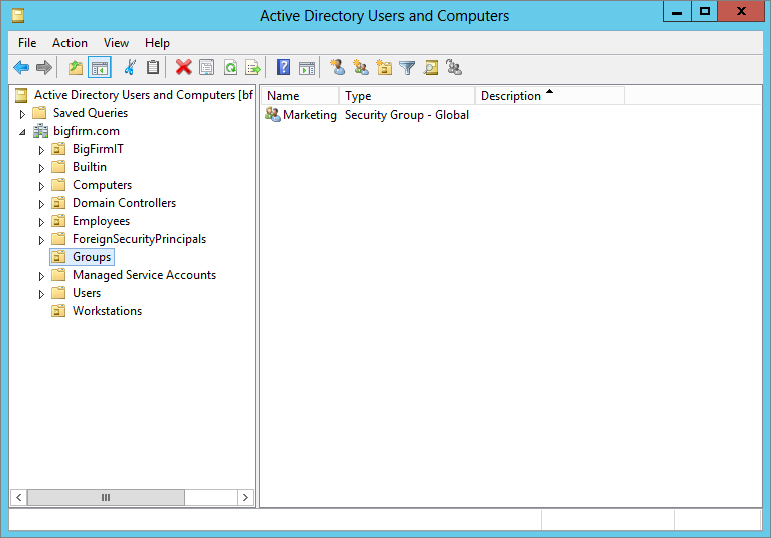
The following example will walk you through giving published resources to an end user. You’ll begin this process by making a Groups OU and a Marketing Active Directory group. This example assumes you understand how to create organizational units and domain global groups. If you are unfamiliar with these processes, please see Chapter 7, “Active Directory in Windows Server 2012 R2.”
Figure 18.24 Active Directory OU and group setup
 Group Policy Management.
Figure 18.25 Creating a new Group Policy object

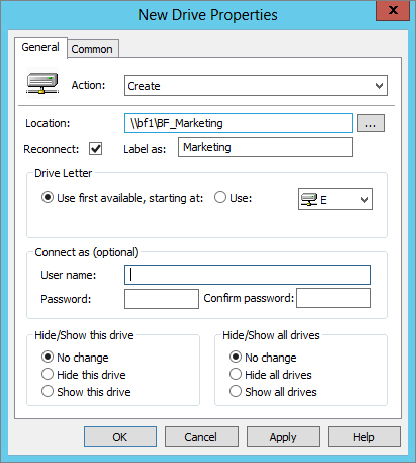
Figure 18.26 Creating the new drive-mapping preference policy
Now that you have the GPO created and a policy for drive mappings defined, you need to link it to bigfirm.com so you can start to use this policy, as shown in Figure 18.27. Having this Group Policy object linked to bigfirm.com allows Marketing users, no matter what child OU they are in, to have the policy applied to them.
Figure 18.27 GPO applied to bigfirm.com

The next steps are all on the client side. You need to make sure that the Group Policy objects are applied to the user. Logging into WIN8CLIENT you can utilize the command prompt to force a Group Policy update. Follow these steps to update your policy on the workstation:
Figure 18.28 Group Policy update with user settings
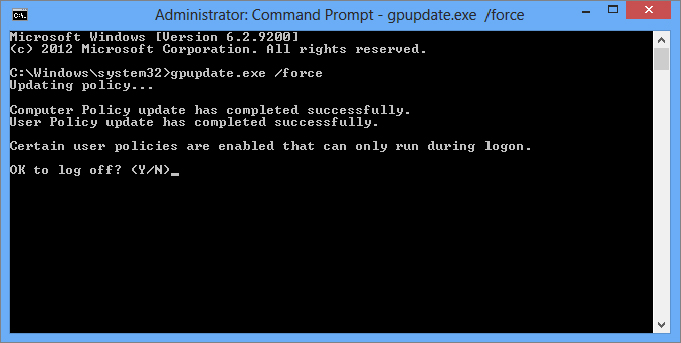
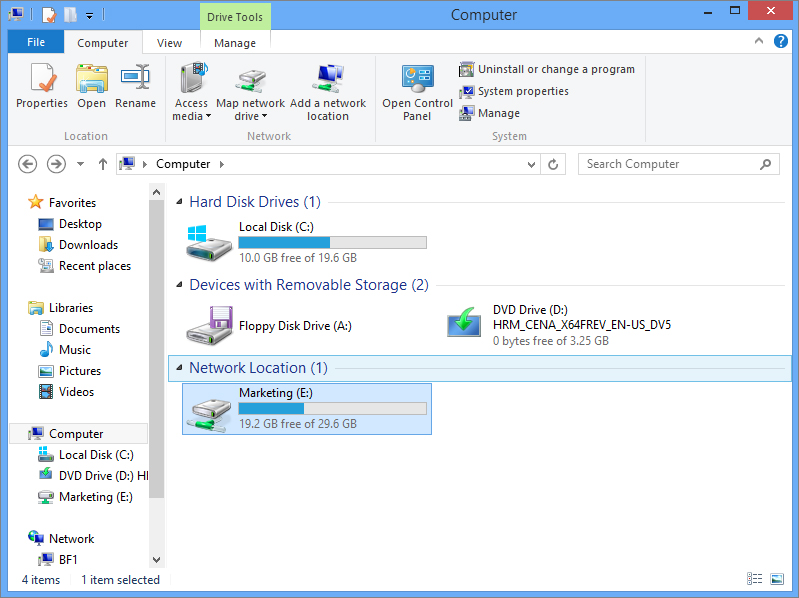
Figure 18.29 Marketing drive mapped to Computer folder
You can add a network printer by searching for a device from the GUI, using the command-line tools, or with the Network applet.
In Windows 8 searching for devices and media has been greatly simplified by the addition of the “Access media” icon in File Explorer. As shown in Figure 18.30, you can select “Access media” and it will search the network for any shared or published device, be it a printer or a media share.
Figure 18.30 “Access media” icon in File Explorer

In the Find drop-down list, choose Printers. If there are multiple domains on the network, you can make the search more specific by choosing your domain name from the drop-down list (located to the right of the Find drop-down list). If the list of printers is likely to be long, you can search by name or keyword or use the Advanced tab to search by other properties. Once you’ve set your search criteria, click Find Now. All printers published to Active Directory that meet your search criteria will appear in the Results window.
To add a found printer to your computer, right-click the printer and choose Connect. The printer will install, and you will see it in your Printers folder.
If you know the name of the printer you want and the print server it’s attached to, you can add it from the command line with the start command. For instance, to add the printer called bf_main_printer located on server bf1 to a Windows 7 or Windows 7 client, open a command prompt and type the following:
start \\bf1\bf_main_printerWhen the printer installs, the print queue for that printer will open, and the printer will be listed for use in the Devices and Printers applet.
To add a network printer to a Windows 8 or Windows 7 client machine, open the Network applet, and click the Add a Printer link on the toolbar of the Network Folder dialog box. Clicking the link will initiate the Add Printer Wizard. This is the same wizard you get when you add a printer from the Devices and Printers button (located on the Start menu in Windows 7) and the Printers applet (located in Control Panel in Windows Vista). Remember, you can get to operating system features in many ways.
Like all previous versions of the Add Printer Wizard, this version allows you to add local printers, Bluetooth printers, and printers that are located on the network. This section will concentrate on network resources, which comprise cabled or wireless network printers. To add a network printer, click “Add a network, wireless or Bluetooth printer,” and click Next. As soon as you click this option, the wizard will search for printers on the network and return any it finds.
To add one of these printers, simply click the printer and click Next; then click Next again on the Results screen. The default configuration is to make this printer the default printer, but you can change this by deselecting the “Set as default printer” box. Click the “Print a test page” button to send a test page to the printer, and click Finish.
The options are to do the following:
The option “Find a printer in the directory, based on location and feature” opens the Find Printers window. You search Active Directory for printers by specifying certain printer criteria (such as a name or a printer model) or a printing feature (such as the ability to print double-sided). Click the Find Now button, and the wizard returns printers that match the specified criteria, as shown in Figure 18.31. You can also enter no criteria, and the search will return all printers in Active Directory.
Figure 18.31 The Find Printers dialog box searches Active Directory for printers matching specified criteria.
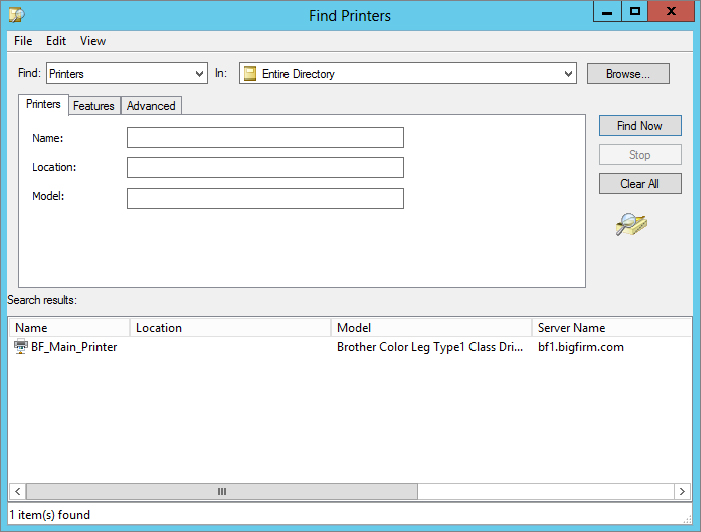
The wizard in our example returned one result. Once you find the printer, select it, click OK, and the wizard will add the printer. Click Next on the following Results screen. Click “Print a test page” to test printing to the printer, and then click Finish.
Instead of searching Active Directory for a printer, you can also add a shared printer by name. Select the option “Select a shared printer by name” and then either enter the network path and name of the printer in the form \\servername\printername or click the Browse button to locate a printer on a specific computer on the network. Once the printer name is added, click Next, click Next again on the information screen, and then click Finish.
Lastly, choose the option “Add a printer using a TCP/IP address or hostname” to add a TCP/IP printer. Enter the IP address of the printer in the “Hostname or IP address” input box. The port name will automatically mimic the IP address (you can change this if you want to use something more descriptive). The Device type defaults to AutoDetect. You should leave this setting alone unless you know the device type to specify. Click Next, and the wizard will attempt to locate the printer and install it.
Sometimes it’s easier to use a drive letter than a UNC path to connect to a network share, especially if you’re browsing from the command line. Some applications demand it; they won’t save to or execute from UNC paths. Therefore, you can add network shares to drive letters—at least until you run out of letters. In Windows 7 and Windows 8, you can do this from the GUI, from the command line, or by creating network location shortcuts.
To map a drive to a shared network folder, follow these steps:
Figure 18.32 Mapping a drive to shared folders found in Active Directory

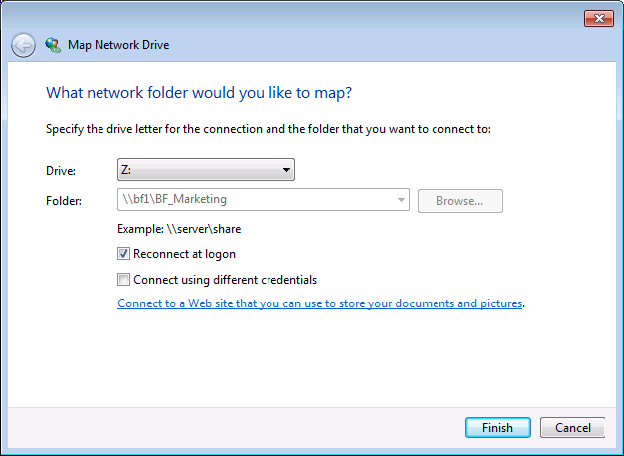
Figure 18.33 Map Network Drive dialog box
To access the mapped drive, select Start Computer, and double-click the mapped drive listed under the Network Location section of the main window. You can also click and drag a shortcut to the mapped drive and drop it on your desktop for fast access later. To disconnect from a mapped drive, simply right-click the drive and choose Disconnect.
Some shared folders might not be listed in Active Directory. To map a drive to an unpublished share on the network, follow these steps:
It’s also possible to map drives from the command line with the net use command if you know the path to the share. In fact, administrators often create login scripts to automatically map drives for users when they log on to their computers. For instance, to map a drive to the bf_marketing share on server bf1, you would issue the following command:
net use M: \\bf1\bf_marketing /PERSISTENT:YESHere’s a breakdown of the parameters used in this example:
To get a full list of parameters for the net use command, open a command prompt and type net use /?.
But what if you don’t know what’s out there to connect to via CLI? No problem. You can use the net view command to get a list of shared resources on the network. Run it once, and you’ll get a list of computers that are visible on the network. Now digging further, you can issue the net view command against a computer on the network to get a list of its shared resources. To delete a mapped drive from the command line, type net use X: /delete, where X is the drive letter of the mapped drive you want to delete.
You’ve learned how to map a drive in Windows 8 in ways very similar to older operating systems. But there is another way to access shared folders (and other network locations): by creating a network folder (basically a shortcut) to the shared location from within your Computer window. Why would you do this as opposed to just mapping a drive? There are both positive and negative differences between mapped drives and network location shortcuts. On one hand, a mapped drive acts like a local drive on the computer. Applications that need to access items from drives will treat the network location as a local drive. However, you can’t map a drive letter to other kinds of locations such as FTP sites and web shares. So, there are reasons to utilize both access techniques.
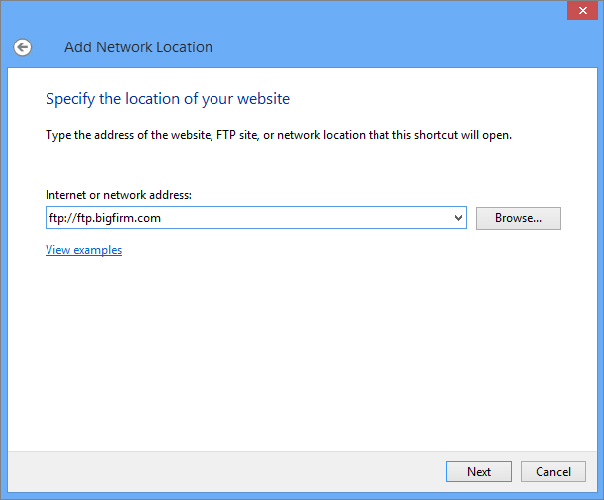
A network location includes shared folders, web shares, FTP sites, and UNC paths. You can add links to these network places in your Computer window by using the Add Network Location Wizard. The Add Network Location Wizard is a menu option in XP’s My Network Places. My Network Places has since been morphed into the Network and Sharing Center in Windows 7 and Windows 8—Network Location Wizard is no longer a feature of that applet.
To open the Add Network Location Wizard in Windows 7 and Windows 8, follow these steps:
Computer.Figure 18.34 Starting the Add Network Location Wizard from the Computer window
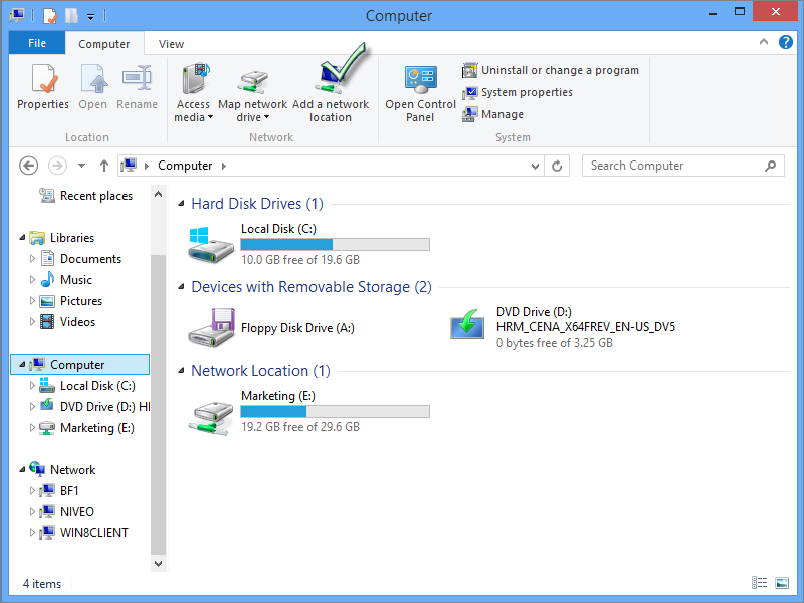
Figure 18.35 Enter the path to the network location or browse the network to locate a network location.
By default, the wizard allows for anonymous access to the FTP site. If you want to change this, follow these steps:
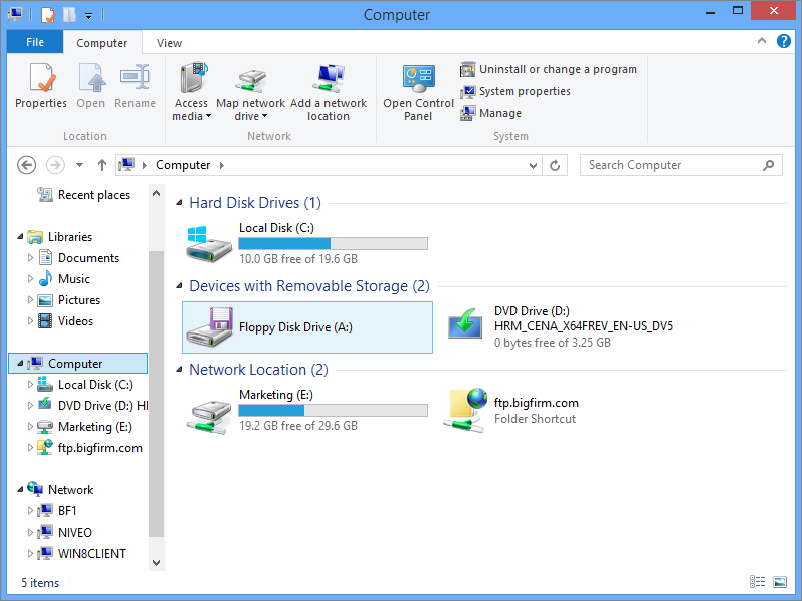
The network location will open, and the network location will be listed in the Network Location section of the Computer window, as shown in Figure 18.36.
Figure 18.36 The network location is added to the Computer window.
To disconnect a network location, simply right-click the network location, and select Delete.
More and more organizations are integrating Apple Macintosh computers into their Active Directory networks each year. This is being facilitated both by Apple, including better networking features, and by Microsoft adding federation services that make it easier for diverse network clients to take advantage of Active Directory.
In the past, the process of connecting a Mac client to a Windows Server machine required additional software to let the Mac understand the Server Message Block (SMB) file protocols used by Windows. In Mac OS X, all the necessary pieces are included with the operating system. This is because Apple has included a version of Samba with OS X. Samba lets Unix-like operating systems, such as Linux and OS X, speak the native SMB dialects that are used by Windows operating systems. So, the issue in connecting your Mac clients is more a matter of authentication than one of basic connectivity.
Even though Macs can speak SMB, Windows Server 2012 expects a certain default level of security for SMB communication that OS X cannot provide natively, namely, SMB packet signing. Packet signing helps a Windows server and client communicate more securely by digitally signing every packet that is sent by SMB. This technique can relieve some of the risk of the packets being intercepted and manipulated in a so-called man-in-the-middle attack.
To let your Mac clients communicate effectively with Windows Server 2012 Active Directory environments, you will need to disable the requirement for SMB packet signing. But in the interest of network security, you don’t want to do away with packet signing altogether. Fortunately, the setting you want to use will enable SMB packet signing for clients that support it but not require it for clients (such as Macs) that don’t.
To enable Mac clients running OS X to connect to your Active Directory domain, you must use the following Group Policy settings:
You can set these policies in the local policies for domain controllers, which will enable access for Mac clients across the network. To set these policies, follow these steps:
Administrative Tools Group Policy Management.Figure 18.37 Using the Group Policy Management Editor

Before you can bind your Mac OS X client to Active Directory, you must complete some preparatory steps. Some of them may be completed already if the clients receive their IP configuration through the Dynamic Host Configuration Protocol (DHCP). Before you try to bind your Mac client to Active Directory, ensure the following items are configured on your Mac:
The Domain Name System (DNS) server address is the critical part. In most organizations using Active Directory, the DNS servers will likely be domain controllers, or at least they will be integrated with Active Directory. This is important because the Mac client will perform a DNS query to find the Lightweight Directory Access Protocol (LDAP) server responsible for the domain name. An Active Directory integrated DNS server will respond with the IP address of a domain controller, which is what you want in order to join the domain.
These are some additional bits of information you will need to provide during the bind process:
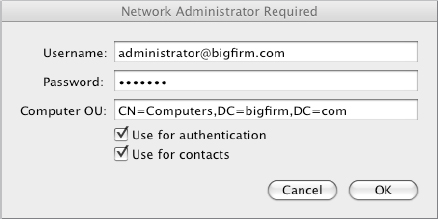
With this information in hand, or at least in mind, you are ready to join your Mac client to your Active Directory domain. Log on to your Mac OS X computer, and perform the following steps:
Figure 18.38 Providing the distinguished path to the OU
The Directory Services utility also allows you to configure and join Active Directory domains or forests from the command line. To configure your Mac from the command line, you need to use the dsconfigad utility to work through this example:
dsconfigad -preferred bf1.bigfirm.com -a "COMPUTERNAME" -domain bigfirm.com -u administrator -p "password"Dsconfigad -alldomains enable -groups domain BigAdmin@Bigfrim.com, Enterprise BigAdmins@bigfirm.comodutil set log debugOnce your Mac client is part of the Active Directory domain, connecting to shared folders is almost the same process as connecting to an OS X server. The single exception is that you must specify that the Finder will use the SMB protocol to connect to the share. Use the format smb://servername/sharename to define the path, similar to Figure 18.39.
Figure 18.39 Defining the path to the Windows server
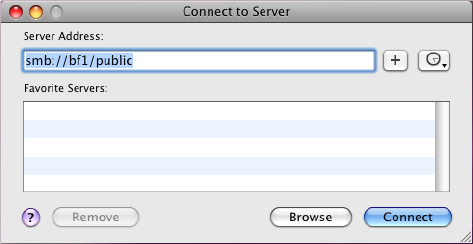
To connect your Mac client to a Windows Server 2012 shared folder, follows these steps:
Like connecting to shared folders, connecting to network printers that are published in Active Directory is a relatively straightforward task. Once the Mac client has joined the Active Directory domain, published printers will be displayed on the Default tab when adding a printer on the Print & Fax page in System Preferences, similar to Figure 18.40.
Figure 18.40 Adding a printer from Active Directory
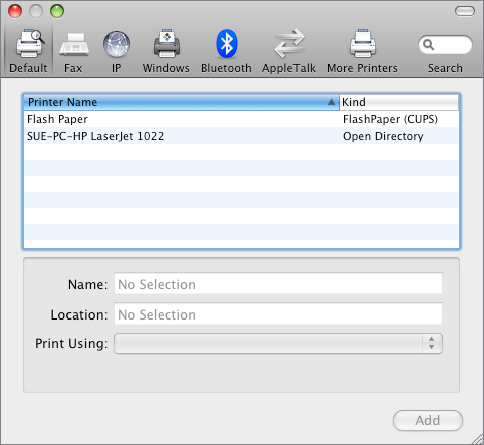
To add a printer that is published in Active Directory, follow these steps:
To add printers in a Windows workgroup environment, the process is similar. You would still use the Print & Scan page of System Preferences to add the new printer, but instead of finding the Active Directory printers listed on the Default tab, you would use the Windows tab and browse for them.
Through the Print and Scan section of System Preferences you can also add IP-based printers and any fax machines that might be available to you.
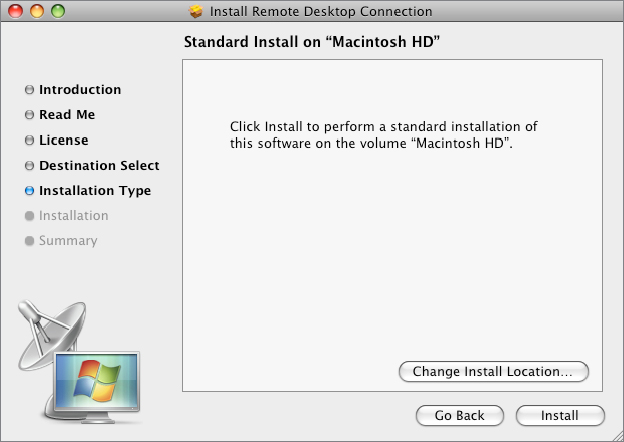
Now that you have added your OS X client to your Active Directory domain and you can access file shares and printers, how can you administer your network? Fortunately, Microsoft has created a Remote Desktop client for OS X that lets you access your Windows Server 2012 computers from your Mac. You can download the Remote Desktop Connection for Mac (RDC) for OS X for free from either Microsoft’s (www.microsoft.com/downloads) or Apple’s (www.apple.com/downloads) download sections. Search the sites for “Remote Desktop Connection.”
To install the Remote Desktop Connection client, follow these steps:
Figure 18.41 Selecting the location to install RDC
Using the RDC is similar to using Remote Desktop in Windows, except that the interface has been changed somewhat to match the OS X style. The initial window contains only a space to enter the name of the computer to which you want to connect. To supply logon credentials and adjust any preferences, use the RDC menus at the top of the screen. Just like the Windows version of Remote Desktop, when you first connect to a remote computer, you will be prompted to provide your username, password, and domain name. RDC does save you some time by letting you store your Windows credentials in the Preferences screen and then save them in your Keychain. Having your Mac joined to an Active Directory domain is not a requirement to use the Remote Desktop client. If the Mac you are using is getting DHCP and DNS information from the network, you will be able to access servers and Windows workstations just as you would on any standard Windows Desktop.
In this section, we offer some troubleshooting tips that will come in handy if you experience these issues while trying to bind your Mac client to Active Directory:
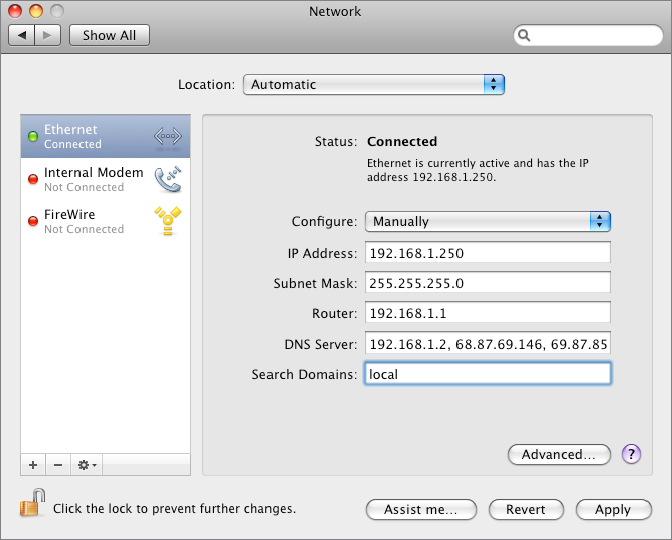
Figure 18.42 Adding local to your search domain order