Chapter 21
Getting from the Office to the Road: VPNs
As mobile computing becomes more prevalent, an increasing number of users often need to remotely access their data located back in the office. Travelling salespeople, telecommuters, and IT consultants among others need to be able to securely connect and work as seamlessly as possible to ensure they stay productive while on the road. Virtual private networks (VPNs) are often used to meet this need.
A VPN is a private connection that is created over a public network, such as the Internet. If the users can access the Internet (there’s hardly a café, airport, or public building these days that doesn’t have some form of connectivity to it), they can then access the office over a VPN. Once connected, users can access any office resources just as if they were there—this includes email, shared folders, and more. The Windows Server 2012 R2 Remote Access role enables the traditional Routing and Remote Access Service (RRAS) features that you’ve become accustomed to in previous Windows Server iterations, but your remote connectivity options get a massive upgrade with the enhanced DirectAccess functionality that also comes bundled with this role. This is a clientless, always on and always managed, group policy–driven alternative VPN option that’s based on the IP Security (IPSec) encryption protocol. DirectAccess provides support for Windows 7 Enterprise and Ultimate or Windows 8 Enterprise clients. For legacy clients, however, you still need to use RRAS for VPN connectivity.
In this chapter, you will learn to:
- Add the Network Policy and Access Services role
- Understand the Remote Access role
- Configure a VPN server
- Explore DirectAccess
Introducing VPNs
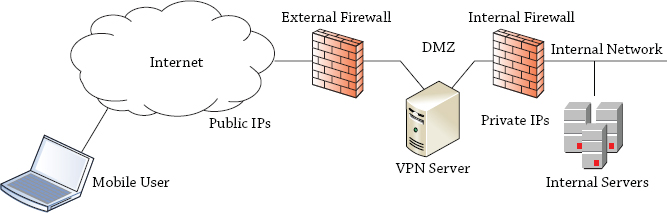
A VPN is used to provide access to a private network over a public network. The public network is often the Internet, but it could also be leased lines that are shared by different companies. Figure 21.1 shows a common example of a how a VPN server is configured.
The VPN server has at least two network interface cards (NICs). One NIC has a public IP address and can be reached by any user who has access to the Internet. The other NIC has a private address connected to the internal network.
VPN servers are often hosted in a demilitarized zone (DMZ), as shown in the figure. A DMZ would typically have two firewalls. One firewall provides a layer of protection to hosts in the DMZ from potential Internet attackers, and the second, internal firewall provides an extra layer of protection for internal clients. In other instances, a DMZ can be created by utilizing an interface on a single firewall and then using routing rules to create the segmentation between DMZ and LAN. Although the figure is simplified to show the VPN server, a DMZ can be configured with more than just a VPN server.
The mobile user can use the VPN connection to connect to the internal network by first connecting to the VPN server. Once connected, the user is able to access internal resources just as if they were physically located in the internal network. One drawback is that the connection is often slower.
First, the mobile user would gain access to the Internet. This could be via a broadband connection, a dial-up connection, or a wireless connection. How the user connects to the Internet isn’t important, only that the user is connected. The VPN server then routes traffic between the mobile user and the internal network.
The specific role that supports VPNs in Windows Server 2012 R2 is the Remote Access role. The Routing and Remote Access Service within this role can be used for both VPNs and direct-dial connections. You can complement the Remote Access role by utilizing policy-driven network and client security through deployment of the Network Policy and Access Services role. Both of these roles will be discussed in detail later on.
Gateway-to-Gateway VPN
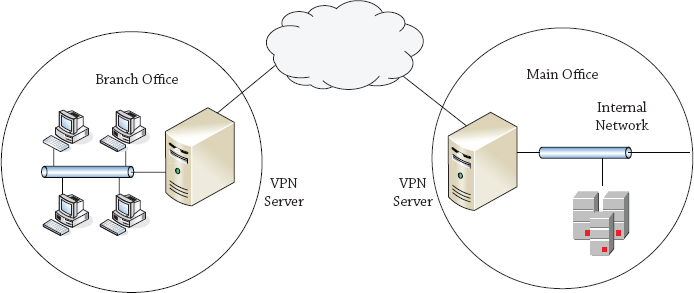
Although this chapter is focused on allowing mobile users to connect, it’s also possible to configure VPNs to allow two different offices to connect. This is referred to as a gateway-to-gateway VPN and is shown in Figure 21.2.
In a gateway-to-gateway VPN, two VPN servers are connected over the public network. It’s common for the public network in this situation to be semiprivate leased lines, but the Internet can also be used. This allows users in the branch office to easily connect to resources at the main office via the VPN. Users may notice that connectivity is slower, but otherwise the connection appears just as if the server were located in the remote office.
Understanding the Tunneling Protocols
When configuring a VPN, security is always a consideration. Data can’t be sent across the Internet in cleartext without the risk of someone using a sniffer to capture it. To combat this risk, VPNs use tunneling protocols.
Currently, there are three primary tunneling protocols in use for Windows VPNs: Layer 2 Tunneling Protocol (L2TP), Secure Socket Tunneling Protocol (SSTP), and Internet Key Exchange version 2 (IKEv2). The Point-to-Point Tunneling Protocol (PPTP) has been used in the past but has known vulnerabilities and is being used less and less as administrators become even more concerned about security.
Both the VPN server and the VPN client must be configured to use the same tunneling protocol.
Layer 2 Tunneling Protocol
Layer 2 Tunneling Protocol is a popular tunneling protocol used with VPNs. It commonly encrypts traffic with IPSec (which is explained in depth later in this chapter), and you’ll often see it expressed as L2TP/IPSec.
When used with IPSec, L2TP encrypts the data, providing confidentiality, and signs the data, providing integrity. However, IPSec has a weakness that prevents it from being used all the time—IPSec can’t travel through a Network Address Translation (NAT) server.
NAT is commonly used to translate private IP addresses to public IP addresses and public back to private. However, because of the way that IPSec packets are put together, NAT affectively breaks IPSec packets. If you need to go through a NAT server, you simply can’t use L2TP/IPSec.
In the past, if you had to go through a NAT server to connect to a Microsoft VPN server, you’d need to use Point-to-Point Tunneling Protocol. PPTP has security concerns, so you’ll rarely see it being used today. However, if you need to go through a NAT server, you have another choice today—Secure Socket Tunneling Protocol.
Secure Socket Tunneling Protocol
Secure Socket Tunneling Protocol (SSTP) is a newer tunneling protocol that was introduced with Windows Server 2008 and is fully supported in Windows Server 2012 R2. It uses Secure Sockets Layer (SSL) over port 443 to secure VPN traffic.
This is actually a big deal. SSL is a well-respected, heavily used, and well-understood security protocol. Because of this, IT administrators and security professionals are willing to trust it much more than something new. That might not seem like much, but if you’ve ever tried to get a firewall administrator to open a port on an enterprise firewall, you know what we mean. Firewall administrators notoriously (and rightfully) want to ensure that only the necessary ports are open. And even if they’re convinced a port must be open to perform a specific task, they need to be thoroughly convinced that it’s safe to open the port.
However, since SSTP uses SSL over port 443, a firewall administrator is more willing to open the port (if it’s not open already). They know SSL is secure, so as long as SSTP is being implemented for the business model, it’s acceptable to the firewall administrator. Additionally, if the enterprise is already hosting a web server that uses HTTPS, port 443 is already open, and you won’t need to beg or bribe the firewall administrator to open the port.
An SSTP session works by first creating an HTTPS session. This HTTPS session is encrypted with SSL, ensuring the session is secure before any data or authentication credentials are sent over the network. After the HTTPS session is established, the SSTP session sends authentication credentials and data over the encrypted channel.
A certificate must be installed on the VPN server from a trusted certificate authority to support SSL. When VPN clients connect, the certificate is sent to the client and used to create a secure session.
Internet Key Exchange Version 2
Internet Key Exchange version 2 was introduced in Windows Server 2008 R2 as a new VPN type and is now gaining a lot of traction in Windows Server 2012 R2. The biggest advantage of IKEv2 is its ability to support VPN Reconnect.
VPN Reconnect allows VPN clients to survive short interruptions in network connectivity without losing the entire connection. After the temporary loss of network connectivity, the VPN client is able to continue without starting the connection over from the start.
IKEv2 is useful in environments where clients may move from one wireless client to another or even move from a wireless to a wired connection. IKEv2 requires a certificate from a trusted certificate authority, but it can use the same certificate that is used by SSTP.
Using the Network Policy and Access Services Role
The Network Policy and Access Services role in Windows Server 2012 R2 enables you to create and enforce policies around your organization’s network access, authentication, authorization, and client health. Deploying this role gives you access to the following services:
Network Policy Server Network Policy Server (NPS) is Microsoft’s implementation of a Remote Authentication Dial-in User Service (RADIUS) server and includes network access policies, accounting, Network Access Protection (NAP), and more. NAP (also sometimes referred to as Endpoint Protection) can be used to ensure the “health” of clients before they are allowed access to network resources. Health is determined by examining the clients to ensure they meet certain conditions predefined by the administrator and can include items, such as being current with updates, having a firewall enabled, and having antivirus software running. These health policies can be applied to any clients—those within a wired network, those in a wireless network, or those connecting remotely.
Health Registration Authority Health Registration Authority (HRA) is part of NAP and is used to issue health certificates for the NAP IPSec enforcement. If the client passes the health policy verification performed by NPS, the HRA will issue a clean bill of health in the form of a health certificate.
Host Credential Authorization Protocol Host Credential Authorization Protocol (HCAP) is used to integrate Microsoft’s NAP solution with Cisco’s Network Access Control Server.
Is This Role a Requirement if We Just Want VPN?
Although it’s not a prerequisite to deploy the Network Policy and Access Services role to create your VPNs, there’s definitely an advantage to having this role installed alongside the Remote Access role to deliver the secure and granular network access that most organizations require with their VPNs. It’s worth noting too that by default, all user accounts in Active Directory have been configured to control their dial-in access through the use of NPS Network Policy regardless of whether the role has been deployed or not.
Installing the Network Policy and Access Services Role
Before starting, we’ll presume that you have an environment with at least one Windows Server 2012 R2 domain controller, a member server, and a Windows 8 client. Check out the earlier chapters in this book if you need assistance in setting up these servers before you attempt to deploy your remote access.
1. To begin, log on to your domain-joined Windows Server 2012 R2 installation with an account that has domain administrative permissions, and from the Server Manager

Local Server
Manage menu, choose the Add Roles and Features option.
2. In the “Before you Begin” dialog box, click Next.
3. Ensure that “Role-based or Feature-Based Installation” is selected in the Select Installation Type dialog box; then click Next.
4. In the Select Destination Server dialog box, leave the default option of “Select a Server from the Server Pool” checked, confirm that your server is highlighted in the Server Pool section, and then click Next to continue.
5. When you reach the Select Server Roles dialog box, scroll down until you find the Network Policy and Access Services option in the Roles list, and check the box beside it.
6. You’ll then be prompted to add some required features here, such as the Remote Server Administration Tools (RSAT), so just click the Add Features button in the window that pops up.
7. Click Next again to continue.
8. Leave the features as they are in the Select Features dialog box; then click Next twice.
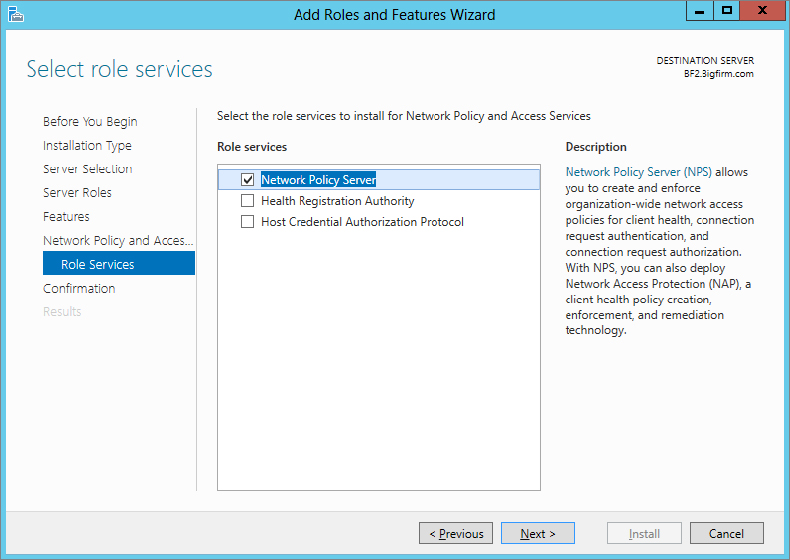
When you reach the Select Role Services dialog box, you will be presented with three options to choose from in the Role Services pane, as shown in
Figure 21.3.
9. Check the box beside Network Policy Server, and then click Next.
10. In the Confirm Installation Selections dialog box, ensure that your settings have been chosen correctly; then click Install to begin.
11. After the installation completes, click Close.
Using the Remote Access Role
The Remote Access role includes much more than just the ability to create a traditional VPN server. The individual services within this role include the following:
Remote Access Service The Remote Access Service (RAS) is used to host either a VPN server or a dial-up server and provides VPN support for older client computers. The server must have at least two NICs to be used as a VPN server.
Routing The Routing service provides a software router to deliver support for routers with capabilities, such as Network Address Translation (NAT), Routing Information Protocol (RIP), and multicasting.
DirectAccess With DirectAccess, users connect transparently to the corporate network every time their company-owned computer has an Internet connection. This delivers greater control and management back to the organization for mobile computers. We will discuss this technology in greater detail later.
Installing the Remote Access Role
Since you’ve already deployed the Network Policy and Access Services role, here are the remaining high-level steps you’ll need to perform to configure your server as a VPN server and connect with a client:
1. Install the Remote Access role.
2. Configure Routing and Remote Access.
3. Add policies to allow connections.
4. Configure user dial-in permissions.
5. Configure the VPN client and connect.
The following sections will walk you through these steps to help you get your VPN server up and running.
Here’s what you need to do to deploy the Remote Access role:
1. To begin, log on to your domain-joined Windows Server 2012 R2 installation with an account that has domain administrative permissions, and from the Server Manager
Local Server
Manage menu, choose the Add Roles and Features option.
2. In the “Before you Begin” dialog box, click Next.
3. Ensure that “Role-based or Feature-Based Installation” is selected in the Select Installation Type dialog box, and then click Next.
4. In the Select Destination Server dialog box, leave the default option of “Select a Server from the Server Pool” checked, confirm that your server is highlighted in the Server Pool section, and then click Next to continue.
5. When you reach the Select Server Roles dialog box, scroll down until you find the Remote Access option in the Roles list, and check the box beside it.
6. You’ll then be prompted to add some required features here, such as the RAS Connection Manager Administration Kit (CMAK) and Web Server (IIS), so just click the Add Features button in the window that pops up.
7. Click Next again to continue.
8. Leave the features as they are in the Select Features dialog box, and then click Next twice.
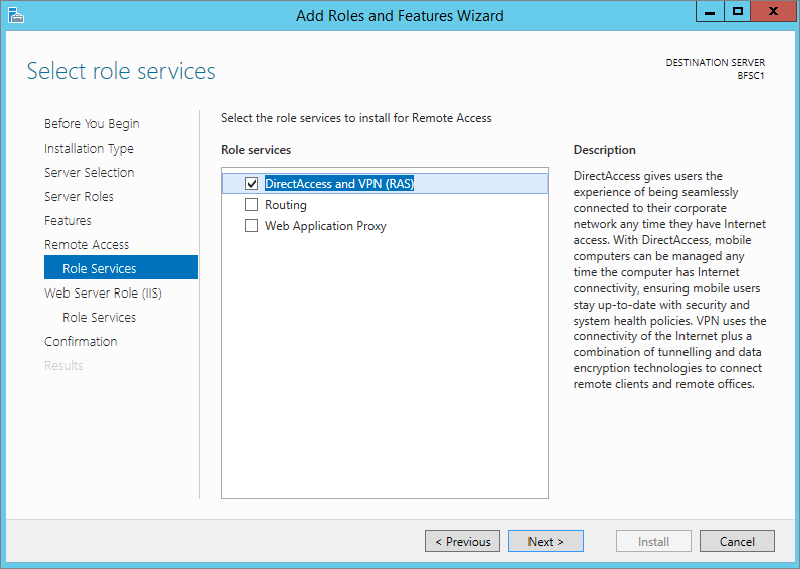
When you reach the Select Role Services dialog box, you will be presented with three options to choose from in the Role Services pane, as shown in
Figure 21.4.
9. Check the box beside DirectAccess and VPN (RAS); then click Next three times, leaving the Web Server Role (IIS) selections at their defaults.
10. In the Confirm Installation Selections dialog box, ensure that your settings have been chosen correctly, and then click Install to begin.
11. After the installation completes, click Close.
Although this adds the service, you’ll still need to configure it and either add or modify policies before it can be used as a VPN server.
PowerShell Tip: Installing the Remote Access Role
Use this simple line of PowerShell as a quick alternative to deploy the Remote Access role and its associated Remote Server Administration Tools:
Install-WindowsFeature RemoteAccess -IncludeManagementTools
Configuring Routing and Remote Access
Once you have installed the Remote Access role, the next step is to configure the Routing and Remote Access Service as a VPN server. You can manage this service via Server Manager or directly via an MMC snap-in. You should be logged on to the Windows Server 2012 R2 computer with an account with domain administrator permissions, not just local administrator permissions.
1. Click the Server Manager
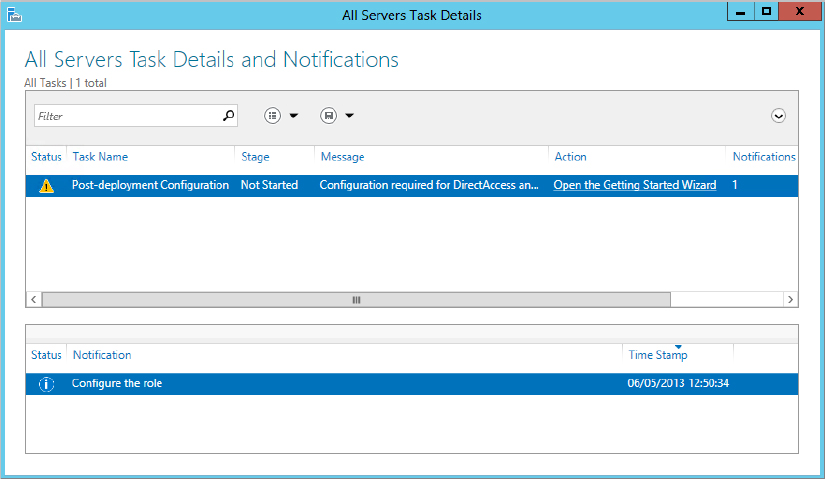
Remote Access menu and notice the warning bar that says “Configuration required for DirectAccess and VPN (RAS).”
2. Click the More link from the same warning bar to continue.
3. In the All Servers Task Details and Notifications dialog box shown in
Figure 21.5, click the Open the Getting Started Wizard link.
When the Getting Started Wizard opens, you will be given the choice to deploy both DirectAccess and VPN together, DirectAccess only, or VPN only.
4. Select the Deploy VPN Only option.
Later we’ll discuss deployment of DirectAccess, but for now VPN is all you need.
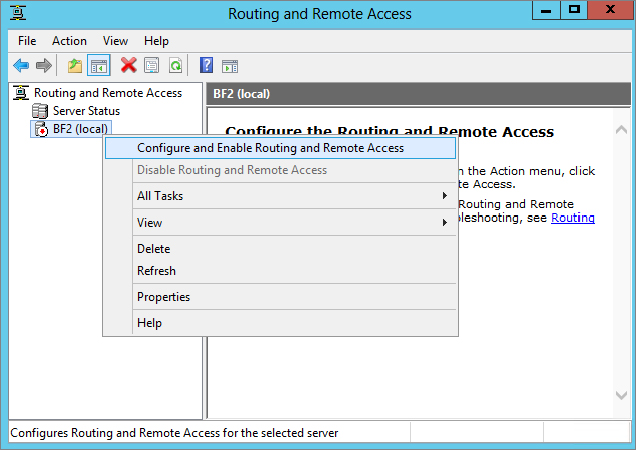
5. In the Routing and Remote Access snap-in, right-click your server name and then choose the Configure and Enable Routing and Remote Access option from the context menu, as shown in
Figure 21.6.
6. This opens the Routing and Remote Access Server Setup Wizard; click Next to continue.
Two NICs Required for VPN
As a reminder, two NICs are required to fully configure RRAS as a VPN server. However, if you have only one NIC, you can still configure RRAS so that you can explore both RRAS and NPS. Instead of choosing “Virtual private network (VPN) access and NAT” on the Configuration page, choose “Custom configuration,” and select the VPN access and NAT options from the Custom Configuration page. Once this is complete, you’ll also need to access the properties page of the server and add a static address pool from the IPv4 tab.
7. From the options presented in the Configuration dialog box, select “Virtual private network (VPN) access and NAT”; then click Next.
8. On the VPN Connection page, select the NIC that’s connected to the Internet.
On this example system we’ve renamed ours Internet Facing NIC, selected it, and simulated a public IP address by assigning it 74.1.2.3.
9. Once you’re happy with your selections here, click Next.
10. On the IP Address Assignment page, select “From a specified range of addresses,” and click Next.
11. Click New. Enter a starting IP address and an ending IP address.
These will be assigned to VPN clients and should be chosen to allow access to the network. Here, we’ve chosen the range of 192.168.20.200 through 192.168.20.250 to be used as an example.
12. Click OK, and then click Next.
13. On the Managing Multiple Remote Access Servers page, accept the default of “No, use Routing and Remote Access to authenticate connection requests,” and click Next. Click Finish.
A dialog box will appear indicating that the DHCP relay agent must be added if DHCP is being used to give out IP addresses. This is not relevant with a static IP range as used in these steps.
14. Review the information and click OK to dismiss the dialog box.
15. If prompted, confirm the notification about the NPS connection request policy by clicking OK, and then click the Start Service button from the pop-up dialog box to start the RRAS service.
At this point, you have a VPN server joined to a domain with Routing and Remote Access Service installed and configured. However, clients will not be able to connect until a network access policy is configured.
Configuring Policies
Network access policies are an integral component in delivering secure and controlled VPN access. If a client doesn’t meet the conditions of any policy, the client will not be able to connect. If the VPN server doesn’t have any policies, clients can’t meet the conditions of a policy and they can’t connect. The Network Policy Server (NPS) service that you installed earlier is where these policies are managed in Windows Server 2012 R2.
NPS can be used to create and enforce network access policies throughout an organization. Although this chapter focuses on remote access, NPS can be used to create advanced policies to check any computers, including those in an internal network. Computers that don’t meet the predefined conditions set by the administrator can be quarantined, and network access can be denied.
Policies are configured within the NPS console, and the NPS console can be accessed from two different methods. However, the console has different capabilities when accessed differently:
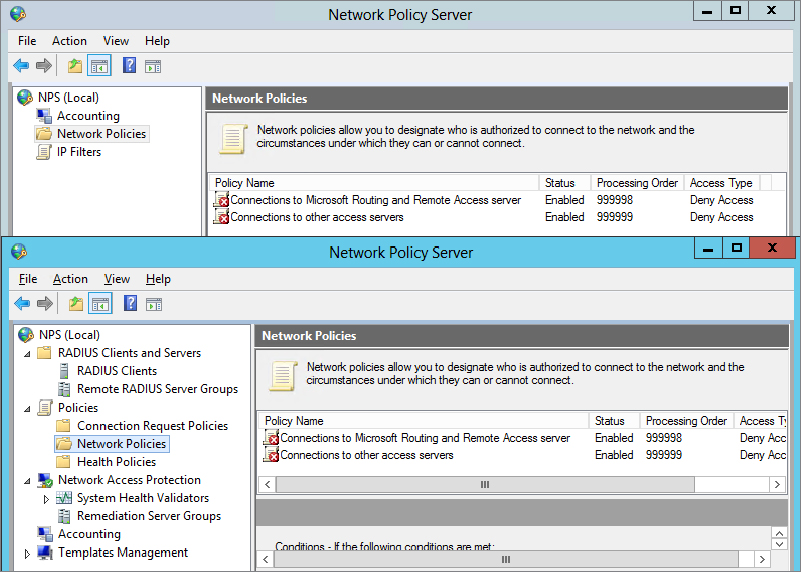
Launch from Routing and Remote Access Inside the Routing and Remote Access snap-in, you can right-click Remote Access Logging & Policies and select Launch NPS. When launched this way, NPS will show only the options that are directly related to RRAS. The top console in
Figure 21.7 was launched from RAS and is the focus in this chapter.
Launch via the Tools Menu When launched by selecting Server Manager
Tools
Network Policy Server, many additional tools are available. The bottom console shown in
Figure 21.7 was launched from the Tools menu.
NPS includes two default policies in the Network Policies node. Each of these policies is set to Deny Access when created but can be changed if desired. The two policies are as follows:
Connections to Microsoft Routing and Remote Access Server Policy This includes a single condition that specifies that the RADIUS client must be a Microsoft client (specified as MS-RAS Vendor ^311$). This applies only to RADIUS clients.
Connections to Other Access Servers This includes a single condition of any time of the day and any day of the week. If no other conditions are met by previous policies, this policy will be used. Notice that the processing order of this starts with a default of 999999, which is the highest possible number that can be assigned. Although you can’t assign the processing order directly, you can modify the order, such as which policy is processed first, second, and so on.
Policies have four important elements: conditions, permissions, constraints, and settings. For a big-picture perspective, here’s an overview. In the following pages, we’ll cover each of these elements in much more depth.
Conditions Each policy must have one or more conditions that must be met for the client to use the policy. If the condition is not met, the policy will not be used. Many conditions can be specified, such as being a member of a Windows group or connecting at a certain time of day or day of week.
If a user meets the condition of a policy, the policy will be used even if the policy prevents a user from accessing the VPN server. No other policies will be used. For example, consider a VPN server that has five policies. If a user meets the condition of the first policy and access is denied from this policy, the other four policies will not be checked.
Permissions Permissions help determine whether a user is granted access once it’s determined that they will use this policy (by meeting the conditions of the policy). On the surface, permissions sound simple since they can be set to Grant Access or Deny Access. However, individual user account settings can override the permission of the policy, and the policy can be set to override the user account setting. As you dig in, you realize it isn’t as simple as just Grant Access or Deny Access.
Constraints Constraints can be used to ensure that clients follow some specific rules for the connection. Constraints include authentication methods, time-outs for the session or idle time, and more. If a user meets the condition and is allowed permission but doesn’t meet one of the constraints, the connection will be refused.
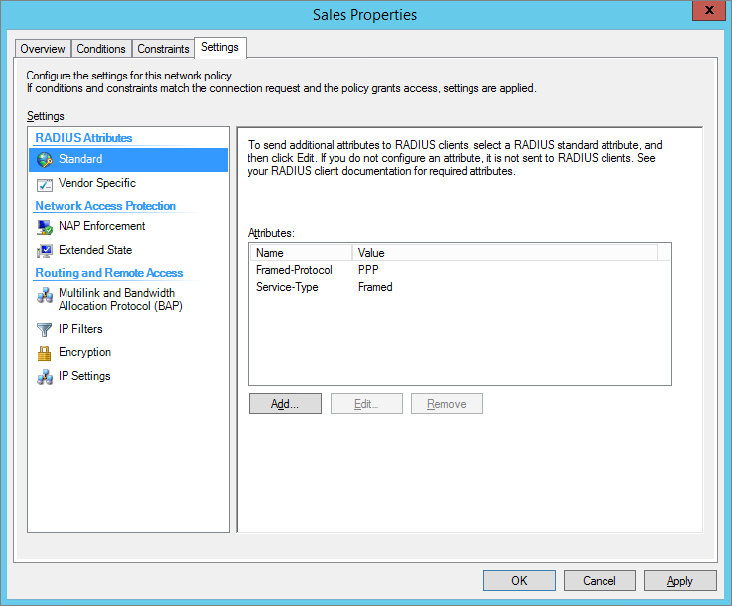
Settings Settings are applied if the policy meets the conditions and constraints of a policy. Settings include multilink and bandwidth-allocation options, encryption choices, IP settings, and IP filters.
Policy Conditions and Policy Order
The conditions are very important to set and understand for policies. Consider these basic rules that govern policies:
- A user must meet all the conditions of a policy to use a policy.
- A user will use only the first policy where all the conditions are met.
- If a user is denied access from a policy where conditions are met, additional policies are not evaluated.
- If a user doesn’t meet the conditions of any policy, access cannot be granted.
- If there are no policies, conditions cannot be met, and access cannot be granted.
As a simple example, you may want to configure a policy for users in the Sales group. You can create a condition for the policy that includes the Sales group (assuming you have a Sales group in your domain). Any user who is a member of the Sales group will meet this condition and this policy will be used.
Understanding Policy Order
Policies are evaluated in a specific order, and when creating policies, it’s important to consider the logic of each to determine which policy will be used. Imagine that after you’ve created the policy for the Sales group, you now have three administrative-created policies with the conditions and permissions shown in Table 21.1.
Table 21.1: Evaluating policy conditions
| Policy Name |
Conditions |
Permission |
| Domain Users |
Member of Domain Users group |
Deny Access |
| IT Admins |
Member of IT Admins group in domain |
Grant Access |
| Sales |
Member of Sales group in domain |
Grant Access |
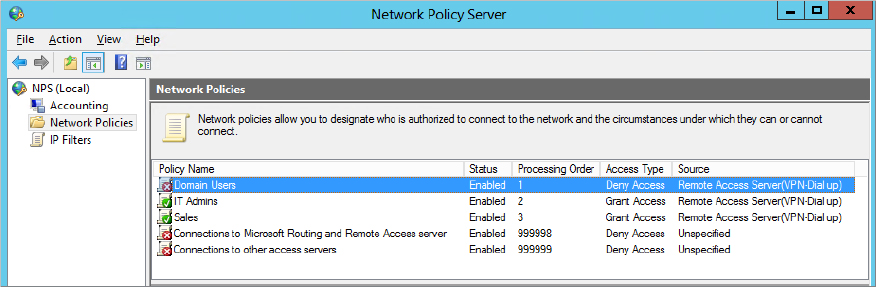
Figure 21.8 shows these policies. Notice in the figure that each of the policies includes a processing order. The Domain Users policy is at the top with a processing order of 1, the IT Admins policy has a processing order of 2, and so on. This identifies the order in which the policies will be evaluated and helps show a serious flaw with the current design.
In this example, only the first policy (Domain Users) would ever be used. Anyone in either the IT Admins group or the Sales group is a member of the domain and would also be a member of the Domain Users group. Since these users are members of the Domain Users group, they would meet the conditions of the first policy and would use this policy. As shown, the IT Admins and Sales policies would never be used, and since the Domain Users policy is set to Deny Access, no one would ever be allowed access.
However, the problem is easy to fix. By right-clicking any of the policies, you can click Move Up or Move Down to change the processing order. Table 21.2 shows a more appropriate processing order. In general, policies should be ordered from most specific to least specific, but you also need to think through the logic.
Table 21.2: Modifying policy order
It’s possible to add more than one condition to a policy. If a policy includes more than one condition, all the conditions must be met in order to use the policy. The categories of the different conditions that can be used are Groups, Host Credential Authorization Protocol (HCAP), Day and Time Restrictions, Connection Properties, RADIUS Client Properties, and Gateway.
Employing the Groups Condition
You can use the Groups condition to restrict access to specific users or computers. Any valid group that is supported within a domain or any local group supported on individual systems can be added. Groups can include Windows groups, machine groups, and user groups.
Using groups can be an effective way to identify the user who is trying to access the VPN server. For example, if you want users in the IT Admins group to be able to dial in anytime but users in the Sales group to be able to dial in only at certain times, you can create two policies with one condition for each group. The constraints can then be configured to restrict access to a specific time.
Host Credential Authorization Protocol
HCAP can be used for communication between NPS and third-party network access servers. If all VPN servers are Microsoft, HCAP would not be used. However, HCAP allows you to support a hybrid environment with different types of VPN servers.
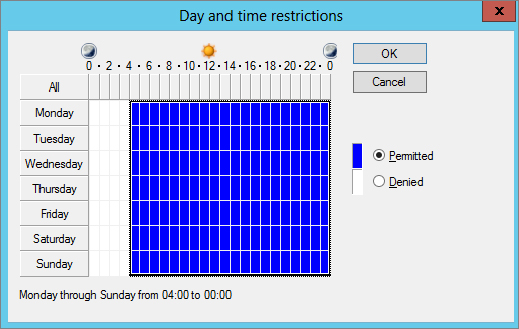
Day and Time Restrictions
Figure 21.9 shows the screen for Day and Time Restrictions. Imagine that you have reserved the hours of midnight to 4 a.m. for maintenance tasks on the server and want to ensure the server doesn’t accept any connections during this time. You could configure the settings as shown.
The Day and Time Restrictions condition is one of the most often used to control access to the VPN server. You’ll see later that you can also use Day and Time Restrictions as a constraint.
Connection Properties
The Connection Properties category includes several different protocols and specifics about the protocol that can be required by the client. The choices are as follows:
Access Client IPv4 and IPv6 Addresses You can specify a specific IP address or IP subnet for the client. This can be useful in gateway-to-gateway VPNs where a remote office is connected to the main office via a VPN. If the remote office has a specific IP address that doesn’t change, the condition can specify this IP address.
Authentication Type Authentication protocols are used to allow the client to prove their identity. Many different authentication types can be used, and they can be identified in the condition or in the constraints section.
Allowed EAP Types Extensible Authentication Protocol (EAP) is used to allow advanced authentication protocols. This allows the use of smart cards and other more secure methods of authentication.
Framed Protocol Framed protocols include Point-to-Point Protocol (PPP) and Serial Line Interface Protocol (SLIP). The most common type is PPP and is used by the client for their initial connection to the Internet. For example, a client could dial into the Internet and then use a tunneling protocol to access the VPN server over the Internet. Several other less-used framed protocols are also supported.
Service Type You can specify which service type a client is using, such as Callback Framed or Framed protocol.
Tunnel Type The Tunnel Type setting can be used to specify the tunneling protocol used by the client. Tunnel types supported include L2TP, PPTP, and SSTP.
RADIUS Client Properties
RADIUS client properties can be used to identify specifics about RADIUS clients. Several conditions can be configured including the calling station ID, the RADIUS client’s friendly name, the IPv4 or IPv6 address, and even the vendor of the client. These settings are used to configure a policy for a RADIUS server but not a VPN server.
Configuring a Gateway
If your VPN server has multiple points of access, you can configure a gateway to ensure that clients are accessing it in a specific way. The various gateway conditions include the phone number called, the name of the server, the IPv4 or IPv6 address, and the port type.
Imagine your VPN server has two NICs with different public IP addresses. One NIC may have a lot of bandwidth available, but another does not. You can restrict access to the higher-bandwidth NIC to a select group by combining a gateway condition with a Windows group condition.
Setting Policy Permissions
Policy permissions can be affected by several different elements. Figure 21.10 shows the Overview tab of a policy. The access permissions are identified in the center of the page.
The Grant Access and Deny Access permissions mean access will be granted or denied if the condition of the policy is met, but only if the user account is configured to use the permissions of the policy and the “Ignore user account dial-in properties” check box is not selected. The user account properties are set on the user’s Active Directory account.

RADIUS Client vs. VPN Client
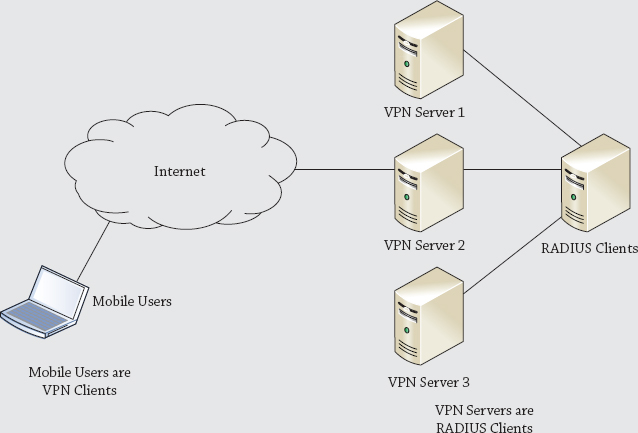
The term RADIUS client is sometimes misunderstood. When RADIUS is used, the end user is not the RADIUS client, but instead the VPN server is the RADIUS client.
Imagine that you have several VPN servers. You could install NPS on another server to act as a RADIUS server and as a central point of authentication for all the VPN servers. Now, instead of each of these VPN servers authenticating the client, they could pass the authentication requests on to a RADIUS server.
Take a look at the illustration shown here. The end user is a VPN client and is accessing VPN Server 2. In this role, VPN Server 2 is acting as a server to the client. However, the VPN server then passes the authentication credentials on to the RADIUS server, and in this role, Server 2 is also RADIUS client.
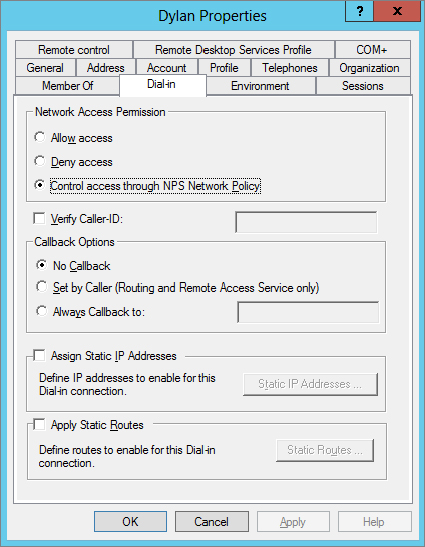
Figure 21.11 shows the properties of a user account with the Dial-in tab selected. The Network Access Permission area includes three settings: “Allow access,” “Deny access,” and “Control access through NPS Network Policy.” As shown, the permissions of the policy will be used. However, if the permissions here are set to “Allow access” or “Deny access,” the permissions of the policy will not take precedence unless you take an additional step.
Alarm bells may be going off in your head. Wait a minute. You have to set the network access permission for every user in your network? If you have 5 users, that’s no big deal, but if you have 5,000 users, this might take some time. There’s an easier way.
If you look back at Figure 21.10, you can see a third choice in the Access Permission section: the “Ignore user account dial-in properties” check box. You can select it in addition to either “Grant access” or “Deny access,” and when selected, the user setting for the user account shown in Figure 21.11 will be overridden.
Configuring Policy Constraints
Policy constraints are additional elements you can configure to control the connections. Constraints can then be used to deny access or disconnect users based on other qualifiers.
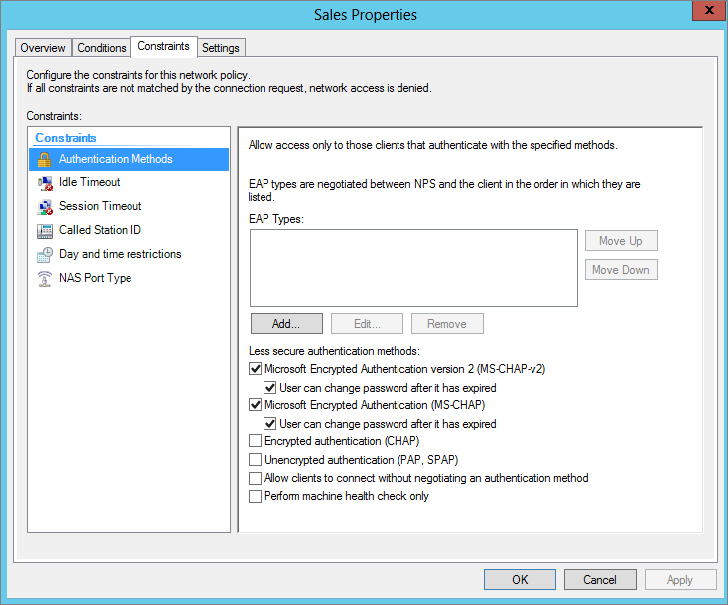
Figure 21.12 shows the Constraints page for a network access policy. You may notice some crossover with the conditions and the constraints. Four elements can be configured as either conditions or constraints: Authentication Methods, Called Station ID, Day and Time Restrictions, and NAS Port Type.
A logical question is, “Should I use the element as a condition or a constraint?” The answer lies in the purpose of the condition—a condition is used to identify the policy to be used. Remember, all conditions of a policy must be met for the policy to be used, and then you set permissions, constraints, and settings to further restrict or control the connection.
As an example, you may want to allow Sales users to be able to connect any time of any day but members of the Domain Users group to connect only between 7 a.m. and 5 p.m. Monday through Friday. The following two policies could be created:
Policy 1
- Condition: Sales group, Allow access
- Constraints: None
Policy 2
- Condition: Domain Users group, Allow access
- Constraints: Day and time restrictions (7 a.m. to 5 p.m. Monday through Friday)
If users in the Sales group access the server, they will use Policy 1 based on the Sales group condition and the constraints won’t restrict their access. If any domain user that’s not in the Sales group accesses the server, they will use Policy 2 based on the Domain Users group condition. If they access the server between 7 a.m. and 5 p.m. Monday through Friday, the connection will complete. However, if they access it at any other time, they’ll still use Policy 2, but the constraint will prevent the connection.
The two extra constraints are as follows:
Idle Timeout You can configure this to close the connection if the session is idle for a period of time, just as a screen saver can be configured to start if a system is idle.
Session Time-out The total connection time can be configured to control how long a user connects. For example, enabling this and setting it to 60 will disconnect users after they’ve been connected for 60 minutes.
Configuring Policy Settings
Policy settings are additional settings that can be applied to the connection. The settings provide additional capabilities that can be used by the clients.
The difference between constraints and settings is subtle. Constraints are used to ensure a VPN client is using specific elements and will prevent the connection if the client does not use these elements. Settings provide additional capabilities that clients are free to use.
Figure 21.13 shows the Settings page for a policy. The RADIUS Attributes section applies only if the server is being used as a RADIUS server. The four Routing and Remote Access settings apply to a VPN server.
Multilink and Bandwidth Allocation Protocol
Multilink allows clients to use multiple lines for a connection. Although this isn’t commonly used for a VPN, it can be valuable for dial-up connections. If a user connects via a single phone line, they are limited to a 56 Kbps modem, and even the modem is limited to speeds slower than 56 Kbps over a phone line.
However, if the client has two phone lines and two modems and the server also has at least two phone lines and two modems, the client is able to make a single shared connection over both phone lines and modems.
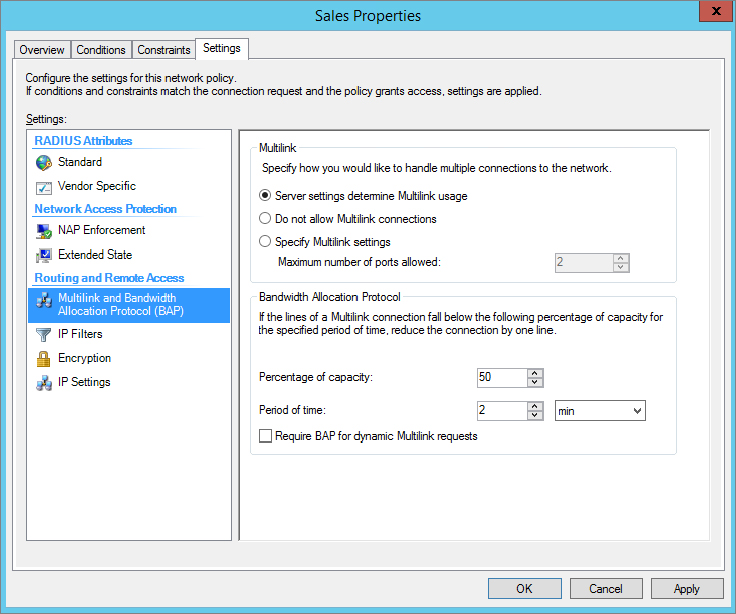
When Multilink is used, the Bandwidth Allocation Protocol (BAP) can also be used. It can be used to dynamically disconnect unused Multilink connections. In other words, if a user connected with two Multilink connections but was using only a small fraction of the bandwidth, BAP can disconnect the unused line so that it is available for another user.
Figure 21.14 shows the Settings page for Multilink and BAP with the default selections.
IP Filters
You can use IPv4 and IPv6 input and output filters to control traffic going across the connection. The settings that can be configured are the same type of settings that can be configured on a basic packet-filtering router.
Packets can be filtered based on IP addresses, subnets, protocols, and ports. For example, if the VPN clients are supposed to have access only to a single subnet in the network, you could create a filter to grant access to this subnet and no others. Similarly, a filter could be granted to block access to a specific subnet while granting access to all others.
Encryption Settings
Encryption settings help determine what encryption will be used for the connection. Encryption will cipher the data so that it is not easily readable if intercepted. This page gives four encryption choices:
- Basic Encryption (MPPE 40-bit)
- Strong Encryption (MPPE 56-bit)
- Strongest Encryption (MPPE (128-bit)
- No Encryption
The actual encryption used is determined by other protocols. For example, if you’re using PPTP, it will use Microsoft Point-to-Point Encryption (MPPE) with the bit lengths shown. However, if you’re using L2TP, it will use IPSec instead of MPPE, and if you’re using Secure Socket Tunneling Protocol (SSTP), it will use SSL instead of MPPE. Additionally, each of the different encryption techniques (MPPE, IPSec, and SSL) has different strengths of encryption.
When all four settings are selected, the client and the server will negotiate the strongest encryption that they both can use. It is not recommended to use the No Encryption setting.
IP Settings
The IP settings determine how the client receives an IP address that is used for internal connections. Although a VPN client typically has a public IP address used to tunnel through the Internet to the VPN server, it will also need an IP address that is local to the internal network after it is connected.
This internal IP address can be assigned through a range of addresses assigned by the VPN server, requested from an internal DHCP server, or assigned statically. For a gateway-to-gateway VPN connection (where the VPN server accepts only a single connection), a statically assigned address is used. If you followed the steps in the chapter to configure Routing and Remote Access, you configured a range of IP addresses that are assigned to VPN clients.
Creating a Network Policy
Once you understand the elements of a network access policy, you can create your own. The following steps will lead you through the process of creating a network access policy to allow users in the Domain Users group to connect to your VPN server. These steps assume your VPN server is a member server in the domain so that the Domain Users group can be used:
1. Launch the Routing and Remote Access Server (RRAS) console by selecting Server Manager
Tools
Routing and Remote Access.
2. Launch the Network Policy Server console by right-clicking Remote Access Logging and Policies and selecting Launch NPS.
3. Select Network Policies in the Network Policy Server console. Right-click Network Policies, and select New.
4. Type Domain Users as the policy name.
5. Select Remote Access Server (VPN-Dial up) from the drop-down box as the type of network access server.
6. Your display will look similar to
Figure 21.15. Click Next.
7. On the Specify Conditions page, click Add. Select Windows Groups, click Add, and then click the Add Groups button.
8. Enter Domain Users as the object name, and click Check Names.
9. If prompted, enter credentials for the domain. Click OK to accept the group on the Select Group page. Click OK on the Windows Groups page, and click Next on the Specify Conditions page.
You can add as many conditions as you like on the Specify Conditions page. However, if more than one condition is added, all conditions must be met to use the policy.
The Specify Access Permission page allows you to grant or deny access and override the user’s dial-in properties.
10. Ensure “Access granted” is selected. Select the “Access is determined by User Dial-in properties (which override NPS policy)” box to ensure that dial-in user properties cannot override this policy. Click Next.
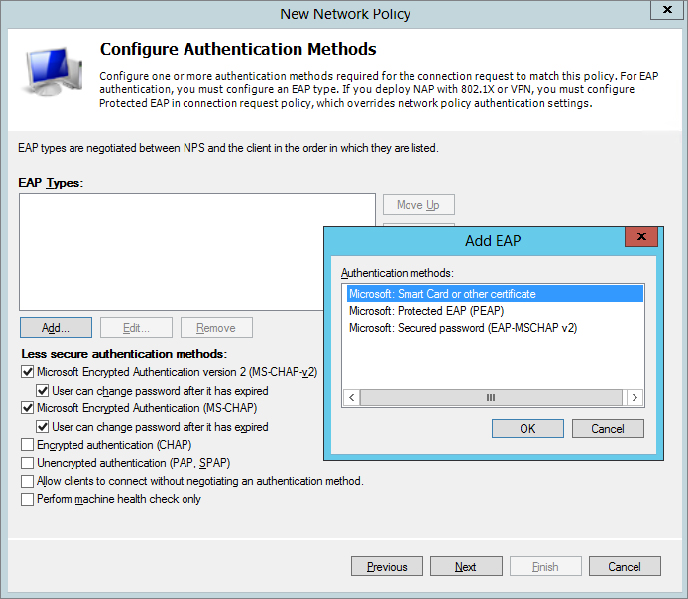
On the Configure Authentication Methods page, you can identify what authentication methods the server and clients will use.
11. Click Add to view the extensible authentication protocols that can be added.
You can add the additional EAP methods, but for now just leave the defaults.
12. Click Cancel to dismiss the Add EAP dialog box.
You’ll explore the different authentication methods in greater depth in the next section.
13. Click Next.
14. On the Configure Constraints page, ensure Idle Timeout is selected, and select the “Disconnect after the maximum idle time” box.
15. Change the 1 to 15 to indicate 15 minutes. Feel free to click through the other constraints to view them. Click Next.
16. The Configure Settings page will appear. Select Encryption, and deselect “No encryption.”
Only “Basic encryption,” “Strong encryption,” or “Strongest encryption” should be selected. This will ensure that any connections will use some type of encryption.
17. Click Next.
18. Review the information on the Completing New Network Policy page, and click Finish.
At this point, you have created a VPN policy that can be used to grant access to any user who has a domain account.
You now have a domain controller (named BF1 in our example test bed) and a member server (named BF2 in our lab). The Network Policy and Access Services role and the Remote Access role have been added and RRAS configured on the server with an associated network access policy created too.
The next step is to configure a client to connect to the VPN server.
Configuring and Connecting with a VPN Client
With your domain controller and VPN server created and configured, it’s time to configure your client and connect. Although a VPN server would actually have one NIC connected to the Internet, a test bed will look more like Figure 21.17.
Notice that the VPN server has two NICs. The backend NIC is connected to the network with an IP of 192.168.20.11/24, which is on the same subnet as the DC with 192.168.20.10/24.
The Internet-facing NIC has a public IP with a manually assigned IP of 74.1.2.3/8. The client will obtain any public IP from the Internet service provider (ISP), but for our lab we’re manually assigning the NIC with an IP of 74.1.2.4/8, which is on the same subnet as the public IP.
One of the biggest challenges is getting a certificate to work with both the server and the client, so for initial testing, we’ll do this without a certificate. Afterward, we’ll show how to add a certificate and configure the server to use L2TP/IPSec.
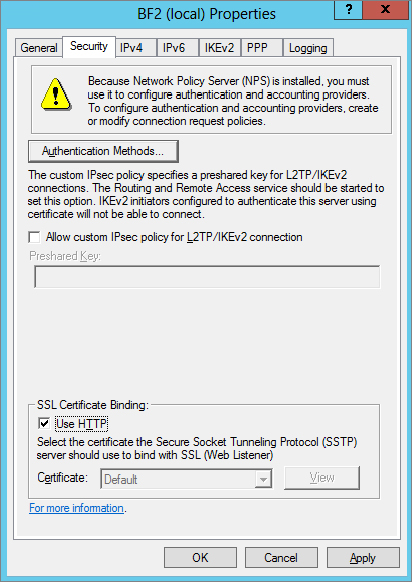
Configure the RRAS server to use SSTP without SSL by following these steps:
1. Launch the Routing and Remote Access console.
2. Right-click the server and select Properties.
3. Select the Security tab and select the Use HTTP check box. This bypasses the need for a certificate.
Now all that’s left is to configure the Windows 8 client and connect with a domain account. You can do so with the following steps:
1. Assign your Windows 8 client the IP address of 74.1.2.4/8 to simulate the public IP address that will reach the VPN server with these steps:
a. From the Windows 8 Start screen, type the word Network, click Settings, and then launch the Network and Sharing Center.
b. Select Change Adapter Settings. Right-click the Local Area Connection, and select Properties.
c. Select Internet Protocol Version 4 (TCP/IPv4), and select Properties.
d. Enter the IP address of 74.1.2.4 with a subnet mask of 255.0.0.0.
e. Click OK to dismiss IPv4 Properties. Click Close to close the Local Area Connection Properties.
At this point, you should be able to access the command prompt and ping the IP address of the VPN server at 74.1.2.3. If you can’t ping the server, you won’t be able to connect with a VPN connection.
2. Click Back in the Explorer window to return to the Network and Sharing Center.
3. Create a VPN connection with these steps:
a. Click “Set up a new connection or network.”
b. On the “Choose a connection option” page, select “Connect to a workplace.” Click Next.
You’ll be prompted to use an existing connection or create one.
c. Select “No, create a new connection.” Click Next.
d. On the “How do you want to connect?” page, select “Use my Internet connection (VPN).”
You’ll be prompted to identify how you want to connect to the Internet.
e. For this exercise, select “Let me decide later.” Click Next.
f. Enter
74.1.2.3 as the Internet address. This is the IP address of the public-facing NIC on the VPN server. Click Create.
Although a message indicates you must create an Internet connection, this isn’t needed for the test bed. It would be needed for a client connecting over the Internet.
g. Click Close.
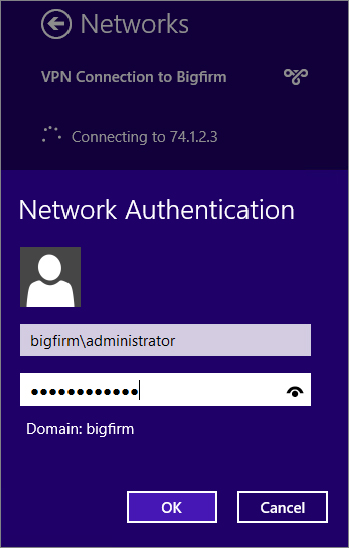
4. Connect to the VPN server with the following steps:
a. At the Networks pane that pops up, select the VPN connection you just created and then click Connect.
b. Enter the password of the domain account you entered when creating the connection. You can also enter a new username and password if desired. Your display will look similar to
Figure 21.19.
c. Click OK.
The connection will try to connect to the server. It tries the SSTP connection first and then others if it’s not successful.
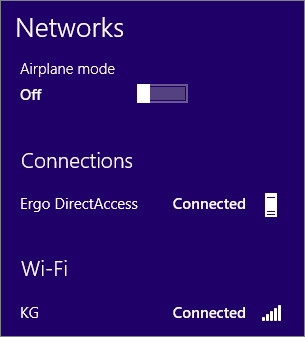
Since SSTP is enabled without SSL, it will connect. Notice that both the Bigfirm VPN connection and the home network are shown as connected.
Adding a Certificate
Now that you know the pieces are working, you can add a certificate to the server to secure the connection. There are several ways to obtain a certificate. You can purchase a certificate from a trusted root authority or add Active Directory Certificate Services and issue and install certificates for free.
We’re taking the free route even though it does require the completion of several tasks. You’ll need to do the following:
1. Install Active Directory Certificate Services.
2. Create the server authentication certificate.
3. Request and install the server authentication certificate.
4. Install the computer certificate on the VPN server.
5. Install the CA certificate on the client.
6. Reconfigure RRAS for a secure connection.
7. Connect with a secure connection.
The next few pages detail the steps needed to accomplish these tasks.
Step 1: Install Active Directory Certificate Services
Perform the following steps to install Active Directory Certificates Services onto your VPN server:
1. Log on to your domain-joined Windows Server 2012 R2 installation with an account that has domain administrative permissions, and from the Server Manager
Local Server
Manage menu, choose the Add Roles and Features option.
2. In the “Before you Begin” dialog box, click Next.
3. Ensure that “Role-based or Feature-Based Installation” is selected in the Select Installation Type dialog box, and then click Next.
4. On Select Destination Server page, leave the default option of Select a Server from the Server Pool checked, confirm that your server is highlighted in the Server Pool section, and then click Next to continue.
5. When you reach the Select Server Roles dialog box, check the box beside Active Directory Certificate Services and then click the Add Features button from the pop-up window.
6. Click Next three times to move to the Select Role Services dialog box.
7. On the Select Roles Services page, select Certification Authority and Certificate Authority Web Enrollment. When prompted to add additional role services, click the Add Required Role Services button. Click Next.
8. Accept all the defaults of the wizard. Review the information on the Confirm Installation Selections page, and click Install.
9. When the installation completes, click Close.
Step 2: Configure Active Directory Certificate Services
Before you can use the Certificate Services role, you need to complete some final configuration steps:
1. Click the Server Manager
AD CS menu and notice the warning bar that says “Configuration required for Active Directory Certificate Services.” Click the More link from the same warning bar to continue.
2. In the All Servers Task Details dialog box, click the “Configure Active Directory Certificate Services on the destination server” link.
When the AD CS Configuration Wizard opens, you need to specify credentials for configuring the role.
3. Enter an account with administrative permissions (or leave the default domain admin in there); then click Next.
4. In the Select Role Services to Configure dialog box, choose the Certification Authority and Web Enrollment options, and then click Next.
5. Choose Enterprise CA from the next dialog box, and then click Next.
6. If you haven’t previously deployed a CA into your environment or are running this in a lab, choose the Root CA option from the next dialog box; then click Next.
7. Click Create a Private Key, and click Next to move on.
8. On the Cryptography for CA page, leave the defaults and click Next.
9. Choose a name for your CA in the CA Name dialog box and then click Next.
10. Specify a validity period for your root certificate or just leave the default of 5 years, and click Next twice.
11. In the Confirmation dialog box, ensure that all of your settings have been input as you want, and when you’ve confirmed that all is good, click the Configure button.
Changing the Name of Your CA
A word of warning here is that once you finalize this procedure, you cannot change the name of your CA and your only option will be uninstalling and reinstalling the role, so make sure you get it right the first time!
12. When the wizard has finished, click Close to exit.
Step 3: Create the Server Authentication Certificate
Perform these steps on the VPN server to create the server authentication certificate:
1. Select Server Manager
Tools
Certification Authority.
2. Browse to Certificate Templates. Right-click Certificate Templates, and click Manage.
3. Right-click the Web Server template, and select Duplicate Template.
4. In the Compatibility tab, leave the default setting of Windows Server 2003, and then click the General tab.
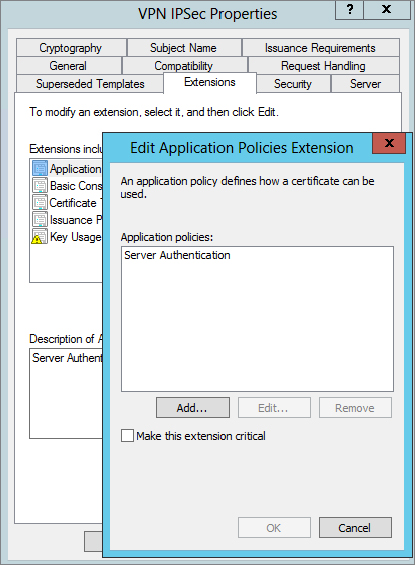
5. Change the Template display name to VPN IPSec.
6. Select the Request Handling tab, and select the “Allow private key to be exported” check box.
7. Select the Subject Name tab, and select “Supply in the request.”
8. Select the Extensions tab. Select Application Policies, and confirm that Server Authentication is listed.
9. Click OK or Cancel to return to the Extensions tab.
10. Click OK to save the template.
11. Return to the Certificate Authority console.
12. Right-click Certificate Templates, and select New
Certificate Template to Issue.
13. Select VPN IPSec, and click OK.
Step 4: Request and Install the Server Authentication Certificate
Perform these steps on the VPN server to install the server authentication certificate:
1. Use the following steps to configure Internet Explorer security so that you can use it to add the certificate:
a. Launch Internet Explorer with administrative privileges (using Run As Administrator).
b. Select Tools
Internet Options, and select the Security tab.
c. Select the Local intranet zone, and change the slider from Medium-low to Low. Click OK.
2. Enter http://localhost/certsrv in the address bar of Internet Explorer to connect to Certificate Services.
3. Click Request a Certificate. Then click Advanced Certificate Request.
4. Select Create, and submit a request to this CA. When prompted to allow an ActiveX control, click Yes.
5. Review the confirmation message, and click Yes again.
6. Select VPN IPSec as the certificate template. Enter the name of your server and the domain in the Name box. For the example exercise, this is
BF2.Bigfirm.com.
7. Click Submit.
8. When prompted to allow the ActiveX control, click Yes, and click Yes again in the confirmation dialog box. At this point, the certificate has been created.
9. Click Install This Certificate, though you will need to take additional steps. Close Internet Explorer.
Step 5: Install the Computer Certificate on the VPN Server
Use the following steps to add the certificate on the VPN server to the certificate store:
1. From the Windows Server 2012 R2 Start screen, type MMC, and click the MMC option.
2. Select File
Add/Remove Snap-in.
3. Select Certificates, and click Add.
4. Click Finish to add the “My user account certificate” snap-in. Click Add again, select Computer Account, and click Next.
5. Click Finish. Click OK.
6. Browse to the Certificates – Current User\Personal\Certificates container.
7. Export the server certificate with these steps:
a. Right-click the server certificate, and select All Tasks
Export.
b. Click Next on the Welcome page.
c. Select “Yes, export the private key,” and click Next.
d. Accept the default file format, and click Next.
e. Enter a password in the Password and Confirm Password text boxes on the Password page, and click Next.
f. Click Browse, and browse to the C:\Certs folder (create it if needed).
g. Name the file VPNIPsec, and click Save.
h. Click Next, click Finish, and click OK.
8. Back in the MMC, import the certificate using these steps:
a. Browse to the Certificates (Local Computer)\Personal\Certificates container.
b. Right-click Certificates, and select All Tasks
Import.
c. Click Next on the Welcome page.
d. Click Browse, and browse to C:\Certs.
e. Change the extension to All Files (*.*) so that the file you exported appears.
f. Select your certificate, and click Open.
g. Click Next on the File to Import page.
h. Enter the password you used to protect the certificate, and click Next.
i. Click Next to accept the default location of the certificate store, and click Next. Click OK.
9. Use the following steps to generate a trusted root certificate on the VPN server:
a. Launch Internet Explorer using Run As Administrator.
b. Enter http://localhost/certsrv in the address bar.
c. Click “Download a CA certificate, certificate chain, or CRL.”
d. When the ActiveX warning appears, click Yes.
e. Click Yes again on the confirmation dialog pop-up.
f. Select “Download CA certificate,” and click Save. Notice that the name is certnew.
g. Browse to the C:\Certs folder, click Save, and then click Close.
You will install this root certificate on the client.
Step 6: Install the CA Certificate on the Client
When the client connects to the VPN server, the VPN server will pass the certificate to use to establish the session. However, the client won’t trust this certificate as valid by default. Instead, the root CA certificate needs to be installed on the client so that the server’s certificate is trusted.
The following steps will install the root certificate on the client:
1. Copy the certnew certificate created in the previous steps from the server to the client in a folder named C:\Certs.
2. On the Windows 8 client, at the Start screen, type MMC, click the MMC.exe icon, and then press Enter.
3. If a User Account Control dialog box appears, click Yes to allow the action.
4. Select File
Add/Remove Snap-in.
5. Select Certificates, and click Add.
6. Select Computer Account, and click Next.
7. Accept Local Computer, and click Finish. Click OK.
8. Browse to Certificates (Local Computers)\Trusted Root Certification Authorities\Certificates.
9. Right-click Certificates, and select All Tasks
Import.
10. Click Next on the Welcome page.
11. Browse to the C:\Certs folder, and select the certnew.cer certification file. Click Open. Click Next.
12. On the Certificate Store page, click Next to accept the default location. Click Finish. Click OK.
Step 7: Reconfigure RRAS for Secure Connection
You can now configure the RRAS server to use the certificate with the following steps:
1. If it’s not open, launch the Routing and Remote Access console.
2. Right-click the server, and select Properties.
3. Select the Security tab.
4. Deselect Use HTTP in the SSL Certificate Binding area. Select the certificate you created earlier.
Step 8: Connect with a Secure Connection
At this point, you can connect using the same Windows 8 connection you created earlier. No changes are needed for Windows 8. It will automatically connect.
Connect to the VPN server with the following steps:
1. Access the Network pane on Windows 8.
2. Select the VPN connection you created earlier and click Connect.
3. Enter the password of the domain account you entered when creating the connection.
4. Click Connect, and you’ll be connected with a secure connection.
In the previous steps, you accepted the defaults for authentication. However, you may choose to use different types of authentication methods. The following topic includes more details on the available authentication choices.
Authenticating VPN Clients
Authentication allows a client to prove who they are. Once that’s been established, the network access policy is able to determine whether the client should be granted access. Obviously, authentication is very important. You wouldn’t want just anyone to connect to your VPN server and have access to your network.
If an attacker can obtain another user’s credentials, it’s possible for the attacker to impersonate the legitimate user and gain access to the server. Because of this, authentication becomes a significant security concern and there are many different ways to authenticate individuals.
Since attackers have gotten better at attacks, IT pros have had to improve security to thwart the attacks. Then the attackers improve and the IT pros improve . . . it’s never-ending. In the next page or so, you’ll see many different authentication methods that show the progression and improvements with authentication.
The oldest authentication method of Password Authentication Protocol (PAP) sent passwords across in cleartext and was easily beatable with just a sniffer to capture the relevant packets. Today, the more-secure authentication methods are referred to as Extensible Authentication Protocol methods. They are extensions of the core authentication methods.
When more than one authentication method is chosen, the client and the server negotiate the most secure authentication method available to both of them. It’s not uncommon for a VPN server to need to support multiple types of clients, so a VPN server will commonly support multiple authentication methods. You’ll need to ensure your VPN server supports the authentication mechanisms for all the clients you choose to support.
On the other hand, you can choose to use only the most secure authentication mechanism. Clients will then need to ensure they can use this method, or they won’t be able to connect.
You created the Domain Users policy earlier in this chapter using the default authentication methods. Authentication can be strengthened by adding the “Microsoft: Secured password (EAP-MS-MSCHAP v2)” authentication method to this policy by clicking Add and selecting the authentication method, as shown in Figure 21.21. This method does require adding a certificate from a certificate authority. If your users are issued smart cards, you can add the “Microsoft: Smart Card or other certificate” choice for the most secure authentication.
All the available authentication methods are listed here from the least secure to the most secure:
Perform Machine Health Check Only If a network policy server is configured, this can be used to validate the health of the client. It isn’t actually authentication since it validates only health but is listed in the authentication page.
Allow Clients to Connect without Negotiating an Authentication Method No authentication is used. Any clients can connect without any proof of identity.
Unencrypted Authentication (PAP, SPAP) Authentication is passed across the transmission lines in cleartext. A protocol analyzer (commonly called a sniffer) can capture the packets and read the credentials. This includes the generic Password Authentication Protocol and the proprietary Shiva Password Authentication Protocol (SPAP). We’d be surprised to see this being used in any production environment today.
Encrypted Authentication (CHAP) Challenge Handshake Authentication Protocol was the first widely used encrypted authentication protocol. When a client connected, the client was challenged with a nonce (a number used once) that was combined with credential information, hashed, encrypted, and returned to the server. The server periodically sent a new nonce to the client and forced another challenge handshake during the session. CHAP has historically been used on Microsoft RRAS servers to support non-Microsoft clients, but the more secure EAP methods are recommended today instead of CHAP.
Microsoft Encrypted Authentication (MS-CHAP) This was Microsoft’s first improvement over CHAP. It worked only on Microsoft clients and has been replaced with MS-CHAP v2. MS-CHAP also encrypts the authentication to thwart sniffing attempts.
Microsoft Encrypted Authentication version 2 (MS-CHAP v2) MS-CHAP v2 was created as an enhancement over MS-CHAP. It provided several improvements over MS-CHAP including mutual authentication. With mutual authentication, the server authenticates to the client before the client sends user credentials.
The following three authentication methods are referred to as Extensible Authentication Protocol methods. EAP is a security framework that can be used by any vendor and provides the strongest security with the most flexibility.
Microsoft: Secured Password (EAP-MS-CHAP v2) EAP-MS-CHAP v2 uses certificates on the VPN server to provide better security. The certificate is issued by a CA that is trusted by the VPN client and is provided when the VPN client contacts the VPN server. Since the CA is trusted, the certificate provides authentication for the server to the client before the client-authentication process starts. TLS is used with public/private keys to create a secure channel for the MS-CHAP v2 authentication process.
EAP-MS-CHAP v2 is easier to deploy than EAP-TLS (smart card authentication) but still provides significant security enhancements over MS-CHAP v2.
Microsoft: Protected EAP (PEAP) PEAP doesn’t specify an authentication method but instead provides additional security for whatever authentication method is used. PEAP provides a protected channel that helps prevent an attacker from injecting packets between the client and the VPN server.
Microsoft: Smart Card or Other Certificate Certificate-based authentication is considered the strongest authentication method that a VPN server can use. Smart cards provide multifactor authentication because a user must have something (the smart card) and know something (an associated PIN). The smart card has an embedded digital certificate obtained from a trusted certificate authority (CA).
Smart cards can add significant expense. They require a CA to issue certificates, the hardware to create the smart cards with the embedded certificates, and the hardware to read the smart cards.
This method uses Transport Layer Security (TLS) and is sometimes referred to as EAP-TLS.
Configuring Accounting
Accounting is used in a VPN server to log details of who accesses the server and daily operations of the server. All the accounting is configured via the NPS console for a VPN server on Windows Server 2012 R2.
NPS includes a wizard that can be used to configure accounting and gives you four choices of how to store the accounting data:
- SQL Server database
- Text file
- SQL Server database and a local text file
- SQL Server database with text file logging for failover
If your network includes SQL Server and someone is familiar with how to configure SQL Server to provide the data, it is the best choice. However, if you don’t have SQL Server running on your network, you should select to log the data to a text file.
Logging allows you to log several different types of data:
- Accounting requests
- Authentication requests
- Periodic accounting status
- Periodic authentication status
The authentication request and status information record all authentication events. These include both failed and successful authentication attempts. Although it’s obvious that authentication occurs when a user first connects, it’s not so obvious that the server periodically challenges the client. This is transparent to the user but ensures that the client’s session isn’t hijacked by a malicious attacker. A successful hijack attempt will disconnect the original user and allow the attacker access to data within the session.
Accounting requests and status comments record information that is often used for billing purposes, such as when a user connected, how long they stay connected, and activity during the connection.
You can use the following steps to configure accounting on a VPN server and to dump the information into a local text file:
1. Launch the Routing and Remote Access Services console by selecting Server Manager
Tools
Routing and Remote Access.
2. Launch the NPS console by right-clicking Remote Access Logging and Policies and selecting Launch NPS.
3. In the NPS console, select Accounting.
4. Click the Configure Accounting link in the middle pane.
5. Review the information on the Introduction page, and click Next.
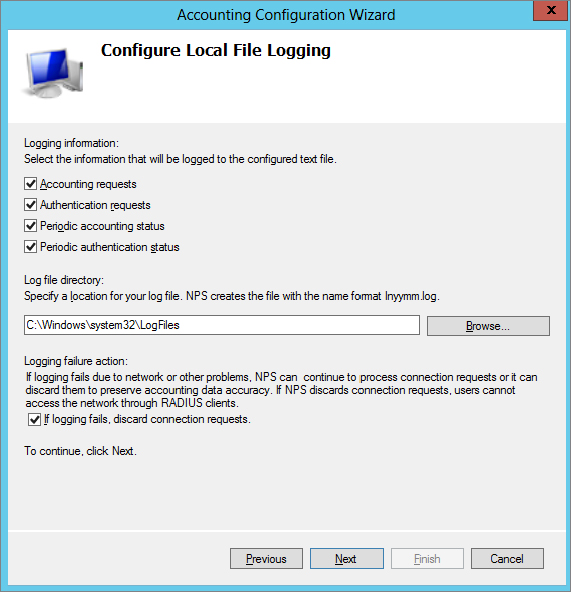
6. On the Select Accounting Options page, select Log to a Text File on the Local Computer, and click Next.
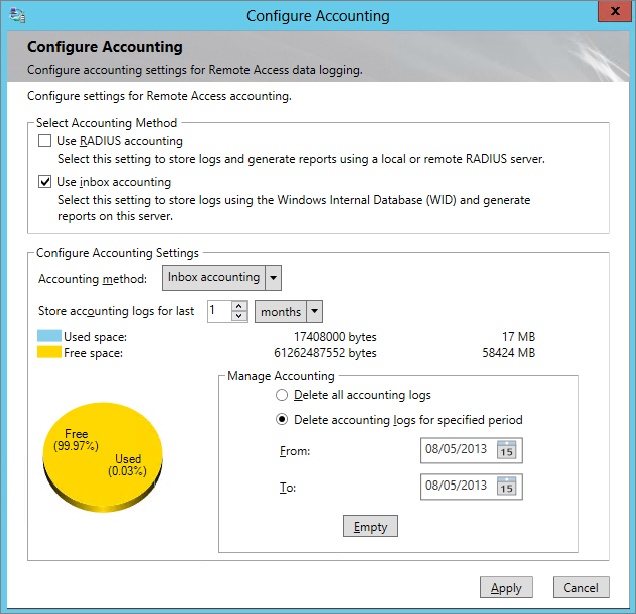
The Configure Local File Logging page allows you to pick and choose what type of information you want logged.
Figure 21.22 shows the default selections.
7. If you want to select a different location, you can simply click Browse and browse to the new location.
An important selection is at the bottom of the screen: “If logging fails, discard connection requests.” You need to know what’s more important to you and your organization—the logging of accounting data or access to the VPN server. If it’s more important for all access to be logged, select the box, and if logging fails, the VPN server won’t allow any connections. If access to the VPN server is more important, deselect the box. If logging fails, users can still connect, but you won’t have a record of the connections.
8. Accept the defaults and click Next.
9. Review the information on the Summary page, and click Next. Click Close.
At this point, you’ve added the Routing and Remote Access Service server, configured it to act as a VPN server, added a network access policy, and configured accounting. One thing you haven’t done is explore the Routing and Remote Access console; you’ll do so in the next section.
Exploring Routing and Remote Access
Once Routing and Remote Access has been added and configured using Server Manager, you can use the Routing and Remote Access console to modify the settings and view information on clients that have connected.
There are three primary areas you’ll want to explore:
- Server properties
- Ports
- Remote access clients
Configuring Server Properties
You can view the server properties by right-clicking the server within the Routing and Remote Access console and selecting Properties. This properties sheet includes several tabs that can all be viewed and changed for the server.
Server Properties General Tab
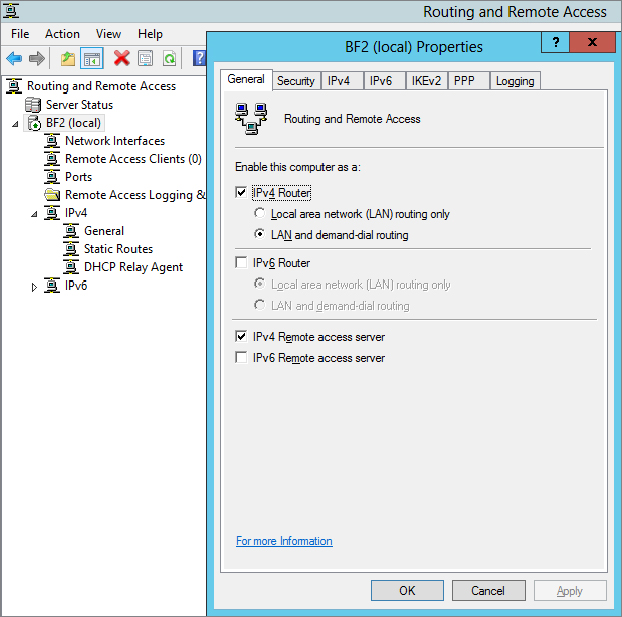
Figure 21.23 shows the properties sheet with the General tab selected. Since the server was configured as a VPN server, it includes both the Router and the “Remote access server” settings.
The IPv4 Router and “LAN and demand-dial routing” settings allow the VPN server to route packets from the public IP address (received from the VPN clients) to the internal LAN. At this point, both IPv4 and IPv6 are supported because the Internet is migrating to IPv6, so either IPv4 or IPv6 could be used. The bottom section has the “IPv4 Remote access server” check box selected to indicate that this is being used as remote access server and the internal network is using IPv4 addresses. From this page, you really can’t tell whether it’s being used as a VPN server or a dial-up server, but when you look at the ports available (shown later in this chapter), it becomes clear that this is being used as a VPN server.
Server Properties Security Tab
If you click the Security tab, you’ll see a screen similar to Figure 21.24. In the figure, the Authentication Methods button was clicked to show the available authentication methods for the server.
This tab has three main settings including authentication; however, if you have deployed the NPS role, then the Authentication settings are managed by that role instead:
Authentication Methods If you have a single VPN server, this would be set to Windows Authentication, meaning that the VPN server will authenticate the client using typical Windows credentials. However, if your organization has multiple VPN servers, you very likely have a RADIUS server and you can choose RADIUS Authentication. Once you choose RADIUS Authentication, you’ll need to click Configure to provide the information so that the VPN server can connect to the RADIUS server.
Allow Custom IPSec Policy IPSec is commonly used with L2TP. If L2TP is used, you can configure a custom IPSec policy. When you select this, it requires a preshared key. Although a preshared key can be used, either Kerberos or a certificate is more secure.
SSL Certificate Binding We covered SSTP earlier in this chapter. If you plan on using this, you need to add a certificate to the server so that the data can be encrypted with SSL. Once the certificate is added, you can select the certificate from the drop-down box. Certificates should be obtained from trusted certificate authorities.
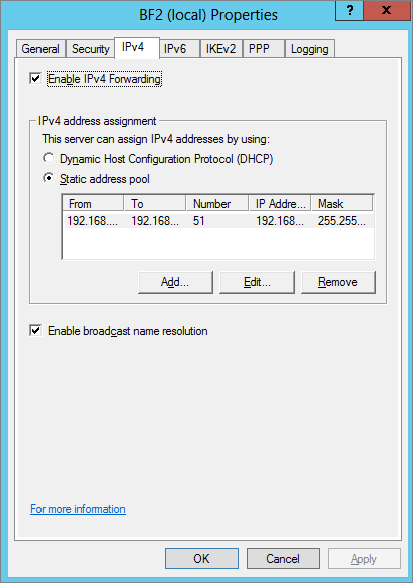
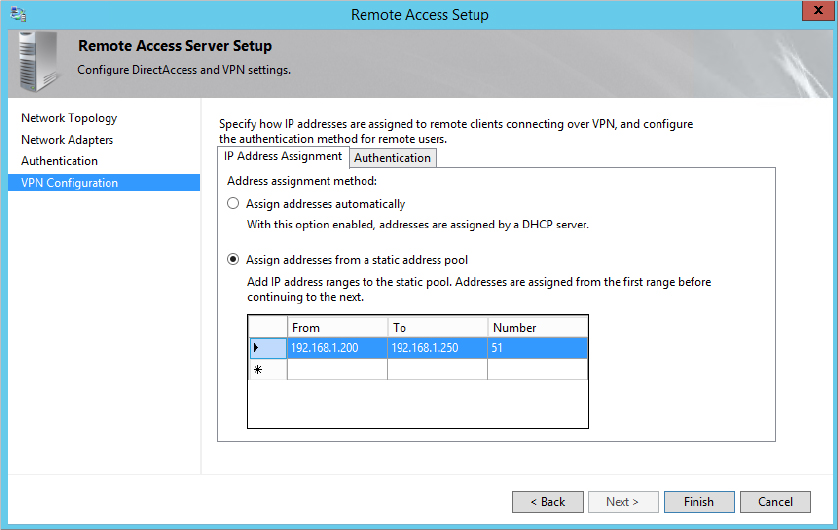
Server Properties IPv4 Tab
Figure 21.25 shows the IPv4 tab. It includes the check box to enable IPv4 forwarding, IP address assignments for the VPN clients, and a check box to enable broadcast name resolution.
If you added the Routing and Remote Access Services server role and configured it using the steps in this chapter, you’ll have a static address pool of 51 IP addresses (192.168.10.200 through 192.168.10.250) that can be assigned to VPN clients. It’s also possible to use an existing DHCP server to assign the IP addresses.
The DHCP server doesn’t need to be on the same server or even the same subnet as the VPN server. It can be any DHCP server that is reachable by the VPN server. However, since the VPN server must relay the DHCP requests from the VPN clients to the DHCP server, you must add the DHCP Relay Agent as an additional Routing and Remote Access service.
If “Enable broadcast name resolution” is selected (the default), clients are able to resolve names on the internal LAN using broadcasts. However, it’s important to remember that broadcasts can’t pass a router. In other words, broadcasts will only resolve names on the same internal subnet that the client’s assigned IP address is on.
For example, if a client receives an IP address from the VPN server of 192.168.10.101 with a subnet mask of 255.255.255.0, broadcasts will only resolve IP addresses for clients on the 192.168.10.0 subnet. Clients on other subnets will need to be resolved using other means, such as DNS.
Server Properties IPv6 Tab
You can use the IPv6 tab if you’re using IPv6 on your internal network. Although IPv6 is becoming much more common on the Internet, its usage hasn’t been widely embraced on internal networks, so you may not need to touch this. This tab has three settings.
Select Enable IPv6 Forwarding if you want the VPN server to act as a router for IPv6 packets. Selecting Default Route Advertisement specifies whether a default route is advertised on the server. If the server is enabled to route IPv6 packets, this should be selected.
Last, you can specify an IPv6 prefix assignment to be compatible with IPv6 addresses on your internal network.
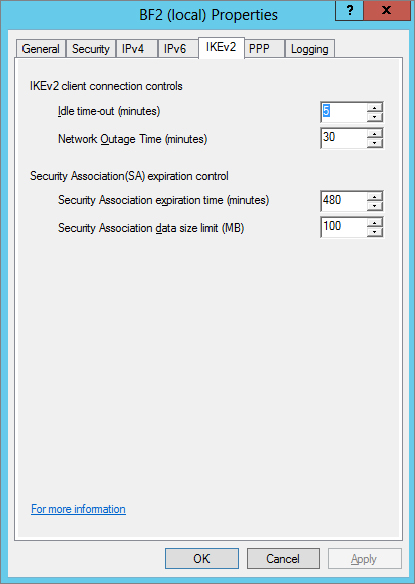
Server Properties IKEv2 Tab
Internet Protocol Security uses security associations to establish secure channels between the client and server. IKEv2 is used on Windows Server 2008 R2 to establish these security associations. Additionally, IKEv2 is used to establish a secure channel when using EAP-MS-CHAP v2 for authentication.
Figure 21.26 shows the IKEv2 tab for the RRAS server with the default settings. The settings can be modified to meet different needs or environments.
The settings are as follows:
Idle Time-out This identifies how long (in minutes) the connection can be idle before IKEv2 will terminate the connection. The default value is 5 minutes.
Network Outage Time This setting specifies how many minutes that IKEv2 packets can be retransmitted without receiving a response. This is useful if the network experiences network outages by allowing persistent connections. The default value is 30 minutes.
Security Association Expiration Time When the expiration time has been reached, a new security association (SA) is negotiated and created before additional data can be transmitted. The default value is 8 hours (480 minutes).
Security Association Data Size Limit When the data size limit has been reached, a new security association (SA) is negotiated and created before additional data can be transmitted. The default value is 100 MB.
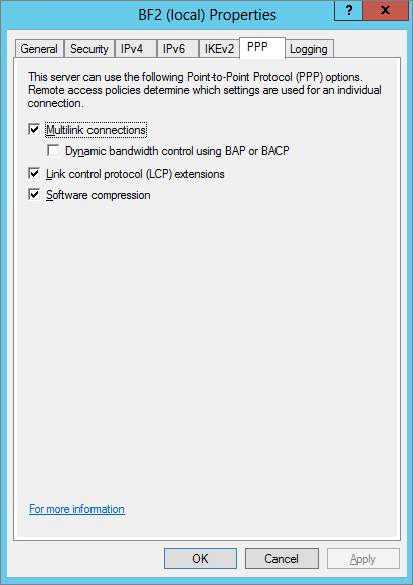
Server Properties PPP Tab
The Point-to-Point Protocol is used for dial-up connections, and dial-up connections can be enhanced with various techniques, such as using multilink connections. Figure 21.27 shows the settings available on the PPP tab.
Settings configured on this tab won’t necessarily apply to all users. Instead, these settings define what is possible on the server and individual network access policy settings define what can be used for the policy. As an example, you could configure these settings to allow multilink connections on the server. A policy defined for IT admins could be configured to allow multilink, while another policy defined for regular users could be defined so that multilink connections are not allowed. The available settings are as follows:
Multilink Connections When enabled, remote access clients can combine multiple connections to increase the overall bandwidth available. This can also be used in demand-dial router connections used in gateway-to-gateway VPNs connecting a remote office with the main office. Two 56 Kbps lines could be connected to achieve a throughput of 112 Kbps.
Dynamic Bandwidth Control Using BAP or BACP BAP and BACP allow lines to be dynamically added or deleted based on usage. For example, if a single user was using two lines but only using 10 percent of the bandwidth, the user’s second line could be automatically dropped to make it available for other users.
Link Control Protocol (LCP) Extensions LCP extensions are used to send additional traffic related to time remaining and identification used in accounting and logs. If this data is not needed, you can deselect this box to eliminate this extra traffic on the line.
Software Compression With this box selected, the Microsoft Point-to-Point Compression (MPPC) protocol is used to compress data.
Server Properties Logging Tab
The Logging tab is used to control what events are logged and where they are logged. Figure 21.28 shows the details in the Logging tab. Although it’s not apparent, these setting are actually for different logs.
Events specified by the radio buttons are logged into the event log and can be viewed by Event Viewer. The choices are errors only, errors and warnings, all events, or no logging. For more information on how to view the event logs, check out Chapter 31.
The “Log additional Routing and Remote Access information (used for debugging)” check box is completely separate from the event log. This check box is used only when you’re troubleshooting specific problems, but it can be quite valuable to help you find the source of problems.
Any time you come across trace or debug logs, you should keep an important consideration in mind—they should be enabled only long enough to troubleshoot a problem and then should be immediately turned off. Trace and debug logs have the potential to consume a significant amount of resources, including processing power, memory, and disk space. Yes, they are useful when troubleshooting, but they may impact normal operation if left on.
Trace logs are stored in the %windir%\tracing directory. By default, this directory is empty, but when you select it, several dozen files will be created in this directory.
%windir% Often = C:\Windows
%windir% is an environment variable that points to where Windows is installed on a system. You don’t have to install Windows on the C drive, and in older operating systems, the Windows folder could be called something else. However, the operating system always needs to be able to locate this directory, so when it boots, it populates the variable %windir% with the actual path to the Windows directory.
You can verify the value by going to the command line and typing %windir%. The command line will interpret the variable as C:\Windows (or wherever Windows is located). C:\Windows isn’t a valid command, so it will give an error, but the first part of the error will tell you how %windir% is being interpreted. You can do this same procedure for any variables, such as %systemroot% or %programfiles%.
Monitoring Remote Access Clients
Once your VPN server starts hosting VPN clients, you’ll occasionally need to view the activity. Figure 21.29 shows the Remote Access Clients node with a remote client connected.
This view shows who is currently connected, how long they’ve been connected (duration), the number of ports they’re using (if the connection is using multilink), and their current status (active or idle). You can disconnect any user by right-clicking the connection and selecting Disconnect.
Configuring Ports
When you create a VPN server, many ports are automatically created. These include 128 PPTP ports, 128 SSTP ports, 128 IKE v2 ports, and 128 L2TP ports. Figure 21.30 shows the ports that are created. Typically, you’ll use only one type of port. In other words, if you’re using SSTP for VPN connections, you wouldn’t be using PPTP and probably wouldn’t be using L2TP or IKEv2.
The number of ports that can be used is relative to how much bandwidth each user needs and the total amount of bandwidth for the server’s connection. If the NIC is connected with a WAN connection with 100 Mbps (lucky you!), you can support a lot more than 128 connections for your chosen protocol, as follows:
1. Select the port.
2. Click Configure.
3. Change the number to allow more connections.
On the other hand, if your bandwidth is only about 1 Mbps, the performance will be dismal if all 128 connections are used simultaneously. In this situation, you’ll likely reduce the number of possible connections.
Up to this point in the chapter, you’ve learned how to add and configure both the Network Policy and Access Services role and the Remote Access role and to then configure your server as a VPN server. Next up, we’ll discuss DirectAccess and the benefits that can be gained by moving your remote access infrastructure and clients over to it.
Introducing DirectAccess
DirectAccess is a relatively new remote access functionality that was first introduced in Windows Server 2008 R2. Adoption of it was low, however, mainly because of the difficulty in getting it to work in the first place—you needed to be a wizard with IPv6 and a netsh command genius to figure it out! The fact that a true DirectAccess experience could only be achieved when you ran it with Microsoft’s Unified Access Gateway (UAG) product meant that it definitely wasn’t a cheap solution and was typically going to be available only to the larger enterprise customer.
With Windows Server 2012 R2 DirectAccess, though, this all changes. Microsoft has redesigned how it’s deployed and managed, and by doing so, it means that this fantastic remote connectivity solution is now available to a much wider audience.
“Fantastic remote connectivity solution?” we hear you say. In this section we’ll explain why we think so, and later we’ll walk you through deploying and managing it. Once you understand what it can do and you’ve tried it out in your own environment, it’ll be hard to go back to the old VPN client way of connecting.
DirectAccess enables remote users to securely connect back into the corporate environment without the need to use a traditional VPN client. I sometimes refer to this as a “hands-free VPN” solution because it has all the benefits of VPNs that we’ve become accustomed to but without the administrative overhead for end users and the requirement on IT administrators to configure and manage multiple authentication methods that come with third-party VPN clients. Whenever a computer that has been configured to connect with DirectAccess has an Internet connection and meets the policies set by the DirectAccess administrator, it will always get automatically connected to the internal office network—even before the user logs on. Users don’t even have to think about connecting, and from the IT administrator’s perspective, they will always have those remote computers under their control and management.
How DirectAccess Works
When you deploy DirectAccess, you get an always-on, IPSec-based remote connection to your office that’s easy to manage and driven through Group Policy. As the person responsible for managing the remote-access solution for your company network, you’ll most likely be familiar with employees constantly logging support calls related to not being able to log on remotely, forgetting their usernames or passwords, and so on.
All these issues go away when you give those same employees DirectAccess connectivity. The fact that all the data encryption, packet encapsulation, and authentication happen as soon as the TCP/IP protocol stack initializes on the client before they even log on, meaning that you still have the capability to push out your updates and group policies, is a win-win situation.
Features
Here’s a list of some of the DirectAccess features that you can take advantage of with Windows Server 2012 R2:
No PKI Prerequisite In the earlier version of DirectAccess, it was a prerequisite to have a public-key infrastructure (PKI) deployed so you could make use of certificates for authentication. In smaller environments, configuring and managing a dedicated PKI was an administrative headache. With this release, you still use certificates for authentication in certain scenarios, but there’s an option now to simply use a self-signed certificate as part of the configuration wizard.
Support behind a NAT Device You can deploy DirectAccess either as an edge server in your DMZ or inside your main network and sitting behind a NAT device, such as a router or firewall. This is a welcome change to its predecessor, it means that you don’t need to have a plethora of NICs and IP addresses at hand if you just want to get up and running quickly.
Load-Balancing Support Windows Network Load Balancing (NLB) or third-party load-balancer solutions can be deployed with DirectAccess to provide high availability and scalability.
Multidomain Support If you need to deliver remote connectivity to your users across multiple domains, then this functionality comes integrated and out of the box now.
NAP Integration You can integrate DirectAccess with your Network Access Protection (NAP) deployments to ensure that remote clients are in a healthy state (all antivirus updates installed, BitLocker enabled, and so on) before gaining access to the internal network.
Monitoring and Diagnostics A handy Monitoring dashboard is available that shows a summary of connected clients and inbound/outbound traffic metrics. You can also check out the health of your DirectAccess deployment from the Operations Status view in the main console.
IP-HTTPS Performance Improvements One of the main reasons why using DirectAccess to connect to your network performs better than your traditional VPN clients is that it uses IPv6 as its core protocol stack for communications. IPv6 is a newer and ultimately faster stack than the older IPv4 stack that you’re well accustomed to. One of the transitional technologies of IPv6 is IP-HTTPS, and there have been some significant performance gains in how it scales and reduces overhead.
Server Core and PowerShell Support Windows Server 2012 R2 DirectAccess will work with Server Core installations of Windows Server 2012 R2 and also provides full Windows PowerShell support—unlike its predecessor, which supported neither.
Remote Access PowerShell Cmdlets
As part of the new PowerShell support for the Remote Access role, you now have over 60 new cmdlets to work with. From a DirectAccess perspective, these new cmdlets allow you to add and remove configuration items, enable multisite deployment, and even provide help when troubleshooting clients. Check out the full list of cmdlets and their descriptions here:
http://tinyurl.com/ws2012racmdlets.
Multisite Support If you have responsibility for managing a large enterprise environment that’s spread across multiple sites and geographic locations, then the new Multisite Support of DirectAccess should appeal to you. It allows you to deploy multiple DirectAccess server entry points across your networks to ensure that clients get the best remote connectivity performance, regardless of their location.
Client Support
From the client computer side, if you want to connect to a DirectAccess server, you will need to be running Windows 7 Enterprise, Windows 7 Ultimate, or Windows 8/8.1 Enterprise editions. Because DirectAccess comes bundled as part of the Remote Access role in Windows Server 2012 R2, it comes as no surprise that it can coexist with your RRAS configurations (as discussed earlier in this chapter) to support any legacy clients that need VPN support and that aren’t yet running a supported client operating system for DirectAccess connectivity.
DirectAccess Requirements
The following are the minimum requirements that you’ll need to have in place to deploy DirectAccess:
Active Directory You’ll need to have a working Active Directory environment up and running because DirectAccess uses security groups and Group Policy to push out its configuration changes to clients.
Domain Controllers At least one Windows Server 2008 R2, or higher, domain controller needs to be deployed to support DirectAccess.
DirectAccess Clients Security Group Create an Active Directory security group that will be used to hold the computer accounts of the computers that you will grant DirectAccess connectivity to. You can name it something similar to “DirectAccess Clients.”
DirectAccess Server A Windows Server 2012 R2 virtual or physical computer is required to enable the Remote Access role, which comes bundled with the DirectAccess functionality.
A Single Internal IP Address If you deploy DirectAccess from inside your internal network (as opposed to your Edge/DMZ network), then you’ll need to ensure that you have at least one NIC with a static IP address on your DirectAccess server and that you’ve configured Port 443 and IP Protocol 41 forwarding through your NAT device to that IP address.
An External DNS Record You’ll need to have an external DNS A record configured that points a friendly name, such as
directaccess.bigfirm.com to the public IP address that will connect NAT port 443 to your internal IP address. As an alternative to this, you could also use a dynamic DNS provider, such as Dyn DNS (
http://dyn.com/dns) or FreeDNS (
http://freedns.afraid.org).
Clients/Workstations As mentioned earlier, your client computers will need to be running Windows 7 Enterprise, Windows 7 Ultimate, or Windows 8/8.1 Enterprise to work with DirectAccess. They will also need to be part of the Active Directory domain to be able to receive the group policy updates from the DirectAccess server.
Client Computer Windows Firewall This is an absolute gotcha and something that catches a lot of people out when they go to deploy DirectAccess. Any clients that you want to connect to the DirectAccess server must have the Windows Firewall service enabled with the Domain and Public profiles set to On. When the group policy settings get pushed out to the clients, they create some rules and make some changes to Windows Firewall, and if it’s been disabled, then DirectAccess won’t work. It’s best to configure and lock down this feature using a centralized group policy for all your users’ computers.
Installing DirectAccess
In this section we’ll walk you through the steps you need to get DirectAccess up and running in your environment. We’ll be deploying our DirectAccess topology behind an edge device with a single network adapter to ensure that everyone can follow these steps with minimum effort and lab resources. We’ll also presume that you have been working through the previous tasks in this chapter, have already deployed the Remote Access role with only RRAS configured, and have met the minimum requirements for DirectAccess as discussed in the previous section.
1. To begin, log on to your domain-joined Windows Server 2012 R2 installation with an account that has domain administrative permissions, and from the Server Manager
Local Server
Tools menu, choose the Remote Access Management option.
2. In the Remote Access Management Console shown in
Figure 21.31, click Configuration from the navigation bar on the left.
3. This should open the Enable DirectAccess Wizard. Click Next to begin the prerequisite check and initialize the configuration.
4. From the DirectAccess Client Setup dialog box, click Add, choose the security group that you configured earlier as part of the prerequisites, and then click Next.
5. In the Remote Access Server Setup dialog box shown in
Figure 21.32, do the following:
a. Choose the “Behind an edge device (with a single network adapter)” option.
b. Type the public DNS name that your clients will use to connect to the Remote Access server (this should be the external DNS A record or Dynamic DNS record that you created as part of the minimum requirements to deploy DirectAccess).
c. Click Next.
6. In the Infrastructure Server Setup and Configure Remote Access dialog boxes, leave the defaults selected and just click Next to move past them.
7. In the final dialog box, just click the Finish button.
Don’t worry too much at this point about making any changes to the default configuration because you’ll do this at a more granular level from the Configuration dashboard once the initial setup is complete.
8. Once the DirectAccess server has been configured, click Close to exit the wizard.
9. Now open the Remote Access Management Console and click the Configuration link from the navigation bar again.
This time you should see a diagram outlining the four steps that will help you configure your DirectAccess deployment, as shown in
Figure 21.33.
10. Click the Edit button in Step 1, Remote Clients, to open the DirectAccess Client Setup Wizard.
11. Leave the default option of “Deploy full DirectAccess for client access and remote management” selected, and then click Next.
12. In the Select Groups dialog box, shown in
Figure 21.34, ensure that the Active Directory security group you set up earlier as part of the minimum requirements is listed and any groups that aren’t relevant have been removed.
Notice the option here called “Enable DirectAccess for mobile computers only.” If you select this, then a WMI query is performed to identify all computer objects that are mobile computers, such as laptops. Once identified, they are then enabled for DirectAccess and any non-mobile computers are ignored.
Be careful with this setting, though, because if you’ve selected it as part of your initial configuration and at a later date you decide to make DirectAccess available to some static remote branch office computers (i.e., not laptops), then you won’t be able to get it to work until you uncheck this option.
13. When you’ve made your choice, click Next to move on.
The final dialog box in Step 1 gives you the option of specifying resources that can be used with the Network Connectivity Assistant (NCA) to determine if the client is connected to the internal network or not. You can leave the default HTTP type resource here if you wish.
A very useful setting at this point to note is the “DirectAccess connection name.” We recommend that you modify this to suit your own organizations needs because this will be the connection identifier that gets displayed in the network pane of each remotely connected DirectAccess client.
14. Click Finish once you’ve made your selections to complete the client configuration.
15. Now click the Edit button on Step 2, Remote Access Server.
The first dialog box you’ll see here is Network Topology.
16. Confirm that your topology setting and public DNS name have been configured correctly, and click Next to continue.
In the Network Adapters dialog box you can see the adapter that you are using to connect DirectAccess to the internal network along with the certificate that’s in use for all IP-HTTPS connections. This is where you can choose to use either a public trusted certificate or a basic self-signed one to authenticate any IP-HTTPS clients that are using DirectAccess.
17. Click Next to move on.
The next step is Authentication (as shown in
Figure 21.35), and you have to pay particular attention to this if you want to connect any Windows 7 devices to your DirectAccess server.
Notice the option “Enable Windows 7 client computers to connect via DirectAccess.” This isn’t enabled by default and is another gotcha that catches people. Make sure you’ve enabled it if you’re planning on using any Windows 7 clients.
18. Click Next to move on.
Figure 21.36 shows the final step in this wizard, VPN Configuration. Here you can specify how remote clients connecting over a VPN are assigned their IP addresses. You can choose from a DHCP server or specify a static IP pool. The Authentication tab gives you the option to use a RADIUS server for client authentication.
19. Click Finish after making your selection to complete the wizard.
20. Click the Edit button for Step 3, Infrastructure Servers, to open the Network Location Server dialog box.
Here you can modify the certificate that the network location server uses to authenticate clients. We’ll leave it as its default self-signed certificate.
21. Click Next.
The DNS dialog box allows you to choose your local name-resolution options, and again, you can leave this at its default recommended setting.
22. Click Next.
The DNS Suffix Search List dialog box lets you specify which additional DNS suffix search lists will be used for the DirectAccess clients. This might come in useful in multidomain deployments, but for standard configurations there’s no need to make any changes here.
23. Click Next to continue.
The Management dialog box gives you the option to specify management servers that can be used for updates and remediation of your remotely connected clients. You could specify a System Center 2012 R2 Configuration Manager server, for example.
24. Click Finish once you’re happy with your changes.
25. At Step 4, Application Servers, click the Edit button to open the DirectAccess Application Server Setup dialog box.
Here you can choose to extend authentication between DirectAccess clients and specified application servers. You can also limit the servers that DirectAccess users can connect to by specifying security groups containing them. We’ll leave this at the default option of “Do not extend authentication to application servers.”
26. Click Finish.
Before you exit the console, you need to save your configuration changes and update the global Group Policy objects that DirectAccess uses to configure clients.
27. Click the Finish button at the bottom of the diagram beside the message that states “Some configuration changes have not yet been applied. Click Finish to apply the changes.”
Configuring a DirectAccess Client
Now that you’ve installed DirectAccess on the server, you can go ahead and connect your clients. You’ll test your connectivity on a Windows 8 Enterprise mobile computer. Here’s all you need to do:
1. In Active Directory, add your Windows 8 Enterprise computer account to the security group that you specified in Step 1, Remote Clients, of the DirectAccess configuration diagram.
2. Ensure the Windows Firewall is turned on, as discussed in the “DirectAccess Requirements” section earlier.
3. With the Windows 8 computer connected to the corporate Active Directory environment, update Group Policy either by opening a command prompt and typing gpupdate /force or by simply restarting the computer and logging back onto the domain.
4. To quickly check that Group Policy has updated on your client, open Windows Firewall and click the Connection Security Rules view.
You should see the updated DirectAccess rules applied, similar to
Figure 21.37.
5. If all of the requirements have been met and the GPOs have been updated to your computer, click the Charms bar in Windows 8 to see the new DirectAccess connection automatically connected alongside your normal Wi-Fi or LAN connection, as shown in
Figure 21.38.
6. If you want to review your DirectAccess client configuration from Windows 8, open Windows PowerShell and type the following:
Get-DAClientExperienceConfiguration
7. To confirm that you’re connected remotely to the corporate environment through the DirectAccess connection, in PowerShell type
Get-DAConnectionStatus.
A status of ConnectedRemotely means that you are connected using a DirectAccess connection.
That’s all you need to do to enable DirectAccess on your Windows 8 Enterprise client. Now you should be able to browse resources on the remote network just as if you were sitting in the office and not have to worry about the administrative overhead from third-party VPN clients.
Getting Windows 7 Clients to Work
Windows 8 clients will always be much easier than Windows 7 clients to configure with Windows Server 2012 R2 DirectAccess because of the new Kerberos Proxy feature, which allows for dual authentication of the user and client computer through Kerberos. Unfortunately, Windows 7 doesn’t have this feature, and for that reason, the main difference in getting Windows 7 to work with DirectAccess is the need for workstation certificates delivered through a certificate authority. To meet this requirement, follow these steps:
1. Either create a new CA or use an existing one.
2. Create a new certificate template on it.
3. Enable auto-enrollment through Group Policy.
4. Check the “Enable Windows 7 client computers to connect via DirectAccess” option in Step 2 of the Remote Access Console diagram.
Here’s a blog post to help you with the process:
http://tinyurl.com/ws2012dawin7.
Managing DirectAccess
The Remote Access Management Console is the central user interface for DirectAccess. You can access it by opening the Server Manager Tools Remote Access Management menu. Once you open the console, you’ll see five different navigation views that you can explore, as follows:
Configuration This view enables you to configure your DirectAccess environment in four easy steps (see “Installing DirectAccess” earlier in this chapter). From the Tasks pane on the right, you can also perform such actions as viewing your configuration summary, removing your configuration settings, reloading configurations, enabling multisite and load balancing, as well as launching the RRAS and VPN management consoles.
Dashboard The Remote Access Dashboard (shown in
Figure 21.39) gives an overview of the Operations, Configuration, and Remote Client statuses.
Operations Status Here, you can see the health state of the DirectAccess deployment. If you are having problems getting clients to connect via DirectAccess, then this is where you should look first to ensure that there are no warnings or errors. Essentially, what you’re looking for here is the Details section to show a message of “Working Properly.” You can also run the View Performance Counters task on the IP-HTTPS, IPSec, and Network Security components to get an insight into packet-level performance metrics.
Remote Client Status Clicking this view will show you a list of connected DirectAccess clients including their username, hostname, protocol, and the duration they’ve been connected for. Right-clicking a client and choosing Details will provide you with detailed statistics, should you need them.
Reporting The Remote Access Reporting section of the console is particularly interesting and useful when you need to generate reports on DirectAccess usage. All you need to do is input start and end dates and then click the Generate Report link. You can also use the Configure Accounting action in the Tasks pane to configure your Remote Access accounting and data logging, as shown in
Figure 21.40. The accounting logs can be stored either on a remote RADIUS server or locally in a Windows Internal Database.
The Bottom Line
Add the Network Policy and Access Services role. The first step to create a VPN server is to add the Network Policy and Access Services role. Once the role is added, you can take additional steps to configure the VPN server.
Master It You need to add the Network Policy and Access Services role to create a VPN server. How can you accomplish this?
Understand the Remote Access role. The Remote Access role includes much more than just the ability to create a traditional VPN server.
Master It Name the individual services within this role (choose three):
a. Remote Access Service
b. VPN Service
c. Routing
d. IPsec
e. DirectAccess
Configure a VPN server. You have added the Remote Access role and now want to configure your VPN server to accept connections from clients.
Master It What should you do to configure your VPN server?
Explore DirectAccess. DirectAccess enables remote users to securely connect back into the corporate environment without the need to use a traditional VPN client.
Master It What client operating systems are supported for Windows Server 2012 R2 DirectAccess?