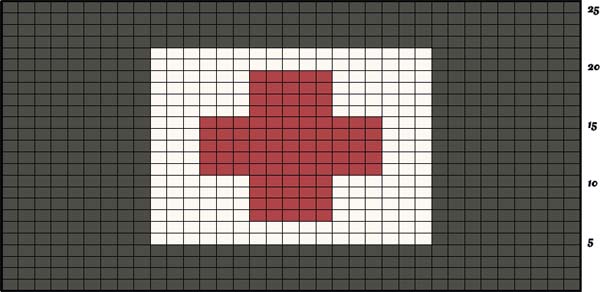
69 FEEL THE PAIN: Wrist Cuffs with Red Cross Design
71 LOVE BITES: Striped Arm Warmers with Heart Design
75 DEATH OR GLORY: Wrist Warmers with Skull-and-Crossbones Design
79 COMBAT ROCKER: Felted Camouflage Lace-Up Arm Warmers

 feel
feelpunk rockers have always embraced the use of military uniforms and insignia to thumb their noses at authority. we love the simplicity and boldness of the red cross symbol. wear these to your next hardcore show!
MATERIALS
» Size 8 needles, or size required to get correct gauge
» Yarn bobbins, optional
» Row counter, optional
» Darning needle
» 1 skein black worsted-weight wool yarn (Cascade 220, 100% Peruvian Highland wool, Black, #8555)
» 1 skein off-white worsted-weight wool yarn (Cascade 220, 100% Peruvian Highland wool, Natural, #8010)
» 1 skein dark red worsted-weight wool yarn (Cascade 220, 100% Peruvian Highland wool, Ruby, #9404)
GAUGE (IN STOCKINETTE STITCH)
» 18 stitches and 24 rows make a 4-inch square
FINISHED MEASUREMENTS
» 4 inches by 8 inches before seaming
SKILLS & METHODS
» Intarsia
» Stockinette stitch
This is a quick and easy project, whether you make only one or a pair! Again, the easiest way to keep your work neat when knitting intarsia is to have separate balls of yarn or separate bobbins of yarn ready at the beginning. For this one, you’ll need 2 balls of black, 2 balls of white, and 1 ball of red (about 20 yards each ball). Cast on 35 stitches with black yarn. Work in stockinette stitch for 3 rows. These plus your cast-on row count as your first 4 rows as shown in the intarsia graph. On row 5, begin following the intarsia pattern by knitting 9 black stitches, attach white yarn, and knit the 17 stitches, then attach a second ball of black yarn and knit 9 stitches. Continue following the intarsia pattern, introducing the red yarn on row 7 until row 21. Knit rows 22 to 25 in black yarn. Bind off in black. Use your darning needle to weave all the loose threads into the back of the knitting. Fold the wrist warmer in half lengthwise, right sides facing each other, and stitch the seam together using your darning needle. Your finished wrist warmer looks great and is so quick to knit that you can wear it right away. However, we do recommend washing it first in a little cold water and hair conditioner to improve the feel of the wool. Lay flat on a towel to dry. It’s not usually necessary to block these small pieces, but if your knitting is curled up or out of shape, blocking can only help! 
 love
lovebeing punk rock doesn’t mean you always have to look hard and tough. give in to your feminine side once in a while with these fuzzy pink-and-black striped warmers. reminiscent of beetlejuice, alice in wonderland, and raggedy ann, they prove that you don’t have to sacrifice your quirkiness in order to be girly.
MATERIALS
» Size 5 needles, or size required to get correct gauge
» Row counter, optional
» Darning needle
» 1 skein pink fingering-weight mohair (Joseph Galler Yarns, Flore II, 75% kid mohair, 20% wool, 5% nylon, Light Pink, #077)
» 1 skein black fingering-weight mohair (Joseph Galler Yarns, Flore II, 75% kid mohair, 20% wool, 5% nylon, Black, #015)
» 1 skein red fingering-weight mohair (Joseph Galler Yarns, Flore II, 75% kid mohair, 20% wool, 5% nylon, Red, #064)
GAUGE (IN STOCKINETTE STITCH)
» 18 stitches and 28 rows make a 4-inch square
FINISHED MEASUREMENTS
» 8 inches by 7 inches before seaming
SKILLS & METHODS
» Fair Isle knitting
» Stockinette stitch
Cast on 31 stitches in pink mohair, and work in stockinette stitch throughout, following the Love Bites graph. Work 3 rows in pink mohair. These 3 rows plus your cast-on row count as the first 4 rows of the graph. Switch to black mohair, and work 4 rows. Switch back to pink, and work 4 more rows. Switch back to black, and work 2 rows. On row 15, knit 15 stitches in black mohair. Add red mohair, and knit 1 stitch. Carry the black mohair across and above the red mohair, and knit 15 stitches in black. Follow the graph for rows 16 to 23. Work 1 row in black mohair. Work 4 rows of pink mohair alternating with 4 rows of black mohair 4 times. Finish with 2 rows of pink mohair. Bind off the third row in pink mohair. Use your darning needle to weave all of the loose threads into the back of the knitting. Fold the wrist warmer in half lengthwise, right sides facing each other, and stitch the seam together using your darning needle and a length of pink mohair. We like to start the seam at the second black row from the top. This allows more give for the wider part of the arm. Turn right-side out. 

LOVE BITES GRAPH
 or glory
feel like you need a little rock and roll in your life? we’ve got the perfect accessories! these wrist warmers are relatively easy to knit and a riot to wear. with or without the red mohawk accent, this skull-and-crossbones pair alerts others to your dangerous side. rock on!
MATERIALS
» Size 5 needles
» Yarn bobbins, optional
» Row counter, optional
» Darning needle
» Size 0 crochet hook, Optional
» 1 skein black worsted-weight wool yarn (Cascade 220, 100% Peruvian Highland wool, Black, #8555)
» 1 skein white worsted-weight wool yarn (Cascade 220, 100% Peruvian Highland wool, White, #8505)
» 1 skein dark red worsted-weight wool yarn (Cascade 220, 100% Peruvian Highland wool, Ruby, #9404), optional
GAUGE (IN STOCKINETTE STITCH)
» 24 stitches and 32 rows make a 4-inch square
FINISHED MEASUREMENTS
» 6 inches by 7 inches before seaming
SKILLS & METHODS
» Fringe, optional
» Intarsia
» Stockinette stitch
Let’s begin with the crossbones wrist warmer. You will need 3 balls of black yarn and 2 balls of white yarn. Cast on 36 stitches in black yarn on size 5 needles. Following the intarsia graph, work 7 rows of black in stockinette stitch. These plus the cast-on row count as the first 8 rows. On row 9, knit 11 black stitches, add white and knit 2 stitches, add another black and knit 10 stitches, add another white and knit 2 stitches, and finally add another black and finish the row. Follow the intarsia design of the crossbones for rows 10 to 27. Finally, work 17 rows in black followed by 3 rows in white. Bind off in white. Use your darning needle to weave all of the loose threads into the back into the knitting. Fold the wrist warmer in half lengthwise, right sides facing each other, and stitch the seam together using your darning needle and a length of black yarn. We like to start the seam right below the white top trim. This allows more give for the wider part of the arm. Turn right-side out, and voilà!
Similarly, for the skull wrist warmer, cast on 36 stitches in black yarn on size 5 needles. Following the intarsia graph, work 7 rows in stockinette stitch. The intarsia design for the skull begins on the ninth row as well. Follow the intarsia design of the skull to the end. Then work 16 rows in black followed by 3 rows in white. Bind off in white. Weave in the loose ends, stitch the seam together, and turn right-side out. Again, start the seam right below the white top trim.
For the optional Mohawk, cut ten 3-inch strands of red yarn. Use a size 0 crochet hook to create a fringe of individual red strands above the forehead of the skull. Space the red strands evenly around the crown of the skull, approximately 1 stitch above the skull. Make sure each fringe knot faces the top edge of the skull so that the yarn lies correctly. This is the same method used for attaching fringe to the edge of a scarf. See glossary for details. To achieve the fuzzy texture, agitate and massage both wrist warmers in alternating baths of cold water and hot water, with conditioner, 3 times. Lay flat on a towel to dry. Fluff Mohawk. 

CROSSBONES GRAPH


as teenagers, we often shopped at army surplus stores looking for inexpensive yet subversive fashion finds. twenty years later, camouflage can be seen everywhere from runway shows to street wear. it is a great design for mixing punk-rock attitude with high fashion sensibility.
MATERIALS
» Size 5 needles
» Yarn bobbins, optional
» Row counter, optional
» Darning needle
» 1 skein dark olive green worsted-weight wool yarn (Cascade 220, 100% Peruvian Highland wool, Yakima Heather, #9459)
» 1 skein pale olive green worsted-weight wool yarn (Cascade 220, 100% Peruvian Highland wool, Irelande, #2429)
» 1 skein black worsted-weight wool yarn (Cascade 220, 100% Peruvian Highland wool, Black, #8555)
» 1 skein tan worsted-weight wool yarn (Cascade 220, 100% Peruvian Highland wool, Camel, #8622)
» 6 yards thin black velvet ribbon or cord
GAUGE (IN STOCKINETTE STITCH)
» 24 stitches and 32 rows make a 4-inch square (before felting)
FINISHED MEASUREMENTS
» 9 inches by 7½ inches at the widest and 5½ inches at the narrowest after felting
SKILLS & METHODS
» Felting
» Intarsia
» Stockinette stitch
There is a lot of color-switching in this pattern, so we suggest you begin by preparing 4 balls of dark olive green yarn, 4 balls of pale olive green yarn, 3 balls of black yarn, and 5 balls of tan yarn before you actually start knitting. Cast on 50 stitches in pale olive green yarn. Note: The cast-on row is the first row shown in the camouflage intarsia graph. Work in stockinette stitch throughout. There are 7 sets of decreases in this project, which you can make simply by knitting 2 stitches together. We suggest knitting the second and third stitches together as well as the second- and third-to-last stitches in rows 13, 24, 35, 46, 57, 68, and 79. This will retain a clean edge. Follow the intarsia graph to the end. Bind off row 90 in pale olive green. Weave all the loose threads into the back of the knitting. This takes a bit of time but is necessary so your stitches do not come apart in the wash. To felt, throw the arm warmers into a washing machine, and run through 2 hot cycles, without detergent or conditioner. As soon as you take them out, pin them to a pillow or a blocking board so that they dry flat and straight. To finish, thread ribbon or cord of your choice through with a darning needle and lace up. Trim ribbon or cord as needed.
hint: If this seems too challenging, we have found that there are many variegated, multicolor yarns available, even olive green–toned instant camouflage. Feel free to skip the intarsia entirely, and just follow the sets of stitches, rows, and decreases for instant gratification!