101 MINI MOD: Small Felted Tote Bag with Mod Target Design
105 ANARCHIST: Large Felted Courier Bag with Punk Mohawk Silhouette
109 ROCKABILLY RIOT: Clutch Bag with Hound’s-Tooth Pattern
 mini
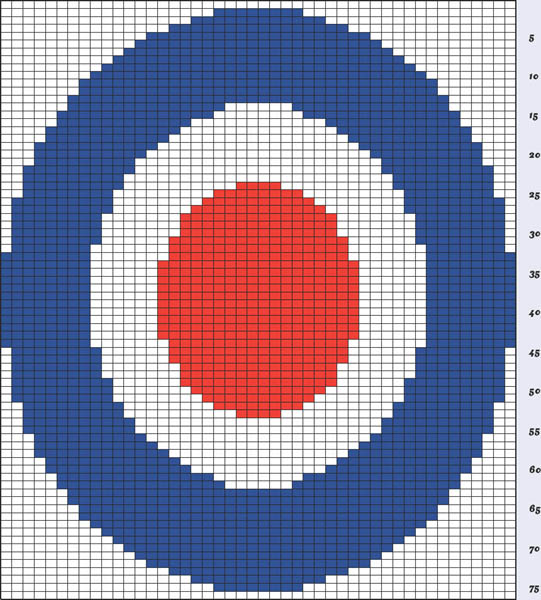
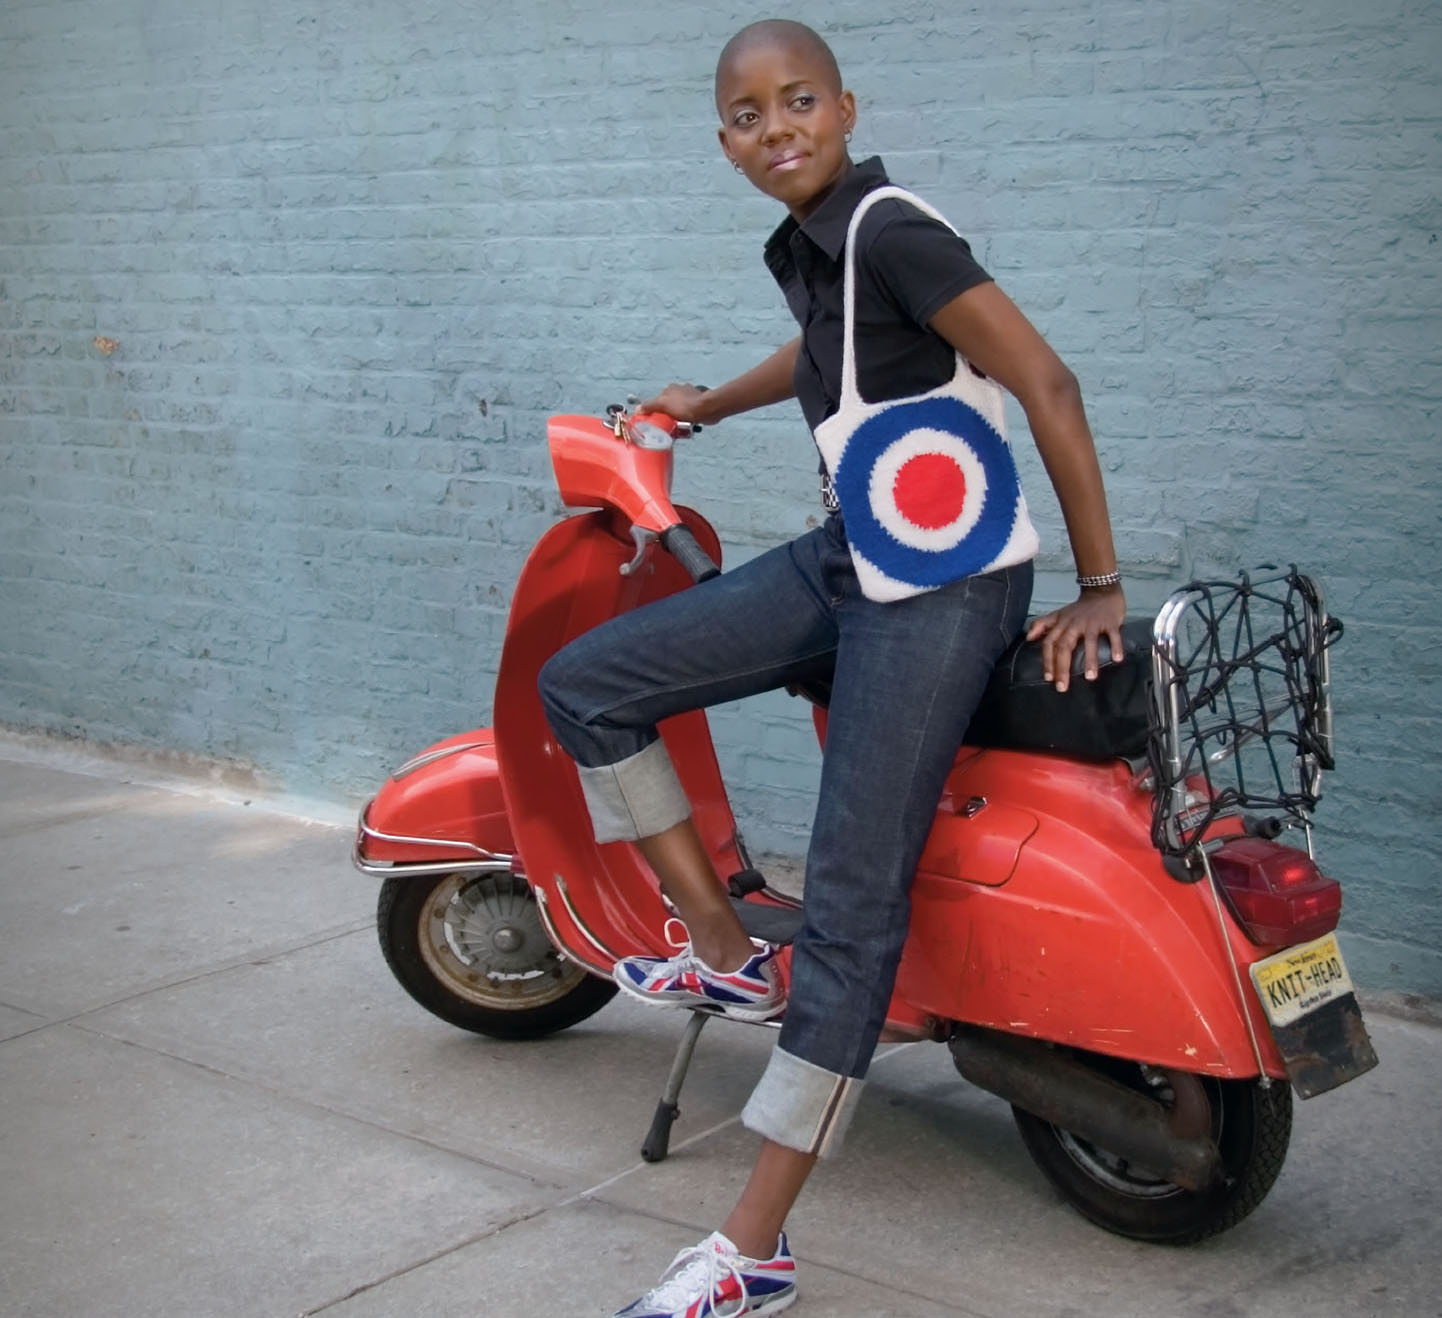
miniwe confess we were never huge fans of the who, but we watched quadrophenia because sting was in it! we also love the mod scene and bold bull’s-eye design and so incorporated it into this small tote bag.
MATERIALS
» Size 7 needles, or size required to get correct gauge
» Double-pointed needles one size larger
» Yarn bobbins, optional
» Crochet hook or darning needle
» 1 skein white worsted-weight yarn (Cascade, 100% Peruvian Highland wool, White, #8505)
» 1 skein blue worsted-weight yarn (Cascade, 100% Peruvian Highland wool, Blue Velvet, #7818)
» 1 skein red worsted-weight yarn (Cascade, 100% Peruvian Highland wool, Christmas Red, #8895)
GAUGE (IN STOCKINETTE STITCH)
» 20 stitches and 25 rows make a 4-inch square on smaller needles before felting
FINISHED MEASUREMENTS
» 9 inches by 12 inches before felting; 9 inches by 9 inches after felting
SKILLS & METHODS
» Felting
» I-cord
» Intarsia
» Stockinette stitch
To begin this one, separate your yarn into 4 balls or bobbins of the white yarn, 2 balls or bobbins of the blue, and just 1 red. Cast on 46 stitches with the regular needles and white yarn using the double cast-on method. Count this as your first row, and begin following the target intarsia graph, working in stockinette stitch throughout. Your last row of white should be your bind-off row. This is the front of the bag.
For the back piece, you can repeat as for the front, or if you prefer, simply cast on 46 stitches in white and knit in all white for 75 rows in stockinette stitch, then bind off. This depends on whether you’d like the graphic on both sides of the bag. Put the 2 pieces together with the right sides facing, and sew along the sides and bottom of the bag, using either a crochet hook or darning needle, whichever method you prefer. Your bag is now sewn inside out. Just turn it right-side out in order to attach the tote handles. With the right side facing you, pick up 5 stitches beginning at the eighth stitch from the left with the white yarn and double-pointed needles. Work stockinette stitch for 3 rows, then knit the I-cord (see the glossary for details) for about 24 inches. Then work 3 more regular stockinette stitch rows, and sew onto the right side. You should attach the I-cord so that it is symmetrical to the left side, with the right side of the handle at the eighth stitch from the right side of the bag. Repeat the same thing for the handle on the other side of the bag. Using a crochet hook or yarn needle, weave in all loose ends. Throw the finished bag into a washing machine along with a pair of old jeans for agitation, and wash on a hot wash setting with a cold rinse, without detergent or conditioner. Your finished bag will shrink to about 9 inches wide by 9 inches high, and the finished fabric will be smooth and sturdy! 
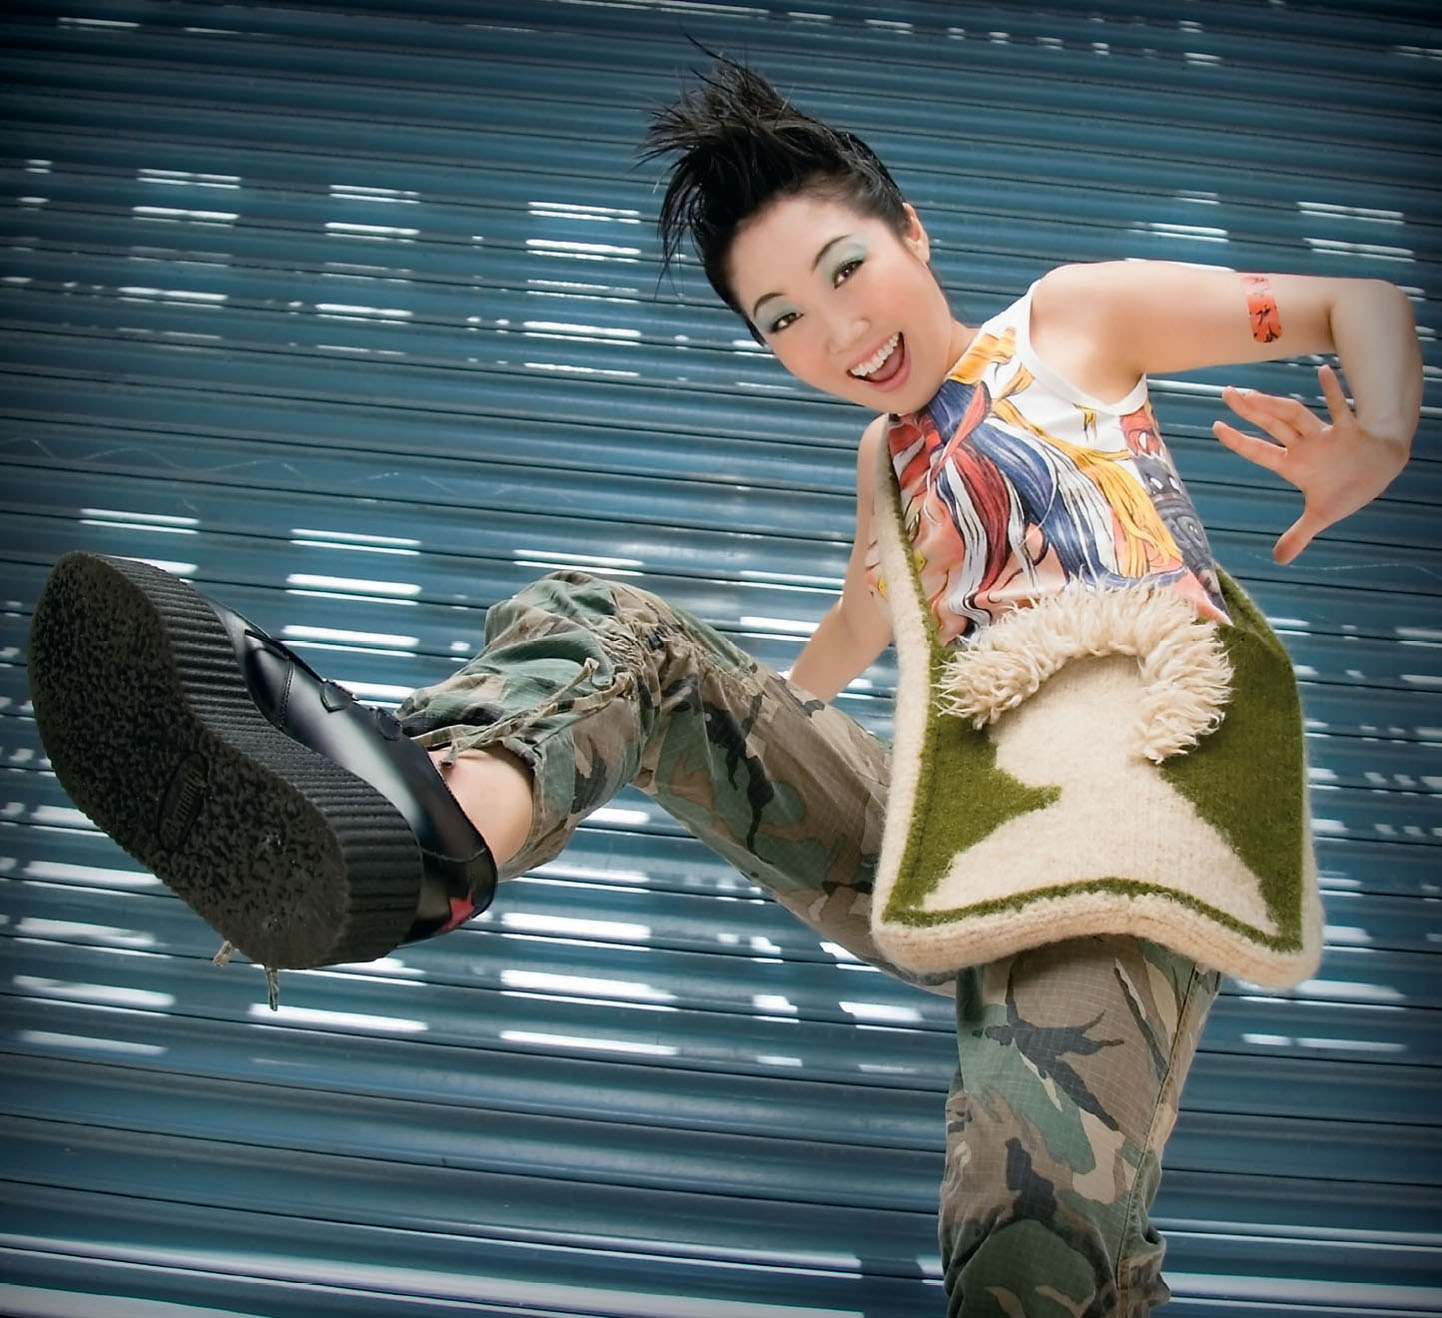

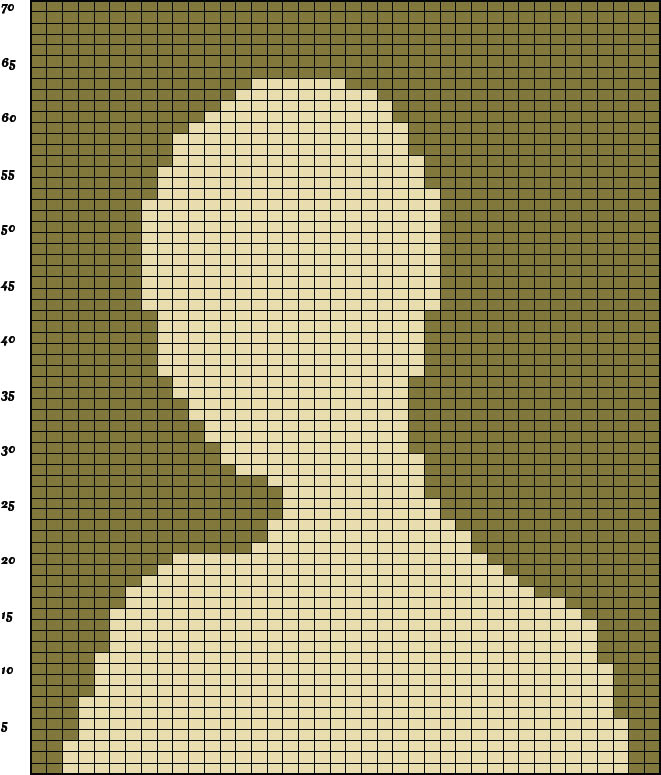
this large courier-style bag can be worn diagonally on the shoulder and is inspired by old army surplus bags. our version is updated to include contrast colors and a punk-rock silhouette with a raised mohawk accent, which complements our hats.
MATERIALS
» Size 11 needles, or size required to get correct gauge
» Yarn bobbins, optional
» Row counter, optional
» Size 1 crochet hook
» Darning needle
» 1 skein olive green bulky-weight wool yarn (Brown Sheep Co., Lamb’s Pride Bulky, 85% wool, 15% mohair, Oregano, M113)
» 1 skein beige bulky-weight wool yarn (Brown Sheep Co., Lamb’s Pride Bulky, 85% wool, 15% mohair, Oatmeal, M115)
» 1 skein off-white bulky-weight wool yarn (Brown Sheep Co., Lamb’s Pride Bulky, 85% wool, 15% mohair, Creme, M10)
GAUGE (IN STOCKINETTE STITCH)
» 12 stitches and 16 rows make a 4-inch square, before felting
FINISHED MEASUREMENTS
» Bag 11 inches by 1½ inches by 13 inches, strap 41½ inches by 2 inches, both after felting
SKILLS & METHODS
» Crochet (single)
» Felting
» Fringe
» Intarsia
» Stockinette stitch
This bag is made up of 3 simple pieces, 1 rectangle with the intarsia design for the front, 1 plain olive green rectangle for the back, and 1 very long beige rectangle for the shoulder strap and seam. It is assembled and finished with a single crochet using the olive green yarn.
In preparation for the front panel, divide the olive green yarn into 2 balls. Cast on 40 stitches on regular needles in the following order: 2 in olive green, 36 beige, and 2 olive green again. Work in stockinette stitch throughout, slipping the first stitch in each row. This will be important when seaming together the bag. The cast-on row is the first row of the silhouette intarsia graph. Work 62 more rows, following the intarsia graph. Then work 7 rows in olive green. Bind off row 70 in olive green.
For the back panel, cast on 40 stitches in olive green yarn. Work 73 rows in stockinette stitch, slipping the first stitch of each row, and bind off.
For the side seam/shoulder strap, cast on 7 stitches in beige yarn. Remember again to slip the first stitch in each row. Work until the piece measures at least 82 inches. Depending on how long you like your shoulder strap, you can make it longer by adding rows or shorter by knitting fewer rows.
To assemble the bag, take the shoulder strap/seam and the front piece and join along the edge of the right side using olive green yarn and working a single crochet in each row. Continue to single crochet across the bottom, along the other side, and around the edge of the shoulder strap, even where it does not connect to the bag in order to create the thin stripe of olive green trim on the shoulder strap. Do the same with the back panel. This is an intentional raised seam. Turn the bag inside out, and seam together the head and tail of the shoulder strap/seam with beige yarn. This seam should be invisible.
To add the raised Mohawk accent to the silhouette on the front of the bag, you will be cutting individual strands to form fringes. First, cut approximately eighty 6-inch-long strands of beige yarn. Each fringe set consists of 4 strands of yarn, and you will need approximately 16 to 19 sets for the back row of the Mohawk detail. Lay the bag flat on your lap with the top of the silhouette facing you. To make a fringe, insert your crochet hook, pull through, and knot the set. (See the glossary for details). The fringe knot should face away from you. Attach the remaining fringe sets desired every 2 or 3 stitches along the crown of the head silhouette. (Our starting point for the back row was the ninth stitch in row 54.) For the front row of the Mohawk, cut approximately 26 strands of beige yarn and 13 strands of off-white yarn. You should make approximately 11 to 13 sets of fringe consisting of 2 strands of beige and 1 in off-white. Attach these sets as for the back row, to your liking. (Start at the eighth stitch in row 52.) Feel free to trim the Mohawk “hair” to your liking.
To felt, throw the finished bag into a washing machine for 1 wash on a warm cycle, without detergent or conditioner. When you take it out, separate each Mohawk strand by grabbing 1 strand in each hand and pulling them apart, down to the knot. This will create a fluffy and full finished look. You may also need to block the shoulder strap of the bag if you find that it is curling. 


what anglophile’s collection would be complete without a hound’s-tooth-patterned accessory? this rectangular clutch bag features a bold red-and-black enlarged hound’s-tooth. it can be used as a makeup bag or to stow necessary items for a night on the town.
MATERIALS
» Size 10½ straight needles, or size required to get correct gauge
» Double-pointed needles one size larger
» Darning needle
» 12-inch-long black zipper
» 1 skein red bulky-weight wool yarn (Brown Sheep Co., Lamb’s Pride Bulky, 85% wool, 15% mohair, Ruby Red, M180)
» 1 skein black bulky-weight wool yarn (Brown Sheep Co., Lamb’s Pride Bulky, 85% wool, 15% mohair, Onyx, M05)
GAUGE (IN ONE-COLOR STOCKINETTE STITCH)
» 13 stitches and 17 rows make a 4-inch square on smaller needles
FINISHED MEASUREMENTS
» 10 inches by 7½ inches after seaming
SKILLS & METHODS
» Fair Isle knitting
» I-cord
» Stockinette stitch
This bag knits up very quickly and is made of 2 rectangles. The back of the bag is all red and worked in stockinette stitch. Simply cast on 36 stitches in red, and work for 35 rows. Bind off. The front of the bag is knit in stockinette stitch as well. Simply pick up stitches from along the cast-on edge of the back of the bag using the red yarn. You will need 1 ball of red and 1 ball of black to work the hound’s-tooth graph using the Fair Isle technique to carry the colors across on the wrong side. Follow the graph, and bind off using the red yarn. With a darning needle and red yarn, seam the 2 sides of the bag together using mattress stitch.
For the final touches, cast on 3 stitches, and use the double-pointed needles to create a 12-inch-long I-cord. Attach this I-cord to make a loop at 1 end of the top opening. Finally, sew a black 12-inch-long zipper across the top of the bag. Your clutch bag is ready!