
Chapter 5
Here We Go, or, “I Just Want to Tell You Both, Good Luck. We’re All Counting On You”
For trained pilots, each phase of a flight has its own formalized briefing (an advance discussion between the pilots about what they’re going to do next, and how). Each phase also has a checklist to confirm that essential items are completed.
For now, let’s concentrate on another mnemonic that comes up on every approach briefing, but that is especially pertinent for a landing in an abnormal situation: the famous five stages (no, not denial, anger, and so on). These are the initial approach; the final approach; then maybe a go-around—a routine maneuver in which you break off an approach, climb away, and come back to start the procedure again—followed by, at last, the landing and the taxi-in to the parking position.
We’ll dispense with the fifth stage, the taxi-in, because you can just stop the plane on the runway and learn how to drive it along the ground another day. We will also set aside the go-around, which is most often required when an aircraft landing ahead of you takes longer than expected to vacate the runway—a situation that the air traffic controllers will be certain not to put you in today. That leaves us with three stages to work through: the initial approach, the final approach, and the landing.
I can’t begin to count the number of times that an instructor has told me that “a good landing comes from a good approach.” But what is an approach, exactly? And how do you fly a good one?

Imagine a brave fellow standing on your intended runway, carefully aiming an optical instrument up into the sky at a shallow angle. Now imagine the crosshairs in that instrument, as if you could see them as bars of light projecting out of the instrument, and expanding as they move out and up into the sky (Figure 20). We’ll call those crosshairs the glidepath (that term also has a more technical meaning, which we’ll set aside for now). The purpose of an approach is to get onto the glidepath while still some distance away from the airport, and then to follow it right down to the runway.

Instead of crosshairs, you could also think of the glidepath as a set of imaginary railway lines sloping from high in the sky all the way down to the runway. But the image of the crosshairs is the better one, I think, because it makes it clear that your left-to-right alignment (Figure 21) and your vertical alignment (Figure 22) are two different tasks.

Left-right (or lateral) navigation is pretty straightforward. Vertical navigation is a little more complicated, so let’s take a more detailed look at how it works, and run through some of the specialized terminology associated with it.
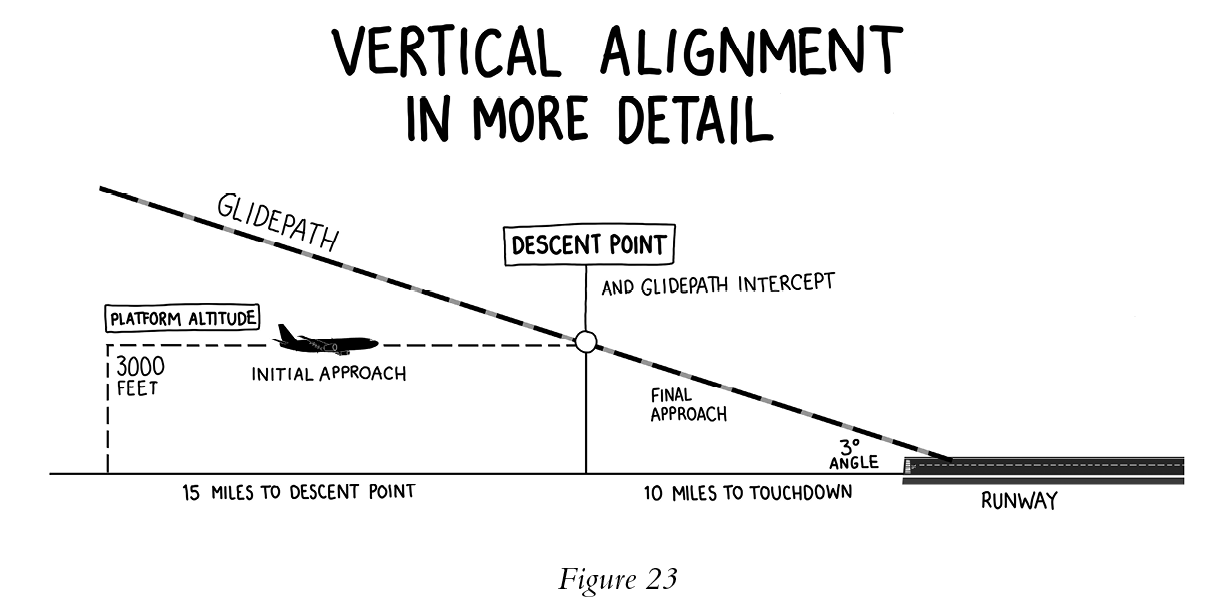
The typical angle between the glidepath and the ground is three degrees. Roughly 10 miles away from the runway, a three-degree glidepath will have risen around 3,000 feet, and, of course, from there it continues to rise as you go even further away from the runway. We’ll call that height of around 3,000 feet your platform altitude (it’s also called an initial approach altitude, but the term “platform” is more descriptive, I think). We’ll call the approximately 10-mile point at which the glidepath crosses this altitude your descent point.
We’re almost ready to delve into the individual steps of the approach. But before we do, here’s an executive summary (or what actual executives, in the business world, might call the “35,000-foot takeaway”). You’re going to focus on your left-right alignment first, and worry about the vertical element later. To do this, you’re going to descend towards your platform altitude and then simply fly level there, turning left or right until you’re flying directly underneath the glidepath and toward the runway. Then, as you intercept the glidepath—that is, as you reach the descent point of 3,000 feet upon it—you’ll gently add in the vertical aspect of the approach as you start to descend along the glidepath’s downward-angled slope. From then on, you’ll follow the glidepath, in both the left-right and vertical senses, all the way down to the runway. Ready? Here we go.
The Initial Approach
Descend now to your platform altitude. Keep in mind that if your destination is 700 feet above sea level, say, then your platform altitude will be 3,700 feet. Level out at the platform altitude and make sure you regularly scan your speed and altitude as you move through the next steps.
Now picture the glidepath—the crosshairs that slope down through the sky to the runway. At 25 miles out and only 3,000 feet up, you won’t have intercepted the glidepath yet; it’s still quite far above you, and it’s also somewhere off to your left or right.
Of course, you can’t actually see the glidepath. Nor are you likely to be able to see the runway itself yet. So, the controller will give you a series of headings to bring you in underneath the glidepath. Since you’re starting this process 25 miles out, and your descent point is at around 10 miles, you’ve got 15 miles to nail your left-right alignment. Fifteen may sound a lot—think of a town 15 miles away from your home—but in a speedy jet those miles will go by very quickly indeed. (In a slower plane, it would be quite reasonable to start the approach closer in.) Whatever kind of plane you’re in, it’s never too early to slow down. Deploy the first few stages of the flaps, reducing to your new target speed after each stage. Be prepared to adjust the pitch, the power, and the trim.
This is also the time to start looking out of the windows for the runway. Turn on all the landing lights—the switches are likely to be on the overhead panel right above the windshield, or on the main dashboard. Have a look around for the windshield wiper switches, too, in case you need them later on.
There’s no hard-and-fast rule as to when you’ll be able to see the runway. It depends a lot on the weather and the time of day. In general, though, runways always look much smaller than you think they will. The planet is an awfully big place, and the angle you’re coming in at makes the runways on it look smaller still. And if you’re landing at night? Most of us think of airports as quite well-lit places, and it’s true that the apron areas around the terminal buildings are often brightly illuminated. But taxiways and runways are so subtly lit that picking out an airfield at night, especially in an urban landscape, often involves looking for a particularly dark spot. Closer in, thankfully, the approach and runway lights are unmistakable.
Once you can see the runway, tell the controllers you are “visual.” You no longer need their vectors to line yourself up underneath the glidepath. You know for yourself that you’re underneath it because you can see that you’re moving towards the runway along its extended centerline. From this point on, your left-right maneuvering will be no different than driving a car on a wide road toward a narrow, one-lane bridge, say, or, indeed, than pulling into a garage, except that you might be doing it at something like 160 knots.
In fact, your left-right alignment will require vigilant monitoring and constant adjustments for the rest of the flight. If you continually have to correct your alignment in one particular direction, then it’s likely that you’re struggling with a crosswind. Do you remember those math problems in school in which you had to calculate the correct angle to go straight across a swiftly flowing river? That’s similar to what you have to do now. Pointing the aircraft slightly into the wind should allow you to fly straight down the line that leads to the centerline of the runway. The task is complicated, though, by the fact that both the strength and the direction of the wind are likely to change as you descend.
The Final Approach
Now that you’ve sorted your left-right alignment (though again, it’s something to monitor and adjust constantly), you need to work on your vertical alignment. Unfortunately, this part is harder. At this point the glidepath is still above you, so you need to stay at 3,000 feet until the glidepath crosses through your altitude at the descent point, about 10 miles from touchdown.
It’s often difficult to judge when you meet the glidepath. Indeed, it can be hard to know exactly when you are 10 miles away from the runway. Even a professional pilot will often use the flight computers or various kinds of radio navigation aids to help gauge when to “start down.” The controller can look at a radar display and tell you where you are in relation to the descent point. They can also tell you what you might see on the ground—a motorway, a prominent hill, a golf course—as you near it.
As you reach that point—i.e., as you at last intersect the glidepath that is steadily descending from above you—carefully lower the nose of the plane and reduce power to start your descent along it. Use the vertical speed indicator to help set a vertical speed that allows you to descend exactly with the crosshairs.
And what is the right vertical speed? It depends on how fast you’re going over the ground. Imagine you’re going down a staircase—the faster you’re going forward, the faster downward you have to go at the same time, in order to stay on that invisible slope. Pilots learn some useful numerical shorthand methods to calculate or check various figures when they’re up in the sky, and there’s an easy one for working out your descent rate. Divide your ground speed—it’s different from your airspeed, and will appear on the controller’s screens, and possibly on your cockpit screens, as well—by two, and add a zero to that to get the answer. For example, with a ground speed of 150 knots you need a descent rate of 750 feet per minute.
By now you’re probably thinking, “Wouldn’t this be a lot easier if I could actually see the glidepath?” Indeed, it would, and when you first contacted the controllers, you asked them to find you a runway equipped with PAPIs, or Precision Approach Path Indicators (see Figure 24 below). These red-and-white angled lights, placed in the grass or pavement off to the side of the runway, don’t show you the glidepath itself. But they do show your relationship to it.
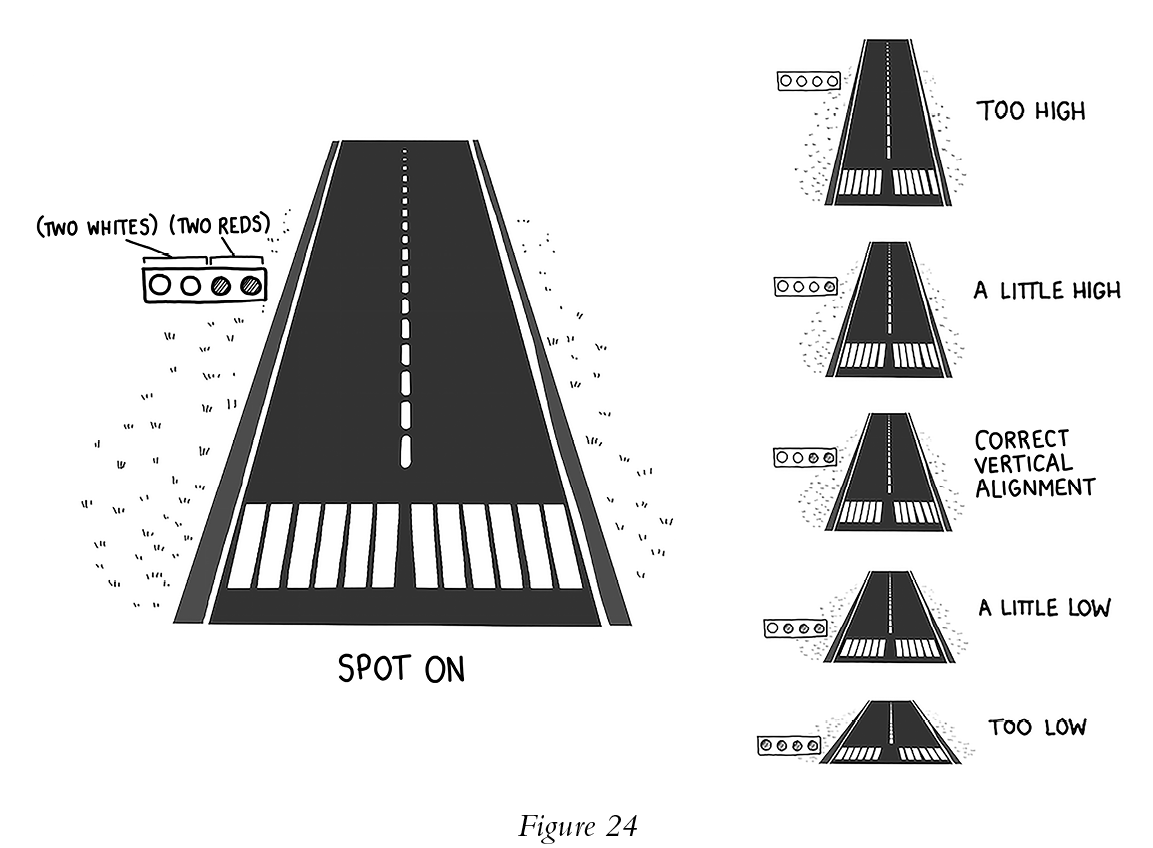
The typical PAPI setup at major airports has four lights (or groups of lights). If you can see four white lights, then you’re flying much higher than the glidepath. Four reds mean you’re far too low (and if you spot a runway’s PAPIs while driving past on a nearby road, four reds is exactly what you’ll see). Three whites indicate that you are slightly above the glidepath, and three reds that you’re slightly below it. There are other versions of PAPIs, with different names and configurations, but the principle is the same—whites are high, reds are low.
With PAPIs, two reds and two whites is perfect—indeed, I’ve even heard pilots use this in non-aviation contexts. “How are things going, Jane? All set for Christmas?” “Yeah, not bad. Two reds, two whites.” In general, if you can see some of each color, then things could be worse.
On a clear night, you may even be able to see the PAPIs before you get to the descent point—great stuff, if so. Flying level at 3,000 feet, you’ll know you’re nearing the descent point when the PAPIs start to change from four reds (because you’re intercepting the glidepath from below it) to a mixture of white and red.
If you must land on a runway without PAPIs, it really isn’t your day. But if that’s the case, a good alternative technique for judging your approach path is to adjust your altitude and descent rate to make sure the runway doesn’t move up or down in the cockpit window at all. (A scratch or a squished bug on the windshield can be helpful in monitoring this.) In fact, this is how student pilots are typically taught to fly an approach, precisely because it’s so basic.
Even with PAPIs, though, the final approach is challenging for new pilots. The most common problem is porpoising above and below the glidepath. Watch the PAPIs like a hawk (if hawks needed PAPIs, which they probably don’t) and react as soon as you see any indication that you’re getting too high or too low. As soon as you see three reds, for example, gently reduce your descent rate. Don’t wait until you see four.
Early corrections make it easier to follow another piece of advice that student pilots hear often: fly gently. It’s often said, even—or especially—by senior pilots, that “the plane knows how to fly better than you do.” Think of your job as applying “pressure” one way or the other, rather than making big, wholesale movements of the controls.
A question I often hear at this point in a flight simulator ride is, “Where should I be looking?” The answer is “Outside, more and more.” First to find the runway and PAPIs, then to follow them (remember, PAPIs don’t help with your left-right alignment, which you must judge by looking at the runway). But, simultaneously, you’ll need to maintain your scan of the instruments, particularly of the airspeed indicator, because this is pretty much the worst possible time to find yourself flying too slowly. Try thinking of the PAPIs and the runway as new, additional instruments, ones that just happen to be located a few miles beyond the others.
Amidst all this scanning, don’t forget to put the aircraft into its correct configuration for landing. In an airliner, lower the landing gear when you’re around 2,000 feet above the airfield. As you move the lever to “Down,” be prepared to add power, because the landing gear greatly increases drag (indeed, lowering the gear is a surefire way to quickly reduce your speed). Once it’s completely down—it can take a while to get there on a large plane—deploy the remaining flaps and reduce to your final approach speed. It’s OK if you’ve forgotten about those rudder pedals. But now, make sure your feet are up against them.
Next, complete the landing checklist, which, on most airliners, is used to carefully confirm that the speedbrake is armed for touchdown, the gear and flaps are correctly positioned, and the cabin is ready (you know the drill—seats upright, seatbelts fastened, hand baggage stowed, etc.) for landing.
At some point the controller will give you a formal landing clearance, a pleasing bit of technical jargon which still sounds as cool to me as it ever did: “Awesomeness Flight 101”—or whatever call sign you chose—“you are cleared to land on Runway 36.”
The Landing
Let’s talk through the last 1,000 feet of your flight.
Remember when Luke Skywalker says he’s not afraid, and Yoda says, ominously, “You will be”? And then he repeats it, even more ominously? Needless to say, such comments are not considered best practice among professional flight instructors. But it’s quite natural to be a little nervous right now. Even the most experienced pilots once had to do a first landing, and you can bet they were nervous too. The margins for error become ever smaller as you get closer to the runway, and you have less time (and space) to recover from any unwanted loss of speed or altitude.
Even so, this is often one of the quietest times in the cockpit (aside from loud automated announcements, such as the memorable command, heard upon reaching the altitude at which the pilots must be able to see enough to continue the approach visually, to “Decide!”). The checklists, the radio calls, and the major changes to the aircraft systems are mostly complete. From here on in, it’s just about the flying.
At 1,000 Feet
If you watch planes in the last minute or two before landing, it’s remarkable just how steady they appear. Even on windy days they can look as if they’re simply hanging in the air or gliding down a perfectly smooth set of rails in the sky. That’s because their approaches are stable, and now’s the time to check that yours is too. On airliners like the 747 we formally check the stability of the approach 1,000 feet above the ground (a height that would be considered unnecessarily conservative in a light aircraft). Is the landing gear down, and are the flaps in the planned landing position? Is the plane on the glidepath—i.e., steady at the center of the imaginary crosshairs, not swinging above and then below it? Do you have two reds, two whites on the PAPIs? And is your speed appropriate, not too fast, and certainly not too slow?
If you meet the stable approach criteria, then you can continue to descend. If not—or if a once-stable approach becomes unstable at any point before landing—break off the approach and try again.
At 500 Feet
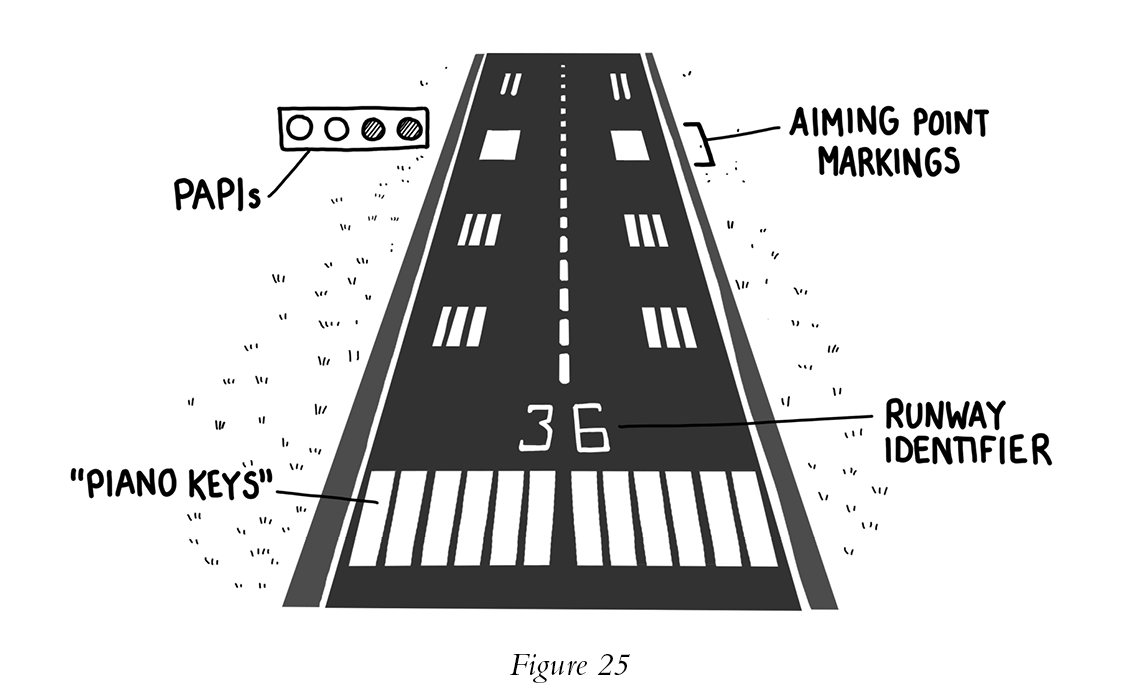
Take a good look at the markings on the runway itself (Figure 25). The altitude at which they’ll become clear to you depends on the time of day and the weather. Don’t aim for the start of the runway, where the black and white “piano key” stripes are located—on a big plane the landing gear can be around 100 feet behind the cockpit, and there are carefully prescribed buffers built into both the beginning and the end of the landing maneuver. Instead, near the PAPIs, you’ll see some blocky, solid markings, usually two solid white rectangles. These are called aiming points. So, as the name suggests, aim for these. Or just keep following the PAPIs—two red, two whites!—which will generally guide you to an acceptable touchdown position.
At 200 Feet
Somewhere in the last few hundred feet, especially in a large plane, the aircraft may start to drift above the glidepath. For example, you might suddenly see that you have three whites and one red on the PAPIs.
This is called the ground effect and it’s caused by the plane compressing the air underneath its wings, which, we might say, can no longer get out of the way as the wings get ever closer to the ground. This cushioning effect sounds pleasant, even helpful. But it’s neither, because the higher you are at this stage, the farther along the runway you’ll probably touch down. A gentle forward press on the controls and a tiny reduction of power will help you fly through the ground effect.
At 100 Feet
From 100 feet up, if you did nothing else but fly the airplane right down onto the runway, the result would most probably be an extremely firm touchdown, and an awful lot of smoke from the tires when your landing appears on the evening news. But the plane, and you, would fly again.
Still, let’s aim for something a little more refined. The landing manoeuvre starts with the flare. Techniques vary, but usually, when you flare, you pull the nose of the plane up a little while starting to reduce power. Raising the nose reduces the descent rate, allowing you to lightly descend onto the runway.
The flare is a tough maneuver and it’s one that pilots continue to refine throughout their careers. Birds, unsurprisingly, can show us how it’s done. A pilot friend of mine is particularly keen on watching seagulls flare just before they touch down on a beach. Otherwise, various (human) instructors over the years have given me several useful pointers.
The main challenge of the flare is knowing when to start it. On an airliner, the height at which the flare is initiated might be 30 feet or higher—that’s the height of the top of a three-story building! In a smaller plane, with a lower vertical speed and with less momentum to act against, the flare may take place closer to the ground. (When a former colleague of mine first learned to fly—on a Tiger Moth biplane, in the summer of 1959—his instructor told him to “keep going down until you can see the blades of grass”).
That leads nicely to a second bit of sound advice: the flare is judged visually. By the time you prepare to perform the flare—confident that you’re at the correct airspeed, having scanned throughout the final approach—you should be looking almost exclusively outside. And where exactly should you look to judge the flare? Certainly, not straight down. On many aircraft, the common advice is to look toward the far end of the runway for the last 100 feet or so of flight. This is the best way to finesse your left-right alignment, and also to assess your pitch attitude just before you start to change it. Your peripheral vision and the overall sense it gives you of the ground rising up around you will help you judge your height and your vertical speed.
A final pointer I can offer, from my experience of the airliners I’ve flown, is to remember that raising the nose is not a continual process. When I take guests into the flight simulator, they may start the flare at just the right time. But they often continue to pull the nose of the plane up, which results in a brief, additional and unintended flight—aptly called ballooning—followed by a memorably sharp touchdown. Instead, pull the nose up a little, start to reduce power, and then hold the nose exactly where it is. (On some planes, especially small ones, you may be taught to pull the nose up continuously at this point, essentially stalling the plane. But—for a first go—the above technique is probably best).
As you flare you also need (finally!) to think about the rudder pedals. If you’re landing in a crosswind, the plane’s wheels won’t be pointing in the direction you’re moving in. Awkward. If this is the case, gently squeeze the left or right rudder pedal to sweep the nose of the plane around so that it lines up with the runway. And those unintended consequences I mentioned? On some aircraft, as you bring the nose around, one wing may start to rise, and the other to dip. Use the control wheel to keep the wings level.
Touchdown—sweet, sweet touchdown—will occur shortly, by which point, on most planes, the power should be at its minimum, or idle, setting. If touchdown doesn’t occur within a few seconds, well, then, that’s called a float, and it means you’re unnecessarily and all too rapidly using up the remaining runway. Immediately relax any backward pressure on the control column to reestablish a shallow descent.
Most aircraft are designed to touch down on their main wheels first, followed shortly after by the nose wheel (or wheels). But even after all the wheels are on the ground, hold off on giving yourself that pat on the back, because you’ve still got some work to do. Perhaps my most vivid experience of flight training was the realization that a plane traveling at high speed on the ground, whether just before takeoff or just after landing, is basically flying along the surface of the earth. Even after touchdown, gusts of wind will act upon the plane, and you need to rely mostly on the controls that act on the passing air to direct the aircraft’s course along the ground. You’re not driving yet!
Select the engines to reverse (if they have a reverse mode). The autobrakes, if fitted and armed, will bring the plane to a complete stop. Otherwise, on nearly all planes you need to use your toes to push down on the tops of both rudder pedals to brake, while simultaneously using the whole of the pedals to steer the plane along the runway. Thankfully, this is more intuitive than it sounds. Remember, however, that on the ground you must never use the control wheel to try to turn left or right, as if the control wheel were a car’s steering wheel. The control wheel rolls the plane from side to side along its nose-to-tail axis, and, on many planes, too much roll near the ground could result in a wingtip or an engine striking the runway.
As the plane slows, it inevitably—and rather sadly—starts to act less like the grand celestial conveyance it is and more like an awkward, very expensive car. As you come to taxiing speed, bring the engines out of reverse, stop the aircraft with the pedal brakes and then apply the parking brake. This last item is usually fitted to the central console. In order to engage it, you may need to simultaneously hold the pedal brakes fully forward.
And . . . Breathe . . .

That’s it! Wipe your brow, unpeel your clenched fingers from the control wheel one by one, and change your underwear as needed. And if it wasn’t the gentlest landing in history, take heart. Every pilot remembers very well what every instructor hammers into us: a good landing is one that occurs in the right place and at the right speed. A firm touchdown is, if anything, preferable to a softer one if the runway is short, wet, or snow-covered, or if it’s very windy. As it says in the fine print of the mighty 747’s manuals: “A smooth touchdown is not the criterion for a safe landing.”
By now someone should be driving the disembarkation steps, a magnum of champagne and a big medal for you to the side of the aircraft. Before they arrive, you’ll want to shut off the engines. In general, on a small propeller plane, start by pulling back the red mixture control knob (near the black throttle) all the way towards you. On other planes, look for fuel control or engine master switches, which will generally be found just behind the thrust levers on the center console. Move them (or any other engine control knobs, switches, or levers you can find) back to the off or cutoff position. You may need to pull them out to do so as, for obvious reasons, they’re designed to be hard to move.
Lastly, if you’re on an airliner, you’ll need to disarm the escape slides attached to the doors. If you’ve still got your headset on, press the PA button on the audio console, pause for effect, and announce: “Prepare doors for arrival and cross-check.” Then grab your cap, take a selfie or two, give the control wheel a final affectionate pat and head out onto the waiting Earth.