" twist drill bit
MATERIALS
Lumber
2"×6" cedar (10' length and four 8' lengths)
2"×4" cedar (10' length and three 8' lengths)
Supplies
2½" decking screws (100 or so)
Tools
Tape measure
Pencil
Carpenter’s square
Wood saw
Power drill
" twist drill bit
Driver bit to match screws
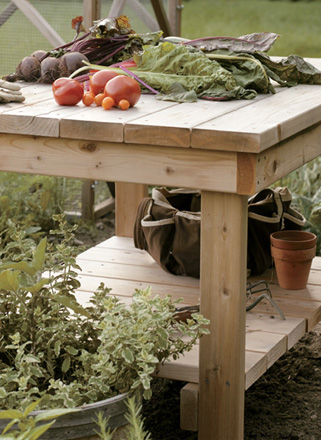
Whether you’re repotting that old begonia or shifting a hundred tomato plants from flats to peat pots, a workspace suited to the purpose makes the job a pleasure. Here’s a freestanding model that is roomy yet not so wide that it is difficult to reach across. The shelf underneath provides a little storage space (great for those extra clay pots and potting tools).
Beyond the Gardening
As indispensable as this rustic bench is for gardeners, it also serves well in other backyard arenas. Place it near the grill and you have a spacious surface for prepping or serving barbecue fare. If you screw a few hooks into the table ends, you’ll have a handy place to hang long-handled spatulas, tongs, and grill forks. Another option is to use the bench as a storage station for your kids’ outdoor toys or for lawn-game equipment, such as a croquet set, badminton rackets, horseshoes, and lawn darts.
POTTING BENCH. A spacious work surface and lower storage shelf make this bench invaluable for vegetable and flower gardeners alike.
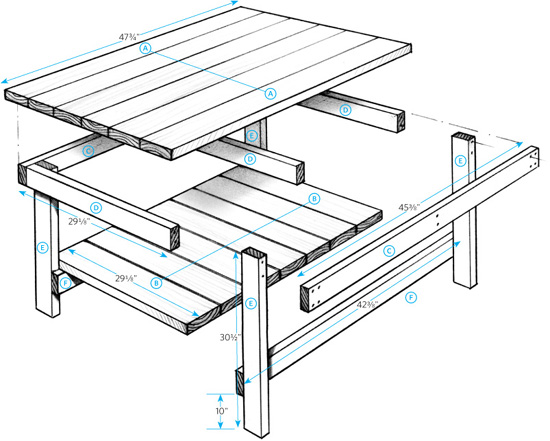
Cutting the lumber. From the 2"×6", cut six 47¾" lengths for the tabletop  and seven 29⅛" lengths for the lower shelf
  .
.
From the 2"×4", cut two 45⅜" lengths for the frame front and back  , three 29⅛" lengths for the frame sides and center
  , four 30½" legs
  , and two 42⅜" lengths for the bottom shelf supports
  .
.
Constructing the bench. Make up the frame to support the tabletop by screwing the front and back pieces to opposite ends of the side and center pieces . Next, join each pair of legs by attaching one of the bottom shelf supports , 10" up from the bottom of the legs. Screw the leg tops into the inner corners of the tabletop frame. Finally, fasten the tabletop and lower shelf boards in place.
FIG. 1