
tomboys
It’s curious to me how many people regard menswear as uninteresting—at least compared to women’s wear—when, in actuality, icons of male fashion such as British aristocrats, fishermen, and soldiers continually inspire designers of women’s clothing. There is something to be said for the sheer practicality of menswear, and while woolen suits and sweaters were once solely in the domain of menswear, many women appear all the more feminine when clad in a simple woolen outfit.
An early attempt to incorporate menswear into women’s wardrobes was made by London’s Rational Dress Society in 1881, driven by the radical idea that women should have to wear no more than seven pounds of underwear (fourteen was typical), and should not deform their bodies for fashion. They promoted bloomers—light, baggy trousers worn under the skirt—which eventually became acceptable as cycling attire, but did not immediately find a place in the fashion mainstream. In the 1920s and 1930s, Gabrielle Chanel popularized practical clothes for women—including pants and boxy jackets made from comfortable fabrics—and the masculine influence took off. Katherine Hepburn’s bold preference for pants became a symbol of independence for women in the 1930s, and in 1977 Diane Keaton made the menswear-look famous again in Annie Hall.
The designs on the following pages celebrate the versatility of menswear—as intended for men and as adapted for women and even children. A military jacket joins a feminine silhouette with bold, masculine details. Knitted ties, once reserved for the “suburban” man, become unisex here. Knitter-friendly argyle patterns add a masculine note to a vest and socks. And a Breton sailor’s sweater—the classic striped, boatneck design adopted by the French navy—here befits a little girl.
His-and-Her Llama Cardigan
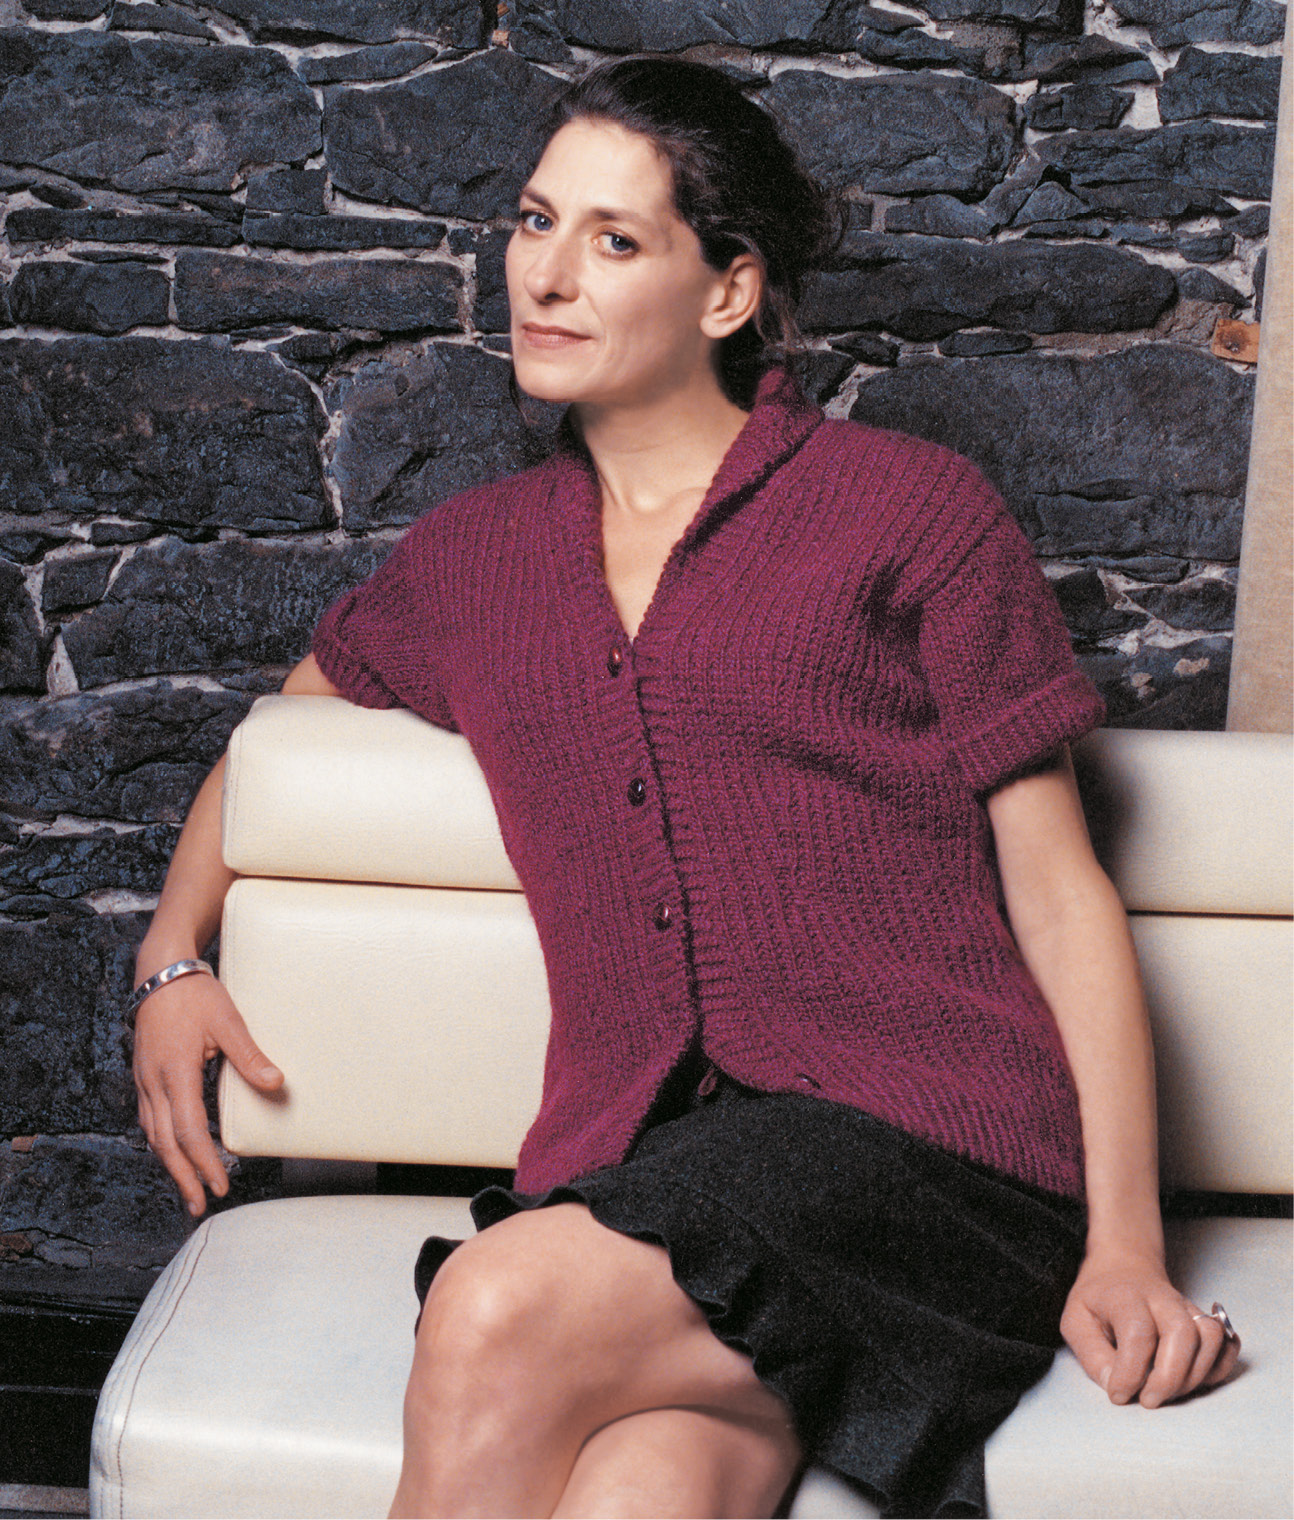
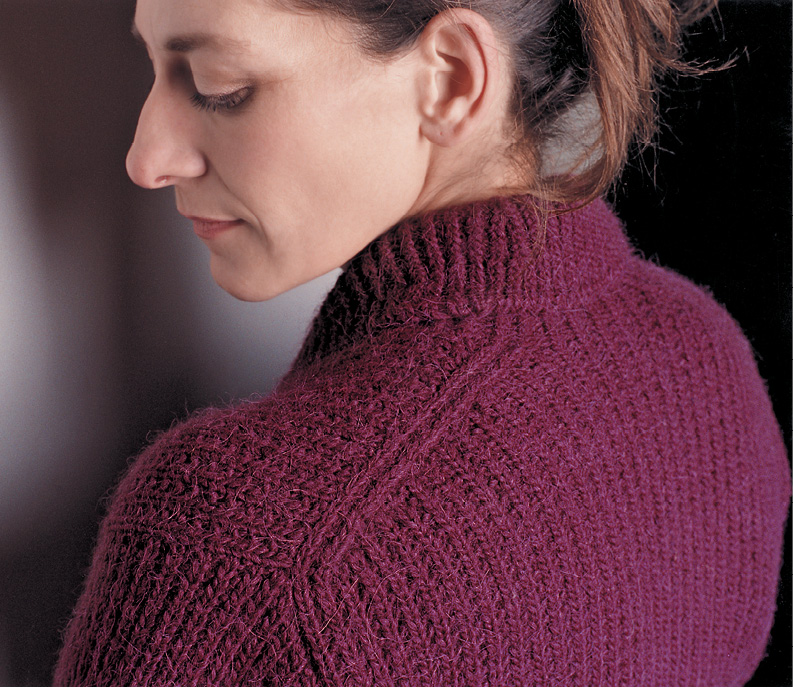
I can’t help thinking of this sweater as my “pépé” cardigan, after my grandfather, who still wears the same burgundy V-neck cardigan I remember from my childhood. I added a shawl collar and used a simple stitch pattern to showcase the shaping details at the neckline and shoulders.
Eager to demonstrate the cardigan’s potential, I offer two here—one styled for men, but with snaps instead of buttons, and one for women, with short sleeves and hourglass shaping. As the bodies and sleeves are interchangeable, many variations are possible.
sizes
X-Small (Small, Medium, Large, X-Large, 2X-Large, 3X-Large, 4X Large)
Long-sleeved cardigan shown in size X-Large
Short-sleeved cardigan shown in size Medium
finished measurements
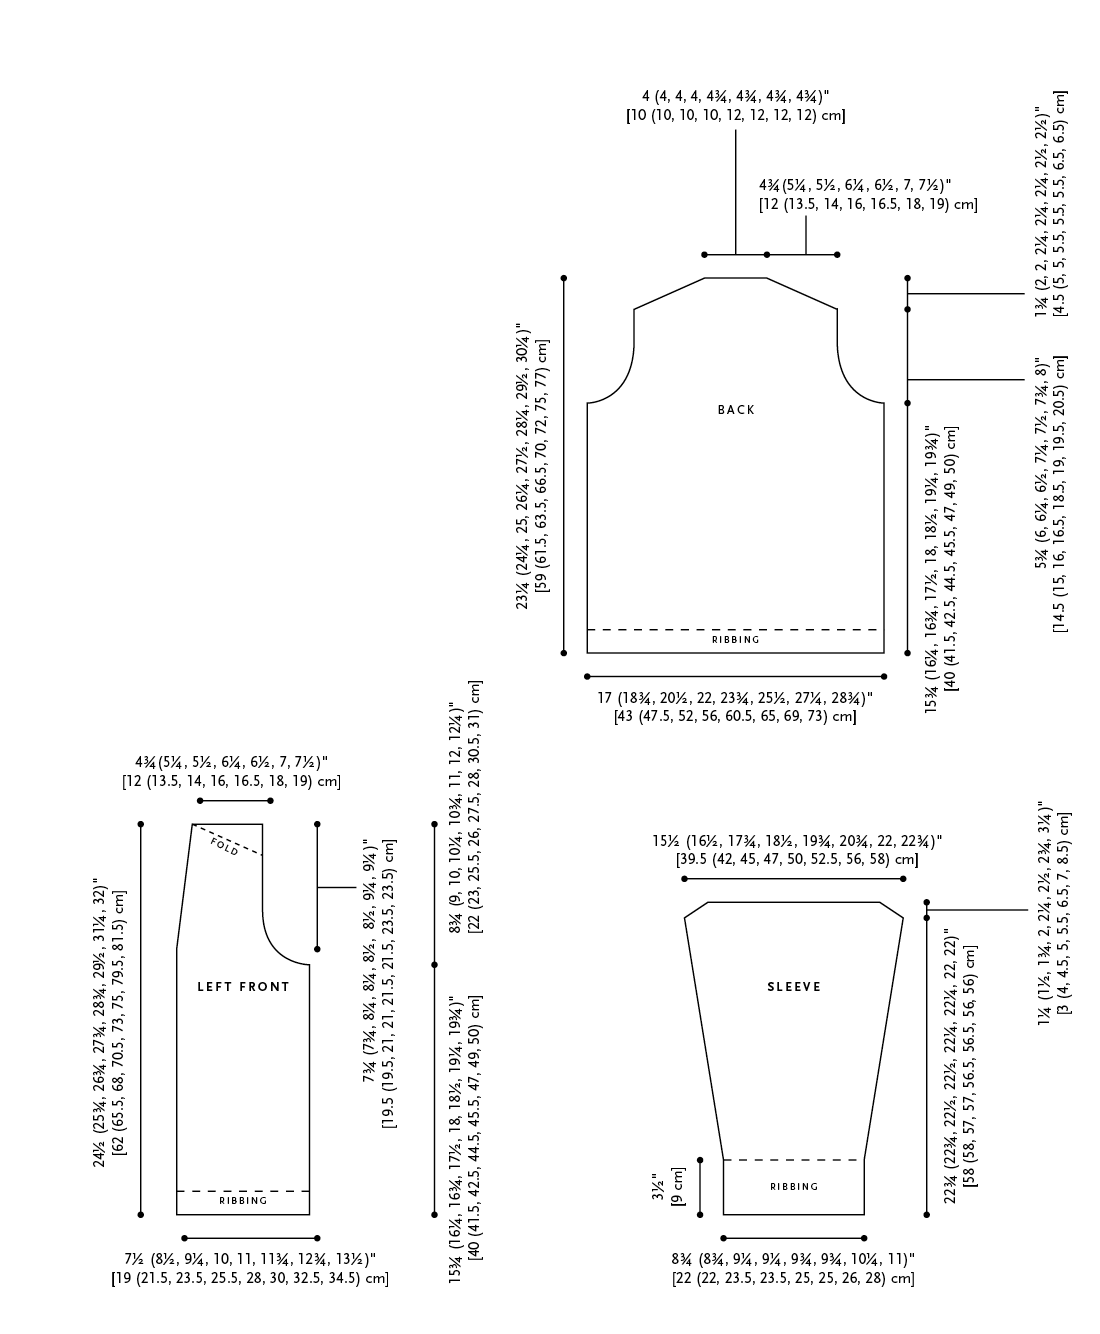
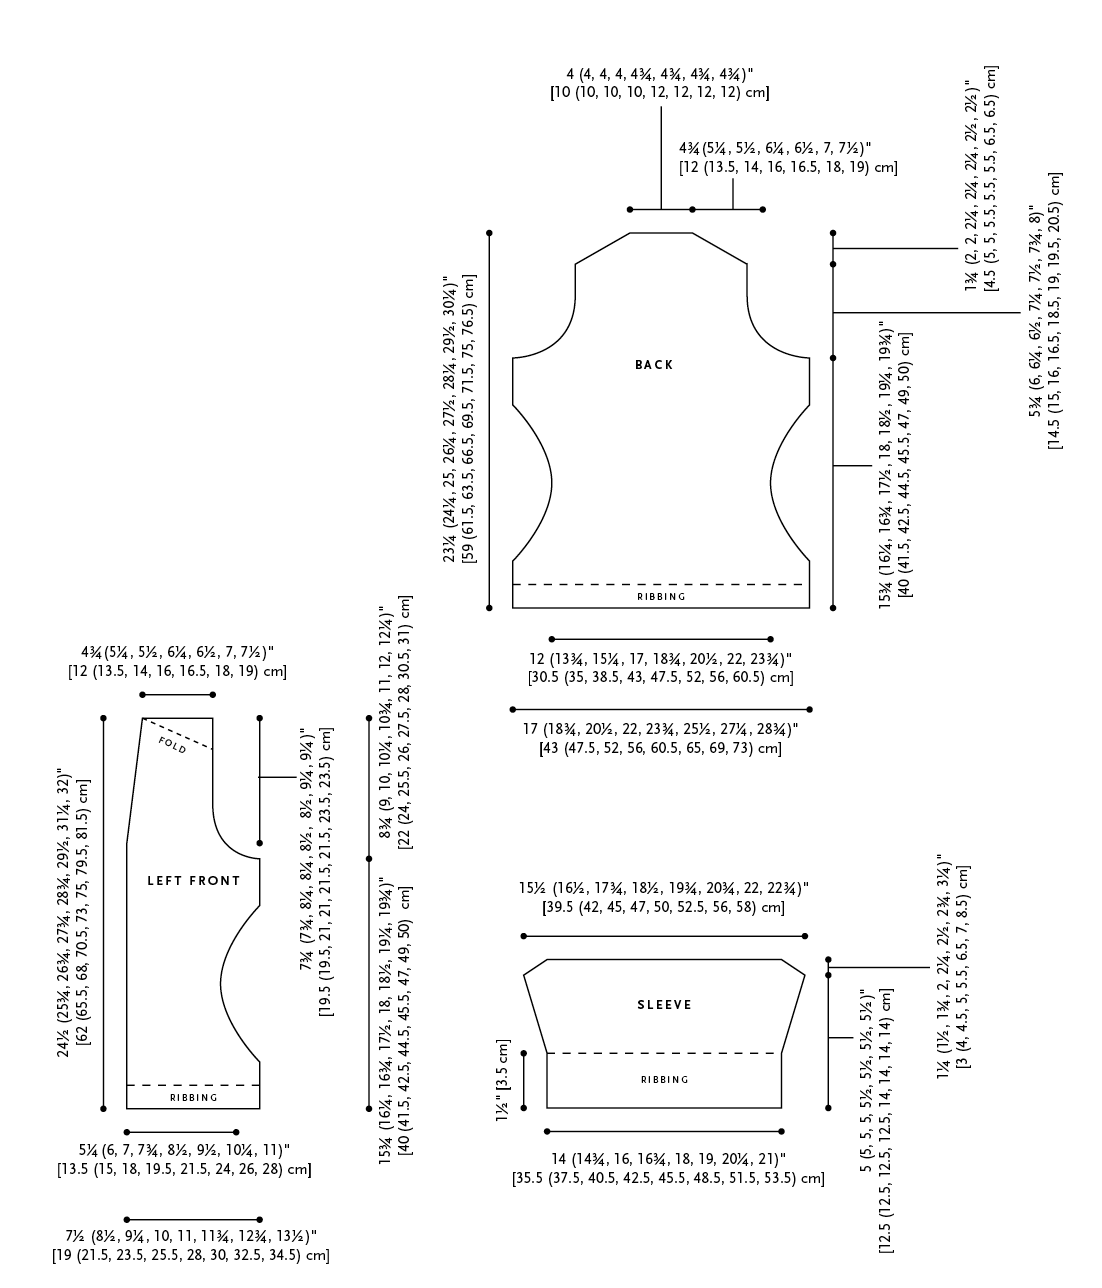
Chest: 34 (37½, 40¾, 44¼, 47½, 51, 54¼, 57¾)” (closed)
yarn
Classic Elite Montera (50% llama / 50% wool; 128 yds / 100 g):
13 (15, 17, 18, 18, 20, 21, 22) skeins in #3854 Alice blue heather for long-sleeved cardigan; 11 (12, 13, 15, 16, 17, 18, 19) skeins in #3827 cochineal for short-sleeved cardigan
needles
One 32” circular (circ) needle size US 7 (4.5 mm)
One pair straight needles size US 7 (4.5 mm)
Change needle size if necessary to obtain correct gauge.
notions
Stitch markers, stitch holders, yarn needle, sewing needle and matching thread, 5¾” leather shank buttons or ½” sew-on snaps
gauge
19 sts and 28 rows = 4” (10 cm) in Broken Rib
abbreviations
Inc2: [K1, yo, k1] in next st
Wrp-t: Wrap next st, turn
stitch patterns
Twisted Rib (multiple of 2 sts + 1; 2-row rep)
Row 1 (RS): *K1-tbl, p1-tbl; rep from * to last st, k1-tbl.
Row 2: *P1-tbl, k1-tbl; rep from * to last st, p1-tbl.
Rep Rows 1 and 2 for Twisted Rib.
Broken Rib (multiple of 2 sts + 1; 2-row rep)
Row 1 (RS): Knit.
Row 2: *P1, k1; rep from * to last st, p1.
Rep Rows 1 and 2 for Broken Rib.
notes
•Work edge sts in St st, except for lower sleeve cuff. Cuffs on long sleeves are turned back; edge sts are worked in rev St st for first 18 rows so that seaming can be done from the WS.
•Shaping is done with double increases and decreases to maintain continuity of rib pattern.
•All shoulder shaping is worked on Back only using a combination of decreases and short rows; the shoulder seam falls to the back.
Long-Sleeved Cardigan
back
CO 83 (91, 99, 107, 115, 123, 131, 139) sts.
Twisted Rib Border: (RS) K1 (edge st), work Twisted Rib to last st, k1 (edge st).
Maintaining edge sts in St st, work 11 more rows in Twisted Rib.
Begin Broken Rib: (RS) Maintaining edge sts in St st, work in Broken Rib until Back measures 15¾ (16¼, 16¾, 17½, 18, 18½, 19¼, 19¾)”, ending with a WS row.
Shape Armholes: (RS) Maintaining patt as est, dec 2 sts at each edge on next row, then every other row 3 (4, 5, 6, 7, 8, 9, 10) more times as follows: K3, sssk, knit to last 6 sts, k3tog, k3—67 (71, 75, 79, 83, 87, 91, 95) sts rem. Work even in patt as est until armholes measure 5¾ (6, 6¼, 6½, 7¼, 7½, 7¾, 8)”, ending with a WS row.
Shape Shoulders:
Row 1 (RS): K4, wrp-t.
Row 2: P1, k1, p2.
Row 3: K3, sssk, knit to last 6 sts, k3tog, k3.
Row 4: P2, k1, p1, wrp-t.
Row 5: K4.
Row 6: P2, k1, p3tog, work in patt to last 6 sts, sssp, k1, p2.
Rep [Rows 1–6] 5 (5, 6, 6, 6, 7, 7, 8) more times and [Rows 1–3] 0 (1, 0, 1, 1, 0, 1, 0) time(s)—19 (19, 19, 19, 23, 23, 23, 23) sts rem. Place sts on holder for Back neck.
left front
CO 38 (42, 46, 50, 54, 58, 62, 66) sts.
Twisted Rib Border: (RS) K1, *p1-tbl, k1-tbl; rep from * to last st, k1. Maintaining edge sts in St st, work 11 more rows in Twisted Rib as est.
Begin Broken Rib: (RS) Maintaining edge sts in St st and continuing rib as est from border, work even in Broken Rib until Front measures 15¾ (16¼, 16¾, 17½, 18, 18½, 19¼, 19¾)”, ending with a WS row.
Shape Armhole: Set-up row (RS): Ssk, k2, sssk, knit to end—35 (39, 42, 47, 51, 55, 59, 63) sts rem. Work 1 WS row.
Dec 2 sts at armhole edge on next row, then every other row 2 (3, 4, 5, 6, 7, 8, 9) more times as follows: K3, sssk, knit to end—29 (31, 33, 35, 37, 39, 41, 43) sts rem. Work 1 WS row.
Shape Neck: (RS) Dec 2 sts at neck edge on next row, then every 24 (24, 24, 24, 16, 16, 20, 20) rows 2 (2, 2, 2, 3, 3, 3, 3) more times as follows: Work in patt as est to last 6 sts, k3tog, k3—23 (25, 27, 29, 29, 31, 33, 35) sts rem. Work 6 (6, 10, 10, 12, 12, 4, 4) rows even in patt as est. BO all sts.
right front
CO 38 (42, 46, 50, 54, 58, 62, 66) sts.
Twisted Rib Border: (RS) K1, *k1-tbl, p1-tbl; rep from * to last st, k1. Maintaining edge sts in St st, work 11 more rows in Twisted Rib as est.
Begin Broken Rib: (RS) Maintaining edge sts in St st and continuing rib as est from border, work even in Broken Rib until piece measures 15¾ (16¼, 16¾, 17½, 18, 18½, 19¼, 19¾)”, ending with a WS row.
Shape Armhole: Set-up row (RS): Work in patt as est to last 7 sts, k3tog, k2, k2tog—35 (39, 42, 47, 51, 55, 59, 63) sts rem. Work 1 WS row. Dec 2 sts at armhole edge on next row, then every other row 2 (3, 4, 5, 6, 7, 8, 9) more times as follows: Work in patt as est to last 6 sts, k3tog, k3—29 (31, 33, 35, 37, 39, 41, 43) sts rem. Work 1 WS row.
Shape Neck: (RS) Dec 2 sts at neck edge on next row, then every 24 (24, 24, 24, 16, 16, 20, 20) rows 2 (2, 2, 2, 3, 3, 3, 3) more times as follows: K3, sssk, knit to end—23 (25, 27, 29, 29, 31, 33, 35) sts rem. Work 6 (6, 10, 10, 12, 12, 4, 4) rows even. BO all sts.
long sleeves (make 2)
CO 44 (44, 46, 46, 48, 48, 50, 54) sts.
Twisted Rib Cuffs: (RS) P1, *k1-tbl, p1-tbl; rep from * to last st, p1. Maintaining edge sts in rev St st (see Notes), work even in Twisted Rib as est for 17 more rows. Beg working edge sts in St st and work 6 more rows in Twisted Rib.
Shape Sleeves: (RS) Maintaining edge sts in St st and continuing rib as est from cuff, begin Broken Rib. Inc 2 sts each edge on 3rd row, then every 16 rows 7 (0, 0, 0, 0, 0, 0, 0) times, every 14 rows 0 (8, 4, 0, 0, 1, 0, 0) times, every 12 rows 0 (0, 5, 6, 1, 4, 0, 0) times, every 10 rows 0 (0, 0, 4, 10, 0, 3, 8) times, and every 8 rows 0 (0, 0, 0, 0, 7, 10, 5) times as follows: K4, Inc2, knit to last 4 sts, Inc2, k3, working all new sts in patt—76 (80, 86, 90, 96, 100, 106, 110) sts. Work even until sleeve measures 22¾ (22¾, 22½, 22½, 22¼, 22¼, 22, 22)” from beg, ending with a WS row.
Shape Cap: Set-up row (RS): Ssk, k2, sssk, knit to last 6 sts, k3tog, k3. Work 1 WS row in patt as est. Dec 2 sts each edge on next row, then every other row 2 (3, 4, 5, 6, 7, 8, 9) more times as follows: K3, sssk, knit to last 6 sts, k3tog, k3—59 (59, 61, 61, 63, 63, 65, 65) sts rem. BO all sts.
Go to Finishing section to complete Cardigan.
Short-Sleeved Cardigan
back
CO 83 (91, 99, 107, 115, 123, 131, 139) sts.
Twisted Rib Border: (RS) K1 (edge st), work Twisted Rib to last st, k1 (edge st).
Maintaining edge sts in St st, work 11 more rows in Twisted Rib.
Begin Broken Rib: (RS) Maintaining edge sts in St st, work in Broken Rib for 8 rows.
Shape Waist: (RS) Set-up row: K4, pm, k17 (21, 25, 29, 33, 37, 41, 45), pm, k41, pm, k17 (21, 25, 29, 33, 37, 41, 45), pm, k4. Work 1 WS row.
Decrease for Waist: (RS) Dec 8 sts on next row as follows: Knit to marker, sm, k3tog, knit to next marker, sm, sssk, knit to 3 sts before next marker, k3tog, sm, knit to 3 sts before last marker, sssk, sm, k3. Work 17 (19, 21, 23, 25, 27, 29, 31) rows even in patt as est. Work Dec row. Work 11 rows even. Work Dec row—59 (67, 75, 83, 91, 99, 107, 115) sts rem. Work 5 rows even.
Increase for Upper Body: (RS) Inc 8 sts on next row as follows: Knit to marker, sm, Inc2, knit to marker, sm, Inc2, knit to 1 st before next marker, Inc2, sm, knit to 1 st before last marker, Inc2, sm, k3. Work 11 rows even in patt as est. Work Inc row. Work 17 (19, 21, 23, 25, 27, 29, 31) rows even. Work Inc row—83 (91, 99, 107, 115, 123, 131, 139) sts. Work even in patt as est until piece measures 15¾ (16¼, 16¾, 17½, 18, 18½, 19¼, 19¾)”, ending with a WS row.
Shape Armholes: (RS) Dec 2 sts each edge on next row, then every other row 3 (4, 5, 6, 7, 8, 9, 10) more times as follows: K3, sssk, knit in patt as est to last 6 sts, k3tog, k3—67 (71, 75, 79, 83, 87, 91, 95) sts rem. Work even until armholes measure 5¾ (6, 6¼, 6½, 7¼, 7½, 7¾, 8)”, ending with a WS row.
Shape Shoulders:
Row 1 (RS): K4, wrp-t.
Row 2: P1, k1, p2.
Row 3: K3, sssk, knit to last 6 sts, k3tog, k3.
Row 4: P2, k1, p1, wrp-t.
Row 5: K4.
Row 6: P2, k1, p3tog, work in patt to last 6 sts, sssp, k1, p2.
Rep [Rows 1–6] 5 (5, 6, 6, 6, 7, 7, 8) more times and [Rows 1–3] 0 (1, 0, 1, 1, 0, 1, 0) time(s)—19 (19, 19, 19, 23, 23, 23, 23) sts rem. Place sts on holder for Back neck.
left front
CO 38 (42, 46, 50, 54, 58, 62, 66) sts.
Twisted Rib Border: (RS) K1, *p1-tbl, k1-tbl; rep from * to last st, k1. Maintaining edge sts in St st, work 11 more rows in Twisted Rib as est.
Begin Broken Rib: (RS) Maintaining edge sts as in St st and continuing rib as est from border, work 8 rows in Broken Rib.
Shape Waist: Set-up row (RS): K4, pm, k17 (21, 25, 29, 33, 37, 41, 45), pm, knit to end. Work 1 WS row.
Decrease for Waist: (RS) Dec 4 sts on next row as follows: Knit to marker, sm, k3tog, knit to next marker, sm, sssk, knit to end. Work 17 (19, 21, 23, 25, 27, 29, 31) rows even in patt as est. Work Dec row. Work 11 rows even. Work Dec row—26 (30, 34, 38, 42, 46, 50, 54) sts rem. Work 5 rows even.
Increase for Upper Body: (RS) Inc 4 sts on next row as follows: Knit to marker, sm, Inc2, knit to marker, sm, Inc2, knit to end. Work 11 rows even in patt as est. Work Inc row. Work 17 (19, 21, 23, 25, 27, 29, 31) rows even. Work Inc row—38 (42, 46, 50, 54, 58, 62, 66) sts. Work even in patt as est until piece measures 15¾ (16¼, 16¾, 17½, 18, 18½, 19¼, 19¾)”, ending with a WS row.
Shape Armhole: Set-up row (RS): Ssk, k2, k3tog, knit to end. Work 1 WS row.
Dec 2 sts at armhole edge on next row, then every other row 2 (3, 4, 5, 6, 7, 8, 9) more times as follows: K3, sssk, knit to end—29 (31, 33, 35, 37, 39, 41, 43) sts rem. Work 1 WS row.
Shape Neck: (RS) Dec 2 sts at neck edge on next row, then every 24 (24, 24, 24, 16, 16, 20, 20) rows 2 (2, 2, 2, 3, 3, 3, 3) more times as follows: Knit to last 6 sts, k3tog, k3—29 (31, 33, 35, 37, 39, 41, 43) sts rem. Work 6 (6, 10, 10, 12, 12, 4, 4) rows even. BO all sts.
right front
CO 38 (42, 46, 50, 54, 58, 62, 66) sts.
Twisted Rib Border: (RS) K1, *k1-tbl, p1-tbl; rep from * to last st, k1. Maintaining edge sts in St st, work 11 more rows in Twisted Rib as est.
Begin Broken Rib: (RS) Maintaining edge sts in St st and continuing rib as est from border, work 8 rows in Broken Rib.
Shape Waist: Set-up row (RS): K17, pm, knit to last 4 sts, pm, k4. Work 1 WS row.
Decrease for Waist: (RS) Dec 4 sts on next row as follows: *Knit to 3 sts before marker, k3tog, sm, knit to 3 sts before next marker, sssk, sm, k4. Work 17 (19, 21, 23, 25, 27, 29, 31) rows even in patt as est. Work Dec row. Work 11 rows even. Work Dec row—26 (30, 34, 38, 42, 46, 50, 54) sts rem. Work 5 rows even.
Increase for Upper Body: (RS) Inc 4 sts on next row as follows: *Knit to 1 st before marker, Inc2, sm; rep from * to last 4 sts, k4. Work 11 rows even in patt as est. Work Inc row. Work 17 (19, 21, 23, 25, 27, 29, 31) rows even. Work Inc row—38 (42, 46, 50, 54, 58, 62, 66) sts. Work even in patt as est until piece measures 15¾ (16¼, 16¾, 17½, 18, 18½, 19¼, 19¾)”, ending with a WS row.
Shape Armhole: (RS) Set-up row: Work in patt as est to last 7 sts, k3tog, k2, k2tog—35 (39, 42, 47, 51, 55, 59, 63) sts rem. Work 1 WS row. Dec 2 sts at armhole edge on next row, then every other row 2 (3, 4, 5, 6, 7, 8, 9) more times as follows: Work in patt as est to last 6 sts, k3tog, k3—29 (31, 33, 35, 37, 39, 41, 43) sts rem. Work 1 WS row.
Shape Neck: (RS) Dec 2 sts at neck edge on next row, then every 24 (24, 24, 24, 16, 16, 20, 20) rows 2 (2, 2, 2, 3, 3, 3, 3) more times as follows: K3, sssk, knit to end—23 (25, 27, 29, 29, 31, 33, 35) sts rem. Work 6 (6, 10, 10, 12, 12, 4, 4) rows even. BO all sts.
short sleeves (make 2)
CO 68 (72, 78, 82, 88, 92, 98, 102) sts.
Twisted Rib Border: (RS) K1, *k1-tbl, p1-tbl; rep from * to last st, end k1. Maintaining edge sts in St st, work 9 more rows in Twisted Rib as est.
Begin Broken Rib: (RS) Maintaining edge sts in St st and continuing rib as est from border, work 14 (12, 12, 10, 10, 10, 8, 8) rows in Broken Rib, ending with a WS row.
Shape Sleeves: (RS) Inc 2 sts each edge on next row, then on following 6th row as follows: K4, Inc2, knit to last 4 sts, Inc2, k3—76 (80, 86, 90, 96, 100, 106, 110) sts. Work even until Sleeve measures 5 (5, 5, 5, 5½, 5½, 5½, 5½)”, ending with a WS row.
Shape Cap: (RS) Set-up row: Ssk, k2, sssk, knit to last 6 sts, k3tog, k3. Work 1 WS row in patt as est. Dec 2 sts each edge on next row, then every other row 2 (3, 4, 5, 6, 7, 8, 9) more times as follows: K3, sssk, knit to last 6 sts, k3tog, k3—59 (59, 61, 61, 63, 63, 65, 65) sts rem. BO all sts.
finishing
(All Cardigans)
Sew shoulder seams.
Collar: (RS) Beg at lower border, pick up and knit 113 (117, 123, 129, 133, 137, 143, 147) sts along right Front; work Twisted Rib across 19 (19, 19, 19, 23, 23, 23, 23) Back neck sts; pickup and knit 113 (117, 123, 129, 133, 137, 143, 147) sts along left Front—245 (253, 265, 277, 289, 297, 309, 317) sts.
Rows 1 and 3 (WS): Slip 1 wyif, *k1-tbl, p1-tbl; rep from * across.
Row 2: Slip 1 wyib, *p1-tbl, k1-tbl; rep from * across.
Row 4 (Buttonhole row-Men’s [optional]): Maintaining patt as est, work to last 70 (70, 72, 72, 74, 74, 76, 76) sts, k2tog-tbl, [yo] twice, *work 14 (14, 14, 14, 16, 16, 16, 16) sts, k2tog-tbl, [yo] twice; rep from * 3 more times, work to end.
Row 4 (Buttonhole row-Women’s [optional]): Maintaining patt as est, work 4 (4, 6, 6, 4, 4, 6, 6) sts, k2tog-tbl, [yo] twice, *work 14 (14, 14, 14, 16, 16, 16, 16) sts, k2tog-tbl, [yo] twice; rep from * 3 more times, work to end.
Shape Collar:
Row 5: Maintaining patt as est, slipping all yo’s as you come to them and dropping 2nd yo, work 80 (80, 82, 82, 84, 84, 86, 86) sts, pm, work 33 (37, 41, 47, 49, 53, 57, 61) sts, Inc2, pm, work 17 (17, 17, 17, 21, 21, 21, 21) sts, pm, Inc2, work 33 (37, 41, 47, 49, 53, 57, 61) sts, pm, work 80 (80, 82, 82, 84, 84, 86, 86) sts.
Row 6: Work to last marker, turn.
Note: A gap will form at turn.
Row 7: Yo, work to first marker, turn.
Rows 8–20, excluding Rows 9, 13, 17, and 21: Yo, work to 4 (4, 4, 4, 6, 6, 6, 6) sts before gap, turn.
Rows 9, 13, 17, and 21: Yo, work to 1 st before first Back neck marker, Inc2, work to next marker, sm, Inc2, work to 4 (4, 4, 4, 6, 6, 6, 6) sts before gap, turn. 265 (273, 285, 297, 309, 317, 329, 334) sts rem.
Row 22: Yo, work in patt, closing all gaps by working yo’s and next st as p2tog-tbl.
Row 23: Work in patt as est, closing gaps on opposite band by working yo’s and next st as ssk.
Work 1 row even, then BO all sts loosely.
Block pieces to measurements. Mark shoulder fold on fronts. (Note: This will be below the actual seam, which falls to the back.) Sew in sleeves, centering top of cap at marked fold. Sew side and sleeve seams. Sew on snaps or buttons. Weave in loose ends.


Aspen Top-Down Sweater
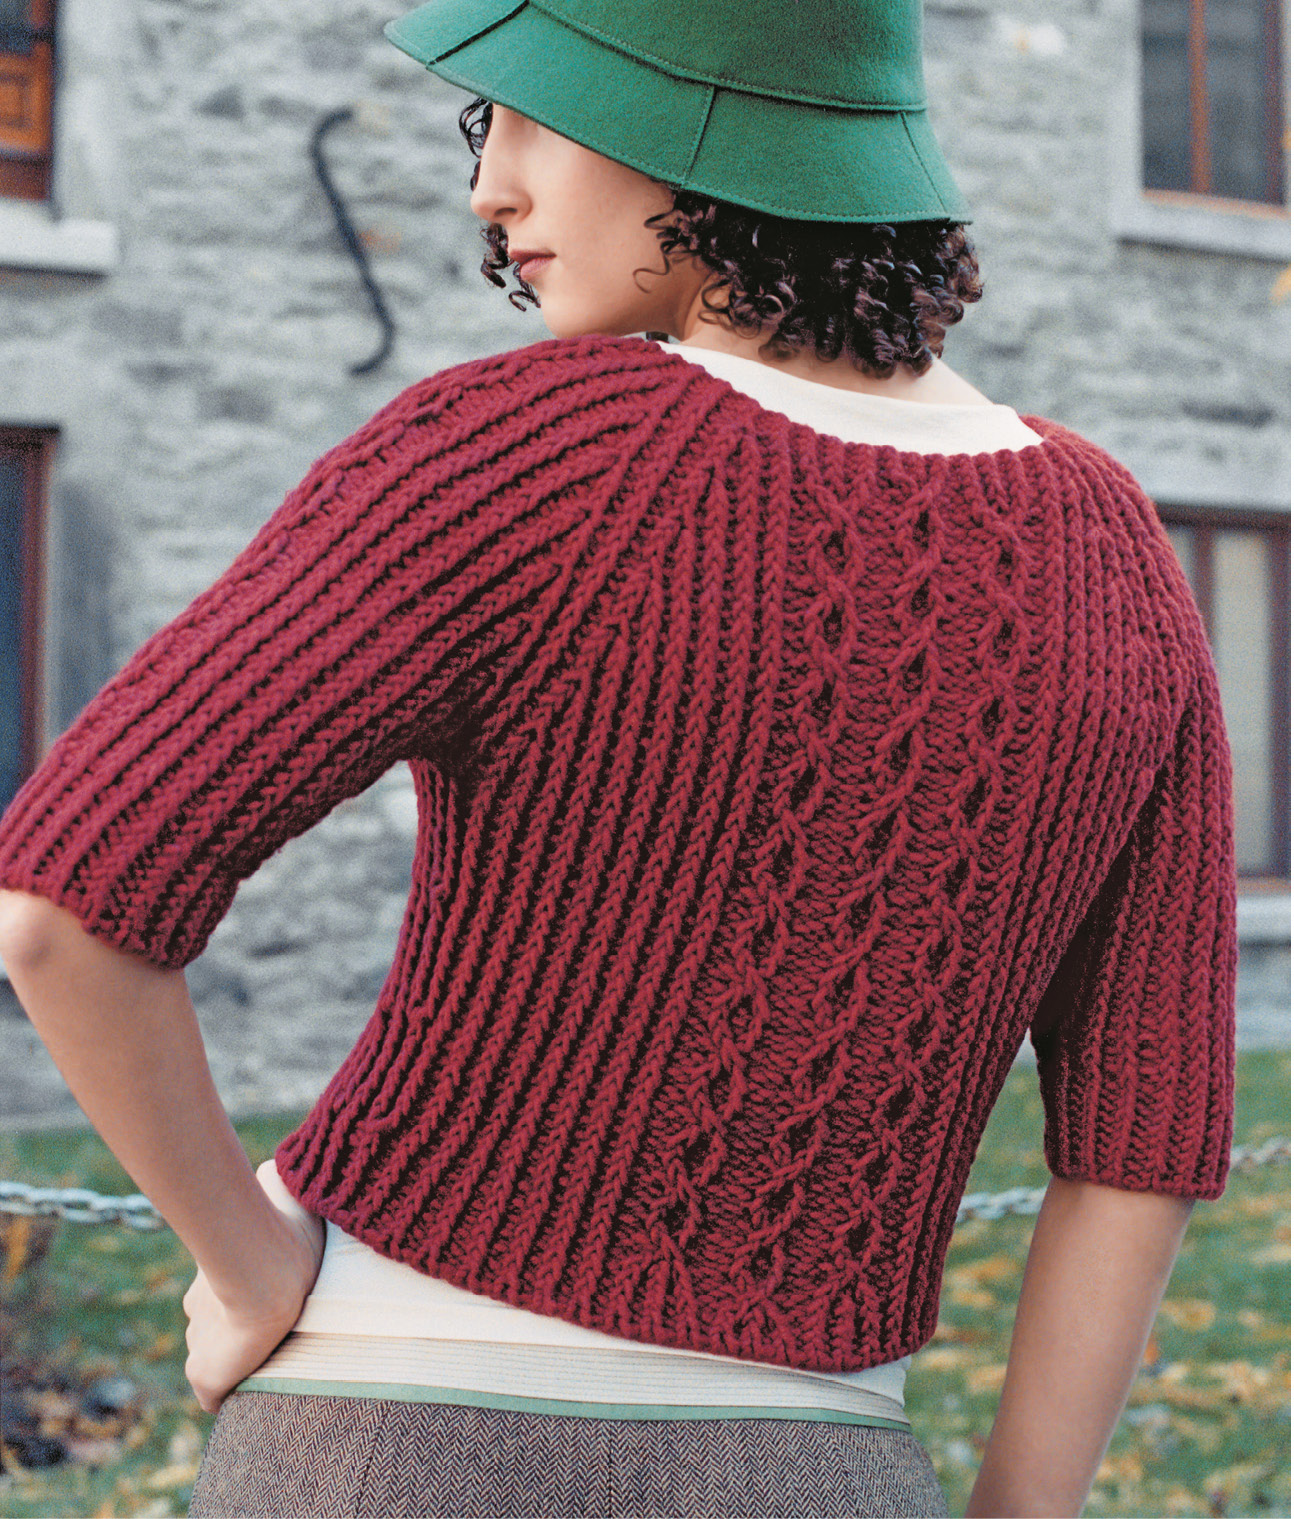
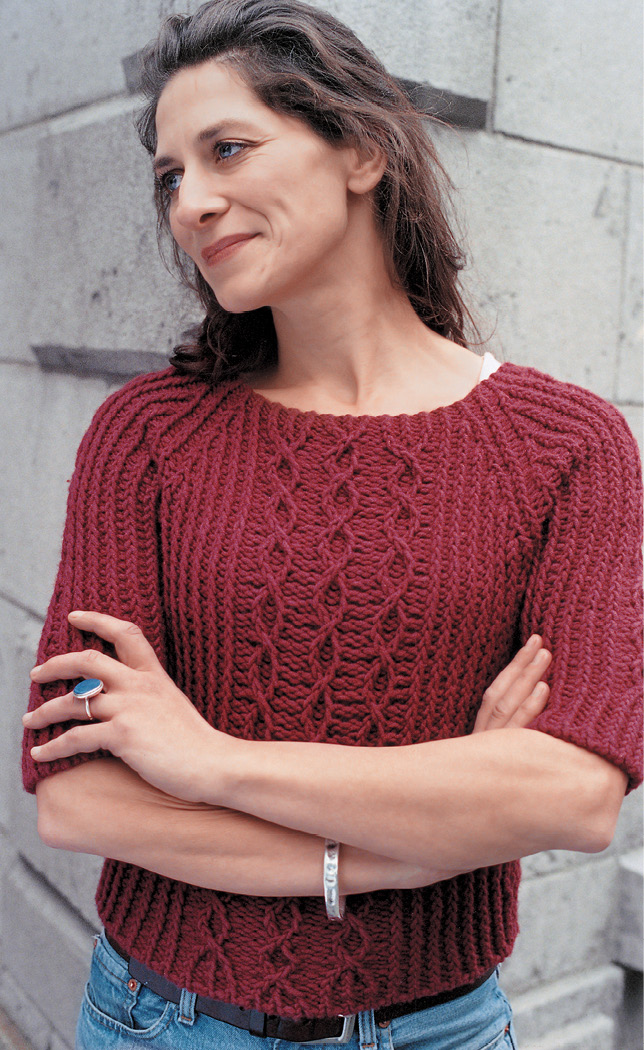
The fisherman’s sweater is a traditional garment frequently featuring textural stitchwork that is knit in many European coastal communities, often by fishermen’s wives for their husbands or for export, to be practical, warm, and weatherproof. Among the better known are the English, Scottish, and Portuguese versions.
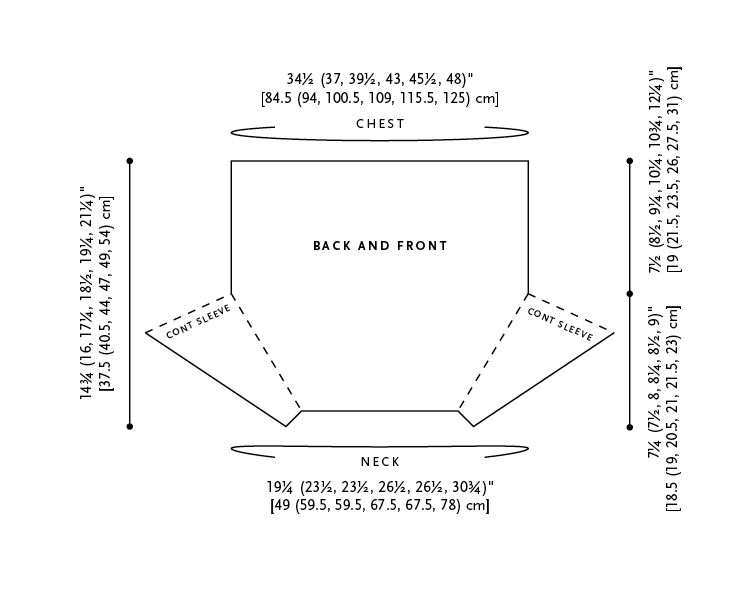
My version is inspired by English fishermen’s sweaters knit primarily in brioche stitch from the top down. I’ve incorporated twisted-stitch panels into it for added depth and interest. This sweater is easily custom-fitted by adding stitches on either side of the center cable panel until the desired circumference is reached, and then knitting until it is long enough for the intended wearer.
sizes
X-Small (Small, Medium, Large, X-Large, 2X-Large)
Shown in size Medium
finished measurements
Chest: 33¼ (37, 39½, 43, 45½, 48)”
yarn
GGH Aspen (50% merino wool / 50% microfiber; 62 yds / 50 g): 9 (10, 10, 13, 13, 15) balls #5 dark red
needles
One each 16” and 32” circular (circ) needles size US 9 (5.5 mm)
One each 16” and 32” circular needles size US 10½ (6.5 mm)
One set of five double-pointed needles (dpn) size US 9 (5.5 mm)
One set of five double-pointed needles size US 10½ (6.5 mm)
Change needle size if necessary to obtain correct gauge.
notions
Stitch markers (one in contrasting color for beg of rnd), coiless safety pin, yarn needle, cable needle (cn)
gauge
13 sts and 24 rnds = 4” (10 cm) in Twisted Rib Pattern using larger needle
abbreviation
Inc2: (K1, yo, k1) in next st
stitch pattern
Twisted Rib (multiple of 2 sts; 1-rnd rep)
Rnd 1: [K1-tbl, p1-tbl] around.
Rep Rnd 1 for Twisted Rib.
notes
•This garment is worked in-the-round from the top down. The yoke is worked first, the sleeve sts are put on hold while the body is worked, and the sleeves are worked last.
•All slipped stitches are worked with yarn in back.
•Change to longer circ needle on Body when necessary to accommodate sts.
•In order to maintain stitch pattern on Sleeves, 2 sts are decreased at center underarm as follows: Work to 1 st before marked center st, then if center st is knit, p3tog; if center st is purled, k3tog-tbl.
yoke
Neck Rib: Using smaller 16” circ needle, CO 72 (88, 88, 104, 104, 120) sts. Place marker (pm) for beg of rnd and join, being careful not to twist sts. Work 3 rnds of Twisted Rib. Change to larger 16” circ needle.
Next rnd: [Slip 1, p1] around.
Shape Yoke:
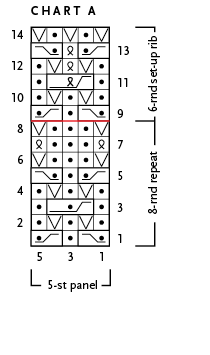
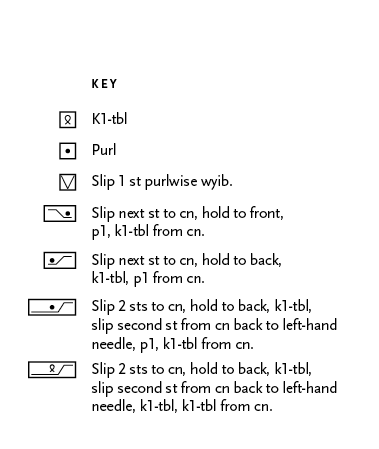
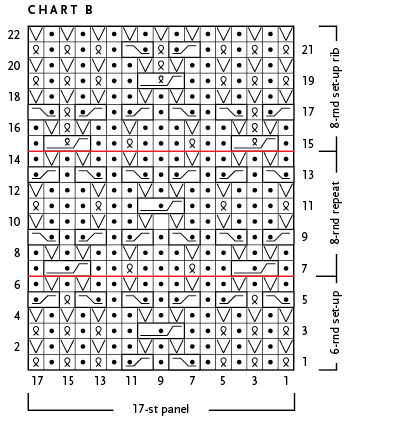
Rnd 1 (set-up and inc): *K1-tbl, pm; p1, Inc2, [p1, k1-tbl] 0 (1, 1, 2, 2, 3) time(s), p1, work Rnd 1 of Chart A over center 5 sts, p1, [k1-tbl, p1] 0 (1, 1, 2, 2, 3) time(s), Inc2, p1, pm; k1-tbl, pm; p1, Inc2, [p1, k1-tbl] 0 (1, 1, 2, 2, 3) time(s), p1, work Rnd 1 of Chart B over center 17 sts, p1, [k1-tbl, p1] 0 (1, 1, 2, 2, 3) time(s), Inc2, p1, pm; rep from * to end of rnd, omitting last marker—16 sts inc’d; 88 (104, 104, 120, 120, 136) sts.
Rnd 2: *Slip 1, sm, p1, k1-tbl, p1, k1-tbl, purl the purl sts and slip the knit sts across to 4 sts before next marker, k1-tbl, p1, k1-tbl, p1, sm; rep from * 3 more times.
Rnds 3 and 5: Cont in patt as est, working increased sts in rib, knitting all knit sts tbl, and working charts over center sts as est.
Rnds 4 and 6: Cont in patt as est, slipping all knit sts and purling all purl sts on rib, and working Charts over center sts as est.
Rep [Rnds 1–6] 5 (5, 6, 6, 7, 7) times, working increased sts in rib and 8-rnd reps of panel sts over center sts as est—168 (184, 200, 216, 232, 248) sts.
Work even in patts as est until yoke measures approx 7¼ (7½, 8, 8¼, 8½, 9)” from beg.
Divide for Body and Sleeves: Removing markers, place first 35 (39, 43, 47, 51, 55) sts on holder for Sleeve; CO 3 (3, 3, 4, 4, 4) sts for underarm, pm for beg of rnd; CO 4 (4, 4, 5, 5, 5) sts for underarm; work 49 (53, 57, 61, 65, 69) sts in patt as est; place next 35 (39, 43, 47, 51, 55) sts on second holder for Sleeve; CO 7 (7, 7, 9, 9, 9) sts for underarm; work in patt as est to end of rnd—112 (120, 128, 140, 148, 156) sts on needle.
body
Work even in patt as est until Body measures approx 5¾ (6¾, 7½, 8½, 9, 10½)”, or 1¾” short of desired finished length, ending with Rnd 14 of panel repeat. Work last 8 rnds of Chart B for rib set-up.
Bottom Rib: Change to smaller needle, and work 3 rnds of Twisted Rib, then BO loosely in rib.
sleeves (make 2)
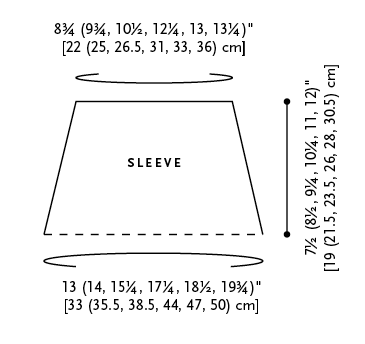
With larger dpns, work 35 (39, 43, 47, 51, 55) sts from holder in patt as est, pick up and knit 7 (7, 7, 9, 9, 9) sts from underarm—42 (46, 50, 56, 60, 64) sts. Mark center underarm st with coiless safety pin for beg of rnd, moving it up as work progresses. Working underarm sts in rib as est, work 2 rnds even.
Shape Sleeves: Dec 2 sts at center underarm on next rnd, then every 6 rnds 6 (6, 7, 7, 8, 8) more times as follows: Work in patt to 1 st before marked center st, p3tog or k3tog-tbl (see Notes), cont around—28 (32, 34, 40, 42, 46) sts rem. AT THE SAME TIME, when Sleeve measures approx 4½ (5½, 6¼, 7¼, 8, 9)”, or 3” short of desired finished length, finish 8-rnd rep, then work last 6 rnds of Chart A for rib set-up.
Cuff Rib: Change to smaller dpns, and work 8 rnds of Twisted Rib. BO loosely in rib.
finishing
Weave in all ends. Block to finished measurements.
Rustic Elegant Tie
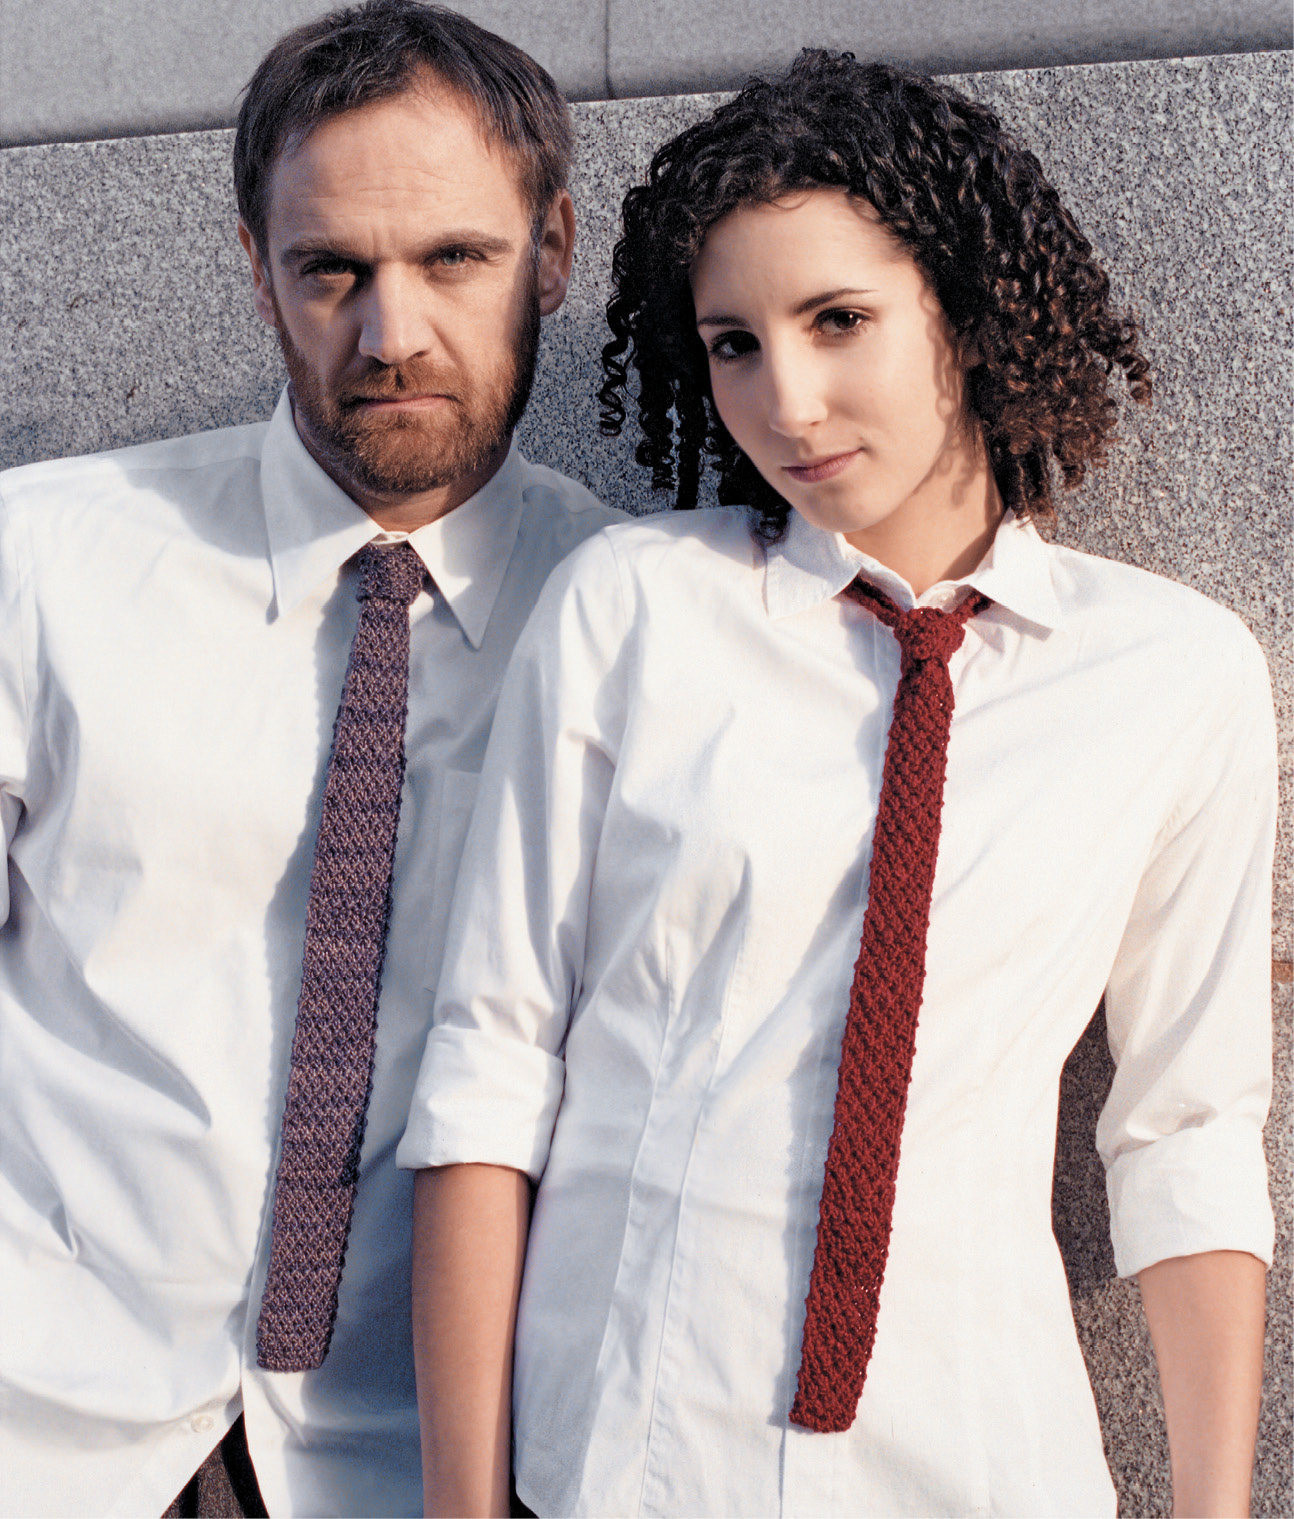
Hanging on my dining room wall is a 1953 framed Esquire print I found in an old Montreal menswear store. On it are illustrations of six men dressed for different occasions: Formal Evening, Semi-formal Evening, V.I.P. in Town, Business, Suburban, and Sportswear. While Esquire categorized knit ties as suburban, the reality is much broader. Today this British mainstay is favored by a wide variety of men and women from Ivy Leaguers to rebels, who, depending on their mood, wear them casually with jeans or a miniskirt, or more formally with a tweed suit. Made from a small amount of gorgeous, naturally dyed silk, this tie provides a wonderful accent to any wardrobe.
finished measurements
Women’s: 1¼” wide by 53” long (shown in red)
Men’s: 1¾” wide by 56” long (shown in purple)
yarn
La Lana Plant Dyed Bombyx Silk (100% silk; 59 yds / 1 oz): 2 skeins rajah red
or
La Lana Phat Silk Fines (50% Bombyx silk / 50% fine wool; 71 yds / 1 oz): 2 skeins purple
needles
Two double-pointed needles (dpn) size US 3 (3.25 mm)
Change needle size if necessary to obtain correct gauge.
notions
Coiless safety pin or yarn marker, yarn needle
gauge
30 sts and 36 rows = 4” (10 cm) in Moss Stitch
stitch pattern
Moss Stitch (odd number of sts; 4-row rep)
Row 1 (RS): Slip 1 wyib, [k1, p1] across.
Row 2: Slip 1 wyif, [p1, k1] across.
Row 3: Slip 1 wyib, [p1, k1] across.
Row 4: Slip 1 wyif, [k1, p1] across.
Rep Rows 1–4 for Moss Stitch.
Using tubular CO method (see Special Techniques, page 136), CO 8 (12) sts.
First 2 rows: [Slip 1 wyib, k1] across.
Establish Moss Stitch: Work Row 1 of Moss st, increasing 1 st—9 (13) sts. Work even in Moss st as established until tie measures approx 20 (14)”, ending with Row 4 of patt.
Decrease Row: Slip 1 wyib, p2tog, work in patt as est to last 3 sts, ssp, k1—7 (11) sts.
[Men’s tie only]: Work even in patt as est until piece measures 20”, then rep Dec row—7 (9) sts.
[Both ties]: Work even in patt as est until piece measures 24”. Place a marker in fabric to indicate beg of back neck section.
back neck section
Row 1: [K1, slip 1 wyif] to last st, k1.
Rows 2 and 4: Purl.
Row 3: K1 [Slip 1 wyif, k1] across.
Rep last 4 rows until back neck section measures approx 13 (14)” from marker.
Change back to Moss st and work even until tie measures 53 (56)” or desired length, dec 1 st on last row—8 (12) sts rem.
Next 2 rows: [Slip 1 wyib, k1] across. BO all sts using tubular BO method (see Special Techniques, page 136).
Child’s Nautical Pullover
While it is difficult to say precisely when the tradition began, stripes have been part of sailors’ uniforms since at least the mid-17th century. Of these uniforms, my favorite is the sailor shirt (or marinière, in French), a long-sleeved, striped tee from Brittany traditionally knit in navy and off-white, and favored by personalities as varied as Gabrielle Chanel, Marcel Marceau, and Pablo Picasso.
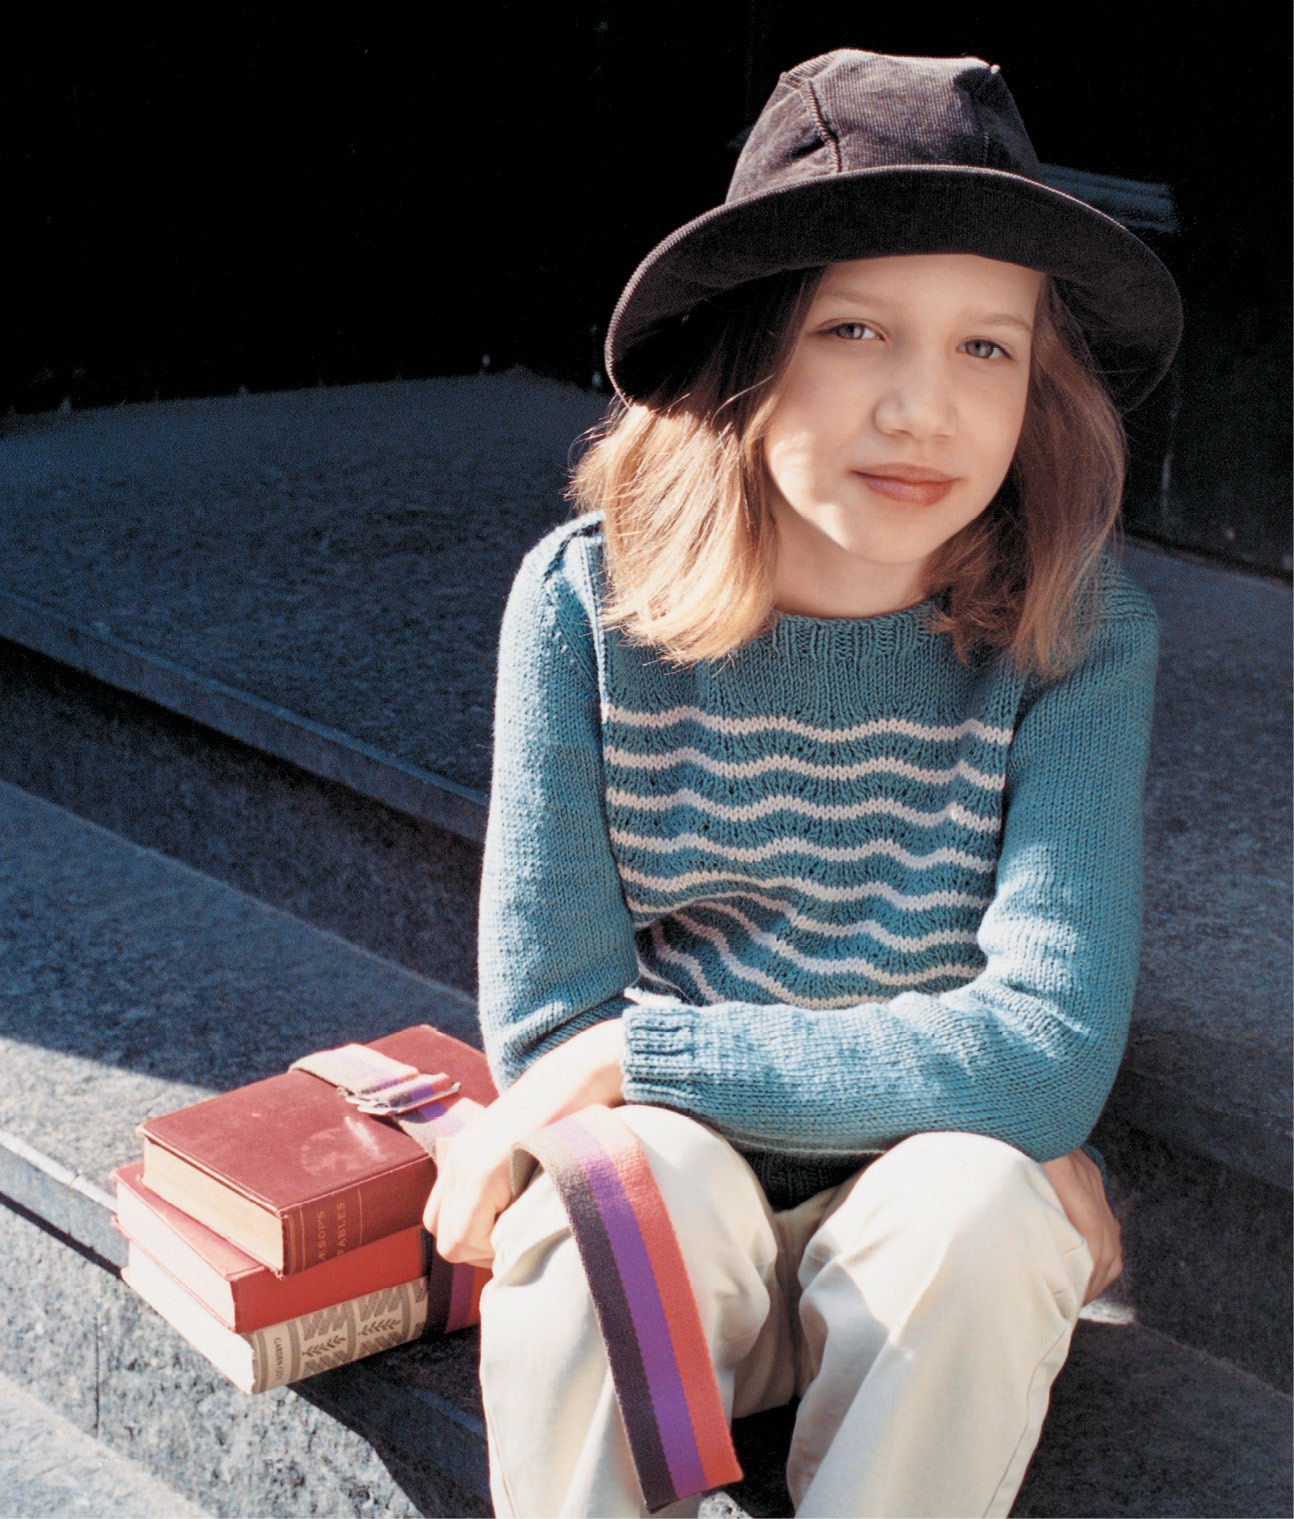
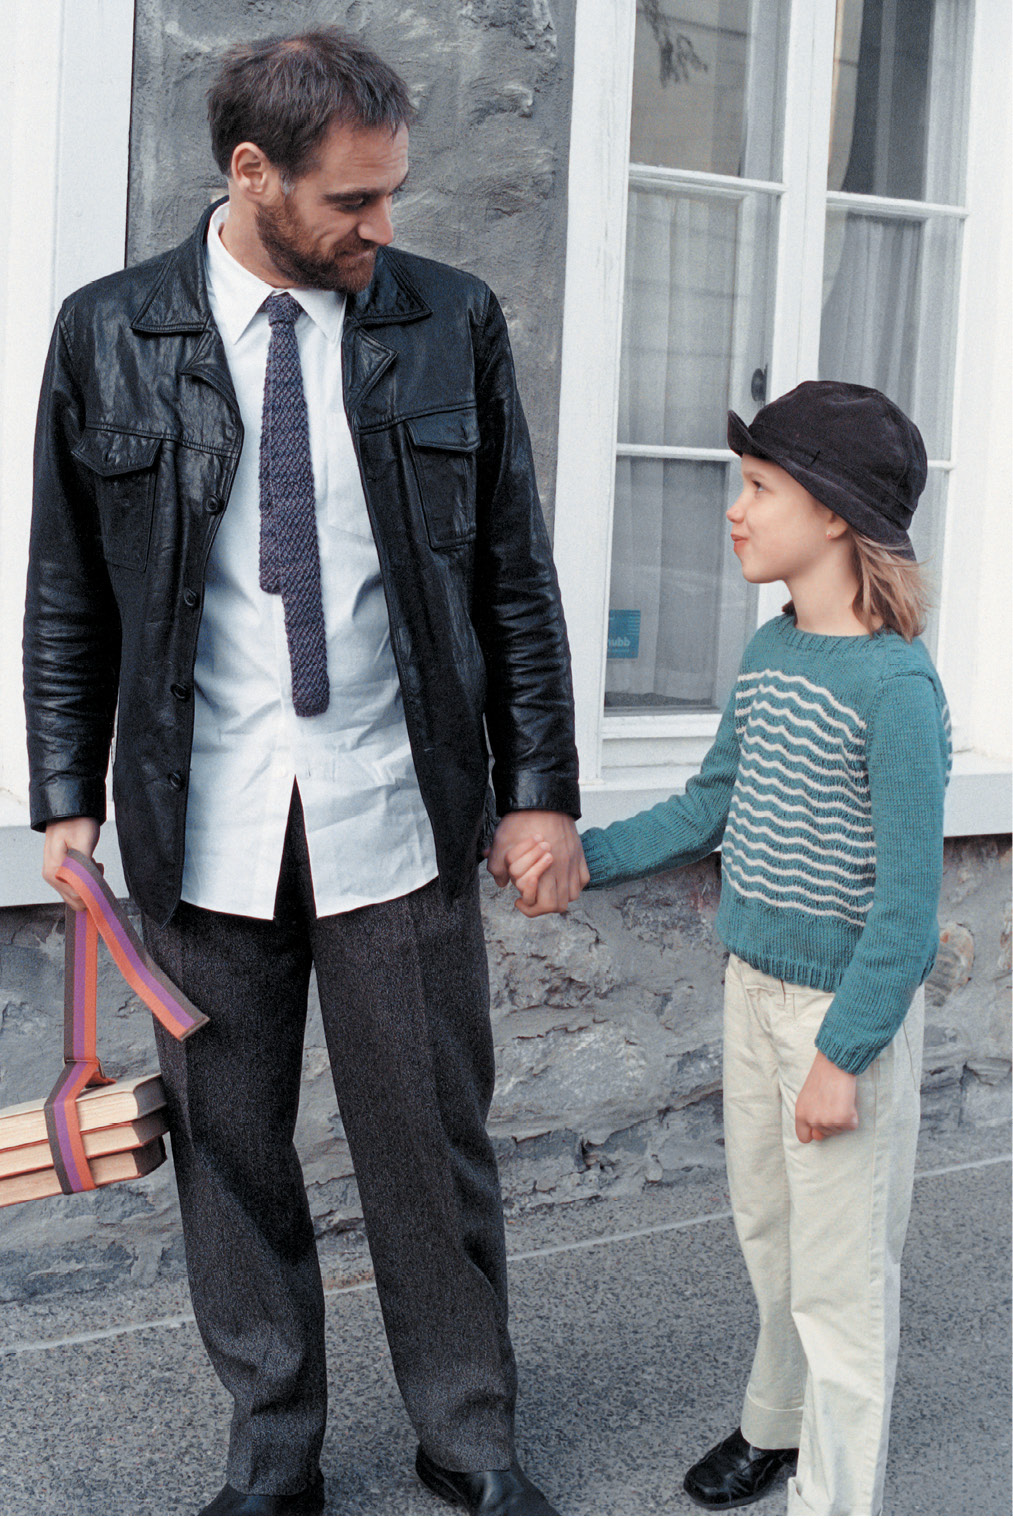
I originally knit a women’s marinière similar to this one in a finer yarn for Interweave Knits magazine. I redid it here for young girls with the same playfully undulating stripes, but in colors closer to those of the traditional sailor shirt. The nautical look is a perennial favorite for children, and they can get in and out of the wide boat neck with ease.
sizes
Children’s 2 (4, 6, 8)
Shown in size 6
finished measurements
Chest: 24 (28, 32, 36)”
yarn
Jo Sharp Soho Summer DK (100% cotton; 110 yd / 50 g): 4 (5, 6, 8) balls #219 sailboat (MC); 2 (2, 2, 3) balls #227 putty (CC)
needles
One pair straight needles size US 3 (3.25 mm)
One pair straight needles size US 2 (3 mm)
Change needle size if necessary to obtain correct gauge.
notions
Yarn needle, stitch markers
gauge
24 sts and 30 rows = 4” (10 cm) in Scalloped Stripe using larger needles
stitch pattern
Scalloped Stripe (multiple of 12 sts; 6-row rep)
Row 1 (RS): With MC, *[k2tog] twice, [yo, k1] 3 times, yo, [ssk] twice, k1; rep from *.
Row 2: Purl, working all yarnovers through back loops.
Rows 3 and 4: With CC, work in St st.
Rows 5 and 6: With MC, work in St st.
Rep Rows 1–6 for Scalloped Stripe.
back
Using smaller needles, MC, and the long tail method, CO 74 (86, 98, 110) sts.
Establish Rib: (WS) K2, *p2, k2; rep from * across. Work even in Rib for 10 rows. Change to larger needles and St st. Work even until piece measures 2½ (2¾, 3, 3½)”, ending with a WS row.
Establish Scalloped Stripe: (RS) K1 (edge st), work Scalloped Stripe patt over center 72 (84, 96, 108) sts, k1 (edge st). Maintaining edge sts in St st, work even in Scalloped Stripe until Back measures 8 (9¾, 11½, 13)” from beg, ending with a WS row.
Shape Armholes: (RS) BO 3 (4, 5, 5) sts at beg of next 2 rows—68 (78, 88, 100) sts. Dec 1 st at each edge on next row, then every other row 2 (2, 3, 5) times, then every 4 rows 0 (2, 3, 4) times as follows: K2, k2tog, work in patt to last 4 sts, ssk, k2—62 (68, 74, 80) sts rem. AT THE SAME TIME, after working Rows 1–6 of Scalloped Stripe 8 (10, 13, 15) times total, work Rows 1 and 2 once more, then change to St st. Work even until armholes measure 4 (4¾, 5½, 6½)”, ending with a RS row.
Begin Back Neck Rib: (WS) P2 (3, 2, 2), k2, *p2, k2; rep from * to last 2 (3, 2, 2) sts, p2 (3, 2, 2). Work 7 rows in Rib as est. Using the sewn method (see Special Techniques, page 136), BO all sts.
front
Work as for Back until armholes measure 1¾ (2½, 2¾, 3¾)”, ending with a WS row.
Shape Left Neck (short rows): (RS) K19 (22, 24, 25), turn; yo, place marker (pm), purl to end.
*Next row (RS): Knit to 2 sts before marker, turn; yo, pm, purl to end. Rep from * 6 (6, 8, 8) more times—5 (8, 6, 7) sts rem.
Next row (RS): Knit all sts, removing markers and hiding gaps by knitting each yo together with the following st.
Shape Right Neck (short rows): (WS) P19 (22, 24, 25), turn; yo, pm, knit to end.
*Next row (WS): Purl to 2 sts before marker, turn; yo, pm, knit to end. Rep from * 6 (6, 8, 8) more times—5 (8, 6, 7) sts rem.
Next row (WS): Purl all sts, removing markers and hiding gaps by working ssp with each yo and the following st. Knit 1 row.
Begin Front Neck Rib: (WS) P2 (3, 2, 3), k2, *p2, k2; rep from * to last 2 (3, 2, 3) sts, p2 (3, 2, 3). Work 7 rows in Rib as est. Using the sewn method, BO all sts.
sleeve
Using smaller needles, MC, and the long tail method, CO 42 (46, 50, 50) sts.
Establish Rib: (RS) K2, *p2, k2; rep from *. Work even in Rib as est for 9 more rows.
Shape Sleeve: (RS) Change to larger needles and beg St st. Inc 1 st at each edge on this row, then every 16 rows 2 (3, 3, 0) times, every 14 rows 0 (0, 2, 0) times, and every 10 rows 0 (0, 0, 9) times as follows: K2, M1-L, knit to last 2 sts, M1-R, k2—48 (54, 62, 70) sts. Work even until Sleeve measures 8 (10½, 13¾, 16)” from beg, ending with a WS row.
Shape Cap: (RS) BO 3 (4, 5, 5) sts at beg of next 2 rows. Dec 1 st at each edge on next row, then every 4 rows 0 (1, 1, 1) time(s), then every other row 10 (9, 10, 13) times as follows: K2, ssk, knit to last 4 sts, k2tog, k2—20 (24, 28, 32) sts rem. BO 3 (4, 4, 4) sts at beg of next 2 rows—14 (16, 20, 24) sts rem. BO all sts.
finishing
Weave in loose ends. Block pieces to measurements. Using yarn needle, baste back shoulders over front shoulders, overlapping them by about 2½”. Sew in sleeves, sewing through both front and back fabric at shoulders. Sew side and sleeve seams, being careful to match stripes at sides. Steam lightly.
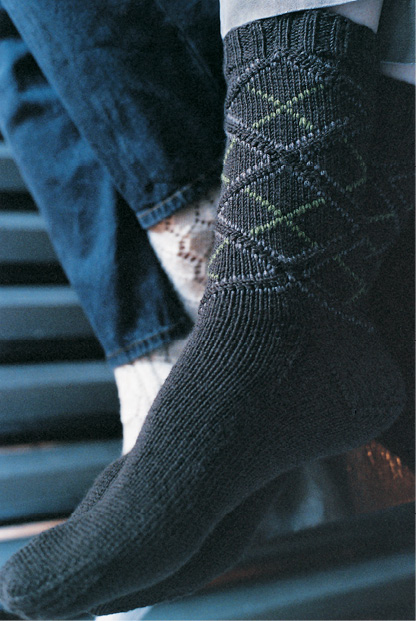
Argyle Socks
Even during the heyday of argyle hand-knitting in the 1930s, many patterns weren’t graphed, and knitters were forced to follow line-by-line instructions. So it comes as no surprise that many chose to avoid allover argyle patterning and contented themselves with knitting socks with several horizontal bands instead. The simplified version is also faster and easier to complete, an advantage to busy knitters then as today.
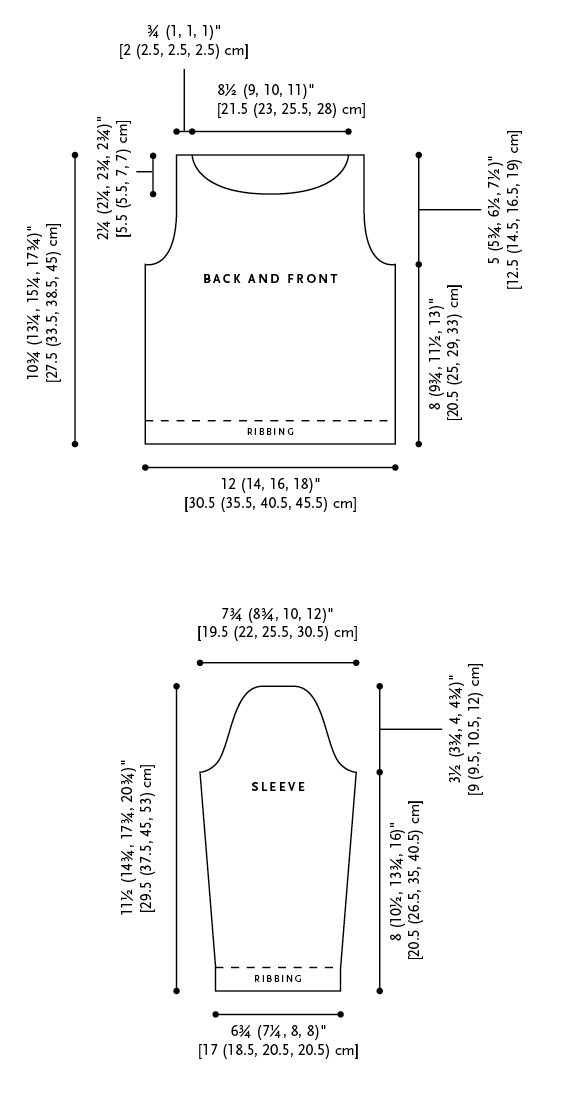
My ambitious first attempt at these socks, inspired by a photograph of Louis Armstrong wearing argyles and golf knickers, was in full intarsia. Though pretty in effect, the numerous color changes compromised the elasticity of the sock leg, which I had trouble getting over my foot. I decided on a more knitter-friendly approach: a monochromatic sock whose argyle pattern is embroidered on afterward.
size
To fit men’s US shoe size 9–11
finished measurements
Foot circumference: 9”
Leg length: 9”
yarn
Louet Gems Opal (100% wool; 225 yds / 100 g): 2 skeins caribou (MC); 1 skein each fern green (A) and linen grey (B)
needles
One set of five double-pointed needles (dpn) size US 2 (2.75 mm)
Change needle size if necessary to obtain correct gauge.
notions
Stitch marker, yarn needle
gauge
26 sts and 40 rows = 4” (10 cm) in Stockinette stitch (St st)
abbreviations
N1, N2, N3, N4: Needles 1, 2, 3, 4 (N1 and N4 are sole, N2 and N3 are instep)
note
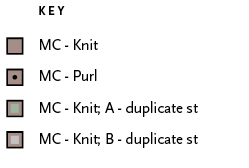
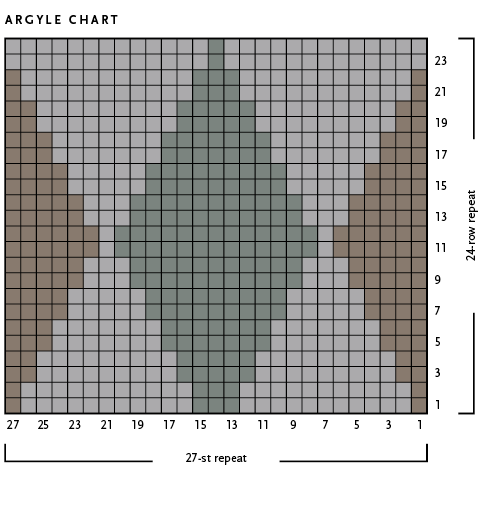
•The sock is worked using MC only. After the sock is finished, the diagonal color pattern is created by working Duplicate Stitch (see Special Techniques, page 136), using A and B, following Chart.
leg
CO 60 sts. Distribute evenly on four needles; place marker (pm) for beg of rnd and join, being careful not to twist sts. Work K2, P1 Rib for 1”.
Beg Chart, working Rnds 1-30 twice, then Rnds 1–16 once more—leg measures approx 8½”.
heel flap
Slip sts from second needle to first needle. Working back and forth on these sts only, knit heel flap as follows:
Row 1 (RS): *Slip 1 wyib, k1; rep from * to end.
Row 2: Slip 1, purl to end.
Rep these 2 rows 14 more times.
turn heel
Row 1 (RS): Slip 1, k15, ssk, k1, turn.
Row 2: Slip 1, p3, p2tog, p1, turn.
Row 3: Slip 1, k4, ssk, k1, turn.
Cont working in this manner, working 1 additional st before the decrease on each row, until 18 sts rem, ending with a WS row.
Next row: Slip 1, k14, ssk, turn.
Next row: Slip 1, p14, p2tog, turn—16 sts rem.
shape gusset
Pick-up rnd: N1: Slip 1, k15 across heel flap, then pick up 15 sts along the side of the heel, then pick up a st from the row below the first instep st to prevent a hole; N2 and N3: k15 on each needle; N4: pick up a st from the row below the first heel st to prevent a hole, then pick up 15 sts along the side of the heel; N1: knit the first 8 sts. Pm for beg of rnd—78 sts arranged 24–15–15–24.
Rnd 1: N1: Knit to last 3 sts, k2tog, k1; N2 and N3: knit; N4: k1, ssk, knit to end.
Rnd 2: Knit around.
Rep [Rnds 1 and 2] 8 more times—60 sts rem (15 sts each needle).
foot
Work even until foot measures 9” from heel, or 2” short of desired finished length.
shape toe
Rnd 1: *N1: Knit to last 3 sts, k2tog, k1; N2: k1, ssk, knit to end; rep from * across N3 and N4—56 sts rem.
Rnd 2: Knit around.
Rep [Rnds 1 and 2] 6 more times—32 sts rem.
Rep [Rnd 1] 5 times—12 sts rem.
Break yarn, leaving an 8” tail.
Slip sts from N4 to N1 and from N2 to N3. Holding N1 and N3 parallel, graft sts using Kitchener st (see Special Techniques, page 136).
finishing
Work diagonal lines using Duplicate Stitch (see Special Techniques, page 136), following Chart. Weave in ends on inside of sock.
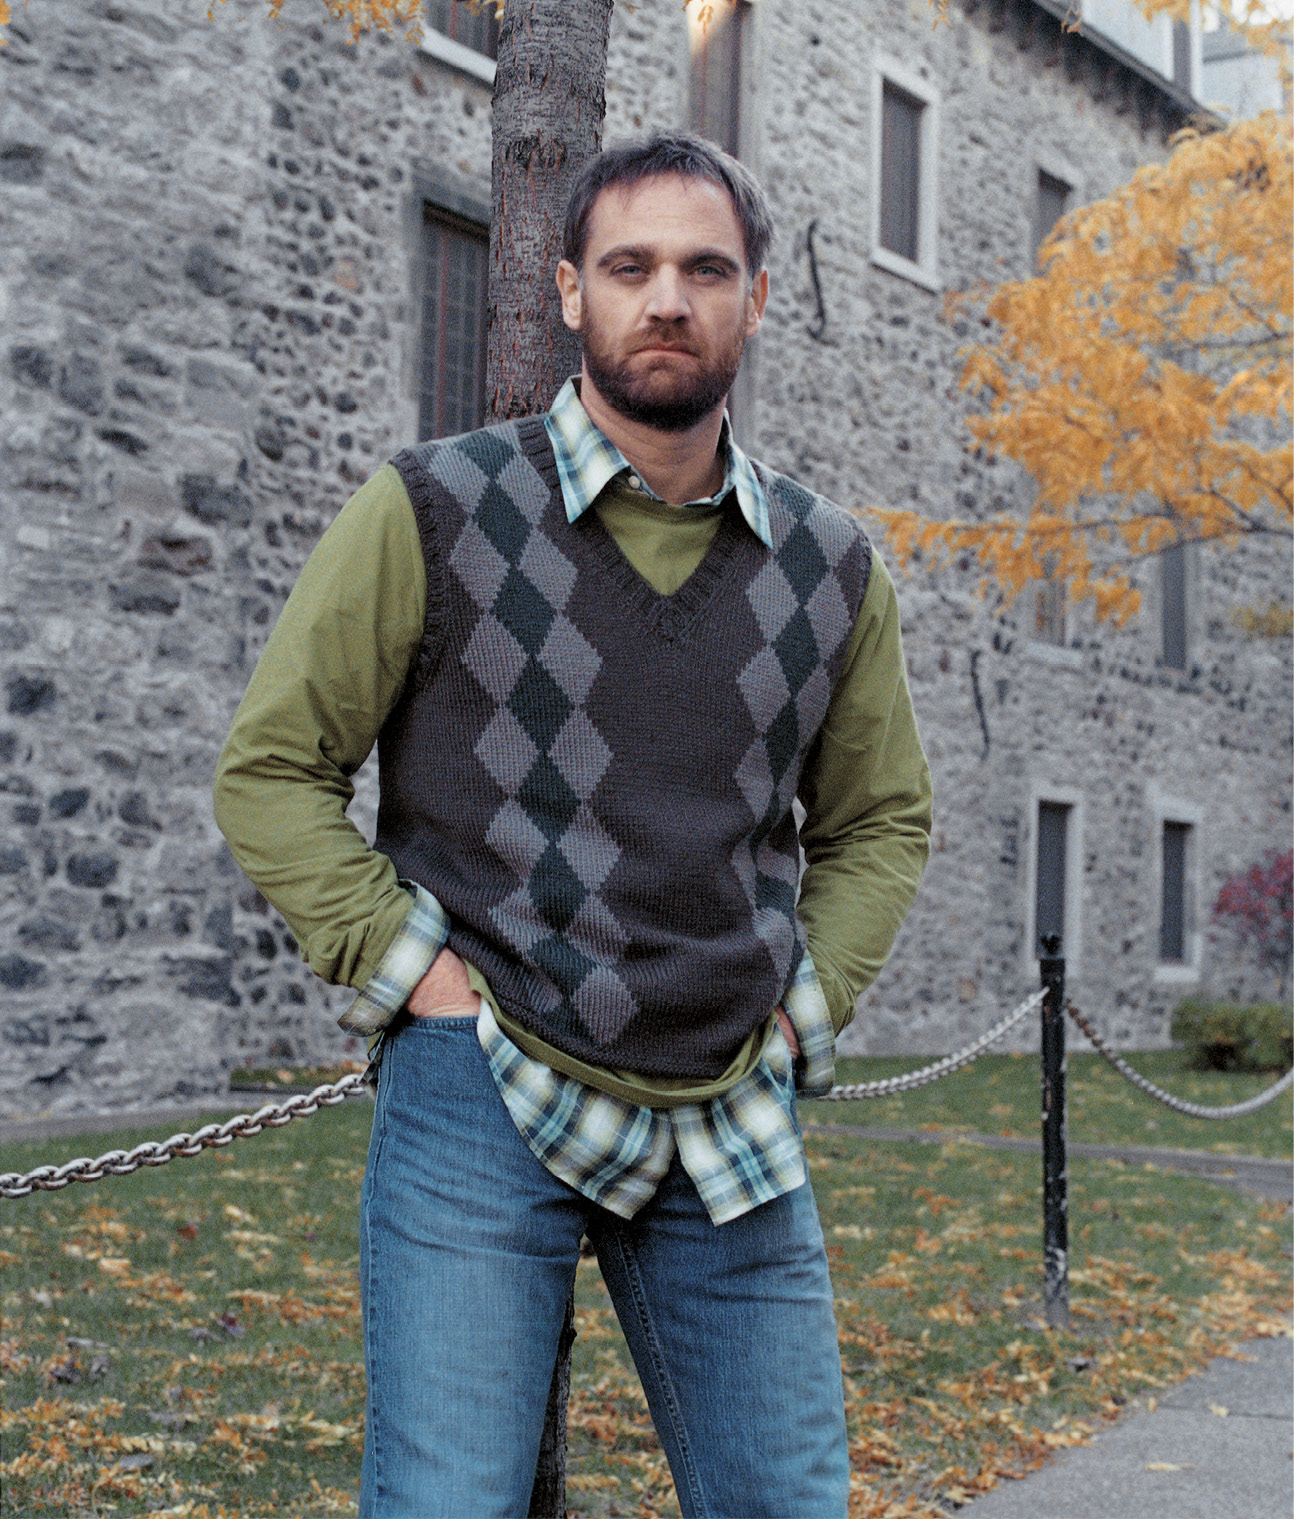
Argyle Vest
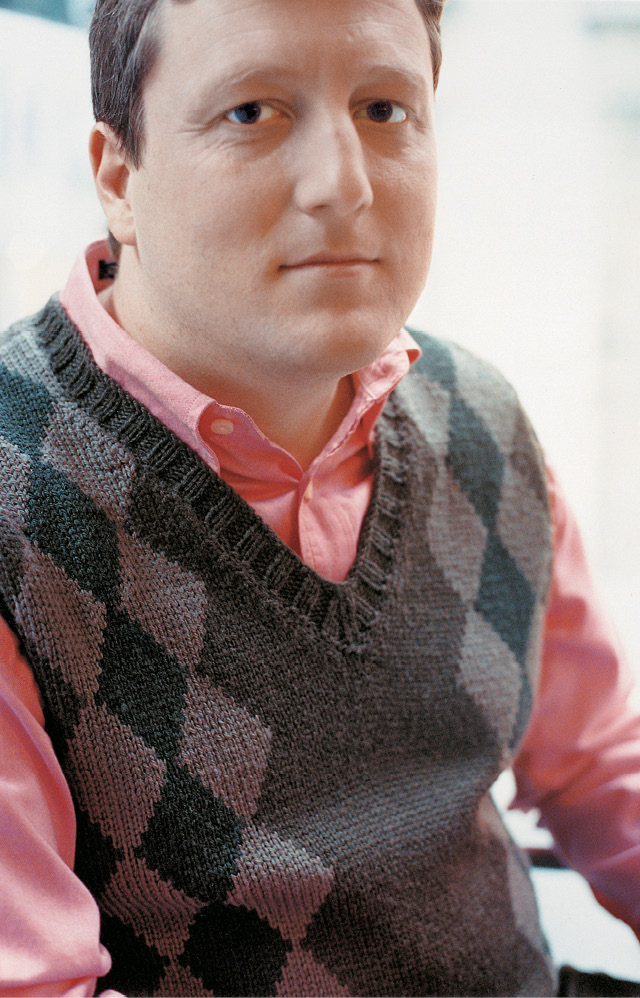
Argyle patterns, thought to have originated from the attempt to knit plaids, are an integral part of British style and have been a standby for well over a hundred years. Never completely out of fashion, they have often been used in an exaggerated manner by British designers such as Bill Gibb, Vivienne Westwood, and Paul Smith. Their send-ups defy convention, as argyle patterns exemplify upper-class tradition for so many of us that simply scaling them up or coloring them in unexpected or jarring hues can signify rebellion. I didn’t aim for rebellion with this piece, but simply doodled arrangements of lozenges until I hit upon a pleasing combination.
sizes
Men’s X-Small (Small, Medium, Large, X-Large, 2X-Large)
Shown in size Large
finished measurements
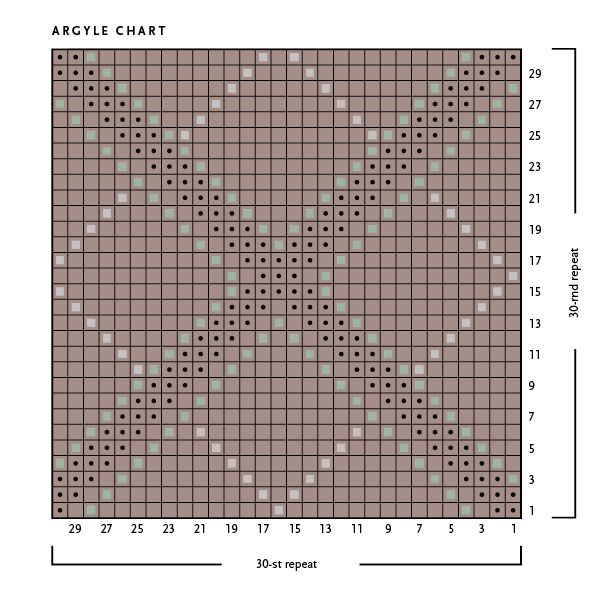
Chest: 34¼ (38, 42, 45¾, 49½, 53¼)”
yarn
Louet Sales Gems Topaz (100% wool; 168 yds / 100 g): 4 (4, 5, 5, 6, 6) skeins #53 caribou (MC); 1 skein each #49 charcoal (A) and #43 pewter (B)
needles
One pair straight needles size US 5 (3.75 mm)
One pair straight needles size US 6 (4 mm)
One each 16” and 24” circular (circ) needles size US 5 (3.75 mm)
Change needle size if necessary to obtain correct gauge.
notions
Stitch markers, bobbins (optional for Intarsia), yarn needle
gauge
21 sts and 28 rows = 4” (10 cm) in Stockinette stitch (St st) using larger needles
back
Hem: Using smaller needles, MC, and long-tail method, CO 92 (102, 112, 122, 132, 142) sts. Beg with a WS row, work 6 rows in St st. Knit 1 WS row (turning row). Change to larger needles and work even in St st until Back measures 13¼ (13½, 13¾, 14, 14¼, 14½)”, ending with a WS row.
Shape Armholes: (RS) BO 5 (6, 7, 8, 9, 10) sts at beg of next 2 rows—82 (90, 98, 106, 114, 122) sts rem. Dec 1 st at armhole edges on next row, every other row 2 (5, 6, 10, 11, 13) more times, then every 4 rows 3 (2, 2, 0, 0, 0) times as follows: K2, ssk, knit to last 4 sts, k2tog, k2—70 (74, 80, 84, 90, 94) sts rem. Work even until armholes measure 10 (10, 10¼, 10½, 10½, 10¾)”, ending with a WS row.
Shape Back Neck and Shoulders: (RS) Mark center 22 (24, 26, 28, 28, 30) sts for Back Neck placement. Knit to first marker, join a second ball of yarn and BO center 22 (24, 26, 28, 28, 30) sts, knit to end—24 (25, 27, 28, 31, 32) sts each side. Working each side at the same time, dec 1 st at each neck edge every RS row 4 (5, 5, 5, 6, 6) times as follows: Knit to last 4 sts, ssk, k2; k2 k2tog, knit to end. AT THE SAME TIME, at each armhole edge, BO 3 sts 2 (2, 4, 3, 5, 4) times, then BO 4 sts 2 (2, 1, 2, 1, 2) time(s)—6 sts rem at each side. BO all rem sts.
front
Hem: Using smaller needles, MC, and long-tail method, CO 92 (102, 112, 122, 132, 142) sts. Beg with a WS row, work 6 rows in St st. Knit 1 WS row (turning row). Change to larger needles.
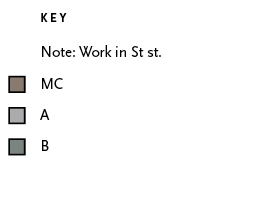
Establish Intarsia Pattern: (RS) K13 (16, 18, 21, 23, 26), place marker (pm), work Row 1 of 27-st panel (see Chart), pm, k12 (16, 22, 26, 32, 36), pm, work 27-st panel, pm, knit to end. Slipping markers on every row, work even in patt as est until Front measures 13¼ (13½, 13¾, 14, 14¼, 14½)”, ending with a WS row.
Shape Armholes and V-neck: (RS) Shape armholes as for Back. AT THE SAME TIME, when Front measures 16¾ (16¼, 16¼, 16½, 16¼, 16½)”, pm between center sts. Working both sides at the same time and joining a second ball of yarn on first row at center, shape V-neck as follows:
Rows 1 and 3 (RS): Knit to 4 sts before center, ssk, k2; k2, k2tog, knit to end.
Rows 2, 4, 5, and 6: Work even in patt as est.
Rep [Rows 1–6] 6 (7, 8, 8, 9, 9) more times, then work [Rows 1 and 2] 1 (1, 0, 1, 0, 1) time(s)—20 (20, 22, 23, 25, 26) sts rem each side.
Work even until armholes measure same as for Back to shoulders, ending with a WS row.
Shape Shoulders: (RS) At each armhole edge, BO 3 sts 2 (2, 4, 3, 5, 4) times, then BO 4 sts 2 (2, 1, 2, 1, 2) time(s)—6 sts rem each side. BO all rem sts.
finishing
Using a yarn needle, sew shoulder seams. Sew side seams. Turn up hem facing along turning row, and sew to WS.
Armbands: (RS) Using shorter circ needle and MC, beg at side seam, pick up and knit 108 (108, 112, 112, 116, 116) sts evenly spaced around armhole. Pm for beg of rnd and join. Purl 1 rnd. Work K2, P2 Rib for ¾”. BO in rib.
Neckband: (RS) Using longer circ needle and MC, beg at right shoulder seam, pick up and knit 36 (40, 42, 44, 46, 48) sts across Back neck, 46 (46, 47, 48, 49, 50) sts along left Front neck, pm, 46 (46, 47, 48, 49, 50) sts along right Front neck—128 (132, 136, 140, 144, 148) sts total. Pm for beg of rnd and join. Purl 1 rnd.
Establish K2, P2 Rib: P1 (1, 0, 0, 2, 1), k2 (2, 2, 1, 2, 2), [p2, k2] to 3 sts before Front neck marker, p2, k1, sm, k1, p2, cont in K2, P2 Rib to end of rnd.
Dec 1 st on either side of Front neck marker on next rnd, then every other rnd 3 more times as follows: Work in rib as est to 2 sts before marker, k2tog, sm, ssk, work in rib as est to end of rnd—120 (124, 128, 132, 136, 140) sts. BO in rib.
Weave in loose ends. Block to finished measurements.

Mohair Portrait Scarf
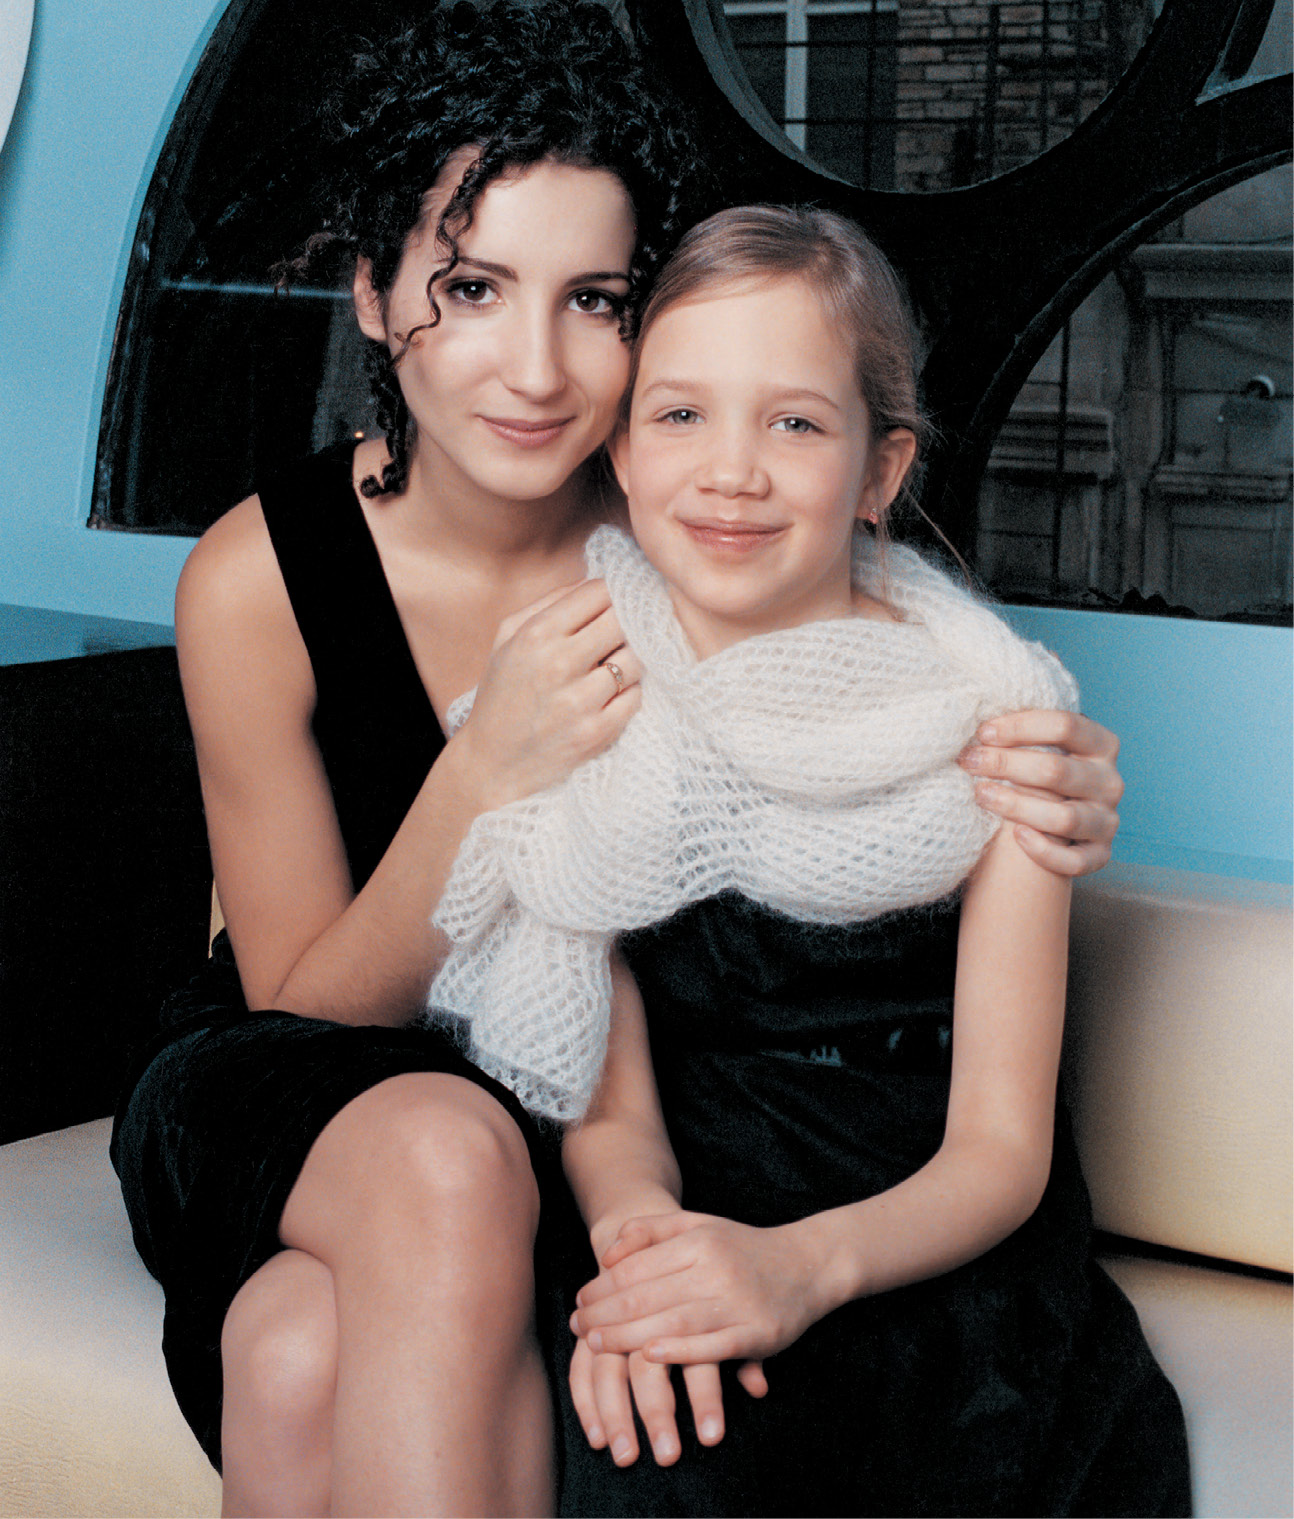
Ruffs, starched neckpieces made of lace or fabric gathered into deep, regular folds, were worn by European men and women in the 16th and 17th centuries. The most extreme examples, known as cartwheel ruffs, stuck out more than a foot and required a metal framework to support them. Many countries passed sumptuary laws to limit or forbid their use, and ruffs eventually fell out of favor, although they are still worn by English choir boys and those who hold certain positions in British law. Gwyneth Paltrow wore one in the 1998 movie Shakespeare in Love, as did Judi Dench playing Queen Elizabeth I. In fact, Queen Elizabeth’s portrait in a bone ruff by Nicholas Hilliard is one of the most famous paintings of the English Renaissance.
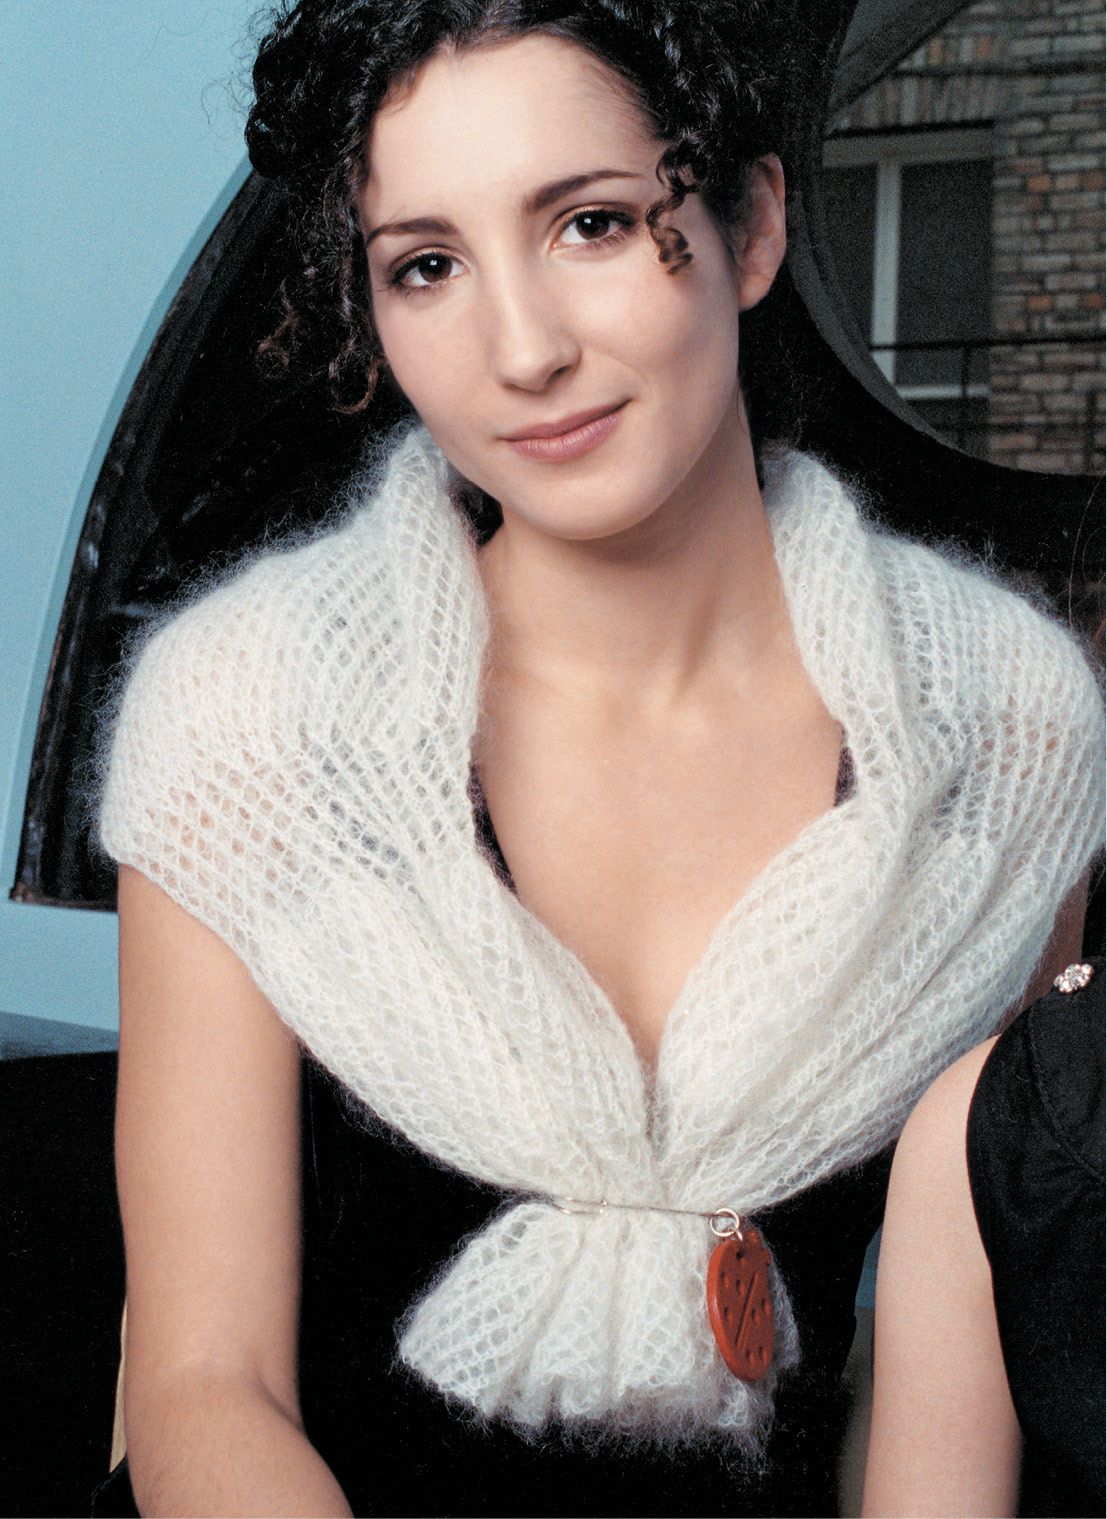
This very different take on the ruff, knit in a soft kid mohair, is as nice to play with as it is to wear. Because of the versatile tube design, it can also be worn as a stole, neck gaiter, or scarf. The increases and decreases within it create pleats when the scarf is collapsed vertically, and gentle undulations when it is laid flat.
finished measurements
Approximately 10” wide by 52” long
yarn
Needful Yarns Mohair Royal (80% mohair / 20% nylon; 235 yds / 25 g): 2 balls #1650 off-white
needles
One set of five double-pointed needles (dpn) size US 6 (4 mm)
Change needle size if necessary to obtain correct gauge.
notions
Yarn needle
gauge
22 sts and 28 rows = 4” (10 cm) in Right Diagonal Lace pattern after blocking; exact gauge is not essential.
note
•To work the Diagonal Lace patterns correctly, you must change the position of the beg of rnd between patterns as follows:
Move marker left: Remove marker, K1, replace marker.
Move marker right: Remove marker and slip last st to LH needle; replace marker and slip st back to RH needle.
CO 120 sts. Place marker (pm) for beg of rnd and join, being careful not to twist sts.
*right diagonal lace
Rnd 1: Knit.
Rnd 2: [Yo, k2tog] around.
Work [Rnds 1–2] 8 times total.
Dec rnd: Move marker left. [K3tog, k1] around—60 sts.
left diagonal lace
Rnd 1: [Ssk, yo] around.
Rnd 2: Knit.
Work [Rnds 1–2] 7 times, then rep Rnd 1 once more.
Inc rnd: [(K1, yo, k1) in next st, k1] around—120 sts. Move marker right.
right diagonal lace
Set-up rnd: [Yo, k2tog, yo, ssk] around.
Work [Rnds 1–2] of Right Diagonal Lace patt 8 times.
Repeat from * 5 more times.
Loosely BO all sts.
finishing
Weave in ends. Wet-block to open up lace patt.
Military Jacket
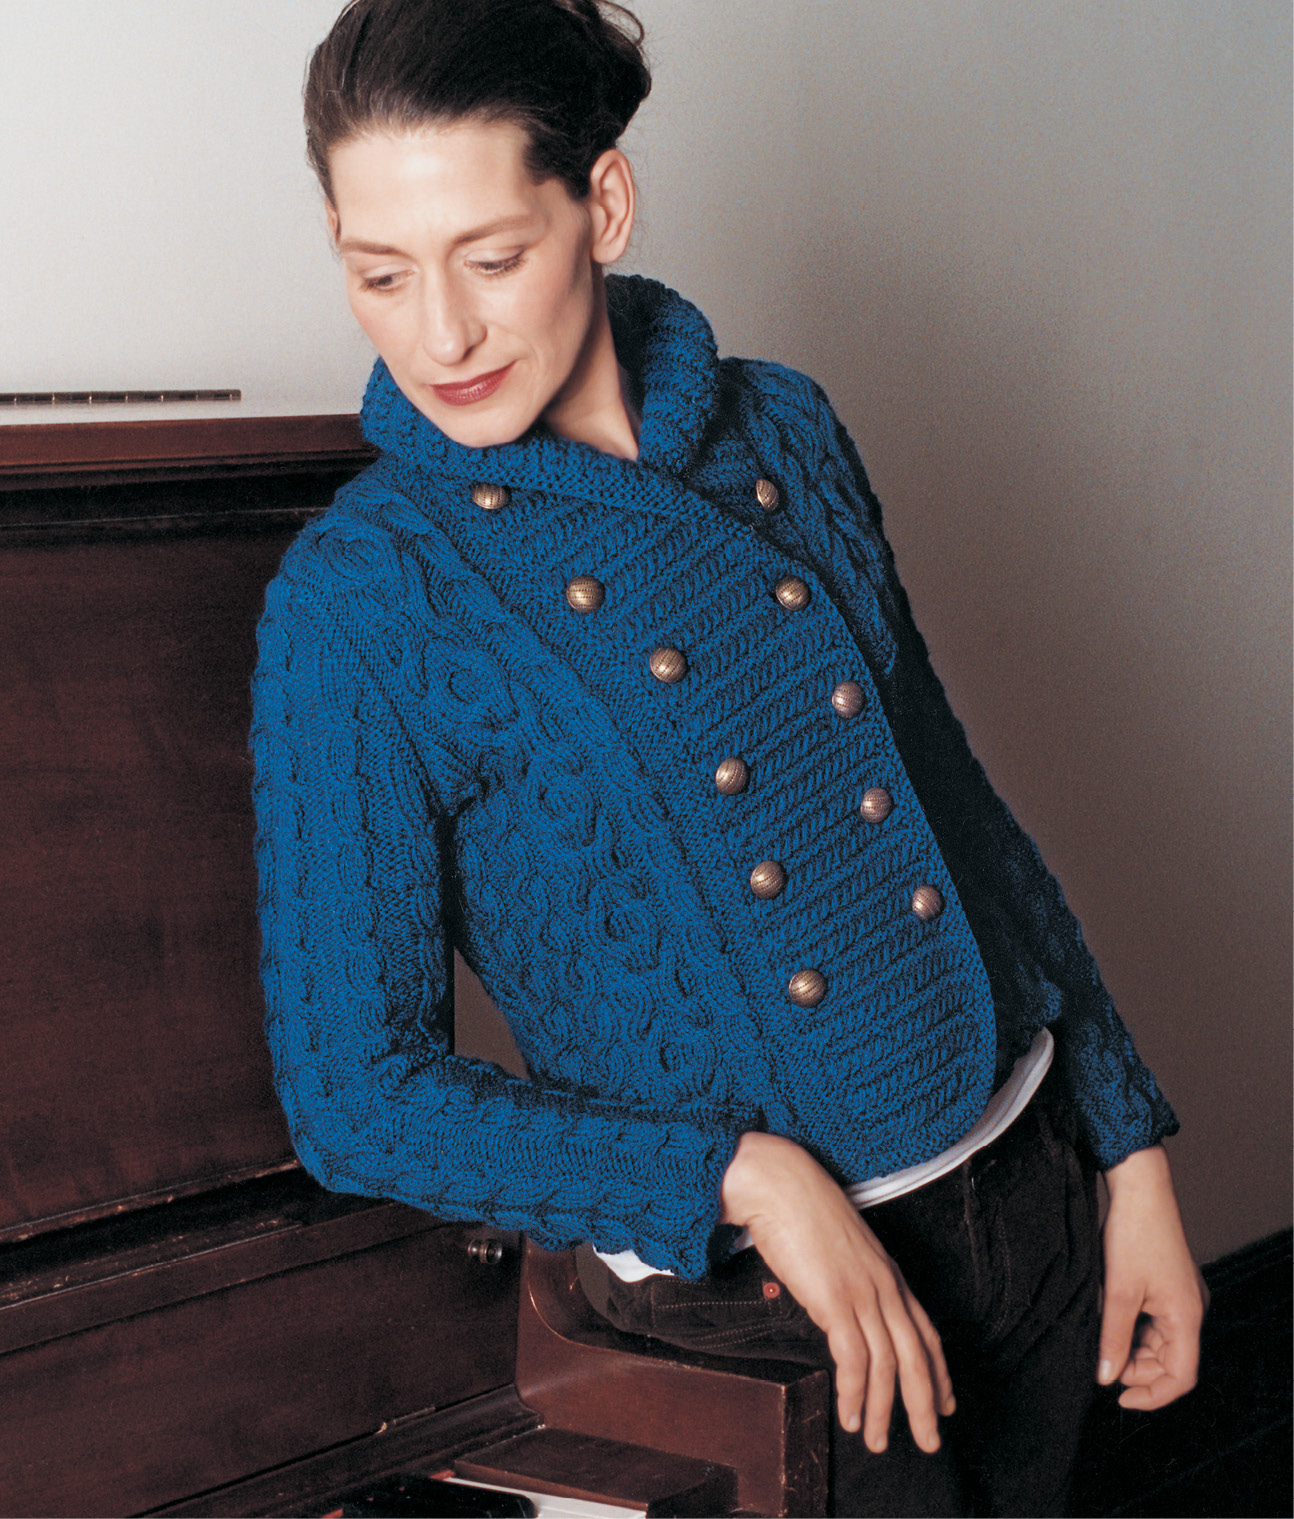
As I pondered what to include in this book, I turned for inspiration to reproductions of vintage texts such as Weldon’s Practical Needlework magazine from the late 1800s and Butterick’s 1892 Art of Knitting. Though some of the patterns illustrated in their pages are foreign to modern sensibilities, others are every bit as captivating as the ones found in contemporary magazines.
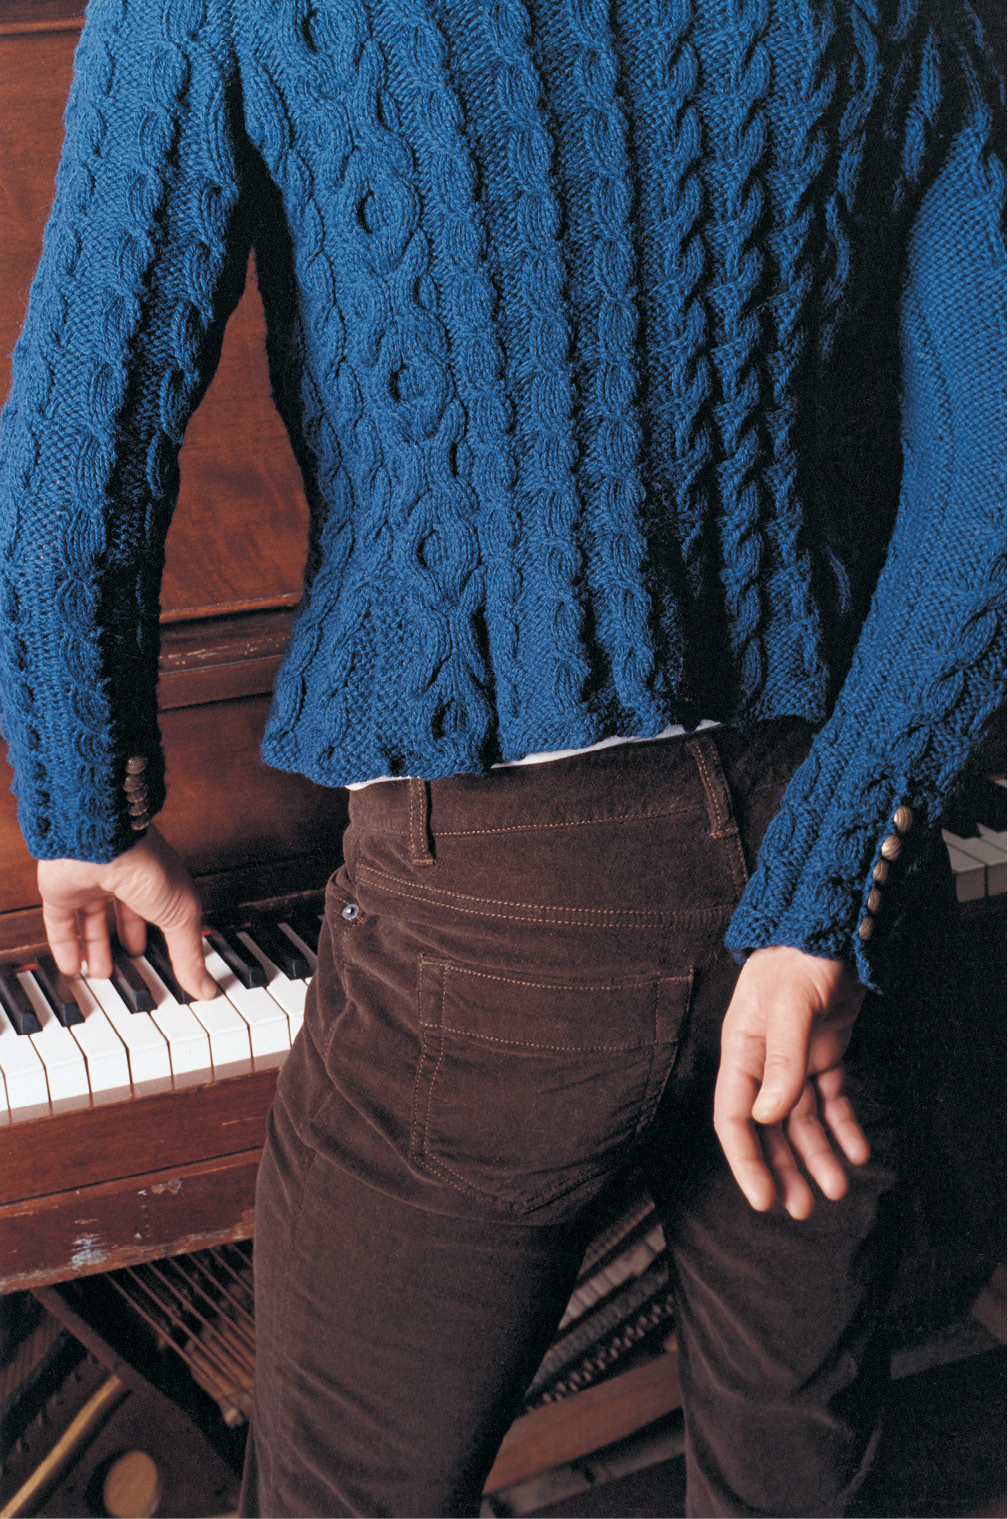
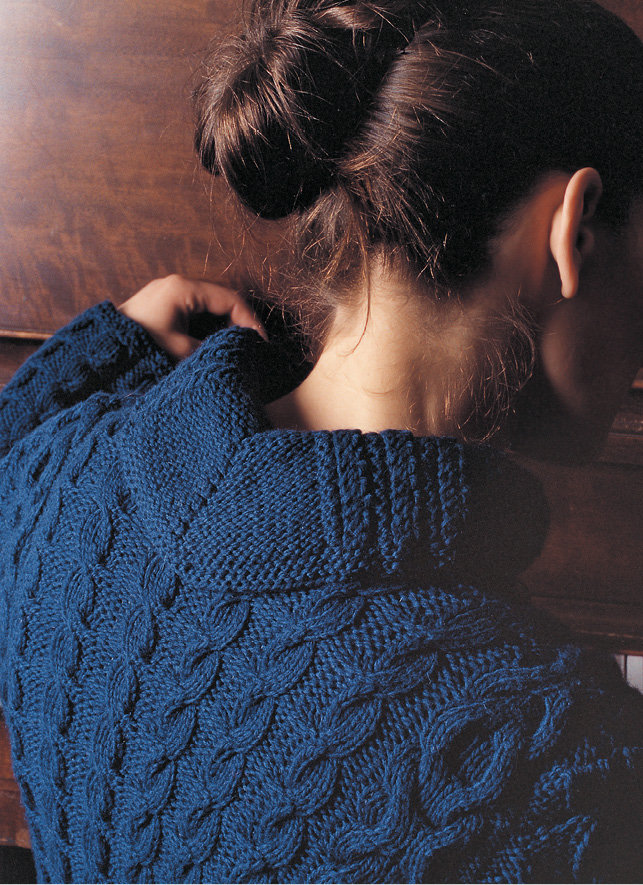
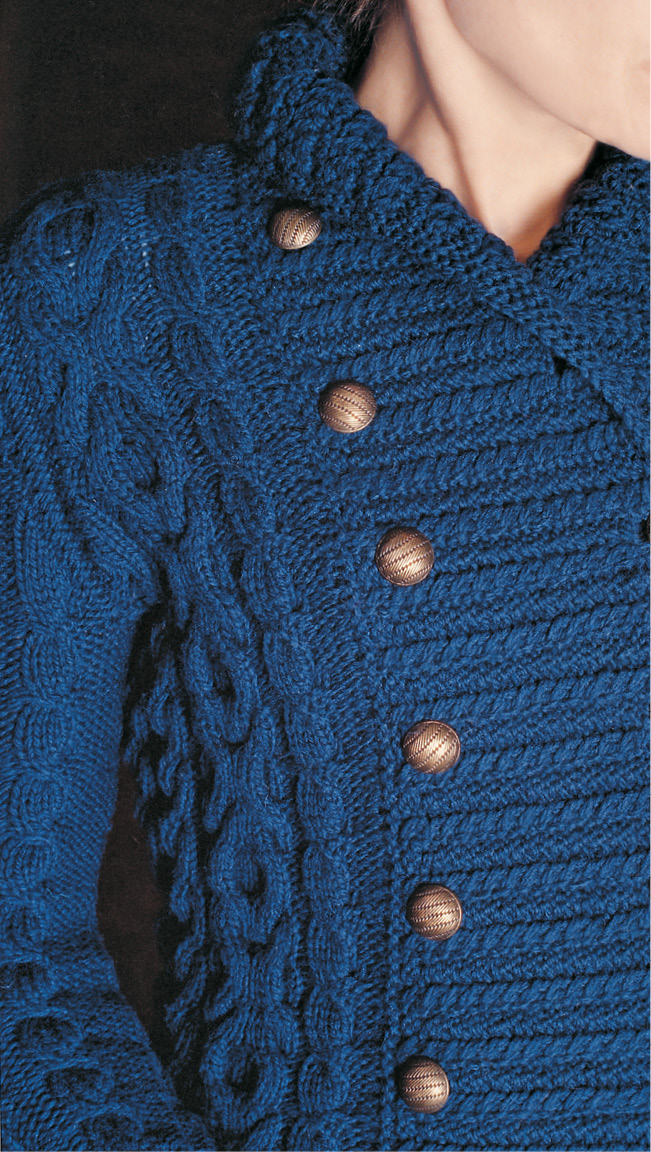
The little jackets I discovered in these books—with very simple shapes and basic cable arrangements—inspired this cardigan, which still looks current today. With “uniform chic” in mind, I added masculine touches such as back vents and buttoned cuffs, as well as a dramatic double-breasted front panel incorporating a collar. Although bold, the cables are satisfyingly simple; to complement them, I chose the biggest, boldest shank buttons I could find.
sizes
Small (Medium, Large, X-Large)
Shown in size Small
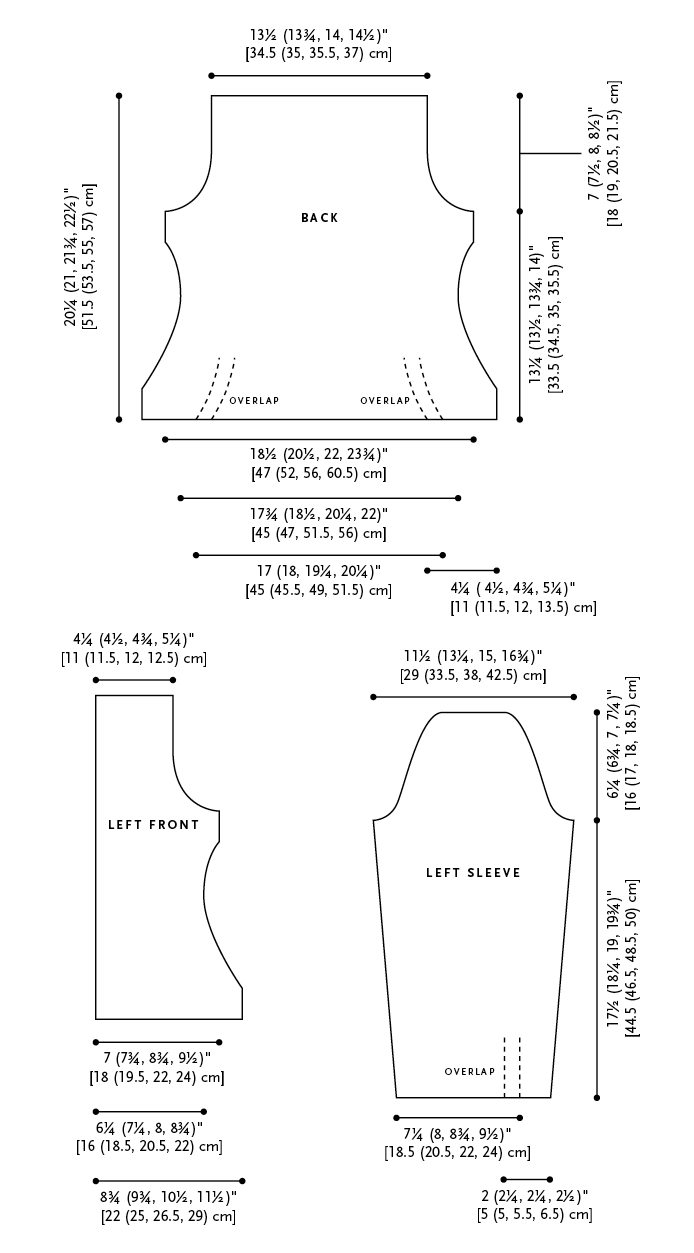
finished measurements
Chest: 37½ (41¾, 46¼, 50¾)”
yarn
Cascade Eco Wool (100% wool; 478 yds / 250 g): 3 (4, 4, 4) skeins #0515 navy
needles
One 32” circular (circ) needle size US 8 (5 mm)
One double-pointed needle (dpn) size US 8 (5 mm) or smaller
Change needle size if necessary to obtain correct gauge.
notions
Stitch markers, stitch holders, yarn needle, cable needle (cn), twelve ⅞” buttons, and ten ⅝” buttons
gauges
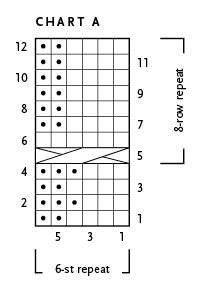
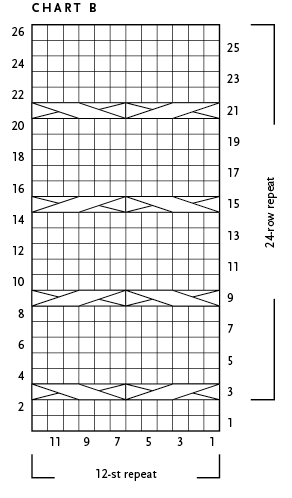
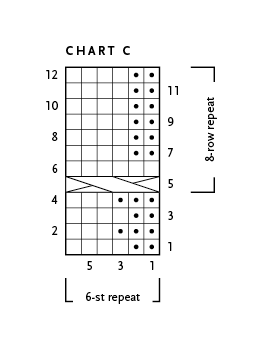
23 sts and 24 rows = 4” (10 cm) in Cable pattern (Chart A or C)
18 sts and 24 rows = 4” (10 cm) in Stockinette stitch (St st)
abbreviations
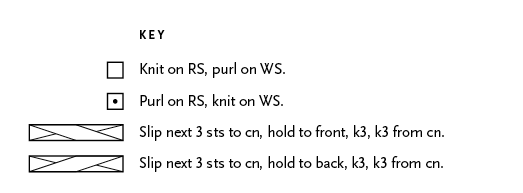
Dec1-back: Slip 2 sts to cn and hold in back, k1, k2tog from cn.
Dec1-front: Slip 1 st to cn and hold in front, k1, slip st on cn back to LH needle and ssp with next st.
Inc1-back: Slip 1 st to cn and hold in back, k1, yo, k1 from cn.
Inc1-front: Slip 1 st to cn and hold in front, k1, yo, k1 from cn.
C3B (Cable 3 Back): Slip 2 sts to cn and hold in back, k1, k2 from cn.
C3F (Cable 3 Front): Slip 1 st to cn and hold in front, k2, k1 from cn.
One-row buttonhole: Slip 1 st to RH needle and bring yarn to front of work between needles; [slip to LH needle and pass 2nd st on RH needle over it] 3 times. Pass yarn over RH needle from front to back and pass first st on RH needle over it. Using the backward loop method (see Special Techniques, page136), CO 4 sts. Slip last CO st to LH needle and k2tog-tbl.
notes
•Sleeves and Back are worked in multiple pieces (2 and 3, respectively) to form vents, and are then joined into single pieces.
•Work all edge sts in St st.
•Slip all markers as you come to them.
left back vent
Peplum: CO 25 (27, 29, 31) sts. Knit 3 rows.
Row 1 (RS): K4, [work Row 1 of Chart A, pm, p4 (5, 6, 7)] twice, end k1 (edge st).
Row 2: P1 (edge st), work sts as they appear to last 4 sts, k4.
Maintaining edge st and 4-st Garter edging, work even until piece measures 2¼”, ending with a WS row.
Shape Waist: (RS) Dec 2 sts on next row, then every 4 rows twice more as follows: [Work in patt to marker, sm, p2tog] twice, work in patt to end—19 (21, 23, 25) sts rem. Work 3 rows, removing markers. Break yarn and set aside, leaving sts on needle.
center back panel
Peplum: CO 98 (104, 110, 116) sts. Knit 3 rows.
Row 1 (RS): K4, work Row 1 of Chart B, [p4 (5, 6, 7), pm, work Row 1 of Chart A] 3 times, pm, p6, pm, [work Row 1 of Chart C, p4 (5, 6, 7), pm] 3 times, work Row 1 of Chart B, end k4.
Row 2: K4, work sts as they appear to last 4 sts, k4. Maintaining 4-st Garter edgings, work even until piece measures 2¼”, ending with a WS row.
Shape Waist:
Dec row 1 (RS): Maintaining patt as est, [work to 2 sts before marker, p2tog] 3 times; work to next (4th) marker, [p1, p2tog] twice, sm; [work to 2 sts before marker, p2tog] 3 times; work in patt to end—90 (96, 102, 108) sts rem. Work 3 rows even.
Dec row 2 (RS): Maintaining patt as est, [work to 2 sts before marker, p2tog] 3 times; work to next (4th) marker, [p2tog] twice, sm; [work to 2 sts before marker, p2tog] 3 times; work in patt to end—82 (88, 94, 100) sts rem. Work 3 rows even.
Dec row 3 (RS): Maintaining patt as est, [work to 2 sts before marker, p2tog] 3 times; knit to next (4th) marker, p2tog; [work to 2 sts before marker, p2tog] 3 times; work in patt to end—75 (81, 87, 93) sts rem. Work 3 rows even, removing all markers. Break yarn and set aside, leaving sts on needle.
right back vent
Peplum: CO 25 (27, 29, 31) sts. Knit 3 rows.
Row 1 (RS): K1 (edge st), [p4 (5, 6, 7), pm, work Row 1 of Chart C] twice, end k4.
Row 2: K4, work sts as they appear to last st, p1 (edge st).
Maintaining edge st and 4-st Garter edging, work even until piece measures 2¼”, ending with a WS row.
Shape Waist: (RS) Dec 2 sts on next row, then every 4 rows twice more as follows: K1, [purl to 2 sts before marker, p2tog, sm, work Chart C] twice, end k4—19 (21, 23, 25) sts rem. Work 3 rows even, removing markers. Do not break yarn.
upper back
Join Pieces: (RS) Using yarn attached to Right Back, [work to marker, rm] twice, work to last 4 sts, pm, place next 4 sts on dpn and hold parallel to and behind Center Back panel; [k2tog] 4 times (sts from Right Back and Center Back); [work to marker, rm] 7 times, work to last 4 sts, pm, then put last 4 sts on dpn, parallel to and in front of Left Back panel; [k2tog] 4 times (sts from Center Back and Left Back), work in patt to end, removing rem markers—105 (115, 125, 135) sts.
Continue to Shape Waist: (WS) *Cont in patt as est, work to 4 sts before marker, [k2tog] twice; rep from * once more, work to end. Work 1 row even—101 (111, 121, 131) sts.
Next row (RS): *Work to marker, k2tog; rep from * once more, work to end—99 (109, 119, 129) sts. Work even until Back measures 7½ (7¾, 8¼, 8½)”, ending with a WS row.
Shape Upper Body: (RS) K1, p1; [Chart A, p1, M1, p0 (1, 2, 3)] twice; Chart B; [p0 (1, 2, 3), M1, p1, Chart C] 3 times; p1; [Chart A, p1, M1, p0 (1, 2, 3)] 3 times; Chart B; [p0 (1, 2, 3), M1, p1, Chart C] twice, p1, k1—109 (119, 129, 139) sts. Work even until Back measures 13¼ (13½, 13¾, 14)”, ending with a WS row.
Shape Armholes: (RS) BO 4 (5, 6, 7) sts at beg of next 2 rows, and 3 (4, 5, 6) sts at beg of following 2 rows—95 (101, 107, 113) sts rem. Dec 1 st each edge every RS row 8 times as follows: K1, p1, p2tog, work in patt as est to last 4 sts, ssp, p1, k1—79 (85, 91, 97) sts rem.
Next row: (RS) K1, p2, Chart B; [p2tog] 0 (1, 2, 2) time(s); p2 (1, 0, 1), Chart A; [p2tog] 0 (1, 1, 2) time(s); p2 (1, 2, 1), Chart A; [p2tog] 0 (0, 1, 2) time(s); p2 (3, 2, 1), Chart A, p1, Chart C; [p2tog] 0 (0, 1, 2) time(s); p2 (3, 2, 1), Chart C; [p2tog] 0 (1, 1, 2) time(s); p2 (1, 2, 1), Chart C; [p2tog] 0 (1, 2, 2) time(s); p2 (1, 0, 1), Chart B, p2, k1—79 (81, 83, 85) sts rem.
[Continue for All Sizes]: Work even until armholes measure 7 (7½, 8, 8½)”. Place rem sts on holder.
right front
Peplum: CO 52 (57, 62, 67) sts. Knit 3 rows.
Next row (RS): K1 (edge st), p4 (5, 6, 7), pm, work Row 1 of Chart C, p4 (5, 6, 7), pm, work Row 1 of Chart B, [p4 (5, 6, 7), pm, work Row 1 of Chart A] twice, end p4 (5, 6, 7), k1 (edge st).
Maintaining edge sts in St st, work even until piece measures 2¼”.
Shape Waist: (RS) Dec 5 sts on next row, then every 4 rows twice more as follows: K1, purl to 2 sts before marker, p2tog; Chart C; purl to 2 sts before next marker, p2tog; Chart B; [purl to 2 sts before marker, p2tog, Chart A] twice; purl to last 3 sts, end p2tog, k1—37 (42, 47, 52) sts rem. Work even until Front measures 7½ (7¾, 8¼, 8½)”, ending with a WS row.
Shape Upper Body: (RS) K1, p1, M1, p0 (1, 2, 3), Chart C; p1, M1, p0 (1, 2, 3); Chart B; [p0 (1, 2, 3), M1, p1, Chart A] twice; p1, M1, p0 (1, 2, 3), k1—42 (47, 52, 57) sts. Work even until Front measures 13¼ (13½, 13¾, 14)”, ending with a RS row.
Shape Armhole: (WS) BO 4 (5, 6, 7) sts at beg of row, and 3 (4, 5, 6) sts at beg of following WS row—35 (38, 41, 44) sts rem. Dec 1 st at armhole edge on next 8 RS rows as follows: Work in patt to last 4 sts, ssp, p1, k1—27 (30, 33, 36) sts rem.
Next row:
Narrow Shoulders: (RS) K1; [p2tog] 0 (1, 1, 2) time(s); p2 (1, 2, 1), Chart C; [p2tog] 0 (1, 2, 2) time(s); p2 (1, 0, 1), Chart B, p3 (4, 5, 6), k1—27 (28, 30, 32) sts.
[Continue for All Sizes]: Work even until armhole measures 7 (7½, 8, 8½)”. Place rem sts on holder.
left front
Peplum: CO 52 (57, 62, 67) sts. Knit 3 rows.
Next row (RS): K1 (edge st), [p4 (5, 6, 7), pm, work Row 1 of Chart C] twice, p4 (5, 6, 7), pm, work Row 1 of Chart B, p4 (5, 6, 7), pm, work Row 1 of Chart A, end p4 (5, 6, 7), k1 (edge st).
Maintaining edge sts in St st, cont Charts and work other sts as they appear until piece measures 2¼”.
Shape Waist: (RS) Dec 5 sts on next row, then every 4 rows twice more as follows: K1, purl to 2 sts before marker, p2tog; [Chart C, purl to 2 sts before marker, p2tog] twice; Chart B; purl to 2 sts before next marker, p2tog; Chart A; purl to last 3 sts, end p2tog, k1—37 (42, 47, 52) sts rem. Work even until Front measures 7½ (7¾, 8¼, 8½)”, ending with a WS row.
Shape Upper Body: (RS) K1; [p1, M1, p0 (1, 2, 3), Chart C] twice; p1, M1, p0 (1, 2, 3); Chart B; p0 (1, 2, 3), M1, p1; Chart A; p1, M1, p0 (1, 2, 3), k1—42 (47, 52, 57) sts. Work even until Front measures 13¼ (13½, 13¾, 14)”, ending with a WS row.
Shape Armholes: (RS) BO 4 (5, 6, 7) sts at beg of row, and 3 (4, 5, 6) sts at beg of following RS row—35 (38, 41, 44) sts rem. Dec 1 st at armhole edge every RS row 8 times as follows: K1, p1, p2tog, work in patt to end—27 (30, 33, 36) sts rem.
Next row:
Narrow shoulders: (RS) K1, p2, Chart B; [p2tog] 0 (1, 2, 2) time(s); p2 (1, 0, 1), Chart A, p2 (1, 2, 1); [p2tog] 0 (1, 1, 2) time(s); k1—27 (28, 30, 32) sts.
[Continue for All Sizes]: Work even until armhole measures 7 (7½, 8, 8½)”. Place rem sts on holder.
right sleeve
Left Cuff Vent: CO 11 (12, 13, 14) sts. Knit 3 rows.
Next row (RS): K3 (4, 5, 6), work Row 1 of Chart C, p1, k1 (edge st).
Working first 3 (4, 5, 6) sts in Garter st and maintaining edge st in St st, work even until piece measures 3¾”, ending with a WS row. Break yarn and set aside.
Right Cuff Vent: CO 43 (47, 51, 55) sts. Knit 3 rows.
Next row (RS): K1 (edge st), p1 [work Row 1 of Chart A, p2 (3, 4, 5)] twice; p2, work Row 1 of Chart C, p2 (3, 4, 5), work Row 1 of Chart C, k3 (4, 5, 6). Working last 3 (4, 5, 6) sts in Garter st and maintaining edge st in St st, work even until piece measures 3¾”, ending with a WS row. Do not break yarn.
Join Vents: (RS) Using yarn attached to right vent, work 40 (43, 46, 49) right vent sts, pm; slip next 3 (4, 5, 6) sts to dpn and hold parallel to and in front of left vent; [k2tog] 3 (4, 5, 6) times (sts from left and right vents of cuff); work in patt to end—51 (55, 59, 63) sts rem. Work 1 WS row.
Next row: Work to marker, sm, p2tog, work in patt to end—50 (54, 58, 62) sts. Remove marker and work even until sleeve measures 4¼”, ending with a WS row.
Shape Sleeve: (RS) Inc 1 st each edge on next row, then every 10 rows 7 (1, 0, 0) times, every 8 rows 0 (8, 8, 4) time(s), and every 6 rows 0 (0, 3, 9) times, working all new sts in rev St st, as follows: K1, p1, M1, work to last 2 sts, M1, p1, k1—66 (74, 82, 90) sts. Work even until Sleeve measures 17½ (18¼, 19, 19¾)”, ending with a WS row.
Shape Cap: (RS) BO 4 (5, 6, 7) sts at beg of next 2 rows, and 3 (4, 5, 6) sts at beg of following 2 rows—52 (56, 60, 64) sts rem. Dec 1 st at each edge every RS row 17 (18, 19, 20) times as follows: K1, p1, p2tog, work to last 4 sts, end ssp, p1, k1—18 (20, 22, 24) sts rem. Work 1 WS row. BO all sts.
left sleeve
Left Cuff Vent: CO 43 (47, 51, 55) sts. Knit 3 rows.
Next row (RS): K3 (4, 5, 6), work Row 1 of Chart A, p2 (3, 4, 5), work Row 1 of Chart A, p2 [work Row 1 of Chart C, p2 (3, 4, 5)] twice, work Row 1 of Chart C, end p1, k1 (edge st). Working first 3 (4, 5, 6) sts in Garter st and maintaining edge st in St st, work even until piece measures 3¾”, ending with a WS row. Break yarn and set aside.
Right Cuff Vent: CO 11 (12, 13, 14) sts. Knit 3 rows.
Next row (RS): K1 (edge st), p1, work Row 1 of Chart A, k3 (4, 5, 6). Working last 3 (4, 5, 6) sts in Garter st and maintaining edge st in St st, work even until piece measures 3¾” (9.5 cm), ending with a WS row. Do not break yarn.
Join Vent: (RS) Using yarn attached to right vent, work 8 right cuff sts, pm; place next 3 (4, 5, 6) sts on dpn and hold parallel to and behind left vent; [k2tog] 3 (4, 5, 6) times (sts from left and right sides of cuff); work in patt to end—51 (55, 59, 63) sts rem. Work 1 WS row.
Next row: Work to marker, sm, p2tog, work in patt to end—50 (54, 58, 62) sts.
Work even until Sleeve measures 4¼”, ending with a WS row. Cont as for right Sleeve.
collar and front plackets
Join shoulders using the 3-needle BO method (see Special Techniques, page 136).
Pick-up row (RS): Beg on 4th row from bottom of Right Front, pick up and knit 92 (96, 100, 104) sts along Right Front, 25 sts along Back neck and 92 (96, 100, 104) sts along Left Front, ending at same point of Left Front as for Right Front—209 (217, 225, 233) sts. Knit 1 WS row.
Set Up Pattern:
Row 1 (RS): K1 (edge st), p1, [Inc1-front, p2] 22 (23, 24, 25) times, pm, Inc1-front, pm, [p2, Inc1-front] 3 times, pm, k1, pm, [Inc1-back, p2] 3 times, pm, Inc1-back, pm, [p2, Inc1-back] 22 (23, 24, 25) times, p1, k1—261 (271, 281, 291) sts.
Row 2: P1, k1, [p3, Inc1-front] 22 (23, 24, 25) times, sm, p3, sm, [Inc1-front, p3] 3 times, sm, p1, [p3, Inc1-back] 3 times, sm, p3, sm, [Inc1-back, p3] 22 (23, 24, 25) times, end k1, p1—311 (323, 335, 347) sts.
Shape Collar Sides and Center Back Collar:
Row 3 (RS): K1, p1, [C3F, p3] to first marker, M1; sm, C3F, sm; M1, [p3, C3F] to next marker, sm; (k1, p1, k1) in same stitch, sm; [C3B, p3] to next marker, M1; sm, C3B, sm, M1, [p3, C3B] to last 2 sts, p1, k1—317 (329, 341, 353) sts.
Row 4: Work in est patt to first center back marker, sm; p1, pm, p1 (center st), pm, p1, sm; work in est patt to end of row.
Row 5: Work in patt as est to first marker, M1; sm, C3F, sm; M1, work in patt as est to next marker, sm; knit to first center-st marker, M1-R, sm, k1, sm, M1-L, knit to next marker, sm; work in patt as est to next marker, M1; sm, C3F, sm, M1, work in patt as est to last 2 sts, p1, k1—6 sts inc’d.
Rep [Rows 4 and 5] 7 more times, then work Row 4 once more, continuing to work new side collar sts into patt as est and new center Back collar sts in St st—365 (377, 389, 401) sts.
Make Buttonholes and Shape Bottom Curve of Plackets:
Row 1 (RS): Maintaining patt as est, work 29 (35, 35, 41) sts, *make one-row buttonhole (see Notes), work 15 sts; rep from * 5 more times; cont in patt as est, increasing at markers as before, to last 6 sts; turn. (Note: A gap will form at turn.)
Row 2: Yo, work as est to last 6 sts, turn;
Row 3: Yo, work as est to 4 sts before gap, turn;
Row 4: Yo, work as est to 4 sts before gap, turn;
Rep Rows 3 and 4—383 (395, 407, 419) sts. Discontinue side and center collar increases and remove all markers except the 2 outlining center Back St st section.
Rep Rows 3 and 4. Do not turn on last WS row; work to last yo and purl it together with following st; rep with all subsequent yo’s.
Next row (RS): Work in patt as est around collar to yo and work it together with following st as ssp; rep with all subsequent yo’s. Do not turn.
Establish Left Bottom Placket Border: With tip of RH needle, pick up and knit 16 sts along side of placket—399 (411, 423, 435) sts.
Decrease Cables: (WS) Dec 1 st as follows in each cable as it faces you: P21, *Dec1-front, p3; rep from * to marker, sm, purl center back collar sts, sm, *p3, Dec1-back; rep from * to last 2 sts, k1, p1—341 (351, 361, 371) sts. Do not turn.
Establish Right Bottom Placket Border: Using both needles to manipulate the yarn, pick up and purl 16 sts (so that edge st turns to the WS) along side of placket—357 (367, 377, 387) sts.
Decrease Cables: (RS) Dec 1 st in each cable as it faces you as follows: K18, *Dec1-front, p2; rep from * to 3 sts before marker, Dec1-front, sm, knit center Back sts, sm, Dec1-back, *p2, Dec1-back; rep from * to last 18 sts, knit to end—297 (305, 313, 321) sts.
Knit 3 rows. BO all sts.
finishing
Sew sleeves into armholes. Sew side and sleeve seams. Sew edges of lower placket edgings to fronts so that plackets and bottom front edges are aligned.
Sew 12 larger buttons to front (6 on each front placket), ¾” from pick-up line opposite buttonholes. Sew 5 smaller sleeve buttons on top of Garter edging, sewing though both layers.
Weave in loose ends. Block to finished measurements.
