PROJECT 8
Makey Makey Light-Up Morse Code Machine
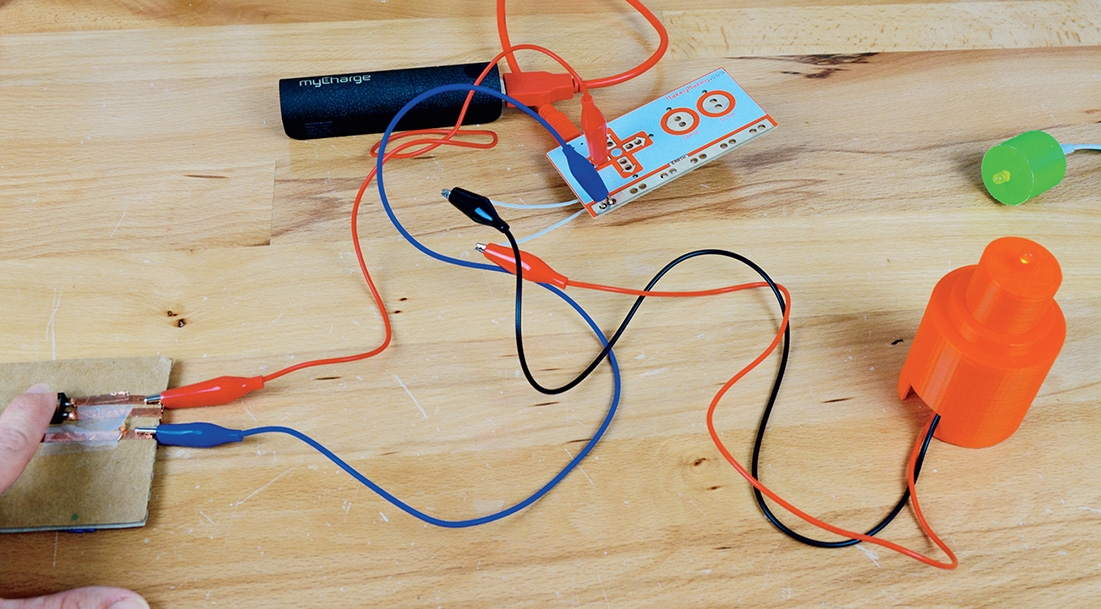
THERE ARE TIMES WHEN AN EVIL GENIUS needs to communicate with a secret code. Unfortunately, our minions don’t have the best hearing, but they are very enraptured by blinking lights. Build this LED Morse code tower to communicate with your minions by blinking lights (see Figure 2-12).

Figure 2-12 Makey Makey Morse code wiring.
Cost: $
Make time: 30 minutes
Skill level: 

Supplies

Step 1: Make a Tower
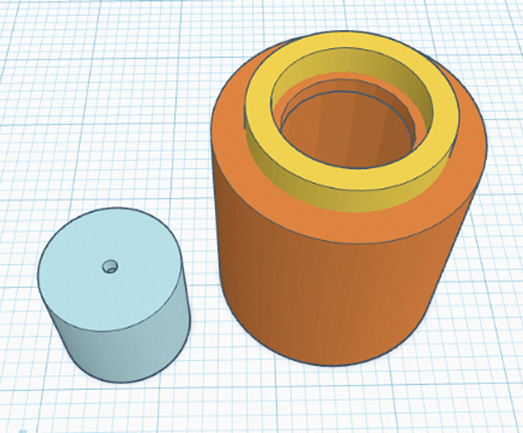
If you have access to a 3D printer, you can easily design a small tower to house your Morse code machine using the free online design tool Tinkercad, available at Tinkercad.com. You can sign up for an account or use an existing provider such as Google to sign in. Once you have signed in, click the “Create new design” button.
Start by clicking the “Edit grid” button located in the lower-right corner of the work plane. Change the units to inches, and click “Update grid.” Click and drag a cylinder from the “Basic shapes” menu to the work plane. Change the diameter to 2 inches by selecting the shape and then entering the dimensions or dragging the white boxes located on the corners. Use the white box at the top center of the shape to adjust the height to 2 inches. With the shape selected, you will notice that a menu of characteristics appears in the upper-right corner of the work plane. To produce a smoother cylinder, maximize the number of sides by setting the slider to “64,” as shown in Figure 2-13. You will need to do this to all the cylinder solid and hole shapes you create for this project. Drag a hole-shaped cylinder to the work plane. Adjust the diameter and height to 17⁄8 inches, and increase the number of sides to 64. Click and drag the hole shape, and try to center it in the solid cylinder. Don’t worry if you’re off a bit; we will fix that later with the “Align” tool. Drag another cylinder-shaped hole to the work plane, and adjust the diameter to 1 inch and the height to 2½ inches. Also remember to adjust the number of sides to 64. Center this hole in the solid cylinder as well. Click and drag just above the shape on the work plane, and select all the shapes. Click on the “Align” tool located in the upper-right corner of the work plane, as shown in Figure 2-14. To center the hole shapes, click on the alignment circle that appears in the front center of the cylinder and the alignment circle that appears to the left center of the cylinder. We need to make a hole in the bottom of the cylinder tower to provide a passageway for the alligator clips. Drag a simple box shape to the work plane, and adjust it to ½ inch on all sides. Drag the box into the cylinder so that it is visible from the inside and outside. Click and drag the mouse, and click on the “Group” tool that appears to the left of the alignment tool.

Figure 2-13 Setting the slider.

Figure 2-14 ”Align” tool.
The top section of the tower is removable so that changing the LEDs and attaching alligator clips are easy and hassle-free. Drag a solid cylinder shape to the work plane, adjust the diameter to 11⁄8 inches, and increase the sides to 64. To create a hollow area in the shape, drag a cylinder-shaped hole to the work plane, and set the diameter to 1 inch and the height to 7⁄8 inch. Remember to adjust for the maximum number of sides. To create a hole for the led at the top of the tower, drag a hole shape to the work plane, adjust the diameter to 1⁄8 inch, and increase the sides to 64. Roughly center the two hole shapes in the smaller cylinder, and then use the alignment to perfectly center them, as shown in Figure 2-15. Click on “Group,” and you now have the top portion complete.

Figure 2-15 Perfect center.
To complete the tower, let’s create a tube shape at the top of the base for the top to slide into. Drag a tube shape onto the work plane, and then adjust the height to ¼ inch and the outer diameter to 1½ inches. You will notice that when you select this shape, you not only can increase the maximum number of sides to 64, but you can also change the wall thickness. Enter 0.12 for this value. Depending on the type of filament and shrinkage that occurs with your 3D printer, you may need to adjust this value if the top is too snug. Put the tube in place by selecting the shape and then dragging the black cone that appears at the top to a height of 2 inches. Center it over the base, and then click and drag to select both shapes. Use the alignment tool to perfectly center it, and then click “Group” to make it a solid shape, as shown in Figure 2-16. You also might consider flipping the smaller upper portion to get a better print. Press the “Export” button on the right, and choose the file type needed for your printer.

Figure 2-16 Group.
One-Banana Hack: If You Don’t Have Access to a 3D Printer
If you don’t have a 3D printer, you can easily use a plastic bottle to make a tower. You can also use a nail if you don’t have a drill. Use a 1⁄8-inch drill bit to drill a hole in a plastic bottle top. You will need a box cutter to cut a hole near the bottom of the bottle so that the alligator clips pass through the bottle. Place the LED through the hole, and then clip the wires to the legs. Carefully tighten the lid and connect the wires as shown in Figure 2-17.

Figure 2-17 Alligator clip to LED legs minding polarity.
Step 2: Assembly
Slide the LED legs through the 1⁄8-inch hole in the top portion of the tower. Separate them so that each leg touches the sides. Polarity matters on a LED, so remember that the long leg of the LED should be the positive leg. Clip an alligator clip onto the positive leg (we suggest using a red alligator clip to remember that it is positive), and clip a black or gray alligator clip to the negative leg. Ensure that the protective covering is slid down over the end of each clip so that the metal from the alligator heads do not touch. Run the wires into the hole on the base and out the bottom, as shown in Figure 2-17. Attach the positive leg of the LED to the KEY OUT output pin on your Makey Makey and the negative leg to EARTH.
Step 3: Wire a Button to Cardboard
For our key press, we will use alligator clips to wire a commonly used electronic component, the button! You do not have to wire a 10-kΩ resistor to your button, but if you eventually want to program it as a digital pin with an Arduino, this can be good practice. So why not get some practice wiring components this way? You’ll need three traces of copper tape on your cardboard square. Bend the legs of your button so that the metal can rest along the copper tape and the ends can still poke down into the cardboard. You only need the front feet of the button to touch each copper trace. The back legs of the button can be pushed into the cardboard for stability. Use a 10-kΩ resistor between what you are using as the negative side of you button, and the other leg of the resistor will be placed on the copper tape. Bend the legs of the resistor by bending them like a zigzag so that the legs will have more connection to the copper tape. Use a regular piece of clear tape to secure the resistor on top of the copper tape traces (see Figure 2-18). You’ll clip the key press input to the positive pin of your button, and you’ll connect EARTH to the tape trace connected only to the 10-kΩ resistor (see Figure 2-18). Make sure that you plug your Makey Makey into the computer, and you are ready to start sending secret messages! (You can actually just press the copper tape traces to turn your LED off and on, but where is the fun in that? Now you know how to wire up a button should you need to, you can actually wire a signal to the middle tape trace, but with this cardboard button, you also get a great clicking sound reminiscent of a real telegraph machine!

Figure 2-18 Wiring a button to cardboard.
Step 4: Send Secret Messages
Print out a copy of the Morse code alphabet, and teach your minions the long and short of it. Practice making long and short button presses and creating words with the “blink” of a LED (see Figure 2-19)!

Figure 2-19 Send messages.
Taking It Further
Is one LED enough? How could you add more LEDs to this design or your own? What other ways could you use a LED to interact with a program in Scratch? If you liked 3D design, try creating a cover for the LED out of translucent filament for light play. Or do some research and discover a way to make the light brighter!