PROJECT 12
Hacking a Kid’s Toy with Makey Makey
Sometimes an evil genius likes to take kids’ toys and make them a little more … well … evil. In this project, learn how to open up the inside of a kid’s toy, create inventive switches, and replace the circuit board with Makey Makey. Take those twinkling bedtime songs and reprogram them with Scratch to play more soothing music for your minions (see Figure 3-1).

Figure 3-1 Kid’s toy hacked.
Cost: $
Make time: 30 minutes
Skill level: 


Supplies

Hack Keyboard Toy
Step 1: Take Out the Battery
As with any take-apart, remove the battery first to prevent getting shocked! Always use protective gear when tinkering with electronics.
Step 2: Open Up the Toy
Kids’ toys often have long and cleverly hidden screws. Make sure to get a long and skinny screwdriver set designed for electronics to remove all the screws. When opening the toy, look for tabs and other things that might hold the toy together. Opening the toy carefully will allow you to evaluate how hackable it will be without breaking it.
Step 3: Investigate Easy Places to Create Switches
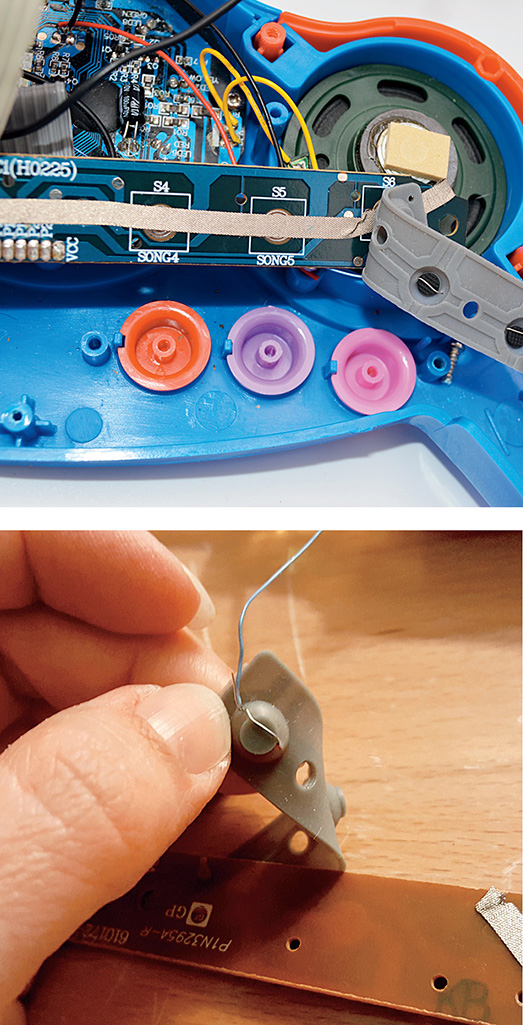
This keyboard toy we’ve opened up has buttons along the top that will make for great Makey Makey switches, and the existing keyboard keys will be fun to hack as well. For the existing top buttons on the toy, we can reprogram them with Scratch and create sound effects or use these existing buttons to change the instrument of our piano keys. While you look at your own toy, consider, “How can I use these existing buttons and switches to create simple switches with the Makey Makey?” Another thing to consider is how to create those switches without cutting existing wires or rendering the toy unusable after you finish. For both of the hackable spots on our toy, there are long-running printed circuit boards (PCBs) that will make a great EARTH (or grounding) connection. On opening this toy, as shown in Figure 3-2, we can see the PCB that controls the keys, while the PCB that controls the top buttons is covered up by a large piece of plastic that holds everything in place.

Figure 3-2 Investigating.
Step 4: Hack Dome Switches
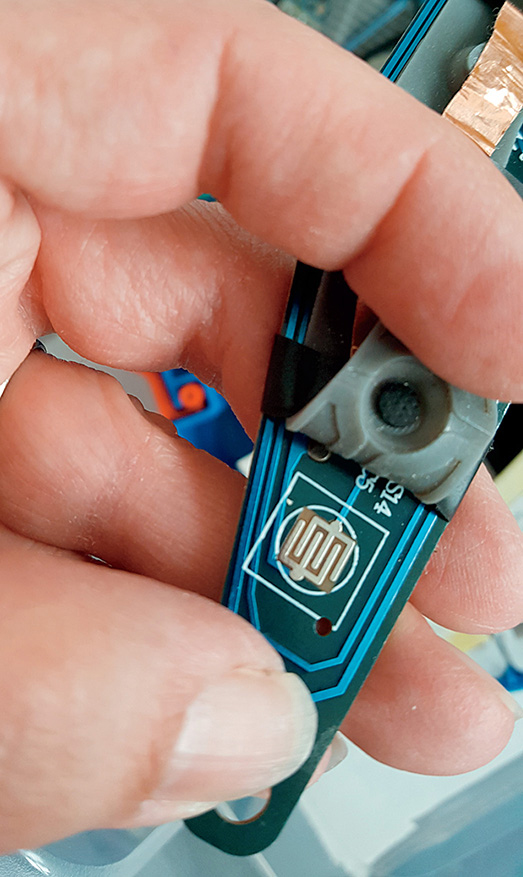
Cheap kids’ toys typically use dome-style switches with rubber that allows the button to be pressed and then spring back up. The inside of the rubber has some type of conductive material (sometimes graphite, sometimes steel traces are embedded), and this conductive spot on the button completes the open circuit that is printed on the PCB when it is pressed. Figure 3-3 is a close-up of the circuit traces so that you can see how the original connection was completed once the button was pushed. Inside the top of the rubber there is conductive material that completes the connection across the circuit traces. Because the conductive material is inside, this “button” can bridge copper traces on the PCB. You can easily add a small, thin hookup wire to the top of the rubber button press by poking the wire through, as shown in Figure 3-4. When you hook this wire to the Makey Makey, you will be able to control this surface area as a key press. Because we are switching the way this button works, we’ll make each key press with these thin hookup wires and create our EARTH input along the entire PCB, which will cover up the original and individual circuit traces printed on the PCB (see Figure 3-4).

Figure 3-3 Close-up of original circuit traces.

Figure 3-4 Top button key press and EARTH on PCB.
To re-create these switches, push a thin hookup wire for each button press through the rubber membrane so that it makes a connection across the inner conductive pad. Push the wire through to the other side, and make sure to twist the wire together on the outside of the rubber, as shown in Figure 3-4. Be careful not to tear the rubber as you twist the wire because we want to reuse as much of the original toy as possible. These existing button presses have a membrane inside the toy that allows the toy’s buttons to spring back up after pressing (like the buttons on a calculator), so you want to be careful to keep them in working springing order.
Once you thread each wire through its button spot, run one strip of conductive tape across the PCB to create a ground for your circuit, as shown in Figure 3-4. Make sure to attach a hookup wire to your EARTH connection and label the opposite end of your wire clearly as EARTH.
Now you can place the rubber key press back over the PCB, as shown in Figure 3-5. The colorful buttons on the toy now can be programmed in Scratch and controlled via your Makey Makey hacked switches.

Figure 3-5 Full switches intact for top buttons.
Step 5: Create Keyboard Switches with Copper Tape
To create switches on the existing piano keys of this toy, apply copper tape that runs from the spot where the connection will be made to the end of the piano key, as shown in Figure 3-6. Because each key will be a separate note, a separate tape trace is needed for each key. Also, to make these switches sturdier, we are going to solder our hookup wire to each tape trace. Cut 18-inch strips of hookup wire to run out of the piano toy through the old off/on switch. We used a little bit of solder to connect a wire to each piece of copper tape.

Figure 3-6 Copper tape for each key press.
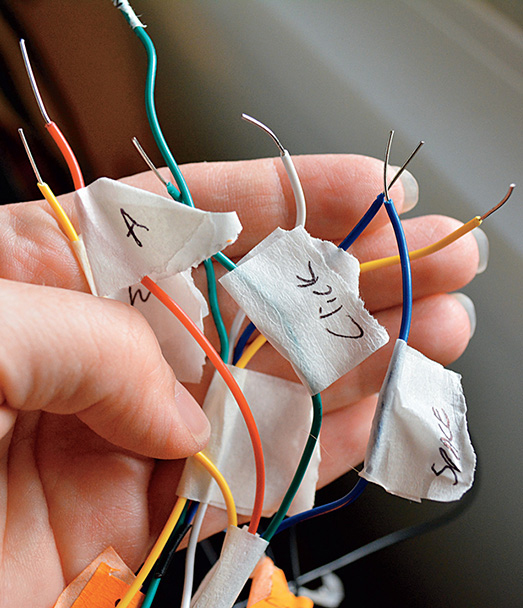
Once you get your keys in place, you may need to insulate the switches to keep them from constantly making connections. Insulate as needed with small pieces of paper, as shown in Figure 3-7. It is important when using this many wires to clearly label each key press on the copper tape and at end of the wires, as shown in Figure 3-8. (An alternative method would be to connect these wires through a ribbon cable and use color coding. You will still need to clearly label each key press.) To create EARTH for these switches, run one continuous piece of copper tape along the top of the existing button presses, as shown in Figure 3-9. (Remember that these rubber button presses help the keys to spring back up.) To keep the copper tape in place and not create a short accidental press from loose copper tape, we wrapped electrical tape between each button press.

Figure 3-7 Insulate if needed.

Figure 3-8 Label wires clearly.

Figure 3-9 EARTH for piano keys.
Step 6: Put It Back Together
Because our minions still like to play with this toy, we kept the original wiring in place and only removed the off/on switch so that we could put it back later if needed. Figure 3-10 shows the toy put back together with our newly hacked switches in place. Hook alligator clips to each wire, and match labels to inputs on your Makey Makey.

Figure 3-10 All switches in place.
When you are hacking an existing toy like this, you’ll probably have to debug a few switches. This is a good thing! It will teach you more about creating your own switches and how the switches are constructed in electronic toys and gadgets. Be careful when putting screws back not to screw them too tightly because it may make your connections constantly go off. While you test each key, make sure that you clearly label each key press on the toy. You can use small pieces of masking tape to debug your switches. (See how we labeled a key press “stuck” with tape in Figure 3-11.) When you are flipping a toy over to create switches, it can get very confusing figuring out which key is having problems, so use this low-adhesive tape to help you debug!

Figure 3-11 Debugging tips.
Step 7: Remap Makey Makey Buttons
To give you more key press inputs, you’ll need to remap the mouse pins located on the backside in the right-side header. Before plugging your Makey Makey into the computer, navigate to http://makeymakey.com/remap/. (Note that you have to have version 1.2 for this remap to work.) Choose Makey Makey Classic, and then, following the graphic, attach one alligator clip to the up arrow and the down arrow and another to the left arrow and the right arrow. Now you are ready to plug your Makey Makey into the USB port. Once you plug in your USB, all the keys will light up on your Makey Makey, and your screen should say, “Makey Makey detected, now remove the clips.” The instructions on the site will tell you to “Hold EARTH with one hand; press the arrows with your other hand on your Makey Makey to navigate. Press ‘Click’ to select.” Hold EARTH, and use the right arrow until you get to the mouse header pins (shown in Figure 3-12). Holding EARTH, press “Click” with your other hand, and remap the pin from “Mouse up” to “0” by using the keys to highlight “0.” Press “Click,” and your Makey Makey “Remap” page should now show a “0” where it previously had “Mouse up.” Use the right arrow input on the Makey Makey to highlight “Mouse Down,” and press “Click.” Remap this pin to the number “1.” Repeat for mouse left to remap as the number “2.” Once you have remapped to your evil heart’s desire, press the down arrow on the Makey Makey, which will highlight “Save.” Press “Click.” The website will prompt you to “CONFIRM: SAVE” and is automatically on “NO.” Press the left arrow input to highlight “YES,” and then press “Click.” You should then see the “Success” window and now be able to move to programming in Scratch. The cool thing about this remap is that your Makey Makey will hold the remap after unplugging. (It is important to note that if you remap a Makey Makey Go, it will not hold the remap after you unplug it from your device.)


Figure 3-12 Remapping keys.
Program with Scratch!
Step 1: Remix Piano Project
Look for the “Scratch Piano” by “Someone10” at scratch.mit.edu. Click “See inside” and then “remix” to save a copy that you can edit and personalize.
Step 2: Label Sprites with Key Press
To help with programming, label each key press on each sprite in the “Costumes” tab as in Figure 3-13. Use the drawing feature to draw the arrows and the text feature for labeling space, w, a, and s.

Figure 3-13 Label key presses in “Costumes” tab.
When you click on a key sprite, duplicate the lines of code for “When sprite clicked,” and on the duplicated scripts, change the “Events” block to a “When space pressed” so that each keyboard key can now be clicked or played via a key press. Change each key to match Figure 3-14.

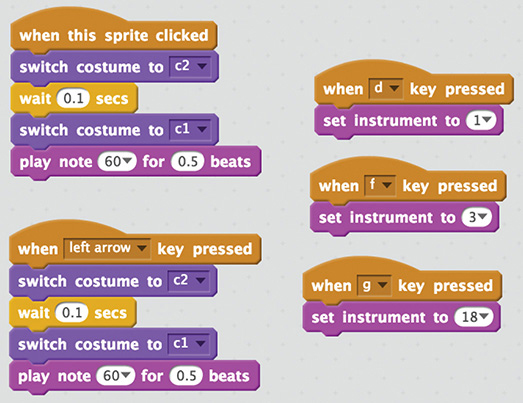
Figure 3-14 “Change instrument.”
Step 3: Add “Change instrument”
To program the top three buttons on the left side of this toy so that we can change the instrument sound on the keyboard, we added the three scripts shown in Figure 3-14. The first, second, and third buttons will change the instrument sound to the chosen sound effect. All you need is a “When space clicked pressed” block located in the “Events” palette and a “Set instrument to 1” block located in the “Sounds” palette. Choose the instrument sounds you prefer, and hack Figure 3-14 accordingly. You’ll also need to drag these three programs to each key sprite so that the sound effect will change for each piano key based on one button press! You can quickly copy scripts by dragging the code to the sprite in the “Sprites” menu. This will copy the code to that sprite. Do this for every piano key sprite!
Step 4: Add Sound Effects and “Stop all”
For the remaining top buttons on the right side of this toy, we added two more sound effects and the ever-important “Stop all” script. Here is where the remapping of the Makey Makey will help you to create more sound effects in Scratch. Add sound effects with the “Repeat” block, as shown in Figure 3-15, so that you can set a beat for your minions to play along with. Then make sure to program the last button with the control block “Stop all.” In this way, if your minions get too loud, you can quickly use the “Stop all” block to silence the sound effects.

Figure 3-15 “Stop all.”
Step 5: Create a Copy and Add Sound Effects
Because this is an easy remix, let’s make another copy and change all the sound effects. For this second game, you will make a drum machine. Just reprogram the piano keys to be drum sound effects similar to Figure 3-16.

Figure 3-16 Add sound effects.
Step 6: Create Another Copy and Record Sounds
We made a third copy of this piano and recorded heavy-metal guitar riffs via the “Sounds” tab for each keyboard press. Now you can create and re-create as many sound effects as you’d like with this piano remix, which will give your newly hacked toy endless programming possibilities.
Step 7: Rotate between Scratch Games to Make Music
Let your minions rotate between Scratch games to fit the mood of the day. Now that you know how to quickly remix and hack existing Scratch games, change your music on a whim and have fun playing your hacked kid’s toy (see Figure 3-17)!

Figure 3-17 Play music.
Taking It Further
If you’d like to tinker further with electronics, you can look into hacking the existing circuit traces on the PCB or even tinker with circuit-bending your toy.