PROJECT 17
Makey Go “Chopsticks”
THE EVIL GENIUS LOVES SUSHI and music, so why not combine the two? In this project you will learn how to use Makey Go to play a note of a song when you dip your sushi in some soy sauce (see Figure 4-4). This is a great project to try when any kind of dipping is involved. Plus it is a splash at parties.

Figure 4-4 Completed Makey Go chopsticks.
Cost: $
Make time: 30 minutes
Skill level: 

Supplies

Create Scratch Program
Step 1: Create and Set Variables
Pick two sprites that will function as each piano hand of your song. Click on your first sprite (which you will program as the left hand), and in the “Data” palette, create the variables “left hand” and “right hand.” Create a program to “Set left hand to 1” when the green flag is clicked. Click on your second sprite (which you will program as the right hand), and create a program to “Set right hand to 1” when the green flag is clicked.
Step 2: Add Sounds in “Sounds” Tab
It’s time for the piano fun! What you are going to do is upload all the piano notes needed to play “Chopsticks” in order and edit each piano key so that it sounds like playing the song “Chopsticks” in real life. No, you don’t have to record all the piano keys yourself; instead, Scratch has piano keys preloaded into the “Sounds” menu. Click back to your first sprite (the “left hand” sprite), and get ready to program.
In the “Sounds” tab, click “Upload,” and then choose the “Musical notes” menu. The first note of the left hand is “F piano.” Click on it, and while you are here, edit the sound so that it plays like a staccato note, as shown in Figure 4-5. Just click and drag your mouse to highlight the audio you want to delete, and click “Delete.” Test your sound to make sure that you like the length.

Figure 4-5 Staccato F note edit.
Now, here’s the great thing: instead of repeating that step, you can just right-click on the sound and select “Duplicate.” Scratch will even number the next note as “F piano2.” Repeat this so that you have six “F piano” notes, and then you are ready for the next sound (see Figure 4-6). Number the sounds in your “Scratch” tab to help you remember. Each short note repeats six times until you get to the C note for both hands.

Figure 4-6 F note duplicates.
Click “Upload” > “Musical notes” > “E piano,” and repeat the “E piano” key six times. Follow the chart below to create the whole song for the left hand. Once you have all left-hand notes uploaded, click on your second sprite, and create the notes for the right hand in your second sprite. (This will allow both notes to play on one key press.) Remember to leave your C piano notes long to mimic the real piano play of “Chopsticks.”

Step 3: Play Sound and Change Note (Left Hand)
You have created your notes in Scratch, but you still have to tell the computer when to play them. This is a quick group of scripts to create because we already created counter variables.
When the spacebar is clicked, you want the Scratch program to play the “left hand” notes. Simply take the “left hand” script from the “Data” palette, and insert it into the “Play sound” block as in Figure 4-7. Then add the “Change left hand by 1” block so that Scratch will count each note and play each note. It is imperative that you have the sounds in order in the “Sounds” tab or the song will not progress in the right intervals. We used the “Next costume” block so that we could change the costumes of our sprites and see each piano note play. Add a costume in the “Costumes” tab if you want to use this block.

Figure 4-7 ”Left hand” program.
Step 4: Play Sound and Change Note (Right Hand)
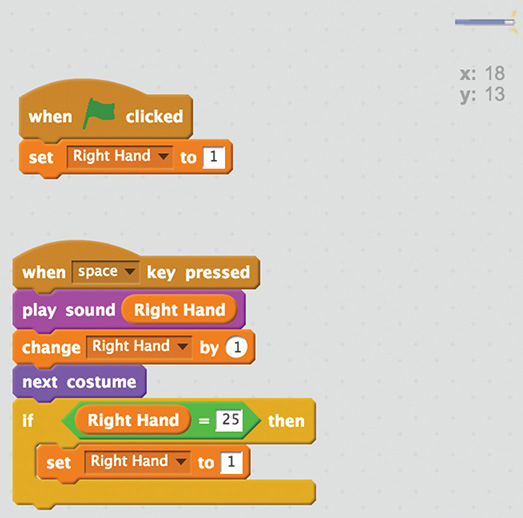
You can duplicate the script above in the “right hand” sprite by dragging the full program to the sprite. Just make sure that you change all references in scripts from “left hand” to “right hand” (see Figure 4-8).

Figure 4-8 ”Right hand” program.
Step 5: If Counter Reaches Last Note, Reset to Beginning
You don’t technically have to do this last step, but it will help if you program another song and need to debug. Plus, this is the same way you would program a song in Arduino based on a “sensor” or “key press.” (See the Arduino stuffie project in our Big Book of Makerspace Projects for the Arduino version of this method with the song “Iron Man.”) To get your song to return to the beginning and start recounting, use the “If” block, and nestle the operator “ =
=  ” between “if” and “then” so that it reads, “If left hand = 25, then set left hand to 1” (see Figure 4-7). Repeat this for the “right hand” sprite and now you are ready to play “Chopsticks” with chopsticks!
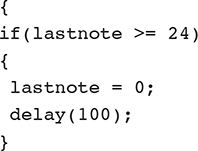
Alternatively, you can also use the scripts “If left hand > 24, then set left hand to 1.” If you were writing a song in Arduino, you’d use something like the following code. This would tell the IDE to reset to zero only if the note count is higher than 24. Because Scratch doesn’t have a “Greater than or equal to” block, you can just use the “Greater than” symbol to emulate this code.

Conductive Chopstick and Dipping Bowl
Step 1: Create Conductive Chopstick and Dipping Bowl
With the programming work out of the way, it is time to make a conductive chopstick. For this, you will simply need to break apart some chopsticks and wrap conductive fabric tape or copper tape from the bottom to the top of one of them. If you are not eating sushi and are using carrots, sliced apples, or celery to scoop your dip, you can skip this step.
Place a piece of conductive fabric tape on the edge of the inside bottom of a small dipping bowl. Run the tape up the side of the box, and cut it about 2 inches above the top of the bowl. Fold the tape over to create a 1-inch tab. Fill the bowl with soy sauce or dip. (If you do not have conductive tape, you can always use aluminum foil and double-sided sticky tape to adhere it to your bowl.)
Step 2: Dip It Real Good!
Insert Makey Go into a USB port on your computer and clip the alligator clip from the plus sensor to the tab on the bowl. Press the “Play” button to calibrate the Makey Go. Grab the chopsticks, and dip a piece of sushi in the sauce bowl. Each time you dip, your sushi song will advance (see Figure 4-9).

Figure 4-9 Sushi chopsticks go!
Taking It Further
As the dip or sauce runs out, will the Makey Go stay calibrated? What other songs can you program and match to their dish? How can you apply this to a buffet or ice cream sundae party?