PROJECT 20
Makey Go Lemon Squeezy
EVIL GENIUSES WOULDN’T BE EVIL if they played fair, now would they? In this two-player Makey Go game there is no chance to win if you play it safe. The goal of “Lemon Squeezy” is for a player to squeeze a lemonade bottle as many times as possible in 30 seconds. However, either player can reset the score to zero at any time in the competition by squeezing a lemon (see Figure 4-21). Strategy and squeeze ability are sure to produce many sour looks!

Figure 4-21 Complete Lemon Squeezy setup.
Cost: $
Make time: 30 minutes
Skill level: 


Supplies

Step 1: Lemon Drops and Sprites
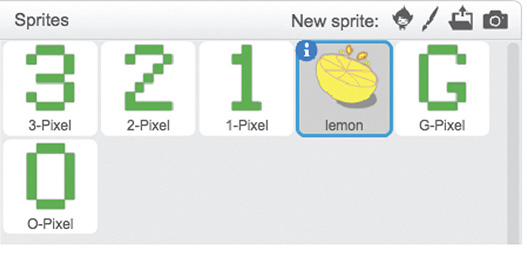
Create a new game in Scratch. Start by clicking the “Choose sprite from library” icon and adding the “Orange2” sprite. Click on the “Costumes” tab, and then use the “Color shape” tool to replace the color orange with yellow so that your orange can magically become a lemon! Click on the “Other costume” option to replace the color orange with yellow for all the other costumes (see Figure 4-22). After you finish, click on the “Information” tab for the “Orange2” sprite, and change the name to “Lemon.” Position the “Lemon” sprite just below the centerline on the stage. Right-click, and delete the “Cat” sprite. You will also need to add the following sprites from the letters library: “1-Pixel,” “2-Pixel,” “3-Pixel,” “G-Pixel,” and “O-Pixel” (see Figure 4-23).

Figure 4-22 Turning an orange into a lemon.

Figure 4-23 List of sprites.
To create a backdrop for instructions, click on the “Backdrop1” button in the lower left of the stage area. Click the “Convert to vector mode” button, and use the text and rectangle tool to create the backdrop shown in Figure 4-24. This backdrop will provide the players with directions for playing the game. Adjust the position of the lemon shape so that it appears in the gap between the text in the “Preview” menu. Right-click on “Backdrop1” to create “Backdrop2.” Delete the instructions at the top, and replace them with a black rectangle, as shown in Figure 4-25.

Figure 4-24 Instruction “Backdrop1.”

Figure 4-25 “Backdrop2.”
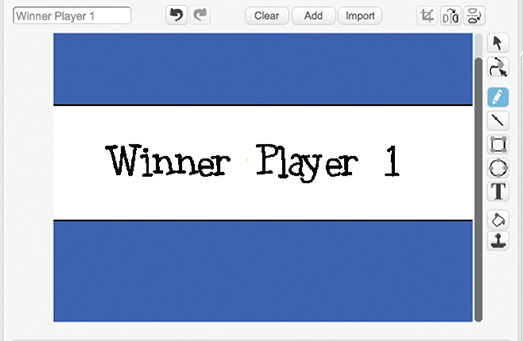
You need to create two backdrops that will indicate which player won the game. Click on the “Paint new backdrop” icon to create a new backdrop like the one shown in Figure 4-26, and name it “Winner player 1.” Right-click and duplicate the backdrop “Winner Player 1,” and then change the name and text in the backdrop to “Winner Player 2.”

Figure 4-26 ”Winner Player 1.”
Step 2: Set Up Variables and Start Screen
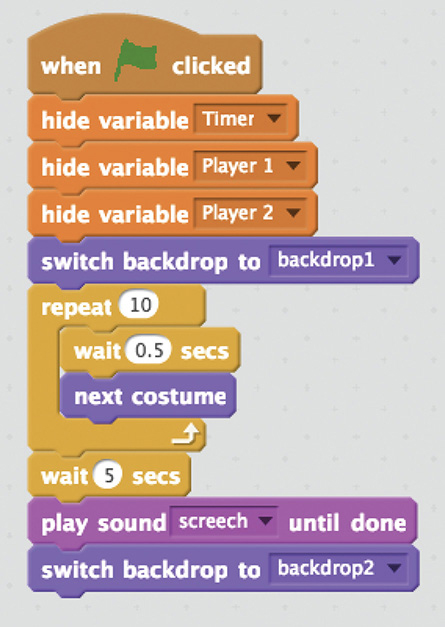
Press on the “Lemon” sprite, and then select the “Scripts” tab. Click the “Data” menu, and click the “Make a variable” button to create the following variables: “Clicks,” “Clickspeed,” “Player1,” “Player2,” and “Timer.” Drag a “When green flag clicked” block from the “Events” palette. So that the variables don’t appear on the start screen, drag over three “Hide variable” blocks, and use the down arrow to set them to “Timer,” “Player1,” and “Player2.” Click the “Looks” menu, and add a “Change backdrop” block to the script. Use the down arrow to select “Backdrop1.” To add some animation and draw attention to the game, we can use the costumes for the “Lemon” sprite. Add a “Repeat 10” block from the “Control” palette, and also place a “Wait 1 secs” block inside the loop. Adjust the time in the “Wait” block to 0.5 second, and then add a “Next costume” block from the “Looks” palette. Follow the loop up with a “Wait 1 secs” loop, and then reset the time to 5 seconds. To get the attention of your players, add a “Play sound” block, and choose a loud, abrupt sound from the sound library such as “Screech.” The last block in the script will initiate the start of the game countdown by changing the background. Add a “Switch background” block from the “Looks” menu, and use the down arrow to choose “Backdrop2.”

Figure 4-27 Start screen script.
Step 3: Variable Setting and Scoring Equations
With the lemon sprite selected, drag the “When backdrop switches to” block into the scripts area, and select the value “Backdrop2.” Add a “Wait 1 secs” block to the script, and change the value to 4 seconds. From the “Data” palette, drag three “Set variable to” blocks to the script. In the first of those blocks, select “Player1,” and set the variable to 0. Set the next one for “Player2” to 0. For the last variable, select “Timer,” and set it to 30. At this point we want all three of these variables to show so that the players can keep score and know how much time remains. Add three “Show variable” blocks to the end of the script, and set them to “Player1,” “Player2,” and “Timer.” To create a 30-second countdown, add a “Repeat 10” block from the “Control” palette, and set the value to 30. Drag a “Wait 1 secs” block into the “Repeat” loop, and then add a “Change variable by 1” block just before it in the “Repeat” block. Set the variable to “Timer,” and enter “−1” into the second variable spot. Your countdown timer is now complete!

Figure 4-28 Variables and timer.
Now it’s time to make some “if/then” statements that compare who has the most points and declare a winner by changing the backdrop. Drag an “if/then” block from the “Control” palette, but don’t attach it to the script you have been working on yet. Leaving it disconnected will allow us to easily duplicate it and change the values. Drag the operator block “ =
=  ” into the “if/then” statement. We need to tell the script to perform these comparisons when the value of the timer is 0. So drag the “Timer” variable into the first part of the operator, and input the value 0 in the second spot. To start our comparison, drag an “if/then” statement into the first “if/then” block. Place the operator block “
 >
>  ” into the “if/then” block. To compare the players’ scores, drag the variable “Player1” in the first location and “Player2” in the second. If Player 1’s score is greater, we need to declare him the winner. To accomplish this, drag a “Switch backdrop” block from the “Looks” palette inside the “if/then” statement, and change the value to the backdrop “Player 1 Winner.” To add some animation, add a “Repeat 10” block just after the backdrop switch. Place a “Next costume” block inside the “Repeat 10” block followed by a “Wait .5 secs” block.
Now Player 1 can win the game, but we also need to provide the same conditional statement and argument for Player 2. Right-click on the section of code you just created for Player 1, and click “Duplicate.” Switch the order of Player 1 and Player 2 in the “if/then” operator to “If Player 2 > Player 1.” The last thing you will need to do is switch the backdrop to “Winner Player 2.” With these changes in place, attach the two script blocks to the script that begins with the switch to “backdrop2” (see Figure 4-29).

Figure 4-29 Are you a winner script?
Step 4: Countdown Clock
To create a “3, 2, 1, GO countdown,” we are going to use the “Show” and “Hide” blocks from the “Looks” palette as well as the “Wait 1 secs” block to time each sprite. Let’s start with the “3-Pixel” sprite. If the sprite is not showing, click on the “i” to bring up information about the sprite. Click the box next to the word “show,” and it should appear. If you want to only work with this sprite, you can click on the “i” for each of the other sprites and unclick the box. Click on the sprite that appears on the stage, and drag it to the position x = 0 and y = 30. You will need to do this for each of the number sprites in the countdown so that they appear centered just below the timer. To get the “G” and “O” into the correct position, place the “G” at x = −26 and y = 30 and the “O” at x = 9 and y = 30.
For testing purposes, you need to drag over a “When green flag clicked” block to the scripts area and follow it with a “Hide” block from the “Looks” menu for all the number sprites and the letters “G” and “O.” An easy way to copy it over to the other sprites is to place it in the backpack and then select the sprite and drag it onto the scripts area. Once you have added this script, click on the “3 - Pixel” sprite. Drag over the “Event” block “When backdrop switches to,” and change the value to “Backdrop2.” Follow this block with a “Show” block and then a “Wait 1 secs” block. Because this is the first sprite to appear in the countdown and we only want this sprite to appear for a second, place a “Hide” block at the end of the script, as shown in Figure 4-30. Click the up arrow on the backpack, and drag this script into the backpack because we will need most of it for the other countdown sprites. Select the “2-Pixel” sprite next, and drag the previous script into the script area. We still want this sprite to appear for 1 second, but we need to delay when it shows up by adding a “Wait 1 secs” block just after the “Switch backdrop to backdrop2” block. Copy the script into the backpack, and then select the “1-Pixel” sprite. Move the script over, but this time change the “Wait 1 secs” block value to 2 seconds. For the “G-Pixel” and the “O-Pixel” sprites you will need to change the value of this block to 3.

Figure 4-30 Script for “3-Pixel” countdown.
Step 5: Click and Clack
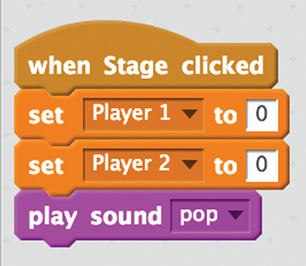
Just to make this game super evil, you are going to add a way to reset the scoring at any time during the game. For this, you’ll have a lemon in between players that players can tap to switch the Makey Go to “Click” mode, tap again to “Click” the backdrop to reset the score, and then tap the lemon one more time to start scoring again. To make this effective with our one-button constraint, we’ll write this program in the “Stage” area on the “Backdrop.” All you need to make this work is an “Event” block “When stage clicked” with two data blocks “Set player1 to 0” and “Set player2 to 0,” as shown in Figure 4-31. You’ll have to attach some conductive tape to the gear input on the Makey Go. In this way, either player can tap the lemon and set one of the Makey Gos to “Click” mode, and then the player will have to squeeze the water bottle to set the game back to 0. Then tap the lemon again to put it back into scoring mode. (It will be important when playing that you move your mouse from the green flag to the center of the stage! Otherwise, you’ll just be clicking the game to start over and over and over.)

Figure 4-31 Reset scripts.
Step 6: Connect and Play Tips
With all the code complete, it’s time to get two Makey Gos going! Cut a 1½-inch length of conductive tape, and fold about ½ inch of it over on itself to create a tab. Press the rest of the tape across the “Gear” button on your Makey Go, as shown in Figure 4-32. Connect an alligator clip to the tab, and push the other end into a lemon. Repeat this step for the other Makey Go. Plug both Makey Gos in simultaneously. Choose one, and hold the lemon for 5 seconds to turn on remapping. Remap space to the “a” key. Test both by tapping the plus sign to see if the game is keeping score. It’s important for all players to know that if they hold the lemon instead of squeezing and releasing it, they may accidentally cause it to go into remap mode. It’s also important to plug into your lemon before you plug the Go into your computer.

Figure 4-32 Makey Go setting hack.
To complete the game, grab some lemonade bottles and take a swig or two; then drop an alligator clip in them. Connect the other end to the “Plus” key on Makey Go, and press the “play” button. Now you are ready to squeeze.
Taking It Further
Start thinking of other ways you could use two Makey Gos at once! Is there a way to make this same game using the classic Makey Makey? What are fun ways you could combine the need for two capacitive controllers?