9
‘We sleep and eat amongst
the dead here’
Sanananda
November 1942 to February 1943
They sat the body of Warrant Officer ‘Harry’ Honeywell up against a tree, and when Captain Athelstan Bosgard touched his lifeless mate, he began to cry. Honeywell was a legend in the 2/2nd Battalion. At Bardia, in Libya, in early 1941 he had walked tallest, inspiring his charges by defying the Italian barrage. Three months later in Greece, he and Bosgard had turned back a German tank with small-arms fire, and few had crossed the Owen Stanleys with less apparent effort than Honeywell. The men called him the war dog: three times he had been allocated to rear-area support tasks, and three times he had refused to move out of the front line. And that was where he died, shot through the heart as he stood directing operations. ‘Freddie, keep this between you and me,’ the grieving Bosgard told one of his men who had witnessed the tragic scene. Bosgard himself had only days to live. Death was never far away on the Sanananda Road.1
In the drive for the coast after the victories at Oivi and Gorari, 25th Brigade had taken the northern route through Jumbora, heading for Gona. Further south, Brigadier John Lloyd’s 16th Brigade had advanced through Popondetta to Soputa before turning north for Sanananda and the coast. Though both brigades had smashed the Japanese force retreating from Kokoda, substantial reinforcements had been landed at the beachheads. The lead element of the 16th, Colonel Paul Cullen’s 2/1st Battalion, came under artillery fire north of Soputa on 20 November, the first indication that the Japanese defensive lines had been reached. These defences were built astride the Sanananda Road, covering its junction with the track to Cape Killerton. There was a second defensive position 2 kilometres further up the track and a third line about a kilometre south of Sanananda village.
Sanananda: 20 November 1942–22 January 1943
Cullen immediately sent two companies, numbering just 90 men, under Captain Basil Catterns out to the left to outflank the Japanese positions on either side of the road. Moving in single file through swampy jungle, Corporal Ralph Albanese led Catterns’ men to a small camp beside the main track and behind the enemy positions. Japanese troops were busy cooking rice when the Australians struck in the fading light. Catterns’ men got within 50 metres of them before being spotted. A thunderous fire broke out, and as the Australians advanced, they realised they were facing a fully prepared defensive position, with a network of trenches behind an apron of vine fences. They took it nonetheless. Catterns estimated that eighty enemy soldiers were killed in the fighting, but his own losses were also severe: the dead included the two company commanders, three more officers and twenty-six other ranks. Among the Japanese dead was Lieutenant Colonel Genjiro Kuwada, the commander of the III/144th Battalion, the butchers from Tol Plantation. Catterns’ men now formed a sausage-shaped perimeter controlling the Sanananda Road and held on to it throughout the following day. Catterns later wrote how ‘the Japs encircled the position like Red Indians attacking a wagon convoy.’ With casualties mounting and ammunition low, he pulled his men out the following night. Only twenty-four remained unscathed.2
Meanwhile, Captain John Burrell’s company moved up the road to locate and engage the Japanese defences while Lieutenant Colin Prior’s company made a shallow move through the jungle on the right flank. Lloyd told Prior, ‘There are about thirty Japs up there; see if you can push them off.’ Prior’s lead platoon moved along the tree line until a machine gun opened up, forcing the Australians to ground.3
Stan Miller was Prior’s quartermaster sergeant, but a lack of supplies had left him short of duties. Under heavy fire, he went forward and brought back Bill Lollback, who had been shot in the shoulder within 30 metres of a machinegun post. He then went out across an open kunai patch to administer morphine tablets and bandage the severe stomach wound of Henry Benson, who was even closer to the Japanese. Miller returned to the Australian lines, had a stretcher constructed, then crawled back out with Bill Kemsley to bring in the mortally wounded Benson under covering mortar fire. It was approaching dusk when Miller went out a third time, this time to bring in another man who had been wounded in the knee. Recommended for a Victoria Cross, Miller would be awarded a Military Medal.4
The next day, 21 November, two of the four companies from the 2/2nd Battalion under Captain Bosgard and Captain Jack Blamey, General Blamey’s nephew, moved forward on the right, while the 2/3rd Battalion supported the main attack up the Sanananda Road. The two companies—only fifty men in all—moved up a dead-end track towards a former banana plantation area. At this point, they thought they were behind the enemy defences, but suddenly heard Japanese being spoken to their left. Going up a rise, Fred Williams saw three enemy soldiers, who were chased back across the creek to the main Japanese position. They left behind a supply dump containing a number of boxes of food, a box of Japanese banknotes, and another full of condoms. There was also plenty of rice, two tons of it.5
After moving further forward, both companies began losing men left, right and centre. Harry Honeywell told Williams to give the Bren to someone else and look after the wounded. Those in the worst shape were to be carried out last. When Williams asked how he should choose, he was told, ‘That’s your job.’ One of those left until last was Lieutenant Mark Strong, who had been shot through the chest; he died later that night.6 The next day, 22 November, Honeywell was also dead.
Meanwhile, Captain Don Fairbrother had taken the other two companies of the 2/2nd forward on the left flank. After advancing through kunai, swamp and jungle, they reached the Japanese perimeter. With the enemy machine guns firing along well-cut fire lanes, casualties quickly mounted, and Fair-brother pulled the men back into a perimeter of their own. Disregarding his own safety, Tom Harvey went out and retrieved three of the wounded. All through the rainy night, Fairbrother’s men waited for an enemy counterattack that never came: for most it was the longest night of their lives. Their position was only 20 metres from the Japanese lines, and if the men dug out any more than a scrape for a weapon pit, the depression would soon fill with water. Numbers gradually fell as enemy snipers and malaria took their toll. It had become an unspoken rule that soldiers would not be evacuated until their temperature had reached 103 degrees, and even then they faced a day’s walk out. After fourteen days, the exhausted remnants of Fairbrother’s companies were withdrawn.7
Much to General Harding’s consternation, the American Colonel Clarence Tomlinson’s 126th Regiment was put under Major General Vasey’s command on 19 November for operations against Sanananda and not Buna. However, the dire situation at Buna meant that only one battalion and some regimental troops were actually transferred by Harding, about 1400 men in all. On 22 November, Major George Bond’s 3/126th Battalion attacked on the left and right flanks of Lloyd’s 16th Brigade. Captain Meredith Huggins, on the left, made the most effective move, crossing the Killerton Track, reaching the Sanananda Road, and on 30 November setting up a roadblock behind the forward enemy positions. The Americans had spent nine days trekking through the swamps to get to the Huggins roadblock, as it became known. Now they were under constant attack and all but cut off from resupply: carriers had to travel through thick jungle and cross the Japanese-held Killerton Track. The location of other US units in the area at this time was a matter of confusion.
The Americans were also confused about the location of the Australian positions. On 25 November, an American 81-mm mortar round fell short, hitting the Australian lines. Harold Vercoe was killed and nine other men wounded, Jack Blamey mortally. Three of the wounded were Americans. Fred Williams and other wounded men were in a pit with a canvas shade over it; to an enemy observer in the tree-tops, it may have looked like a headquarters. A mortar bomb fell on the edge of the dugout, and Williams was temporarily both blinded and deafened. He recalls running around like a scalded cat with shrapnel wounds down his leg. One of the Yanks grabbed him, and he was taken out of the line. The next day a fierce Japanese counterattack hit the right flank and Bosgard was killed.8 The forward observation officer, Lieutenant Alfred Daniels, did outstanding work in calling down artillery fire to break up the attacks. Daniels put himself in extreme danger to ensure that the shelling fell where it could do the most damage—bravery that a few days later cost him his life.
Lloyd’s 16th Brigade, which had pushed the Japanese all the way back across the Kokoda Trail, was now spent. Since leaving Port Moresby, it had lost twenty-nine officers and 576 men in action; another fifty-six officers and 922 men were evacuated sick.9 However, the 16th Brigade did not leave the area entirely. Well into December, members of the unit were still holding the line at Sanananda, carrying on in the spirit of men like Harry Honeywell. Meanwhile, troops from 2/14th Battalion, their way blocked by extensive swamps behind the narrow beach, had been unable to make any progress along the coast from Gona towards Sanananda. The Allies would need to continue to push up the Sanananda Road from the south.
Two battalions from Brigadier Selwyn Porter’s 30th Brigade, the 49th and 55/53rd, now moved into the Sanananda area. It was the first action for the 49th, which had sat in Moresby during the Kokoda campaign. The 53rd had been sent over the Kokoda Trail and been harshly dealt with by the Japanese and by its own commanders; it had since been amalgamated with the 55th Battalion. Both battalions lacked training and battle experience, a shortcoming that was compounded by Porter’s failure to insist that the operation be properly planned with adequate reconnaissance. Both the Americans and Lloyd’s 16th Brigade had already tried the direct approach and failed, so it was not hard to predict the outcome if untrained militia troops were used in a hastily planned operation along similar lines. However, at this stage Gona had yet to fall, and the pressure from MacArthur and Blamey for an Australian victory or an Australian sacrifice was immense. On 6 December, Lieutenant Colonel Owen Kessels’ 49th Battalion, part of 30th Brigade, took over positions east of the Sanananda Road, with a creek on their right flank. There was heavy rain that night, but 7 December dawned clear. It was the last day that many of Kessels’ young Australian infantrymen would see.
After three minutes of intensive supporting fire from the four 25-pounders of 2/1st Field Regiment, the battalion attacked at 0700 with two companies abreast and two more moving up behind. Captain James Bryce’s A Company slewed to the right as it advanced about 400 metres, taking heavy casualties. Bryce and his 2IC, Lieutenant Geoff Unsworth, were wounded. Unsworth kept going, only to be killed. Kessels’ men were mown down by the well-camouflaged, well-concealed machine guns on the left of the track, which raked them with enfilading fire.10 On the far right flank, where the enfilade was less effective, Captain Russell Forster’s C Company cleared a number of positions and advanced about 700 metres.
Problems came when the follow-up companies got too far behind, giving the defenders time to prepare for their arrival. Some of the positions that fired on the second wave had not even opened fire on the first. Behind Bryce on the left, Captain John Thorn’s B Company reached the Japanese defences only to find all the positions manned. Thorn was one of the first to fall, and when Lieutenant Clarrie Forster took over, he was also killed. In the end a corporal, Clive Blair, took command and rallied the men. He led from the front, silencing one Japanese position and charging at another before he was wounded.11
Battalion headquarters, whose control had been decidedly lacking, now advanced 600 metres. Then, just as it was about to dig in, Porter ordered the battalion to withdraw to the original positions. All had been for nothing. That morning 180 casualties went through the regimental aid post. Of the twenty-four officers in the battalion, fourteen were casualties. The only remaining company commander, Captain Bill Noyes, reorganised the battalion remnants into a scratch company and positioned them on the right side of the road.12
One of the companies from Lieutenant Colonel David Lovell’s 55/53rd Battalion had made a diversionary attack to support Kessels, but as reports of what happened to the 49th came back, Lovell ordered two more companies into the fray. They attacked straight along the road in the afternoon, but when supervision of the attack broke down, Lieutenant Bill Reid’s company was hit by enfilading fire.
Porter had further bungled the operation by failing to concentrate his force. The 55/53rd Battalion attack was not scheduled until mid-afternoon, well after Kessels’ attack. In the 30th Brigade war diary, Porter says the problem came about because he had only two battalions and could therefore deploy only one at a time. If so, he was taking an extremely blinkered view of brigade command: he could easily have detached a company from each battalion if he required a reserve. Though the 55/53rd made a diversionary attack, it took place further out on the western flank, away from the track.13 By day’s end, Lovell’s battalion had gained only about 100 metres for the loss of eight officers and 122 men, twenty-two of them the NCOs who held the unit together. Kessels’ losses were even more horrendous, on a scale befitting Porter’s primitive tactics: fourteen officers and 250 men were dead or wounded, over half the strength of the companies that went forward that morning. Next day, Herring told Blamey simply: ‘Porter’s casualties yesterday were much higher than was at first anticipated.’14
The Japanese defenders at the crossroads were from Lieutenant Colonel Hatsuo Tsukamoto’s I/144th Battalion, the veterans of Kokoda, with a detachment from the III/41st Battalion and some engineers and labourers attached. After the fighting at Oivi–Gorari, about 450 soldiers from Colonel Kiyomi Yazawa’s 41st Regiment had managed to reach the coast at the Kumusi River mouth, from where they were taken to Sanananda. The 6000 Japanese troops at Sanananda endured punishing conditions, with little food and no prospect that things would improve. One wrote on 27 November that ‘the patients in the hospital are like living statues. There is nothing to eat. Everybody is in a weak and staggering state.’ After two days at the hospital, this soldier rejoined his company on the Sanananda Road so he could get food. He was killed.15
The two Australian commanders who had ordered the attacks, Herring and Vasey, called an end to the senseless carnage, mainly because there were no fresh units available. But more meat for the grinder was on its way.

On 15 December, two new units arrived at the Sanananda front, Lieutenant Colonel Oscar Isaachsen’s 36th Battalion and Lieutenant Colonel Edgar Logan’s 2/7th Cavalry Regiment. The men of the latter unit, normally the motorised component of the 7th Division, had left their Bren carriers behind and would fight as infantrymen. The 2/7th was 450 strong and organised as four squadrons of three troops each, mirroring an infantry battalion’s company-and-platoon structure. It had been in Port Moresby since early October 1942, and having waited so long to get into action, the men were full of vigorous anticipation. Or perhaps they just wanted to get away from the cruel training regime. ‘We were worked like hell,’ Hymie Pearlman wrote. ‘Some of the chaps looked like old men of 90 years . . . they will work the guts out of the boys.’16
On 15 December, Logan’s men were flown across to Popondetta and then marched to Soputa. As they moved up to the front a few days later, General Vasey singled out Pearlman and asked him how things were. Such inquiries were typical of Vasey, who liked to stay in touch with his men. Logan’s 7th Cav had the most ambitious role to play in the planned attack: it was to move to the Huggins roadblock on 18 December and push up the road to Sanananda Point the following day.
More than 100 native carriers would help carry two 3-inch mortars, 50 mortar bombs and other supplies. They were all lined up at Soputa when an Australian Administration man asked in pidgin, ‘Any boy yellow belly step forward.’ Five or six did so and were excused from duty. The rest of them were inserted in the Army line, a carrier between each pair of soldiers. The unit approached Huggins from the west along the tenuous American supply line, struggling through thick scrub, wading through chest-deep swamps, and crawling through kunai grass. An enemy machine gun in Tsukamoto’s forward perimeter was positioned to fire directly up the Killerton Track, and did so at regular intervals. Two boys in A Squadron were killed as they crossed the track. The men soon learned to wait for a burst of fire, then dive across a log and crawl to the other side of the track. Logan’s men reached Huggins that night, much to the relief of the Americans. Lieutenant Jim Donaldson was delighted to see that a mortar pit had already been dug for his two mortars.17
The next morning, 19 December, the artillery opened fire and Major Murray Strang’s A Squadron advanced north up the road. ‘At daybreak today,’ Pearlman wrote, ‘we started on our big adventure, from which many of us will never return.’18 Success was immediate: Strang’s men penetrated the enemy lines and surprised a party of Japanese preparing breakfast in an open area about 500 metres up the track. They also seized a number of trucks, all without loss. Strang now saw the opportunity to break the Japanese defences in front of Sanananda. He deployed his three troops, Lieutenant Eustace Barlow’s on the left, Lieutenant Henry Tomkins’ to the right and Lieutenant Cecil McDougall’s straight up the road. But the Japanese quickly recovered and were waiting for them. On the left flank, Barlow lost four men before he was also killed. In the centre, Strang was mortally wounded and McDougall was among the thirteen men killed; only two men in his troop remained standing. On the right, Tomkins’ troop fared better, but Tomkins was killed, picked out by a sniper and shot in the side, then shot again as he lay beside a tree. There would be no easy advance to Sanananda. The shattered remnants of A Squadron pulled back.19
Behind Strang, Logan ordered Captain Jack James’ B Squadron to the left and Captain Henry Cobb’s D Squadron to the right of the road. However, the Japanese troops whom Strang had earlier passed now opened fire. Jim Donaldson was close to Logan, advancing through a head-high kunai patch to the left of the road, when a machine gun opened up; Donaldson could see the bullets whistling through the kunai. Then he looked across to see Logan, who was a taller man, peering across the top of the kunai before abruptly dropping out of sight, badly wounded by a machinegun burst. His leg shattered, Logan started crawling back to Huggins, but he died on the way.20
On the left, Jack James also found enemy troops waiting and was forced back onto the road. When Robert Everingham, the man in front of ‘Sandy’ Sanderson, was killed as he crossed a log, Sanderson dived over to see how he was. He then tried to spot the machine gun by drawing fire to himself. Judging that it was about 30 metres away, he threw two grenades, fired an Owen gun towards the position, then took up his rifle and bayonet and charged. In fact, the Japanese were only 5 metres away. They killed him as he came up on the position: three Japanese bodies were later found next to his. Sanderson’s action had saved the rest of his troop from the carnage of point-blank machinegun fire.21 Given the ferocity of the Japanese resistance, all James could now do was to form a perimeter where he was, about 400 metres north of Huggins, and hold on. James was a young and active man with guts and a streak of enterprise, but this situation would test him to the utmost.22 With fourteen wounded men to tend, James placed them in the centre of the perimeter, a cleared area just to the left of the road. James Perimeter had been established.
A runner then came in from the south with the news that another twenty-two men were pinned down by machinegun fire along the road between the two perimeters. James turned to Jim Donaldson and said, ‘It’s up to you now.’ The phone line back to his mortars at Huggins was still intact, but Donaldson would have to judge the range by sound. Listening to the enemy machinegun, he estimated that it was 200 metres away, near a tall tree alongside the track. He called through to ‘Mick’ Burgess at the mortars and asked for a smoke round, but the bomb landed in the mud and failed to produce any smoke. Donaldson had heard the round drop, however, and thought it landed a bit close to their perimeter. He told Burgess to adjust the range ‘up 25 yards, five rounds rapid HE [high explosive].’ The bombs came down, and the first one struck the enemy position. Not all the Australians were pleased, though: ten minutes later, the twenty-two men reached the perimeter, only to tell Donaldson he had ‘got that mortar too close.’23
Soon after Lieutenant Eric Baldwin’s troop led Cobb’s squadron crossed the road to the right, Ken Muiry was shot by a sniper and killed. Pearlman wrote, ‘From the start the Japs were ready for us. MGs were chattering everywhere and snipers are everywhere . . . we cannot see where their shots are coming from and we just have to crawl on into the very face of it.’ Frank Doolin, Pearlman’s section leader, led the way and was stitched across the midriff by a burst of machinegun fire from a position he never saw. After Pearlman helped pull him back to a shallow trench, Doolin told him he was done for and that Pearlman should take over the section. He then asked another man to shoot him, but he refused. So ‘in awful agony a real man passed away.’24 Two others also died. With four men dead or dying, Cobb realised the attack was suicidal, so the section pulled back across the road and found some shelter in the shallow roadside ditch. Cobb and Bob Ebner then tried to get forward along the ditch. They managed to clear out one enemy post before Ebner was ordered back. Cobb kept on and was killed.25 When his body was later found, there were three dead Japanese in a nearby weapon pit and another next to Cobb. Before he had died, Cobb had buried his pack, which contained the plans for the operation.26 Captain Fred Haydon took over the squadron.
Meanwhile, Lieutenant Ken Cameron’s troop moved out of Huggins roadblock through the swamp, trying to outflank the enemy. When Ned Connell was hit, he called out to the men to stay away: ‘Don’t come over here. I’m pinned down. You’ll all be killed.’ When they came for him anyway, Connell pushed up his body to draw the enemy fire that would have killed the other men. A year and a half later, another brave soldier in New Guinea was awarded the Victoria Cross for a similar act of valour. Connell was mentioned in despatches. As with the attack further south, little had been achieved at dreadful cost. Cameron returned to Huggins.27
On 20 December, Jack James sent three B Squadron men, Ham Morton, George Chesworth and Frank Hancox, to see if they could reach Huggins. They left in the dark, making their way through the swamps and scrub following a compass bearing. As they approached the American perimeter, the three men were spotted by the Japanese, so they charged the final stretch with their Owen guns blazing. Chesworth and Hancox were shot down, but Morton kept going, leaving five dead enemy soldiers in his wake. Though shot through the arm, he made the perimeter, only to be fired on by the Americans. ‘Huggins, are you there? Ham Morton here!’ he called out. The firing stopped, and he came in. The bodies of Chesworth and Hancox were never recovered.28
On 21 December, Lieutenant Arch ‘Shill’ Shilliday, the 6 Troop commander, took a fighting patrol out from James Perimeter into the midst of the Japanese position blocking the road back down to Huggins. As James later told Dudley Leggett, ‘He went in fast, had a smack, made a swing and brought his troop back.’ At least ten Japanese defenders were killed; the three of Shill’s men who were wounded walked out. James added, ‘I didn’t expect them to come back. They stopped a crossfire and a head-on fire yet didn’t go to ground at all.’ Padre Frank Hartley noted that the patrol’s assault ‘awakened such a hornet’s nest that to retire became inevitable.’ But it also forced the Japanese to retire, easing the pressure on James. Shilliday later wrote, ‘How any one of us lived through the hail of lead at times is beyond my comprehension.’29
Using the information from Ham Morton, Lieutenant Sam Hordern took a small party out from Huggins the next morning to the right of the road, moving through thick scrub and sago swamp. Hordern dropped off two standing patrols under Sergeant Oliver Batchelor and Lieutenant Franklin Morgan to form intermediate posts before making it through to James Perimeter. Rations and ammunition parties followed, and later most of the regiment, nineteen officers and 205 men, concentrated inside the perimeter. Padre Hartley, who went with the men, later wrote, ‘The track wound in and out Japanese defences that had been abandoned after James Perimeter had been consolidated.’ On Christmas Day, the thirteen wounded men within the perimeter, eight of them on stretchers, were taken back to Huggins.30
Meanwhile, 36th Battalion took over the positions astride the Sanananda Road in the south, while the remnants of Kessels’ and Lovell’s shattered battalions swung right and left to extend the flanks. At 0722 on 19 December, four 25-pounders opened up in support of the attack. Captain Noyes took the forty-nine men in from the right flank, spread out in four platoon-sized groups. They did well and, reinforced by a company from the 36th, managed to reach Huggins late in the day. On the left, the 55/53rd was stymied by strong Japanese defences: seventy-five more good men fell. On 21 December, Porter threw the rest of the 36th Battalion in on the right, where Noyes had made his ground, but little more was achieved for the loss of another fifty-five men. Porter’s only contribution was to slight the 36th and 55/53rd for failing to achieve their objectives. ‘NOT fit for war,’ he wrote to Vasey on 22 December. Heedless of the gallantry with which his men had fought and died, he added callously that they ‘had been almost exterminated in 55/53 Bn and are likely to be exterminated in 36 Bn.’ He didn’t even mention the shattered 49th.31
What confidence the men had in Porter at that point is not recorded. More of them might have been alive to express their views if Porter had bothered to ask himself how a poorly trained militia brigade could succeed where a crack AIF brigade and fresh American troops had failed. In terms of training, why had Porter—who had been the brigade commander of the 49th and a good part of the 55/53rd Battalion for over six months and who had experience on the Kokoda Trail—not taken more trouble to ensure that the battalions were fit for war? Most of the training they had had in Port Moresby was in unloading ships and shifting gravel. On 22 December, Brigadier Dougherty took command north of Huggins. He brought the remnants of the 39th Battalion across from Gona to join up with the remnants of the 49th.
Back with the 7th Cav, Hymie Pearlman’s section was given the job of tackling the enemy machinegun position alongside the road. He told his soldiers, ‘It is like sentencing men to death,’ but they advanced until sniper fire stopped them. Pearlman did the point work, enduring ‘the strain of looking into every tree, every tree hole and bit of jungle . . . We just crawl, or keep very low . . . the going is mostly through dense knee to ankle depth swamps full of rotted dead men, mostly Japs, some Yanks and I believe, an Aussie artillery officer.’ Christmas Eve held no joy for the men on the Sanananda Road. Pearlman wrote, ‘We sleep and eat amongst the dead here and the stink of rotting flesh is everywhere.’32
On 27 December, Lieutenant Colonel Charles Moses, who had escaped from Singapore earlier in the war, took command of the unit. Cyril Treasure flew across to Popondetta with Moses, but while Moses got a jeep ride up to Soputa, Treasure had to walk until General Vasey picked him up in a jeep. Treasure then trudged the ‘dead men’s bones’ track to Huggins and moved on along the supply track to James Perimeter, from where he was posted to Sergeant Batchelor’s intermediate position outside the main perimeter. Of his first patrol to pinpoint an enemy machinegun position, Treasure wrote, ‘The idea was to lie doggo and observe, but Don [Doyle] could not resist giving them a blast and in return fire Don went down with a wound in the face.’33
Treasure again left James Perimeter on 1 January as part of Ken Hurst’s troop, sent to reconnoitre the enemy positions to the north. Moving through the mud and slush along the edge of the swamp, the men were at times waist deep in water, forced to hold their Owen guns above their heads. On the second day, the patrol moved along a creek, dodging enemy positions as Hurst searched for higher ground. Two days in the water was hard on the men, so on the third day they decided to shoot up the Japanese before heading back. After crawling up to the edge of an enemy position, Treasure and Hurst opened up on a Japanese officer and two men before scooting off. The Australian patrols from James Perimeter managed to kill seventy-eight enemy soldiers without loss. The country boys in the unit showed a fine instinct for such work.34
The brave men of 7th Cav deserved a Christian burial, and Frank Hartley was committed to providing it. He asked Colonel Moses for two men to help with the burials. ‘Not while the hot stuff is going on,’ Moses told him. When Hartley then asked Brigadier Dougherty, he was told that he could go ahead, if he could get two volunteers. Two men did so, even though they had not attended any of Hartley’s services. They went out, dug the holes, and then pushed the bodies into them. At one point, small-arms fire broke out as Hartley was saying a prayer for the dead. The two soldiers hit the deck, but the padre stood there and finished the burial service. ‘Are you mad?’ the men said. ‘I’m doing God’s work,’ he replied, ‘and God will protect me.’35 God or fortune blessed Hartley, but not Reverend Clive Cox. Further south, on 28 December, Cox went out to bury the fallen from the 49th Battalion’s attack. He never returned: his God held little sway on this battlefield.
Sanananda had become a stalemate, and Herring knew he would have to wait until Buna was reduced before he could put in more troops. The three battalions of 18th Brigade, already shattered, were now asked to give even more. Meanwhile, the US 163rd Regiment, led by Colonel Jens Doe, had moved into the area. Its 1/163rd Battalion took over Huggins roadblock and James Perimeter on 2 January. This was the first unit from the 41st Division to reach the front. Like the 32nd Division before them, they had a lot to learn.
An American company arrived at Huggins en route to relieve the 2/7th Cav at James Perimeter. ‘Come with me,’ Jim Donaldson told its captain. ‘I’ll show you the track around.’ The captain said he would prefer to use the road, adding, ‘I’ll get my heavy weapons platoon.’ Donaldson watched the young platoon move out from Huggins: ‘They were babes in arms,’ he recalled. Within ten minutes, firing broke out further up the track. Having set out with twenty-five men, the platoon sergeant returned with only nine. Shocked, the captain turned to Donaldson and said, ‘I think we’ll try your track after all.’36 The Americans were still trying to break through along the road from Huggins to James three weeks later, but even a visit to the front line by General Vasey and the American commanders Lieutenant General Eichelberger and Colonel Doe could not help them advance. Meanwhile, the US 126th Regiment was withdrawn, only 165 men remaining of the original 1400.37
The toll on the Japanese defenders was no less. Susumu Kawano, who had joined Kuwada’s III/144th Battalion just before the Kokoda campaign, was one of the defenders at Sanananda. His diary entries recorded the ghastly conditions. 1 December: ‘Enemy attack is terrific . . . I cannot stand the terrible stench of the dead.’ 8 December: ‘Today is the first anniversary of the present war. I have not eaten anything for 5 days.’ 31 December: ‘I am bony and skinny. I walk with faltering steps. I want to see my children.’ On 3 January Kawano went to Giruwa hospital to get food and made his last entry: ‘Dead bodies of our troops were lying about the hospital, so I could not even set my foot down.’38
Brigadier Wootten sent the 2/9th Battalion, now under the command of Major Bill Parry-Okeden, to take over from the remnants of Kessels’ 49th in the swamp and scrub adjacent to the road. Lieutenant Colonel ‘Wolf ’ Arnold’s 2/12th was on the left, with the 7th Cav to its left. Wootten planned yet another attack on the Japanese road junction positions aided by three tanks and two companies from the 2/10th Battalion. Following the loss of Dobbs, the 2/10th was now commanded by Lieutenant Colonel Charles Geard.
With his battalion still raw from the losses at Buna, Parry-Okeden had to make do. Lieutenant Paul Lloyd commanded A Company. ‘This lad was very inexperienced but was a good type and reliable with plenty of dash,’ Parry-Okeden wrote. ‘However I did not have much confidence in him.’ Lieutenant George ‘Ken’ Jackson, one of the original officers remaining in the battalion and ‘a most reliable commander,’ had taken over B Company. Heavy rain fell on the night of 10 January, turning ankle-deep tracks into waist-deep creeks. ‘There was water feet deep everywhere,’ Parry-Okeden observed. ‘We were plodding about over our knees in mud and water. Men’s feet were giving trouble. Tinea was prevalent.’39
Two days later, the attack went in. Parry-Okeden later wrote: ‘The intention was to attack and destroy the enemy in the timbered area on the right. Two companies forward, B Coy right, A Coy left.’ Patrolling had shown that this area was lightly defended by Japanese outposts. The troops were issued with emergency rations for five days, another 200 rounds of ammunition each, and extra grenades. Jackson’s company gained the outer defences and consolidated. Parry-Okeden recalled: ‘Old Ken Jackson was speaking on the phone to me quite cheerfully with his usual old style. I gave him orders about consolidation and about 15 minutes afterwards McGinnis rang and said Ken had been killed. Shot clean through the head.’40
Meanwhile, after the artillery barrage, Lloyd’s company crossed the creek under heavy enemy crossfire. Lieutenant John Grant, one of the reinforcement officers, was killed, while Len Teese was wounded in the head and shoulder. Brian ‘Lofty’ Wells pulled him out.41 Still concerned about Lloyd, Parry-Okeden then went forward to get the company moving. ‘They had come under heavy fire and Lloyd was not doing a thing about it. The poor bugger really did not know what to do. I am afraid that I was very short with him.’ Lloyd was killed soon thereafter, as happened to so many frontline leaders at Sanananda. An experienced NCO here could make all the difference. Accordingly, Parry-Okeden ‘reduced all reinforcement NCOs to privates and made all the originals NCOs, which was a great help.’42
On the left, the 2/12th Battalion had little joy. Here, three Stuart tanks were used for support but could not deviate from the road. Lieutenant Des Heap’s tank went in first and soon had two 37 mm anti-tank gun shells ricochet off its front armour. Another shell hit as Heap fired back at the gun flash, then a fourth shot struck home. All Heap could do was get the dying machine off the road to allow Charles Boughton’s tank to advance. The anti-tank gun then bombarded Boughton’s tank with over twenty high-explosive rounds, wounding four crewmen, Boughton mortally. Despite burns to his face, driver Frank Lynn managed to turn the shattered tank and get back down the road, leaving the way open for Sergeant Ken MacGregor’s third tank. MacGregor took his tank further up the road, level with the anti-tank gun, before a land mine shattered a track and stopped the tank. Twenty-three mines were later found buried along the road, several of which had been driven over without exploding. A Japanese defender then attacked MacGregor’s tank with a Molotov cocktail, setting it afire. None of the five-man crew survived.43
Despite the failure of the tanks, Captain John Trinick and Captain Owen Curtis, the sole surviving C Company officer from Buna, took their 2/12th companies forward. Trinick, who should not even have been in the front line, was mortally wounded. Curtis’ men made three attacks and three times failed, hampered by the twisted and torn trees felled by the artillery fire. Between them, the two companies had lost four officers and ninety-five men. After the horrific losses at Buna, Arnold’s 2/12th was now being bled white. Belatedly, Vasey realised that the head-on attacks against the Japanese defences were ‘repeating the costly mistakes of 1915–17’.44 When the Deputy Chief of the General Staff, Major General Frank Berryman met Vasey the next day, he noted that the commander ‘painted a gloomy picture on his front.’45 What none of the Australians knew at that stage was that, after almost two months of resistance, Tsukamoto’s stubborn defenders had been ordered to pull back: only the sick and wounded were to remain. By dusk on 14 January, the Australians had finally occupied the road junction.
Next morning, they began the drive for the coast. The 2/10th took the lead, with Major Trevivian’s men advancing up the track towards Cape Killerton. Nightfall found them stranded in the swampy hinterland, perching in trees to stay out of the water. It was a slow slog through the swamps. Though up to their chests in water, the men somehow kept moving, and finally reached the cape. From there, they pushed down the coast towards Wye Point, where the enemy had dug in, stopping the advance. Captain Frank Cook took A Company inland, heading for the Sanananda Road, and by late on 16 January they were almost there. Wootten sent two companies from Arnold’s 2/12th to back them up. Drenching rain made the swamps almost impassable in places, but by midday on 17 January, Captain Harry Ivey’s company had reached the road, as had Cook’s company further south.
Meanwhile, Wootten’s third battalion, the 2/9th, was also on the move. Pushing northeast through the swamps, A Company spent two days in the mud and water, meeting only enemy stragglers. Then, on the night the company reached the beach, a ferocious storm broke, leaving the men waist deep in water. At dawn, the attack went in along the beach against scant resistance, and Sanananda village was taken. Parry-Okeden then pushed C Company down the Sanananda Road to link up with the 2/12th. The men of that battalion had been stymied in their own push north, taking heavy losses as they tried to break through along the right-hand side of the road. In a final move, Colonel Arnold sent in Frank Cook’s company on the left. Here the Japanese positions were surrounded by swampland except for one narrow corridor of higher ground, well covered by machine guns. At 0850, Cook’s men charged the position under a barrage of hand grenades. Despite the heavy fire, Cook kept them going. The position, manned by around 150 enemy troops, was taken and a large quantity of supplies captured.46 That success allowed Arnold to push his men through to contact the 2/9th and reach the coast. More enemy pockets remained, with more trudging through the swamps and more casualties. The remnants of the Japanese hospital camps along the road presented a pitiful sight. Arnold observed that ‘the whole area, swamps and rivers included, [is] covered with enemy dead . . . the stench from which is overpowering.’47 The Americans encountered similar scenes. When they came upon a Japanese field hospital with about ninety skeletal patients, twenty resisted capture and were killed.48
Meanwhile, Trevivian’s 2/10th company had been struggling along the beach. With the sea on one side and the swamps on the other, it was difficult work. As Lieutenant Gordon Mates’ platoon reached a narrow stretch of beach approaching Sanananda Point, machine guns opened up. To divert the enemy’s attention, Murray Saint, who had never been in combat before, stood up and fired back with his Bren gun. He was immediately wounded, but his action allowed the men in the forward sections to scramble for cover. Wounded four times and blinded in one eye, Saint did not stop firing until a bullet struck his Bren gun, disabling it.49
On 20 January, the company managed to get 500 metres forward under cover of mortar fire and capture an important position. Trevivian killed an enemy colonel who stood beneath a Japanese flag affixed to a mangrove tree. Within 300 metres of Parry-Okeden’s men on the other side of the pocket, the remaining thirty men from Captain Hugh Matheson’s company made the final connection through the swamps on the inland flank. The men of the 2/9th saw them walking down the beach in line extended, each firing his automatic weapon. Sergeant Don White recalled that ‘ahead of the sixty slowly moving boots a wall of golden tracer studded fire marched ahead.’50
Matheson had attacked at 0930 without the promised artillery barrage, though he had support from the mortars at Wye Point. The Japanese bunkers, which had to be built above ground because the water table was so close to the surface, were constructed from rice bags and ammunition boxes filled with sand. Matheson’s men surprised the defenders in the first two, killing the eight or so occupants before heavy fighting stopped the attack. When Dick Allen saw the defenders trying to get a machine gun into position, he ran down the open beach to the water’s edge and opened up with a Bren gun from 100 metres. Calling a warning to his platoon, he bowled over the Japanese soldier carrying the machine gun and kept firing on any other movement. His haversack riddled with holes and his webbing pierced, Allen stood his ground for an hour and a half until the rising tide forced him up the beach. From there, he indicated targets for ‘Snowy’ Evans, who hit many of them with rifle fire.51 In the late afternoon, the 2/9th moved down from Sanananda Point and joined the 2/10th in mopping up, leaving some twenty Japanese bodies on the beach. As the pressure told, more Japanese moved to the coast, and barges came in at night to evacuate them. The Australians could hear the throb of the motors as the barges approached. When one beached opposite the Australian positions, ‘Alf ’ Franklin’s crew quickly got the Vickers gun into position and sunk it.52
The men of the 2/10th had done their job, but the survivors, already spent after the travails of Buna, were at the end of their tether. Trevivian later recalled that the final attack ‘was the hardest mental and physical ordeal of the lot.’ At the end, his body gave way and he was carried out. Back at Soputa, many men who had malaria but had somehow kept going finally collapsed. The strength of the battalion when it boarded the planes for Port Moresby was eight officers and seventy men: five officers and 150 men had come in as reinforcements before Sanananda. Matheson’s company was down to just twelve men. Matheson had already been evacuated with malaria, which had struck him as the final attack began.53
General Eichelberger later observed: ‘One can’t imagine a more unfriendly country or worse conditions to fight in . . . the whole campaign was a military nightmare.’54
As the final Japanese defenders were hunted down, the Papuan campaign came to an end where it had begun seven months earlier. For the Australians, these final battles to reduce the beachheads, so costly for all the troops involved, were the price of having the Americans as allies—the reverse side of the coin that until then had fallen so favourably for Australia. The United States Navy had prevented the Japanese invasion force from reaching Port Moresby during the Battle of the Coral Sea, and American aircraft had backed up the advance to Kokoda and the coast. Further afield, the US submarine fleet was starting to take a deadly toll on the Japanese merchant fleet. On the Papuan beachheads, however, it was the turn of the Australians to help out their struggling ally and turn the tide in the battle for New Guinea.
Over 1250 Australians and 900 Americans died to give General MacArthur his victory. General Blamey knew what was at stake. His own position was a minor chip in the game: the real prize was the partnership with a powerful ally. The US Navy was pressing for an offensive in the Central Pacific, starting with attacks on the Gilbert and Marshall Islands and moving on to the Marianas. If the battle to reduce the Papuan beachheads had become locked in endless stalemate, the Central Pacific option would have acquired much more importance. This, however, would siphon naval resources away from the Southwest Pacific—and from MacArthur and Blamey. Victory in Papua opened the way for MacArthur’s preferred strategy of leapfrogging north through the islands of New Guinea and the Philippines concurrently with the Central Pacific drive towards Japan. The brigades of Vasey’s 7th Division had been all but destroyed in the struggle for Papua. Now they would be rebuilt. They were needed for the next stage: the contest for the mandated territory of New Guinea.
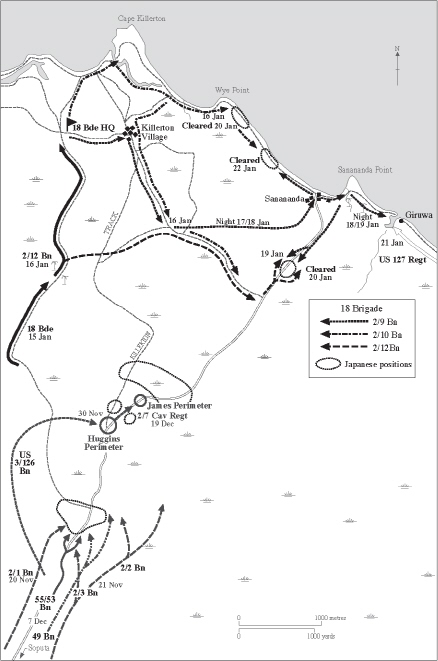
His hands bound, Alex Davis is marched across Kavieng airfield by Japanese naval troops, 23 January 1942. Davis was among the 1053 later lost in the sinking of the Montevideo Maru. (Author’s collection)
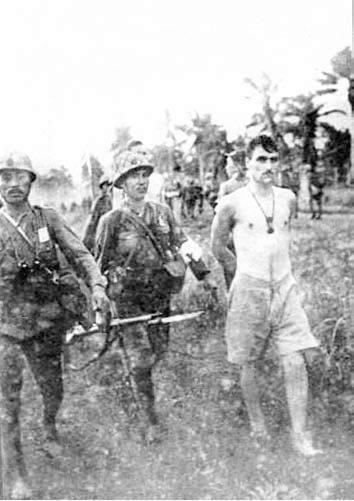
A Japanese propaganda leaflet, inadvertently mirroring the fate of the Japanese Army in New Guinea. (US National Archives)
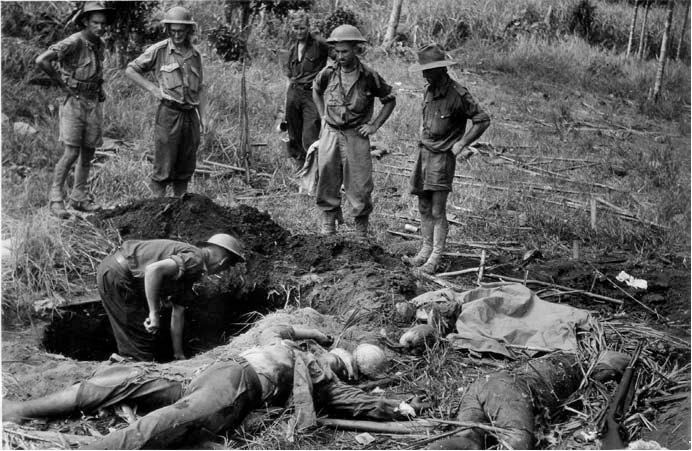
Burying Japanese dead. Gona, 14 December 1942. (Photo by George Silk. Department of Information)
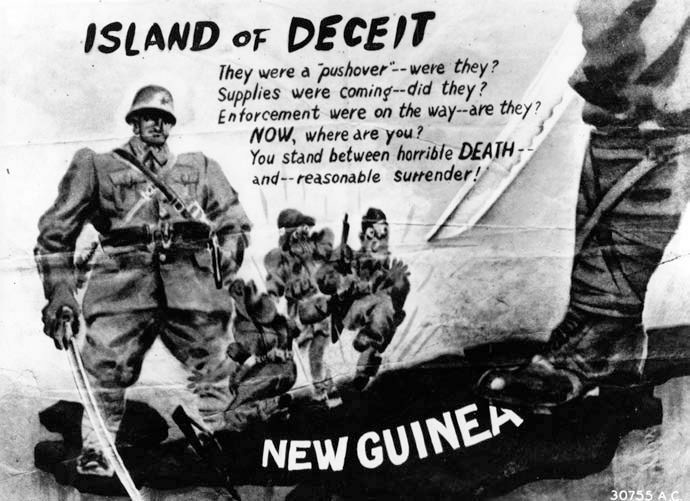
‘Formosan (Taiwanese) unit fighting through the Owen Stanley mountains.’ New Guinea, 1942. Painting by Goro Tsuruta. (US National Archives)
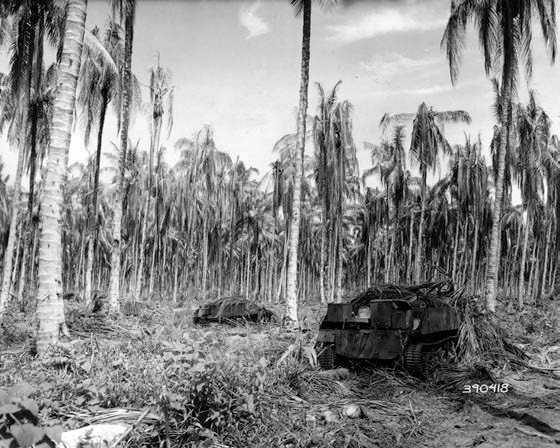
Three of the Bren-gun carriers knocked out during the attack at Cape Endaiadere on 5 December 1942. (US National Archives)
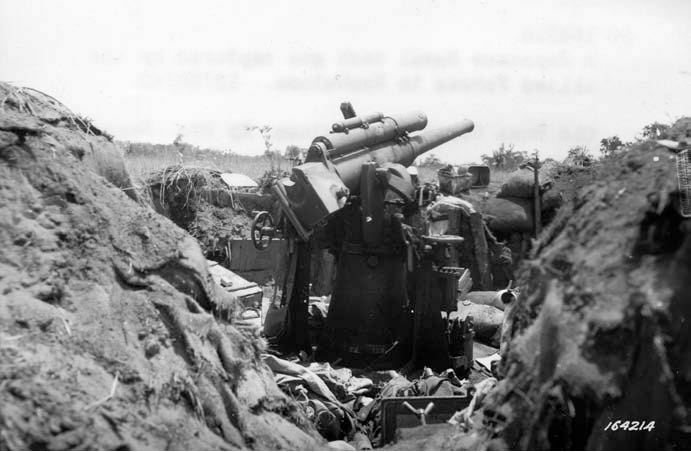
One of the dual-purpose Japanese 3-inch guns at the western end of Old Buna airstrip. (US National Archives)
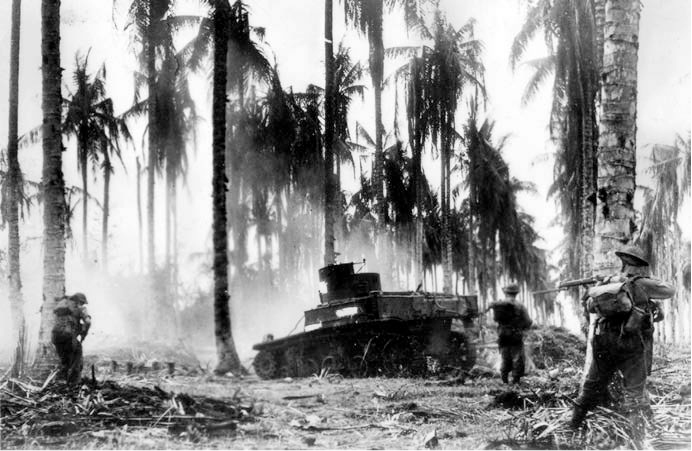
Buna, 1 January 1943. Stuart tank blasting bunkers in support of D Company, 2/12th Battalion, during the attack to the coast. (Photo by George Silk. Department of Information)
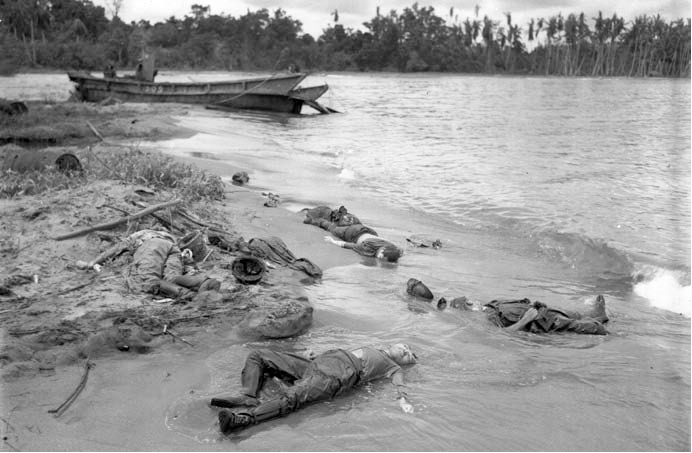
Buna, 3 January 1943. Japanese dead on the beach west of Giropa Point. (US National Archives)
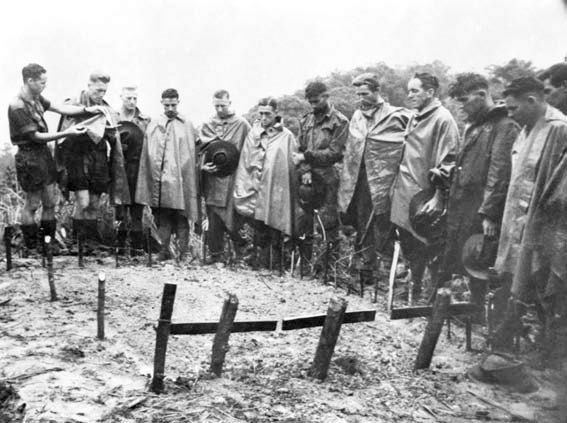
‘Hard fight, tired men—wet capes—tired eyes . . . they prayed with sincerity their homage to their three fellow comrades.’ Timbered Knoll, 29 July 1943. (Photo by Damien Parer. AWM 127986)
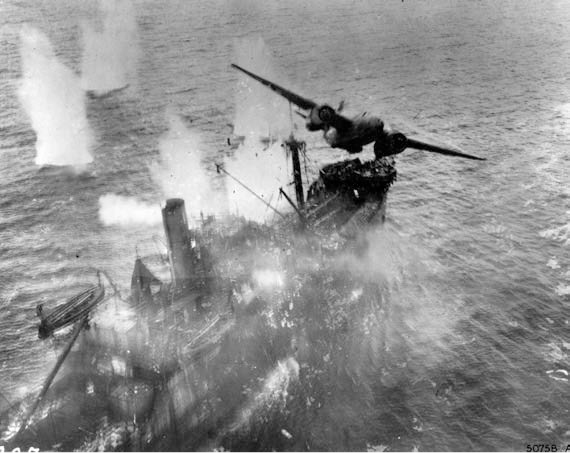
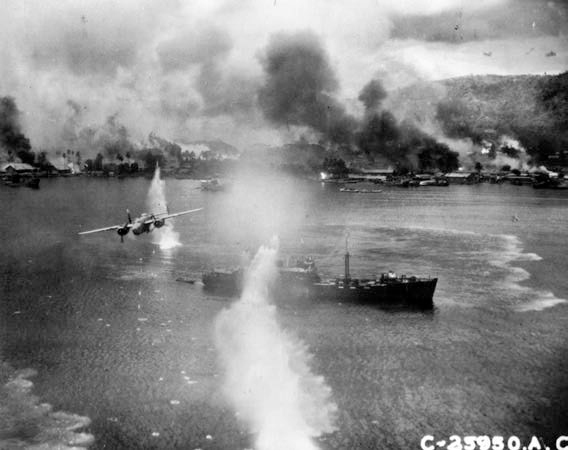
Demonstrating the mast level skip-bombing tactics that were the key to success during the Battle of the Bismarck Sea, a USAAF A-20 Havoc attacks a 4000-ton Japanese transport off Wewak on 19 March 1944. (US National Archives)

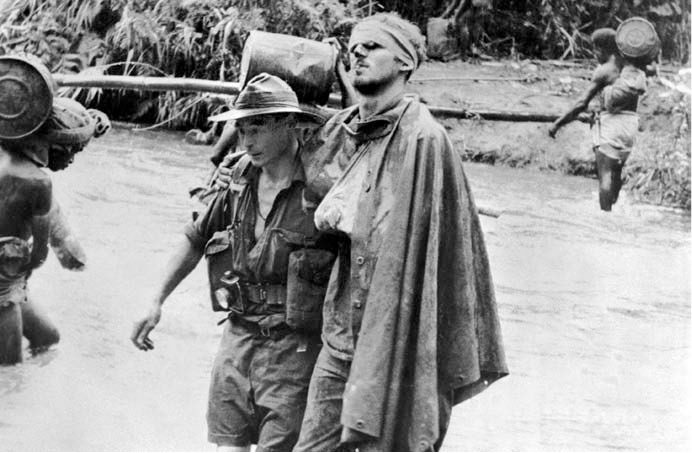
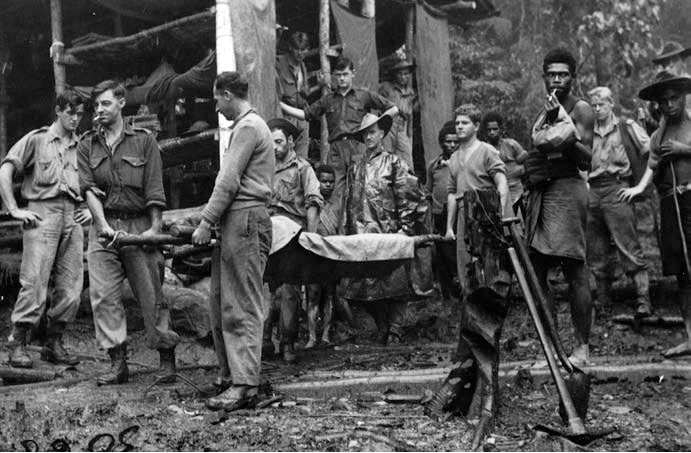
‘A blinded digger led by an RAP sergeant stumbles over a stony creek.’ Gordon Ayre helping Wal Johnson across Uliap Creek, 13 July 1943. (Photo by Damien Parer. AWM 127971)
Infantrymen from 2/5th Battalion in a captured weapon pit at Mount Tambu, 23 July 1943. (Photo by Robert Buchanan. AWM 056767)
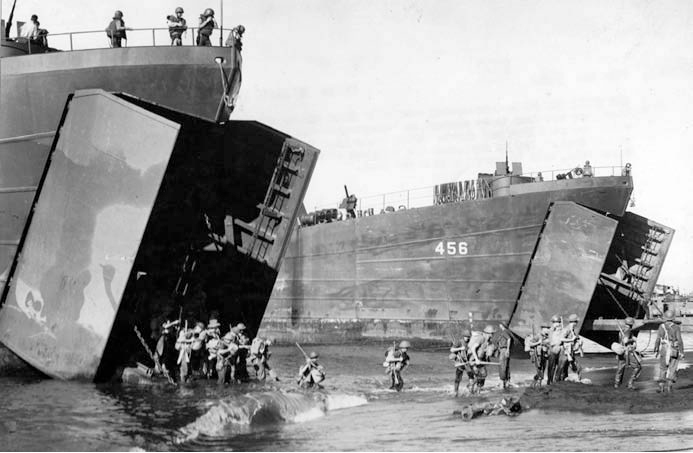
Lae, September 1943. Ninth Division troops disembark from LSTs. (US National Archives)
Grim work at the Advanced Dressing Station at House Banana near Mubo, 16 August 1943. (Photo by Gordon Short. Department of Information)

‘Not much more than a decorated tightrope.’ The rebuilt kunda bridge across the Busu River near Lae, October 1943. (Photo by Don Bain)
‘We were just bloody good.’ 2/6th Independent Company troops at Kaiapit, 22 September 1943. (Photo by Norm Stuckey. Department of Information)
Les Agars gets a light from one of the carriers, Ramu Valley, October 1943. (Photo by Norm Stuckey, Department of Information)
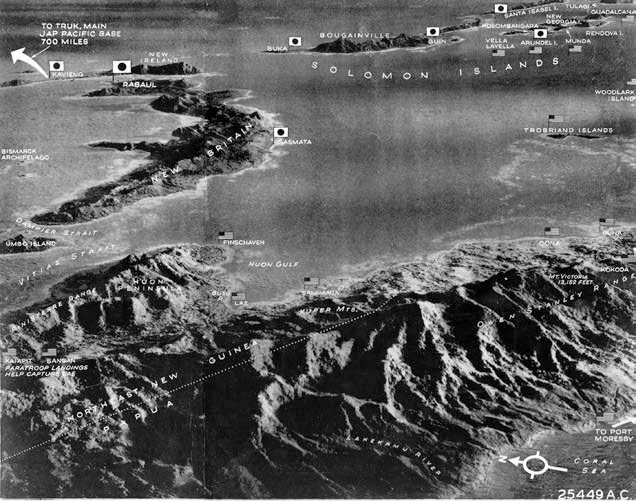
New Guinea theatre, October 1943. (US National Archives)
‘There never was country such as this.’ 2/9th Battalion infantry dig in on Green Snipers Pimple, Shaggy Ridge, 22 January 1944. (AWM 064260)
Les Thredgold and George Vandeleur on the southern shoulder of Shaggy Ridge, October 1943. (Department of Information)
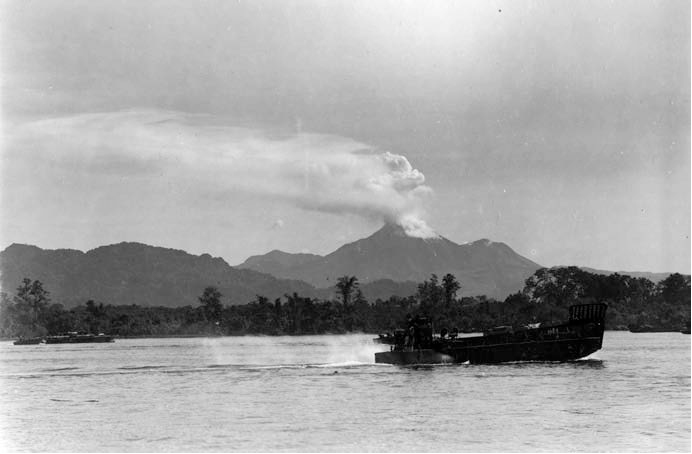
View across the steamy coastal lowlands near Torokina towards the mountainous spine of Bougainville, Mount Bagana dominating. (US National Archives)
B-25 Mitchell bomber over Simpson Harbour Rabaul, 2 November 1943. (US National Archives)
Following the action at Milak, Lieutenant Ken Perkins (in hat) stands with Lieutenant Neil Redmond. Seated at left is Corporal Tony Gannan. (Courtesy of Keith Johnston)
Berry’s Hill on the Numa Numa Trail, Bougainville, August 1945. Japanese troops parade for surrender. (Photo by Don Bain)
Former Japanese bunker position, Cape Endaiadere. (Author’s photo)
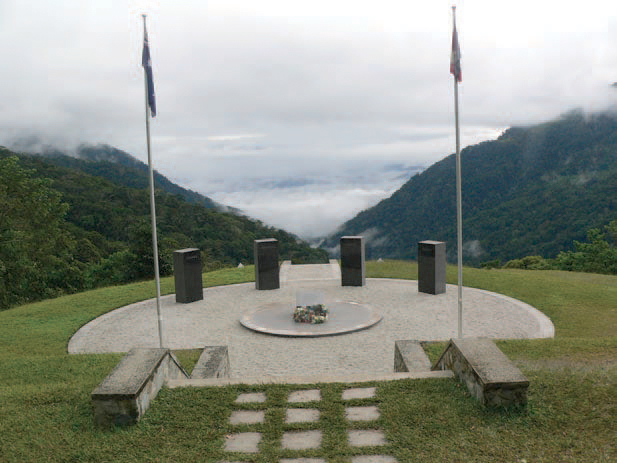
Courage, endurance, mateship, sacrifice: the memorial on the Isurava battlefield to the Australians and Papua New Guineans who fought and died on the Kokoda Trail in 1942. View is north along the Eora Creek valley. (Author’s photo)
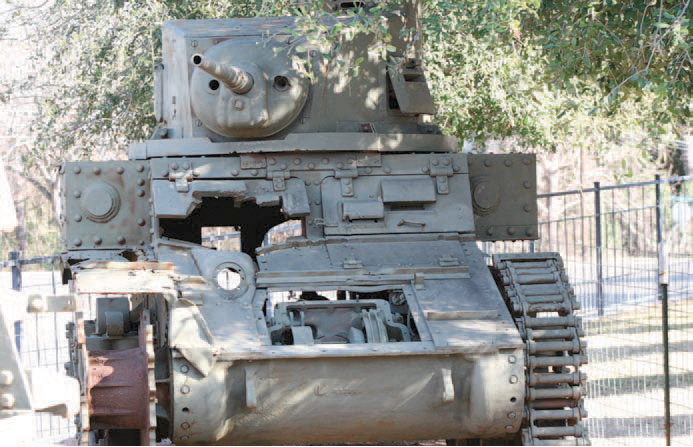
Jack Lattimore’s Stuart tank lost on 24 December 1942, clearly showing the 3-inch shell damage, National Museum of the Pacific War, USA. This tank, plus Lattimore’s and Grant Curtiss’s tanks lost on 18 December, was recovered in 1973. (Photo by Justin Taylan)
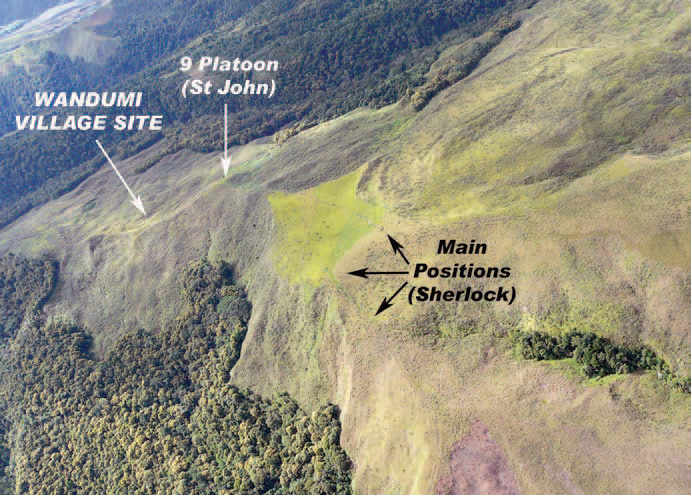
Aerial view over Wandumi Ridge. (Author’s photo)
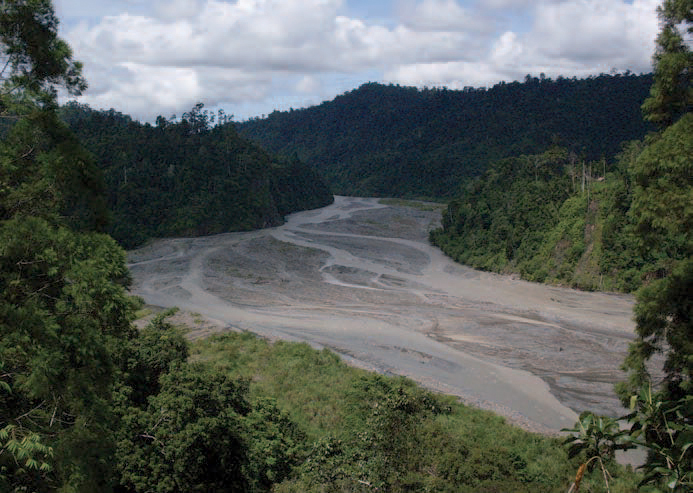
The gorge of the Busu River, looking downstream. (Author’s photo)
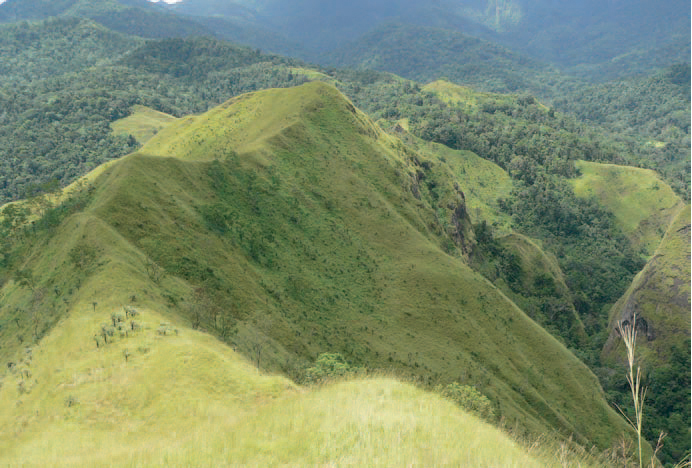
View along the ridge from King’s Hill to Pallier’s Hill. Uria River gorge to the right. (Author’s photo)
Billy Wilson’s gun at Coonabarabran. (Author’s photo)

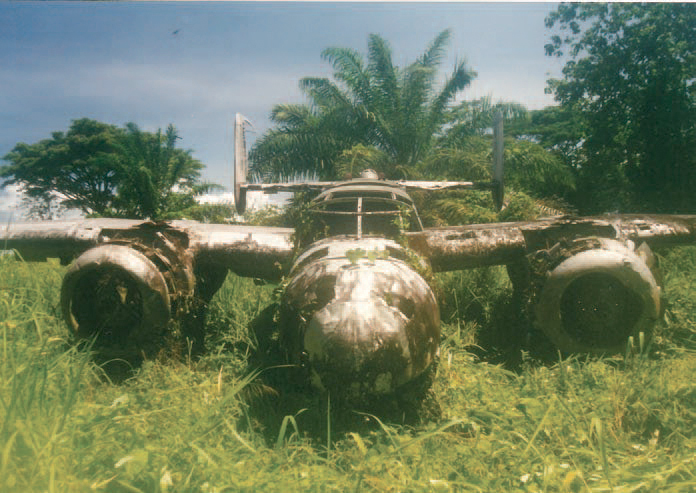
B-25 Mitchell bomber at Talasea, New Britain, 2001. (Author’s photo)