Granny Square Techniques
Granny squares are fun to crochet; you’ll feel a little surge of satisfaction with every square you finish. Though not unusual, there are certain techniques used for granny squares that differ from standard crochet in rows or rounds. If granny squares are new to you, use this section as a guide to those techniques. If you’ve already crocheted stacks of granny squares, use it to refresh your memory and perfect your skills.

GETTING STARTED
Most granny squares are worked in rounds, beginning with a center ring. There are different ways to begin the ring. The method you choose may depend on whether you want the center to be open or tightly closed.
CHAIN RING
In this method the size of the ring is fixed and cannot be tightened.
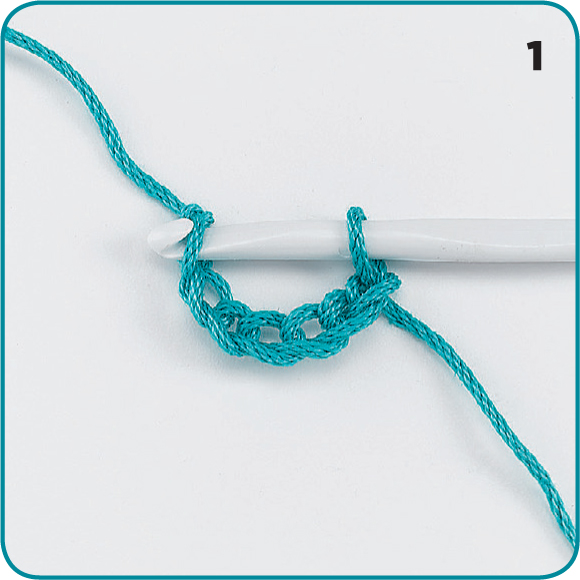
1. Make a foundation chain, joining with a slip stitch to form a ring.
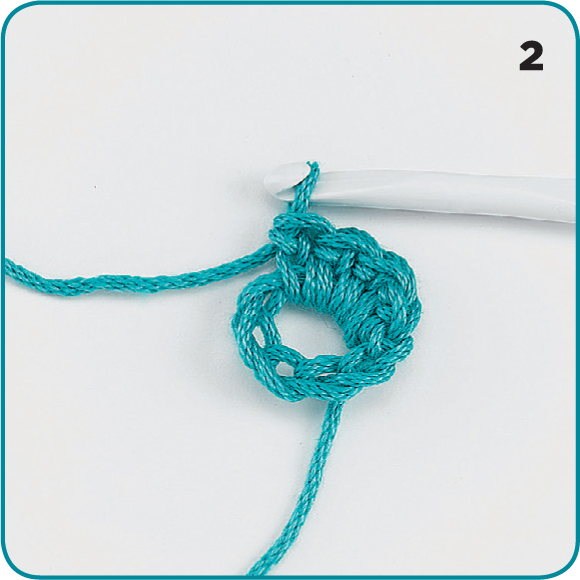
2. Work the next round inserting the hook into the center of the ring rather than in the chain stitches.
SLIP KNOT

1. Form a loose slip knot. Holding the tail between your thumb and middle finger, work the first round of stitches into the slip knot.
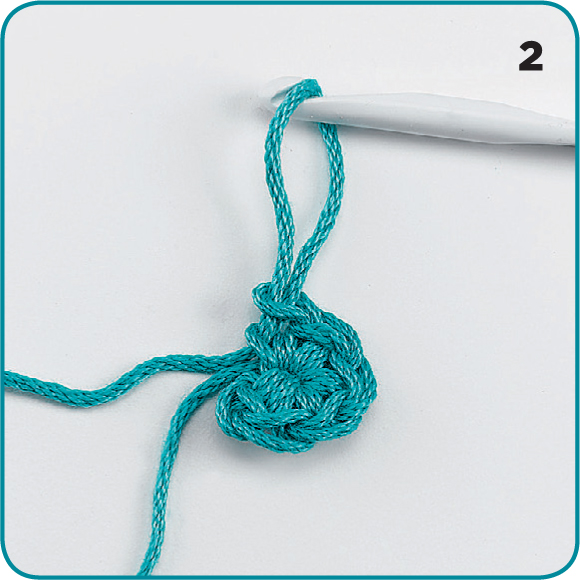
2. Before joining the round, gently pull the tail of the knot to tighten the center.
ADJUSTABLE RING
A third method, sometimes referred to as magic ring or sliding loop, also allows you to pull the ring tightly closed.

1. Wrap the yarn clockwise around your index finger twice, leaving a 6" (15.2 cm) tail. Holding the tail between your thumb and middle finger, slide the hook under the wraps and catch the working yarn.
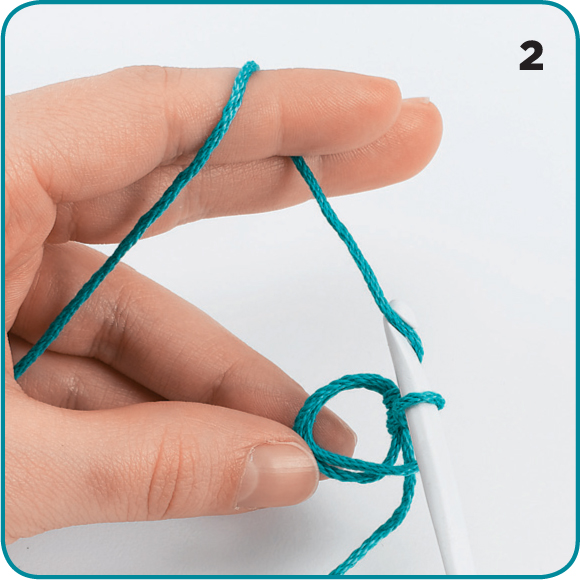
2. Pull the working yarn through the ring, and chain the designated number of stitches.
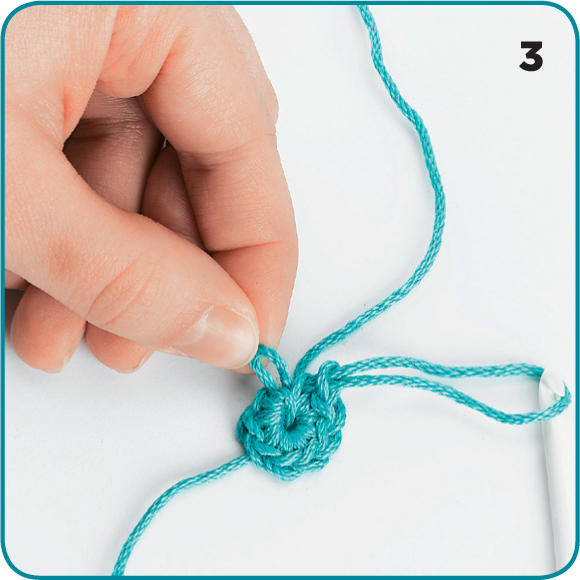
3. Work additional stitches into the two loops of the ring, keeping the tail free. Before joining the round, pull on the tail a little; one loop will tighten slightly. Pull on that loop, which will tighten the other loop.
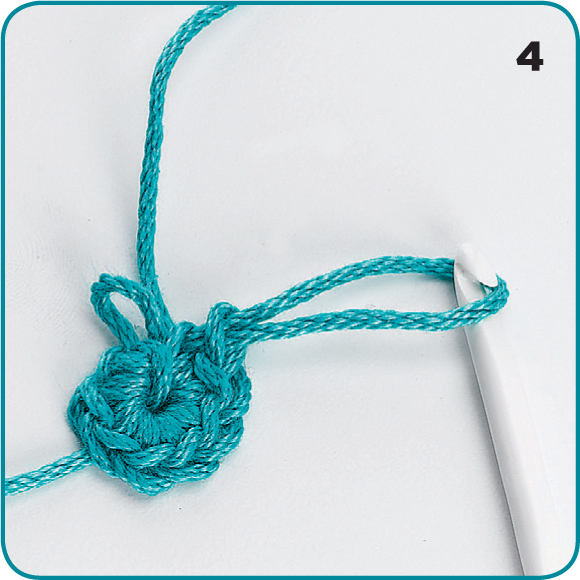
4. Then pull the tail to tighten the remaining loop.
CLASSIC GRANNY SQUARE
Most granny squares are worked in rounds instead of rows. A classic granny begins with a foundation chain formed in a circle. Because many of the floral granny squares in this book are very textural, you may find it appealing to separate them with the plainer classic granny squares for projects like blankets. If you have never crocheted a granny square before, this is the best place to start!
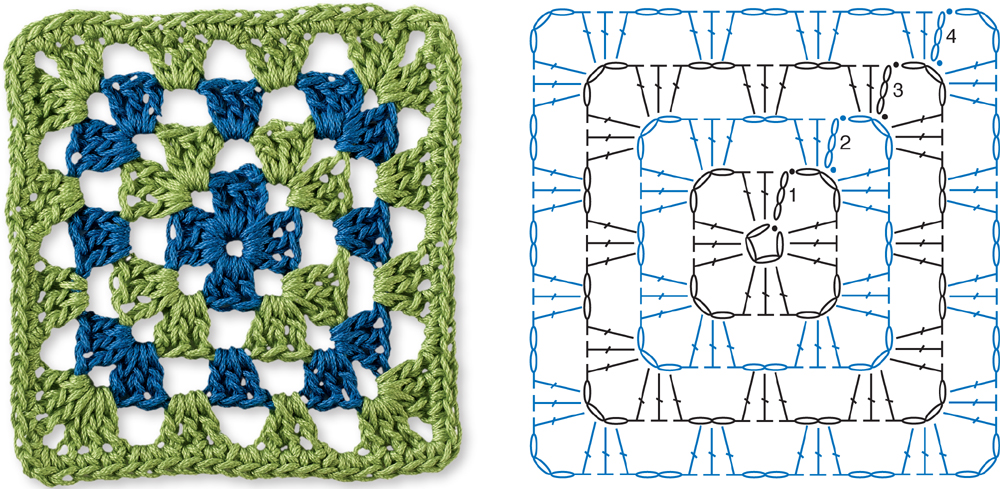
HOW TO CROCHET A CLASSIC GRANNY SQUARE

1. Foundation rnd: With A, ch 4, join with a Sl st to form a ring.
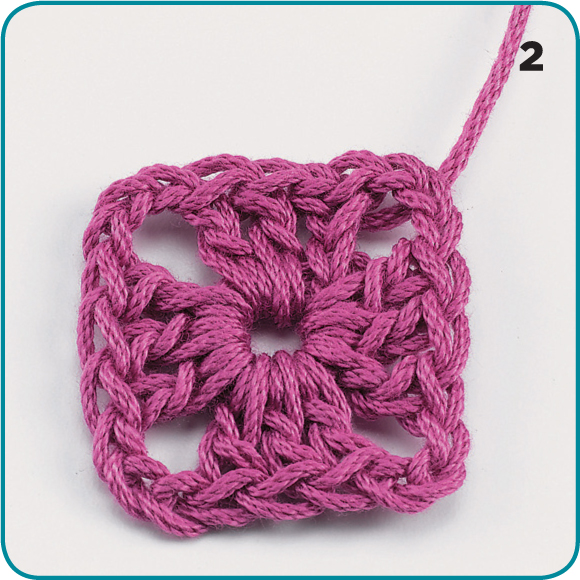
2. RND 1: With A, ch 3 (counts as a dc), work 2 more dc in ring, *ch 3, work 3 more dc in ring, rep from * twice more, join with a Sl st to 3rd ch of beg ch 3.

3. RND 2: Join B by making a slip knot on hook, place hook in any corner ch-3 sp, pick up a loop, yo through 2 (1 ch made), ch 2 more for beg chain (A). 2 dc in same ch-3 sp (half corner made), *ch 2 [3 dc, ch 3, 3 dc] in next ch-3 sp (corner made) (B), rep from * twice, ch 2, 3 dc in same sp as beg ch-3, ch 3, join with a Sl st to 3rd ch of beg ch-3 (C).
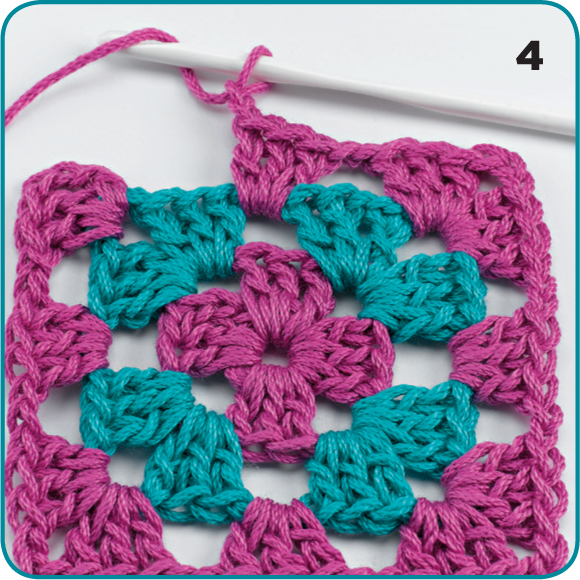
4. RND 3: Join A with a slip knot (same as rnd 2), make 2 more dc in same ch 3 sp (half corner made), *ch 2, 3 dc in next ch-2 sp, ch 2, [3 dc, ch 3, 3 dc] in next ch-3 sp (corner made), rep from * twice, ch 2, 3 dc in next ch-2 sp, ch 2, 3 dc in same sp as beg half corner, ch 3, join with a Sl st to 3rd ch of beg ch-3, fasten off.
Continue to add rounds until your classic granny square is the size you desire. Here is a Classic Granny with four rounds. Refer to the symbol chart on page 142 if you are unfamiliar with reading crochet stitch diagrams.
BEGINNING CHAINS
When you crochet in rows, you alternate from right side to wrong side with each row. At the end of each row, you crochet a turning chain of one to four chains, depending on the height of the next row of stitches. When crocheting granny squares, you are working in rounds always from the right side and continuing in the same direction, but you still crochet a chain to begin the round. If the next round will be single crochet, you chain 1 to begin; half-double crochet: chain 2; double crochet: chain 3; triple crochet: chain 4, etc. The directions will tell you how many chains to make. The beginning chain counts as a stitch. For instance, the directions may say, “ch 3 (counts as dc).” At the end of each round, the last stitch is worked into the beginning chain from the previous round.
INVISIBLE JOIN
When working in the round, connecting the end of the round to the beginning can sometimes seem awkward. Here is a way to connect the last stitch in a way that will leave the connection nearly invisible.
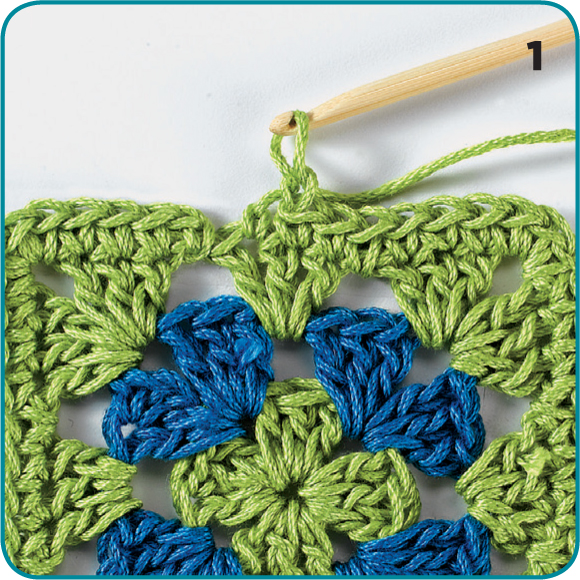
1. End the last stitch but do not join to the beginning with a slip stitch.
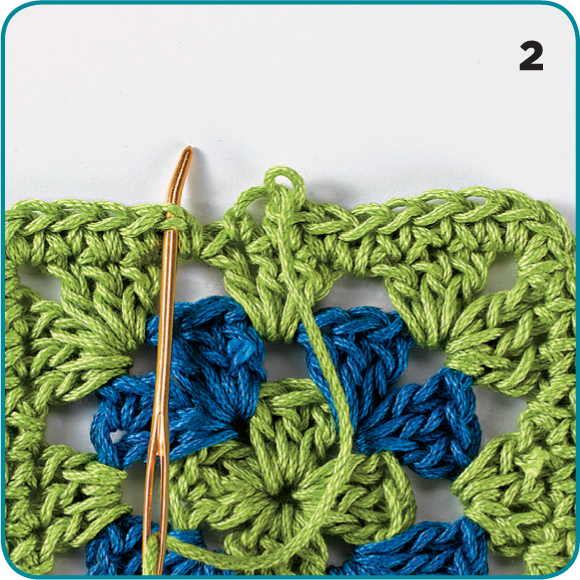
2. Cut the yarn, leaving a tail several inches long. Pull the yarn through the last stitch and set the hook aside. Thread the tail on a tapestry needle, and run the needle under the beginning stitch, pulling the tail through.
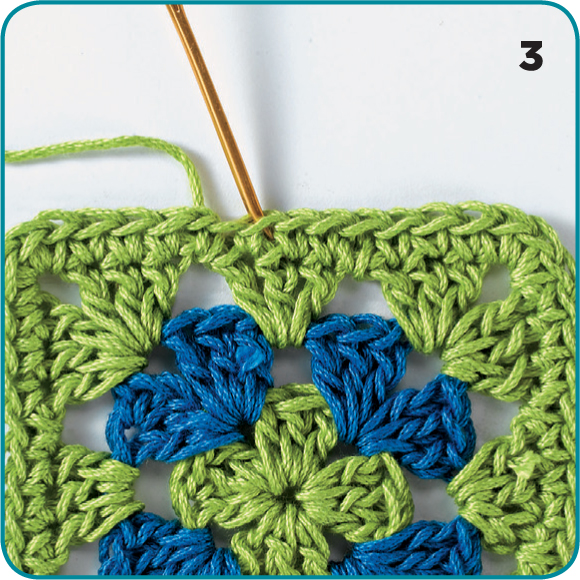
3. Insert the needle back through the center of the last stitch of the round and pull the tail to the back of the work (not too tightly).
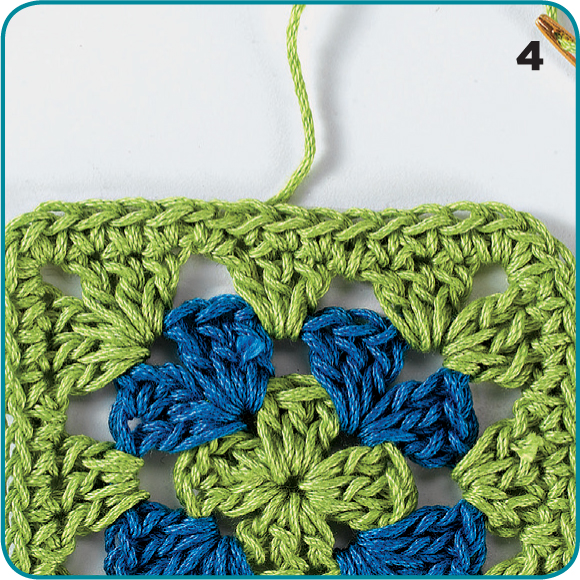
4. This will join the beginning to the end invisibly. Weave the tail into the back of the work.
GAUGE AND ADJUSTING SIZES
Every pattern will tell you the exact yarn (or weight of yarn) to use, and suggest what size hook to use to crochet an item with the same finished measurements as the project shown. It is important to choose yarn in the weight specified in order to successfully complete the project. The hook size recommended is the size an average crocheter would use to get the correct gauge. Gauge refers to the number of stitches and the number of rows in a given width and length, usually in 4" (10 cm), of crocheted fabric. For this book, gauge also refers to the finished size of a granny square.
Before beginning to crochet a project, it is very important to take the time to check your gauge, whether you use the yarn specified or substitute another yarn of the same weight. This is especially important for garments or projects that must be specific dimensions. Crochet a sample swatch of the stitch pattern or crochet one of the granny squares used in the project. If you have more stitches to the inch or if your square is smaller than the instructions call for, you are working tighter than average; try a new swatch or square with a larger hook. If you have fewer stitches to the inch or if your square is larger than the instructions call for, you are working looser than average; try a smaller hook. Always change hook size to get proper gauge, rather than trying to work tighter or looser.
These three samples of the same granny square were worked on different yarns with different size hooks. You can see why working to the correct gauge makes a huge difference in the finished size of your project.

SEAMS
Once you have crocheted all the granny squares for a project, you join them into one large piece using one of several methods. For some methods you sew seams with yarn and a tapestry needle. For other methods, you use a crochet hook. Some might consider this final step of a project to be a chore, but to me, the rhythm of hand sewing is soothing and relaxing.
WHIPSTITCH SEAM
The whipstitch seam works best for sewing straight-edged seams. This method creates a little decorative ridge on the right side of work. Place two squares side-by-side, wrong-side up, aligning the stitches of the outer round. Insert the needle through the top loops of corresponding stitches, bring through and around, and repeat.
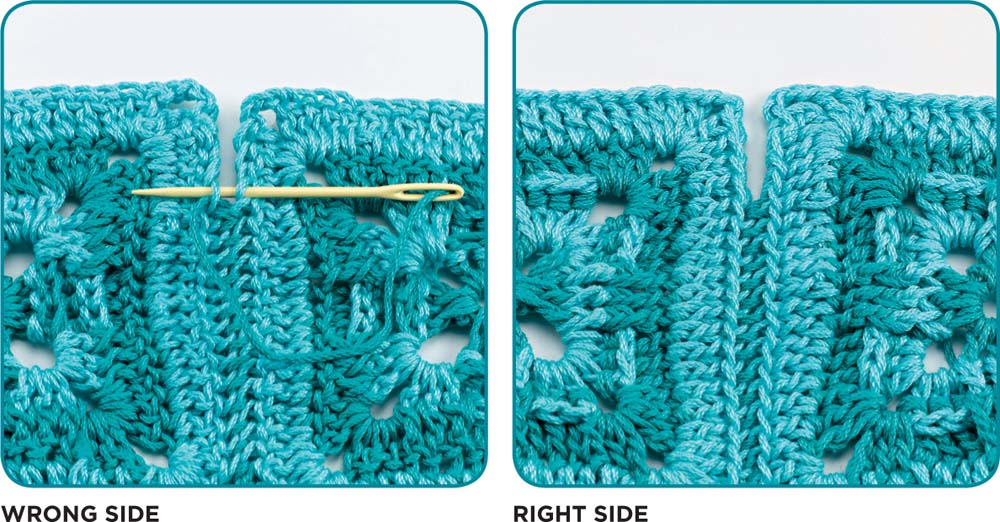
WEAVE SEAM
Use this join when you want a really flat seam. Hold pieces to be seamed side-by-side and, working from the wrong side, insert needle from front to back, through 1 loop only, draw through, progress to next stitch, bring needle from back to front (not over), and proceed in this manner until seam is completed. If you draw through top loop only, a decorative ridge will be left on the right side of work. If you draw through bottom loops, the ridge will be on the back of the work.
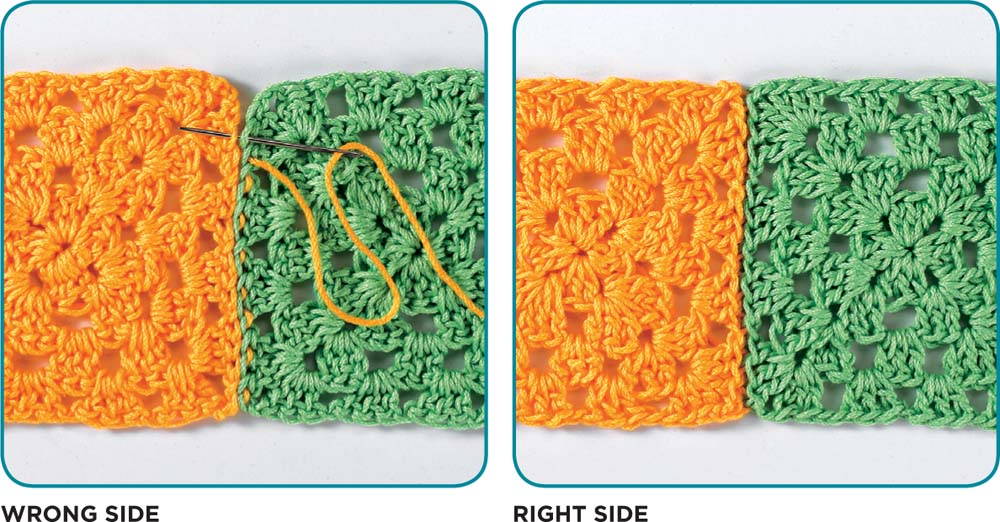
SINGLE CROCHET SEAM
The single crochet seam creates a decorative ridge. Holding the pieces wrong sides together, work single crochet through the whole stitch on both motifs.
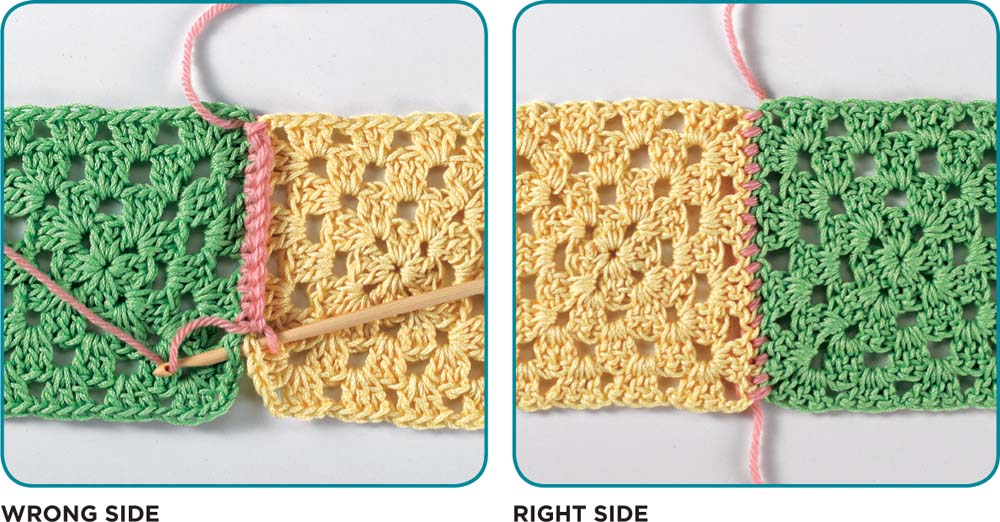
CHAIN JOIN
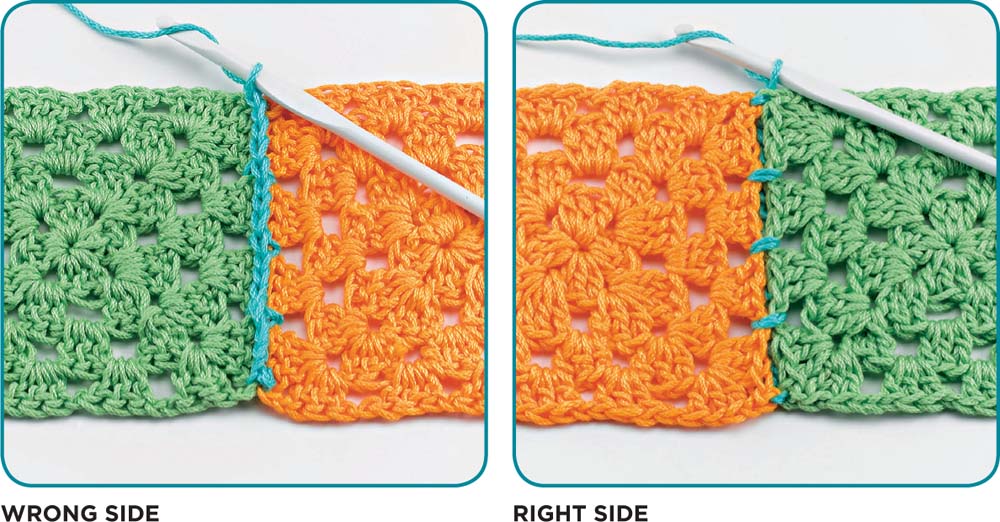
When the outer rounds of your squares have open spaces, you can join pieces with a stitch pattern that suits the spacing. This decorative join can be worked from either side. Place the pieces right sides together (or wrong sides together), aligning the stitches. Join yarn in one corner through both layers. *Chain 3, skip 3, single crochet through spaces of both layers, repeat from *.
LACY CHAIN SEAM
This method of joining granny squares creates a more open seam, resulting in a lighter weight, lacy look. This seam is used for the Woodland Scarf on page 99; where you will find a stitch symbol diagram for it.
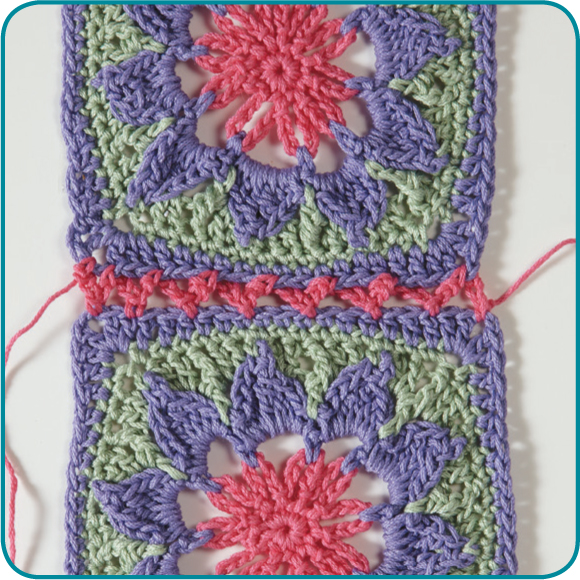
Hold two squares together, one above the other, join yarn in corner space on bottom square, ch 3 remove hook from loop, place hook in corner of top granny square, pick up dropped loop and pull through, *ch 3, skip 2 sts on bottom square, 1 sc in next st, ch 3, skip 2 sts on top square, remove hook from ch, put hook through the next st, pick up dropped loop and pull through st, repeat from * end last sc in bottom corner, ch 3, remove hook, place hook in top corner, pick up dropped loop and pull through, fasten off.
BORDERS
You often need to pick up stitches from the edges of a crocheted piece to add a border. When picking up stitches along the sides of granny squares, simply pick up one stitch for every stitch along the edge.
Picking up stitches along row ends of a crocheted piece is a little more complex. The general rule of thumb is to pick up one stitch in every other row for single crochet (1). For instance, if you have worked twenty rows of single crochet, you will pick up ten stitches along the row ends. Pick up one stitch for every row for double crochet (2). For instance, if you have worked twenty rows of double crochet, you will pick up twenty stitches. These guidelines work most of the time, but not always. Your work must lie flat, and sometimes you will have to experiment to judge how to proceed. If your edges are rippling, like a ruffle, you are picking up too many stitches; if they are pulling in, you are picking up too few stitches.
The best way to get an even edge is to divide the length to be worked into four parts. When the first section is done and lies flat, repeat that number of stitches for each of the following three sections. Work in every stitch of the top and bottom edges. Always work three stitches in each corner to make the project lie flat.


