We've been talking about shared custom views and Android libraries as if they were the same. The most suitable way to share a custom view is as an Android library. The main difference between an Android application and an Android library is that the latter cannot be run by itself on a device or emulator and will only produce an .aar file. This .aar file can, later on, be added as a dependency in an Android application project or other libraries. We could also have sub-modules inside the same project and have dependencies between them. To see how this works, we'll convert a custom view project into an Android library and we'll add a test application project to quickly test it.
First, once we have an Android application, we can convert it to a library by just performing two simple steps:
- Remove the line mentioning the applicationId on the app module build.gradle file.
- Change the plugin applied from com.android.application to com.android.library.
Basically changing the following:
apply plugin: 'com.android.application'

android {
   compileSdkVersion 25
   buildToolsVersion"25.0.2"

   defaultConfig {
       applicationId"com.rrafols.packt.customview"
       minSdkVersion 21
       targetSdkVersion 25
       versionCode 1
       versionName"1.0"
Change to the following:
apply plugin: 'com.android.library'

android {
   compileSdkVersion 25
   buildToolsVersion"25.0.2"

    defaultConfig {
       minSdkVersion 21
       targetSdkVersion 25
       versionCode 1
       versionName"1.0"
In our example, we've also refactored the app module name to lib.
More information on how to convert an Android application to an Android library can be found at the developer Android documentation page:
https://developer.android.com/studio/projects/android-library.html.
If we're developing or extending this library, we'd recommend adding a new module inside the project as a test application. It would considerably speed up developing and testing of the custom view.
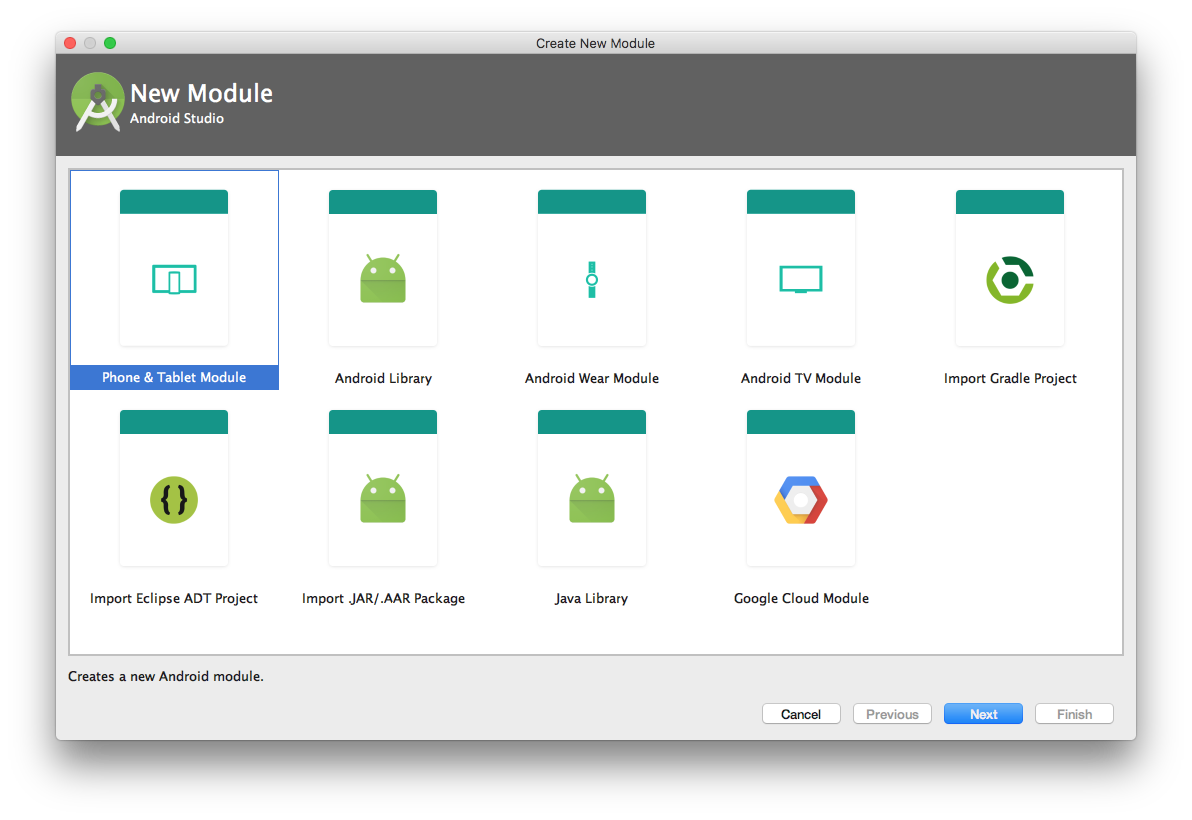
We can add a new module using the Android Studio File menu: File | New | New Module:
Once we've added a test application module, we add a dependency to the library. In the build.gradle file of the new module, add a dependency to the local lib module:
dependencies {
    compile project(":lib")
    compile fileTree(dir: 'libs', include: ['*.jar'])
    androidTestCompile('com.android.support.test.espresso:espresso-core:2.2.2',
    {
        exclude group: 'com.android.support', module: 'support-annotations'
    })

    compile 'com.android.support:appcompat-v7:25.3.1'
    compile 'com.android.support.constraint:constraint-layout:1.0.2'
    testCompile'junit:junit:4.12'
}
Now you can add the custom view to this new test application layout and test it. In addition, we can also produce a library binary to distribute. It'll only include the library or the lib module. We can do so by executing the lib:assembleRelease task on gradle:
Example32-Library raimon$ ./gradlew lib:assembleRelease
We'll get the .aar file in our project folder at lib/build/outputs/aar/lib-release.aar. Using the lib:assembleDebug task, we'll produce the debug library, or simply using lib:assembleDebug we'll get both debug and release versions.
You can distribute the binary in any way you prefer, but one recommendation is to upload to an artifact platform. Many companies are using internal artifact or software repositories for their enterprise libraries and artifacts in general, but if you want to make it available to the wider public, you can upload it to JCenter, for example. If we check our topmost build.gradle file from any Android project, we will see there is a dependency on JCenter to look for libraries:
...
repositories {
    jcenter()
}
We can easily do so from Bintray: https://bintray.com, for example. Once we've registered, we could create projects, import them from GitHub, create releases and versions, and even publish it to JCenter if our project is accepted.
For more information about the Bintray gradle plugin, go to:
https://github.com/bintray/gradle-bintray-plugin#readme.
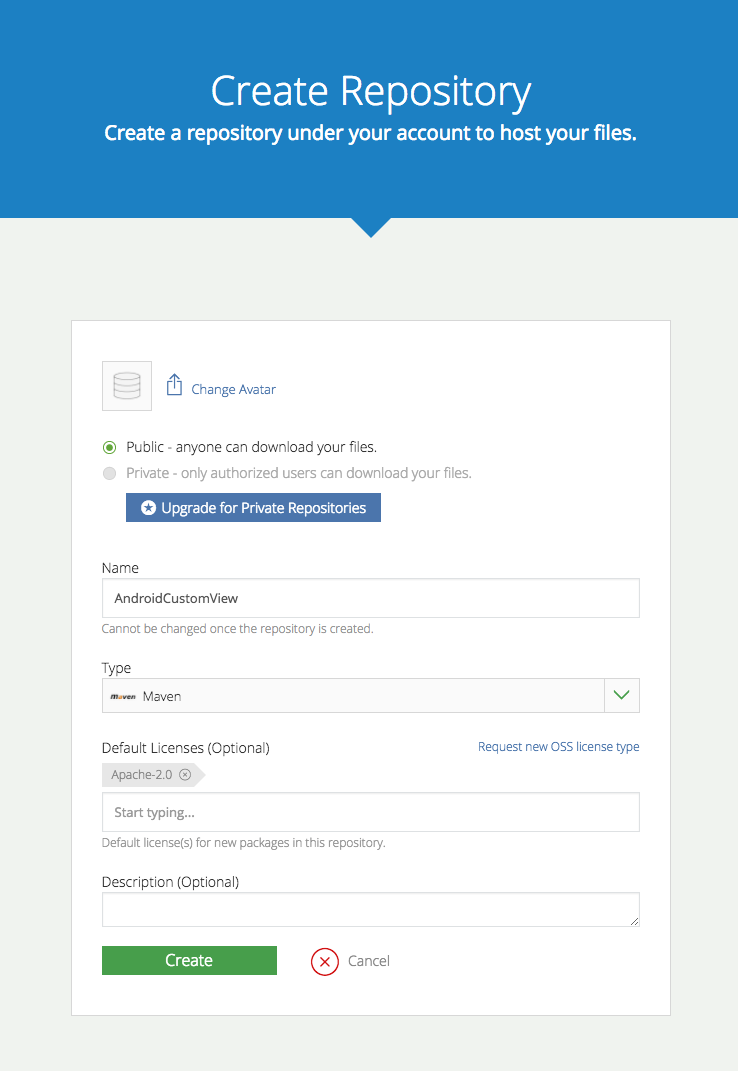
To simplify our lives, there are some open source examples and code that will make this process way simpler. But first, let's create a repository on Bintray.
We'll name it AndroidCustomView, set it up as a Maven repository, and add a default Apache 2.0 license:
Once we have it, we can create versions or we can add them directly from our gradle build scripts. In order to do so, we must add some dependencies to our topmost build.gradle:
buildscript {
    repositories {
        jcenter()
    }

    dependencies {
        classpath'com.android.tools.build:gradle:2.3.0'
        classpath'com.jfrog.bintray.gradle:gradle-bintrayplugin:1.4'classpath'com.github.dcendents:android-maven-gradleplugin:1.4.1'
    }
}
Now we can take advantage of some open source gradle build scripts already created. Instead of copying and pasting or adding more code to our build script, we can simply apply it directly from GitHub. Let's add these two lines to the very end of our library build.gradle file:
...
apply from: 'https://raw.githubusercontent.com/nuuneoi/JCenter/master/installv1.gra
 dle'
apply from: 'https://raw.githubusercontent.com/nuuneoi/JCenter/master/bintrayv1.gra
 dle'
After applying these two gradle build scripts, we end up having an additional task: bintrayUpload. We need to add the artifact configuration first, so let's add it at the very beginning of the file, just after the apply library line on the library module build.gradle file:
apply plugin: 'com.android.library'

ext {
    bintrayRepo = 'AndroidCustomView'
    bintrayName = 'androidcustomview'
    publishedGroupId = 'com.rrafols.packt'
    libraryName = 'AndroidCustomView'
    artifact = 'androidcustomview'
    libraryDescription = 'Uploading libraries example.'
    siteUrl = 'https://github.com/rrafols/AndroidCustomView'
    gitUrl = 'https://github.com/rrafols/androidcustomview.git'
    libraryVersion = '1.0.0'
    developerId = 'rrafols'
    developerName = 'Raimon Ràfols'
    developerEmail = ''
    licenseName = 'The Apache Software License, Version 2.0'
    licenseUrl = 'http://www.apache.org/licenses/LICENSE-2.0.txt'
    allLicenses = ["Apache-2.0"]
}
We need to add the Bintray user and API key information to our local.properties file:
bintray.user=rrafols
bintray.apikey=<key - can be retrieved from the edit profile option on bintray.com>
The bintrayRepo variable has to match the repository where we'd like to store our binaries or otherwise the build script will fail.
Now that we've all the configuration in place, we can build a new version of the library by using ./gradlew install and uploading it to Bintray by using ./gradlew bintrayUpload.
Keep in mind that versions are read-only when they've been uploaded, so we'll not be able to override them and we'll get an error when executing our gradle script unless we update the version number and upload a different version.
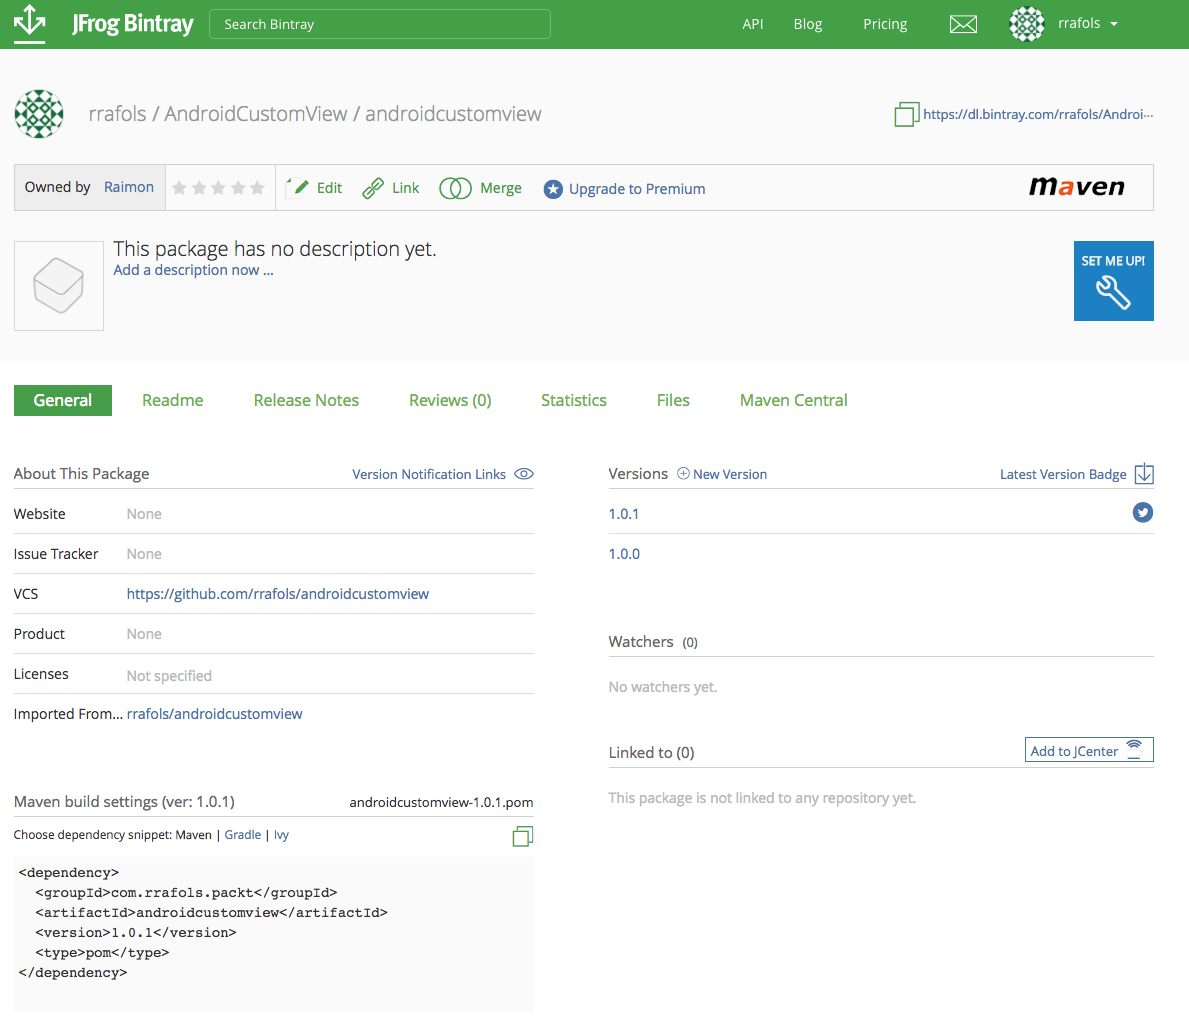
Once we've uploaded a version, we'll have something close to the following screen:
We can also inspect the files of an uploaded version to see what has been uploaded. If we go to a version and to the Files menu, we'll see the .aar Android library and all the other files the script has uploaded for us:
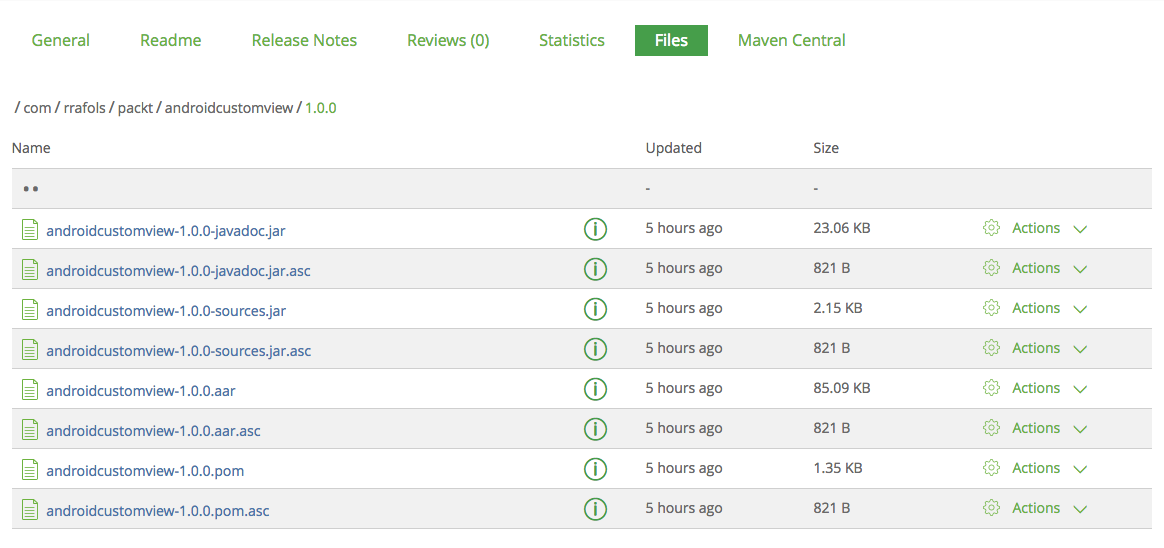
As we can see, it also packaged and uploaded the source code, the Javadoc and created a .pom file as it's hosted as a Maven repository.
After doing all these steps, we can upload it to JCenter directly from the artifact repository page by pressing Add to JCenter. Once approved, anyone wanting to use our library can simply define a dependency on com.rrafols.packt.androidcustomview and directly get it from JCenter.
For more information about this process and the author of these gradle build scripts, go to:
https://inthecheesefactory.com/blog/how-to-upload-library-to-jcenter-maven-central-as-dependency/en.
Something we haven't mentioned but is also quite important is how to version our library. Whenever we're creating a new release, we create a version number. It is highly recommended to use semantic versioning, MAJOR.MINOR.PATCH, when versioning our custom view. This way we can easily indicate if changes in one version are introducing incompatibilities or not. For instance, using semantic versioning, if we change the major number, we're indicating we've introduced incompatibilities with previous versions, or by changing the minor number, we indicate we've added new functionality without introducing any incompatibility. This is important for third-parties or other developers using our library, so they know what to expect from one version to the next.
For more information on Semantic Versioning, go to:
http://semver.org/.
Check also the full source code of this example in the Example32-Library folder on the GitHub repository.