Chapter 8
Several Twists on the Yoga Twist
In This Chapter
 Enjoying spinal fitness — with a yogic twist
Introducing six simple twists
Imagine you’re cleaning the kitchen with a wet sponge. After you mop up some spills, the sponge gets dirty. You hold it under the kitchen faucet, turn on the water, and squeeze out the dirty water. As you release the pressure on the sponge, it sucks up some clean water. You’re ready to start again.
This description is a lot like how yogic twists work on the spine. The pulpy pads (discs) between the individual bones have no direct blood supply of their own after about age 20, so they depend on your everyday movements to help them wring out the accumulated wastes and soak up a fresh supply of blood and other reviving fluids. Over time, if you don’t continually squeeze and soak your discs, they tend to harden and dry out, like a sponge left unused for a few days. Consequently, your spine stiffens up and shrinks.
Twists are an important component of any yoga practice. They clean out the discs and help keep them firm and supple; massage the internal organs, such as your intestines and kidneys; stoke the inner fire of digestion; and stretch and strengthen the muscles of your back and abdomen.
This chapter features seated twists, which emphasize the upper spine, and reclining twists, which emphasize the lower spine.
 Approach all twists with caution if you’re suffering from disc problems anywhere in your spine. Consult your physician, chiropractor, or physical therapist, or work with a reputable yoga therapist after you have a diagnosis.
Trying Simple Upright Twists
When done properly, yogic twisting postures strengthen your body, especially the weak spots (notably the lower back). Although twisting is part of your everyday movements, unless your muscles are well trained, you can easily injure yourself. The exercises in this section can help you get your back in tip-top shape as you look forward to enjoyment and enlightenment along the way.
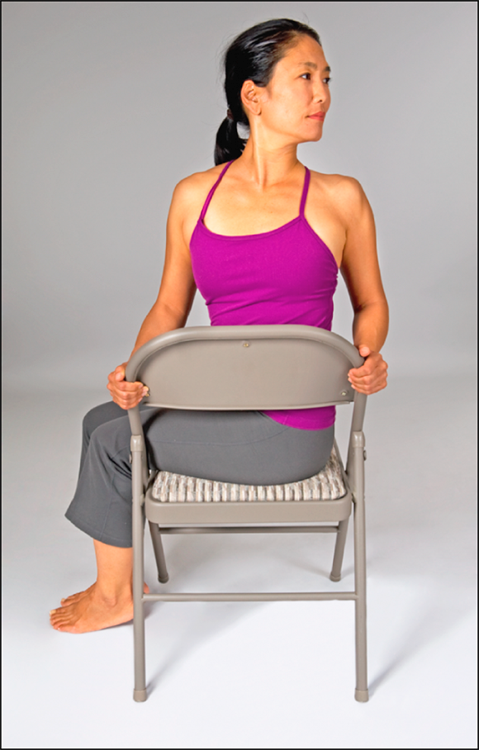
Easy chair twist
This seated posture is an excellent way for a beginner to safely achieve a good twist before moving on to more complex methods of twisting. And you can use this simple, effective posture to liberate your spine while at the office without drawing too much attention to yourself. Your spine will thank you!
 Twist mainly from your shoulders; the head and neck come along for the ride.
- Sit sideways on a chair, with the chair back to your left, your feet flat on the floor, and your heels directly below your knees.
- Exhale, turn to the left, and hold the sides of the chair back with your hands.
- As you inhale, extend or lift your spine upward.
- As you exhale, twist your torso and head farther to the left, as in Figure 8-1.
- Repeat Steps 1 through 4, gradually twisting farther with each exhalation, for 3 breaths (don’t force it); then hold the twist for 6 to 8 breaths.
- Repeat Steps 1 through 5 on the opposite side.
 If your feet aren’t comfortably on the floor for the easy chair twist, elevate them with a folded blanket or a phone book.
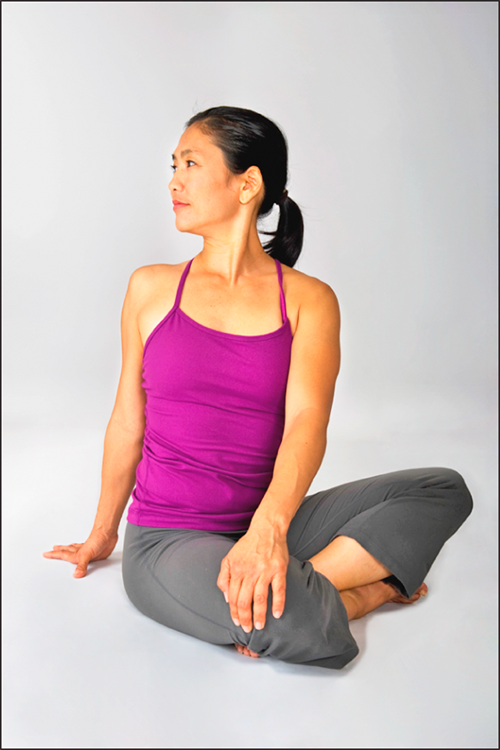
Easy sitting twist
When you can twist comfortably while seated on a chair (see the preceding section), you can transfer that skill to the floor and try the following exercise. Its effect is similar to that of the easy chair twist, and it fits nicely into a regular yoga practice, a large part of which you can do on the floor.
- Sit on the floor with your legs in a simple cross-legged position, and extend your spine upward, nice and tall.
- Place your left hand palm down on top of your right knee.
- Place your right hand palm down on the floor behind your right hip, to prop yourself up.
- As you inhale, extend your spine upward.
- As you exhale, twist your torso and head to the right (see Figure 8-2).
- Repeat Steps 4 and 5 for 3 breaths, gradually twisting farther with each exhalation (don’t force it); then hold the twist for 6 to 8 breaths.
- Repeat Steps 1 through 6 on the opposite side.
If you have difficulty sitting upright in this seated twist, use blankets or pillows under your bottom to make your hips even with your knees.
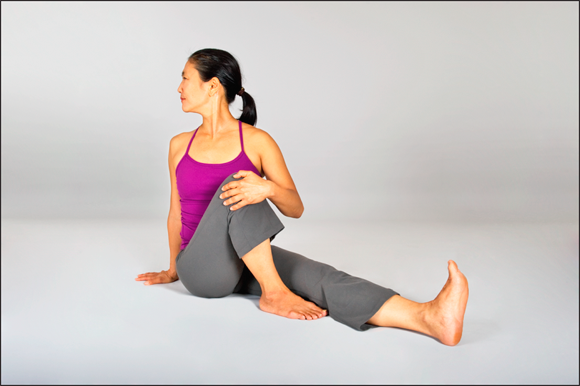
The sage twist
The easy chair twist and the easy sitting twist (in the preceding sections) are the simplest yogic twists. By changing the position of your legs, you alter the level of difficulty and also enhance the overall benefit. The sage twist does just that to give you extra rewards for your investment.
- Sit on the floor with both legs extended forward; bend your right knee and place your right foot on the floor just inside your left thigh, with your toes facing forward.
- Place your right hand, palm down, on the floor behind you; wrap the palm of your left hand around the side of your right knee.
- As you inhale, extend or lift your spine upward.
- As you exhale, twist your torso and head to the right, as in Figure 8-3.
-
Repeat Steps 3 and 4, gradually twisting farther with each exhalation, for 3 breaths (don’t force it); then hold the twist for 6 to 8 breaths.
- Repeat Steps 1 through 5 on the opposite side.
If you have difficulty sitting upright in this seated twist, sit on blankets or pillows until your hips are even with your knees.
 This posture is a variation of the classic posture maricyasana. The Sanskrit word marici (pronounced mah-ree-chee) means “ray of light” and is the name of an ancient sage.
Twisting while Reclining
The remaining exercises in this chapter call for you to lie down. You can harvest all kinds of benefits from them, including a delicious feeling of release in your spine.
Bent leg supine twist
The bent supine twist is a variation of the classic posture known as parivartanasana. The Sanskrit word parivartana (pronounced pah-ree-vahr-tah-nah) means “turning.”
This posture has a calming effect on the lower back. Here’s how you do it:
- Lie on your back with your knees bent and feet on the floor at hip width, and extend your arms from your sides like a T (in line with the top of your shoulders), with your palms down.
-
As you exhale, slowly lower your bent legs to the right side while turning your head to the left (see Figure 8-4).
Keep your head on the floor.
- As you inhale, bring your bent knees back to the middle.
- As you exhale, slowly lower your bent knees to the left while turning your head to the right.
- Repeat Steps 1 through 4, alternating three times slowly on each side; then hold one last twist on each side for 6 to 8 breaths.
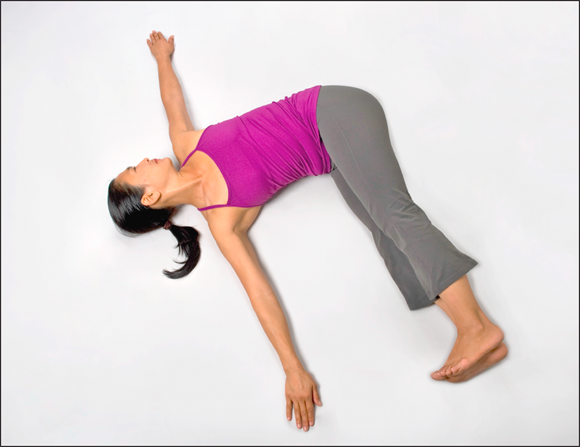
The Swiss army knife
This posture, a variation of the classic jathara parivritti, tones the abdominal organs and intestines and also stretches the lower back and hips. Jathara parivritti (pronounced jat-hah-rah pah-ree-vree-tee) means “belly twisting.” Just follow these steps:
- Lie flat on the floor with your legs straight down, and extend your arms out from your sides like a T (in line with the top of your shoulders), with your palms up.
- Bend your right knee, and draw your thigh into your abdomen.
- As you exhale, slowly lower your bent right leg to the left side and extend it a comfortable distance.
-
Extend your left arm on the floor along the left side of your head (palm up), and then turn your head to the right, as in Figure 8-5.
Keep your head on the floor, and try to visualize lines of energy going out through your arms and legs.
-
Relax and stay in Step 4 for 6 to 8 breaths.
- Repeat Steps 1 through 5 on the opposite side.
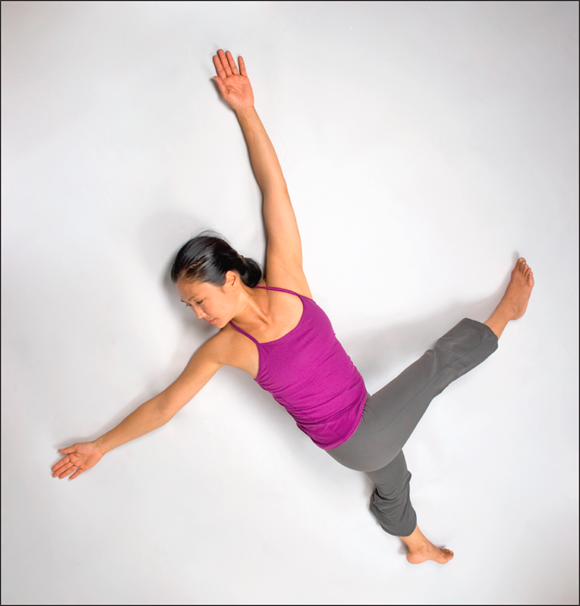
Extended legs supine twist: Jathara parivritti
If you enjoy practicing the Swiss army knife (see the preceding section), you’re likely to enjoy this slightly more demanding exercise. This variation of jathara parivritti gives you the same benefits as the Swiss army knife but creates an even more pronounced stretch of the lower back and hips. Of course, stretching is good for your muscles and your spine, too. The following steps show you how it works:
- Lie on your back with your knees bent and your feet on the floor at hip width, and extend your arms out from your sides like a T (in line with the top of your shoulders), with your palms down.
- Bend your knees and draw both thighs into your abdomen.
- As you exhale, slowly lower your bent legs to the right side.
-
Extend both legs a comfortable distance, and then turn your head to the left, as Figure 8-6 illustrates.
Keep your head on the floor. If this posture is difficult, try bending both legs a little more.
-
Relax and stay in Step 4 for 6 to 8 breaths.
- Repeat Steps 1 through 5 on the opposite side.
Note:
In the classic (traditionally taught) version of this posture, the knees are straight and the joined legs are resting on the floor. The arms are straight and extended to the sides at right angles to the torso. The hand on the same side of the extended legs holds the top foot.