Chapter 2
Relaxed Like a Noodle: The Fine Art of Letting Go of Stress
In This Chapter
 Understanding and dealing with stress
Relaxing the body through mental and physical exercises
Life in general — not merely modern life — is inherently stressful. But not all stress is bad for you. The question is whether that stress is helping you or hurting you.
Psychologists distinguish between distress and eustress (good stress). Yoga can help you minimize distress and maximize good, life-enhancing stress. For example, a creative challenge that stimulates your imagination and fires your enthusiasm but doesn’t cause you anxiety or lost sleep is a positive event. Even a joyous celebration is, strictly speaking, stressful, but the celebration isn’t the kind of stress that harms you — at least not in modest doses. On the other hand, doing nothing and feeling bored to tears is a form of negative stress.
In this chapter, you discover how you can control negative stress not only through various yogic relaxation techniques but also by cultivating appropriate attitudes and habits.
The Nature of Stress
Your body has evolved to handle episodes of physical stress that arise and then subside. The fight-or-flight response you experience when you’re in stressful situations helps you react to real threats in your physical environment. The alertness and physical energy you feel when your physical safety is threatened are truly life saving. These circumstances were the ones for which this capacity evolved.
Contrast this stress with the constant stress experienced in the course of modern life. The relentless demands — work, money woes, noise, pollution, a packed schedule, and so on — can put you in a chronic state of alertness that’s extremely draining to your body’s energies and resources. Instead of getting you to safety, the chronic stress that’s part of today’s lifestyles creates an imbalance in the body and the mind, causing you to tense your muscles and breathe in a rapid and shallow manner, perhaps with little relief. Under such chronic stress, your adrenal glands work overtime and your blood may become depleted of oxygen, thus starving your cells.
How can you deal with your stress response efficiently? Yoga suggests a three-pronged solution:
- Correct your stress-producing attitudes.
- Change habits that invite stress into your life.
- Release existing tension in the body on an ongoing basis.
 Stress can occur without any obvious unpleasant stimulus. Even a birthday celebration can cause you stress, usually because of some hidden anxiety (like another year to mark off). Stress can be cumulative and can creep up on you so gradually that it’s imperceptible — until its acute and adverse symptoms manifest.
Correcting wrong attitudes
Yoga’s integrated approach works with both the body and the mind, offering potent antidotes to just the sort of attitudes that make you prone to stress, especially egotism, extreme competitiveness, perfectionism, and the sense of having to accomplish everything right now and by yourself. In all matters, yoga seeks to replace negative thoughts and attitudes with positive mental dispositions; it asks you to be kind to yourself. Yogic practice helps you understand that everything has its proper place and time.
If you, like so many stress sufferers, have a hard time asking for help, yoga can give you a real appreciation that everyone is interdependent. If it’s your nature to distrust others, yoga puts you in touch with the part of your psyche that naturally trusts life itself. It shows you that you don’t need to feel as if you’re under attack, because your real life — your spiritual identity — can never be harmed or destroyed.
Changing poor habits
People often desperately maintain a hectic schedule because they can’t envision an alternative that includes time out. They fear what may happen if they slow down. But money and standard of living aren’t everything; the quality of your life is far more important. Besides, if stress undercuts your health, you have to go into low gear anyway, and your climb back to health may prove costly. Yoga gives you a baseline of tranquility to deal with your fears and anxieties effectively — as long as you engage it at the mental level and not just the physical level.
Of course, you can take many practical steps to manage stress by reducing stressful situations: Don’t wait until the last minute to start or finish projects, improve your communication with others, avoid unnecessary confrontations, and so on. Meditation, explained in Book VII, Chapters 3 through 5, is another way to reduce stress. Yoga recommends that you constantly remember your spiritual nature, which is beyond the realm of change and is ever blissful and at peace. However, it also asks you to care for others and the world you live in, all while appreciating that you can’t step into the same river twice. These principles are explained in the next sections.
Embracing balance
Everything in the universe follows an ebb-and-flow pattern that you can count on. Seasons change, and newborn babies grow and eventually become elderly adults. Yogic wisdom recommends that you adopt the same natural patterns in your personal life. Notice and appreciate the cyclical change of the seasons, the myriad ways that you and your environment change and evolve. You may spend much of your time being serious, but you need to play, too. In fact, you need to make time to just be, with no expectations and no guilt. Taking time to just be is good for your physical and mental health. Work and rest, tension and relaxation belong together as balanced pairs.
Letting go
Your inner wisdom tells you that your body and mind are subject to change and that nothing in your environment permanently stays the same. Therefore, there’s no point in anxiously clinging to anything.
Yoga shows you how to cultivate the relaxation response throughout the day by letting go of your hold on things. Herbert Benson, MD, coined this phrase and was among the first to point out the hidden epidemic of hypertension (high blood pressure) as a result of stress. The yogic equivalent of the relaxation response is vairagya, which means, literally, “dispassion” or “nonattachment.” We call it “letting go.”
Feeling passionate about what you do (as opposed to having a lukewarm attitude) is good, but at the same time, you merely invite suffering when you become too attached to people, situations, expectations, and the outcome of your actions. Yoga recommends an attitude of inner detachment in all matters. This detachment doesn’t spring from boredom, failure, fear, or apathy; it comes from inner wisdom. For example, if you’re a mother, you love and take tender care of your children. But if you’re also a yogini, you don’t succumb to the stress-producing illusion that you own your children. Instead, you always remain aware of the fact that your sons and daughters have their own lives to live, which may turn out to be quite different from yours. You know that all you can do is guide them as best you can.
Releasing bodily tension
Yoga pursues tension release through all its many different techniques, including breathing exercises and postures, but especially relaxation techniques. The former are a form of active or dynamic relaxation; the latter are a form of passive or receptive relaxation.
 Your daily Hatha Yoga routine, especially the relaxation exercises, can help you extend the feeling of peacefulness or calmness beyond the yoga session to the rest of the day. Pick some activities or situations that you repeat several times a day as reminders to consciously relax, such as when you go to the bathroom, wait at a traffic light, sit down, open or close a door, or look at your watch. Whenever you encounter these activities, exhale deeply and consciously relax, remembering the peaceful feeling evoked in your daily session.
Relaxation Techniques That Work
The Sanskrit word for relaxation is shaithilya, which is pronounced shy-theel-yah and means “loosening.” It refers to the loosening of physical and mental tension and effort — all the knots that you tie when you don’t go with the flow of life. These knots are like kinks in a hose that prevent the water from flowing freely. Keeping muscles in a constant alert state expends a great amount of your energy, which then is unavailable when you call upon your muscles to really function. Conscious relaxation trains your muscles to release their grip when you don’t use them. This relaxation keeps the muscles responsive to the signals from your brain telling them to contract so that you can perform the countless tasks of a busy day.
Relaxation isn’t quite the same as doing nothing. Often when you believe you’re doing nothing, you’re actually busy contracting muscles quite unconsciously. Relaxation is a conscious endeavor that lies somewhere between effort and noneffort. To truly relax, you have to understand and practice the skill.
Relaxation doesn’t require any gadgets, but you may want to try the following:
- Practice in a quiet environment where you’re unlikely to be disturbed by others or the telephone.
- Try placing a small pillow under your head and a large one under your knees for support and comfort in the supine, or lying, positions. Alternatively, use a folded blanket.
- Ensure that your body stays warm. If necessary, heat the room first or cover yourself with a blanket.
- Don’t practice relaxation techniques on a full stomach; it can cause reflux.
Deep relaxation: The corpse posture
The simplest, yet most difficult, of all yoga postures is the corpse posture (shavasana, from shava and asana, pronounced shah-vah-sah-nah). This posture is the simplest because you don’t have to use any part of your body at all, and it’s the most difficult precisely because you’re asked to do nothing whatsoever with your limbs. The corpse posture is an exercise in mind over matter. The only props you need are your body and mind.
If you’re high-strung, asana practice helps make the corpse posture more easily accessible.
Here’s how you do the corpse posture:
-
Lie flat on your back, with your arms stretched out and relaxed by your sides, palms up (or whatever feels most comfortable).
Place a small pillow or folded blanket under your head, if you need one, and another large one under your knees for added comfort.
-
Close your eyes.
Check out Figure 2-1 for a look at the corpse posture.
-
Form a clear intention to relax.
Some people picture themselves lying in white sand on a sunny beach.
- Take a couple of deep breaths, lengthening exhalation.
- Contract the muscles in your feet for a couple of seconds and then consciously relax them; do the same with the muscles in your calves, thighs, buttocks, abdomen, chest, back, hands, forearms, upper arms, shoulders, neck, and face.
-
Periodically scan all your muscles, from your feet to your face, to check that they’re relaxed.
You can often detect subtle tension around the eyes and the scalp muscles. Also relax your mouth, jaw, and tongue.
- Focus on the growing bodily sensation of no tension, and let your breath be free.
- At the end of the session, before opening your eyes, form the intention to keep the relaxed feeling for as long as possible.
- Open your eyes, stretch, roll to one side, and get up slowly.
Practice 10 to 30 minutes; the longer the duration, the better. But watch out; relaxing for too long can make you drowsy.
Ending relaxation peacefully
Allowing relaxation to end on its own is best; your body knows when it has benefited sufficiently and naturally brings you out of relaxation. However, if you have only a limited time for the exercise, set your mental clock to 15, 20, or however many minutes after closing your eyes, as part of your intention.
If you need to have a sound to remind you to return to ordinary waking consciousness, you can find any number of free or low-cost apps for your smartphone. You can set the timer for the length you like and be awakened by a pleasant sound of your choosing, like a bell or gong.
Staying awake during relaxation
The beautiful part of relaxation is that you’re conscious throughout the experience and can control it to some extent. Through relaxation, you get more in touch with your own body, which benefits you throughout the day: You detect stress and tension in your body more readily and then take appropriate action.
If it looks like you’re going to fall asleep while doing the corpse posture, try bringing your feet closer together. Also, periodically pay attention to your breathing, making sure it’s even and unforced.
Afternoon delight
When your energies flag in the afternoon, try the following exercise as a great stress buster. You can practice it at home or in a quiet place at the office. Just make sure that you aren’t interrupted. For this exercise, you need a sturdy chair, one or two blankets, and a towel or an eye pillow (small bags filled with light materials, usually plastic pellets, that not only block light but put slight pressure on the eyes). Allow 5 to 10 minutes.
-
Lie on your back and put your feet on the chair, which faces you (see Figure 2-2).
Make sure your legs and back are comfortable. Keep your legs 15 to 18 inches apart. You can also put your legs and feet up on the edge of a bed. If none of the feet-up positions feels good, just lie on your back with your legs bent and feet placed on the floor. If the back of your head isn’t flat on the floor, and if your neck and throat feel tense or your chin is pushed up toward the ceiling, raise your head slightly on a folded blanket or a firm, flat cushion so that you feel more comfortable.
-
Cover your body from the neck down with one of the blankets.
Don’t let your body cool down too quickly; it not only feels uncomfortable and interferes with your relaxation, but it also can cramp your muscles.
- Place the eye pillow or towel folded lengthwise over your eyes.
- Rest for a few moments, and get used to the position.
-
Visualize a large balloon in your stomach: As you inhale through your nose, expand the imaginary balloon in all directions; as you exhale through your nose, release the air from the balloon.
Repeat this step several times until it becomes easy for you.
-
Inhale freely, and begin to make your exhalation longer and longer.
Inhale freely, exhale forever.
- Repeat Step 6 at least 30 times.
-
When you finish the exercise, allow your breath to return to normal and rest for a minute or so, enjoying the relaxed feeling.
Don’t rush getting up.
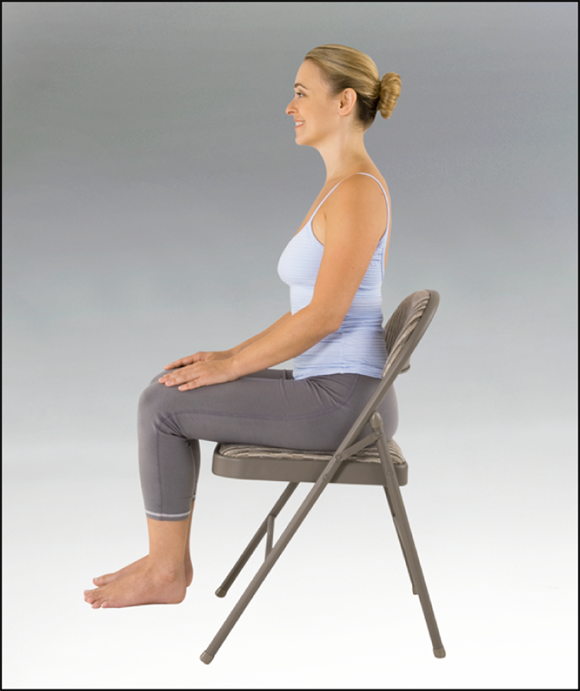
Magic triangles: Relaxing through visualization
The following relaxation technique utilizes your power of imagination. If you can picture images easily in your mind, you may find the exercise enjoyable and refreshing. For this exercise, you need a chair and a blanket (if necessary). Allow 5 minutes.
-
Sit up tall in a chair, with your feet on the floor and comfortably apart, and your hands resting on top of your knees, as in Figure 2-3.
If your feet aren’t comfortably touching the floor, fold the blanket and place it under your feet for support.
- Breathe through your nose, but allow your breath to move freely.
-
Close your eyes and focus your attention on the middle of your forehead, just above the level of your eyebrows.
Make sure you don’t crinkle your forehead or squint your eyes.
-
Visualize as vividly as possible a triangle connecting the forehead point and the palms of both hands.
Register (but don’t think about) any sensations or colors that appear on your mental screen while you hold the triangle in your mind. Do this visualization for 8 to 10 breaths, and then dissolve the triangle.
-
Visualize a triangle formed by your navel and the big toes of your feet; retain this image for 10 to 12 breaths.
If any part of the mental triangle is difficult to connect, keep focusing on that part until the triangle fully forms.
-
Keeping your eyes closed, visualize again the first triangle formed between your forehead and your two palms, and then simultaneously visualize the second triangle (navel to toes).
This final step is more challenging. Picture both triangles together for 12 to 15 breaths, and then dissolve them.
Relaxation before sleep
If you want to enjoy deep sleep or you’re experiencing insomnia (but you don’t want to count sheep), the following exercise can help you. Many people don’t make it to the end of this relaxation technique without falling asleep. For this exercise, you need the following props: a bed or other comfortable place to sleep, two pillows, and one or two blankets. Allow 5 to 10 minutes.
-
Prepare yourself for sleep and get into bed, lying on your back under the blankets.
Your legs can be straight or bent at the knees, with your feet flat on the mattress.
- Place one pillow or a folded blanket under your head, and have the other one nearby.
-
With your eyes closed, begin to breathe through your nose, making your exhalation twice as long as your inhalation.
Keep your breathing smooth and effortless. Also, don’t try to direct your breath to any part of your body. Let the breathing pattern be effortless, something you can keep up.
-
Remain on your back for 8 breaths. Then roll onto your right side and place the second pillow between your knees.
Now use the same breathing ratio from Step 3 for 16 breaths.
- Finally, roll onto your left side, with the second pillow still between your knees, and use the breathing ratio for 32 breaths.
Insomnia buster
This exercise is for people who suffer from insomnia but have an active imagination. Instead of watching your mind weave tale after tale when you can’t sleep at night, why not recruit your imagination for the purpose of falling soundly asleep? Here’s how.
If you’re claustrophobic, this exercise may not necessarily work for you. But before giving up, you may first want to try evoking feelings of security and comfort, as when in a mother’s womb or a favorite place in nature.
- Prepare yourself for sleep, and lie down comfortably in bed in any position.
- With closed eyes, breathe evenly through your nose for a while.
- Now visualize yourself snugly enfolded in a protective cocoon of purple.
- While feeling safe in your purple environment, visualize a thin line of white light extending from the crown of your head to your solar plexus, just below your navel.
This technique works even while traveling on a plane, with the jets roaring next to your ears. Just tell the flight attendant not to disturb you while you’re sleeping.
Yoga Nidra: Catching Up on Your Sleep Quotient with Yogic Sleep
If your body-mind is slow to wind down to get its well-deserved rest, here’s a potent technique to entice Mr. Sandman to visit you regularly. Yogic Sleep is a powerful relaxation technique that you can do when you gain some control over the relaxation response (discussed in the earlier section “Letting go”). When practiced successfully, this technique can be as restorative as sleep — except that you remain fully aware throughout.
To induce Yoga Nidra, you must listen to a set of instructions, similar to guided meditation. You can listen to a friend reading the instructions, but listening to a recording by someone else or by you yourself is more practical.
One feature of this practice is to focus in relatively quick succession on individual parts of the body. Mentally name each part, and then sense it as distinctly as possible.
In the beginning, you may find actually feeling certain body parts difficult. Don’t let this setback dismay you; continue to rotate your awareness fairly swiftly. With practice, you can include even your inner organs and all kinds of mental states in this circuit.
Practicing Yoga Nidra before sleep is best because it’s an excellent technique for inducing lucid dreaming and out-of-body experiences during sleep. Lucid dreaming refers to the kind of dream in which you’re aware that you’re dreaming. Great yoga masters remain aware even during deep sleep. Only the body and brain are fast asleep, whereas awareness is continuous.
Formulating your intention
Yoga Nidra serves as a potent tool for reprogramming your brain. If you do it correctly, it can accelerate your inner or spiritual growth. It allows you to cultivate good habits and attitudes. First, consider which specific habit or attitude you really want to replace with a more positive habit or attitude. This phase is called formulating your intention. Take your time to consider what you want to change about yourself.
Phrase your chosen intention in the following way: “I will become more [this or that].” This wording affirms your life’s future trajectory by enlisting the unconscious mind. Worthy intentions may be to become more patient, more tolerant, or more loving. Also make your intention realistic and specific. “I will become enlightened” is specific but perhaps not very realistic, and “I will become a better person” is too vague. You want your intention to be something you can stick with until you realize it in your life, not one you have to abandon because it was too lofty or undefined.
When formulating your intention, try to evoke the corresponding feeling inside you so you know what it feels like to be loving, patient, forgiving, or whatever.
After you set an intention, you formally apply it during the actual Yoga Nidra exercise (described in the following section) by repeating it when prompted.
Performing Yoga Nidra
The following steps show you how to perform Yoga Nidra.
-
Choose a clear intention (as described in the preceding section), and lie flat on your back, with your arms stretched out by your sides (or however feels most comfortable).
Place a pillow or folded blanket behind your neck for support, and use another pillow or folded blanket under your knees for added comfort. Refer to Figure 2-1 earlier in the chapter for an illustration.
- Close your eyes.
- Repeat the clear intention you chose in Step 1 three times.
- Take a couple of deep breaths, emphasizing exhalation.
-
Starting with your right side, rotate your awareness through all parts on that side of your body — limb by limb — in fairly quick succession.
Follow this progression: each finger, palm of the hand, back of the hand, hand as a whole, forearm, elbow, upper arm, shoulder joint, shoulder, neck, each section of the face (forehead, eyes, nose, chin, and so on), ear, scalp, throat, chest, side of the rib cage, shoulder blade, waist, stomach, lower abdomen, genitals, buttocks, whole spine, thigh, top and back of knee, shin, calf, ankle, top of foot, heel, sole, each toe.
- Be aware of your body as a whole.
- Repeat the rotation in Step 5 on the left side, ending with the whole-body awareness described in Step 6.
- Repeat Steps 5 through 7 one or more times until you achieve an adequate level of relaxation.
- Continue to be aware of the whole body and the space surrounding it, feeling the stillness and peace.
- Reaffirm your initial intention three times.
- Mentally prepare to return to ordinary consciousness.
- Gently move your fingers for a few moments, take a deep breath, and then open your eyes.
No time limit applies to your Yoga Nidra performance unless you impose one. Expect to come out of Yogic Sleep naturally, whether you return after only 15 minutes or a whole hour. Or you may just fall asleep. If you have things to do afterward, make sure you set your phone or meditation app for a gentle wake-up call. Don’t rush! Take your time to reintegrate with the ordinary world.
This practice is the most powerful yogic technique for personal change at the beginner level. Only the ecstatic state (samadhi) is more transformative. Several good recordings for practicing Yoga Nidra are available, but don’t be surprised to discover that the instructions vary from recording to recording. Check out additional yoga resources at dummies.com.