When I refer to essential oils I mean the pure plant distillates and extracts that are excellent allies in yesterday’s, today’s, and tomorrow’s world of home health care. They are naturally derived, and should be respected as powerful substances to be used with caution and education. Pure essential oils are extracted directly from different parts of plants, depending on the oil concerned. Some are extracted from flowers, others from leaves, stems, the rind of fruit, berries, resin, or roots using a variety of extraction methods.
The resulting oil is a highly concentrated, volatile substance that is made up of many different elements, including alcohols, esters, hydrocarbons, aldehydes, ketones, phenols, terpene alcohols, and acids. Chemists have tried to re-create essential oils in the laboratory, but, to date, they have not been 100 percent successful.
As a buyer, you must beware of imitations! Better yet, be educated! Synthetic aromatic chemicals have become the norm for so long that many folks are used to them, and are unaware of the choices they have from nature’s bounty.
Knowing the supplier you are buying oils from is the first step. You can shop from the suppliers listed on page 351 with confidence that they are doing their best to supply only the finest, high-quality pure essential oils. Questions as to the origin and purity of an oil are usually met with enthusiasm by someone who is proud of their suppliers.
Always look for pure essential oils packaged in full, dark glass bottles, preferably with built-in droppers. These allow you to dispense the oil one drop at a time. Some oils are more viscous than others and may take a while to drop out. Some companies have adjusted the size of the dropper or bottle-neck accordingly. You can also use a separate glass eyedropper, but do not store it in the bottle because the oil will eventually break down the rubber bulb at the top, which will then contaminate the oil.
Read the label carefully. Look for the term “pure essential oil” and for cautions such as “Keep out of reach of children,” and “For external use only.” Seeing these warnings on a bottle is a sign of a responsible company that understands the effects of its product.
Whenever possible, buy small bottles. Air in unfilled bottles can accelerate the deterioration of pure essential oils. Keep the bottles cool, dark, and well filled. I will often transfer small quantities of oils to a smaller bottle if I do not need them for a while.
Working with pure essential oils can be rewarding in many ways. However, it can also be dangerous if certain precautions and cautions aren’t observed. Remember that everyone is different and will react to individual essential oils in varying manners. The following simple precautions can make your experiences much more pleasant.
Never use essential oils too near the eyes. Keep your hands away from the face, genitals, and mucous membranes when they have been in contact with oils. Always wash your hands before and after working with oils. I wear eye protection when pouring essential oils, and recommend it for you as well. If you do get some oil in the eye, wipe it with a cotton bud that has been moistened with sweet almond oil. Water will just disperse and spread the oil.
Pure essential oils can be toxic if ingested in large amounts, and harmful to the skin and eyes if improperly spilled or undiluted. Children have no place playing with oils unless properly supervised and cautioned.
The use of essential oils on babies is debatable. Some sources say yes, some no. I would not use them on an infant without proper supervision and direction, such as reading Aromatherapy for Pregnancy and Childbirth by Margaret Fawcett, attending classes or workshops on the subject, or visiting a qualified aromatherapist or doctor with experience in this area. I have seen success with using oils on children as young as two years old, and successfully employed them with my own daughter, Christina, over the years.
Children’s reactions to pure essential oils vary greatly. Just like adults, children take time to adjust to new things, including new scents. Let their noses be their guides. Ask them which scents they like and why. The olfactory anchors you create today can span a lifetime.
There are conflicting opinions on the uses of essential oils during pregnancy. I have heard that absolutely no essential oils should be used in pregnancy, but I also have books detailing just how much you can use. I would advise extreme caution, especially in the first trimester. Many oils can stimulate the uterus, which may be great as birth approaches, but not at two months into the pregnancy.
I have attended births where pure essential oils were used along with jasmine absolute with marvelous results. If you are interested in this use, I advise working with a doctor, midwife, or aromatherapist who specializes in this area. I have heard reports of a reduction in stretch marks when a combination of pure essential oils and high-quality carrier oils were used faithfully on the skin after the first trimester.
Pure essential oils are meant for external use only. There are those who practice internal use, but they are doctors or professionals trained in the practice of Medicinal Aromatherapy, primarily in Europe. Using pure essential oils internally would require a great amount of training and testing before it became acceptable in America. I do not suggest that anyone use them internally for any reason.
Some essential oils, including bergamot and other citrus oils, such as lemon and orange, may increase the skin’s sensitivity to the sun. The citrus oils can also increase the skin pigmentation in some people. If not properly blended and applied evenly, darkening and skin irritation could result. You can purchase bergamot with the bergaptene (the component of the oil that can lead to increased pigmentation of the skin) removed. Lemongrass, a fast-growing grass often used in culinary arts, may also increase sensitivity to the sun and have an irritant effect when used directly upon the skin, due to some of the key chemical constitutes it contains.
Pure essential oils and absolutes are very concentrated. Many pounds of herbs, flowers, resins, or fruits are used to produce small amounts of oils. Only small amounts of oil are needed to gain results. “Less is best” is what I tell my work-study students and clients. Many people think that if two drops of an oil will help them feel better, then five or six drops will lead to greater relaxation or stimulation — not so! Using too much essential oil can sometimes have a boomerang effect and aggravate, rather than soothe, symptoms. Essential oils can be expensive, and using less is smart in a financial sense as well.
I always advise caution regarding healing and medicinal claims made by some when referring to the powers of pure essential oils. Always consult qualified help when deciding whether to use oils for something other than simple home use. Be sure to consult your doctor before changing any medications or healing practices.
Essential oils should be added to a bath just before you enter the tub. If added to the water while the tub is filling, much of the oils’ precious essences goes up in steam and very little is left to be absorbed by the skin. Then you get the benefit of inhaling the scents, but you miss out on the benefits to the skin.
Once you have added the oils, be sure to mix them into the water well. It is very important to avoid direct skin contact with undiluted essential oils that may irritate or cause skin sensitivity. You can also dilute the essential oils in a carrier oil before adding them them to the bath or, as some people prefer, in ¼ cup (62.5 ml) milk or cream.
Remember that less is best. Adding more essential oils will not necessarily help you feel better than a small amount of oils will. These are very concentrated and should be used sparingly and well diluted. As you become familiar with the oils, their intensity, and your own personal reaction to each of them, then you may feel comfortable experimenting with a larger number of drops of selected oils. But, generally, err on the side of too little rather than too much. Pure essential oils are much more concentrated than the herbs in the leaf or flower state and deserve your respect.
Following are several recipes for combining essential oils in a bath. While specifically designed for baths, these blends may also be used with a base oil (such as sweet almond, jojoba, or grapeseed oil) to create wonderfully aromatic and healthful personal care products. Add oils directly to a tub full of warm water and mix well.
WAKE UP BATH
3 drops rosemary
3 drops lemon
2 drops eucalyptus
For a massage oil, add blend to 1 ounce base oil.
PMS BATH
It’s no fun being out of sorts, bloated, and cranky. I’ve found that personalized herbal formulas and the use of pure essential oils can significantly reduce painful and distressing PMS symptoms.
PMS Bath I |
PMS Bath II |
3 drops clary sage |
2 drops clary sage |
For bloating: Add oils to ½ ounce base oil and 2 drops juniper and massage into the abdomen.
COLD CARE BATH
This pungent blend opens the nose and soothes aching muscles. It is effective when a cold is coming on. Before using, apply it to a small patch of skin on the inside of the arm to test for skin sensitivity.
5 drops eucalyptus
2 drops peppermint
2 drops lavender
As an inhalant, add blend to a simmer pot in a sick room. Be sure to watch the water level.
For a massage oil, add blend to ½ ounce base oil and massage into the chest.
CHEST COLD CARE BATH
I have found this blend useful when I feel that congested, tight feeling in my chest that often accompanies a cold or flu.
3 drops frankincense
3 drops hyssop
6 drops eucalyptus
The blend can also be used as an inhalant in a bathroom sink or large bowl of warm water, with a towel placed around the head to help direct the vapors up the nose. The scent is warm and spicy and feels good as you inhale.
As a massage oil, add blend to 1 ounce base oil and massage into chest, arms, neck, and abdomen. The vapors are released by body heat. It’s nice to take a warm bath with the essential oils before a massage with the base-oil blend.
If this blend smells too medicinal to you, add a drop or two of a favorite oil such as ylang-ylang, rose geranium, or jasmine absolute to sweeten it to your taste. I have found that the addition of 1 to 2 drops chamomile (Roman) or clary sage helps me relax and stay in bed — and resist that urge to get up and work when I obviously need rest!
RELAXING BATH
5 drops lavender
2 drops ylang-ylang
2 drops rose absolute or otto
For a massage oil, add to ½ ounce base oil and 2 drops Roman chamomile (optional) and massage over the body before rest. This blend smells wonderful.
ANTIDEPRESSANT BATH
3 drops bergamot
3 drops rosewood
3 drops lavender
2 drops rose otto
For a massage oil, add essential oils to ½ ounce base oil and massage over the entire body, especially the heart area. For a full body massage, double the amounts in the recipe.
GRIEF BATH
3 drops sweet marjoram
3 drops lavender
3 drops rose absolute
1 drop cypress
For a massage oil, add essential oils to ½ ounce base oil and massage into the heart area.
Sea salt detoxifies the body and conditions the water and skin. Adding pure essential oils to sea salt makes wonderful bath salts. This method is especially useful when using very expensive oils such as jasmine and rose absolute since it only takes a few drops added to 2 cups (500ml) of sea salt to make an elegant blend. While 1 or 2 drops of these oils alone does not seem like much for enhancing a bath, when mixed thoroughly into sea salt these drops are extended and make for a very pleasant bath. (Sea salt is great for scrubbing the oily film off your tub as well!)
Base oils such as sweet almond, apricot kernel, or grape-seed oil can also be added to the sea salt/essential oil blend to make a salt glow.
There are endless combinations of essential oils for bath salts. These are a few favorites that work well. The recipes can easily be doubled to make more.
BATH SALTS COMBINATION #1
These essential oils are known to help cleanse toxins from the body, and the scent is clean and fresh.
3 drops lavender
3 drops grapefruit
2 drops juniper
2 cups (500ml) sea salt
For relieving cellulite: Make sure the oils are well mixed with the salt to avoid skin irritation. Then take a “skinny bath” in these salts, which have been found to help relieve cellulite. Follow up the bath with an application of the oils blended in ½ ounce base oil to particular areas where cellulite is a problem.
BATH SALTS COMBINATION #2
An earthy, grounding blend that men tend to especially like.
3 drops sandalwood
3 drops patchouli
3 drops lavender
2 cups (500ml) sea salt
BATH SALTS COMBINATION #3
A balancing, refreshing blend. If desired, add 1 or 2 drops of a citrus oil such as lemon, sweet orange, or tangerine to brighten this blend.
3 drops rosewood
3 drops bergamot
2 drops frankincense
2 cups (500ml) sea salt
BATH SALTS COMBINATION #4
This is a great blend to bathe in when a cold is coming on.
3 drops eucalyptus
2 drops peppermint
2 drops benzoin absolute resin
2 drops cypress
2 cups (500ml) sea salt
Children are always destined for a warm bath. They are also very much in tune to the sense of smell, so combinations of pure essential oils are an effective and fun way of enticing them into the tub.
These recipes are great evening bath blends that help an active child unwind. A follow-up massage can be a great opportunity to spend quality time with a child and a wonderful way to show you care and are there to listen. A parent’s caring touch is an oasis in an often challenging world.
This blend smells yummy and makes it a bit easier to get a dusty 5-year-old to come in from play.
2 drops sweet orange
2 drops vanilla oleoresin
LEMON DROP BATH
This blend is especially good at getting a grubby child squeaky clean. Lemon is so cleansing and refreshing.
2 drops grapefruit
2 drops lemon
SLEEP-EASY BATH
This soothing, relaxing blend that helps to ease away a day’s stresses and strains also seems to help ease some of the emotional lumps and bumps of childhood.
2 drops ylang-ylang
3 drops lavender
Sometimes there is not a tub or the time available for a full body bath. This is when an aromatic foot bath is greatly appreciated. We do not often realize just how important our feet are. We stuff them into ill-fitting shoes, stand on them for long hours, and never give them much notice until they are blistered or in pain.
The basic equipment you need for a foot bath is a vessel that is large and deep enough to allow your feet to fit comfortably and holds enough water to cover the feet up to the ankles. I prefer a plastic dish basin or enamel wash basin because it is deep enough to keep the water from sloshing over the sides when carried, or overflowing when the feet are submerged. I have not used essential oils in the automatic foot baths that vibrate and massage the feet. My concern would be for the internal plastic parts, if any, that might deteriorate as a result of contact with the oils.
A dish basin is also easy to clean and portable — you can sit in front of the TV, or read and relax on the couch, while soaking tired feet. It is good to keep a kettle of water heating on the stove so you can keep warming up the foot bath as needed. Remember to set a towel next to your soaking area so you have it ready to wrap up those relaxed toes when you are finished.
Begin the bath by washing your feet before putting them into the basin to soak. Essential oils should be added to the basin just prior to immersing your feet. A total of 8 to 10 drops of essential oil is enough, and the combinations are endless. I prefer varying combinations using peppermint, rosemary, lemon, patchouli, rose geranium, bergamot, lavender, eucalyptus, tea tree, and clary sage. As with a tub bath, you must make sure the oils are well dispersed in the water before entering the water.
Another way to take a foot bath is to just sit on the side of the tub on a thick towel and dangle your feet. Wash your feet with soap first, drain the tub, then add enough warm water to cover your feet up to the ankles. Add the essential oils after the tub is full, and sit and enjoy inhaling their aromatic vapors while your feet soak in their beneficial effects. More warm water can be easily added as the water cools. This is also a foot bath you can share with a loved one or friend. Children usually enjoy foot baths, as well, and several of them can sit on the edge of the tub at once to clean up grubby little toes. Liquid soap dissolves any oily residue left in the basin or tub.
I use the tub method when I have been outside gardening and my feet are covered with earth. Also, after a long day on my feet it is easier and quicker than hauling out the dish basin.
When traveling, blend your foot bath oils ahead of time and carry them with you. In a hotel, the tub method works best.
Individual needs and the condition of the feet being bathed should guide you in choosing the most appropriate essential oils. Foot baths are especially helpful in treating tired, aching feet, cases of ingrown nails, foot fungus problems such as athlete’s foot or ringworm, injuries, and sprains.
These foot bath blends should be added to 2 gallons (8 liters) of warm water and mixed well. One cup (250ml) of Epsom or sea salts can be a nice addition to these foot baths. The essential oils can also be mixed with base oils and added to the warm water in this form.
TIRED TOOTSIES BLEND
This blend comes in handy when I have been on my feet all day and still have things to do at home before I can totally relax. The lavender soothes the feet and the rosemary and lemon refresh, revive, and stimulate circulation.
3 drops lavender
3 drops rosemary
4 drops lemon
BURNING FOOT BATH/BLISTER BUSTER
This is a favorite for worn, weary feet that have been moving all day. The peppermint cools, and the lavender and chamomile soothe both feet and spirit.
3 drops peppermint
4 drops lavender
3 drops chamomile (Roman)
MY ACHING FEET BATH
This combination is for those occasions when you know you should have brought along more comfortable shoes. This blend is refreshing and soothing. A follow-up application of arnica gel will put you right back on your feet!
3 drops lavender
3 drops eucalyptus
4 drops rosemary
ATHLETE’S FOOT BATH
This combination of pure essential works wonders for people plagued with chronic athlete’s foot problems. Tea tree is antifungal, as is lavender. The sandalwood conditions, softens, and soothes sore, cracked feet and toes. Its antiseptic and soothing properties help keep feet safe from secondary problems that can arise from the open, cracked skin. Patchouli could be substituted for sandalwood as a skin regenerator. Patchouli also has fungicidal properties.
4 drops tea tree
4 drops lavender
2 drops sandalwood
The companies listed below offer pure, high-quality essential oils and aromatherapy-related products including diffusers, blends, skin care products, and bath salts.
The American Society of Natural Perfuming
Francois Michel
Natural Perfumer
P.O. Box 95
Wallingford, PA 19086
(610) 876-9432
Aromaland
RR 20 Box 29 AL
Sante Fe, NM 87501
1-800-933-5267
Boericke & Tafel, Inc.
2381 Circadian Way
Santa Rosa, CA 95407
663-9128
Amirita Quality of Life Products
Christoph Streicher
P.O. Box 2178
Fairfield, IA 52556
(515) 472-8672
Aroma Vera
Marcel Lavabre
5901 Rodeo Drive
Los Angeles, CA 90016-4312
1-800-669-9514
Aromatherapy Quarterly
P.O. Box 421
Iverness, CA 94937-0421
(415) 663-9519; Fax: (415)
The Essential Oil Company
Dorene Peterson
P.O. Box 206
Lake Oswego, OR 97034
1-800-729-5912
Frontier Co-Op Herbs
3021 78th St.
P.O. Box 299
Norway, IA 52318
1-800-669-3275
Lavender Lane
5321 Elkhorn Blvd.
Sacramento, CA 95842
(916) 334-4400
Carries hard-to-find herbalware: bottles, droppers, essential oils, and labels.
Herbal Endeavours Ltd.
Colleen K. Dodt
3618 S. Emmons Ave.
Rochester Hills, MI 48307-5621
(810) 852-0796
Catalog: $2.00
Colleen is available for lectures and book signings.
National Association for
Holistic Aromatherapy
P.O. Box 17622
Boulder, CO 80308
Oshadi/R. J. F. Inc.
Gary Bernhardt
32422 Alipaz Suite C
San Juan, CA 92675
(714) 240-1104
For additional English sources write to:
The International Society of Professional Aromatherapists
The Annexe, Hinckley and District Hospital
Mount Rd., Hinkley, Leicestershire, LE10 1AG, England
My first profound experience with aromatherapy occurred while treating a terrible sunburn — my own. I was in pain and had already tried various sunburn remedies, but nothing helped. When a blend of herbs and oils quickly brought soothing relief, it got my attention. I began to inquire into the properties of various oils and to explore their many possible applications.
Then at the age of 34 I contracted an infectious liver disease. It was a very frightening experience. I was severely ill, and my health remained fragile for many months after I had recovered from the most acute stage of the illness. It was during my recovery that I learned to trust in the profound healing power of essential oils. My liver had become so compromised during my illness that my body rejected food and medicines. I’m convinced that the essential oils I used during that time restored my liver to its full function.
There are so many different ways to use aromatherapy in your own life. Essential oils can be applied directly to the skin as part of a massage, reflexology, or meridian treatment. They can be dispersed in a bath, inhaled, or diffused into the atmosphere of a room. Specific oils affect specific systems throughout the body. You can target these various systems if you know how to select an essential oil for its properties, and how to select an effective and efficient means of delivery in each case.
One of the miracles of aromatherapy is its absolute simplicity. Just a whiff of the right oil can adjust your attitude, clarify your thinking, steady your resolve, even ease your pain. I’m rarely without a small vial containing some blend to help me through the day. Lavender is often in my pocket for brief inhalations whenever stress is beating me down. A whiff of lemon invariably clears my head and refreshes my thought processes. Inhalations are a practical way to incorporate aromatherapy into your day.
JET LAG INHALATION
5 drops geranium essential oil
5 drops bay laurel essential oil
5 drops lavender essential oil
Combine the oils in a small glass vial with a tight stopper.
To use: Carry a vial in your pocket or purse while traveling. Sniff periodically throughout the day to forestall the exhaustion and brain fog of jet lag.
STRESS-BUSTER #1
Stress wreaks havoc on the immune system. This blend will help give it a healthy boost.
5 drops niaouli essential oil
5 drops ravensara essential oil
Combine the oils in a small glass vial with a tight stopper.
To use: Carry a vial in your pocket or purse and sniff periodically.
STRESS-BUSTER #2
This is a very calming blend.
5 drops lavender essential oil
2 drops Roman chamomile essential oil
34 drops ylang-ylang essential oil
Combine the oils in a small glass vial with a tight stopper.
To use: Carry a vial in your pocket or purse to sniff periodically throughout the day.
MEDIA OVERLOAD
5 drops clove essential oil
3 drops nutmeg essential oil
10 drops sandalwood essential oil
Combine the oils in a small glass vial with a tight stopper.
To use: Carry a vial in your pocket or purse. If you’re working at a computer terminal for extended periods, sniff periodically throughout the day.
There are many ways of scenting an environment. Incense has been used to deliver scent for thousands of years. More recently candle burners, simmering potpourri pots, and lightbulb rings have all become popular methods of dispersing scent atmospherically. Although these methods are aesthetically pleasing, they are not the best choices for aromatherapy. Commercial incense and potpourris are often rounded out with synthetic scents; their purity is unreliable. Additionally, incense smoke may transmit harsh, and even carcinogenic, chemicals along with its pleasing aroma. Candle burners and lightbulb rings can overheat delicate essential oils, changing their chemical makeup.
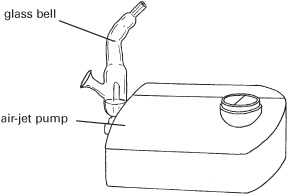
Diffusers act quite differently. Without altering or heating oils, they disperse them into the environment via an air-jet pump connected to a glass bell. A nebulizer within the glass bell diffuses a fine mist of negatively charged, scented ions into the atmosphere, much the same way that nature spreads fragrance.
The aromatic diffuser first appeared in Paris in 1960, when Dr. Bidault demonstrated the germicidal action of aromatic essences on tuberculosis, whooping cough, and influenza. His clinical observations indicated that disinfection of the air surrounding a patient had a therapeutic preventive effect. At the University of Paris School of Pharmacy, students tested his theories by collecting samples of air from an urban factory, the forest of Fontainebleau on the outskirts of the city, and a Parisian flat. By diffusing various essential oils into sealed chambers containing the air samples, they were able to validate the effectiveness of the essential oils against airborne bacteria and molds.
The modern aromatic diffuser is a natural alternative to aerosol deodorizers and chemical air fresheners. A diffuser is a safe and convenient method of dispersing essential oils throughout a home, school, or workplace.
By using a diffuser, it is possible to dispense a therapeutic aromatherapy treatment to a number of people simultaneously. It is an excellent way of purifying the environment as well as administering the uplifting, rejuvenating, or relaxing effects of selected oils or blends to a group.
In the home environment, the therapeutic effects of diffused oils on the respiratory system are especially helpful during the cold and flu season, because the diffuser destroys airborne bacteria. When outside air is polluted, a diffuser can help create a safe, peaceful, and uplifting atmosphere indoors.

A diffuser such as this one pumps a fine mist of essential oils into the air without heating them (which can destroy their effectiveness).
ASTHMA WITH NERVOUSNESS AND ALLERGIES BLEND
5 ml (1 teaspoon) mandarin essential oil
5 ml (1 teaspoon) tarragon essential oil
5 ml (1 teaspoon) rosemary ‘verbenon’ essential oil
Combine the oils in a small, dark glass vial with a tight stopper and shake to mix.
To use: Use this blend in a diffuser during flare-ups of asthma. The blend can also be carried in a small glass vial in the pocket to be sniffed frequently throughout the day.
DETOXIFICATION BLEND
10 ml (2 teaspoons) lemon essential oil
5 ml (1 teaspoon) rose geranium essential oil
5 ml (1 teaspoon) everlasting essential oil
Combine the oils in a small dark glass vial and shake to mix.
To use: Use this blend in a diffuser when detoxifying or working on breaking a smoking, alcohol, or drug habit. This blend can also be carried in a small glass vial in the pocket to be sniffed frequently throughout the day.
RELAXATION BLEND
5 drops petitgrain essential oil
10 drops mandarin essential oil
20 drops lavender (Lavandula angustifolia) essential oil
Combine the oils in a small dark vial and shake to mix.
To use: Use in a diffuser to encourage relaxation.
MEDITATION BLEND #1
4 drops myrrh essential oil
5 drops sandalwood essential oil
10 drops frankincense essential oil
2 drops clove essential oil
2 drops cistus essential oil
2 drops rose essential oil

Combine the oils in a small, dark glass bottle and shake well.
To use: Add to a diffuser and use to support meditation.
MEDITATION BLEND #2
10 drops clary sage essential oil
4 drops vetiver essential oil
2 drops cistus essential oil
20 drops cedarwood essential oil
5 drops fir essential oil
Combine the oils in a dark glass vial and shake well.
To use: Diffuse to support and enhance meditation.
You can create your own spa experience with just a few oils and a tub of hot water. An aromatherapy bath is the ultimate luxury. Experiment with 3 to 5 drops of several different, complementary oils, adjusting the total amount to suit your individual taste. You can add the oils directly to the bath or, for added luxury, disperse them in a cup of milk first. Here are some combinations of essential oils that you might try for the bath.
Lavender essential oil
Chamomile essential oil
Geranium essential oil
Rose essential oil
Bois de rose essential oil
Ylang-ylang essential oil
Bois de rose essential oil
Frankincense essential oil
Clary sage essential oil
Geranium essential oil
Roman chamomile essential oil
Angelica essential oil
Neroli essential oil
Clary sage essential oil
Pine essential oil
Rosemary essential oil
Eucalyptus essential oil
Sandalwood essential oil
Neroli essential oil
Cedarwood essential oil
Ravensara essential oil
Thyme essential oil
MQV essential oil
Marjoram essential oil
Cypress essential oil
Lavender essential oil
The physician must be experienced in many things, but most assuredly in rubbing.
— Hippocrates
An essential oil is the life force or the “soul” of the plant. Each precious, aromatic, highly volatile, concentrated drop of an essential oil contains hundreds of powerful chemical constituents that act on our bodies either physiologically or psychologically. The therapeutic and mood-enhancing qualities of essential oils are undeniable — and extensive studies have borne this out.
Essential oils are natural ingredients for massage oils. When we inhale the gaseous vapor they release into the air and apply them to the body externally, essential oil molecules are absorbed into the bloodstream. This is an essential oil’s single most important property: The molecules are small enough to penetrate the skin, reaching the dermis layer and interacting with sensory nerves, blood vessels, lymph vessels, hair follicles, and the sebaceous and sweat glands. Essential oils have a proven ability to promote elimination of waste matter and dead cells while increasing regeneration of cells.
Many massage oil recipes call for an essential oil of your choice. Choose fragrances that you find pleasing and calming. A scent may have different effects on different people, depending on past associations and life experiences, but lavender and chamomile are the fragrances most often chosen for relaxation. Bergamot, frankincense, neroli, patchouli, rose, sandalwood, and ylang-ylang are also relaxing. Patchouli, sandalwood, and frankincense are earthy; the others are more flowery. To find the essential oils that will best suit you, visit a store that carries them and use tester bottles to sample various scents.
There are a variety of massage practices, but they may not all be styles that you enjoy. Some people appreciate a gentle massage; others prefer a deeper, more vigorous massage. And most of us give someone the type of massage we like to receive. Don’t hesitate to tell your masseuse what you like, and to remind her as often as you need to. It’s important that you receive the kind of massage you will enjoy most.
There are many different techniques and styles of massage. For more information, look for a mini-course on massage at your local adult education center. It’s worth exploring all the options.
Preparation is essential in creating a quality massage experience. Select a place of solitude where you won’t be interrupted. For a full-body, a massage table adjusted for your height is ideal, but cushioning a long table or even using a bed or sofa can also be effective. Set up the table so that you can get around all sides, if possible. Make up the table or bed with both a bottom and a top sheet.
Another important factor is warmth. Warmth helps the muscles relax and is essential to a good massage. When lying in the prone position, the body tends to lose heat. Oil on the skin results in it becoming easily chilled. Make sure the room is warm when you start; bring in a space heater if necessary. Also use blankets as needed. Select music that is soothing and pleasing to your “client,” whether that be yourself, your partner, or a friend.
There are many different types of massage and therapeutic touch, and plenty of good books on the subject. Here is a simple explanation of a few beginning strokes you can do at home that are quite beneficial.
This is a gliding stroke over the surface of the skin, usually done with oil or a massage cream. Massage normally starts with light effleurage to gently connect with the person, soothing her nervous system. Gradually, deeper strokes with more pressure may be applied to increase the circulation of blood and lymph.
This kneading movement lifts, presses, and rolls muscle tissue away from the bone to increase circulation of blood and lymph and to detoxify the muscles.
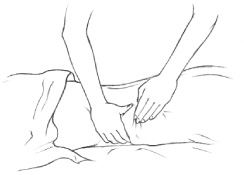
Petrissage is a kneading movement that lifts muscle tissue away from the bone.
Compression is direct pressure to the body and affects muscular, nervous, and energy systems. This technique is done with the thumbs, the whole hand, and even the elbows.
Rocking is a smooth, rhythmic motion that soothes the nervous system. Gently shaking the limbs or rocking parts of the torso encourages the receiver to let go of tension.
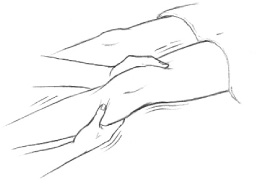
Rocking is a rhythmic shaking of a limb or a part of the torso.
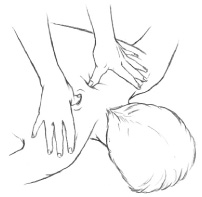
Compression is direct pressure applied with the thumbs, hands, or elbows.
Once you have chosen a massage technique, you need to decide what kind of massage oil will be best for you. Plain vegetable oil is the simplest choice. The next step up is aromatherapy oils, which are easy to make and offer the healing elements of both the herbs and their aroma. A third option is an herbal infused oil. These are a bit more work, but they offer the healing elements of the herbs you choose to infuse. You can also create a product with both aromatherapy oil and herbal infused oil if you want to get really fancy: Simply infuse the oil with herbs, then scent with a complementary essential oil.
Once you’ve made your massage oils, remember that oils are delicate. Light and heat destabilize them; protect your oils from both. Destabilized oils become rancid. Rancid oils are linked to cancer, so it is important to heed safeguards in making, using, and storing products with oils. Dark amber and cobalt blue bottles afford the most protection from light.
Unfortunately, even the oils purchased at health food stores are rarely packaged in dark containers, with the exception of olive oil, which is the least light-sensitive. If you can, purchase oils in bulk from a supplier who has them in a dark container. If you’ve purchased oil in a clear glass container, either transfer it to a darker bottle or tape brown paper around the glass.
People who live in hot climates may need to refrigerate oil products for most of the year. Those in cooler climates may be able to get away with storing them in a cool, dark basement. Make small quantities, and refrigerate products that you have heated to make if you are not using them daily.
When making aromatherapy massage oils, choose the essential oils that call to you. For the simplest formula, combine one scent with one main oil, an antioxidant oil, and a few drops of vitamin E oil.
RED ROSE OIL
Rose essential oil has antidepressant, sedative, and aphrodisiac properties and is known as a restorative.
⅔ cup grapeseed oil
1 teaspoon alkanet root
⅓ cup wheat germ oil
10 drops vitamin E oil
6 drops rose essential oil
1. Pour the grapeseed oil and the alkanet root into the top of a double boiler.
2. Gently heat the water bath of the double boiler on the lowest heat.
3. Once the desired degree of redness is achieved in the oil, remove from heat and strain out the alkanet.
4. Add the wheat germ oil, vitamin E, and essential oil to the red oil.
5. Pour all ingredients into a dark bottle that has a spout.
6. Shake well.
1. Shake well before each use.
2. Pour the oil into your hands to warm before putting it on the body.
3. Massage into body using a circular motion.
YIELD: 8 OUNCES
SIMPLE LAVENDER OIL
Lavender is often recommended for its relaxing, soothing properties.
⅔ cup grapeseed oil
⅓ cup wheat germ oil
10 drops vitamin E oil
6 drops lavender essential oil
To make:
1. Pour all ingredients into a dark bottle that has a spout.
2. Shake well.
To use:
1. Shake well before each use.
2. Pour the oil into your hands to warm before putting it on the body.
3. Massage into body using a circular motion.
YIELD: 8 OUNCES
HERBAL OIL
This is a terrific conditioning oil for all hair and scalp types. It can also be used as a body massage oil.
1 tablespoon dried chamomile flowers
1 tablespoon dried rosemary
1 tablespoon dried horsetail
1 cup almond or sesame oil
To make:
1. Combine the ingredients in an airtight container. Let stand for several days (or even weeks, if time allows), stirring or gently shaking the mixture frequently.
2. Strain off the oil and discard the spent herbs. Store in dark glass bottles in a cool, dark place. Will keep for 3 to 4 weeks.
To use:
Use as an oil treatment for your hair, a scalp massage (as described on next page), or a massage oil for your body.
YIELD: APPROXIMATELY 1 CUP
Use the essential oil of your choice to scent this wonderful massage lotion.
2 tablespoons fresh chamomile
2 tablespoons fresh rose buds
2 tablespoons fresh comfrey
2 tablespoons fresh lavender
2 tablespoons fresh calendula
2 fresh sage leaves
1 sprig fresh rosemary
2 tablespoons dried witch hazel bark
2 tablespoons fresh lemon balm
1 sterilized, 12-ounce widemouthed jar
1 ¼ cups apricot kernel, almond, or grapeseed oil
¼ cup cocoa butter
⅔ cup coconut oil
5 drops essential oil (optional)
To make:
1. Harvest fresh herbs in mid-morning, if possible.
2. Place the herbs on paper towels and allow to wilt overnight.
3. Fill the jar with the wilted herbs.
4. Completely cover the herbs with apricot, almond, or grapeseed oil.
5. Each day for the next week, poke the herbs down into the oil to release any captured gases. For the three following weeks, do this once a week.
6. After 4 weeks, strain the herbs from the oil.
7. Add the cocoa butter and coconut oil to the infused oil. Warm until all ingredients melt together. Scent with the essential oil of your choice.
To use:
1. Pour oil into the palm of your hands to warm.
2. Gently massage into the skin.
YIELD: APPROXIMATELY 12 OUNCES
The technique described here is a simple technique. You may want to learn other massage techniques through your local adult education center. Ideally, you should take the course with your massage partner.
• Space heater (if necessary)
• Relaxing music
• Massage lotion, oil, or cream
• Bowl
• Pillow
• Top and bottom sheets
• Blanket or two
1. Make sure the room is comfortably warm; use a space heater if necessary. Put on a tape of relaxing music.
2. Wash your hands thoroughly before the massage and trim your fingernails if necessary.
3. Pour 4 ounces of oil into the bowl to start for easy access.
4. Oil your hands and rub them together to warm the oil.
5. Start with your “client” lying faceup with his or her head on a pillow and the body covered by a sheet (and blanket, if needed). Apply the oil to the throat using gentle side-to-side strokes.
6. Gently swipe across the chin, above the lips, and then across the forehead.
7. Using the fingertips, gently massage in upward strokes, starting at the jaw outside the mouth, coming up along the side of the nose, then across the bridge of the nose.
8. Make several spiraling, circular motions spanning the entire forehead, ending up above and outside the eyes.
9. Press the cheekbones using slight pressure from the outside to the inside.
10. Use a spiral, circular stroke on the cheeks.
11. Press along the sides of the neck, working outward to the shoulders.
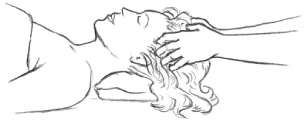
Step 12
12. Massage the crown of the head using the fingertips. Press gently, working down and around to the back of the skull.
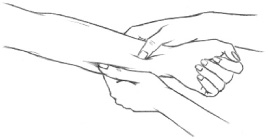
Step 13
13. Uncover one arm, leaving the rest of the body draped. Gently holding the wrist, shake the arm from side to side. With both hands around the arm, gently squeeze. Work back and forth starting at the shoulder and working down to the hand.
14. Do the same on the other arm and then each leg.
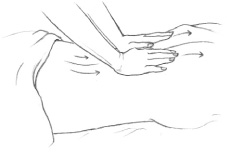
Step 15
15. Have the “client” turn over, and work on the back. Starting at the base of the spine, gently push on the spine, working up to the top of the shoulders. Rub the shoulders and top of the back all over.
Used for their stimulating, strengthening, and moisturizing properties, pre-shampoo scalp treatments loosen and slough off the dead surface cells on the scalp and provide nourishing emollient and antioxidant benefits. Oil treatments render the scalp more flexible, normalize both oily and dry itchy scalp conditions, and increase blood circulation to all the hair “roots.” The protein and essential fatty acids found within these treatments will serve to fortify and smooth the hair while imparting a healthy shine. If you tend to use a lot of styling products, pre-shampoo oil treatments may have a softening effect on any film or buildup on your hair and scalp. These treatments are also especially beneficial for treating dandruff and dermatitis.
In contrast to most conditioners, which are applied after shampooing, hair and scalp oil treatments are generally administered before your bath or shower, when your hair is dry, and then shampooed from the hair. They can also be applied in the evening, left in overnight, and shampooed out the next morning, giving the oil a chance to provide optimal benefits. You will find that when you use an oil massage on a regular basis (which you should not do if you have oily hair and scalp or fine hair), your hair will not need an after-shampoo conditioner but, rather, an after-shampoo hair rinse.
This soothing and simple treatment requires about 45 minutes of your time — most of it spent relaxing!
1. Pour 2 tablespoons of vegetable oil, fruit oil, nut oil, Herbal Oil, or Ayurvedic Scalp Massage Oil into a plastic bottle with a flip-up spout top or into a cup. If desired, add 15 to 30 drops of an essential oil of your choice and mix thoroughly.
2. Although you can certainly use it unheated, you may want to warm the oil by setting the container in hot water for a couple of minutes before using. Warming the oil will enhance your hair’s ability to absorb it to a degree (although the true absorption of the oil is really related to its molecular makeup, coupled with the degree of porosity of your hair).
3. Put some oil on your fingertips and work between your hands. Beginning at the top front hairline area, massage the oil with small circular strokes onto your scalp, working back toward the crown. Put more oil on your fingertips as needed.
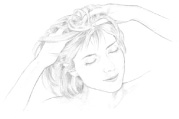
Step 3
4. Repeat this procedure from the temple area back to the lower crown and through the nape area. Be gentle yet thorough, massaging your entire scalp for at least 3 minutes. Remember to massage with the pads of your fingertips in small circular movements along the scalp, not on top of the hair.
5. Next, put some oil into your palms and work it between your hands. Massage this oil into the hair from your scalp out to the ends with a gentle stroking or massaging motion.
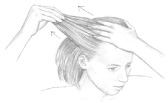
Step 5
6. Cover your hair with a plastic cap and close off with a clip. (Use and recycle a plastic bag from your whole food market, or try a reusable shower cap.) You can wrap a hot, damp towel around the plastic cap if you want to maximize the effect in the shortest amount of time (20 to 30 minutes), or if time permits, take a bath, meditate, or simply luxuriate around the house while your own body heat enhances the absorption of the treatment. If you want to leave the oil on overnight, pin up your oiled hair and sleep with a towel over your pillow.
7. Shampoo, condition with a detangling formula (especially useful for long hair) or herbal rinse if required, and then style.
8. If any of this recipe is left over, use it on your body, especially on your elbows and feet. If you opt to save the oil for another day, keep it refrigerated and use within 3 weeks.
AYURVEDIC SCALP MASSAGE OIL
Use the herb bhringaraj, called “ruler of the hair” in Ayurveda, to create a highly effective medicated oil that is famous in India for removing grayness and reversing hair loss. Or you can select your favorite herb(s) and use in combination with bhringaraj to create your own individualized scalp oil.
¼ cup dried herbs of choice
1 cup water
2 cups sesame oil
3-5 drops essential oils of choice (optional)
To make:
1. Combine the herbs and water in a stainless-steel or glass pan. Bring to a boil, reduce the heat, and then simmer, uncovered, until approximately half of the liquid has evaporated. Strain off the herbs.
2. Add the decoction to the sesame oil in a stainless-steel pan, bring to a boil, then immediately turn down the flame as low as possible and let this mixture simmer very slowly for at least an hour. The oil will be ready when all of the liquid from the decoction has evaporated and a drop of water added to the oil makes a crackling sound.
3. Add a few drops of essential oils. Store this oil in an airtight glass bottle in a cool, dark location.
To use:
Use for scalp and hair massages.
YIELD: APPROXIMATELY 2 CUPS
FLOWER ESSENCE SCALP MASSAGE
Flower essences can work wonders to calm the nerves and soothe anyone who is stressed out. The essences are subtle healing substances extracted from flowers. Edward Bach developed a procedure for extracting the essences in the early 1900s. Rescue Remedy, the most popular, is actually a combination of five flower essences and is available in most health food stores. Incorporating flower essences into a scalp treatment benefits both the hair and the emotional and mental state of the recipient. This treatment, which is offered at finer spas, is remarkably easy to make and enjoy at home.
Flower Essence Number 1
¼ cup apricot kernel oil
3 drops red clover flower essence
3 drops lavender flower essence
Flower Essence Number 2
3 drops Rescue Remedy flower essence (or other flower essence combination of your choice)
3 drops lavender essential oil
1 plastic bag that will fit over your hair
To make:
1. First add the apricot kernel oil, then the flower essences and essential oils, to a lotion jar.
2. Shake well to disperse all ingredients.
3. Let sit for 24 hours in a cool, dark place; shake again before use.
1. Rinse hair with warm water.
2. Warm 1 tablespoon of the oil in the palms of your hands.
3. Using your fingertips (not nails), in a circular motion gently massage the oil into the scalp.
4. Repeat until the entire scalp has been massaged.
5. Rub the shafts and ends of your hair with the remaining oil.
6. Place a plastic bag over your hair, secure with a hair clip or clothespin, and allow the oil to remain for at least 15 minutes.
7. Rinse well, then shampoo as you normally would.
YIELD: 1 TREATMENT
Often neglected when people think of massage, hands demand some “touching” attention. For a hand massage, rub on a moisturizing cream. You can also mix 1 tablespoon of gently warmed avocado oil with 3 to 5 drops of your favorite pure essential oil and allow your hands to savor the experience.
1. Palm rub. Rub your palms together briskly to create some warmth, then rub the back of each hand.
2. Back of hands press. Clasp the fingers of both hands together with the palms facing. Squeeze the fingertips against the back of your hands. Hold for 5 to 10 seconds. Relax. Breathe deeply. Repeat.
3. Web pinch. The space between each of your fingers is the web. Pinch between the thumb and the index finger, hold for a moment, then rub. Repeat this process between each of the fingers on both hands. Eastern therapies hold that applying pressure on the finger’s web sites (not the Internet!) helps to dispel headaches and move toxins from the body.
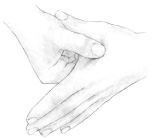
Step 3
4. Finger circles. Use your opposite hand to gently stretch and make little circles with each finger and thumb. Reverse direction of finger rotation. Repeat on the other hand.
5. Wrist compress. Support the wrist of one hand with the palm, fingers, and thumb of the other and squeeze lightly for about 5 seconds. Next, create the motion of a washing machine by gently rotating back and forth the wrist being held in the grasp of the supporting hand, while gently moving the holding hand in the opposite direction. Give the other wrist the same gentle treatment.
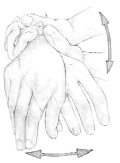
Step 5
6. Forearm press. Knead the outer muscle of the forearm below the elbow. Push the tips of your four fingers sensitively into the skin, using the thumb as an anchor, and work slowly up and down the arm, about three times, as if you were kneading bread dough. Repeat on the other arm.
7. Elbow rub. Take this opportunity to moisturize the elbow and forearm with your favorite cream or lotion by massaging with the fingertips of the opposite hand in circular movements from the elbow down to the wrist, then over the hand and fingers.
8. Arm and finger stretch. Interlace the fingers of both hands with the palms facing and then slowly turn the palms outward. Stretch your arms in front of you and give the fingers and arms an easy, relaxed stretch. Release and shake out your hands as if you were trying to dry your nails.
If your nerves are frayed, your energy level is running on empty, and your feet are simply worn out, then by all means partake of an aromatherapy foot massage. It will soothe your spirits, reduce your stress, put the spring back into your step, and soften your feet. What’s good for the body is good for the “sole”!
Wooden footsie rollers have been around for many years. They come in all shapes and sizes, from single to double or triple rollers. Some are handheld and some sit on the floor. Ones with raised ridges going from one end to the other are particularly successful. If you don’t have a footsie roller, a wooden rolling pin can be used in a pinch. Simply place the footsie roller or rolling pin on the floor and, while bearing down comfortably, roll the entire length of your foot over the tool, back and forth, concentrating on your arches. Do this for 5 to 10 minutes per foot. This exercise relieves fatigue and cramping, especially in your arches.
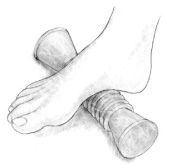
Foot roller massages can relieve fatigue and cramping, especially in your arches.
A foot massage can be performed at any time you wish or as a part of a home pedicure procedure. The following illustrations depict some standard foot massage techniques that a nail technician might perform on her client during a pedicure. If you do not have a willing partner to give you a massage, never fear. These techniques are just as easily done (with a minor bit of alteration) by yourself on your own feet.
If a partner is involved, have the one receiving the foot massage recline against a big pillow on the sofa or bed to fully relax the entire body. Foot massage feels really great if the whole body is at ease.
If you’re going solo, find a comfortable chair, preferably one with padded arms and a foot rest, such as a recliner. Sit back, prop one foot in your lap and let the other rest extended in front of you, and massage those feet until they smile or you fall asleep!
Note: If using massage oil or lotion, a towel or two will come in handy to protect furniture and clothing.
Rub oiled or creamed hands together vigorously to warm them before beginning foot massage. Complete all six steps on one foot before moving on to the other.
1. Stroking. Stimulates circulation and warms the foot. Holding your partner’s foot in your hands, on the top of the foot begin a long, slow, firm stroking motion with your thumbs, starting at the tips of the toes and sliding back away from you, all the way to the ankle; then retrace your steps back to the toes with a lighter stroke. Repeat this step three to five times.
Now stroke the bottom of the foot with your thumbs, starting at the base of the toes and moving from the ball of the foot, over the arch, to the heel, and then back again. Use long, firm strokes, slightly pressing the sole with your thumbs as you stroke. Repeat this step three to five times.
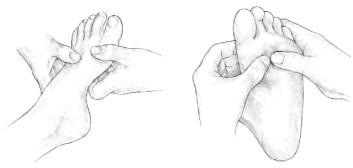
Step 1
2. Ankle rotation. Loosens joints and relaxes feet. Cup one hand under the heel, behind the ankle, to brace the foot and leg. Grasp the ball of the foot with the other hand and turn the foot slowly at the ankle three to five times in each direction. With repeated foot massages, any stiffness will begin to recede. This is a particularly good exercise for people suffering from arthritis.
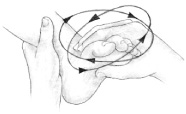
Step 2
3. Toe pulls and squeezes. Toes, like fingers, are quite sensitive to the touch. This massage step is unbelievably calming. Grasp the foot beneath the arch. With the other hand, beginning with the big toe, hold the toe with your thumb on top and index finger beneath. Starting at the base of the toe, slowly and firmly pull the toe, sliding your fingers to the top and back to the base. Now repeat, but gently squeeze and roll the toe between your thumb and index finger, working your way to the tip and back to the base. Repeat these two movements on the remaining toes.
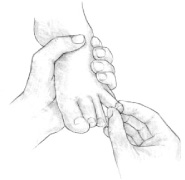
Step 3
4. Toe slides. Grasp foot behind the ankle, cupping under heel. Insert the index finger of the other hand between each pair of toes and slide back and forth three to five times.
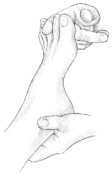
Step 4
5. Arch press. Releases tension in the inner and outer longitudinal arches. Hold foot as you did in step 4. Using the heel of your other hand, push hard as you slide along the arch from the ball of the foot toward the heel and back again. Repeat five times. This part of the foot can stand a little extra exertion on your part; just don’t apply too much pressure.
6. Stroking. Repeat step 1. This is a good way to begin and end a foot massage.
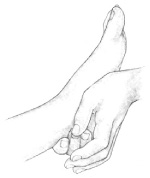
Step 5
Foot massage can be performed with or without oils and creams. It’s easier to grip your own or your partner’s foot if it’s dry, but you can use a small amount of oil or cream fragranced with essential oils. Don’t overdo it, though, or the foot you’re working on will be too slippery and difficult to hold.
The following recipes are very easy to make and have a relatively long shelf life in case you decide to double or triple a formula and store it for later use. The ingredients are especially good for dry, neglected feet and will leave your paws exceptionally soft and pampered.
RELAXING FOOT MASSAGE OIL
After washing and exercising your feet, use this fabulous aromatherapy herbal oil to further enhance your relaxed mood and soften any rough skin.
2 teaspoons soybean, jojoba, extra-virgin olive, or almond oil
2–6 drops (depending on strength desired) lavender, German chamomile, orange, or clary sage essential oil
To make: Mix all ingredients thoroughly in a small bowl.
To use: Massage into feet using a firm, strong hand. Apply pressure as needed to alleviate fatigue and tension in your feet. Put on socks afterward. You may be ready to climb into bed at this point.
YIELD: 1 TREATMENT
This formula will help feet feel cool and refreshed and aid in deodorizing.
2 teaspoons castor, soybean, jojoba, or extra-virgin olive oil
1 drop peppermint essential oil
1 drop eucalyptus essential oil
1 drop rosemary essential oil
To make: Combine all ingredients in a small bowl. Stir thoroughly.
To use:
1. Use about 1 teaspoon per foot and massage into feet completely.
2. Put on socks after massage to absorb excess oil and soften feet.
YIELD: 1 TREATMENT
AGONY OF THE FEET RELAXING MASSAGE OIL
2 teaspoons castor, jojoba, soybean, or extra-virgin olive oil
3 drops lavender essential oil
1 drop German chamomile essential oil
1 drop geranium essential oil
To make: Combine all ingredients in a small bowl. Stir thoroughly.
To use:
1. Use approximately 1 teaspoon per foot and massage in completely. Inhale the aroma on your hands before you massage, and continue to breathe deeply, as these particular oils are extremely calming.
2. Put on socks after massage to absorb excess oil and soften feet.
YIELD: 1 TREATMENT
FOOT REFRESHER AND DE-STRESSOR
This combined exercise and foot soak is designed to relax tired, aching feet, relieve toe cramps, and strengthen weak foot muscles that support the plantar fascia, which runs the length of the bottom of your foot from the heel to the ball. This one is also good if you suffer from hammertoes and pain in the ball of your foot.
Foot tub
40–60 medium to large marbles
2 tablespoons yarrow or sage
2 tablespoons wintergreen
5–10 drops lavender, camphor, peppermint, rosemary, or eucalyptus essential oil
¼ cup sea salt, baking soda, or Epsom salts
Large towel
To make:
1. Place the foot tub with the marbles in it in front of a comfortable chair.
2. Boil enough water to fill the foot tub to above ankle level.
3. Remove the water from the heat and add the yarrow or sage and the wintergreen tied tightly in cheesecloth. Cover and steep for 15 minutes. Remove the herbs. (You can add the spent herbs to your compost.)
4. Fill the foot tub with the hot tea, and add the essential oil and the sea salt, baking soda, or Epsom salts. Swish the ingredients around to dissolve the salt and to blend in the essential oil.
To use:
1. Place your feet in the tub and roll them around on the marbles.
2. Pick up and release marbles with your toes by grasping the marbles tightly, squeezing your toes, then releasing. Do this for 10 to 15 minutes.
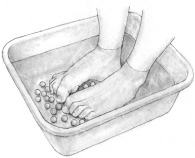
Step 2
3. Dry your feet roughly with a towel.
4. Slather with a thick moisturizer and put on socks.
YIELD: 1 TREATMENT