To take a build from the Dev branch and apply it to a standalone test server, perform the following:
- Open the Azure DevOps site, open your project, and locate Build - Dev - Coninuous from the Pipelines | Builds section.
- Click on the description of the build (under the Commit column) and select the Summary tab page. You should see the following output if the build is successful:

- Click the ellipses (...) next to the Packages file container and select View contents.
- Expand the Packages folder and click the ellipses. Choose Download from the list, as follows in the following screenshot:

- Download the file and then open LCS (https://lcs.dynamics.com/).
- You can apply this to a standalone OneBox using these instructions, which can be found in the Collect topology configuration data section: https://docs.microsoft.com/en-us/dynamics365/fin-ops-core/dev-itpro/deployment/install-deployable-package.
If we are to deploy a build to UAT, we need to integrate Dev into Main. Perform the following to do this:
- Open Visual Studio.
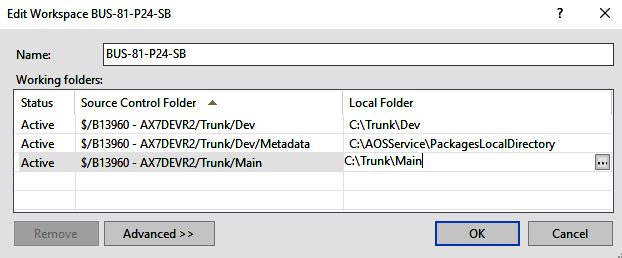
- Ensure that the source control mapping is configured for the Main and Dev branches, in line with the following screenshot:

- With this complete, we can now integrate Dev into Main. From the Team Explorer window, select Source Control Explorer.
- Expand Trunk, right-click on Dev, and select Branching and Merging | Merge... from the popup menu, as follows in the following screenshot:

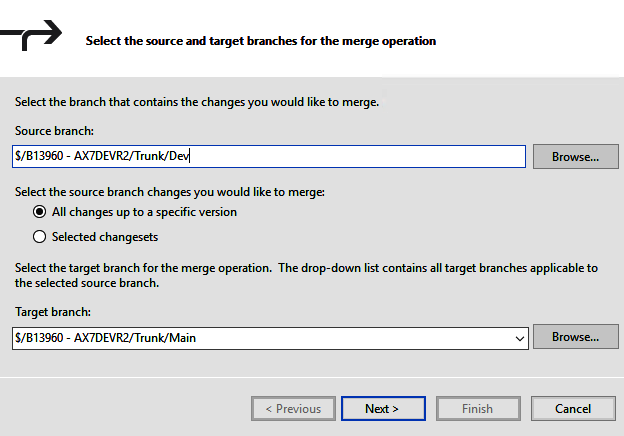
- The next dialog box will show the Source as the Dev branch and the Target automatically as the Main branch. If it doesn't, this means we didn't create the Dev branch from Main. The dialog should look as follows:

- Press Next and then Finish. This will add all the changes to Pending changes against the Main branch.
- Finally, choose Check in from Pending changes on the Team Explorer window.
- We would usually have a task (an Azure DevOps task) for this, that states some details about the build. When we check in with a task, the code in that Check in is automatically associated with the Check in.
- Now, you need to manually create a build for the Build - Main pipeline. Once you've done this, the resulting package can be used to upload to LCS.
To upload the package to LCS and apply it to the UAT environment, perform the following steps:
- Open your LCS project and then open the Asset library. Depending on the type of project, this will be under the burger icon or a tile on the project. Do not use the Shared Asset Library.
- In the Asset library, select Software deployable package from the left and press the plus (+) symbol. In the dialog, enter the build name (for example, B20191231) and a description, and then click on Add a file.
- Locate the deployable package we just downloaded and click on Upload. Once complete, click on Confirm on the Upload Software deployable package file dialog.
- Open the environment that this should be deployed to and choose Maintain | Apply updates. This will show a list of Software deployable package assets. Select the asset and click on Apply.
The update process will start immediately. This will take the server offline and apply the update, which will take around an hour to complete.
- After testing is complete, go back to the sandbox environment. You will be prompted to confirm that the update was successful. After that, go back to the Asset library, select the deployable package, and then click on Release candidate. Do this so that it's available to be deployed to the production environment.