Chapter 8: Let’s Party!
Half the fun of a party is in the preparation, and kids love to help. Work together on these projects to assemble a variety of fantastic party favors ahead of time—or better yet, select one special project to organize as a fun party activity. All your kids’ friends can get involved in making their own favors to bring home and enjoy.


Itty-Bitty Book-in-a-Box
Combine your kids’ love for all things miniature with their fondness for drawing by creating these itty-bitty matchbox sketchbooks. They are perfect for doodles and store away for safe-keeping in their own boxes.

Let’s Make It
Measurement: 21⁄8" x 13⁄8" x 1⁄2" • Time: 15 minutes
Materials
• Matchboxes
• Newspaper
• Acrylic paint and paintbrushes
• Decorative papers
• Craft knife and self-healing mat, or scissors
• Ruler
• Glue or glue stick
• White drawing paper
• 2 small binder clips
• Stapler
Decorate the Matchbox
1 Remove the interior drawer from each matchbox and safely dispose of the matches. Protect your work surface by laying down a piece of newspaper.
2 Paint all sides of the interior drawer from each matchbox and set it aside it to dry.

3 Cut a 41⁄2" x 21⁄8" piece of decorative paper.
4 Spread a small amount of glue all over the back of the piece of decorative paper.

5 Apply the decorative paper to the outside of the matchbox, smoothing out any air bubbles with your fingers as you go.

Make the Book
6 Cut a 4" x 11⁄4" piece of decorative paper.
7 Cut 6–8 pieces of white drawing paper also measuring 4" x 11⁄4".
8 Fold the decorative paper in half short end to short end and crease along the fold.

9 Unfold the decorative paper.
10 Stack the papers with the decorative paper as the cover facing out on one end of the stack. Line up the pages as straight as possible and secure both sides with small binder clips.

11 With the outside of the stack facing out, secure one staple through the center crease. This step creates a pamphlet binding on the book.

12 Fold all the papers of the book in half short end to short end and crease along the fold.
Put it All Together
13 Place the book in the drawer. (If necessary, trim the pages of the book to fit the drawer.)
14 Slide the drawer into the matchbox.

Party Pencils
Dress up boring old pencils with decorative papers, glue, craft materials, and a few snips of your scissors. Work together with your kids to create a bunch of these pencils to share with friends and teachers at school.

Let’s Make It
Time: 15 minutes+
Materials
• Ruler
• Wooden pencils
• Decorative papers
• Scissors
• Glue or glue stick
• Single-hole punch
• A variety of fun craft materials such as pompoms, googly eyes, craft foam sheets and cutouts, felt, pipe cleaners, embroidery floss, and beads
• Tape
Make Papered Pencils
1 Measure the pencil from the eraser hardware to the end. Cut a 11⁄2" wide strip of decorative paper to that length.
2 Apply glue to the back of the paper strip.

3 Apply the strip of paper to the length of the pencil starting at the eraser hardware.

4 Carefully roll the pencil in the paper, smoothing it to the surface of the pencil and pressing out any air bubbles as you go.

5 Apply a little bit more glue to the edge before you finish wrapping the paper onto the pencil, if needed.
6 Press along the edge of the paper down the length of the pencil to secure it in place.

7 Allow it to dry before sharpening for use.

Create Monogrammed Pencils
We used craft foam for these personalized pencil toppers, but they would also be great made with felt.
8 Punch two holes in a craft foam circle just inside the edge on opposing sides.

9 Cut out your first initial in a corresponding color of craft foam, or use a self-adhesive craft foam letter.
10 Apply the foam letter to the foam circle.

11 Slip the pencil through the two holes on the circle so that the letter is facing outward.

Make Fringed Pencil Toppers
12 Cut a 2" square of double-sided decorative paper.
13 Use scissors to cut slits in the paper, leaving 3⁄4" uncut at the bottom edge.

14 Wrap the paper around the eraser hardware at the end of the pencil.

15 Tape the fringed pencil topper to itself, but not directly to the pencil. This way it can be easily slipped off when your kids need to use the pencil eraser.

|
TIP Create Your Own Pencil Pals Set out a variety of materials and allow the kids to use their imagination to create their own pencil pals. Look in books and magazines for inspiration. There really is no wrong way to do this project—have fun and encourage your kids to bring their designs to life.
|

Driveway Doodlers
Drawing all over the driveway is great fun for kids of all ages. The next time your supply of chalk is running low, try making your own instead of purchasing yet another bin of the mass-produced stuff. In just a few minutes, you and your kids can mix up a batch in fun shapes and all your favorite colors.

Let’s Make It
Time: 15 minutes plus drying time
Materials
• Cookie cutters
• Duct tape
• Rubber gloves
• Empty bucket
• Plaster of Paris
• Long spoon or painter’s stir stick
• Tempera paint powder
• Ice cube trays

Prepare Your Work Space and Materials
1 Work in a well-ventilated area to protect everyone from plaster and paint dust.
2 The mixture will harden very quickly, so it is best to have all of your materials ready before you begin.
3 Cover one side of each cookie cutter with duct tape. Be sure it is well sealed.

Create Your Own Chalk
4 Wear rubber gloves when you work.
5 Combine two parts plaster of Paris and one part water in a bucket. Try 1 cup of plaster to 1⁄2 cup water the first time so you can familiarize yourself with the process.
6 Stir well to mix.

7 Add tempera paint powder to the mixture 1 tablespoon at a time and stir well to combine. Add more paint if needed to achieve your desired color.

8 Pour or spoon the plaster mixture into your cookie cutter molds or ice cube tray.
9 Allow to harden and dry completely. It can take anywhere from 1⁄2 hour to overnight, depending on the size of the chalks you create. The larger the pieces, the longer they will take to harden.
10 Unmold the chalk and enjoy!

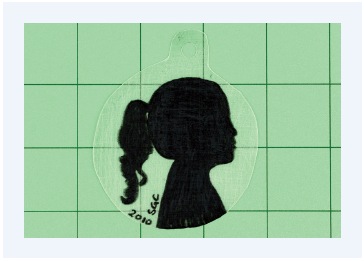
Silhouette Charms
This fun twist on a classic silhouette portrait is a great way to chronicle the ones you love. These sweet little charms can be made into jewelry or sized to create memorable holiday ornaments.

Let’s Make It
Measurement: About the size of a quarter • Time: 1⁄2 hour
Materials
• Profile photos of your kids (wallet-sized)
• 8" x 101⁄2" sheets of artist’s grade shrink plastic (such as PolyShrink)
• Sandpaper (fine grit)
• Scissors
• Single-hole punch
• Colored pencils
• Cookie sheet
• Baking parchment paper
• Clear sealer
Prepare Your Materials
You may wish to make a photocopy of each child’s profile photograph so the original is not marked.
1 Follow the manufacturer’s instructions to sand one side of a shrink plastic sheet. (If your shrink plastic is pre-sanded, you can skip this step.)

2 Choose one of the charm templates from the Appendix and trace it onto the shrink plastic with a pencil.

3 Use scissors to cut out each charm. You can also use decorative-edged craft scissors for a unique finished look.

4 Punch a hole in the top of each charm with a single-hole punch in the spot indicated on the template.

Create the Silhouette
5 Place the shrink plastic charm piece (sanded side up) on top of the portrait and trace with a black colored pencil. Set the portrait aside when done.
6 Use colored pencils to color in the entire silhouette shape. Traditional silhouettes are done in black, but feel free to use any color you like.

7 Write the date and the child’s name or initials on the charm to make note of when this particular portrait was created.
Shrink the Charms
8 Space out the shrink plastic silhouettes on a cookie sheet lined with parchment paper.

9 Bake according to manufacturer’s instructions to shrink the plastic charms. This is a quick process and really fun to watch through the oven door.
10 Allow the charms to cool completely.

Finishing
11 Apply a coat of clear sealer to the charm to protect the silhouette from smudges.
12 String up your silhouette charm on a length of silk cord to wear as a necklace.

A simple charm bracelet filled with your family’s silhouettes would be a fantastic gift for a mother or grandmother.
Another fun idea would be to create a much larger version of these silhouettes to make keepsake Christmas ornaments. Simply enlarge the charm templates as well as the photos you trace by 200%–300%.

|
TIP Silhouette Charm Kits Put together a kit of this project as party favors so your friends can make them at home after the party. Follow steps 2–5 to prepare a few blank charms for each friend. Enclose a package of colored pencils and a small card with directions on creating the silhouette, as well as baking instructions.
|

Easiest Play Dough Ever
Right in your very own cupboards are the ingredients for a terrific antidote to the “I’m bored” syndrome. Have the kids whip up a batch of this no-cook play dough and watch them become inspired to play and enjoy getting lost in their creations.

Let’s Make It
Measurement: Approximately 11⁄2 cups of dough • Time: 15 minutes (plus hours of play time)
Materials
• Mixing bowl
• Whisk
• Measuring cup
• Salt
• Vegetable oil
• Flour
• Food coloring
Make the Dough
1 In a mixing bowl, whisk together 1⁄2 cup of salt, 1⁄2 cup of warm water, and 1⁄4 cup of vegetable oil for about 5 minutes.

2 Add 1⁄2 cup flour to the mixture and continue to whisk until it forms a smooth paste. Continue to whisk for a minute to allow the salt to continue to dissolve and distribute.

3 Add another 1⁄2 cup of flour to the mixture and continue to whisk until it forms a smooth, sticky dough.

4 Sprinkle some flour onto your work surface and scoop the dough out of the bowl onto your work surface.
5 Knead the dough with your hands.
6 Add up to an additional 1⁄4–1⁄2 cup flour as you knead until the dough is smooth and no longer sticky.

7 Divide the dough into a few smaller portions.
8 Flatten a small portion of dough and add a few drops of food coloring. (Fold over the dough so the food coloring does not drip all over your work surface.)
9 Knead the dough for a few minutes until it is your desired color.

10 Repeat steps 1–9 to create a colorful variety of dough balls, and enjoy!
Salvaged Scribblers
Almost everyone who has children has crayons in the house. And if you have crayons, you most likely also have a whole lot of broken crayon bits. Let’s rescue those colorful pieces from certain fate in the garbage can by recycling them into colorful, whimsical crayons that the kids will love to use and share with friends.

Let’s Make It
Time: 1⁄2 hour (plus cooling time)
Materials
• Old crayons
• Vegetable spray
• A variety of whimsical molds such as silicone ice cube trays and mini-muffin tins
• Cookie sheet
• Toothpick or bamboo skewer (optional)
Prepare Your Materials
1 Peel any remaining paper wrappers off of your old crayons.

2 Break the crayon into small pieces.
3 Determine if you would like to make multicolored or single- colored scribblers and sort the crayons accordingly.

Create the Scribblers
4 Preheat the oven to 200 degrees.
5 Lightly spritz your molds with vegetable spray.
6 Place the crayon bits into the molds.
7 Put the molds on a cookie sheet and place the cookie sheet in the oven.
8 Melting the crayons is a relatively quick process, and the time is determined by the size of your molds. It might take anywhere from 5 minutes to 15 minutes. Watch through the oven door while the crayons melt.

9 Remove the cookie sheet and molds from the oven and allow them to cool completely before use.
10 If you are making multicolored scribblers, try swirling the melted wax with a toothpick or bamboo skewer to create marbled scribblers.

|
TIP A few Salvaged Scribblers along with an Itty-Bitty Book-in-a-Box (instructions earlier in this chapter) would make a great party favor.
|

Add-a-Button Barrettes and More
Hair accessories featuring whimsical fabric buttons are a fun way for girls to express their personal style. In this project, you will learn the basic process and create a few special pieces that will allow your kids to switch the buttons as often as they wish.

Let’s Make It
Time: 15 minutes (or as long as you like)
Materials
• Needle nose pliers
• Cover button kit and cover button refill (available in the notions aisle of sewing and craft stores)
• Pen
• Small piece of clear hard plastic (a takeout salad container works great)
• Scissors
• Fabric scraps
• Self-adhesive hook and loop dots
• Barrettes
• 1⁄2” buttons with shaft
• Elastic ponytail holders and hair bands
• Embroidery floss or string
Make the Buttons
1 Use needle nose pliers to remove the shaft from each of the button backs in the cover button kit.

2 Trace the button pattern from the cover button kit onto the piece of clear hard plastic to create a see-through template.

3 Cut out the template.
4 Use the template to trace the pattern onto fabric scraps, centering any desired images so that they appear centered on the buttons.
5 Cut out the fabric pieces.

6 Follow the manufacturer’s instructions to secure fabric onto the buttons. Be sure to center any motif on the button prior to pressing it all together.

7 Apply a soft-sided self-adhesive hook and loop dot to the back of each fabric button.

Make Add-A-Button Barrettes
8 Apply a scratchy-sided self-adhesive hook and loop dot to a barrette.

9 Apply a small scrap of fabric to the exposed adhesive on the reverse of the hook and loop dot (a) and trim it to size (b). Covering any exposed adhesive will help make sure it will not stick to the wearer’s hair.

10 Secure any fabric button you like to the barrette by using the hook and loop dots.

Make Add-A-Button Ponytail Holders
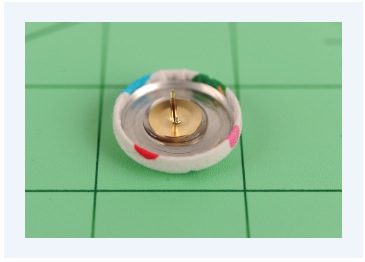
11 Apply a scratchy-sided self-adhesive hook and loop dot to the face of a small button with a shaft.

12 Use a strand of string to pull an elastic ponytail holder through the shaft of the button.
13 Loop one end of the ponytail holder through the other to create a knot.

14 Secure a fabric button to the ponytail holder by matching the hook and loop dots.

Make Add-A-Button Hair bands
15 Apply a scratchy-sided self-adhesive hook and loop dot to the face of a small button with a shaft.

16 Use embroidery floss or string to tie the button to an elastic hair band.

17 Secure a fabric button of your choice to the hair band by matching up the hook and loop dots.

Other ways to use Fabric Buttons
Glue small round magnets to the back of fabric buttons. Once the glue is dry, you can use the buttons on your fridge or magnetic memo board.

Fabric buttons make fun pushpins for your bulletin board. Apply thumbtacks to the back of fabric buttons with a small amount of glue and allow it to dry before using.
|
TIP How About a Game of Checkers? Glue felt to the back of fabric buttons and use them as game pieces for checkers, backgammon, and board games. You can make this simple checkerboard by applying a piece of large gingham to felt using fusible web.
|

No-Trouble Bubbles and Wands
Everybody—young and old—loves bubbles. Let’s whip up a batch of homemade bubbles and create your own personalized bubble wands.

Let’s Make It
Time: 15 minutes
Materials
• Wax paper
• Oven-bake polymer clay (we used Sculpey Soft)
• Alphabet rubber stamps with 1⁄4" letters
• Baking parchment paper
• Cookie sheet
• Bucket
• Dishwashing liquid
• Serving spoon
• Measuring spoons
• Glycerin (found in the beauty aisle, or ask at the pharmacy counter at your local drugstore)
Make the Bubble Wands
1 Set out a piece of wax paper on each person’s work surface.
2 Break a 2-ounce block of oven-bake clay into four equal-sized pieces.
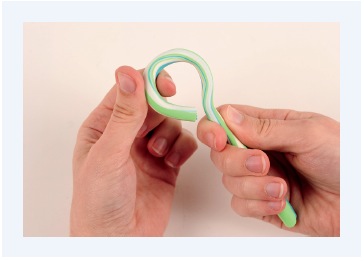
3 Take a piece of clay and roll it into a log shape.

4 Create a loop in each end of the clay wand. Try a circle on one end and a different shape on the other—triangles, squares, and even elongated ovals will all work well for blowing perfectly round bubbles.
5 Use the alphabet rubber stamps to “write” your name on your wand.

6 Place the bubble wands on a parchment-lined cookie sheet and bake according to the manufacturer’s instructions. They will shrink slightly and harden quite a bit.
7 Allow the bubble wands to cool completely before using them with your bubbles.
Mix the Bubbles
8 In a bucket, gently stir together 4 parts water to 1 part dishwashing liquid.
9 Add 1 tablespoon of glycerin for every 21⁄2 cups of bubble mixture. Stir to combine.

10 The kids can use their new bubble wands with this mixture right out of the bucket.
11 You can also decant the bubble mixture into smaller containers (such as yogurt cups) for individual use.
12 This bubble mixture gets better over time, so make extra to fill a large bottle and allow it to “cure” for a few days.