Dress in layers.
 Dress in layers.
Regardless of the day’s weather report, wear a tank top, T-shirt, button-down shirt, sweater, sweatshirt, and fall coat. Additionally, bring a winter coat with you. Adjust the number of layers you are wearing over the course of the day as necessary.
Bring an umbrella.
Carry an umbrella with you wherever you go, including the beach or on a hike. Also carry a towel to dry off after a sudden squall.
Carry hand-warmers.
Place them in the pockets of your shorts or in your shoes.
When at a barbeque or evening bonfire, sit as close as possible to the coals or fire pit.
Exercise vigorously.
Raise your internal body temperature by performing a quick set of 10 jumping jacks and 10 push-ups.
Modify the temperature of your household.
Place your air conditioner and heater side by side so that you can easily switch between one and the other when the weather becomes extremely cold or extremely hot.
Be Aware
The average temperature in San Francisco in June is 62 degrees Fahrenheit; in October it is 61 degrees Fahrenheit.
1 Greet the host or hostess.
As you enter the restaurant, make eye contact with the person who welcomes you, and nod your head politely to any waiters or waitresses you see. It is not necessary to bow.
2 Sit at the sushi bar.
Greet the itamae, or “chef,” in a measured, respectful tone.
3 Ask for theomakase.
Ordering the omakase, or “chef’s choice,” is a sign of respect, and the itamae will prepare a variety of sashimi (a bit of raw fish), nigiri (a bit of fish over rice), and maki (fish and rice rolled together in seaweed).
4 Order drinks, soup, and other nonsushi items from your waiter or waitress.
Never ask the itamae for anything other than sushi.
5 Do not ask the itamae to perform tricks.
Do not ask him to juggle knives or set a stack of onions on fire.
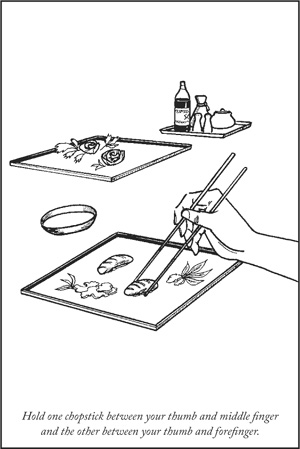
6 Eat with chopsticks.
When your sushi arrives, pick up your chopsticks. Hold one between your thumb and middle finger, the other between your thumb and forefinger. With a precise pincer motion, pick up one whole piece of sushi at a time. Eat each piece in one or two bites at most.
7 Pour two tablespoons of soy sauce in the shallow dish provided.
Dip your pieces of sushi sparingly in the soy sauce. If the itamae has preseasoned a piece of sushi, do not use soy sauce on it.Between courses, ask the waiter or waitress (not the itamae) for a fresh bowl of soy sauce, especially if you have lost rice or pieces of fish in your soy sauce.
8 Use wasabi sparingly.
Wasabi is a form of horseradish paste with an extremely strong taste that can overpower the delicate flavor of a piece of sushi. If the itamae has given you a piece of sushi with wasabi, do not add more.
9 Freshen your palate.
Place a piece of sushi ginger, or gari, in your mouth between courses to freshen the palate. Do not eat the ginger along with a bite of the sushi.
10 Finish everything on your plate.
It is disrespectful to leave uneaten sushi or sashimi on the plate, especially when seated at the sushi bar.
11 Place your chopsticks on the bar.
When you are finished eating, or while waiting for more sushi, place your chopsticks on the bar in front of you, parallel to the edge. Never insert and leave your chopsticks in a bowl of rice, as this is considered a bad omen.
Be Aware
• It is a sign of a superior sushi restaurant to offer finely grated fresh wasabi root rather than the green paste version.
• It is acceptable to eat sushi with your hands.
1 Shop at the right time.
Plan your shopping for off-peak hours and days. The crush of shopping crowds increases later in the day and closer to the weekend—shopping Monday morning will be less intense than Friday evening. Note that while sales on Black Friday (the day following Thanksgiving) include “doorbusting” crowds at very early hours, these crowds are generally self-contained and of minimal threat to postdawn shoppers.
2 Research your items.
Although sale items are often only available in-store, you can still research your selections online to narrow your shopping destinations from among the 2,000-plus retail outlets on the 2.6 acre plaza and its environs.
Upon entering the store, go directly to the area and the item you are interested in. If visiting more than one department, start from the topmost floor and work down, and from departments furthest from the escalators to the closest to ease your movement between floors. Avoid slow and overcrowded elevators.
4 Grip your item(s) tightly.
Once you have selected something, hold the item tightly to your chest with both hands. If you are unsure which size will fit or color of the item you prefer, take one of each and move to a less-densely crowded area to sort through the items.
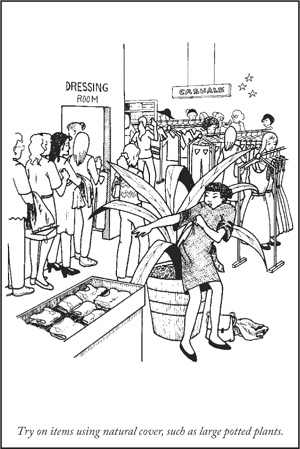
Try on items using natural cover, such as large potted plants or at the center of circular clothing racks, rather than wait in long dressing room lines.
6 Move immediately to the checkout.
Once you have selected your items, proceed directly to the closest register, holding your items close to your body, elbows out, head down.
7 Proceed to the next store.
Use your shopping bag as a wedge to help you make your way through the crowds to the next store.
Be Aware
Arrive at the store wearing comfortable shoes. Wear an appropriate under-layer of clothing for ease in trying items on in store aisles.
1 Take a calming breath.
Breathe in for a count of four, and then out for a count of four. Use your heartbeat to time the breaths.
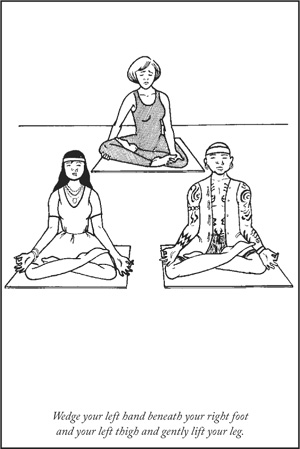
2 Wedge your left hand beneath your right foot and your left thigh.
As you are removing the foot off the thigh, use your right hand to cradle the right knee.
3 Gently shift your right leg forward off the left thigh.
Fully extend your right leg and stretch your calf muscle. Rotate your ankle and wiggle your toes until you are sure your leg has not fallen asleep.
4 Use your hands to lift and move the left leg.
Stretch out the left leg as you did the right.
5 Allow your muscles to relax before standing.
1 Get out of the position.
Stop doing whatever pose has caused you to cramp and carefully reverse the movements that resulted in the cramp position.
2 Massage the cramped area.
Rub your hands in a gentle, circular motion over the cramp for one minute.
3 Stretch.
Extend the cramped area to its full length by standing up on tip toe (if suffering a leg cramp) or fully extending your arm (if suffering an arm cramp).
Wrap six chunks of ice in a headband and press against the cramping area. Rub the ice pack into the cramp for 10 to 15 minutes. Repeat steps 2 and 3.
5 Drink water.
Drink eight ounces of water within a half hour of the onset of the cramp, and remain hydrated until the cramp subsides.
1 Remain calm.
If you cannot remember your mantra, let it go.
2 Be here now.
Be present in mind and place. Survey the contents of the room and note three items or people.
Combine the first syllable of the name of each item or person in the order you noticed them. This is your new mantra.
4 Recite the mantra.
Repeat your new mantra over and over until it loses its “meaning value” and transcends conscious thought.
5 After yoga class is over, write down your new mantra.
Be Aware
• Common yoga injuries involve the neck, hip flexors, and lower back. Rarer and more serious injuries include herniated discs and fractures, which can be caused by poses such as the plow and shoulder stand.
• Do not attempt more challenging versions, such as “power yoga,” without the guidance of an experienced teacher.
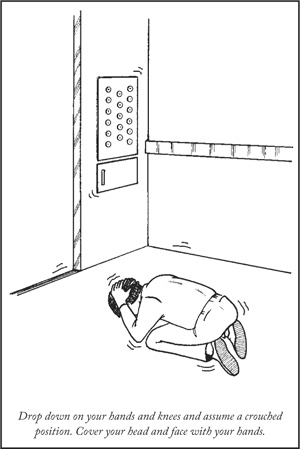
1 Drop down on your hands and knees.
2 Crawl towards a sturdy piece of furniture.
Find a heavy desk or table with enough room for your whole body to fit underneath.
3 Get under the piece of furniture.
If there is no such piece of furniture available, crawl to a section of wall that has no high objects against it. Sit in a hunched position with your back against the wall.
4 Cover your face and head with your hands.
Close your eyes and stay in your safe spot until the ground stops shaking. Remain alert for aftershocks.
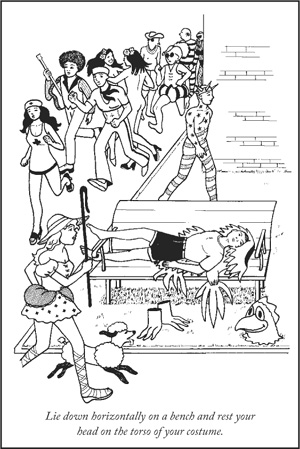
1 Drop down on your hands and knees on the floor of the elevator car.
Assume a crouched position, covering your head and face with your hands.
2 Stay in the elevator car.
Do not pry or bang on the doors. Most California elevators are equipped with shake-actuated switches that will automatically bring the car to the next level and open the doors in the event of a quake.
3 Step off the elevator.
When the doors open automatically, look down before you exit the car to make sure there is no gap between the door of the elevator and the beginning of the floor.
4 Take shelter under a sturdy piece of furniture.
Crawl under a heavy desk or table with enough room for your whole body to fit underneath. Cover your face and head with your hands. Remain still and alert for aftershocks.
1 Stop the car.
Pull over either off the road or as far out of the stream of traffic as possible. Turn off the engine, set your emergency brake, and turn on your hazard lights.
2 Remain in the car.
You will be more vulnerable to falling debris if you are outside of the vehicle.
3 Prepare for possible submersion if the bridge collapses.
Roll all the windows of the car down completely. Remove glasses, shoes, jewelry, and heavy clothing. Switch on the car’s interior lights.
4 Wait for the shaking to subside completely.
Stay inside the vehicle until the shaking has stopped.
5 Start your car and continue slowly.
Drive cautiously to the other side of the bridge, avoiding immobile cars, cracks in the roadway, and (once you are off the bridge) downed power lines. If the bridge has buckled in the course of the quake, exit your vehicle and walk rapidly away from the rupture to the other side of the bridge.
Be Aware
• Standing under a doorway is a common but mistaken reaction to an earthquake. In most modern homes and apartment buildings, the doorway is no sturdier than the rest of the house.
• If you are in bed when an earthquake hits, stay in bed. Place a pillow over your head; you are far less likely to be injured by remaining in place.
• If you are not on an elevator when the quake begins, do not get on one. Use the stairs.
• According to the Working Group on California Earthquake Probabilities, California is more than 99 percent certain to suffer a quake of at least a 6.7 magnitude somewhere in the state in the next 30 years.
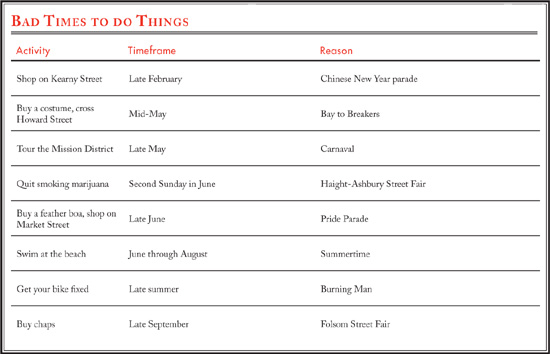
1 Sit down.
Find a nearby spot to sit down on the curb, or atop another runner who has passed out from alcohol consumption.
2 Take off your giant chicken costume.
3 Ice the injury.
Take a handful of ice from someone’s cooler or iced keg. Wrap the ice in a T-shirt and press firmly on the injured area for about twenty minutes or until the swelling goes down.
Wrap the sprained ankle tightly with a makeshift bandage.
5 Lie down.
Assume a horizontal position on a bench, resting your head comfortably on the fuzzy torso section of your chicken costume. Elevate your ankles to about the level of the rest of your body. Remain in a horizontal position for 10 minutes and then try walking on the ankle to see if the pain is limited enough to allow you to continue.
6 Borrow or construct a crutch.
Find someone dressed as Little Bo Peep and borrow his staff. Continue along the race route.
7 Finish the race.
Do not push yourself to run too quickly; remember that Bay to Breakers is considered the least competitive race in America, and possibly the world.
Be Aware
• During and postrace, continue to apply ice to the injury every half hour, for 20 minutes out of each hour, until swelling fully subsides.
• Do not combine any pain or antiswelling medication with alcoholic beverages.
• If you see someone dressed as a doctor or nurse, do not assume that they are actually a medical professional. Runners wearing low-cut nurse’s gowns or “peek-a-boo” doctor scrubs should not be relied upon for medical treatment.
• The total race length is 7.46 miles.