Chapter 15: More Fun with Bees

The fun things you can do with bees are limited only by your imagination. Your bees can construct unusual comb shapes that are quite artistic. You can train them to collect food from the palm of your hand or anywhere else, record their sounds outside and inside the hive (you’ll be surprised to hear their little sounds inside the hive), photograph them in the hive and on flowers, spend hours watching incoming and outgoing “bee traffic” in a hive entrance runway, and so on. The possibilities are many, but please avoid risky experiments or demonstrations that make nonbeekeepers nervous or upset.
Capturing a Bee in a Cage
If you can catch a bee, there are many fun things you can do, such as teaching others about bees. First, you’ll need a cage. Cut a piece of galvanized hardware cloth (#8 mesh is perfect) that is approximately 3¼ x 5 inches (8.3 x 12.7 cm). Roll the long dimension around a broom handle or a slightly larger diameter pipe so that the edges overlap about half an inch. While the mesh is in this tightly rolled position, wrap a fine wire about an inch (2.5 cm) from each end so the cage holds its shape when removed. Close the open ends using a cork or a square of heavy duty aluminum foil pressed against the ends and crimped into place.
Remember that when a bee is disturbed or confined, it attempts to walk or fly upward, toward light. Just point the closed end up, and the bee will obediently move upward long enough for you to close the open end at the bottom of the cage. To release the bee just point the open end up and toward the light source.
One easy method is to capture a bee is to place the open end of your cage over a bee that is resting on a comb surface. When you refine your bee-catching skills, you can even catch a foraging bee on a flower. Approach upwind so the bee can’t smell you, don’t make fast movements, time your catch maneuver while the bee is occupied with sucking up nectar, and place the cage over the bee. Disturbing a honey bee on a flower will never, ever be a sting risk. If you botch the catch attempt, the bee will just fly away (ignore the tiny bee profanities!).
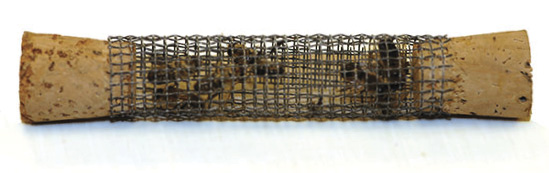
This homemade bee cage is easy to make and very useful if you need to confine a few bees for some reason. Be sure to handle it by the ends to prevent an accidental sting.
Another easy way to capture bees at a feeder is to place an 8-mesh wire cone, open at the tip, over the feeder when multiple bees are feeding. After feeding the bee instinctively flies upward and exits through the small opening at the tip of the cone. You can capture single or multiple bees, depending upon how long you hold the cage over the cone tip. Once the desired number of bees is in the cage, lift it up quickly and plug the lower end to prevent escape. You can capture all the bees coming to the feeding station by repeatedly exposing the feeder and capturing the departing bees. If you want to capture large numbers, you can release captive bees into a larger holding cage. Bees captured this way are full of artificial nectar, so they can survive several hours without additional feeding.

How to Tag or Paint Bees for Identification
Why would you want to attach an ID tag to a honey bee? The answer is that you must be able to identify a bee in order to follow its activities. Imagine trying to watch a football game with unnumbered players! It’s the same situation when you need to know the identity of certain bees. I have conducted experiments in which I had to identify more than 5,000 bees!
Most people, even hobby beekeepers, cannot imagine how to glue an ID tag to a bee without getting stung. First, you need to capture the bees. You can capture flying bees with an insect net. You can capture bees foraging at a feeder by placing the open end of a cylindrical cage over them while they are feeding. They will go up into the cage, so you can close the bottom to confine them. You may need multiple cages, each containing a few bees, for some applications. Next, you must anesthetize the bees, as described in the sidebar above, to prevent getting stung during handling.
Attaching a tag to the thorax can be a daunting experience for the beginner. Let’s make it easy! First, you must deposit a tiny droplet of glue precisely in the middle of the dorsal thorax area:not the entire area:just in the middle. This is extremely difficult if the applicator tip is too large. Also, if you deposit too much glue, it may contaminate the area where the wings connect to the thorax, which will doom normal flight.
An easy way to apply that tiny droplet is to use a wooden kabob skewer as your applicator tool. This type of skewer is sharply pointed on one end and flat on the other end. Dispense a drop of the adhesive onto a surface and then touch the pointed skewer tip to the drop to pick up a tiny droplet, which you can then deliver directly to the thorax. To pick up and apply the tag, gently touch the flat end of the skewer to a wet surface (such as your tongue) and then touch that end to the top of the tag. The tag will adhere to the stick so you can pick it up. Now touch the tag onto the glue and press gently to spread the glue and set the tag in position. When you withdraw the skewer, it easily releases the tag from the tip. Ideally, the glue will cover the underside of the tag without surplus glue oozing out around the perimeter.
There are many choices of adhesives. For most short-term experiments, I have found that Elmer’s wood glue, packaged in a dual-tip pen, works well. The shellac-based glue that is provided with the plastic tags is the best one for permanently tagging queens. It is excellent for worker bees, too.

Numbered tags identify bees to record your observations of their behavior and activities.
Tagging or Marking a Queen Bee
Queens are tagged or marked just like workers, except they should not be anesthetized. With one hand, hold the sides of the queen’s thorax between your thumb and forefinger while you apply glue or paint with the other hand. I promise that she will never sting you! Remember, the only time queens use their stingers is when a virgin queen stings a rival virgin queen. Once, under laboratory conditions, I unintentionally caused a virgin queen to sting me by accidentally applying the odor of a rival virgin queen to my finger. The “rival queen” (a.k.a. my finger) didn’t die, but it surely was a painful experience. As you would predict, the naughty virgin queen did not lose her stinger because a queen’s stinger does not have “fish hook” barbs.
Beekeepers tag or mark queens for two reasons. First, they are easier to find when they are wandering around among thousands of other bees similar in appearance. The other reason is to determine if the original tagged queen has been replaced by a new queen. This is especially vital information in areas where Africanized bees are established. You want to be certain that bees in your colonies are European bees produced by the European queen that mated in an area free of Africanized drones.

Sting Demonstration
If you want to see how a stinger works, catch a worker bee in a small cage, anesthetize her as previously described, carefully pick her up with tweezers or by both of her wings with your fingers, and press the tip of her abdomen against a piece of suede leather or a piece of animal skin, such as pork skin. After the protruding stinger catches by the barbed tip, gently pull the bee away and watch the stinger pull itself into the skin and pump for several minutes. Use a magnifying glass to see the details of this amazing sight. Be sure to smell the stinger when it is first deposited. The banana-like odor is the alarm pheromone odor that excites other bees to sting. Don’t do this experiment near the hive!
Immediately dispose of the stinger donor humanely by dropping the bee into soapy water or putting it in a freezer. Don’t be squeamish about sacrificing a bee for educational or research purposes. If you drive a car or walk outdoors, you are sacrificing many insects, including bees, by squishing them underfoot or colliding with them:just examine your windshield. When you routinely inspect your colony, removing and replacing comb frames, a few bees always get squished, despite your best efforts. That’s just how it is!

A bee sting that has been removed from a bee.
Capturing “Baby” Bees
The best way to introduce kids to bees:and bees to kids:is to show them freshly emerged adult bees up close. You can call them “baby” bees:kids love that. Select a brood frame on which bees are emerging from their cells. Shake and brush all bees off the comb and into the brood nest. Place the comb in a warm environment. Within minutes, several bees should emerge. Gently pick them up and place them into a transparent plastic cup that has a thin layer of lubricant:petroleum jelly or vegetable oil:on the inside wall near the top to prevent their escape. They can’t fly at this age, but they could walk out of the cup. When you’re done, return the bees to the brood chamber.

When a mature brood comb, with all bees removed, is held in an incubator for several hours, many “baby” bees emerge.
Training Bees to an Outdoor Observation Feeder
Observing foraging bees at an observation feeder away from the hive is entertaining, similar to watching a hummingbird feeder but a lot more fun because you will have multiple bees feeding constantly throughout the day whenever weather permits. You can also perform many fascinating experiments. Note: Be sure to provide shade for your feeder.
There are at least two ways to train bees to visit your backyard observation feeder: either from your hive or from nearby flowering plants. First, you need to make “artificial nectar” (sugar syrup with added flavor). Dissolve one part sugar in two parts water (by volume). Use bottled drinking water if your tap water contains significant odors or flavors, such as chlorine. Add a tiny drop of a food flavor, such as anise extract (not pure anise oil; it would be too strong). If you add too much, it could repel the bees. Mix thoroughly to dissolve the sugar. Store the syrup in the refrigerator when not in use.

When training bees from your hive, attach a “gangplank” walkway, maybe an inch (2.5 cm) wide and 2 feet (0.6 m) long, to the entrance of the hive so that bees can walk from the hive entrance landing area onto the walkway. During warm weather when there is active bee flight, sprinkle droplets of artificial nectar on the landing board at the hive entrance. The bees will immediately start sucking up the syrup. Replenish the supply several times until there are many bees feeding. Cease feeding on the landing area and place droplets, approximately 1 to 2 inches (2.5 to 5 cm) apart, along the full length of the walkway.
Place a training feeder just beyond the end of the walkway so that it can only be reached by flying, not walking down the runway. This temporary training feeder should be small (1 to 2 inches [2.5 to 5 cm] square) and hold a clean blue or yellow sponge saturated with sugar syrup. Initially, the bees will walk to the droplets to feed. As they consume nearby droplets, the distance they have to walk increases to the point that some bees will opt to fly, rather than walk, to the syrup.
When several bees are collecting artificial nectar from the training feeder, remove the runway and set up the destination feeder. Immediately place several training feeders on saucers or paper plates at 5-to-10-foot (1.5-to-3-m) intervals from the initial training feeder and aligned in the direction of the target feeder. Each time the feeding bees reach the most distant feeder, relocate (leapfrog) the other feeders in the training direction, spacing them at increasing distances with each move. When several bees reach the observation feeder at the destination, remove all the other training feeders.
I recently developed an alternate method for training bees to an observation feeder even if you don’t have a nearby hive. During midmorning, find a nearby flowering plant, as close as possible to the observation feeder location, where bees are actively foraging. If you can’t find a plant with actively foraging bees, try lightly spraying (no runoff) a flowerless plant with artificial nectar, repeating several times during the day. When conditions are favorable, the bees will discover the artificial nectar, usually within several hours. Don’t be surprised if other species of nectar-collecting insects, such as bumble bees or wasps, show up for the “nectar feast.”
After multiple bees, maybe ten or more, are actively foraging, stop spraying the flowers and place a training sponge feeder near the flowers. In some areas, you may need to protect the feeder from ants. If ants invade the feeder the bees will be repelled, or at least not feed. One option is to hang it by a monofilament fishing line several inches long.

Protect the cotton swab with aluminum foil and then slide it out of the foil to deposit a drop of fragrance oil on the tip.
As the sprayed artificial nectar is depleted:maybe after several hours:bees will start foraging at your feeder. Be patient. They may not start feeding until the following day. Once they are feeding and recruiting additional foragers, set up the destination observation feeder. Put a fragrance lure near the feeder. The lure consists of a drop or two of the training fragrance oil (or extract if you don’t have pure oil) on a cotton swab loosely wrapped in aluminum foil. This setup is very attractive because it will release much more training fragrance in the area and will be easier for bees to discover than the relatively weak fragrance of the syrup in the observation feeder.
Now you can “lead” the foraging bees toward your destination observation feeder by frequently relocating the training sponge feeder. If the distance between the training feeder and the destination feeder is great, you can use multiple training feeders at various distances and aligned in the direction of the destination observation feeder.
Making and Using an Outdoor Observation Feeder
Many kinds of bee feeders can be found online, but most feeders are designed for use at the hive. You can make an observation feeder to place on a feeding table away from the hive area. Use a glass or a clear plastic container, such as a 9-ounce (0.3 l) disposable plastic drinking cup, that has a smooth rim around the top. Fill the container with artificial nectar, place a clear or colored plastic plate on top, carefully invert it, and put it on the feeding table. Practice inverting the feeder over a sink, initially using water instead of sugar syrup, so you can master the movements without spillage. However, if you spill a few drops of sugar syrup, the bees will politely and eagerly clean up your mess!

The sugar syrup will distribute completely around the rim’s perimeter by capillary action. As the bees feed, air bubbles will rise to the top as syrup is released. You have the option to make a 1/8-inch (about 3 mm) notch in the rim to make smaller air bubbles that release more frequently and improve accuracy if you are monitoring the syrup uptake speed in your experiments. Refill as needed and clean the container after each use to prevent mold. Bees will visit your feeder every day that weather permits bee flight. However, if you forget to feed them for more than a day or two, they may cease foraging at the feeder, and you will have to train new foragers. If you are using a lightweight plastic feeder, such as a 9-ounce (0.3-l) disposable plastic drinking cup, you should place a small weight on top. Otherwise, if it becomes empty, excited bees start pushing and shoving around the perimeter. Amazingly, they can actually elevate the cup enough to allow many bees to enter and subsequently become trapped when the cup falls back into position as the remaining bees give up and return to their hive.
The bee population at the observation-feeder table will rapidly increase as the foragers feed and recruit additional foragers. If the population grows too large, it can cause several problems. The quantity of syrup they can collect can exceed your sugar budget. Also, the typical foraging behavior you intended to observe and manipulate for various experiments simply turns into massive, intensive, feeding competition by hundreds of bees:an out-of-control bee stampede!

A simple feeder made of an inverted glass resting on a plastic saucer.
There are several options for controlling the foraging bee population. One is to reduce the bees’ access to the syrup. Another is to decrease or increase the sugar concentration of the artificial nectar. Your feeder will be competing with floral nectar sources that change daily and seasonally. You also have the option to display your feeder for limited times each day. Bees have memory and a sense of time, so be sure to provide the same feeding time and duration each day. You can have fun experimenting with other feeder designs that permit many options for feeding and observing. Check www.havingfunwithbees.com for designs and plan to spend many happy hours sitting by the feeder and watching the foraging bees’ antics.

I have spent a lot of time observing bees’ feeding behavior up close. These hungry little girls paid no attention to me or anyone else, the same as when they are foraging on flowers. If it makes you feel more secure, you could apply a tiny spot of insect repellent (not a spray type) on your clothing, which would significantly risk changing their foraging behavior or outright repelling them from the feeder area.
Before you sit down by the feeder, notice if the bees have a preferred flight path to and from the feeder so you can seat yourself on the opposite side, where “flight traffic” is minimal. If you still don’t feel secure, you can always wear a bee veil. Or you can just be a ’fraidy cat and forfeit an outdoor adventure by opting to peer through a window bee-feeder setup.
Indoor Viewing of an Outdoor Bee Feeder
Observing bees feeding through a window is a different experience than observing an outdoor feeder. Now you are enjoying the comforts of home: air conditioning, soft background music, licorice candy, and so forth. On the negative side, you are not enjoying the buzzing of flying bees and the wonderful sounds of nature, such as birds singing (and, for you urban beekeepers, the occasional siren).
A window feeder can rest on a small platform near the glass. It should not be mounted near an entrance door. You and your guests should not have to walk through the bees’ flight path. The feeder ideally should be protected by shade and located in a convenient area where you can enjoy comfortable, relaxing, prolonged viewing.
One advantage of a window feeder is that the observer can easily have a perfect close-up view of bee activities without disturbing the bees’ normal behavior. For example, exhaling your potentially offensive (at least to the bees) breath could insult their sensitive little antennae! They may head home and never return. But with a window feeder, for the first time, you can get nose to nose (or, rather, nose to antennae) with bees to see their amazing little bodies. You can watch their extended, complex proboscises (tongues) as they suck up the artificial nectar. Watch their two antennae perform interesting movements as they sense the food “in stereo,” similar to our stereo perception of sound.
Another wonderful use of the window observation feeder is to introduce fearful people to bees in the most positive manner. Prolonged observation is a very effective treatment strategy for treating the fear of bees. Another bonus is that your fearful observer will have the opportunity to learn how to identify a bee compared to other stinging insects, such as yellow jackets or wasps.
A window observation feeder also offers a golden opportunity to acquaint children with one of the most fascinating critters in nature. Observing bees could be the educational spark that ignites a child’s burning fascination, ultimately leading to a career in biology or another field of science. You can do a few simple experiments with this observational “laboratory.” Don’t forget to invite your neighbor to watch the feeder:it could mean the difference between having a supportive or a combative neighbor.
Bee Sounds
Honey bees make a great variety of sounds. Some are by-products of activities, such as the sounds made by wing beats during flight. Others appear to be important as a means of communication. Inside the dark hive environment, there is endless “bee chatter.” Constant and frequent communication is a fundamental requirement for social organization. The variety of bee sounds associated with various behaviors is very impressive. For example, a foraging bee that discovers a rewarding source of nectar and pollen communicates the distance to the source by a rapid series of sound “bursts” while performing the wag-tail dance.
You can have fun listening to bee sounds with a stethoscope placed inside the hive or near bees that are active in some way, such as fanning, shaking, or responding to an intrusion at the hive entrance. If you have a sensitive recorder with a sensitive microphone, you may be able to record sounds that you can analyze on your computer.
Bees apparently do not respond to sounds made by humans. You can sing, whistle, and shout profanities near the hive without eliciting any obvious reactions from the bees. Very loud, low-frequency sounds from powerful speakers conceivably could vibrate the combs and cause bees to react in some manner, but don’t try this experiment!
I accidentally discovered some very interesting sounds that worker bees make when they are recovering from anesthetization with carbon dioxide. You can generate carbon dioxide by placing dry ice pellets in a container that allows the gas to escape at all times (in a closed container, pressure would increase, causing an extremely dangerous explosion that could result in serious injuries). Next, put multiple bees in a cage and expose them to the carbon dioxide for one or two minutes. Then, transfer and contain them inside another closed container during recovery. After a few minutes, they will make very distinct, rhythmic sounds that are surprisingly loud. I don’t have a clue concerning the message they are communicating, but you can hear this sound frequently inside the hive environment.
Bee Memory Demonstration
Bees returning from foraging flights remember their precise hive locations. To demonstrate this phenomenal memory, gently move your hive (with your friend’s help) about 5 to 10 feet (1.5 to 3.1 m) sideways on a day when there is active bee flight at the hive entrance. Then, move away from the hive and watch from one side. Returning bees come to a screeching halt in midair in front of the original hive-entrance location and hover there as if bewildered. After two or three minutes, quickly and gently return the hive to its original position and stand back again. A mad rush of bees will enter the hive in its familiar location. Now they’re happy. If you were to leave the hive in the new location a little longer, some returning bees would find the new entrance location and start fanning and releasing orientation pheromones from their scent glands, which are visible near the tips of their abdomens. Soon, the disoriented bees at the original hive location would follow the pheromone trail, alight at the new location, and participate in releasing additional attractive pheromones. The bees will quickly learn to navigate to the new location.

Hundreds of excited bees will enter the exact location where they departed from their hive. If you move the hive, even if only a few feet, the bees hover at its original location, momentarily confused.

Foraging Behavior on Flowers
Take a walk, find some flowers that are attractive to bees, and spend some time observing the behavior of individual foragers visiting flowers. Try to analyze their movements and the time occupied with various behaviors. Do they always approach upwind to a flower? How long do they stay on one flower? Do they tend to move in one direction? Are they collecting pollen and/or nectar? Do they fly to the nearest flower or “shop around” before alighting? Do they interact with other insects feeding on the same flowers? What time of day are they most active? Just take that walk. You need a break!
Foraging Behavior Experiments
The behavior of honey bees foraging on flowers is rather amazing. Every species of flower presents a different challenge. Flowers differ dramatically in color, shape, fragrance, the quantity and quality of nectar and pollen, and the time of day that these goodies are produced by the flowers. Foraging bees quickly learn how to cope with all of these variables. Your observations give you firsthand appreciation of the bee’s ability to learn and remember events typically associated with flowers.
It’s fun to observe the behavior of foraging bees and to experiment with their ability to see colors and smell fragrances. Each bee has to learn how to collect nectar and pollen from flowers that vary in color and fragrance.
Start by training bees to forage at an observation feeder on a table surface that doesn’t have distracting colors or images. It can be clear glass or all white. You can cover the surface with wrapping paper, white poster paper, or something similar to provide a uniform, color-neutral surface. Temporarily move the feeder about 10 to 20 feet (3.1 to 6.1 m) away from the original location. All of the bees will depart from the feeder within about two minutes as they finish collecting a full load. Then move the feeder indoors for temporary storage. At the original feeder location, observe the arriving bees for several minutes as they search for the missing feeder. Is there a pattern of flight during their searching behavior? Do they start searching at the original feeder location? Do they search in the general area? Are they attracted to residual training fragrance on your hands? (Go wash them now!)
After several minutes, while the bees are still searching, place several droplets of artificial nectar on a blue card, approximately 4 inches (10 cm) square, placed in the original feeder location. Watch the bees’ searching behavior carefully. Note how long it takes the first bee to discover the droplets and start feeding, and then watch to see if other bees sense the “success” of the initial feeding bee. How long did it take for the second bee to start feeding? Is the second bee attracted to the first bee? Replenish the drops of nectar as needed so there is enough time (twenty to thirty minutes) for foragers to make several trips.
Now remove the colored card and store it indoors. Immediately place two color cards, one yellow and one blue, and identical in size, several feet from the initial location where they were feeding on the blue card. Place the cards 1 to 2 feet (0.3 to 0.6 m) apart. Take precautions, such as wearing gloves, to avoid accidental contamination with any odors from your fingers. Are the bees attracted to the blue card?
Now put the same number of drops of artificial nectar on each card and then move a few feet away so you don’t interfere with their searching. Which color attracts the feeding bees? Remove both cards and store them indoors. Replace them with two new odor-free blue cards. Do any bees alight? Next, place two drops of water on one card. Do any bees alight? Then place two drops of artificial nectar on the other card. If they alight on the scented card, its would demonstrate that fragrance, as well as color, attracts the bees to flowers. Both are learned when each bee begins foraging for the first time.

Observation Hives
I previously discussed observation hives in public places for educational purposes, and there is no better way to learn about bee activities inside the colony than by mounting a glass-walled observation hive inside your home or garage window. You can buy an observation hive from a bee-supply company, or you can search for do-it-yourself construction plans online.
Use a hive design that enables you to see both sides of all combs at all times; otherwise, the queen may not be visible. You can connect the hive to the outdoors via a visible runway that is several feet feet long and covered with glass or plastic to permit observations of bee traffic at the entrance.
The hive should contain a minimum of two deep frames, but four are better. You can use a queen excluder to confine the queen to the lower brood comb(s) as a means of preventing overpopulation.
Making Beeswax Candles
You can make beautiful beeswax candles that are decorative or burned for various occasions or ceremonies. Beeswax candles are superior to candles made with other kinds of wax because beeswax burns brighter and longer, with a delightful mild fragrance. Another advantage of beeswax candles is that they do not bend out of shape when exposed to warm temperatures. Making decorative beeswax candles out of either molten wax or colorful wax sheets rolled into various shapes and sizes is a fun hobby. Buy a beeswax candle-making kit to get started.

Traditional dipped candles are beautiful for special occasions.

You can wrap sheets of beeswax embossed with hexagons to make candles of various diameters.
Selling Your Honey
Bottle your honey in containers that bear your private label, which you can easily make using design software and printable sticker sheets. Some bee-supply companies print labels for honey containers. You’ll have no difficulty selling your fresh, raw, organic, natural, and locally produced honey for premium prices. If you don’t know the predominant floral source, just call it wildflower honey. Honey does contain other nutrients besides sugar, but promote your product honestly. For example, honey contains trace minerals, but you would have to consume many pounds of honey each day to get your daily requirement!

Producing more honey than you and your friends can eat? Try a “for sale” sign, and you may be surprised by its effect.
Start a Bee Book Collection
Maybe you love to collect items such as artwork, old records, or something similar. Why not consider starting a collection of bee books? Few people realize that hundreds of bee books have been published in many languages. Some are quite valuable, owing to their age, limited availability, or autographs by famous authors and scientists. In fact, this book can be the first in your collection!