Spring provides support for the MVC architectural pattern through Spring MVC. This Spring project allows for incorporating a vast set of UI frameworks, in order to build forms and related components that will enable users to interact with the application.
Spring MVC is built on top of the servlet API, which is designed to create web applications. There is no way to create a desktop, or any other kind of application, using this. Even though the MVC architectural pattern can be applied to all of them, Spring MVC is only focused on the web.
Despite the large number of View technologies supported by Spring MVC, the one most commonly used tends to be Thymeleaf, because of its smooth integration. However, you can also use another framework, such as the following:
- JSF
- FreeMarker
- Struts
- GWT
Spring MVC is designed around the front-Controller pattern, which relies on a single object to handle all of the incoming requests and provide the respective responses. In the case of Spring MVC, this object is represented by a Servlet implemented by the org.springframework.web.servlet.DispatcherServlet class.
This Servlet is in charge of delegating the requests to the Controllers and rendering the corresponding page on the screen, with the desired data. The following diagram shows how DispatcherServlet processes the requests:
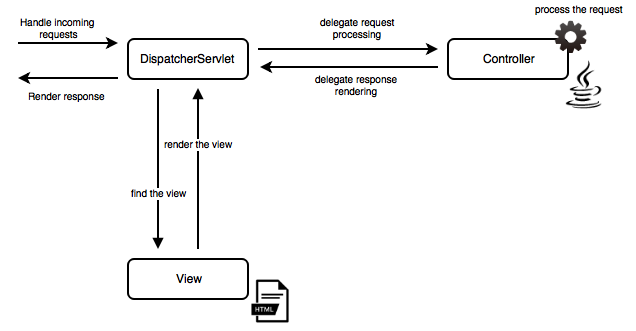
In the preceding diagram, we can see that Controller is a Java class and View is an HTML file. In the latter case, we can also use any tag-library/template-engine tag that will later be compiled as HTML code that is rendered in a web browser.
A Controller in Spring is created using the @Controller annotation over the class name, as shown in the following code snippet:
import org.springframework.stereotype.Controller;

@Controller
public class DemoController
{
  ...
}
Now that the class is marked as a Controller, we need to indicate what request mapping will be handled, and what actions need to be executed as a part of the request processing. In order to support this functionality, we need to write a simple method using the @RequestMapping annotation, as shown in the following code:
@RequestMapping(value = "/ABC", method = RequestMethod.GET)
public String handleRequestForPathABC() {
    // do something
    return "ui-template";
}
As you can see, the preceding method handles the incoming request from the /ABC path, and, once the processing is done, a ui-template is provided, to be rendered on the browser.
This operation is done by Spring MVC using View resolvers, which will look to render a file with the name ui-template.html. You can also write custom resolvers to add suffixes or prefixes to your views, if required.
When we need to pass data from the Controller to the View, we can use the Model object, enabled by Spring View resolvers. This object can be populated with any data that you want to use in your views. In the same way, when the user submits data from the views, this object is populated with the entered information, which the Controllers can use to perform any desired logic.
In order to send data from the Controller to the View, we need to include the Model object as an argument in the method that handles the request, as follows:
@RequestMapping(value = "/ABC", method = RequestMethod.GET)
public String passDataToTheView(Model Model) {
    Model.addAttribute("attributeName", "attributeValue");
    // do something
    return "ui-template";
}
All templates have the ability to read the attributes passed from the Controller using the ${...} syntax, known as expression language:
<!DOCTYPE html>
<html lang="en">
    <head>
        <title>Title</title>
    </head>
    <body>
        ${attributeName}
    </body>
</html>
Alternatively, if you want to pass data from View components to the Controller, you have to populate an object in the View (using a form, for example), as follows:
<!DOCTYPE html>
<html lang="en">
    <head>
        <title>Title</title>
    </head>
    <body>
        <form action="#" th:action="@{/process}"
        th:object="${myObject}">
            <label for="name">Name:</label>
            <input type="text" id="name" th:field="*{name}"/>
            <button type="submit">OK</button>
         </form>
    </body>
</html>
Once the object fields are populated and the submit button is pressed, the request will be sent, so that we can declare a method to handle the request:
@RequestMapping(value = "/process", method = POST)
public String processForm(@ModelAttribute MyObject myObject) {
    String name = myObject.getName();
    // do something
    return "ui-template";
}
In this case, you may have noticed that we are using @ModelAttribute to capture the data that was sent in the request.