Spring Batch is a complete framework for creating a robust batch application (https://projects.spring.io/spring-batch/). We can create reusable functions to process large volumes of data or tasks, commonly known as bulk processing.
Spring Batch provides many useful features, such as the following:
- Logging and tracing
- Transaction management
- Job statistics
- Managing the process; for example, through restarting jobs, skipping steps, and resource management
- Administration Web Console
This framework is designed to manage a high volume of data and achieve high-performance batch processes by using partition features. We will start with a simple project, to explain each principal component of Spring Batch.
As mentioned in the Spring Batch documentation (https://docs.spring.io/spring-batch/trunk/reference/html/spring-batch-intro.html), the most common scenarios for using the framework are as follows:
- Committing batch processes periodically
- Concurrent batch processing for parallel processing a job
- Staged, enterprise message-driven processing
- Large parallel batch processing
- Manual or scheduled restart after failures
- Sequential processing of dependent steps (with extensions to workflow-driven batches)
- Partial processing: Skip records (for example, on rollback)
- Whole-batch transaction: For cases with a small batch size or existing stored procedures/scripts
In enterprise applications, the need to process millions of records (data) or read from a source is very common. This source may contain large files with several records (such as CSV or TXT files) or database tables. On each of these records, it is common to apply some business logic, execute validations or transformations, and finish the task, writing the result to another output format (for example, the database or file).
Spring Batch provides a complete framework to implement this kind of requirement, minimizing human interaction.
We are going to review the basic concepts of Spring batch, as follows:
- A job encapsulates the batch process, and must consist of one or more steps. Each step can run in sequence, run in parallel, or be partitioned.
- A step is the sequential phase of a job.
- JobLauncher is in charge of taking a JobExecution of a job that is running.
- JobRepository is the metadata repository of the JobExecution.
Let’s create a simple example of a job using Spring Batch, in order to understand how it works. First, we will create a simple Java project and include the spring-batch dependency. For this, we will create a Spring Boot application using its initializer (https://start.spring.io), as shown in the following screenshot:

Note that we added the dependency for Spring Batch. You can do this by typing Spring Batch into the search bar within the dependencies box, and clicking Enter. A green box with the word Batch in it will appear on the selected dependencies section. When this has been done, we will click on the Generate Project button.
The structure of the project will be as follows:
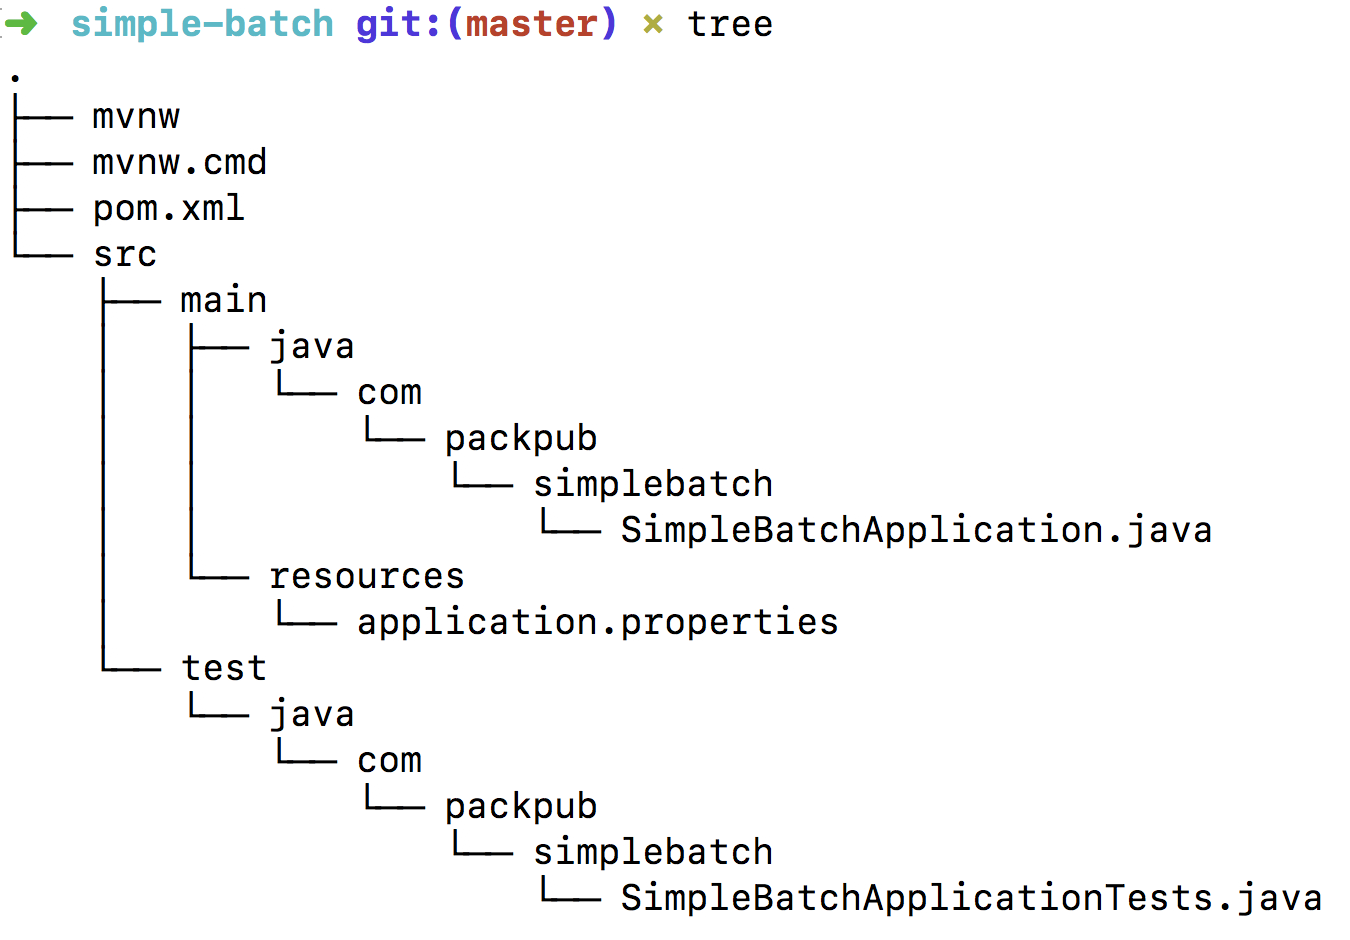
If we look at the dependencies section that was added by the initializer, we will see the spring-batch starter on the pom.xml file, as follows:
<dependency>
  <groupId>org.springframework.boot</groupId>
  <artifactId>spring-boot-starter-batch</artifactId>
</dependency>
<dependency>
  <groupId>org.springframework.boot</groupId>
  <artifactId>spring-boot-starter-test</artifactId>
  <scope>test</scope>
</dependency>
<dependency>
  <groupId>org.springframework.batch</groupId>
  <artifactId>spring-batch-test</artifactId>
  <scope>test</scope>
</dependency>
<dependencies>
<dependency>
<groupId>org.springframework.batch</groupId>
<artifactId>spring-batch-core</artifactId>
<version>4.0.1.RELEASE</version>
</dependency>
</dependencies>
Alternatively, we can do this using Gradle, as follows:
dependencies
{
compile 'org.springframework.batch:spring-batch-core:4.0.1.RELEASE'
}
The project will need a data source; if we try to run the application without one, we will get a message in the console showing an error, as follows:

To fix this issue, we are going to add a dependency as a part of the pom.xml file, to configure an embedded data source. For testing purposes, we are going to use HSQL (http://hsqldb.org/), as follows:
<dependency>
   <groupId>org.hsqldb</groupId>
   <artifactId>hsqldb</artifactId>
   <scope>runtime</scope>
</dependency>
Now, we need to add the @EnabledBatchProcessing and @Configuration annotations to the application:
@SpringBootApplication
@EnableBatchProcessing
@Configuration
public class SimpleBatchApplication {
Next, we will set up our first job by using the JobBuildFactory class with one task process, based on Spring Batch, using the StepBuilderFactory class:
@Autowired
private JobBuilderFactory jobBuilderFactory;

@Autowired
private StepBuilderFactory stepBuilderFactory;
The Job method will then show that it is starting, which will look as follows:
@Bean
public Job job(Step ourBatchStep) throws Exception {
   return jobBuilderFactory.get("jobPackPub1")
         .incrementer(new RunIdIncrementer())
         .start(ourBatchStep)
         .build();
}
Once the Job has been created, we will add a new task (Step) to the Job, as follows:
@Bean
public Step ourBatchStep() {
   return stepBuilderFactory.get("stepPackPub1")
         .tasklet(new Tasklet() {
            public RepeatStatus execute(StepContribution contribution,
            ChunkContext chunkContext) {
               return null;
            }
         })
         .build();
}
The following code shows what the application class looks like:
@EnableBatchProcessing
@SpringBootApplication
@Configuration
public class SimpleBatchApplication {

   public static void main(String[] args) {
      SpringApplication.run(SimpleBatchApplication.class, args);
   }

   @Autowired
   private JobBuilderFactory jobBuilderFactory;

   @Autowired
   private StepBuilderFactory stepBuilderFactory;

   @Bean
   public Step ourBatchStep() {
      return stepBuilderFactory.get("stepPackPub1")
            .tasklet(new Tasklet() {
               public RepeatStatus execute
                (StepContribution contribution,
                    ChunkContext chunkContext) {
                  return null;
               }
            })
            .build();
   }

   @Bean
   public Job job(Step ourBatchStep) throws Exception {
      return jobBuilderFactory.get("jobPackPub1")
            .incrementer(new RunIdIncrementer())
            .start(ourBatchStep)
            .build();
   }
}
In order to check that everything is okay, we will run the application. To do this, we will execute the following on the command line:
$ mvn spring-boot:run
Alternatively, we could build the application by running maven, as follows:
$ mvn install
Next, we will run our recently built jar on the Terminal, as follows:
$ java -jar target/simple-batch-0.0.1-SNAPSHOT.jar
Finally, we will see the following output in the console:

Now, we will look at the components behind the following steps in more detail:
- ItemReader represents the retrieval of the input for a step
- ItemProcessor represents the business processing of an item
- ItemWriter represents the output of a step
The following diagram shows the big picture of Spring Batch's main elements:
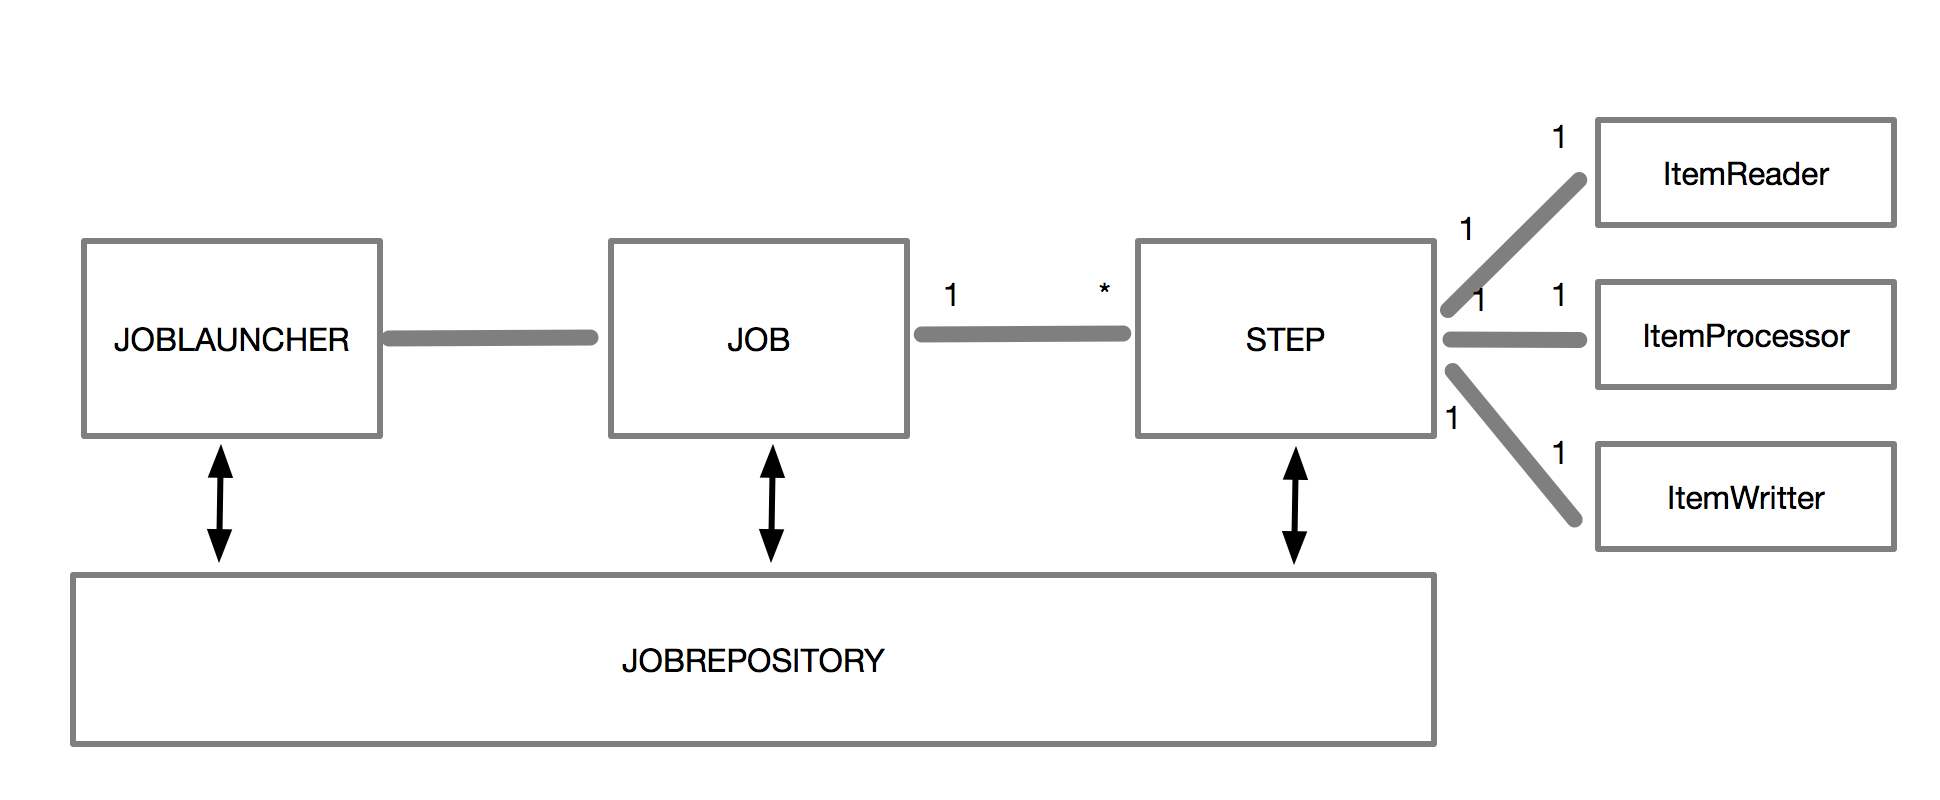
Now, we will complete our example by using an ItemReader, ItemProcessor, and an ItemWriter. By using and explaining these components, we will show you how Pipe-and-Filter architectures can be implemented using Spring Batch.